Troubleshooting
Problem
This document tells you how to troubleshoot CD and DVD drive issues.
Resolving The Problem
- To begin troubleshooting, check the following top issues. If your issue is listed, select the link; otherwise, proceed to step 2.
errors
hangs

Hangs booting ServerGuide CD (xSeries 200)
not detected / unable to access
- Make sure the CD or DVD drive has power by pressing the eject button and observing the drive activity light. The drive activity light should flash and the drawer should open. If the drive has power and ejects the drive tray, proceed to step 3.
- Press the Eject/Load button. The tray should slide out of the drive. Do not manually force the tray open. If the tray does not slide out of the drive when you press the Eject/Load button, insert the pointed end of a large straightened paper clip into the emergency-eject hole located on the front of the CD-ROM drive.
Note: In some models, you might have to remove the front bezel that houses the CD-ROM drive so that you can access the emergency-eject hole. The following illustration shows the front of a typical CD-ROM drive:

Note: For the IBM BladeCenter, first select the appropriate blade server for which you would like to use the CD-ROM drive. Before switching ownership of the CD-ROM drive (media tray) to another blade server, safely stop the media tray devices on the blade server that currently owns the media tray.
- If the light flashes but the drawer does not open, either the drive drawer mechanism is broken or jammed, or in the case of -RW drives, the burning software may prevent the drawer from opening until the software has completed its operation.
- If the light does not blink and the drawer does not open, remove any extra adapters or devices and reseat the power cable or try swapping the power cable with the hard drive.
- If the hard drive does not power up after swapping the power cables but the CD or DVD drive now powers up, the power cable is bad. If there are no extra power cable connections available, the power supply will need to be replaced or you may try connecting a power splitter to the cable which would split the cable to have two connections.
- If the CD or DVD drive powers up after removing the extra adapters or devices, either there is a problem with the removed adapters or devices, or the power supply does not have enough power to supply the computer with all of the adapters or devices installed.
- If a hard drive connected to the power cable powers up, but the CD or DVD drive still does not power up, replace the CD or DVD drive.
- If the drive tray is jammed, and the tray cannot be ejected and cleared manually, the drive should be replaced. Some drives have an emergency eject hole. See the CD-ROM drive layout for an example of an emergency eject hole. Insert a straightened paper clip into the hole to eject the disc.
- If the drive has power and ejects the drive tray, but fails read or write functions, proceed to step 3.
- Place a disc in the tray with the label facing up.
- Close the tray by pressing the Eject/Load button, or by gently pushing the tray forward. When the tray is closed, the CD-ROM drive In-Use light on the front of the drive will activate to indicate that the drive is in use.
- To eject the disc, press the Eject/Load button. When the tray slides out, carefully remove the disc.
- Close the tray by pressing the Eject/Load button, or by gently pushing the tray forward.
- Press the Eject/Load button. The tray should slide out of the drive. Do not manually force the tray open. If the tray does not slide out of the drive when you press the Eject/Load button, insert the pointed end of a large straightened paper clip into the emergency-eject hole located on the front of the CD-ROM drive.
- Test the drive using different discs. Can the drive read any discs, or is it having trouble just reading one particular disc? If the drive can read other discs, then this particular disc may be damaged, defective, or not burned properly. If the drive cannot read any discs at all, then proceed to step 4.
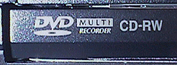
- Ensure the disc media you are trying to read is supported by the drive. Due to the variance in media formats, some movies or data on CD-R, CD-RW, DVD-R, DVD-RW, DVD+R, and DVD+RW media may not be able to be read by some drives. Check your drive tray for logos and formats supported by the drive:
- Try reading the original and not a burned copy to test if the disc copied correctly. Re-burn the disc if the copy failed the first time. Be sure to select the option to close the disc session within the CD burning software (before you burn the disc), so that the CD can be read and its files can be seen and used properly. If while burning discs the copies continue to hang, fail to complete, or fail to work, check CPU utilization (via pressing Ctrl+Alt+Del, then selecting the Performance tab). Close all unneeded background utilities, programs, and applications while burning discs.
- Some drives may have trouble reading or writing dark colored discs. Some combinations of drives, media, and burning software may just be incompatible. Try using different media first to see if this solves the problem.
- Hold the disc up to the light. Are there any scratches, or can you see pinpricks of light throught the disc? Over time, optical discs may experience a gradual deterioration and decay known as "CD rot". The aluminum data-carrying layer of the disc may oxidize or "rust" if the thin protective layer of lacquer underneath the label becomes scratched or damaged. Eventually, discs may be rendered unreadable from this oxidation.
Note: The top side of the disc (with the label) is more fragile than the clear underside of the disc. Scratches on the underside need to be fairly deep to cause skipping or to cause the disc to fail, but scratches on the top can easily damage the aluminum layer. The slight pressure of a ballpoint pen or pencil when labeling a disc is enough to penetrate and dent the aluminum, and can render the disc unreadable.
Damage to the protective layer occurs due to:
- poor or harsh handling
- stacking or allowing discs to rub against each other
- writing on the label with a pen
- flexing or bending the disc
- improper/uneven application of lacquer during manufacturing of the media
- environmental and temperature extremes
- natural oxidation over time
To maximize disc life-span
- store discs vertically, do not stack them
- store discs in a cool, dry place with stable temperature and humidity. Don't store discs in direct sunlight
- handle discs only by the edges, don't touch surfaces
- don't flex, bend, or drop the disc. This may scratch, damage, or physically break the media
- if you must clean a disc, wipe the disc from the center to the outside with a soft, nonabrasive cloth. Wiping the disc in a circular direction might cause loss of data. Do not use benzene, thinners, or other cleaners to remove dust or fingerprints.
- don't stick labels on discs
- when labeling, don't write on discs with anything other than a soft marker
- Ensure the disc media you are trying to read is supported by the drive. Due to the variance in media formats, some movies or data on CD-R, CD-RW, DVD-R, DVD-RW, DVD+R, and DVD+RW media may not be able to be read by some drives. Check your drive tray for logos and formats supported by the drive:
- Make sure the drive is recognized and correctly placed in the System Configuration Utility. The System Configuration Utility is also referred to as the IBM Setup Utility, and is accessed by pressing F1 on system bootup. Make sure to enable the primary IDE channel.
- Check for firmware updates for the CD or DVD drive.
Download the latest files for your system
- Check cable connections and hardware setup. CD-ROM drives in IBM systems have either a SCSI or IDE interface. The standard interface for IBM eServer xSeries, IBM Netfinity servers, and IBM IntelliStation workstations is IDE. Older IBM PC Servers shipped with SCSI CD-ROM drives. Check and reseat the power, signal, and audio connections to ensure they are firm and proper, with no bent pins.
View drive installation and removal movies for your system
Standard IDE allows for a master and a slave device. Most IBM systems have dual IDE channels allowing for up to 4 IDE devices.IDE CD or DVD drives
- Ensure the CD/DVD writer is set to the master drive on its IDE channel. Setting burners to slave causes the drive to receive a lower priority, reduces bandwidth, and may cause the creation/burning of discs to fail.
- If the CD or DVD drive is the only device connected to the IDE cable, then it must be set to master.
- If the CD or DVD drive is connected along with another IDE device or drive, then make sure that one of the devices is set to slave.
- Verify that the IDE signal and power cables are connected firmly and correctly, with no bent pins.
- Verify that the IDE devices are recognized and displaying correctly, using the system's F1 setup and configuration utility at bootup.
Normally these are 50-pin / 8-bit SCSI devices used either on a separate channel with its own 50-pin SCSI cable, or attached to a 68-pin cable via a 50-68 pin convertor.SCSI CD-ROM drives
- Verify that the SCSI ID for the CD-ROM drive is not conflicting with any other SCSI device. All SCSI IDs must be unique.
- Verify that the SCSI termination of the SCSI bus is correct.
- If using a 50-68 pin convertor, verify that the part is firmly seated correctly, with no bent pins.
- Run hardware diagnostics on the drive.
Download the latest diagnostics for your system
The following parts may be defective and need to be checked or replaced:- the CD or DVD drive
- the CD or DVD interposer card
- the CD or DVD signal cable
- the CD or DVD power cable
- If these steps have not solved your problem,
refer to your system's Hardware Maintenance Manual (HMM), or refer to "Need more help?"
| Back to top |
If the SUSE LINUX operating system is installed remotely onto a blade server that is not the current owner of the media tray (CD-ROM drive, diskette drive, and USB port), SUSE LINUX sees the CD-ROM drive as /dev/sr0 instead of /dev/cdrom, establish a link between /dev/sr0 and /dev/cdrom as follows:
- Type: rm /dev/cdrom; ln -s /dev/sr0 /dev/cdrom
- Press Enter.
- Insert the line: /dev/cdrom /media/cdrom auto ro,noauto,user,exec 0 0 in the /etc/fstab file.
| Back to top |
When the CD-ROM drive is owned by blade server x, is switched to another blade server, then is switched back to blade server x, the operating system in blade server x no longer recognizes the CD-ROM drive. This happens when you have not safely stopped the drives before switching ownership of the CD-ROM drive, diskette drive, and USB port (media tray).
Because the BladeCenter unit uses a USB bus to communicate with the media tray devices, switching ownership of the media tray to another blade server is the same as unplugging a USB device. Before switching ownership of the CD-ROM drive (media tray) to another blade server, safely stop the media tray devices on the blade server that currently owns the media tray, as follows:
- Double-click the Unplug or Eject Hardware icon in the Windows taskbar at the bottom right of the screen.
- Select USB Floppy and click Stop.
- Select USB Mass Storage Device and click Stop.
- Click Close.
- You can now safely switch ownership of the media tray to another blade server.
| Back to top |
The customer interface card (FRU number 59P6629) in the BladeCenter JS20 (Type 8842) unit is not compatible with the JS20 blade server and must be replaced with the latest level FRU.
Note: The FRU number of the customer interface card installed in the BladeCenter JS20 (Type 8842) unit is viewed from the Hardware VPD view of the management-module web interface, where it is listed as "media tray" instead of "customer interface card". For more information on how to view this number, see the BladeCenter JS20 (Type 8842) Installation and User's Guide. The FRU number is also printed on the customer interface card. Replace the customer interface card with the latest level; for the correct FRU number and the replacement procedure, see the BladeCenter JS20 (Type 8842) Hardware Maintenance Manual and Troubleshooting Guide.
| Back to top |
| Support forums |
| Submit a technical question |
| Before you call IBM Service |
Document Location
Worldwide
Was this topic helpful?
Document Information
Modified date:
28 January 2019
UID
ibm1MIGR-41559