Technical Blog Post
Abstract
Installing MDM Workbench v11
Body
If you've used previous versions of the workbench, one of the first changes you'll hit is that you no longer need to run the developer environment setup tool when you create a new workspace. In version 11, no projects need to be imported into the workspace, and you use the same installer to setup a local test server on your development machine as you would to install a production system.
Full development environment install
If you have a completely clean machine, the simplest way to get started is to use the workbench typical install. This will install DB2, Rational Application Developer, and WebSphere Application Server, along with MDM Server and the workbench, i.e. everything you need for a full development and test environment in one go. Here's how to get everything ready to run a typical install...
Firstly, you'll need to download all the typical install images. The following part numbers are required for a full MDM Workbench v11 typical install:
CIM6NEN, CIM6PEN, CIR9NML, CIR9PML, CIR9QML, CIR9RML, CIR9SML, CIR9TML, CIR9UML, CIR9VML, CIE5FML, CIE5GML, CIE5HML, CIE5IML, CI6XNML, CI6XPML, CI6XQML
You'll also need to download WebSphere Application Server Fix Pack 8.5.0.2 from Fix Central.
Important: If you are about to install MDM but downloaded the install images before 17th October 2013, you must download the product refresh first.
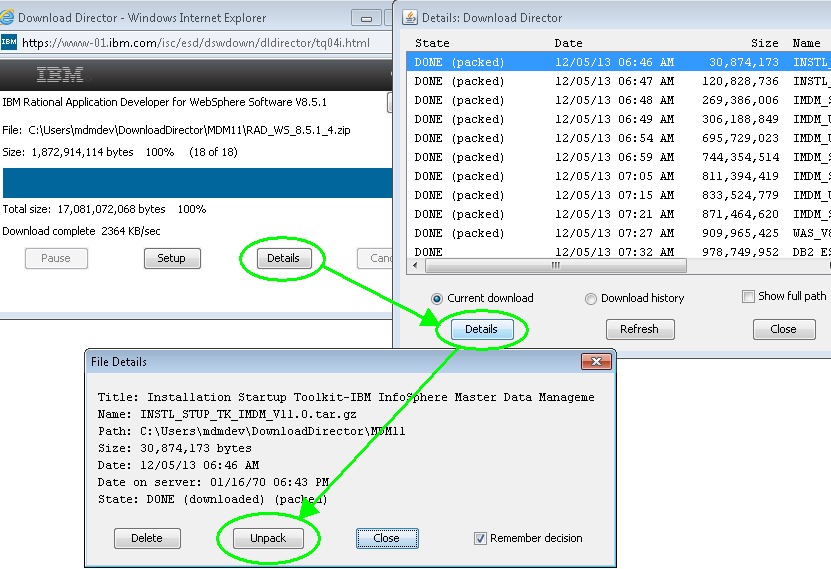
Once you have all the install images downloaded, the contents must be extracted into a specific directory structure required by the typical install. You'll require a third party tool to extract the .tar.gz images on Windows if you don't already have one. For example, I use 7-Zip. Alternatively, Download Director includes an Unpack option:
After extracting all the install images, open the install launchpad, which you can find in the MDM\disk1 directory (there are 32 and 64 bit versions). The typical workbench install link is right at the bottom of the launchpad:

When the install starts, you should be able to click through all the panels without changing anything:
- Install package selection
Make sure that you leave all packages selected, otherwise the typical install will switch to a custom install. - Prerequisites
- Licenses
- Location (shared resources)
- Location (package groups)
- Features (languages)
- Features (selection)
The required features are selected. - Features (configuration)
There should just be Rational Application Developer help system configuration in the list. If you see any MDM Server configuration panels, the install has switched to a custom install. - Summary
Click install!
Make sure you confirm that the IVT tests pass at the end of the install and, if they did, you're ready to start developing for MDM v11!
Note: you should change the default passwords for user accounts created by the typical install.
Workbench only install
If you don't want a local server to test changes on, installing the workbench is much quicker, since DB2, WebSphere Application Server and the server install are not required. In this case, you'll only need the following part numbers:
CIM7CML, CIR9TML, CIR9UML, CIR9VML, CIE5FML, CIE5GML, CIE5HML, CIE5IML
The launchpad doesn't support this scenario, so you have to install Installation Manager manually, add the necessary repositories, then install Rational Application Developer and the workbench. The MDM Workbench v11 Installation video demonstrates this type of install.
Alternatively, you can use the Installation Manager command line to install Rational Application Developer and the workbench in one step. For example, assuming you extract the install images in the same structure as for a typical install:
imcl install com.ibm.rational.application.developer.v85 com.ibm.im.mdm.workbench -repositories "C:\Temp\RAD","C:\Temp\MDMWB" -acceptLicense -installationDirectory "C:\IBM\SDP" -properties cic.selector.arch=x86_64 -showProgress
Where imcl.exe can be found in the eclipse\tools directory under the Installation Manager install location.
Related information
A typical install is ideal for demos or evaluating MDM but to set up developer environments I would recommend installing manually. You'll also need to do this if the typical install does not support your environment. The following blog post describes the manual install process:
There is also a wiki page with an up-to-date* list of install related information.
(* Please update it if it's not up-to-date!)
Updates:
- added headings and link to new YouTube video (14th October 2013)
- new part numbers due to product refresh in October (28th November 2013)
- included Download Director information (6th December 2013)
- added 'Related information' section (20th January 2014)
UID
ibm11142332