Fix Readme
Abstract
Instructions for upgrading IBM InfoSphere Information Server, Version 11.7.1.0 to 11.7.1.1. This readme document contains guidance for installation of the 11.7.1.1 upgrade package available on Fix Central.
Content
Table of Contents
1) Introduction
2) General installation information
2.1) Environment
2.2) Using a password or passwordless SSH for upgrading the Microservices tier
3) Downloads
4) Installation
4.1) Instructions for upgrading Information Server in GUI mode of the Update Installer
4.2) Instructions for upgrading Information Server in Console mode of the Update Installer
5) Post upgrade actions
5.1) Information Analyzer microservice
5.2) Data Flow Designer
5.3) Multi-tier Information Server installations with a Microservices tier
5.4) Usage of Information Server Administration (web) console
5.5) Synchronize assets
5.6) (Optional) Upgrade Repository Tier DBMS
6) 11.7.1FP1 Respin
1) Introduction
The IBM InfoSphere Information Server 11.7.1.1 ispkg image is available for upgrading of Information Server 11.7.1.0 installations. The steps for upgrading to 11.7.1.1 depends on whether a Microservices tier is installed.
Before Information Server is upgraded to 11.7.1.1:
- You must have Information Server 11.7.1.0 installed
- If you have a Microservices tier, it must be at 11.7.1.0 and all pods must be up and running
- Upgrade to 11.7.1.1 is not supported if Watson Knowledge Catalog (WKC) is installed.
- If WKC is installed but is not in use, you can manually uninstall WKC to allow installation of 11.7.1.1. See Remove Watson Knowledge Catalog from an Information Server 11.7.1.0 installation for details.
- If WKC is installed and is in use, you cannot install 11.7.1.1 - See technote for issues you might need to address prior to the install, and also issues that may affect you after the install
Note: If you need to add a Microservices tier, or enhance an existing Microservices tier in an Information Server 11.7.1.0 installation, you must use technote instead of this technote.
2) General installation information
2.1 Environment
For the Information Server host system, ensure that your system meets the requirements listed in Information Server 11.7.1.1 System requirements. Disk space requirements are included in the System requirements.
Refer to the 11.7.1.0 pre-installation checklist while checking your system.
In this case, you do not have to set up passwordless SSH from the Information Server host to the primary node.
However, for a multiple nodes environment, you must set up passwordless SSH for the root user from the primary node to the worker nodes.
The specified non-root user must have sudo privilege with NOPASSWD enabled.
In this case, you do not have to set up passwordless SSH from the user running the install on the Information Server host to the primary node.
For a multiple nodes environment:
ii. you must set up passwordless SSH for the specified non-root user from the primary node to the worker nodes
You must set up passwordless SSH from the user running the install on the Information Server host to the primary node.
For a multiple nodes environment, passwordless SSH must also be set up for the root user from the primary node to the worker nodes.
The specified non-root user must have sudo privilege with NOPASSWD enabled.
You must set up passwordless SSH from the user running the install on the Information Server host to the primary node.
For a multiple nodes environment:
i. the specified non-root user must be set up in the same manner on all nodes
ii. passwordless SSH must also be set up for the specified non-root user from the primary node to the worker nodes
a. If the file /root/.ssh/id_rsa.pub does not exist, create the SSH Keys with the following command:
> ssh-keygen -f /root/.ssh/id_rsa -q -N ""
b. Copy the SSH public key to the Microservices tier node with the following command:
> ssh-copy-id -i /root/.ssh/id_rsa.pub root@<enterprise search="" node="">
c. Validate the root passwordless SSH connection to the Microservices tier node with the following command:
> ssh root@<enterprise search="" node=""> hostname
A non-root user with sudo privileges can be set up for passwordless SSH in the same manner.
3) Downloads
3.1) If you are upgrading the Microservices tier, verify that your system meets the requirements for usage as the Microservices tier of IBM InfoSphere Information Server 11.7.1.1.
3.2) Update the Update Installer to the latest
3.2.1) On the Information Server host, update to an appropriate version of the Update Installer
For Windows installations, download Update Installer 11.7.1.095 or 11.7.1.116 and later. Do not use 11.7.1.105.
For AIX and Linux, you can use Update Installer 11.7.1.095 or later. However, do not use 11.7.1.098.
3.2.2) Instructions to update the Update Installer.
See section “Installing a new version of the Update Installer before installing an update, fix, or patch” for information on extracting the new Update Installer and running updateImage.sh.
If you used the default directory for Information Server, the Update Installer will install in /opt/IBM/InformationServer/Updates/bin.
3.3) Download the following images from IBM Fix Central and Passport Advantage based on your installation choices.
For details on locating the images see the Download document.
3.3.1) On the Information Server host, download and extract the Information Server 11.7.1.1 ispkg image (is1171_fp1_server_*) from IBM Fix Central:
For example, fixpack_FP1_IS1171_*_11710.tar.gz
Note: Your umask must be set to 022 before extracting the image.
3.3.2) On the Microservices tier, download IBM Information Server Enterprise Search v11.7.1.1 for Linux (is11711_ises_docker_services_engine_multi) from IBM Fix Central. Do not extract the file.
For example, fixpack_FP1_IS1171_microservices_11710.tar.gz
4) Installation
You must address "Known issues while installing or upgrading Information Server to version 11.7.1.0" prior to starting the install.
4.1) Instructions for upgrading Information Server in GUI mode of the Update Installer
4.1.1) Log in to the Information Server host. Change directory to <IS_HOME>/Updates/bin
For example, cd /opt/IBM/InformationServer/Updates/bin
4.1.2) Verify that the Update Installer version is 11.7.1.070 or later (see step 3.2):
./installUpdates -version
4.1.3) Initiate the Fix Pack install with the following command:
./installUpdates
This command launches the Update Installer in GUI mode.
4.1.4) Provide information as required in each panel to complete the installation.
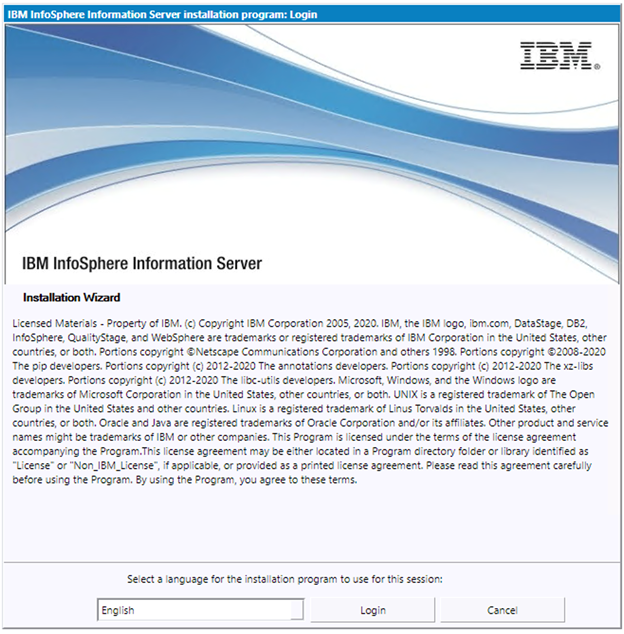
Click Login.
4.1.5) Review the System requirements, Release Notes and Planning information.
Click Next.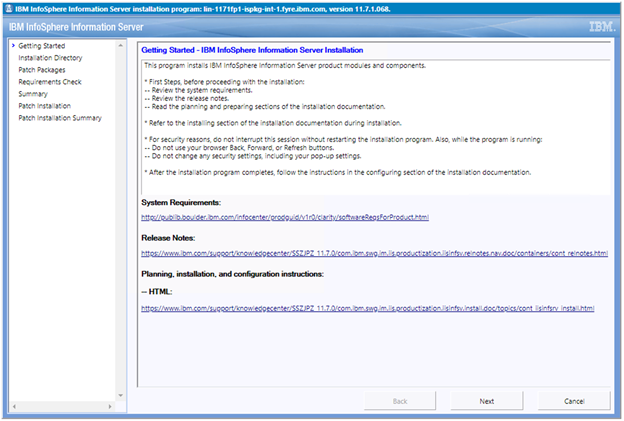
4.1.6) The Update Installer displays the Information Server installation directory. The contents of the displayed panel depends on whether Watson Knowledge Catalog was installed previously.
4.1.6.1) If your installation does not include Watson Knowledge Catalog, click Next.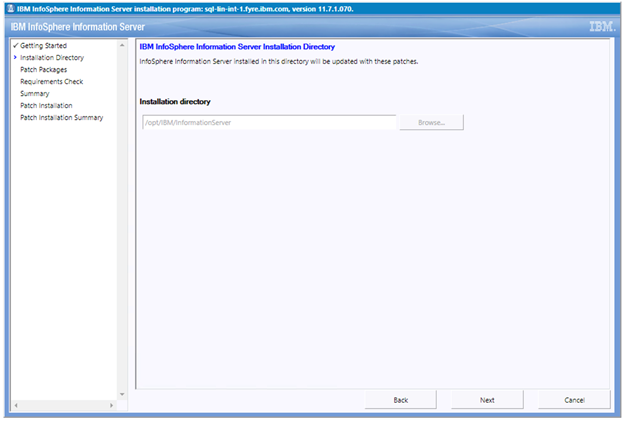
4.1.6.2) If you previously installed Watson Knowledge Catalog, a checkbox allows you to indicate whether you intend to apply 11.7.1 Fix Pack 1 to your 11.7.1.0 installation. Installations with Watson Knowledge Catalog are not permitted to install 11.7.1 Fix Pack 1 until Watson Knowledge Catalog is manually uninstalled. See technote for steps to manually uninstall Watson Knowledge Catalog.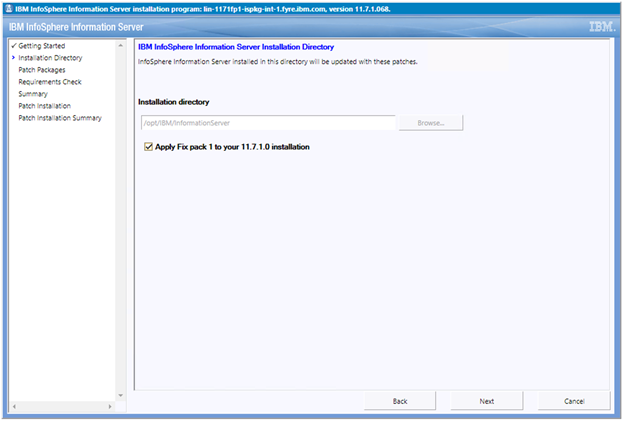
If you select the checkbox to apply Fix Pack 1 to your 11.7.1.0 installation, and click Next, the following error is displayed.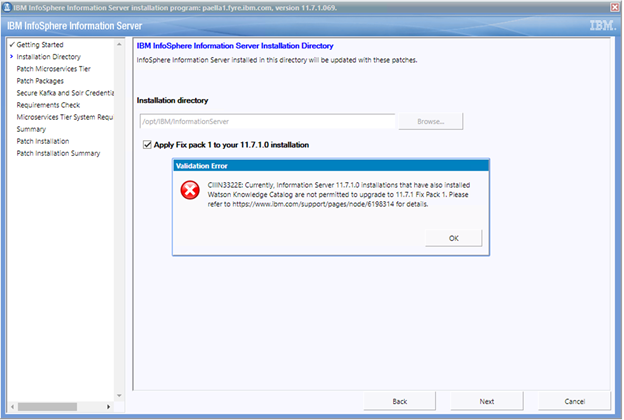
4.1.7) In this step you will choose whether to upgrade the Microservices tier.
Note:
1. The Microservices tier must be at 11.7.1.0.
2. All pods must be up and running.
You can check the status of the pods by running the following command:
kubectl get pods --all-namespaces
4.1.7.1) If you do not want to upgrade the Microservices tier, check the "Skip patching of Information Server microservices tier" checkbox.
Click Next and skip forward to step 4.1.8.
Information on subsequently upgrading your Microservices tier to 11.7.1 Fix Pack 1 can be found in technote.
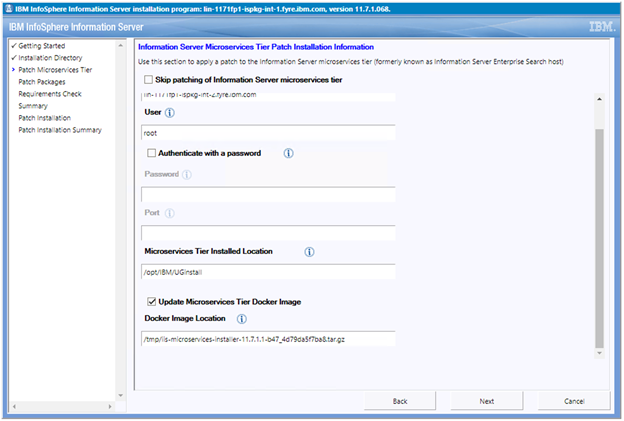
4.1.7.2) To upgrade the Microservices tier
a. Deselect the "Skip patching of Information Server microservices tier" checkbox.
b. Specify a fully qualified domain name for the Primary Node Host.
c. Specify the same User as was used during the initial installation of the Microservices tier.
d. For details on "Authenticate with a password" see section 2.2.
e. If you specify a non-root user, in /etc/security/limits.conf, the hard and soft setting of nofile and nproc for the specified user must be 10240.
Also, umask must be set to 022 in ~/.bashrc.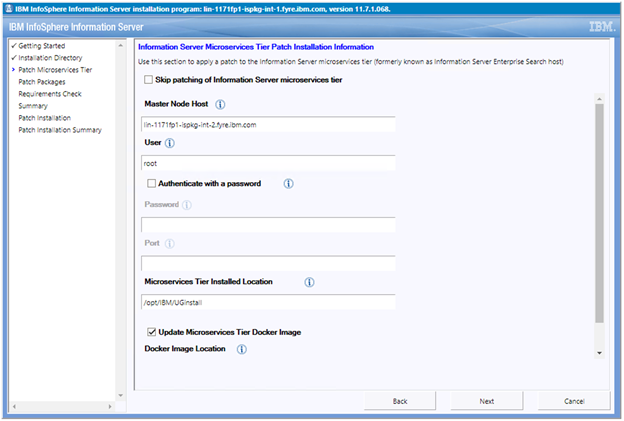
4.1.8) In the list of "Packages to be installed", select the 11.7.1.1 ispkg file you downloaded from IBM Fix Central.
Click Next.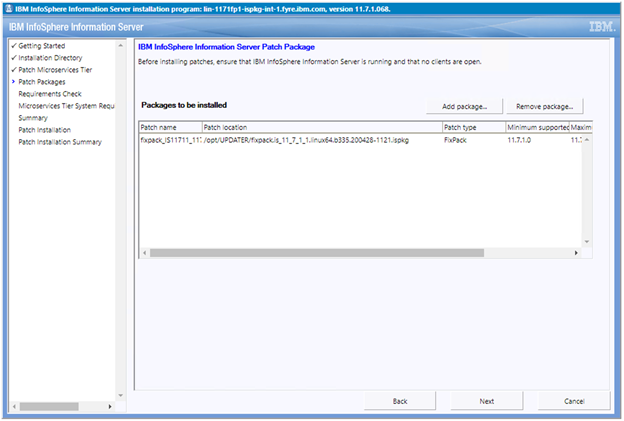
The Installer again checks whether Watson Knowledge Catalog is installed on the system. If present, the following error is displayed.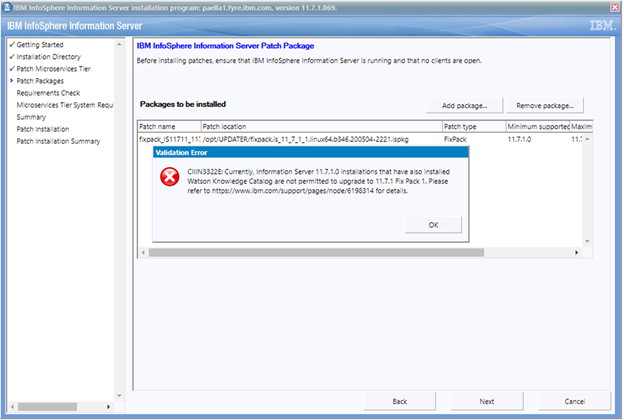
Installations with Watson Knowledge Catalog are not permitted to install 11.7.1 Fix Pack 1 until Watson Knowledge Catalog is manually uninstalled. See technote for steps to manually uninstall Watson Knowledge Catalog.
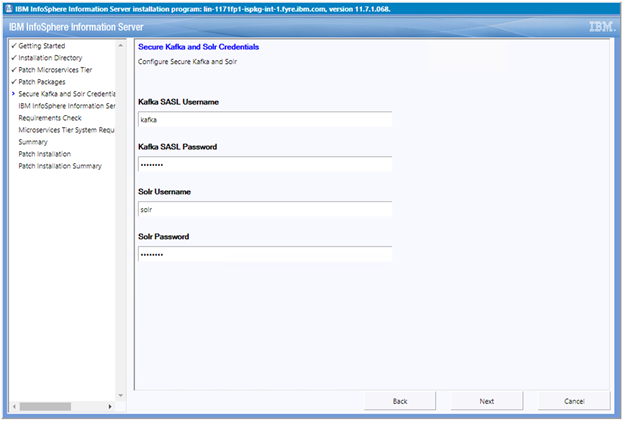
4.1.9) Provide credentials to be used for Kafka and Solr (for example, solruser, solrpwd etc). The Update Installer creates the specified users in Kafka and Solr; they do not have to be an operating system user, Information Server user, or LDAP user.
Later, you can use the specified values for maintenance actions such as accessing the Solr Web UI.
Click Next.
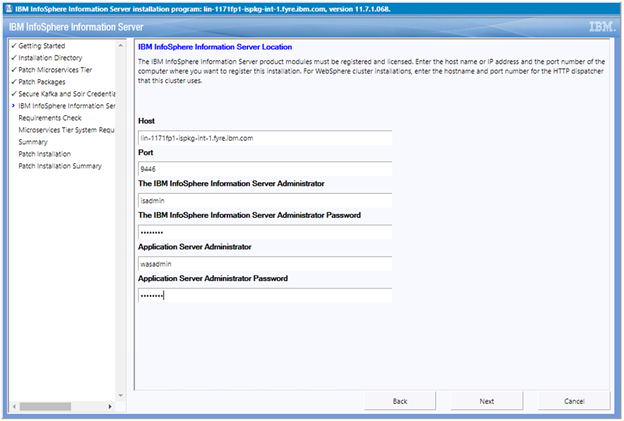
4.1.10) Provide the Information Server Administrator user name and password. Accept the certificate and click Next.
4.1.11) On the System Requirements Check page, confirm that all system requirements passed, and then click Next.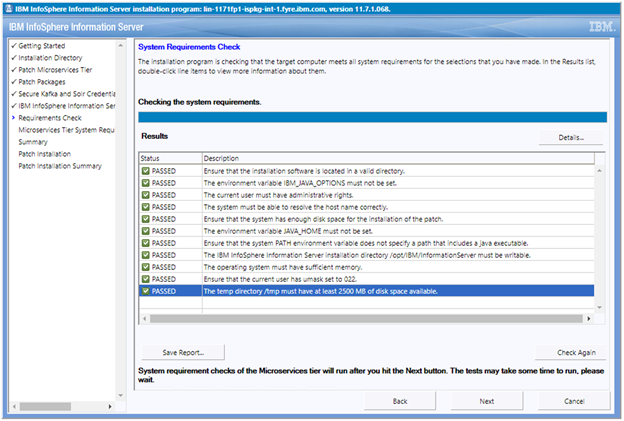
4.1.12) If you have a Microservices tier, examine the results from system requirement checks of the Microservices tier. If all is good, click Next.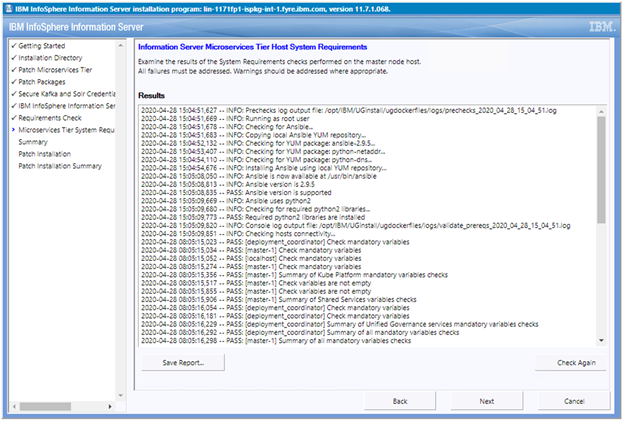
4.1.13) Review the Preinstallation Summary and click the Install button to start the installation.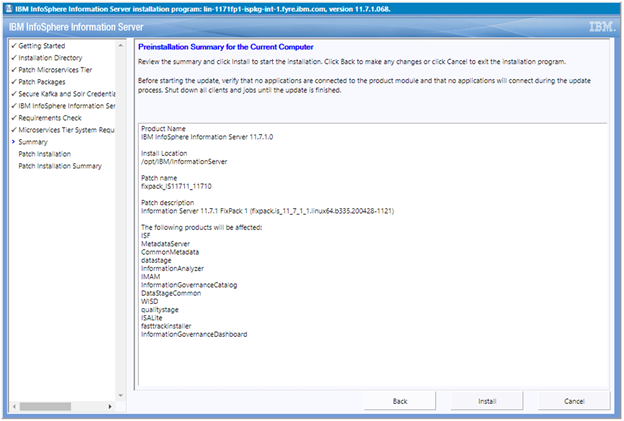
4.1.14) Click the Finish button after the installation completes.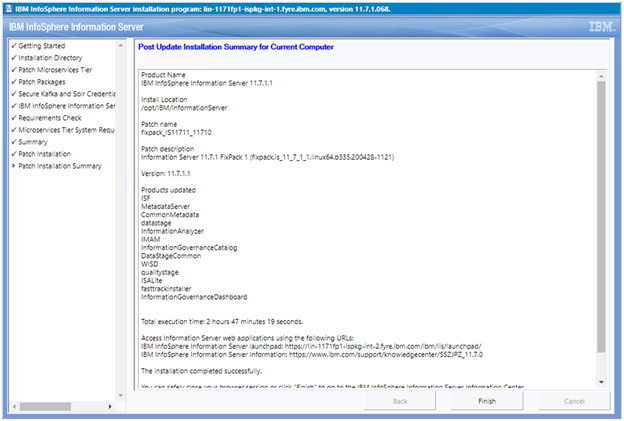
4.1.15) Click “Advanced” followed by "Accept the Risk and Continue".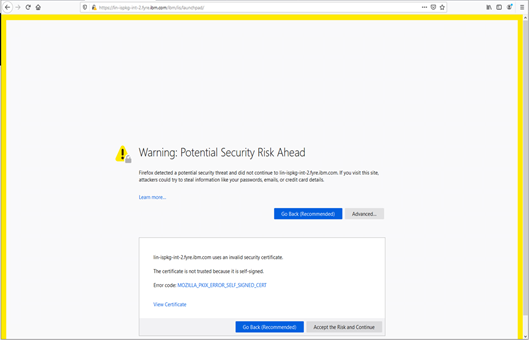
4.1.16) The Launchpad is displayed.
4.1.16.1) If you don't have a Microservices tier, you see the Information Server Launchpad.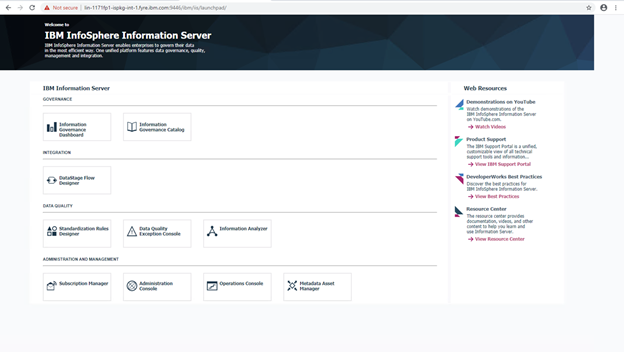
4.1.16.2) If you have a Microservices tier, you see the Information Server (Microservices) Launchpad.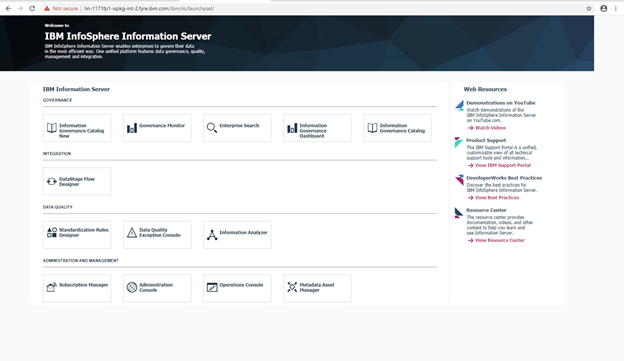
4.2) Instructions for upgrading Information Server in Console mode of the Update Installer
4.2.1) Log in to the Information Server host. Change directory to <IS_HOME>/Updates/bin
For example, cd /opt/IBM/InformationServer/Updates/bin
4.2.2) Before the Update Installer is started, check the Information Server 11.7.1.1 System requirements and make sure that your system meets the requirements.
4.2.3) Verify that the Update Installer version is 11.7.1.070 or later (see step 3.2):
./installUpdates -version
4.2.4) Run the Update Installer to upgrade Information Server.
For example, installUpdates -i /opt/IBM/InformationServer/ -p /opt/Builds/ISPKG/<ispkg_file_name>.ispkg -verbose -console -properties <property_file_name>
where
<ispkg_file_name> is the ispkg file you downloaded from IBM Fix Central
<property_file_name> is the name of the property file wherein you specify values for the various properties that control the install.
The Update Installer prompts you for the Information Server administrator user ID and password, and the WebSphere Administrator user ID and password.
5.1) Information Analyzer microservice
Migrate the rule execution results to the IA micro-service by running following command for each project containing rule execution results:
/IBM/InformationServer/ASBServer/bin/IAAdmin -user -password -migrateXmetaMetadataToMicroservice -projectName
Do not specify the project name to migrate all projects.
The migration can take a long time depending on the number of projects and rule execution results to migrate.
5.2) Data Flow Designer
If SQLServer or Oracle is used as a metadata repository, execute script <IIS_PATH>/ASBServer/bin/sql/<type_of_DB>/alterGitTable.sql to add column 'REMOTE_GIT_PUSH_PREPEND_PATH' to table "DFD_SCM_GIT_REPOS_CONFIG".
5.3) Multi-tier Information Server installations with a Microservices tier
Note: Follow these steps only if you are installing the version of 11.7.1.1 released in May 2020.
If you are installing the updated version of 11.7.1.1 released in June 2020 these steps are not required.
If you have a multi-tier Information Server installation (a separate Services tier and Engine tier) and a Microservices tier:
- Check whether the file
$IIS_HOME/Kafka/ug-host-truststore.jksexists on the Services tier.
If WebSphere Application Server is clustered the file is present on both WebSphere nodes. - Copy the file
$IIS_HOME/Kafka/ug-host-truststore.jksfrom the Services tier to the Engine tier at the same location as on the Services tier -$IIS_HOME/Kafka/ug-host-truststore.jks - Restart ODFEngine:
service ODFEngine stop
service ODFEngine start
5.4) Usage of Information Server Administration (web) console
You might not be able to log in to the Information Server Administration (web) console.
Clear the browser cache and cookies and again try to log in to the Administration console.
5.5) Synchronize assets
If you already had data in InfoSphere Information Governance Catalog prior to the upgrade, you need to synchronize data manually after the upgrade. Follow the instructions here.
5.6) (Optional) Upgrade Repository Tier DBMS
If wanted, you can upgrade your repository to the latest supported version.
Information Server 11.7.1.1 added support for DB2 11.5, Microsoft SQL Server 2017, and Oracle 19c3.
6) 11.7.1.1 Respin
Change directory to <IS_HOME>/ASBServer/bin
./iisAdmin.sh -set -key com.ibm.iis.ug.installed.version -value 11710
2. Change directory to <IS_HOME>/Updates/bin
./installUpdates -force
Was this topic helpful?
Document Information
Modified date:
19 October 2022
UID
ibm16128295