White Papers
Abstract
Part 5 of multi-part series describes WebSphere DataPower Appliance support for the OAuth 2.0 client credential grant type. It covers configuration of both the authorization server and the enforcement point.
Content
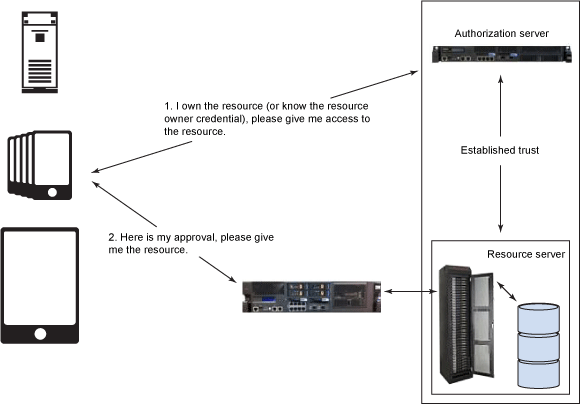
The client credentials grant is one of the four grant types defined in the OAuth 2.0 Specification Framework (Section 4.4). Given grant type differs from the other grant types in that the client itself is the resource owner. The client application can obtain an access token by presenting just its own credentials. With given grant type, the client avoids having its credential being exposed in every resource request on the wire. For general information about OAuth, see Part 1 of the series, Introducing OAuth 2.0 support in DataPower, or the IETF OAuth 2.0 Authorization Framework. In particular, Section 4.4 of the OAuth 2.0 Specification covers the client credential grant type discussed here. Figure 1 illustrates the request flow. It's identical to Figure 1 in Part 4 series. In Part 4, the client did not own the resource; it merely knew the resource owners credentials. In the article, the client is the resource owner. They look the same diagrammatically. However, the request to the authorization server is different. The flow illustrated in Figure 1 provides a high-level overview of the client credentials flow: In our scenario, a client application would like to retrieve the account information (protected resource) stored at a remote HTTP server (resource server). Scenario is implemented as follows: In Step 1, you create an OAuth client profile named account-application for the client. You also create an OAuth client group referencing the configured OAuth client profile. The OAuth Client Group used by the AAA policy in Step 2 and Step 3 to support the OAuth authorization. It is "registering the client application." In Step 2, you create an AAA policy that supports OAuth and a Web Token Service that implements an OAuth authorization server. It validates requests for an access token and issue access tokens. In Step 3, you create an AAA policy that supports OAuth and a Multi-Protocol Gateway service that implements an enforcement point for the resource server. The enforcement point validates the access tokens. In order to concentrate on OAuth configuration, some pre-configured DataPower objects are provided for you in the Downloadable resources section of article. Populate these fields: Note: The Add button is important in Step 5. If you only select account-application, but don't add it, you are left with an empty list of clients. There are several methods supported by DataPower that perform authorization. Here, we use the AAA information file for its ease of configuration. The The next step is to create a Web Token Service (WTS) from the AAA policy. The WTS wizard was covered in detail in Part 3. For the WTS creation wizard screenshots, see Part 3 article series. For given case, a processing policy with two rules is created as shown in Figure 5. After committing the WTS, view the completed service and click the Processing Policy edit button "..." to view the policy with its two rules: The authorization server we configured in the previous step returns the access token. The enforcement point service proxy created in the step verifies the token before allowing a request to pass. The result looks similar to Figure 6. This completes the configuration for the OAuth client credentials flow. The next section shows you how to request an access token from DataPower and use it to access a protected resource. You have two avenues available to you for testing: The next section explains how to use the curl tool. The Node.js application provides instructions on its homepage. In this section, the client first makes a request for an access token. The authorization server (Web Token Service configured in Step 2) receives the request and authenticates the client ID and secret. It returns an access token to the client if the request is valid. Otherwise, an error code is returned. The client then makes a request to the resource server (MPGW service configured in Step 3). The enforcement point receives the request, validates the access token, and returns the resource back to the client if the request is valid. Otherwise, the client access is rejected. To request an access token uses client credentials grant, the client must present its client credentials to the authorization server (Web Token Service, listening on port 5050), and add two required parameters in its request: The The authorization server verifies the client credentials and returns an access token if the authentication is successful. The response contains the access token, the token type, the token lifetime, and the scope granted in the following format (line breaks added for clarity). If the authorization server fails to validate the access request, an error code is included in the response. In order to acquire more detailed information regarding the error conditions, you can enable the probe in your service to turn on the diagnostic mode. The DataPower probe allows you to view the step-by-step progression of your policy rules. You can also use client side debugging via the browser tools. These techniques are described in Part 2 series in more detail. Enabling the probe on the WTS causes the "error_description" property to be passed in the response when an error is encountered. Otherwise, only the "error" property is returned. To reach the probe settings for a Web Token Service, click the Probe Settings link on its configuration page. If the OAuth client application, Response: It occurs because the request scope Account is not valid. It does not match the allowed scope set in the account-application OAuth client profile. In the following example, the OAuth client application, Response: It occurs when the client application ( In the following example, the OAuth client application, Response: It occurs if the client credentials grant type is not selected in OAuth client profile. Thus, the client is not authorized to use method to request an access token. You can correct the error by selecting the client credentials grant type in the account-application OAuth client profile. The client application named Response: The error occurs because the client application, A similar error occurs when the provided client secret does not match the one in the OAuth client profile. To access a protected resource that uses an access token, the application client must present a valid access token to the enforcement point (MPGW service, listening on port 5051). Before including the access token in a curl command, you must URL-encode the token. For more information, see Online URL Encoding. The enforcement point validates the access token and returns a resource if the request is valid. If the access token sent by the client is valid, the protected resource (for example, a JSON response as shown below) on the resource server is returned back to the client. If any error occurs when validating the resource request, an error code is returned via the WWW-Authenticate Response Header, or it is included in the response body. You can enable the probe in your service to turn on the diagnostic mode so that an error description is included in the response, in addition to a single error code, to help understand any errors that occurred. By the A client application, account-application, attempts to access a resource. But, the enforcement point returns an invalid_token error (the access token has expired): Response: Thw error occurred because more than 3600 seconds (the default duration for our generated token) had passed since the time the access token was generated. The client application, Response: The error can occur when either the access token is not valid, or the access token is valid, but the shared secret in the OAuth client profile associated with the resource server is different from the one used to generate the access token on the authorization server. Ensure the access token is correct and check that the shared secret key in the OAuth client profile, The client application, Response: The error occurred because the scope requested (oauth) is different from the scope granted by the resource owner (getAccount). It is only enforced if you follow the optional Step 5 near Figure 11 for the Resource Extraction tab of the AAA policy. If you do not select "URL sent by client", the URL is not checked and the above request succeeds. When URL sent by client is checked for the Resource extraction phase for the endpoint server AAA policy, it is important that the requested scope in the token request includes the leading slash. That's because the enforcement point compares the URL with the requested OAuth scope that is encoded in the access token. If they don't match, the resource request is denied. Part 5 of the article series described how to use and implement the client credentials grant type in DataPower. It demonstrated how to configure DataPower as an OAuth authorization server that issues access tokens. It then showed how to configure DataPower as the enforcement point for resource server to validate access tokens. The request and response examples were provided to demonstrate troubleshooting techniques. The author would like to thank Shiu-Fun Poon and John Rasmussen for their review of the article.Introduction
Implementing the client credentials grant type
Preparing for DataPower configuration
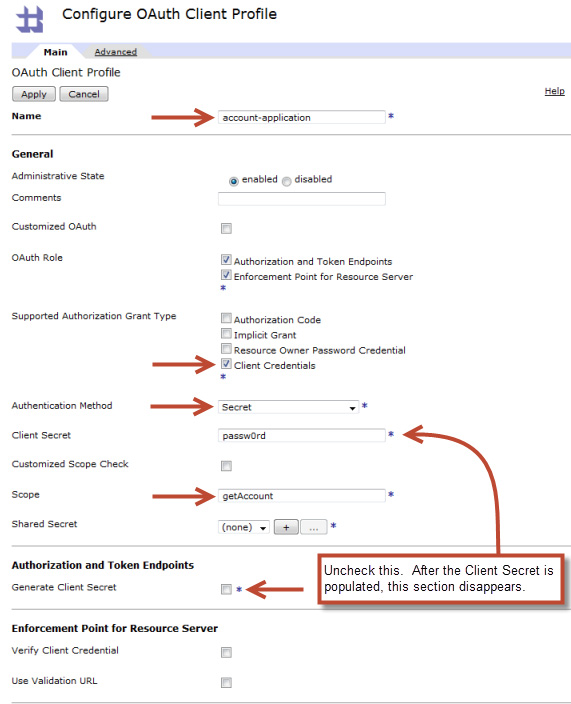
Step 1: Creating a client registration
sharedSecretKey.txt file uploaded during the preparation section. It is used to encrypt and decrypt the access token generated by DataPower. The key material is 64 hex digits prefixed by "0x". For information on generating secure secret keys for your own use, see The shared secret key section in Part 4 of the article series or Perfect Passwords.

registeredClients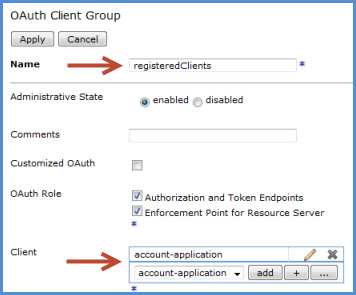
Step 2: Configuring DataPower as the OAuth authorization server
clientcred-aaa.AAAInfo.xml in the local directory is based on store:///AAAInfo.xml and was uploaded to the local: directory during the preparation import. The code snippet below shows how an authorization entry was added for account-application. It is both the client and the resource owner.
<Authorize> <InputCredential>account-application</InputCredential> <InputResource>getAccount</InputResource> <Access>allow</Access> </Authorize>
OAuth-azsvr and click Next.5050 for Port and select the imported SSL Proxy Profile named sslserver. Click Add and then Next.
*/favicon.ico to ignore the favicon request sent by browsers.* that includes the http-convert action and the AAA policy you created.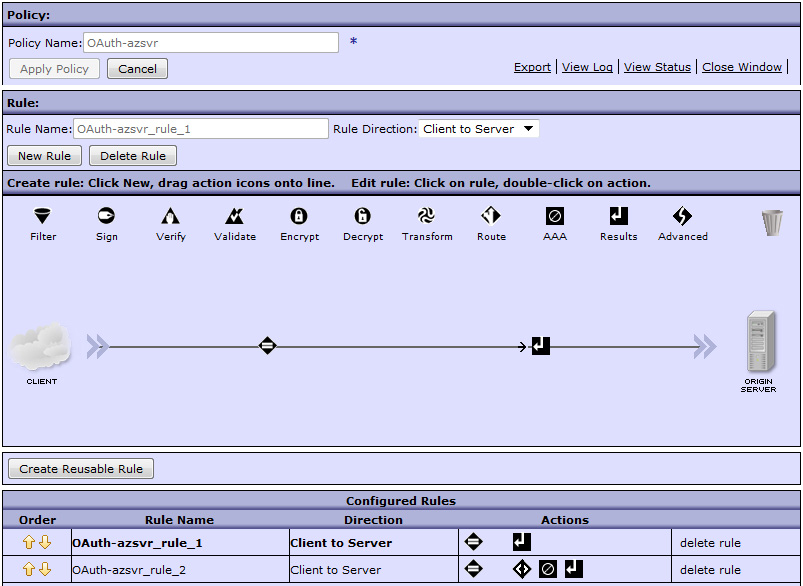
Step 3: Configuring DataPower as the enforcement point for a resource server
rssvr-aaa.
enforcementPoint-rssvrhttp://127.0.0.1:5001
HTTPS-rssvr5051
enforcementPointMatchAll. Add a matching rule for all URLs in the Matching Rule tab.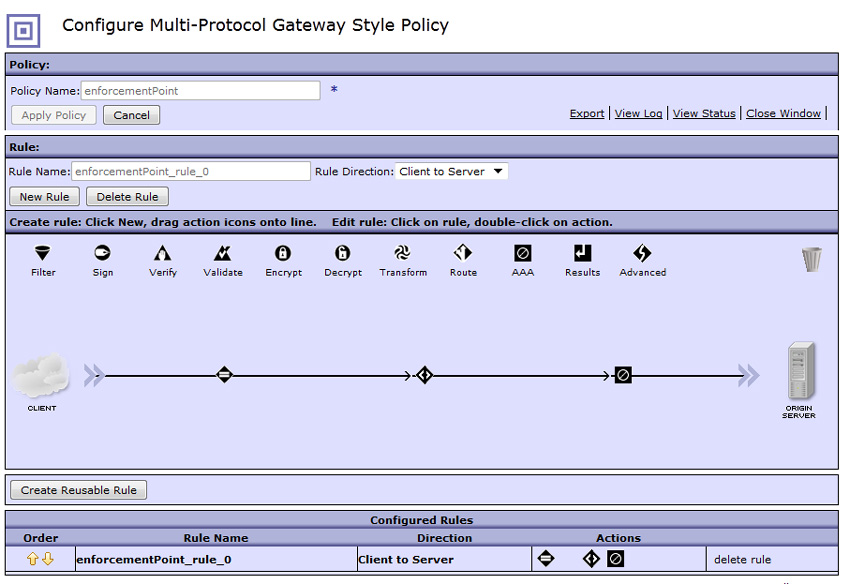
Sample request and response
Client requests an access token that uses the client credentials grant type
grant_type with the value set to client_credentials.scope to indicate the resource of interest.
curl -k https://<DataPower IP>:5050/token –-user account-application:passw0rd -d "grant_type=client_credentials&scope=/getAccount"
--user option in the above command places the client credentials in the HTTP Authorization header. They can also be sent in the body of the request as the client_id and client_secret parameters as shown below.
curl -k https://<DataPower IP>:5050/token -d "grant_type=client_credentials&scope=/getAccount&client_id= account-application&client_secret=passw0rd"
{ "token_type":"bearer", "access_token":"<Access_Token>", "expires_in":3600, "scope":"/getAccount" }
account-application, attempts to request an access token for resource "Account," the authorization server returns an "invalid_scope" error instead of an access token.
curl -k https://<DataPower_IP>:5050/token –-user account- application:passw0rd -d "grant_type=client_credentials&scope=Account"
{ "error":"invalid_scope" }
account-application, attempts to request an access token, but the authorization server returns an "unauthorized_client" error (saying that it is not authorized for the resources).
curl -k https://<DataPower_IP>:5050/token -–user account- application:passw0rd -d "grant_type=client_credentials&scope=getAccount"
{"error":"unauthorized_client", "error_description":"not authorized for the resources"}
account-application) is not authorized to use the resource (getAccount). The client and the requested resource must be authorized in AAAInfo.xml. The error is resolved by adding account-application to the authorized list as shown in Step 2.account-application, attempts to request an access token, but the authorization server returns an "unauthorized_client" error (saying that the client_credentials grant is not supported).
curl -k https://<DataPower_IP>:5050/token -d "grant_type=client_credentials&scope=/getAccount" –user account-application:passw0rd
{ "error":"unauthorized_client", "error_description":"client_credentials grant not supported" }
hr-application attempts to request an access token, but the authorization server returns an "invalid_client" error instead of an access token.
curl -k https://<DataPower_IP>:5050/token -d "grant_type=client_credentials& scope=/getAccount&client_id=hr-application&client_secret=passw0rd"
{ "error":"invalid_client", "error_description":"OAuth client is not configured" }
hr-application, is not registered with the authorization server. Check that the client is properly registered by verifying its OAuth client profile object listed in the OAuth client group definition as shown in Figure 4.Client requests resource by sending an access token
curl –k https://<DataPower_IP>:5051/getAccount -H "Authorization: Bearer <Access_Token>"
curl –k https://<DataPower_IP>:5701/getAccount -H "Authorization:Bearer AAEFQWxpY2WOaEskZ5CHTvotHKGPCZghSw%2Fmj7%2FFEqJWlDgl3rlbiJ%2B h0X3KjTVEQk%2BME8tl4J1yc3xa1fvdXnjntLIOYa3P" { "name": "myAccount", "balance":1.00, }
–v (verbose) flag on curl requests, you can view the returned headers as shown below:
< HTTP/1.1 401 Unauthorized < Content-Type: text/xml < WWW-Authenticate: Bearer error="invalid_token",error_description="*[account-application] Failed to verify oauth request signature*"
curl –k https://<DataPower_IP>:5051/getAccount -H "Authorization: Bearer <Access_Token>" –i
HTTP/1.1 401 Unauthorized WWW-Authenticate: Bearer error="invalid_token",error_description="*[account-application] access_token expired*" <?xml version="1.0" encoding="UTF-8"?> <env:Envelope xmlns:env="http://schemas.xmlsoap.org/soap/envelope/"> <env:Body> <env:Fault> <faultcode>env:Client</faultcode> <faultstring>Failed to verify OAuth information. (from client)</faultstring> </env:Fault> </env:Body> </env:Envelope>}
account-application, attempts to access a resource. However, the resource server returns an invalid token error (saying that the token signature verification failed).
curl –k https://<DataPower_IP>:5051/getAccount -H "Authorization: Bearer <Access_Token>" -i
HTTP/1.1 401 Unauthorized WWW-Authenticate: Bearer error="invalid_token",error_description= "*[account-application] Token signature verification failed*" <?xml version="1.0" encoding="UTF-8"?> <env:Envelope xmlns:env="http://schemas.xmlsoap.org/soap/envelope/"> <env:Body> <env:Fault> <faultcode>env:Client</faultcode> <faultstring>Failed to verify OAuth information. (from client)</faultstring> </env:Fault> </env:Body> </env:Envelope>
account-application, is indeed shared between the token endpoint and the enforcement point.account-application, attempts to access the resource. However, the resource server returns an insufficient_scope error.
curl –k https://<DataPower_IP>:5701/oauth -H "Authorization:Bearer <Access_Token>" –i
HTTP/1.1 403 Processed Content-Type: application/json Cache-Control: no-store Pragma: no-cache { "error":"insufficient_scope", "error_description":"not authorized for the resources" }
Conclusion
Acknowledgments
Was this topic helpful?
Document Information
Modified date:
25 July 2022
UID
ibm11109499