You can replace a PCI adapter with the system power on
in the AIX® environment.
If your system is managed by an HMC, use the HMC to complete the steps
for replacing the part in the system. For instructions, see Replacing a part by using the
HMC.
Read
the following notes to determine if this is the correct procedure
for the task to be performed.
If you do not have an HMC, complete the following
steps to replace a PCI adapter with the system power on in the AIX environment:
- Complete the prerequisite tasks that
are described in Before you
begin.
- Take appropriate precautions for avoiding
electric shock and handling static-sensitive devices. For
information, see Avoiding electric shock and Handling static-sensitive devices.
- If you are removing a failing PCIe adapter,
identify the failing part. For
instructions, see Identifying
a part. If
you are removing the PCI adapter for other reasons, continue to the
next step.
- If you are installing, removing,
or replacing a PCI adapter in a rack-mounted system, follow these
steps to remove the service access cover.
- Open the front rack door.
- Place the system unit in the service position.
- Remove or open the service access cover.
- Follow these steps to replace a PCI
adapter using the PCI Hot-Plug Manager menu in the AIX Diagnostic tools:
- Enter the system diagnostics by logging in as root user or as
the celogin user, type diag at the AIX command line.
- When the DIAGNOSTIC OPERATING INSTRUCTIONS menu displays, press
Enter.
- At the FUNCTION SELECTION menu, select Task Selection,
then press Enter.
- At the Task Selection list, select PCI Hot Plug Manager.
- Select Unconfigure a Device, then press
Enter.
- Press F4 (or Esc +4) to display the Device Names menu.
- Select the adapter you are removing in the Device Names menu.
- Use the Tab key to answer YES to Keep Definition.
Use the Tab key again to answer YES to Unconfigure Child
Devices, then press Enter. The ARE YOU SURE window displays.
- Press Enter to verify the information. Successful unconfiguration
is indicated by the OK message displayed next to
the Command field at the top of the screen.
- Press F3 (or Esc +3) twice to return to the Hot Plug Manager menu.
- Select Replace/remove PCI Hot Plug adapter.
- Select the slot that has the device to be removed from the system.
- Select Replace. A fast-blinking amber LED
located at the back of the machine near the adapter indicates that
the slot has been identified.
- Press Enter. This places the adapter in the action state, meaning
it is ready to be removed from the system.
- Label, and then disconnect all cables attached
to the adapter you plan to remove.
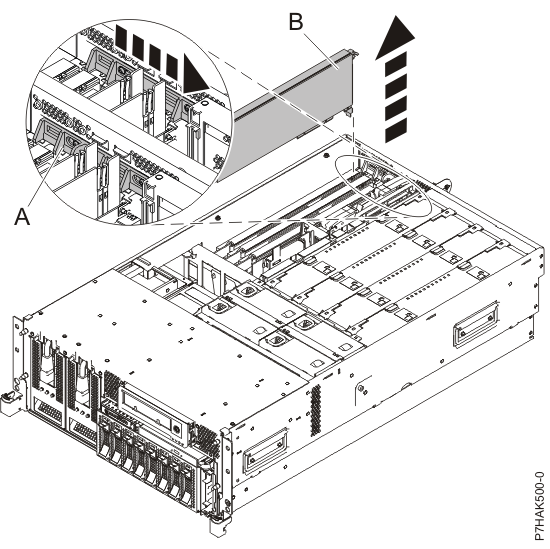
- Slide the adapter latch (A) into
the open position, as shown in the following figure.
Figure 1. PCI adapter or filler plate removed
from the rack-mounted system unit
- Carefully grasp the PCI adapter (B) by
its top edge or upper corners, and remove it from the system. Store
the adapter in a safe place.
- If necessary, remove the replacement adapter from the antistatic
package.
Attention: Avoid
touching the components and gold connectors on the adapter.
- Carefully grasp the adapter by its top edge, and align
the adapter with the expansion slot and its connector on the system
backplane.
- Press the adapter (A) firmly into
its connector. See the following figure.
Attention: When you install an adapter into
the system, be sure that it is completely and correctly seated in
its connector.
- Slide the adapter
latch (B) back into place as shown in the following
figure.
Figure 2. PCI adapter
replaced in the rack-mounted system unit
- Connect the adapter cables.
- Press enter and continue to follow the instructions in
the system diagnostics until you receive a message that the replacement
is successful. Successful replacement is indicated by the OK message
displayed next to the Command field at the
top of the menu.
- Press the F3 (or Esc+3) key to return to the PCI
Hot-Plug Manager menu.
- Press the F3 (or Esc+3) key to return to the TASK selection
list.
- Select Log Repair Action.
- Select the resource just replaced, press Enter, press Commit
(F7 or ESC 7), then press Enter.
- Press F3 (or Esc+3) to return to TASK Selection
List.
- Select Hot Plug Task, press enter.
- Select PCI Hot Plug Manager, then
select Configure a defined device, then press
Enter.
- Select the device just replaced from the list, then press
Enter. The device is now configured.
- Press the F10 key to exit the diagnostic program.
Note: If
you are running the stand-alone diagnostics, do not exit the program
completely.
- Verify the PCI adapter by using the following instructions:
- Did you replace the adapter with the system power on?
- Yes - Go to the next step.
- No - Load the diagnostic program by doing the following:
- If AIX is
available, boot AIX,
log in as root or CELOGIN, then enter the diag command.
- If AIX is
not available, boot the stand-alone diagnostics
- Type the diag command if you are not already
displaying the diagnostic menus
- Select Advance Diagnostic Routines, then
select Problem Determination.
- Select the name of the resource just replaced from the menu. If
the resource just replaced is not shown, choose the resource associated
with it. Press Enter, then press Commit ((F7
or Esc+7)).
- Did the Problem Determination identify any problems?
- No: Continue to the next step.
- Yes: A problem is identified
- If you are a customer, record the error information, then contact
your service provider.
- If you are an authorized service provider, return to map 210-5.
- Press the F10 key to exit the diagnostic program.
- Replace or close the service access
cover and, if applicable, return the system to the operating position.
- Verify the installed part.
- If you replaced the part because of a service action, verify the
installed part. For instructions, see Verifying a repair.
- If you installed the part for any other reason, verify the installed
part. For instructions, see Verifying the installed part.