Adding document extractors
You can add custom document extractors to agentic workflows to extract fields or entities such as date, names, and others from documents.
When you configure a document extractor, you can choose a model from the list of available models. You can also add your own custom model through AI Gateway. For more information, see Adding custom AI models.
To add a document extractor to an agentic workflow:
-
Open the agentic workflow in the workflow builder.
-
Click the Add flow items icon
 .
. -
Select the Flow nodes tab.
-
Drag Document extractor to the agentic workflow.
-
Select one of these tool options to extract fields from your documents: Structured or Unstructured. For more information and guidelines on which tool option is suitable for your data extraction use case, see Choosing a tool option for extracting fields from documents.
Alternatively, to add a document extractor, click the connector line between the start and end nodes, then select Add a flow activity > Document extractor.
Choosing a tool option for extracting fields from documents
You can choose from two tool options to extract fields from documents: Structured and Unstructured. These tools differ in how they process information, but the steps that you need to follow in both options are almost the same.
-
Unstructured: Uses a text-based language model to extract top-level fields from documents. It works best for text-heavy content, but does not extract column values from tables.
-
Structured: Uses a vision-based, multimodal language model to extract both top-level fields and table data. Because it relies on a larger model, it usually runs slower. Structured extraction is designed to identify and return these types of values:
- A single, atomic value per field from a document. Typical examples include values such as an invoice number, form date, or total amount.
- Structured tuples of values with a fixed structure that are grouped within the document. Typical examples include line items in an invoice, or items in a receipt.
When to use each tool option
-
Use Unstructured when your documents meet these criteria:
- Text-heavy documents that span multiple pages such as, contracts, emails, or manuals
- Fields appear in headers or within the body of the text
-
Use Structured when your documents meet these criteria:For more information, see Configuring a document extractor after selecting the Structured option.
- Have a structured or fixed layout that contains labels and values
- Include tables or form-like sections
- Are typically short (1–3 pages), such as invoices, purchase orders, or tax forms
Configuring a document extractor after selecting the Unstructured option
The watsonx/ibm/granite-3-3-8b-instruct model is deprecated as of November 24, 2025, and will be withdrawn on February 22, 2026. Use the default model or another supported model for the unstructured document extractor.
To configure the document extractor to identify and extract a set of fields from unstructured documents:
-
Select the document extractor that you added to the agentic workflow.
-
Click the Edit fields icon
 .
. - Select a model to use for the document extractor from the Model list.
A dialog to upload the documents and add fields is displayed.
From the Models list, click View all foundation models to open the model selection dialog, which lists all available models. To select a model, search for it or choose one from the list. After you select a model, click Save. Any notices associated with the selected model, such as deprecation notices or third‑party license requirements, are displayed.
Certain models include a status tag in the dialog to indicate states such as Recommended or Third party. A warning icon indicates that a model might be withdrawn or deprecated in a subsequent release.
Note:You can upload documents or add fields in any order. Extraction begins when the system has at least one document and one field.
-
Do the following:
-
Upload your documents
The uploaded sample documents help in creating the fields. These documents do not train the model, and are also not a part of the agent that is being configured.
It might take some time to upload the documents.
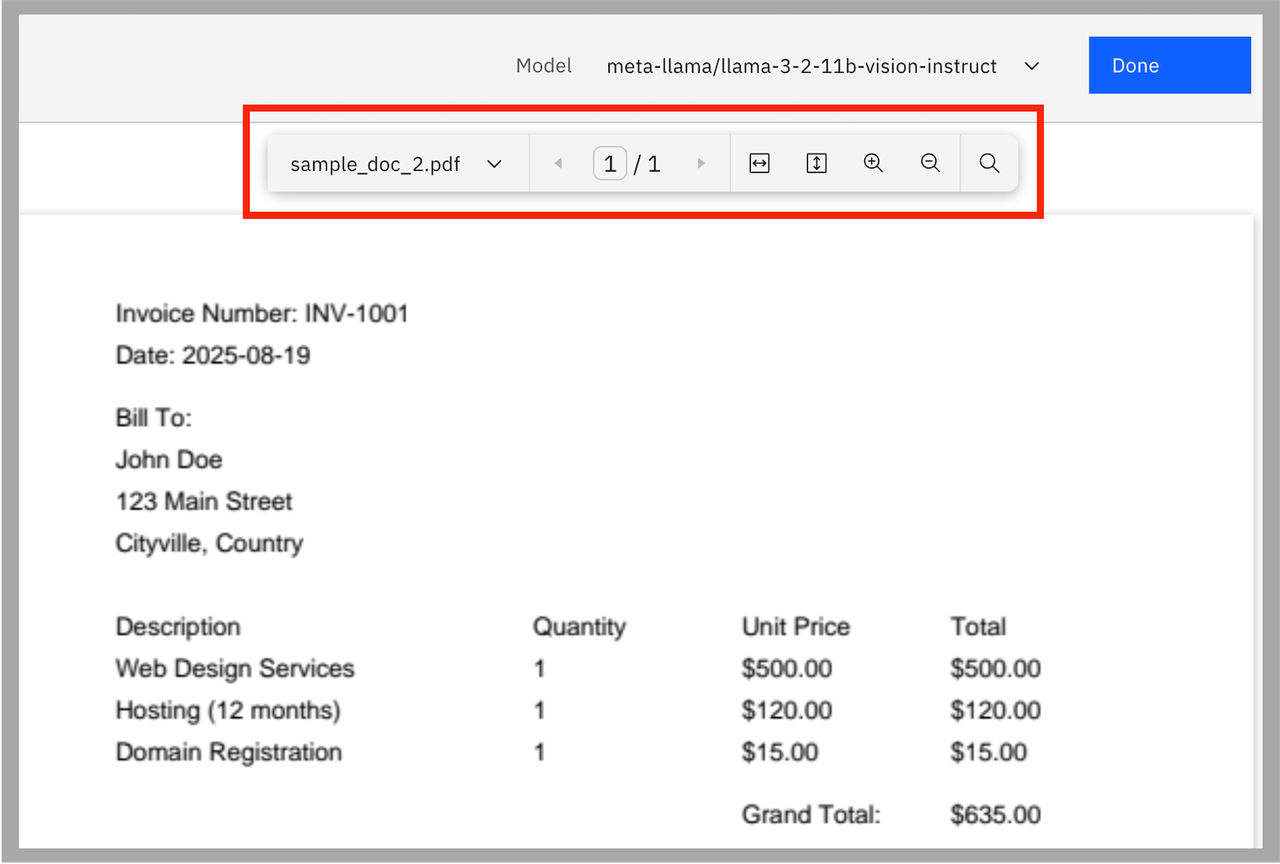
When the upload is complete, you can see a document preview where you can do the following actions by using the options in the toolbar:
-
Select an uploaded document to view from the list
-
Browse the pages of a document that you are viewing
-
Fit the page width and height to view
-
Zoom in and zoom out a page to view
-
Search for a field in a document
In the previous example, a user uploads sample documents and the document preview is displayed for these documents.
-
- Add fields
Click Add field to add fields for the information that you want to extract from the documents such as dates, names, and others.
The document extractor searches for values that are related to the fields across documents.
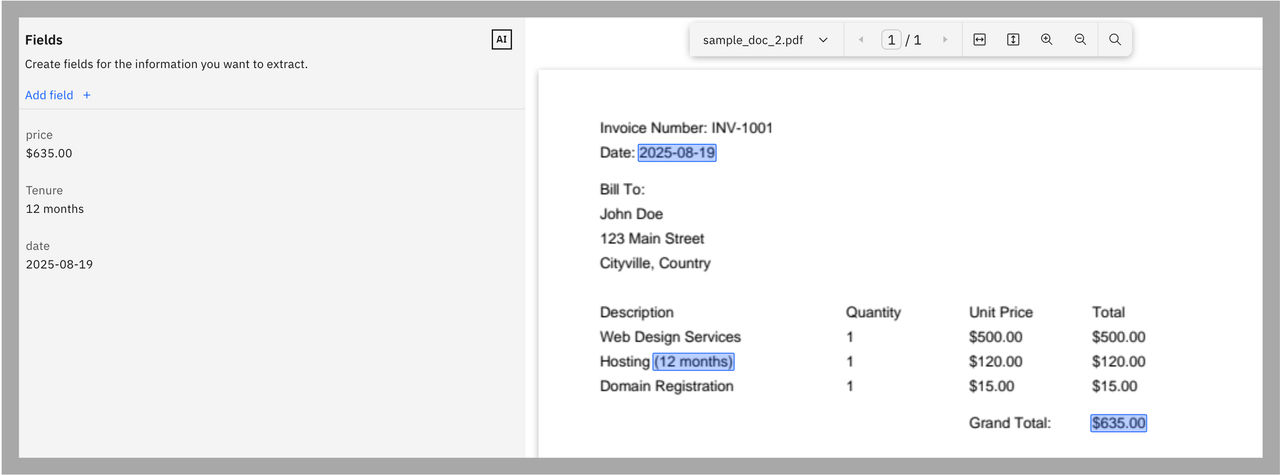
In the previous example, a user has added the price, tenure, and date fields, which are searched and shown on the document preview panel.
To edit the field details, hover over the field, and click the View field details
 icon. You can edit the field name, description, and data type. You can add examples of the field to help the model understand what information you want to extract, and click Show on document to get the results. You can also delete the field if it is no longer needed.
-
-
To upload more documents and delete existing documents, select the Manage documents option from the list in the document preview toolbar.
-
Browse the different documents from the document preview toolbar to verify whether the information is extracted as you expected.
-
Configure the settings that trigger a user review. For more information, see Configuring a user review.
-
After you verify and get the expected results, close the document extractor dialog.
Configuring a document extractor after selecting the Structured option
The ability to extract all line items from structured documents such as purchase orders and invoices reduces manual efforts and improves accuracy in document processing.
To configure the document extractor to identify and extract a set of fields from structured documents:
-
Select the document extractor that you added to the agentic workflow.
-
Click the Edit fields icon
A dialog to upload the documents and add fields is displayed.. - Select or specify a model to use for the document extractor from the Models list.
From the Models list, click View all foundation models to open the model selection dialog, which lists all available models. To select a model, search for it or choose one from the list. After you select a model, click Save. Any notices associated with the selected model, such as deprecation notices or third‑party license requirements, are displayed.
Certain models include a status tag in the dialog to indicate states such as Recommended or Third party. A warning icon indicates that a model might be withdrawn or deprecated in a subsequent release.
Note:You can upload documents or add fields in any order. Extraction begins when the system has at least one document and one field.
- Do the following:
- Use a schema from a list of predefined schemas
You can choose a document type and add multiple fields that are associated with the document type, instead of manually adding the fields one at a time. Several document types such as bank statements, invoices, insurance claims, and others are available for selecting schemas.
To add fields from a predefined schema, do the following:- Click Define schema.
- Select a type of document from Predefined schemas.
A description about the selected document type and all the associated fields that are available to extract data are displayed.
- Click Create.
The document extractor searches for values that are related to the fields across documents.
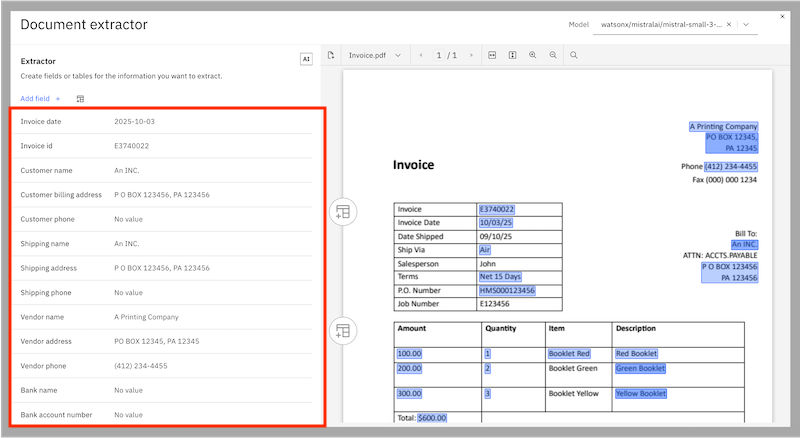
In the previous example, the fields that are extracted for an invoice document are shown in the dialog.
To edit the field details, hover over the field, and click the View field details
icon. You can edit the field name, data type, and description. You can add examples of the field to help the model understand what information you want to extract, and click Show on document to get the results. You can also delete the field if it is not needed.
-
Upload your documents
The uploaded sample documents help in creating the fields. These documents do not train the model, and are also not a part of the agent that is being configured.
It might take some time to upload the documents.
When the upload is complete, you can see a document preview where you can do the following actions by using the options in the toolbar:
-
Select an uploaded document to view from the list
-
Browse the pages of a document that you are viewing
-
Fit the page width and height to view
-
Zoom in and zoom out a page to view
-
Search for a field in a document
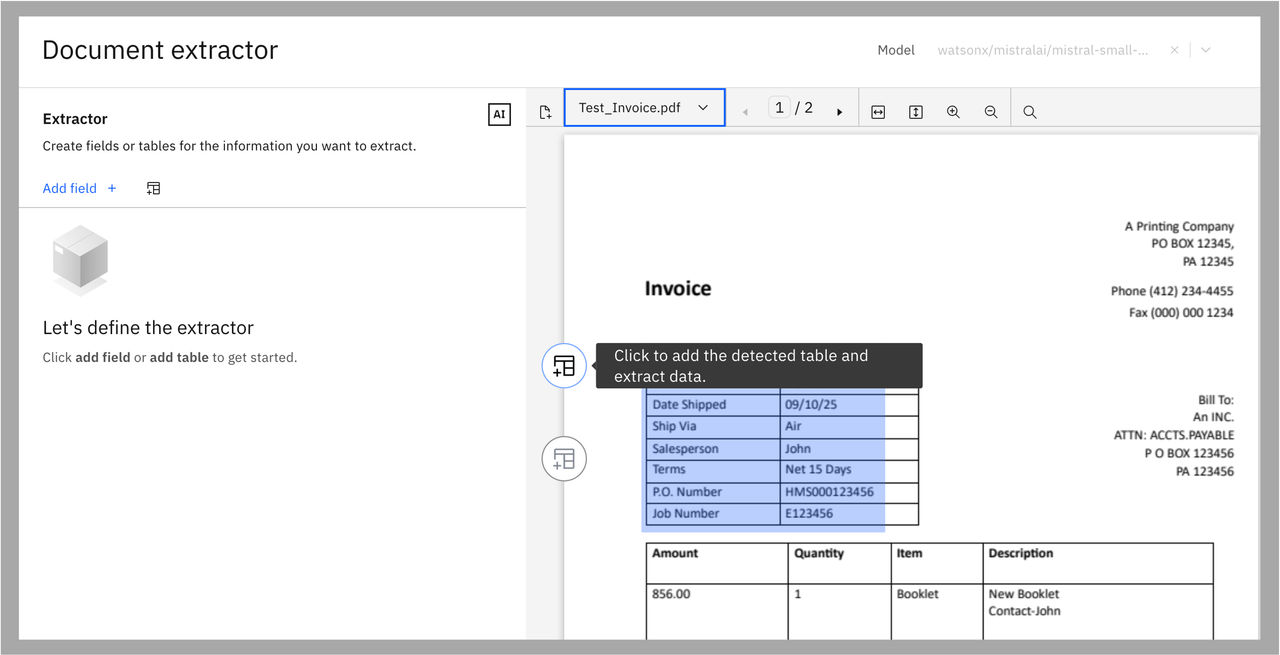
In the previous example, a user uploads a sample invoice document and the document preview is displayed for the document. The preview also shows the automatically detected tables in the document from which you can extract data.
-
-
Add automatically detected tables
To add an automatically detected table from the document to extract data, click the Add table icon
 .
.The data from the table is added to the fields for extraction under a table name. To edit the table name, hover your mouse over the table name, and click the Edit icon
. To delete the table, you can click the Delete icon  .
.You can also reorder the columns in the extracted tables. For more information, see Reordering columns.
-
Add custom tables
To add a custom table and define the fields to extract data, click Define schema, and select User-defined schema, and click Create.
Do the following to add a custom table:
a. Click the Add table icon
 in the side panel, specify a name for your custom table, and press Enter.
b. Click Add column and provide the column name for your custom table, and press Enter. Repeat this step to add more columns to your custom table.
The system searches for the column values in the document. The first value that is found for a column is displayed in the side panel and all other values for that column are highlighted in the document preview.
If a value is not found for a column, no value is displayed in the side panel for the column. In this case, you can click the View column details icon
 to prompt the system for the expected value in the document. This action helps the system to understand what information you want to extract for the column.
To prompt for a value, select the data type, set the Description switch to on and enter or describe the value, and then click Show on document. The system searches for the values in the document based on your description. If a value is found, it is displayed in the side panel. You can also delete the column if it is no longer needed.
You can also reorder the columns in the extracted tables. For more information, see Reordering columns.
c. To view your custom table with a preview of the extracted data, click View next to the table name.

-
Add fields
To add more fields for the information that you want to extract from the documents such as dates, names, and others, click Define schema, select User-defined schema, click Create -> Add field.
After you enter a field name, the document extractor searches for values that are related to the fields across documents.
To edit the field details, hover over the field, and click the View field details icon
. You can edit the field name, data type, and description. You can add examples of the field to help the model understand what information you want to extract, and click Show on document to get the results. You can also delete the field if it is no longer needed.
- Use a schema from a list of predefined schemas
-
To upload more documents and delete existing documents, click the Manage documents icon
 from the list in the document preview toolbar.
 -
Browse the different documents from the document preview toolbar to verify whether the information is extracted as you expected.
-
Configure the settings that trigger a user review. For more information, see Configuring a user review.
-
After you verify and get the expected results, close the document extractor dialog.
Reordering columns
You can reorder columns in tables by dragging and dropping them. This action is helpful, for example, when you want to ensure that the column order aligns with the original table in the document.
By default, the column order in the schema matches the order in the extracted table. However, if a column is missed during auto-detection and is added manually later, it appears at the end of the table.
To reorder column names in tables:
-
Hover over the column name in the side panel and drag it by clicking the Drag icon
 .
. -
Click View next to the table name. The new column order in the table is displayed in the preview.
Mapping data to inputs
By default, auto-mapping is enabled. However, you can map values to the inputs.
To map values to inputs, complete the following steps:
-
Select the document extractor node and then click Edit data mapping.
-
Specify the input values for data mapping. For more information about data mapping, see Mapping data.
Mapping tables extracted from a document extractor node to other nodes in a workflow
You can now map a table type output from a document extractor node in a workflow. You can do any of the following:
-
To display the entire table in a chat, map the extracted table in the workflow by using the list interaction type under a document extractor node.
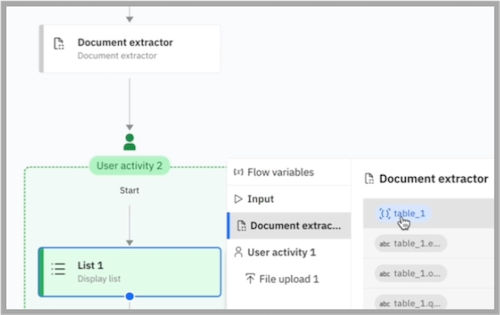
-
To display row data from a table in a chat, you can iterate through the rows of an extracted table using a For each loop in the workflow. To do this, you can combine a For each loop with a user activity node and Message output. Then, to display each row, you can select the columns in the For each loop data mapping.
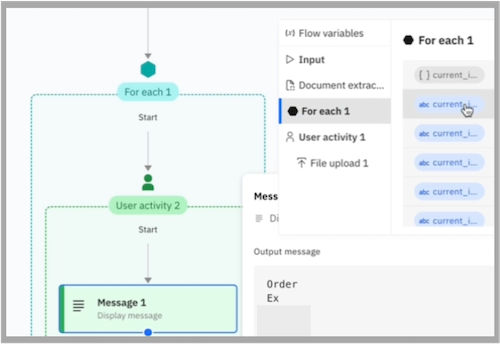
Also, to use any extracted table output in a downstream node in the workflow, you can use this same process of For each loop data mapping. This enables further processing such as applying conditional logic in a workflow.
Configuring a user review
You can configure the settings that trigger a user review.
If the system extraction confidence score is lesser than the set extraction confidence threshold (for unstructured option), or when the extraction returns empty values (for structured option), a user review task is created and assigned to the user.
To configure a user review:
-
Select the document extractor in the agentic workflow.
-
Set the User review switch to on.
-
Do one of the following:
-
For unstructured option: Click the Edit icon
in the If the extraction confidence is below field. Set the extraction confidence threshold for all fields or specific fields that can trigger a user review. To select specific fields that trigger a user review, click the Edit icon , select the specific fields, and click Done. Extraction confidence score reflects how closely the extracted results match the expected values. -
For structured option: Click the Edit icon
in the If the extraction returns any empty values field.-
In the Assign to list, select one of these options:
-
-
|
Option |
Description |
|---|---|
|
Flow initiator |
Only a user who starts the flow can review the document. |
|
Specified user |
Only a specified user can review the document.If no users are assigned, click Assign user to select a user. The selected user is displayed in the Assigned user field. To change the user, click the Edit icon |
|
User from a variable |
Only a user who is specified in a variable can review the document. |
The system notifies the user in the chat that a review is required depending on the extraction confidence score or empty values.
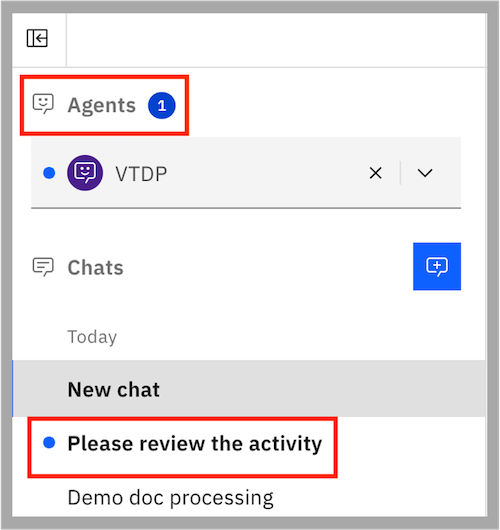
The user can click the chat notification to view the review activity.

The user can then examine the extracted values, make any necessary changes, and submit the review. After submission, the workflow continues with the updated values.

Document extractor limits and restrictions
Document extractors have the following limits and restrictions.
|
Area |
Description |
|---|---|
|
Maximum file size |
10 MB |
|
Maximum number of uploaded files |
5 files |
|
Accepted file types |
.doc, .docx, .jpe, .jpeg .jpg, .pdf, .png, .ppt, .pptx, .tif, .tiff |
|
Maximum number of pages |
600 pages |
|
Maximum number of fields |
25 fields |
The following limitations also apply to the document extractor:
-
Confidence values for extracted fields
The structured document extractor does not provide confidence scores for extracted field values, unlike the unstructured document extractor. Therefore, confidence-based user review rules cannot be configured.
-
Single-mention extraction
The document extractor captures only one instance of a field value in a document, usually the first occurrence. For example, if an invoice number appears multiple times, only one instance is extracted. To capture multiple values, define fields with distinct semantic labels, such as home phone number and mobile phone number.
An agentic workflow defines a set of linked activities and controls that are designed to achieve a specific business purpose or goal. Learn more about agentic workflows.