How To
Summary
Use the ISPF editor to create a panel by using Edit Models and display the panel by using ISPF Dialog Test.
Steps
In 'Write Your First Mainframe App Using ISPF - Part 1 What is ISPF?' we introduced basic ISPF concepts. In Write Your First Mainframe App Using ISPF - Part 2 What Data Sets Do You Need?' you allocated the data sets for your application. Now you’re ready to write your application.
The typical first application is “Hello World”. Because ISPF displays panels, instead of just writing “Hello World” to the screen, we are going to create an ISPF panel with “Hello World” as the text.
You already have a panels library that you allocated in part 2. Now you need to use the ISPF editor to create a panel. From the ISPF Primary Option Menu, type 2 on the command line and press enter to see the ISPF Edit Entry panel.
If you allocated your panels library with a 3-part name, you can enter it in the Project, Group, and Type fields. In the member field, enter the name of the panel.

Press Enter to start an edit session.
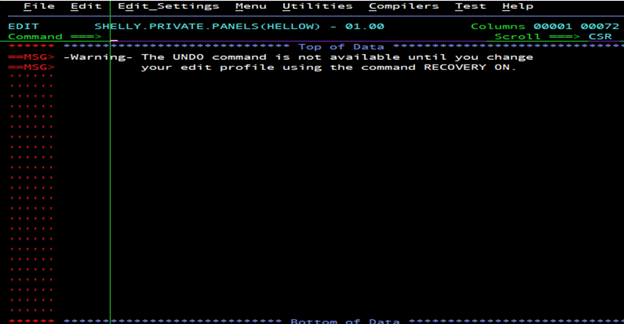
The dots on the left side are the line command area. The dots are replaced with numbers when you press the Enter key. You can use the command line, labeled
Command ===>
to enter edit primary commands. There is frequently a message at the top of the edit session. In this case, it is a warning that the undo command is not available. This message is not saved with your data.
On the upper right side of the panel is a columns indicator. It says that you are looking at columns 1-72. Since in part 2 you allocated the data set with a width of 80, there are columns on the right of your data set that you cannot see. Sometimes the editor puts numbers in these columns to support programming languages that require them. These examples do not require numbers. On the command line, type UNNUM to turn off numbering mode. When you press enter, any numbers in columns 72-80 are removed.
Next, make sure that the editor does not turn text input as lowercase into uppercase. On the command line, type CAPS OFF.
One thing that the ISPF editor does to help programmers is to use color to highlight various keywords and structures that are important in a particular language. If you type HI AUTO on the command line, Language Sensitive Editing, otherwise known as highlighting, is turned on.
The editor saves these changes in an edit profile. To see the profile, type PROFILE on the command line. Verify that the profile values are what you expect.

Type RESET on the command line to remove the profile lines from the display.
On the command line, type MODEL. ISPF Edit models are useful reminders of the syntax of various dialog elements. To see a list of panel formats to choose from, type F0. On the Panel Formats panel, type F1 to get a standard entry panel model.

Press Enter to insert the model into the edit session.
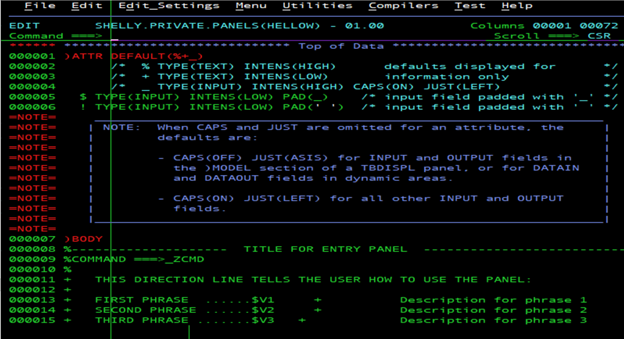
The model appears in the blank lines of the member. The sections of the panel are denoted by keywords preceded by a close parenthesis in column 1. If you turned on highlighting earlier, the keywords that show the sections of the panel are highlighted in red. The notes in blue are additional information, which disappears when the member is saved.
Since we are making a simple panel, we are going to get rid of almost everything. First, type RESET on the command line and press Enter to make the notes disappear.
The )ATTR section sets up some defaults for how the panel displays. Comments are enclosed between /* and */. If you have highlighting turned on, comments display in turquoise. The comments explain how the default attributes from the )ATTR statement are defined. For example, the % (percent sign) has a default meaning that any characters following the percent sign are text, not input or output fields. The text is highlighted when displayed.
The first change we want to make is to get rid of the attributes that we don’t need. Delete the attributes in lines 5 and 6 by typing D in the line command area and pressing enter.

The )BODY section describes what information displays on the panel. The )BODY section needs 1 blank line and 1 line to say “Hello, World.” We can delete all but 2 lines in the )BODY section. Use the D line command to delete any extra lines. Type over any lines that you want to change
Here’s an example of how the panel source might look:
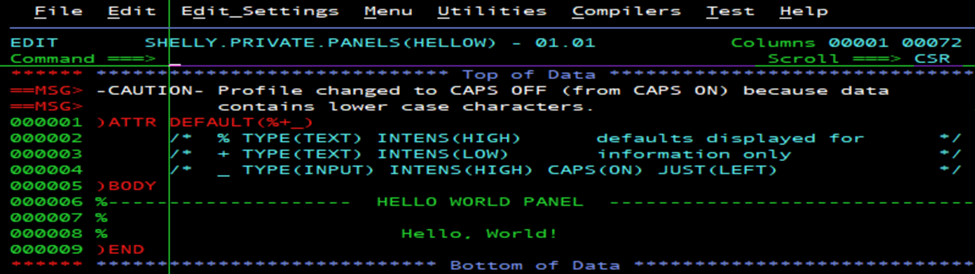
The last statement we need is the )END statement.
Once your panel looks like the sample, save the changes. Enter the End command, either by typing it on the command line and pressing enter, or by pressing F3 on your keyboard.
Press the end key to return to the ISPF Primary Option Menu.
Now you can display the panel. The easiest way to display a panel is to use Dialog Test. Select Option 7, Dialog Test, on the ISPF Primary Option Menu.
The first thing you need to do is tell ISPF where the panel is located. Type 6 on the Option field of the Dialog Test Primary Option Panel.
The LIBDEF service associates an ISPF DDname with an ISPF library. The DDname for the panels source is ISPPLIB, so on the Invoke Dialog Service panel, enter the LIBDEF command like this, substituting your panels library name for the one in the example:

When you press enter, ISPPLIB is associated with the data set indicated by the ID parameter. Press the End key to return to the Dialog Test Primary Option Panel. To display the panel, type 2 in the Option field and press Enter. On the Display Panel panel, type in the name of the panel, and press Enter.

You can now see panel HELLOW displayed.

Document Location
Worldwide
Was this topic helpful?
Document Information
Modified date:
30 August 2022
UID
ibm16614813