Question & Answer
Question
In this document we'll cover how to set up an LPAR, VIOS, CEC & HMC management object on your NIM master, but will not cover any additional operations on them.
Answer
Introduction
The purpose of this document is to explain how to configure and work with NIM Management objects (VIOS, CEC, HMC). Having defined management objects gives you more options on how to control your environment, as well as servers as a requisite for more advanced NIM operations (viosupgrade / LKU through NIM).
What are NIM Management Objects?
NIM Management objects allows for more control over your individual LPARs (NIM clients). If you have set up a Hardware Management Console (HMC), Virtual I/O Server (VIOS) and Central Electronics Complex (CEC), you can perform network installations/maintenance mode booting, boots and reboots all from the NIM Master on any of the set up LPARs (NIM clients).
Setting up a NIM environment with control objects is pretty straightforward, and the only requirement is that your NIM master needs to have the dsm.core fileset installed. You can check whether or not it's installed with:
# lslpp -l dsm.core
Fileset Level State Description
----------------------------------------------------------------------------
Path: /usr/lib/objrepos
dsm.core 7.2.3.16 COMMITTED Distributed Systems Management Core
----------------------------------------------------------------------------
Path: /usr/lib/objrepos
dsm.core 7.2.3.16 COMMITTED Distributed Systems Management Core
Path: /etc/objrepos
dsm.core 7.2.3.16 COMMITTED Distributed Systems Management Core
dsm.core 7.2.3.16 COMMITTED Distributed Systems Management Core
Furthermore, having NIM management objects is a requirement for using some of the latest IBM technologies in combination with a NIM Master, specifically viosupgrade and Live Kernel Update.
How do I define an HMC object?
The first part of defining an HMC object on your NIM master is to set up an encrypted password file that contains the login ID and password needed to access the HMC. It must be created using the dpasswd command, which is provided by the dsm.core fileset. While running the dpasswd command, you'll be prompted to enter the HMC user's password as clear text. If you do not wish for the password to be displayed in clear text, you can exclude the -P parameter and the dpasswd command will prompt you for the password. Note that this operation is performed on the NIM master.
For this guide, we'll be using the following HMC login credentials:
HMC name - IBM-HMC
User - hscroot
Password - hscroot_password1
> Generating an encrypted password file:
# dpasswd -f /export/passwords/IBM-HMC_passwd -U hscroot -P hscroot_password1
or
# dpasswd -f /export/passwords/IBM-HMC_passwd -U hscroot
Password file is /export/passwords/IBM-HMC_passwd
Warning! Password will be echoed to the screen as it is typed.
Warning! Password will be echoed to the screen as it is typed.
Password:hscroot_password1
Re-enter password:hscroot_password1
Password file created.
Re-enter password:hscroot_password1
Password file created.
Once the password file has been generated, we can create a NIM HMC management object:
# nim -o define -t hmc -a passwd_file=/export/passwords/IBM-HMC_passwd -a if1="find_net IBM-HMC 0" IBM-HMC
Or using smitty:
# smit nim_mkmgmt_obj
> Select hmc = specifies the management object type for hmc hardwarecec = specifies the management object type for cec hardware
> Hostname of HMC [IBM-HMC]
On the following page:
>* Password File [/export/passwords/IBM-HMC_passwd]
NOTE:
If the HMC is on the same subnet/network as the NIM master, the NIM Network stanza will automatically be populated with the NIM master network definition. Otherwise, you first need to create a new NIM network to hold the HMC.
Once finished, you can verify the newly defined NIM object:
# lsnim -l IBM-HMC
IBM-HMC:
class = management
type = hmc
passwd_file = /export/passwords/IBM-HMC_passwd
mgmt_port = 12443
if1 = nim_net IBM-HMC 0
Cstate = ready for a NIM operation
prev_state =
Mstate = currently running
class = management
type = hmc
passwd_file = /export/passwords/IBM-HMC_passwd
mgmt_port = 12443
if1 = nim_net IBM-HMC 0
Cstate = ready for a NIM operation
prev_state =
Mstate = currently running
We're now ready to add CEC and VIOS resources to the defined HMC.
How do I define a CEC object?
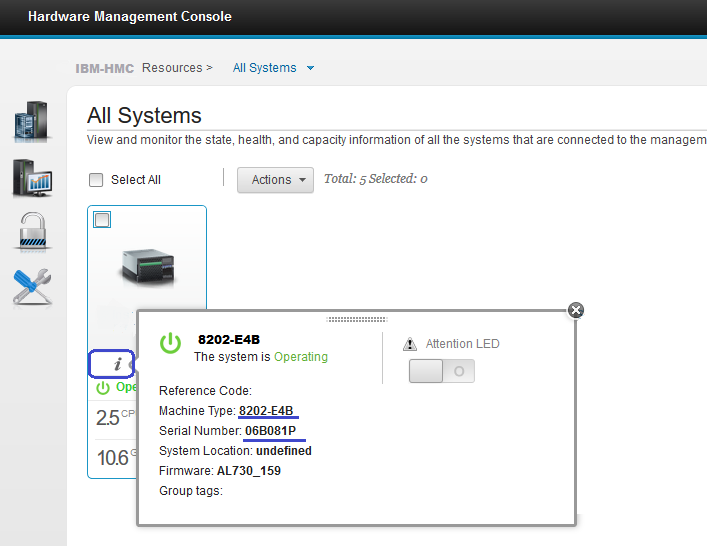
Defining a CEC object is simply defining your frame. For that, you'll need the hardware Type, the hardware Model and the hardware Serial Number of your Power frame. You can verify these from the HMC GUI, or directly from your NIM master.Verifying the type/model/serial number from the HMC Enhanced+ and Classic GUI:
Once logged into your HMC, you will be presented with a list of all of your managed systems:
On Enhanced+ GUI, you just need to click the information icon under the managed system:
On the Classic GUI, you need to navigate through Systems Management > Servers > the CEC > Properties
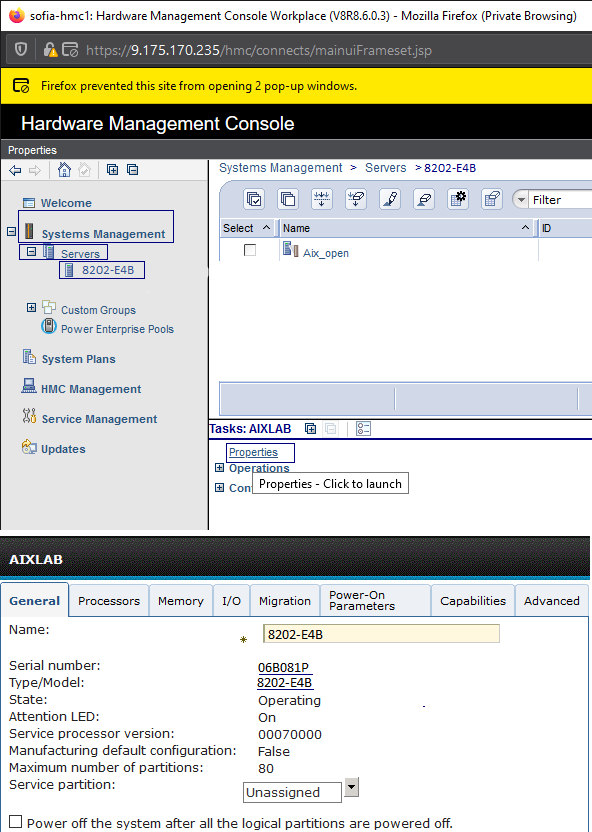
From the above screenshot, we can see that we have a system with the following information - Type 8202; Model-E4B; Serial 06B0.
Verifying the Type/Model/Serial from your NIM master's console can be done using the nimquery command.
With nimquery you can query the HMC to provide you with the information of all it's managed systems, and alternatively, define them as CEC resources in one go.
# nimquery -a hmc=IBM-HMC -p
The output of this command shows pretty much everything there is to know about your frame. We're only interested in the type_model and serial_num stanzas:
# nimquery -a hmc=IBM-HMC -p
CEC 8202-E4B:
"lpar_proc_compat_modes = default
5250_application_capable = 1
POWER6 = POWER6+
POWER7 = POWER8"
"lpar_proc_compat_modes = default
5250_application_capable = 1
POWER6 = POWER6+
POWER7 = POWER8"
......
serial_num = 06B081P
type_model = 8202-E4B
Once we have all the required information, we can define the CEC object on the NIM master. For this, we need the following:
Hardware Type - 8202
Hardware Model - E4B
Serial Number - 06B081P
# nim -o define -t cec -a hw_serial=06B081P -a hw_type=8202 -a hw_model=E4B -a mgmt_source=IBM-HMC 8202_cec
Or using smitty:
# smit nim_mkmgmt_obj
> Select cec = specifies the management object type for cec hardware
On the following page:
> Management Object Name [8202_cec]
> Hardware Type [8202]
> Hardware Model [E4B]
> Hardware Serial [06B081P]
> Management Source [IBM-HMC]
> Hardware Type [8202]
> Hardware Model [E4B]
> Hardware Serial [06B081P]
> Management Source [IBM-HMC]
Once finished, you can verify the newly defined CEC object:
# lsnim -l 8202_cec
8202_cec:
class = management
type = cec
serial = 8202-E4B*06B081P
hmc = IBM-HMC
Cstate = ready for a NIM operation
prev_state =
8202_cec:
class = management
type = cec
serial = 8202-E4B*06B081P
hmc = IBM-HMC
Cstate = ready for a NIM operation
prev_state =
Note that we have the model,type and serial number present in the NIM definition as well.
How do I define a VIOS object (optional)?
While optional, 99% of the big environments have at least one VIO server, as they should. While you may be familiar with defining a VIOS as a standalone NIM client, this is different. VIO servers should be defined as management objects and still allow the NIM master to perform all regular operations it would on a NIM client, on the VIO servers.
Defining the VIOS is pretty straightforward, but this time will require some action to be done on the VIOS side as well. The only thing you need to have before-hand is the LPAR ID of the VIO server. In this case, the LPAR ID of the VIO is 1.
On the NIM master, you can define the VIOS with:
# nim -o define -t vios -a if1="find_net ibm-vios 0" -a mgmt_source=8202-cec -a identity=1 ibm-vios
Or using smitty:
# smit nim_mkmgmt_obj
> Select vios = specifies the virtual hardware server object
> Hostname of the VIOS [ibm-vios]
On the following page:
> * Management Source [8202-cec]
> * Identity [1]
> * Identity [1]
Once finished, you can verify the newly defined VIOS object with:
# lsnim -l ibm-vios
ibm-vios:
class = management
type = vios
connect = nimsh
platform = chrp
netboot_kernel = 64
if1 = nim-net ibm-vios 0
cable_type1 = N/A
mgmt_profile1 = IBM-HMC 1 8202-cec
Cstate = ready for a NIM operation
prev_state = unavailable for use
Mstate = ready for use
cpuid = 00FB43B94C00
class = management
type = vios
connect = nimsh
platform = chrp
netboot_kernel = 64
if1 = nim-net ibm-vios 0
cable_type1 = N/A
mgmt_profile1 = IBM-HMC 1 8202-cec
Cstate = ready for a NIM operation
prev_state = unavailable for use
Mstate = ready for use
cpuid = 00FB43B94C00
Note that it looks similar to the details you get on a regular LPAR.
The last part that you need to do is to enable remote management on the VIOS itself:
Login as padmin and run the following:
$ remote_management -disable
$ remote_management -interface <VIOS interface> <NIM hostname>
If successful, you should get an output similar to:
$ remote_management -interface en5 ibm_nim
nimsh:2:wait:/usr/bin/startsrc -g nimclient >/dev/console 2>&1
0513-059 The nimsh Subsystem has been started. Subsystem PID is 7209094.
How do I tie them all together?
In a sense, we've been defining an environment from the top down, in a tree-like way. But how do they all work together?
The HMC is what ties it all up. Your HMC definition will have references to all the managed systems (CECs) it controls. Similarly, your CEC definitions will reference all of the systems they control as well, be it VIOSes or LPARs. The only difference is that while for defining a VIOS management object, you 100% must specify a CEC to which it belongs, we all know this is not the case when defining regular NIM clients/LPARs.
For this, we need to change the definitions of our existing NIM clients, belonging to the CEC we defined. Similar to defining a VIOS, we only need the LPAR ID. In this case, our LPAR's ID is 2:
# nim -o change -a identity=2 -a mgmt_source=8202-cec ibm-lpar
Or using smitty:
# smit nim_chmac
> Select ibm-lpar
On the following page:
> * Management Source [8202-cec]
> * Identity [2]
> * Identity [2]
Finally, let's see how it all ties up.
Output from lsnim -l ibm-lpar:
ibm-lpar:
class = machines
type = standalone
connect = nimsh
platform = chrp
netboot_kernel = 64
if1 = nim-net ibm-lpar 4A807C81F60B
cable_type1 = N/A
mgmt_profile1 = IBM-HMC 2 8202-cec
Cstate = ready for a NIM operation
prev_state = not running
Mstate = currently running
cpuid = 00C27D084C00
class = machines
type = standalone
connect = nimsh
platform = chrp
netboot_kernel = 64
if1 = nim-net ibm-lpar 4A807C81F60B
cable_type1 = N/A
mgmt_profile1 = IBM-HMC 2 8202-cec
Cstate = ready for a NIM operation
prev_state = not running
Mstate = currently running
cpuid = 00C27D084C00
Here, we can see the mgmt_profile1 stanza is populated with all our objects. We have our HMC (IBM-HMC), our LPAR ID (2) and our CEC (8202-cec).
Output from lsnim -l ibm-vios:
ibm-vios:
class = management
type = vios
connect = nimsh
platform = chrp
netboot_kernel = 64
if1 = nim-net ibm-vios 0
cable_type1 = N/A
mgmt_profile1 = IBM-HMC 1 8202-cec
Cstate = ready for a NIM operation
prev_state =
Mstate = currently running
cpuid = 00FB43B94C00
class = management
type = vios
connect = nimsh
platform = chrp
netboot_kernel = 64
if1 = nim-net ibm-vios 0
cable_type1 = N/A
mgmt_profile1 = IBM-HMC 1 8202-cec
Cstate = ready for a NIM operation
prev_state =
Mstate = currently running
cpuid = 00FB43B94C00
Again, we have the stanza for our management objects - mgmt_profile1 - HMC (IBM-HMC), VIOS LPAR ID (1) and CEC (8202-cec).
Our CEC should now have information about all the objects that it controls - output from lsnim -l 8202-cec:
8202_cec:
class = management
type = cec
serial = 8202-E4B*06B081P
hmc = IBM-HMC
Cstate = ready for a NIM operation
prev_state =
class = management
type = cec
serial = 8202-E4B*06B081P
hmc = IBM-HMC
Cstate = ready for a NIM operation
prev_state =
manages = ibm-lpar
manages = ibm-vios
hmc = IBM-HMC
Cstate = ready for a NIM operation
manages = ibm-vios
hmc = IBM-HMC
Cstate = ready for a NIM operation
Our CEC resource shows all the objects that are assigned to it - we have our AIX LPAR, our VIOS and we can see that it's assigned to the IBM-HMC.
Finally, our HMC will show the following - output from lsnim -l IBM-HMC:
IBM-HMC:
class = management
type = hmc
passwd_file =/export/passwords/IBM-HMC_passwd
manages = 8202-cec
manages = ibm-vios
login = hscroot
mgmt_port = 12443
if1 = nim-net insl-p8hmc 0
Cstate = ready for a NIM operation
prev_state =
Mstate = currently running
class = management
type = hmc
passwd_file =/export/passwords/IBM-HMC_passwd
manages = 8202-cec
manages = ibm-vios
login = hscroot
mgmt_port = 12443
if1 = nim-net insl-p8hmc 0
Cstate = ready for a NIM operation
prev_state =
Mstate = currently running
Our HMC definition shows it manages both the CECs as well as the VIOSes we define.
References:
Creating and Restoring a Mksysb Without Preserving Mirrors: https://www-01.ibm.com/support/docview.wss?uid=isg3T1011782
Network Installation Management Intro: https://www.ibm.com/support/knowledgecenter/en/ssw_aix_72/com.ibm.aix.install/nim_intro.htm
Mksysb command: https://www.ibm.com/support/knowledgecenter/en/ssw_aix_71/com.ibm.aix.cmds3/mksysb.htm
NIM Setup Guide: http://www-01.ibm.com/support/docview.wss?uid=isg3T1010383
Using a mksysb image to install the BOS on a NIM client: https://www.ibm.com/support/knowledgecenter/en/ssw_aix_72/com.ibm.aix.install/basic_mksysb_image.htm
Bosinst.data control_flow stanzas: https://www.ibm.com/support/knowledgecenter/en/ssw_aix_71/com.ibm.aix.install/bosinst.data_cntrl_flow_stanza.htm
Created by:
Todor H. Todorov
[{"Business Unit":{"code":"BU058","label":"IBM Infrastructure w\/TPS"},"Product":{"code":"SSMVAX","label":"AIX Express Edition"},"Component":"","Platform":[{"code":"PF002","label":"AIX"}],"Version":"All Versions","Edition":"","Line of Business":{"code":"LOB08","label":"Cognitive Systems"}}]
Was this topic helpful?
Document Information
Modified date:
17 April 2020
UID
ibm11282822