News
Abstract
The following updates will be available in release 2.0.60 of Planning Analytics Workspace.
Content
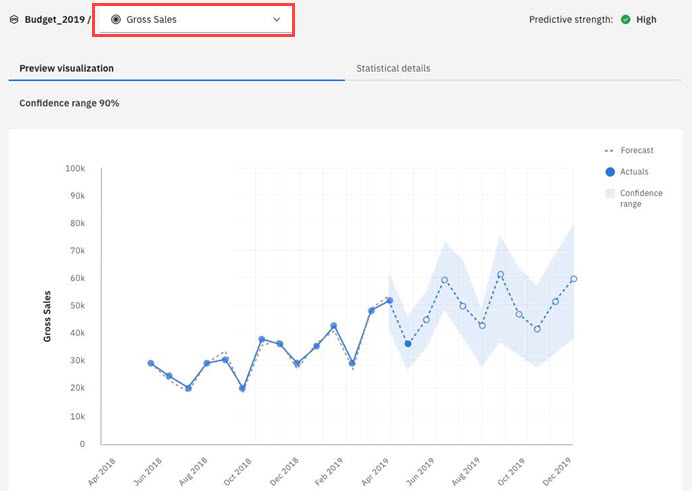
Preview multiple rows in a forecast
A new selector on the row path of the forecast Preview window lets you pick a different row member and render an updated preview.
Determine scope of data for a forecast
A new Select scope of historical data used option on the Advanced Forecast tab lets you specify whether a forecast uses only historical data present in the current exploration view or if it uses all historical data in the cube when creating a forecast.
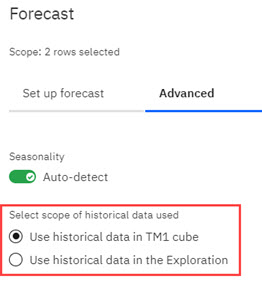
If you select Use historical data in the TM1 cube, the time dimension will be fully expanded, sending all data present in the cube for the slice shown.
If you select Use historical data in the Exploration, the data present in the exploration view will be send to the forecast engine.
New data tree Settings menu
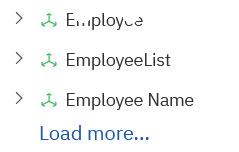
A new Settings menu lets you manage the behavior of the data tree.

You can specify a Load more size value to determine how many items of any object type are displayed in the data tree before you have to click Load more to retrieve and display more items. For example, here you can see a list of dimensions where the Load more option is enabled because the number or dimensions exceeds the specified Load more size value.
You can also use the Display members option to determine if the Members node appears in the data tree under dimension hierarchies. When the option is enabled, the Members node is available, as in this example.

When the option is disabled, the Members node is not available in the data tree.
Applications and Plans UI enhancements
The user interface for Applications and Plans has been updated to simplify administration.
The text link to Add a step (for plans) and Add a section (for applications) has been moved from the bottom of the plan/application grid and converted to a button at the top of the grid. This example shows the change in a plan, but you'll see the same change (with a different button label) for applications.

Additionally, the plan contribution panel has been modified to show only the first three submissions for a step. You can click Show all to reveal all the submissions.

After reviewing the submissions, you can click Show less to collapse the list and show just the first three submissions.
Prefix negative values with a minus sign
When defining a display format for an entire view, a single row, a single column, or a cell widget, you can set the format to display negative values with a minus sign, rather than enclosed in parentheses.
The Negative data with minus sign option is available when you select any of the following formats:
- Comma
- Rounded
- Accounting
- Currency
- Currency (Rounded)
- Thousands
- Millions
This example shows the Negative data with minus sign option applied to the Accounting format and visible in a cube view.

Ability to delete a folder for a removed user
Previously, when a user was removed from Planning Analytics Workspace, the user's personal folder was renamed to Unknown and the folder could not be deleted by an administrator.
Administrators can now delete the Unknown folder associated with any deleted user.
Move assets or folders in a user's personal folderA Move option is now available for all assets and folders within a user's personal folder. A user or administrator can use this option to move an asset or folder to a new location, either in the Shared folder or a different place in the user's personal folder.
When you click the Options menu next to any asset or folder within a user's personal folder, you'll see the new Move option.

When you click the Move option, you can select a destination folder for the asset or folder. The destination can be in the Shared folder or in the user's personal folder. If you move to the Shared folder, you are prompted to set user/group permissions to the asset or folder.
Set agent API key (local only)
When a request is sent from Planning Analytics Workspace to a local agent, an authentication token is also sent.
This token is created using a key that must be set to the same value in both Planning Analytics Workspace and the local agent
This token is created using a key that must be set to the same value in both Planning Analytics Workspace and the local agent
.
To add the key in agent, set the AGENT_API_KEY property in the agent's bootstrap.properties file: AGENT_API_KEY=<KEY_VALUE>. The <KEY_VALUE> is plain text of your choosing; you do not need to obtain it from anywhere other than your imagination.
Note that after the agent starts, this key is encoded. The AGENT_API_KEY property is removed from bootstrap.properties and replaced with the AGENT_API_KEY_ENCODED property. If you want to change the key, you must again add the AGENT_API_KEY property to the agent's bootstrap.properties file. The AGENT_API_KEY_ENCODED property will then be updated to contain the encoded key.
To add the key in Planning Analytics Workspace, add the following line to paw.env:
export AdminAgentAPIKey=<KEY_VALUE>
export AdminAgentAPIKey=<KEY_VALUE>
[{"Line of Business":{"code":"LOB10","label":"Data and AI"},"Business Unit":{"code":"BU059","label":"IBM Software w\/o TPS"},"Product":{"code":"SSD29G","label":"IBM Planning Analytics"},"ARM Category":[{"code":"a8m0z000000Gn0QAAS","label":"General"}],"Platform":[{"code":"PF025","label":"Platform Independent"}],"Version":"All Version(s)"}]
Was this topic helpful?
Document Information
Modified date:
11 January 2021
UID
ibm16386478