News
Abstract
The following updates are available in release 2.0.93 SC of Planning Analytics Workspace.
Content
Books now retain data format when saved as a template
When you save a book as a template, any data format that you applied to an entire view or visualization now also saves to the template. When you create a new book using the template, the retained data format automatically applies to the view or visualization when you populate the data.
The data format is retained in a template only if you applied the format to an entire view or visualization by clicking Format values in the application toolbar.

The data format is retained even when you replace the current view in the new book with another view.

Use the new advanced selector widget to synchronize members
The new Advanced selector widget supports one-way synchronization and has multiple selectors with the same hierarchy that let you pick members from different groups to form a set. This new feature lets you easily compare members, view data for a range of members, or create a multiple selection list.
When you enable Synchronize hierarchies for a view or visualization, selecting a specific member in an Advanced selector updates the view or visualization. Changes in the Advanced selector widget trigger synchronization in the same synchronization group but does not synchronize to the changes of sets.
At any time, you can click Undo to reverse a selection change.
Adding an Advanced selector widget
You can add Advanced selector widgets from an exploration row, column, or context area but not from benched dimensions.
- In Edit mode, click the menu icon next to the dimension you want to create an advanced selector widget from.
- Under Add widget as, select Advanced selector.
After you add an Advanced selector widget to your book, you can customize the widget in its appearance, layout, selection methods, and choose when selection changes apply to the synchronization group.
Custom properties of an Advanced selector widget
You can tailor the Advanced selector widget for your purposes.

Apply selections
You can manage if the change in one selection applies to its synchronization group immediately or changes from multiple selectors apply in a batch.
Enable the In batch property if you want changes from multiple selectors to apply in a batch and only when the Apply button in the widget is pressed. Otherwise, any change in a member selection applies as soon as the change occurs.
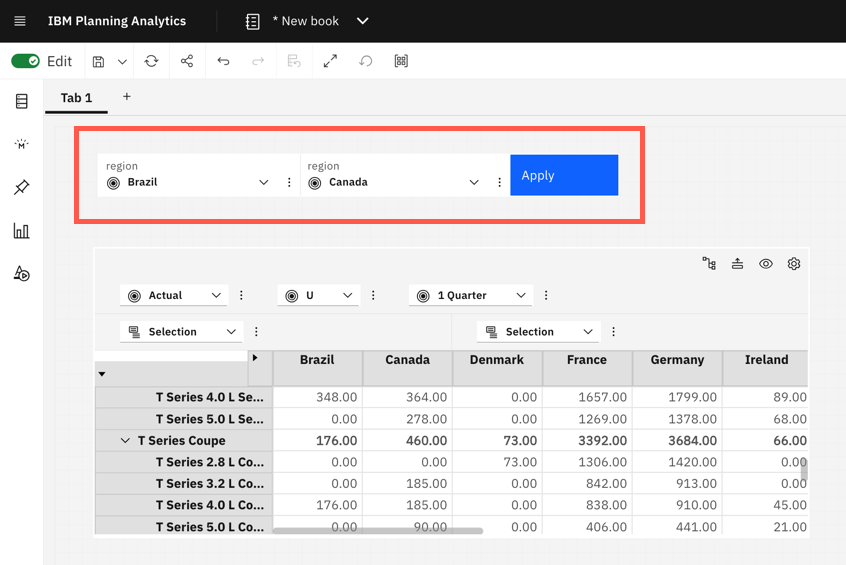
Important: The Show as range selector property works only when you have a maximum of two selectors in an Advanced selector widget.
In the following example, both the In batch and Show as range selector properties are enabled. When you change the member selections to 2 Quarter and 4 Quarter in the first and second selectors, the view updates to display all the members between 2 Quarter and 4 Quarter.
Enable Multiple selection list to display the Advanced selector widget as a list, which allows multiple member selections.
Note: You will need to also enable the In batch property when using Multiple selection list so that changes apply after all the selections are made.
Layout
In the Layout section, you can select whether you want the Advanced selector to display horizontally or vertically and you can restore the widget to its default size.
You can also select the number of selectors that display in an Advanced selector widget. You can choose between two to four selectors. By default, Advanced selector widgets contain two selectors.
Selector titles
You can specify the title for each selector in an Advanced selector widget.
Selector style
Much like the custom properties of the Selector widget, under the Selector style section, you can display an Advanced selector widget as a simple list, expand and collapse the widget, show the search bar, and much more.
Manage email notifications in a plan
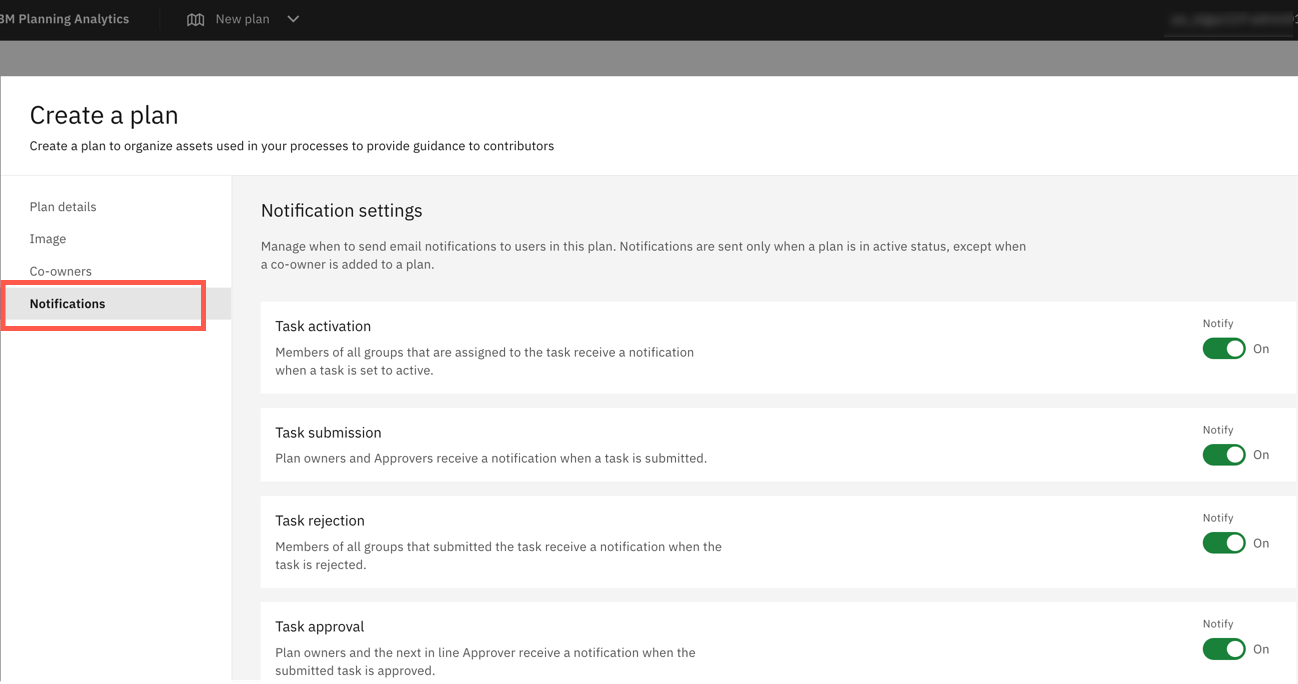
You can now turn on or turn off email notifications for individual events on the new Notifications tab in a plan. Previously, plan users automatically received email notifications when actions, such as a task submission or task approval, occurred in a plan.
When you create a new plan or edit an exiting one, you can manage notifications for individual events in a plan on the Notifications tab. By default, all notifications are turned on.

Improved handling of simultaneous actions in Plans
Previously, when two users from the same group opened a plan to perform the same action at the same time, such as submitting or approving a task, both actions were recorded in the Submission log. Now, in Planning Analytics Workspace 2.0.93, only the first action is logged in the Submission log.
When another user performs the same action, they receive a response that the action is already complete.
Copy and move multiple assets or folders
You can now copy and move multiple assets or folders to a new location on both the Reports and Analysis page and the Data and Models page in [() IBM]® Planning Analytics Workspace
.To copy or move multiple assets:- Click either the Reports and Analysis or the Data and Models tile on the Planning Analytics Workspace home page.
- Click the check mark icon beside each of the assets or folders you want to copy or move to a different location.
- Click Copy or move option in the toolbar.
- Select a destination.
- Click Copy or Move. The assets will be moved to the new location.

New filtering options available in the dimension editor
Additional filtering options are now available in the dimension editor, which allow you to further narrow the focus of members that are displayed in the editor.
Previously, you could filter members in the dimension editor with Filter (optional) or use Search to generate a list of members that match the search term.
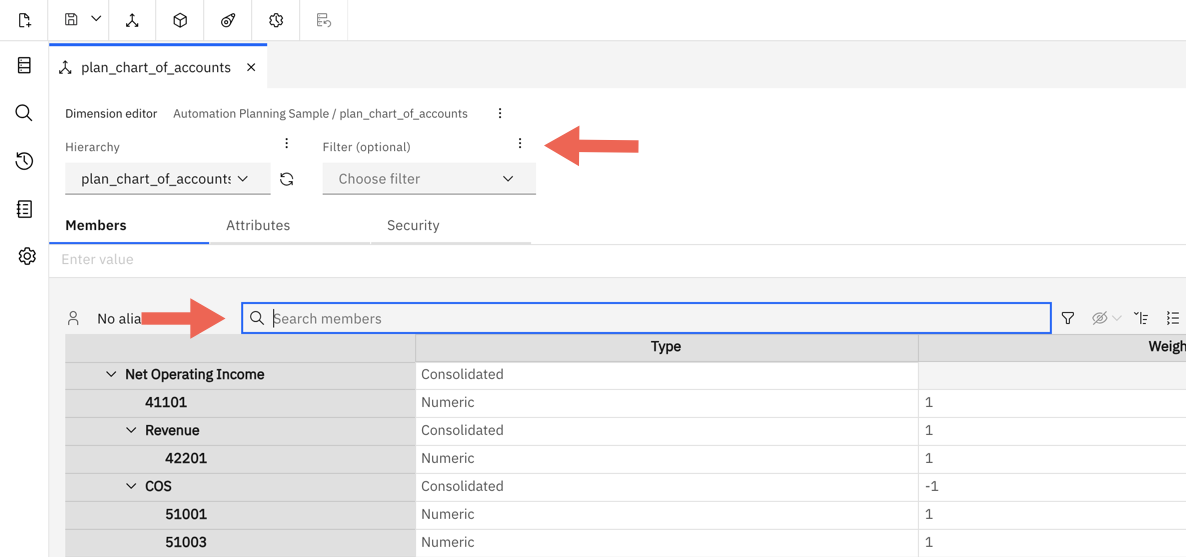
In IBM Planning Analytics Workspace 2.0.93, along with the existing Filter (optional) and Search methods, new filtering options similar to those in the set editor are available under the new Filter icon.
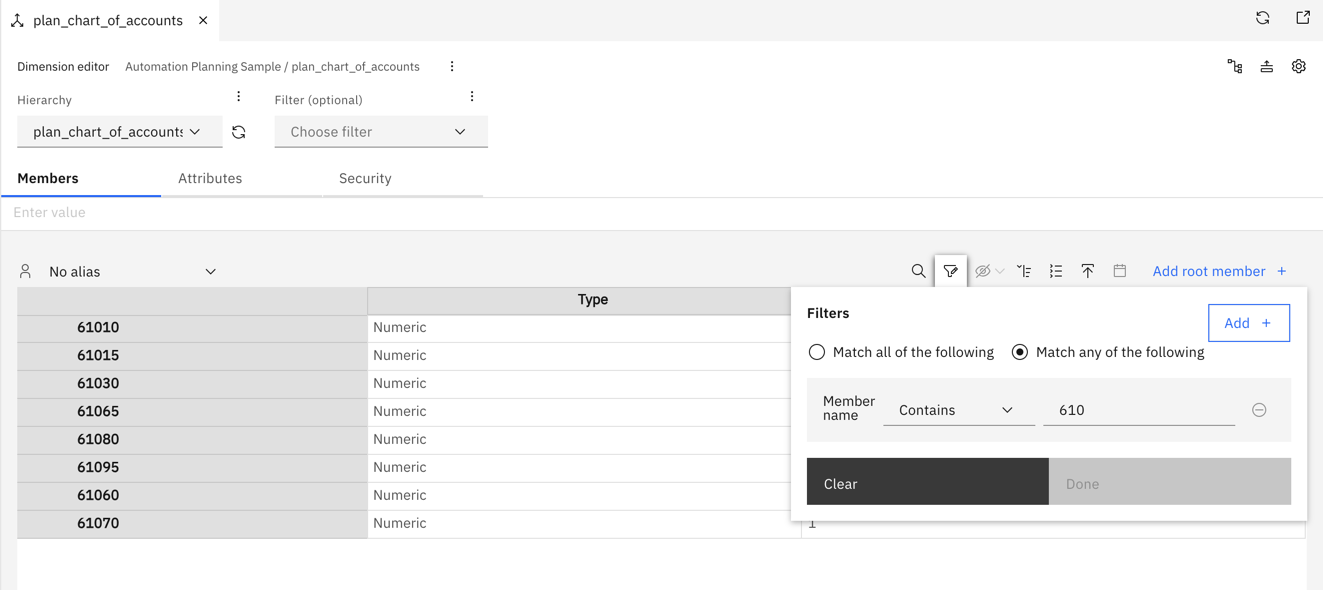
Click the Filter icon in the dimension editor toolbar to filter on member names. You can choose operators such as = or < > to create dynamic selections and combine up to three filter parameters in one go.
When you apply these filters on the Members tab, the same filters automatically apply to the members on the Attributes tab.
Clearing filters on either the Members or Attributes tab clears the filters on both tabs.

Replace an existing cube
You can now replace an existing cube with a new cube in Planning Analytics Workspace.
- On the Databases tree, right-click the cube that you want to replace.
- Click Create from cube.
- In the Create cube menu, you can optionally change the database and name of the cube.
- Click the check box next to Replace cube.
- Click Next.
- In the Dimensions menu, you can add or remove dimensions from the cube you are creating.
- Click Create. A warning appears, explaining that deleted data is not recoverable.
- Click OK. The existing cube is deleted and a new one is created.

Map to existing dimensions when importing data to a new cube
You can now map to an existing dimension or control dimension when importing data to a new cube.
Previously, importing data to a new cube required that all cube dimensions be created as new from the imported data.
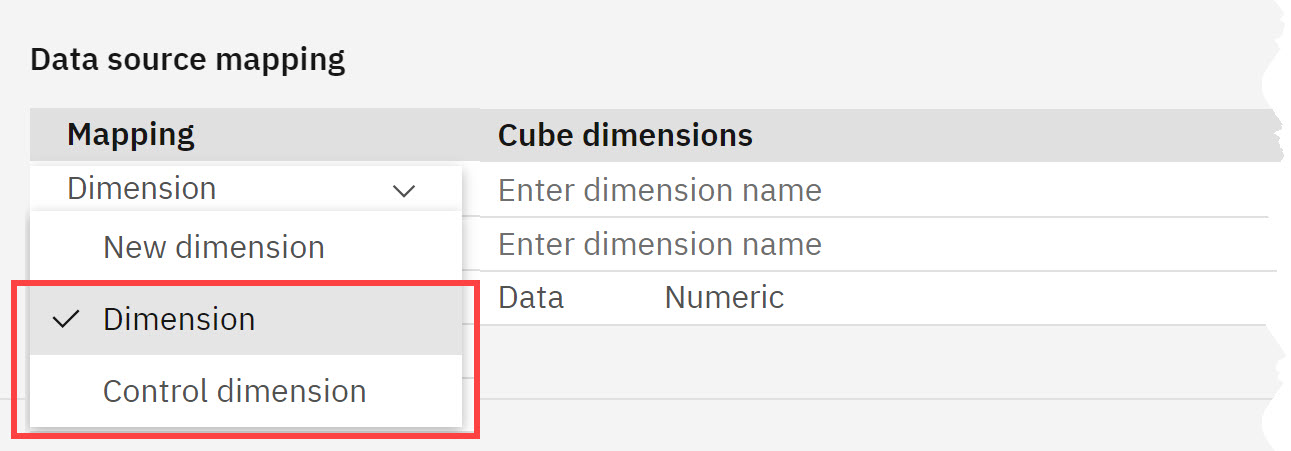
When importing data in Planning Analytics Workspace 2.0.93 and later, the Data source mapping section includes three options for mapping dimensions:
| New dimension | Data in the source is mapped to a new dimension. You must provide a unique name for the new dimension. |
| Dimension | Data in the source is mapped to an existing dimension. You must select from a list of existing dimensions on the Cube dimensions column. |
| Control dimension | Data in the source is mapped to an existing control dimension. You must select from a list of existing control dimensions on the Cube dimensions column. |
What's new in administration
View subscription overages in Planning Analytics Administration on Cloud
Planning Analytics Workspace subscription administrators can now view subscription overages directly in Planning Analytics Administration without accessing IBM Subscriptions Management.
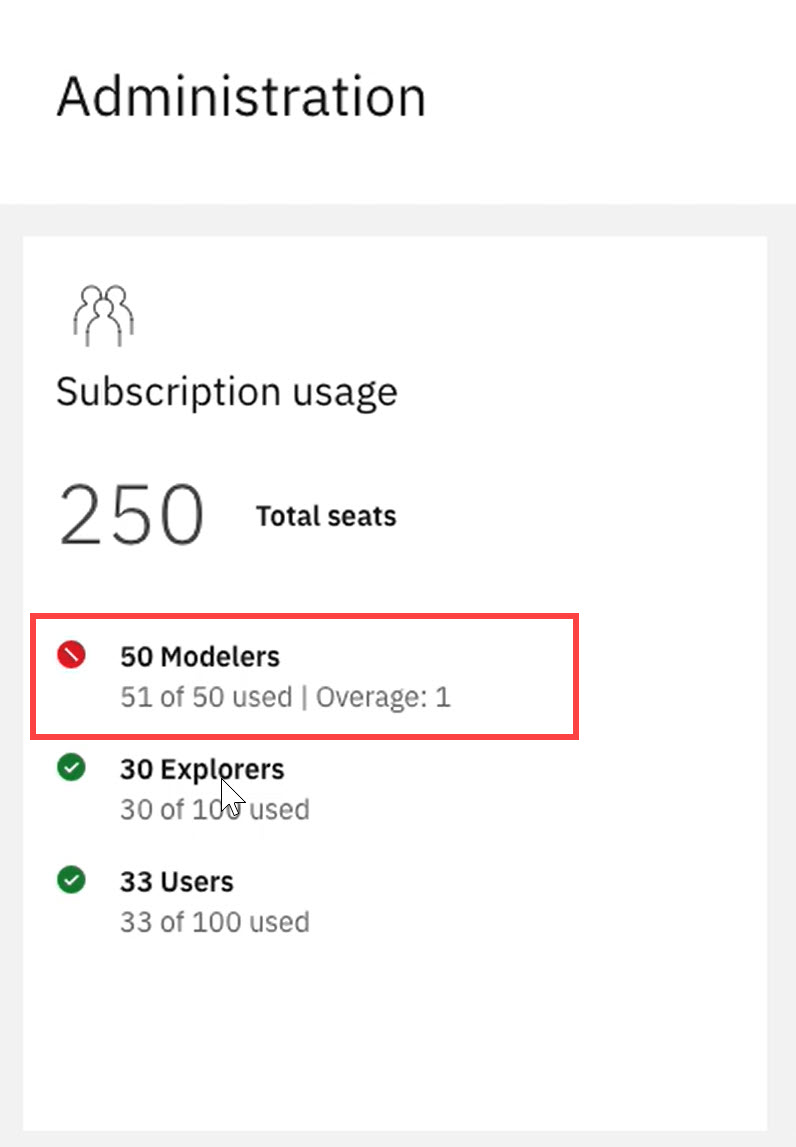
The Subscription usage tile on the Administration page shows the total number of seats available for your subscription plan, as well as the number of seats used and available for each category of user. If an overage exists for any category it is reported on the tile.
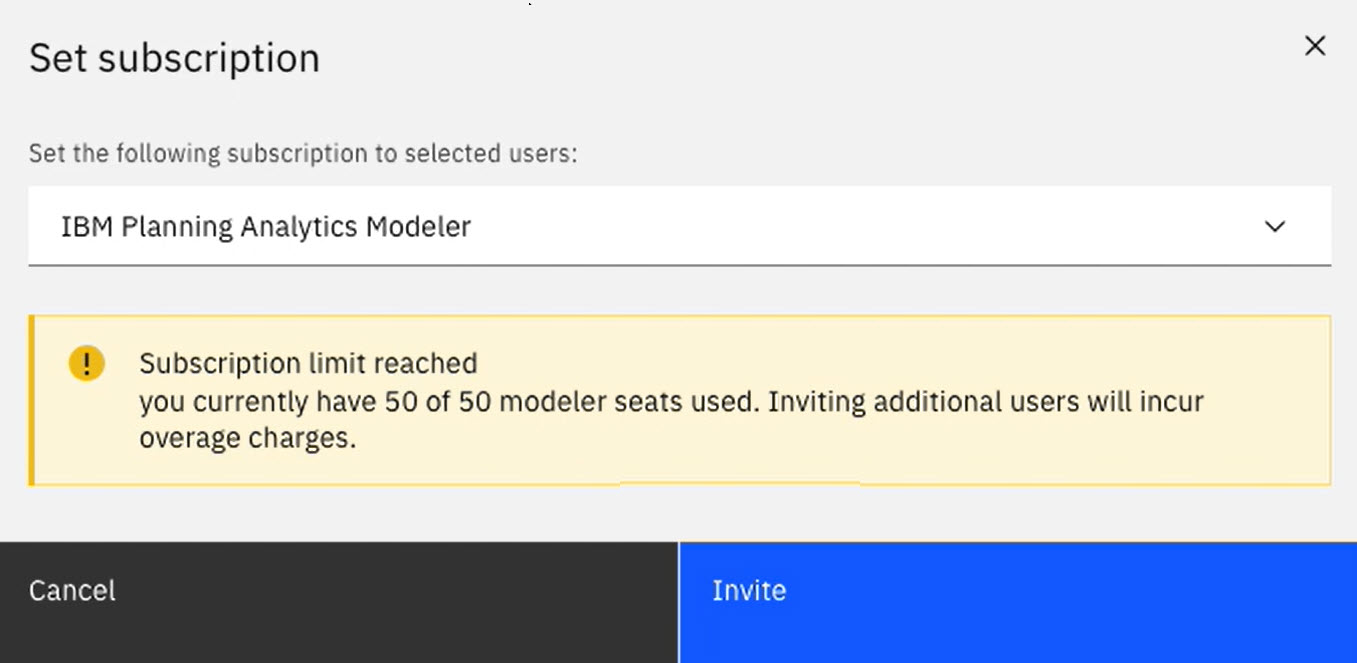
Additionally, you are now warned if an attempt to set a subscription for one or more users will result in an overage. In such an event, you can click Cancel to avoid overage charges.

Planning Analytics Workspace Local support for Red Hat Enterprise Linux 9 (Local only)
You can now install Planning Analytics Workspace Local version 2.0.93 or later on Red Hat Enterprise Linux 9.

Improved availability of manual database backups in Planning Analytics Workspace on Planning Analytics as a Service
A new location for manual database backups in Planning Analytics Workspace on Planning Analytics as a Service makes it easier to access and use backups.
Prior to Planning Analytics Workspace 2.0.93, manual database backups were stored in the .backupsets directory of File Manager on the Modeling Workbench, which is within the Planning Analytics Workspace database. This location made it impossible to access manual backups when the database was unavailable.
Conversely, automated database backups were stored to a location external to the database, which remains accessible even when the associated Planning Analytics Workspace database is unavailable.
As of Planning Analytics Workspace 2.0.93, both manual and automated database backups in Planning Analytics Workspace on Planning Analytics as a Service are stored in a location external to the database. All manual backups created in Planning Analytics Workspace 2.0.93 or later and all automated backups appear on the database Backups tab, regardless of the current state of the database.
This change means that manual backups created prior to Planning Analytics Workspace 2.0.93 and stored in File Manager no longer appear on the Backups tab. You can, however, continue to access any such backups through File Manager.
If you'd like to move a manual backup from File Manager to the storage location external to the database:
- Locate and select the manual backup (tar.gz archive) in File Manager.
- Click the Action button for the backup, then click Download. Save the backup archive to a convenient location.
- Return to the Databases page in Planning Analytics Administration.
- Click the database that is associated with the backup.
- Click Upload.
- Specify the backup archive that you saved in Step 2.
- Click Upload.
The uploaded archive appears on the Backups tab as a manual backup and the Date created reflects the date on which the archive was uploaded to the Simple Storage Service location.
Deprecation notices
Selector lists and Selector tile widgets are replaced by Selector visualizations in Planning Analytics Workspace 2.0.93
Any Selector list or Selector tile widget present in books is converted to a Selector visualization in Planning Analytics Workspace 2.0.93. The Selector visualization will be styled to most closely replicate the list or tile widget it replaces.
Selector visualizations were originally introduced in Planning Analytics Workspace 2.0.89, but were subject to administrator enablement. As of Planning Analytics Workspace 2.0.93, Selector visualizations are enabled by default as the only type of Selector available in all environments. You can no longer create Selector lists or Selector tile widgets.
The Selector visualization behaves much as Selector lists and Selector tile widgets did, but there are multiple custom visualization properties that you can apply to better tailor a Selector visualization for your purposes. There are also several ways to insert a Selector visualization into a book.
For more information, see Create a Selector visualization to manage views.

End of support for Planning Analytics Workspace Local on Red Hat Enterprise Linux 7 (Local only)
Planning Analytics Workspace Local versions 2.0.70 and later are supported on Red Hat Enterprise Linux version 8.
Planning Analytics Workspace Local versions 2.0.93 and later are supported on Red Hat Enterprise Linux version 9.

End of support for Planning Analytics Workspace Local on Windows Server 2016 (Local only)
Planning Analytics Workspace Local versions 2.0.74 and later are supported on Windows Server 2019.
Was this topic helpful?
Document Information
Modified date:
27 February 2024
UID
ibm17113707