Technical Blog Post
Abstract
Using WebSphere 8.5.5 Migration Tool with Maximo 7.5 (part 2): Using the Migration tools
Body
Continuing from my last blog posting, the next step is to migrate your profiles.
Today's entry is pretty much going to be a step-by-step how to migrate the existing Deployment Manager profile, using out-of-the-box (OOB) Maximo 7.5. Your own environment is more complex than out-of-the-box Maximo, so this will be easy. Let's start!
1. First, shut down IBM HTTP and IBM WAS 7.0 services, and change their startup Type to manual. Then, restart the server.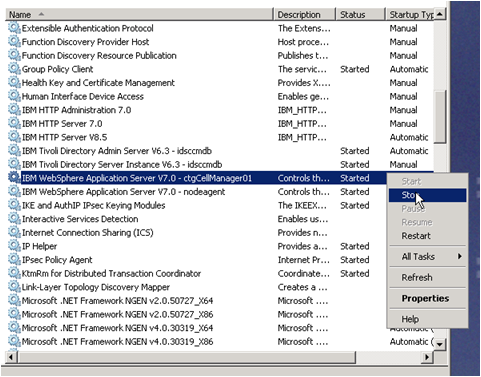
Even though you'll be given a chance to back up your profiles in the Migration Tool, let's back them up now.
2a. Run the backupConfig command or your own preferred utility to back up the Version 8.5 deployment manager configuration.
(C:\Program Files (x86)\ibm\WebSphere\AppServer\profiles\ctgDmgr02\bin\)
2b. Run the backupConfig command or your own preferred utility to back up the Version 7.0 federated node configuration.
(C:\Program Files\IBM\WebSphere\AppServer\profiles\ctgAppSrv01\bin\)
Launch the configuration tool.
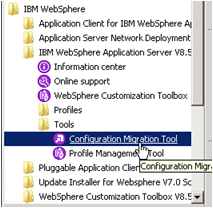
3. Go to Start Menu > IBM WebSphere > IBM WebSphere Application Server 8.5 > Tools > Configuration Migration Tool
Create Migration Source
4. Under Migration Sources, Click New.
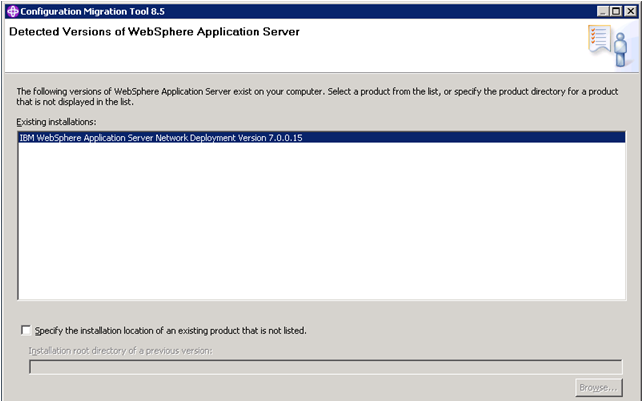
5. The Tool will search for versions of WAS. Select existing installation – Note that the example has just the single WAS 7.0.0.15 Network Deployment instance. Select it and click Next.
5a. Source Profile. We’ll be migrating two profiles. Start with ctgDmgr01. Since we backed up configuration before, there is no need to back it up again. Click Next.

5b. Administrative Security. Enter the WebSphere username (wasadmin default) and password and click Next

5c. Deployment Manager Disablement. Keep "Disable the source deployment manager after migration" checked, unless both WAS environments need to run on this server. Click Next.
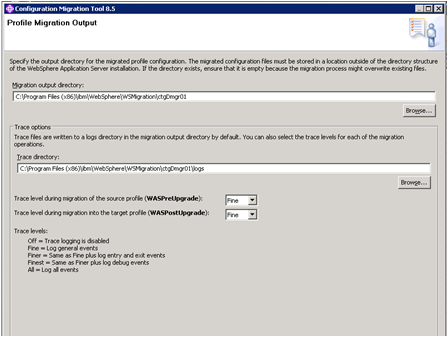
5d. Profile Migration Output. When you accept the defaults note that the new WAS 8.5 Deployment Manager will have the same name as the WAS 7.0 Dmgr. The new Deployment Manager profile we created earlier is required to run the Migration Tool, but is not used in the final product. Click Next.
Target Profile
6a. Keep "Migrate to a New Profile" selected, and click Next.
You can migrate to an existing profile but it must have been created earlier. Remember that when we created ctgDmgr02 we did not federate it (pair it with an Application Server).
6b. Profile Creation Parameters. You can give it any name you want. I decided to give it the same name as is used in OOB Maximo. This is okay because the profile name is unique to the set of product binaries (WAS 8.5) where it is created. The other ctgDMgr01 profile is unique to WAS 7.0.). Check the host name and click Next

6c. Application Migration. Accept the default values. The application installed is Deployment Manager, not MXServer. MXServer will be migrated later, in the second run of Configuration Migration Tool. Click Next.
6d. Port value. Since we’re shutting down WebSphere 7.0, you can use the port values assigned to the source profile (Deployment Manager). If you were to keep the older WAS version running, there is an option to increment the port numbers by one. Click Next.
6e. Additional Migration Options. Click Next.
6f. Migration Summary. Click Migrate... and watch it go.

When migrating Deployment Manager, it will not take that long to complete. When it has completed, you will see a full listing of the output from the migration toool. Click Next, then click Finish.
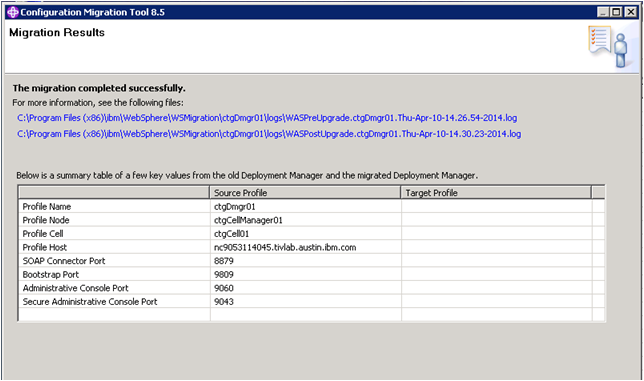
The reason you don't see anything in the Target Profile column is because none of the values have changed.
...and that completes this week's blog entry. Next time, migrating the Application Server profile.
If you have any questions or comments about the steps I've gone through here, just add a comment and I'll reply.
UID
ibm11113783