How To
Summary
How to configure the SSL/TLS FTP Client for Fix Central Secured FTP downloads (FTPS).
Objective
Fix Central unsecured and anonymous FTP downloads have been disabled as of 31 August 2022.
This document describes how to configure the SSL/TLS FTP client for use with Fix Central Secured FTP downloads directly to the IBM i System. SSL/TLS FTP uses digital certificates to encrypt data end to end. Passwords, FTP subcommands, and the data transferred are all encrypted by this means.
If the SSL/TLS FTP Client is properly set up, the FTP command provided in the Fix Central delivered emails will be able to start a connection with the IBM FTP server and then follow with an FTP session:
FTP command from Fix Central email: FTP RMTSYS('delivery01-bld.dhe.ibm.com') PORT(*DFT) SECCNN(*SSL)
FTP session results:
File Transfer Protocol
Previous FTP subcommands and messages:
Connecting to host delivery01-bld.az14.dal.cpc.ibm.com at address 9.214.246.18 using port 21.
220 ProFTPD Server (proftpd) [9.214.246.18]
234 AUTH TLS successful
Connection is secure.
Note: If you do not get the above FTP connection results, then use one of the following methods to configure client.
Steps
METHOD 1: Use the IBM i Navigator Digital Certificate Manager (DCM) option to configure the FTP client
In this method, the required and well-known Certificate Authorities CAs will already exist on the system if the system is current with maintenance/PTFs. Use the following document to determine the latest PTFs required:
Recommended DCM fixes for r730, r740. Default in r750.
https://www.ibm.com/support/pages/ibm-i-support-recommended-fixes
https://www.ibm.com/support/pages/ibm-i-support-recommended-fixes
- If PTFs are applied, then use the following command in a web browser session to connect and use DCM to populate the CAs and configure the TCPIP FTP client:
- http://sysname or ipaddr:2006/dcm
- Then Log on with a QSECOFR equivalent profile / password

- On the above screen: Select Open Certificate Store and select *SYSTEM and provide the associated password,
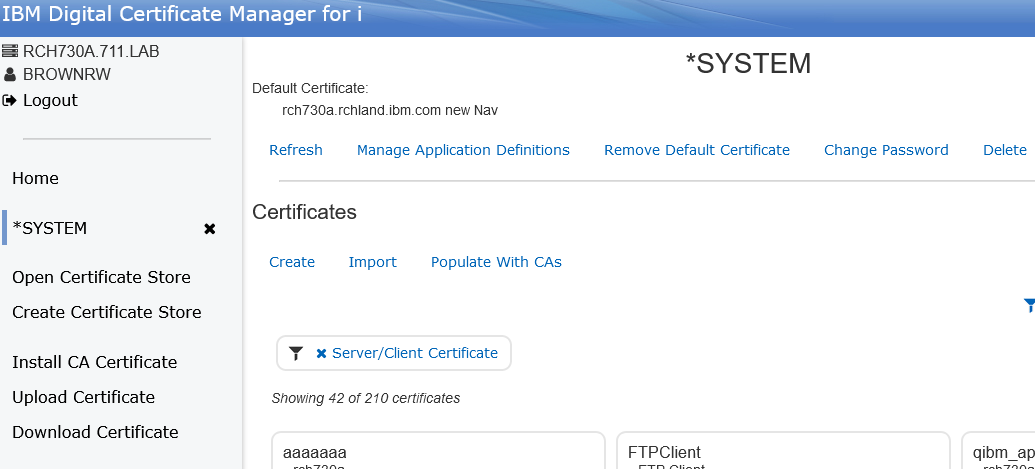
- On the above screen: Select the option under Certificates to Populate with CAs,

- On the above screen: Select the following Digicert certificate authorities if not already selected with a checkmark;
DigiCert Global Root CA
DigiCert Global Root G2
DigiCert TLS RSA SHA256 2020 CA1
DigiCert Global Root G2
DigiCert TLS RSA SHA256 2020 CA1
DigiCert Global G2 TLS RSA SHA256 2020 CA1
- After all 4 are marked ... then select the Populate option on the screen,
Note: the Populate option is at the top or bottom of the list of certificates.
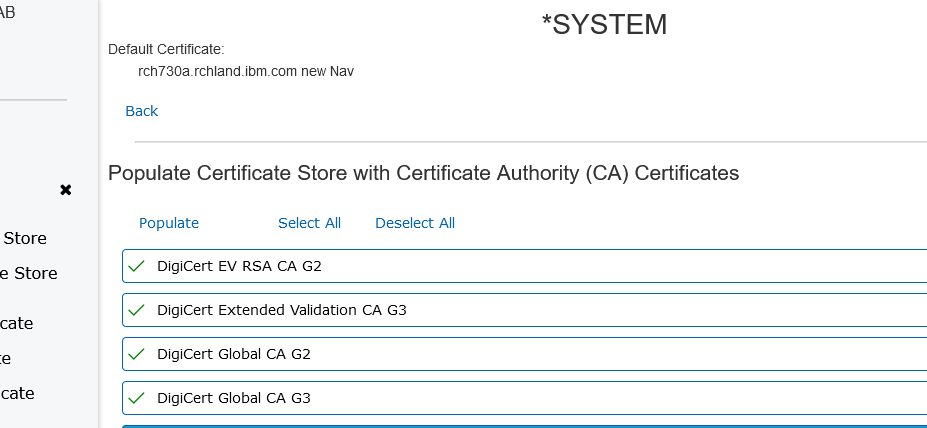
- if successful, the 4 certificates should now be marked with a checkmark and then select the Back option on the screen,
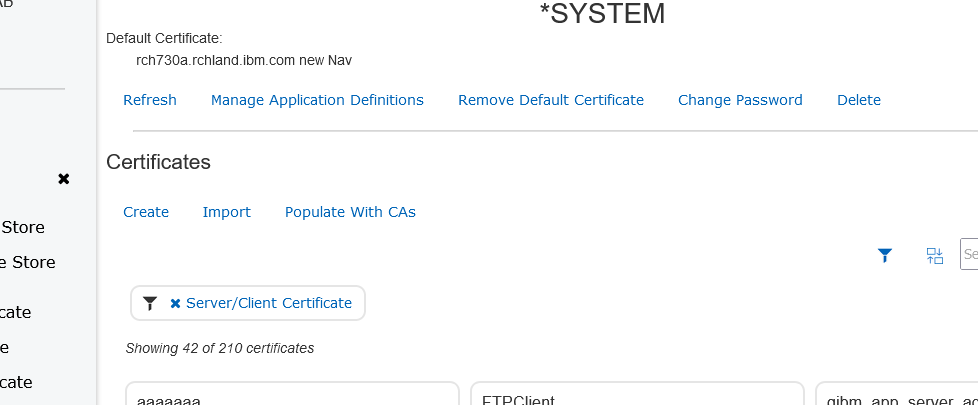
- On the above screen: Select the MANAGE APPLICATION DEFINITIONS option near top of screen
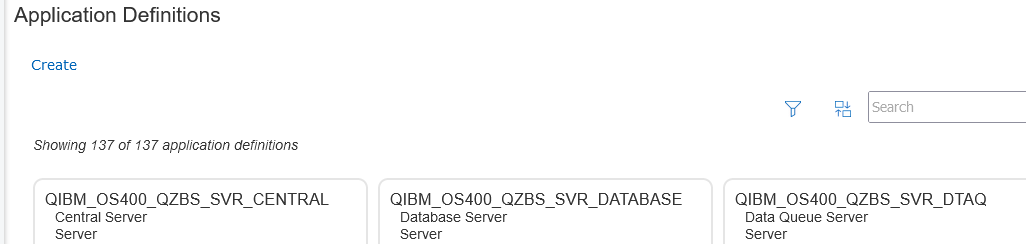
- On the next screen shown above: Select the Filter icon that looks like a funnel near the search box,
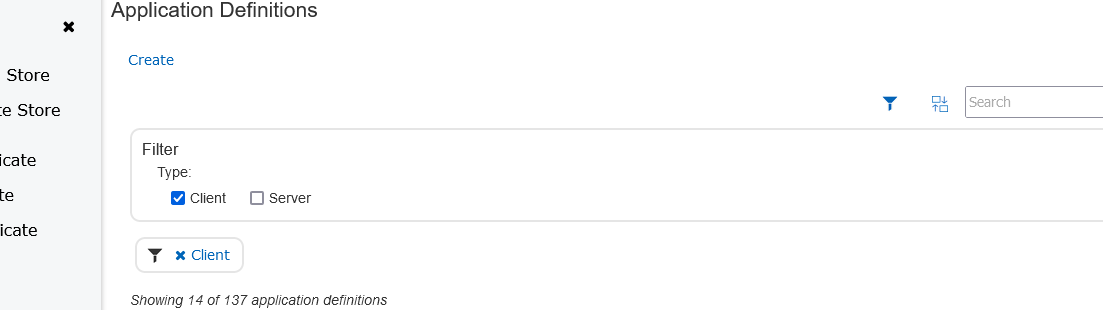
- Then select the Client checkbox under Filter Type:
- Then scroll down to the QIBM_QTMF_FTP_CLIENT box and mouse click the + sign in lower corner of box,
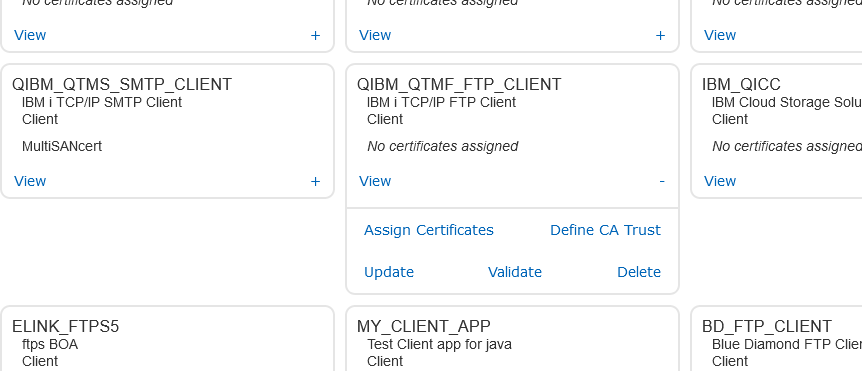
- In the extended box that opens select the UPDATE option,
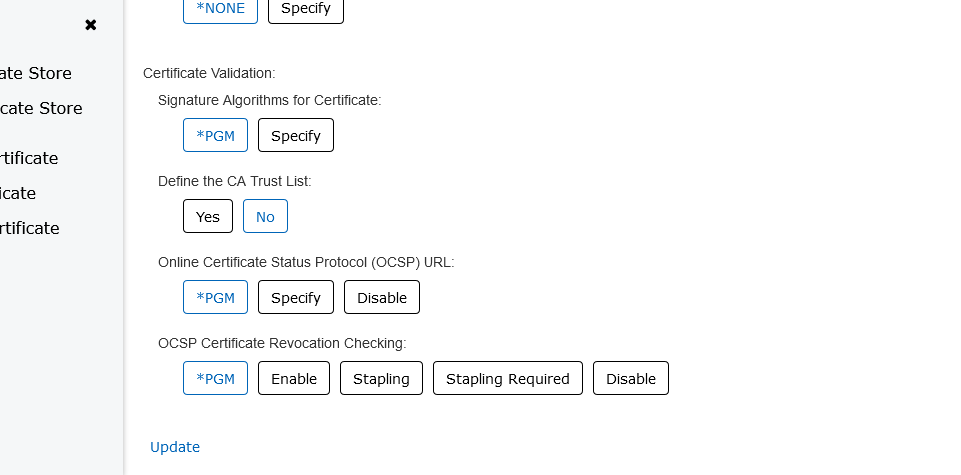
- Scroll down to DEFINE CA TRUST LIST and select the NO box then scroll to bottom of screen and select UPDATE
- If successful ... you can Test the FTPS download from ibm.com/support/fixcentral using the FTP command:
- FTP RMTSYS('delivery01-bld.dhe.ibm.com') PORT(*DFT) SECCNN(*SSL)
Method 2: If the Certificate Authorities CAs from DegiCert are not on the system using the PTF updates as in Method 1, then use QMGTOOLS GETSSL Utility to download & extract the CAs from endpoints using the following technote: https://www.ibm.com/support/pages/node/683901
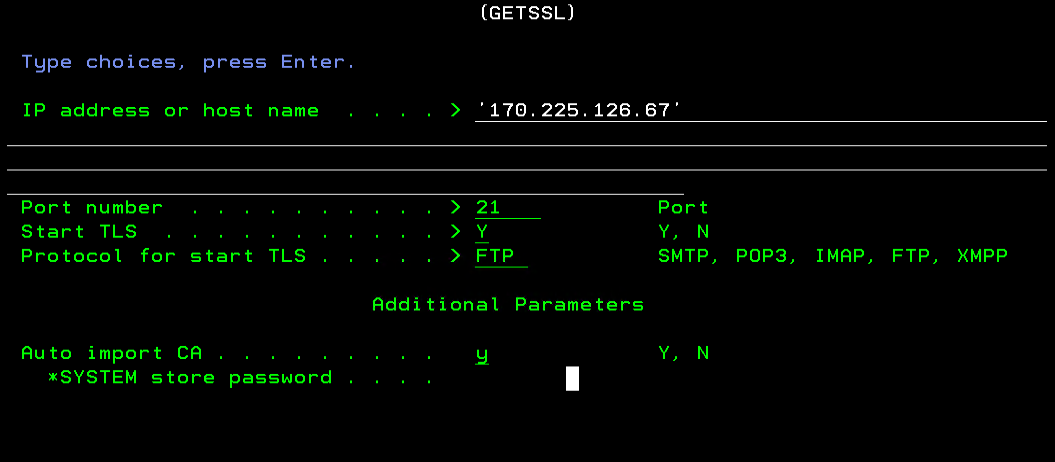
The system will need the FTPS endpoint sites using port 21. The following IP addresses are subject to change. Use DNS names whenever possible. IP address changes occurring on 10/20/23 are documented in 'Preparing customer firewalls and proxies for the upcoming infrastructure changes on IBM Electronic Fix Distribution / IBM Fix Central system', https://www.ibm.com/support/pages/node/7030591.
170.225.126.67 used to access delivery01-bld.dhe.ibm.com
129.35.224.102 (170.225.119.157 after 10/20/23) used to access delivery01-mul.dhe.ibm.com
129.35.224.101 (170.225.119.156 after 10/20/23) used to access delivery01-bld.dhe.ibm.com in case of failover from BLD to MUL
170.225.126.68 used to access delivery01-mul.dhe.ibm.com in case of failover from MUL to BLD
- Type the command: ADDLIBLE QMGTOOLS
- Then type the command: QMGTOOLS/GETSSL
- Then press the F10 key, and then F11 key to get the following screen and complete the TCPIP information for each CA:
After receiving the CA's into DCM, use the same DCM steps as in METHOD 1 skipping the screens for Populate with CAs, and follow all the screens starting with Manage Application Definitions.
METHOD 3: Manual download & installation of CA certificates
- Download DigiCert root and intermediate certificates from this website:
- (https://www.digicert.com/kb/digicert-root-certificates.htm)
- Retrieve the following CA's:
DigiCert Global Root CA
DigiCert Global Root G2
DigiCert TLS RSA SHA256 2020 CA1
DigiCert Global Root G2
DigiCert TLS RSA SHA256 2020 CA1
DigiCert Global G2 TLS RSA SHA256 2020 CA1
Step 1: UNZIP/CONVERT and FTP the certificates to the IBM System i System
a. Detach the CA to your PC and unzip/extract the files. The certificates usually have a .cer extension (or it might not have one at all).
On the pc, use Windows Certmgr.msc to convert the files to Base64 encoded X509 .cer files
Extracting a CA Root Certificate from a Digital Certificate
b. Open up a DOS command prompt on the PC and type: FTP <system name or IP address>
c. Sign on with your standard operating system user ID and password.
d. At the FTP prompt, run the following command: QUOTE SITE NAMEFMT 1
n
e. Set the directories for the FTP using cd and lcd commands:
cd / (To change the directory to the root directory on the System i system)
lcd C:\Users\UserName\Downloads\Fix_Central_Certificates (to change to the directory on your pc that contains the files)
lcd C:\Users\UserName\Downloads\Fix_Central_Certificates (to change to the directory on your pc that contains the files)
f. At the FTP prompt, run the command: ascii
Note: .pfx and .zip files would be binary. Stand-alone .cer files are ascii.
f. Issue the PUT command with your converted file name from step1a. Do not send the original der format file.
PUT DigiCert_Intermediate.cer (to transfer the first file)
PUT DigiCert_Intermediate_G2.cer (to transfer the second file)
f. Issue the PUT command with your converted file name from step1a. Do not send the original der format file.
PUT DigiCert_Intermediate.cer (to transfer the first file)
PUT DigiCert_Intermediate_G2.cer (to transfer the second file)
PUT DigiCert_Root.cer (to transfer the third file)
PUT DigiCert_Root_G2.cer (to transfer the fourth file)
Step 2: Importing the CA Using Digital Certificate Manager
The CA will be imported using Digital Certificate Manager (which is part of the HTTP ADMIN server). Do the following:
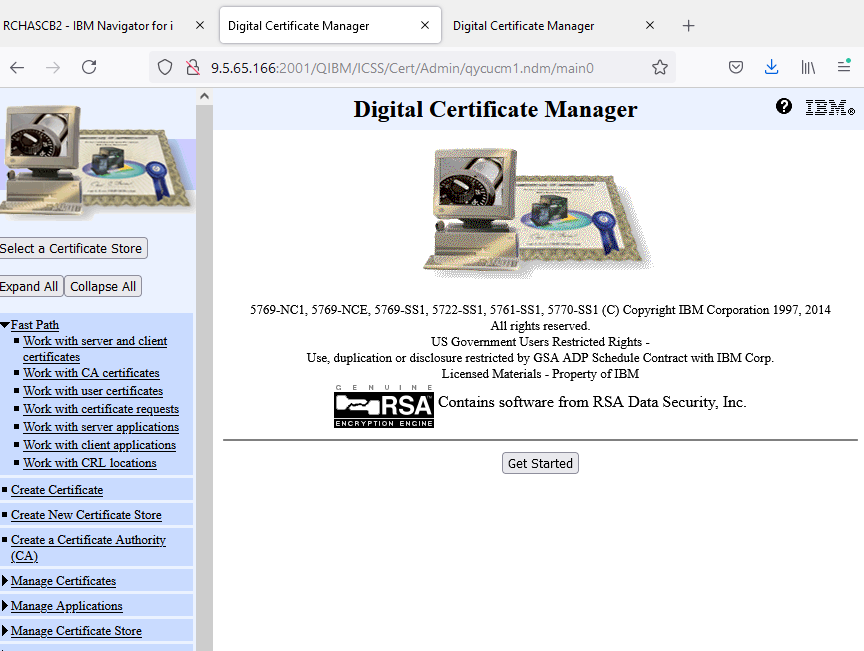
a. Open a web browser, and type:
http://system_name:2001/QIBM/ICSS/Cert/Admin/qycucm1.ndm/main0
For example, to go to the ADMIN server on system RCHASCLC. The following would be typed in the address bar:
http://rchasclc:2001/QIBM/ICSS/Cert/Admin/qycucm1.ndm/main0
If an error is displayed such as "Page cannot be displayed", ensure port 2001 is active using NETSTAT *CNN and press 14 to see whether port 2001 is active. If the port is not found, issue the STRTCPSVR SERVER(*HTTP) HTTPSVR(*ADMIN) command.
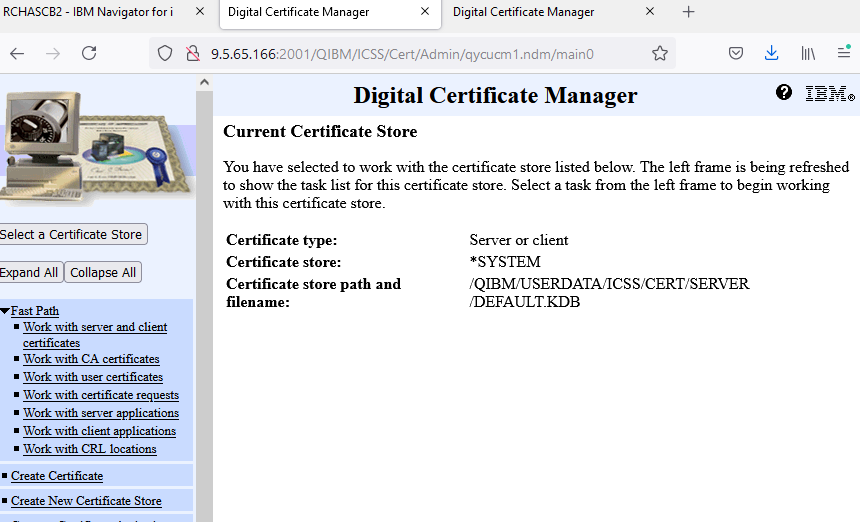
b. Sign on with a user ID that has *SECOFR authority. Then, click IBM i Tasks Page.
c. Click Digital Certificate Manager link.
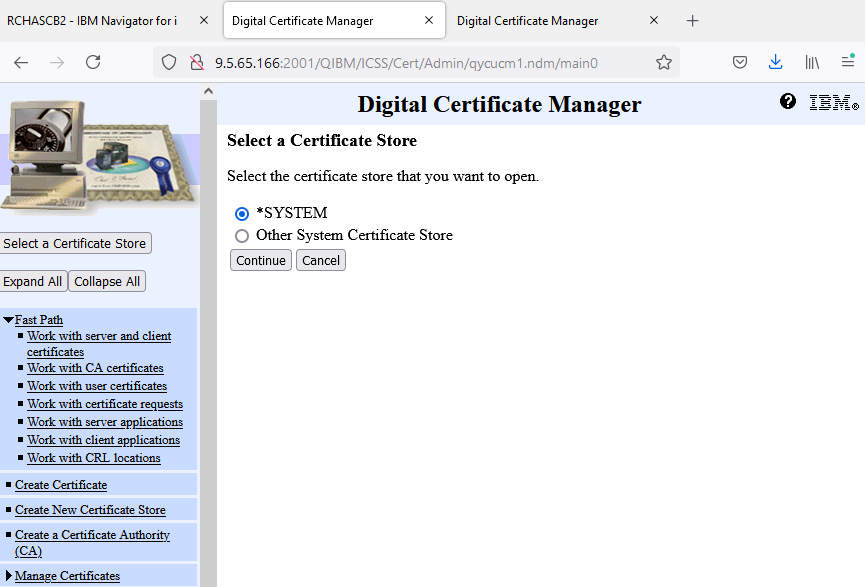
d. Click Select a Certificate Store button on the left.
e. Click the radio button for *SYSTEM and then click Continue button.
For example, to go to the ADMIN server on system RCHASCLC. The following would be typed in the address bar:
http://rchasclc:2001/QIBM/ICSS/Cert/Admin/qycucm1.ndm/main0
If an error is displayed such as "Page cannot be displayed", ensure port 2001 is active using NETSTAT *CNN and press 14 to see whether port 2001 is active. If the port is not found, issue the STRTCPSVR SERVER(*HTTP) HTTPSVR(*ADMIN) command.
b. Sign on with a user ID that has *SECOFR authority. Then, click IBM i Tasks Page.
c. Click Digital Certificate Manager link.
d. Click Select a Certificate Store button on the left.
e. Click the radio button for *SYSTEM and then click Continue button.
Note: If there is no *SYSTEM option, then follow steps to Create a New Certificate Store in the document.
Digital Certificate Manager - FAQs: Https://www.ibm.com/support/pages/node/683481
f. Type the password for the certificate store.
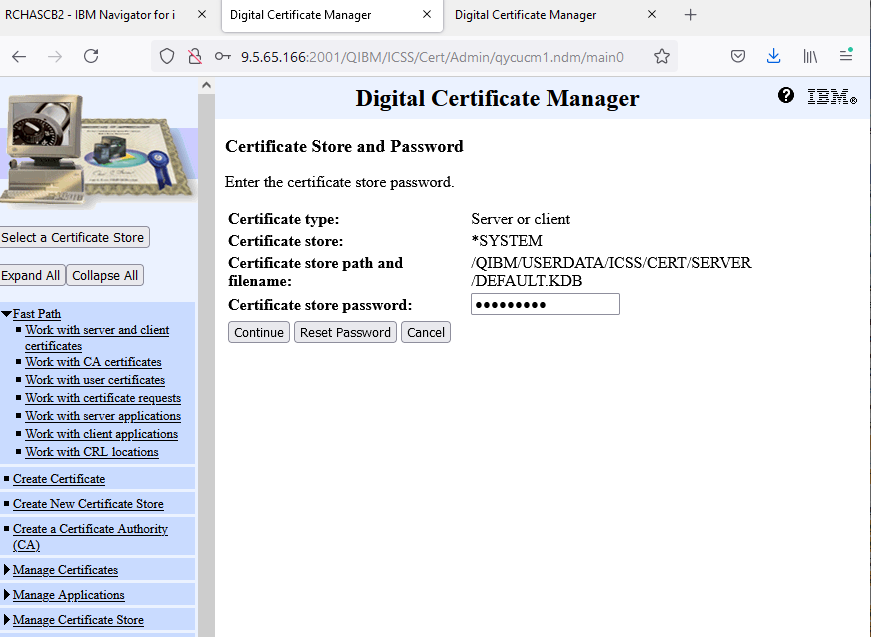
g. If the password is correct, you are now signed on and can import the CA.
Note: if you do not know the password, you should check with authority who might have created it or use the Reset Password button to change the password to a new value.
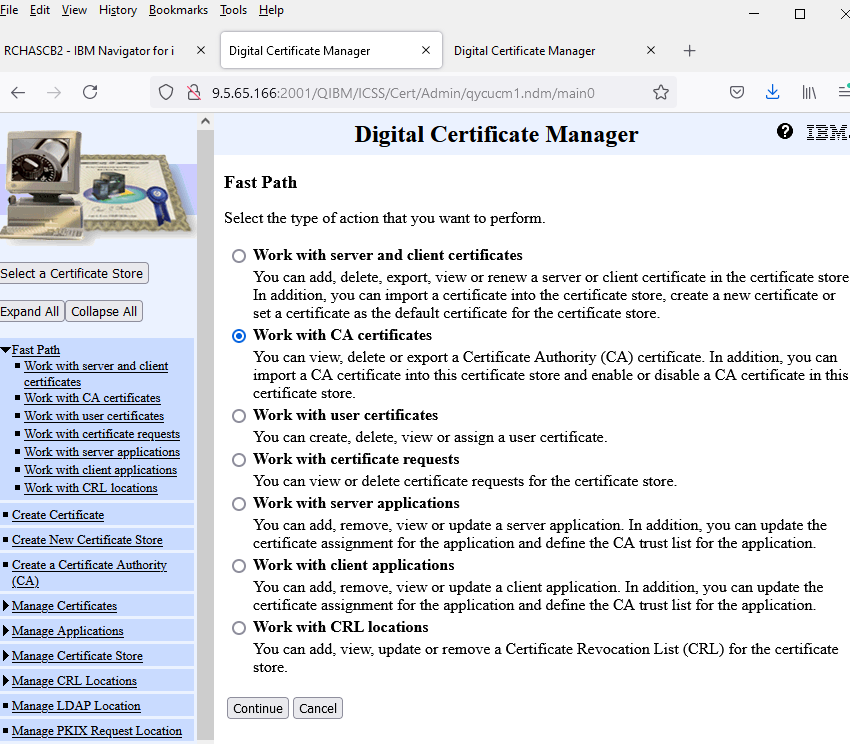
h. Once signed into the certificate store then click "Fast Path" in the left column.
h. Once signed into the certificate store then click "Fast Path" in the left column.
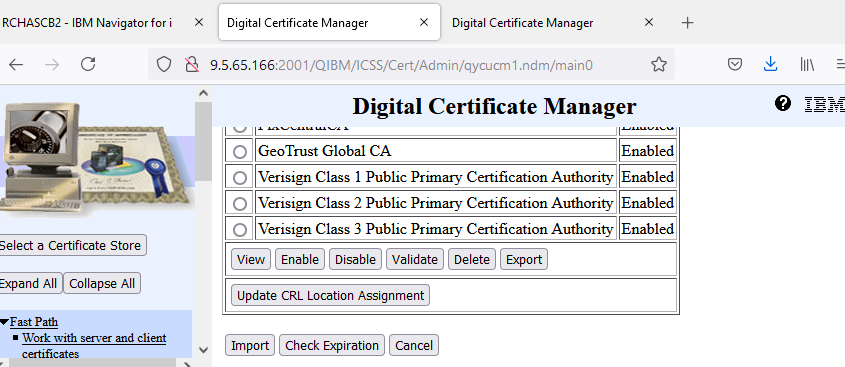
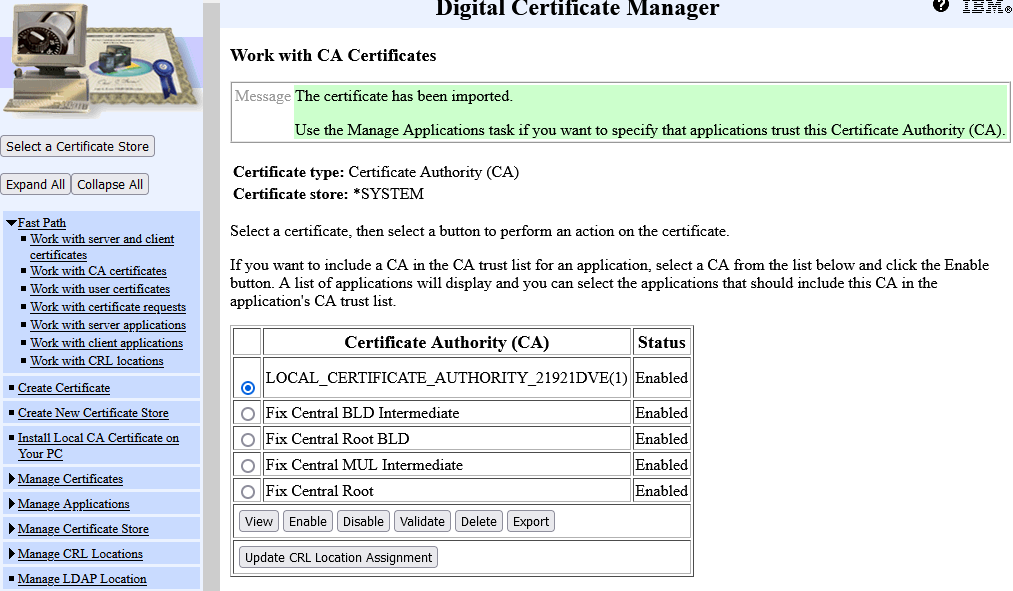
i. Click radio button for Work with CA Certificates and click continue button.
j. The list of all the current CAs on the system is shown. Scroll all the way to the bottom, and click IMPORT button.
k. Next, the full path of the CA that was transferred to the system using FTP will need to be entered.
In this example, the certificates are:
DigiCert_Intermediate.cer
DigiCert_Intermediate_G2.cer
DigiCert_Root.cer
And DigiCert_Root_G2.cer
(this step must be done for each .cer file separately)
Then, click Continue button.

l. Then, enter a CA certificate label and then click Continue button.
This can be anything you would like to identify this CA.
In this example, the follow was used:
FixCentral BLD Intermediate (for the DigiCert_Intermediate.cer)
FixCentral MUL Intermediate (for the DigiCert_Intermediate_G2.cer)
Fix Central Root BLD (for the DigiCert_Root.cer)
Fix Cental Root (for the DigiCert_Root_G2.cer)

m. A message is displayed indicating that the CA was imported successfully.
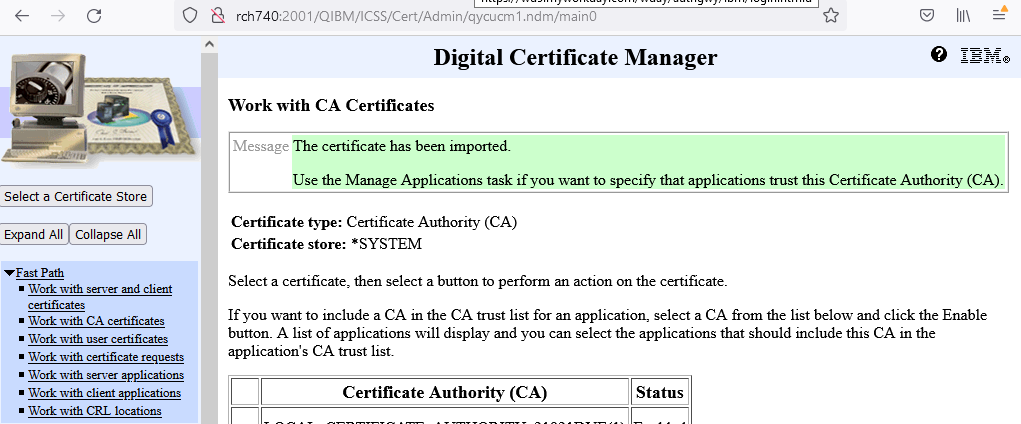
n. Click Import button again and repeat the process for the other 3 certificates.
The CAs are now successfully imported. The next step is to set the FTP SSL/TLS client to trust the CA we imported.
Step 3: Setting the FTP Client to Trust This CA.
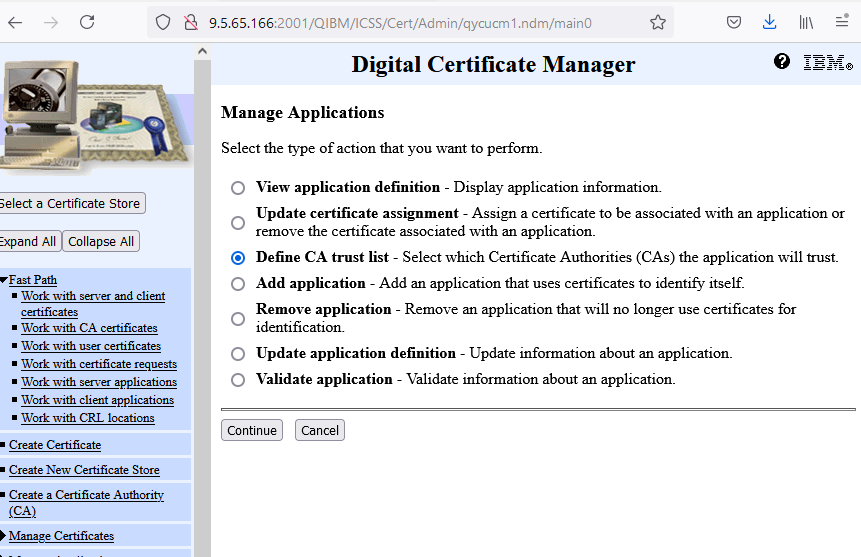
a. Click Manage Applications in the left navigation pane.
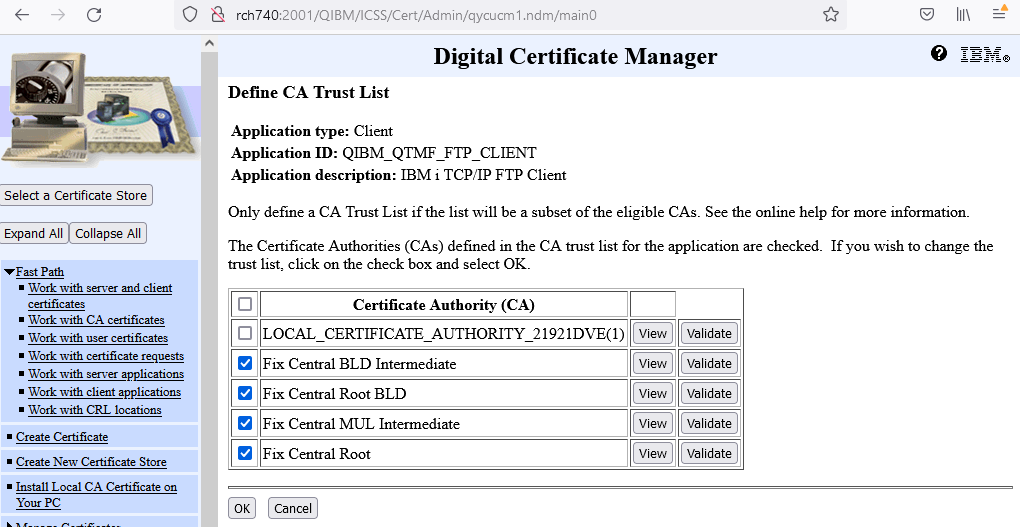
b. Then, click the radio button for Define CA Trust List, and click Continue.
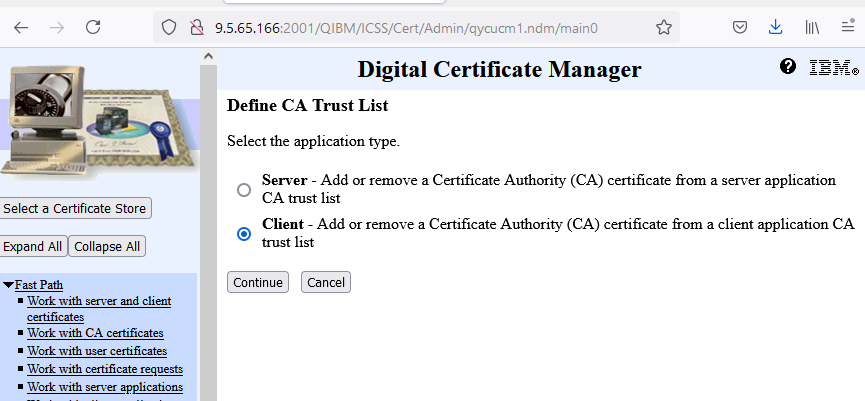
c. Click the Client radio button, and click Continue button.
d. Click radio button for IBM i TCP/IP FTP Client.
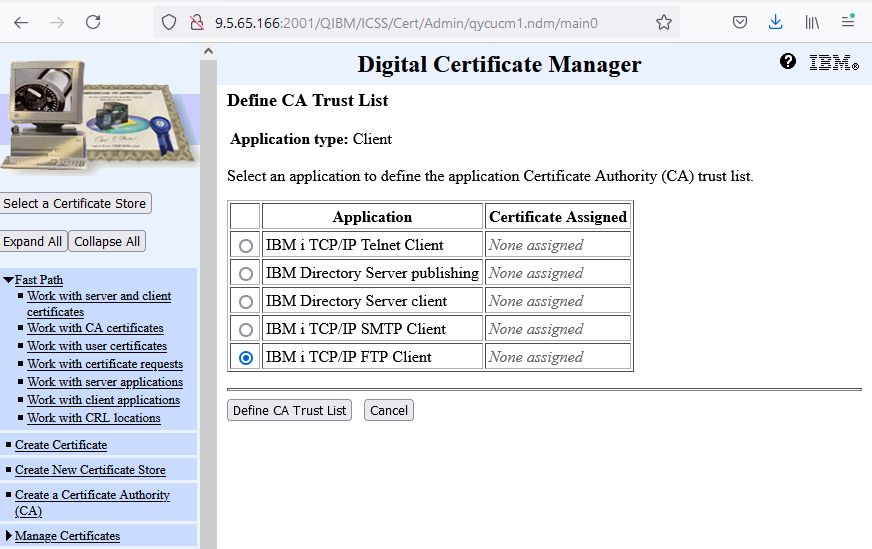
e. Click Define CA Trust List at the bottom.
f. Find the four CAs that you imported in Step 2 and click box next to each CA defined.
c. Click the Client radio button, and click Continue button.
d. Click radio button for IBM i TCP/IP FTP Client.
e. Click Define CA Trust List at the bottom.
f. Find the four CAs that you imported in Step 2 and click box next to each CA defined.
FixCentral BLD Intermediate
FixCentral MUL Intermediate
Fix Central Root BLD
Fix Central Root
g. Scroll to the bottom, and click OK. A message is then posted indicating that the changes have been applied.
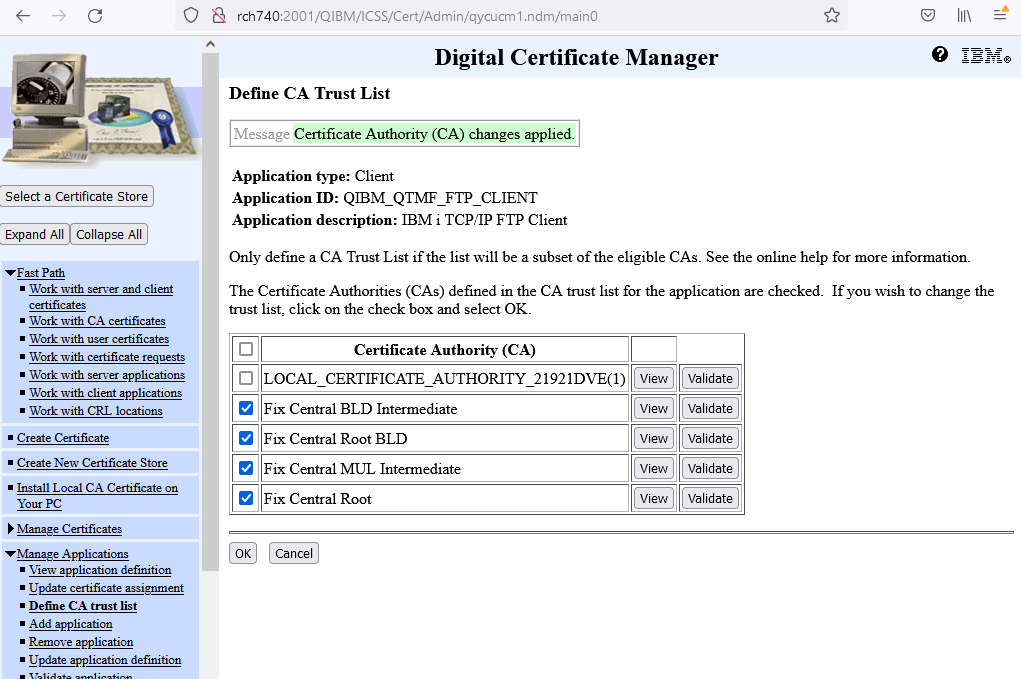
The FTP client is now set to use this certificate authority when prompted by the FTP server. More CAs can also be trusted by clicking the check box next to them.
Note: Only new jobs will be able to use this new configuration. This means that interactive sessions running batch jobs or persistent applications must be ended and started again to be able to use the changes made to the SSL/TLS FTP client.
Note 2: The use of mget *.* OR mget * is no longer supported on FTPS connections. If you want to get multiple files with MGET via FTPS, you will need to specify all file names, like the example below:
mget file1.txt file2.bin file3.binRelated Information
Document Location
Worldwide
[{"Type":"MASTER","Line of Business":{"code":"LOB57","label":"Power"},"Business Unit":{"code":"BU058","label":"IBM Infrastructure w\/TPS"},"Product":{"code":"SWG60","label":"IBM i"},"ARM Category":[{"code":"a8m0z0000000CIJAA2","label":"SSL TLS Communications"}],"ARM Case Number":"","Platform":[{"code":"PF012","label":"IBM i"}],"Version":"All Versions"}]
Was this topic helpful?
Document Information
Modified date:
20 February 2024
UID
ibm16475697