Technical Blog Post
Abstract
Setting up a SFTP Server Adapter - As easy as 1 - 2 - 3
Body
Here are the 3 steps for setting up the SFTP Server adapter:
Step 1. Find a free port for the Adapter to listen on
The following commands will let you see if there is some other application (or process) listening on, or using, a specific port:
unix: netstat -an | grep <port#>
windows: netstat-an | FIND "port#"

In the example above the port I looked for was 10022. Since the prompt came right back, that tells me that nothing is currently using that port, so we will. You will see later what the netstat command returns when a port is in use. Once you know what free port you will use, step 1 is done.
Step 2. Create a SSH Host Identity Key
Log on to the SI application and go to the following location.
Deployment>SSH Host Identity Key, then click [Go!] under Create SSH Host Identity Key.

As you see from the above picture, Host Name: is the only mandatory parameter that you need to fill out. All others are either pre-filled with a default value, or is not needed. I entered a Key Comment.
Click [Next], [Finish] then [Return] and step 2 is done.
Step 3. Create the SFTP Server Adapter
Go to Deployment>Services>Configuration
Click [Go!] under Create New Service

As you see from above, click the bottom icon.
This will open a new window.
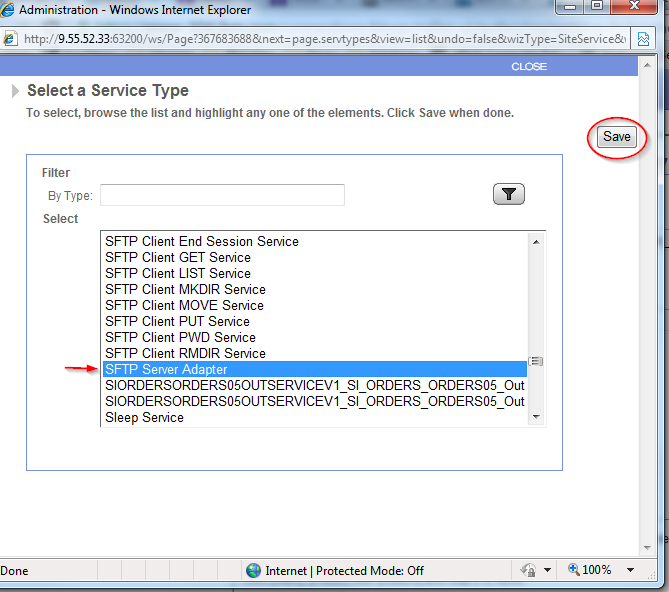
In the new window (seen above) scroll down and highlight SFTP Server Adapter, then click [Save].
The box goes away and SFTP Server Adapter is filled in as the Service Type.
Click [Next].

As you see from above we filled in the Name and Description and left the default for environment as node1.
*** Operationally node1 means that the ip_address your partner will use to connect to you on is the ip address of the box SI is installed on.
Click [Next]

As you see from above, we select the Host Identity Key that we created in Step 2. In the SFTP Server Listen Port we enter the free port we found in Step 1. Take all other default parameters.
Click [Next] through all the following screens until you get the confirmation screen.
Click [Finish] and [Return]. Now step 3 is done.
That's it. You're done!
You can check the adapter from the Deployment>Services>Configuration screen.

The SFTP Server Adapter just created should be Enabled. And...

port 10022, that was free in Step 1, now has the SFTP Server adapter called BLOG SFTP Server Adapter listening on it.
See, setting up a simple SFTP Server Adapter is as easy as 1 - 2 - 3!
UID
ibm11122069