Question & Answer
Question
What information is needed when logging a Support Ticket for an application issue with IBM Security QRadar® Support?
Answer
In order for QRadar® Support to troubleshoot an app issue, an initial set of logs and information should be submitted with your case:
- A detailed description of the issue, include a screen capture or any error messages displayed.
- A summary of the actions that lead to the error message. QRadar Support uses these steps to attempt and recreate the scenario that generated the issue. For example:
- After an upgrade from QRadar 732+ to 750, the application will not start.
- Moved all applications from the Console to a newly installed App Host appliance.
- Restored a configuration backup and all applications do not function as expected.
- Any troubleshooting steps taken by the administrator to resolve the problem. For example:
- Restarted the application in the QRadar Assistant App and continue to experience issues.
- Checked the status of all application services and all report action (running).
- Rebooted the App Host appliance and applications do not display as expected.
- Attach the output of the following command so we can verify the status of the application:
Additional information on this command, see About the qappmanager support utility./opt/qradar/support/qappmanager - Attach logs from the Console and from the App Host system. For more information, see: user interface instructions or command line interface instructions.
Collect logs from the users interface (UI) for your support case
- Log in to the QRadar Console as an administrator.
- Click the Admin tab.
- Click the System & License Management icon.
- Select all QRadar® appliances that require log collection for your support case. For application cases, select the App Host and the Console as these are the only appliances that run applications.

- Select Actions > Collect Log Files.

- Select the Include Application Extension Logs check box and the number of days that would cover the issue.
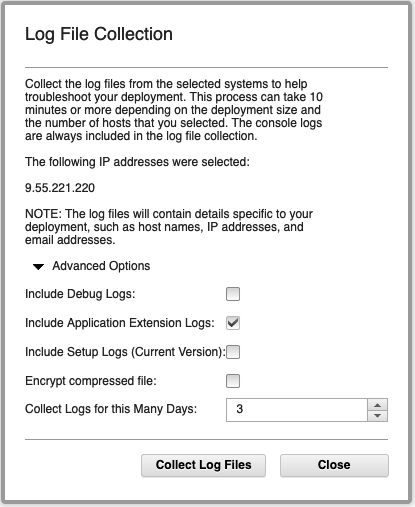
- Click Collect Log Files.
- Wait for the Console to collect log files from the selected appliances. It might take several minutes for logs to be collected from appliances.

- Download the logs from the QRadar Console.

- Attach the log file to your support case.
Collect logs from the command line (CLI) for your support case
- Use SSH to log in to the QRadar Console as the root user.
- Optional. If the problem exists with a managed host, open an SSH session to the non-Console appliance.
- To collect logs, type:
Note: Administrators can use the -h flag to display a help screen with more options./opt/qradar/support/get_logs.sh -a -S -q 5 - After the log file is generated, the path and name of the log file is displayed. For example:
The file /store/LOGS/logs_hostname_date_bc609784.tar.gz (64M) has been created to send to support - Download the file from the QRadar appliance.
- Repeat this procedure for other appliances that need logs collected.
- Attach the log file from the appliance to your QRadar Support Case.
[{"Business Unit":{"code":"BU059","label":"IBM Software w\/o TPS"},"Product":{"code":"SSBQAC","label":"IBM Security QRadar SIEM"},"ARM Category":[{"code":"a8m0z000000GnbbAAC","label":"QRadar"}],"ARM Case Number":"","Platform":[{"code":"PF016","label":"Linux"}],"Version":"All Versions","Edition":"","Line of Business":{"code":"LOB24","label":"Security Software"}}]
Was this topic helpful?
Document Information
Modified date:
11 March 2024
UID
ibm16190905