Question & Answer
Question
How do you mount an ISO with the Integrated Management Module (IMM) or the XClarity Controller (XCC)?
Answer
Important: QRadar ISO software installations are not intended over Integrated Management Modules (IMM) or XClarity Controllers (XCC) and are not supported. Remote software installations of QRadar 7.x.x over IMM/XCC are not validated by development or quality teams.
Known errors related to software installations over IMM/XClarity:
- Administrators with network speeds under 1GB/s have reported installation errors.
- Network infrastructure, such as IPS devices or firewalls can drop connections, leading to installation errors.
To use this procedure, you first need to access the IMM or IMM2 by using Active X with Internet Explorer or Browser that supports Java™.
Before you Begin:
- A virtual CD or DVD drive must contain media before it is mapped. If the drive is empty, you are prompted to insert a CD or DVD in to the drive.
- This remote installation, or update, method uses the hardware's integrated IMM, or XCC, interface. If IMM or XCC network speeds are not sufficient, or the upgrade fails, use USB installation instead.
- When Powering up or Rebooting the system, you might need to select the F12 key to add a removable media device.
- Chrome and Firefox ended support for NPAPI, so the Java™ Plug-in no longer works. Use Internet Explorer 11 or a browser that supports NPAPI. If Remote Control does not open or a browser use one that supports NPAPI.
Contents:
- Mapping and Un-Mapping drives with IMM and M3 Appliances
- Mapping and Un-Mapping drives with IMM2 and M4 or M5 Appliances
- Mapping and Un-Mapping drives with XCC and M6 Appliances
- Booting to the ISO from IMM Remote Control (M3/M4/M5 Appliances)
- Booting to the ISO from XCC Remote Console (M6 Appliances)
Mapping and Un-Mapping drives with IMM and M3 Appliances
- Log in to the IMM Web GUI to map an ISO as a virtual drive.
- Click Remote Control.
- To start the Remote Control session, click use Active X for Internet Explorer or Java for all other Browsers.
- Click Start Remote Control in Single User Mode to start the session.
- After the Remote Control session is open, click Tools from the top menu bar.
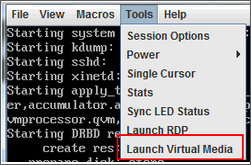
- From the drop-down menu, click Launch Virtual Media.
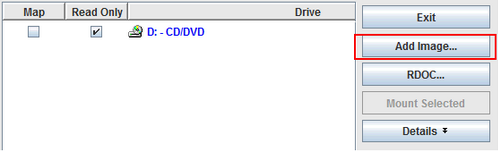
- From the Pop-up menu, click Add Image.
- Navigate to the folder that contains the QRadar ISO.
- Highlight the image and click Open.
- Select the check box next to the drive that you want to map and click Mount Selected.

- Power Up or Reboot the system and start the software installation process.
- To un-map the drives, click the Map checkbox.
Note: To boot into the mounted ISO, use the steps from Booting to the ISO from IMM Remote Control (M3/M4/M5 Appliances)
Mapping and Un-Mapping drives with IMM2 and M4 or M5 Appliances
- Log in to the IMM Web GUI to map an ISO as a virtual drive.
- Click Remote Control.

- To start the Remote Control session, click use Active X for Internet Explorer or Java for all other Browsers.
- Click Start Remote Control in Single User Mode to start the session.
- Under Virtual Media on the menu click Activate.
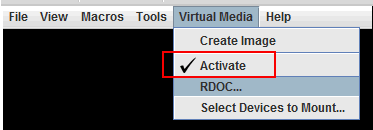
- Under Virtual Media displayed on the menu, click Select Devices to Mount.
- From the pop-up window, click Add Image.

- Navigate to the directory that contains the ISO image.
- Select the ISO and click Open.
- Click the box to Map the image.

- Click Mount Selected.
- After finishing rebuilding the appliance, click Unmount All.

- Power Up or Reboot the system to start the software installation process.
- Click Yes when prompted to unmap all drives.
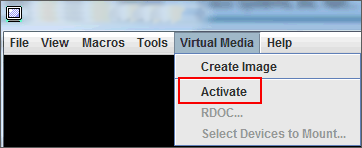
- From Virtual Media on the top menu bar, click Virtual Media.
- Clear the check mark next to Activate to end the Virtual Media session.
Note: To boot into the mounted ISO use the steps from Booting to the ISO from IMM Remote Control (M3/M4/M5 Appliances). For More information on the IMM and IMM2, view the Lenovo® System x Documentation.
Mapping and Un-Mapping drives with XCC and M6 Appliances
- Log in to the XCC Web GUI to map an ISO as a virtual drive.
- Click Remote Console.
- To start the Remote Control session, click "pop-up arrow" in the Remote Console Preview.
- In the Remote console Settings pop-up window, select Single User Mode and uncheck Allow others to request to disconnect my remote session.
- Click Launch Remote Control.
- After the Remote Control session is open, click Media in the top menu bar.

- In the Mount Virtual Media window, click Activate.
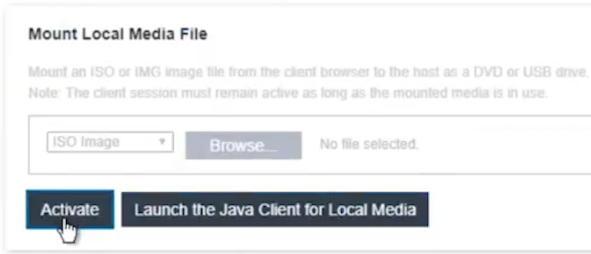
- Click Browse to browse to locate the ISO image you want to use. Select the ISO and click Open.
- After the ISO image is displayed in the Mount Virtual Media window, click Mount all local media.

- After mounted, the ISO filename has a green check mark next to it.
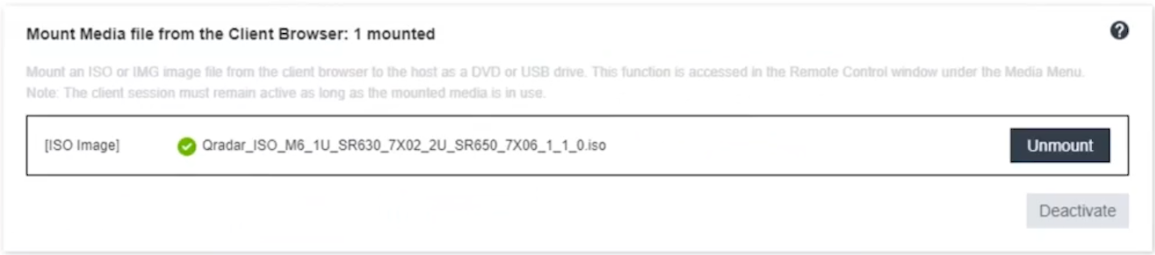
- After the upgrade or installation is complete, the ISO can be unmounted by going back to the Media and from the Mount Virtual Media window, click Unmount, then next click Deactivate.
For More information on the XCC Remote Control, view the Lenovo System Management Documentation.
Note: To boot into the mounted ISO use the steps from Booting to the ISO from XCC Remote Console (M6 Appliances)
Booting to the ISO from IMM Remote Control (M3/M4/M5 Appliances)
- When the splash menu is displayed with the option <F12>, Select Boot device press the F12 key on your keyboard.

- At the Boot Devices Manager window, scroll down to the option CD/DVD.

- Press the enter key to select the entry.
- Complete the installation.
Note: for M3 and M5 Appliances, select the option CD/DVD is displayed. For M4 Appliances select the option USB4: CD/DVD - USB Port 4 Remote.
Booting to the ISO from XCC Remote Control (M6 Appliances)
- Reboot the host. When the splash menu is displayed with the option F12: One Time Boot Device press the F12 key on your keyboard or use the Keyboard option from the top menu to open a keyboard pop-up and click F12.

- With Legacy Mode Checked, use the arrow keys to highlight CD/DVD Rom and press Enter.

Note: With Legacy Mode unchecked, you might see an option: XCC: Virtual Media, which can be used to boot the ISO.
Related Information
[{"Type":"SW","Line of Business":{"code":"LOB24","label":"Security Software"},"Business Unit":{"code":"BU059","label":"IBM Software w\/o TPS"},"Product":{"code":"SSBQAC","label":"IBM Security QRadar SIEM"},"ARM Category":[{"code":"a8m0z000000cwtcAAA","label":"Hardware"}],"ARM Case Number":"","Platform":[{"code":"PF016","label":"Linux"}],"Version":"All Version(s)"}]
Was this topic helpful?
Document Information
Modified date:
18 August 2023
UID
swg21974632