Question & Answer
Question
What are some common things you need to know about installing and uninstalling Windows endpoint agents?
Answer
What are the system requirements for the QRadar EDR endpoint agent on Windows?
Windows Client
7 (SP1),8, 8.1, 10,10-POS (Fully updated)
Windows Server
How to install the QRadar EDR agent on a Windows endpoint?
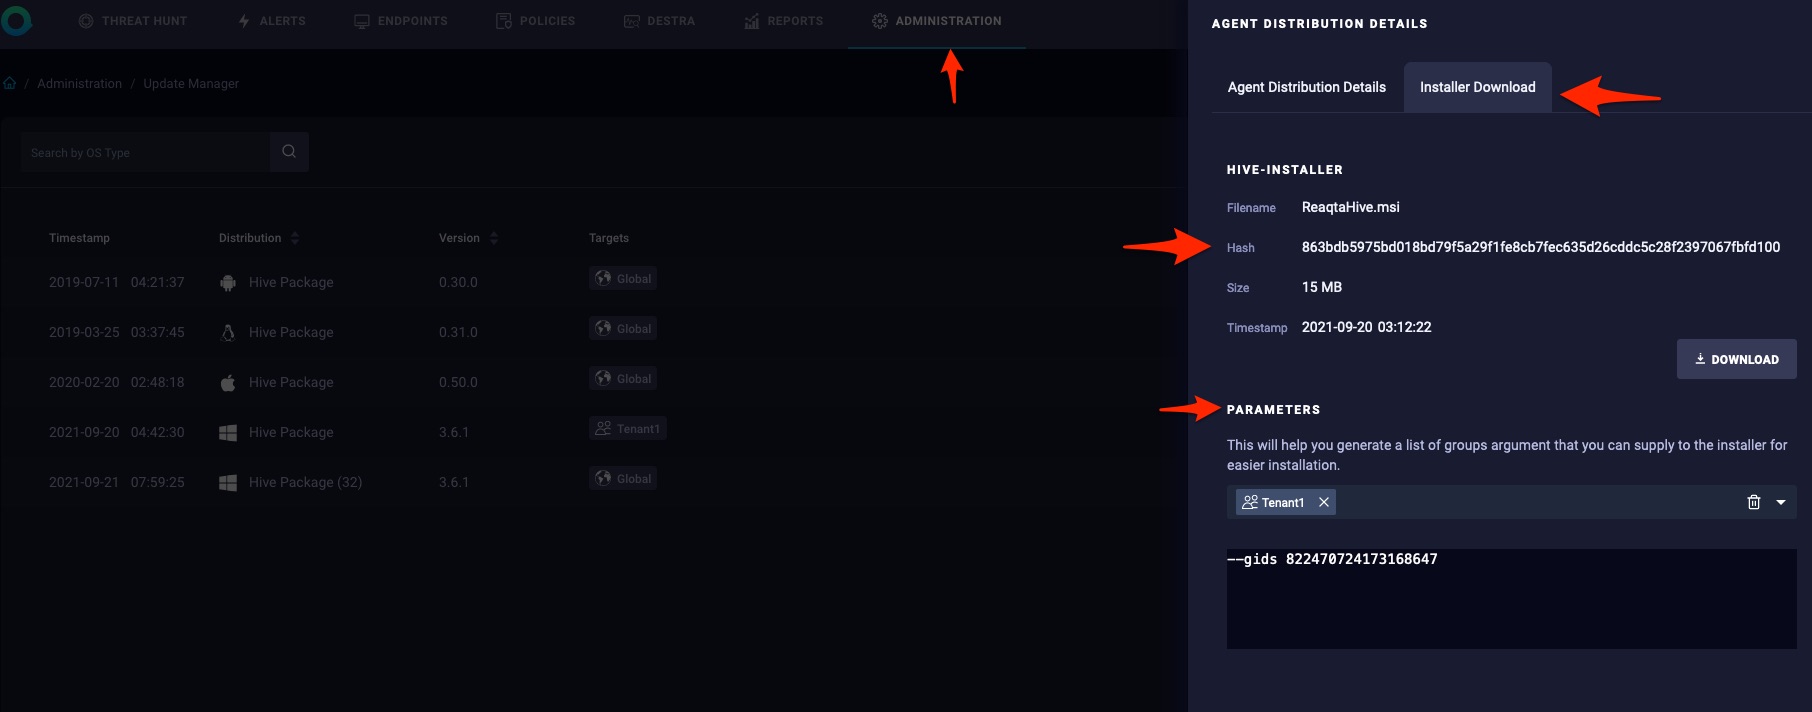
Downloading the Windows agent
The agent can be downloaded from the Hive Dashboard, by using the following steps:
- Log in to the Hive Dashboard
- Go to Administration > Update Manager
- Click the wanted Windows package (32-bits or 64-bits)
- Click the Installer Download tab and then choose download
- A sha256 hash is available under the Installer Download tab to verify file integrity after you download it
Optionally - If this is a multi-tenant Hive Dashboard, you can choose which tenant this agent belongs to and the tenant details (GIDS) are provided.
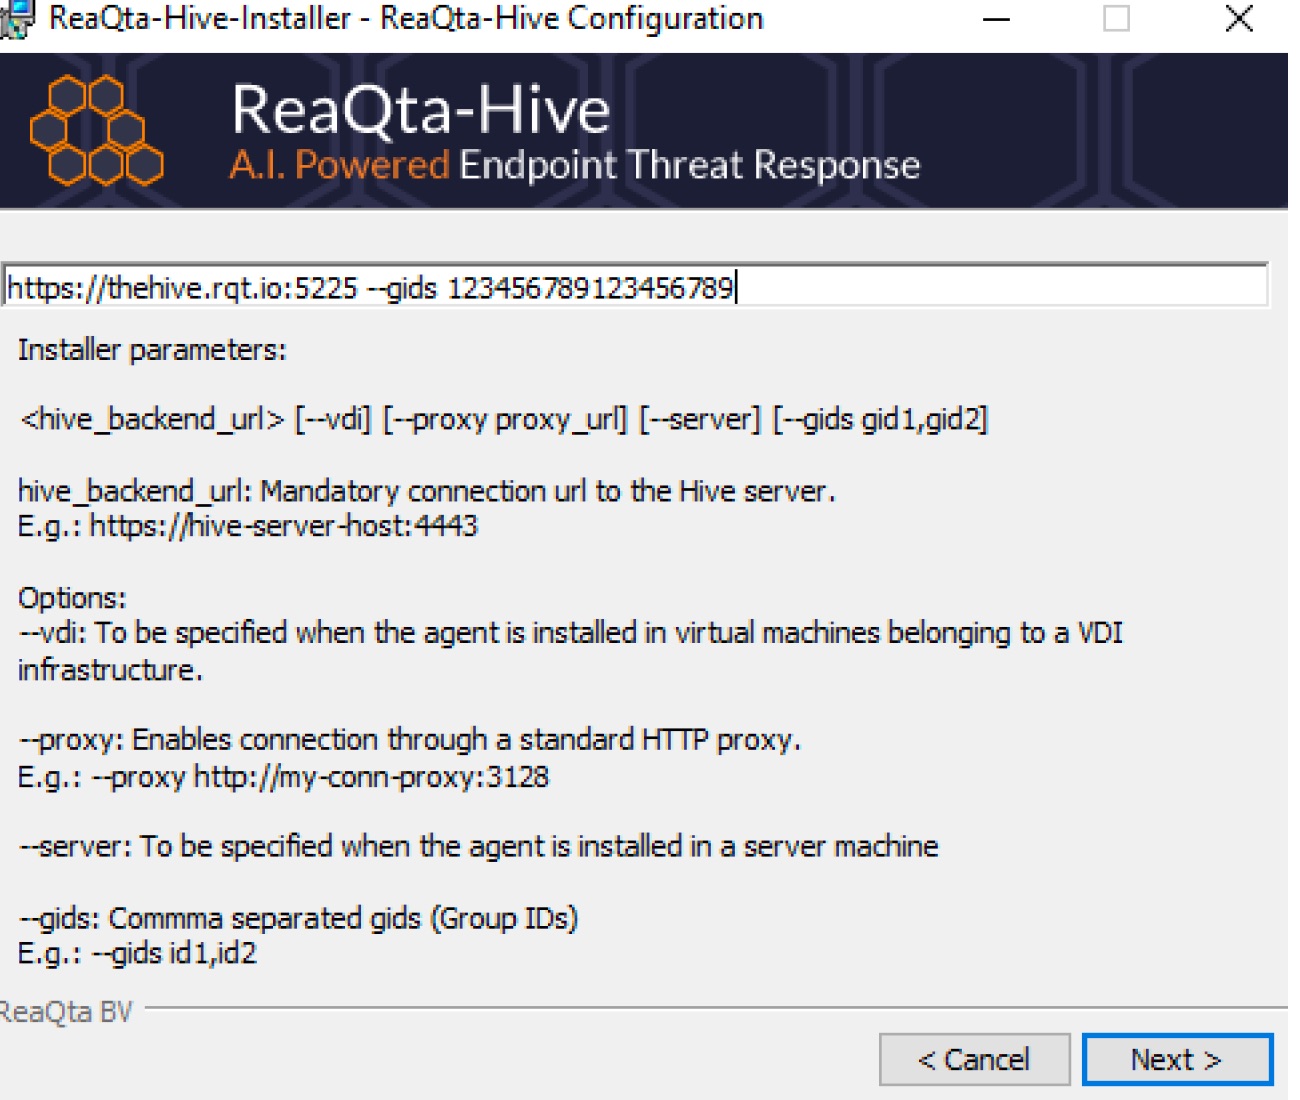
Installing a Windows agent manually
- Once the package is downloaded and copied over to the Windows endpoint in question, run the installer with elevated rights
- The installation wizard requires a set of parameters to continue, the following is a general example:
https://backend_url:port --gids [your tenant gids]- The Hive Dashboard URL (Hive Backend URL) or IP
- The agent registration port
- Group IDs (GIDS), if this is a multi-tenant environment (optional)
- Proxy information, if the endpoint needs to go through a proxy in order to reach the Hive Dashboard (Optional)
- Whether the Windows agent is being installed on a Server (Optional)
- Is the agent being installed in a virtual machine belonging to a VDI infrastructure? (Optional)
Installing a Windows agent by using command line
In order to install the agent from the command line, the installation package must be downloaded and copied to the endpoint in question (See Downloading Windows agent above). Once this is done, the following commands can be run to install the QRadar EDR agent from the command line:
- From an administrative command line:
msiexec /I [package name].msi IPFORM="https://server_url:port" /qb - In the event this is a multi-tenant environment and group IDs (GIDS) are provided
msiexec /I [package name].msi IPFORM="https://server_url:port --gids ID" /qb
Push Installation Using Group Policy Objects (GPO) - Scheduled Task
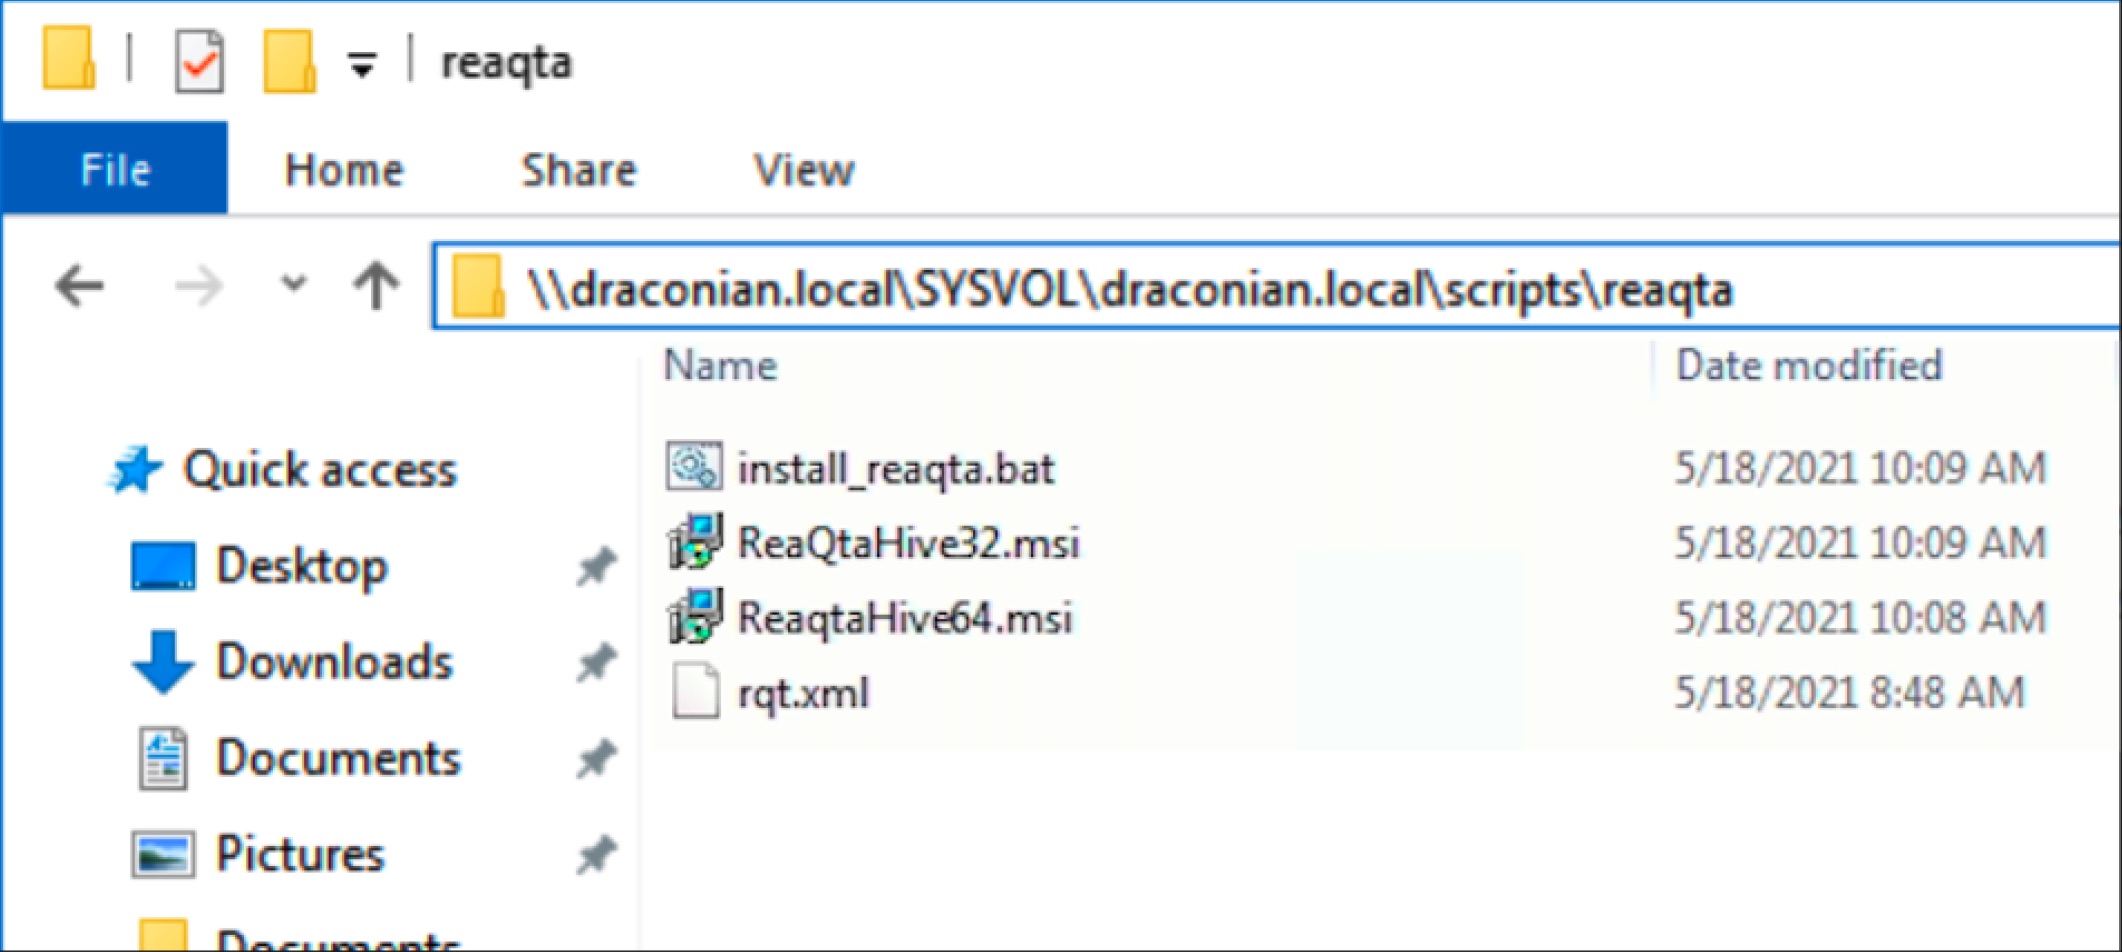
- Ensure you have the Windows agent installer file downloaded and copied
- Edit the batch file attached and change “https://hive-server:4443 --gids 123456789012345678” with the actual Backend URL and port. Additionally, change the “\\path\to\rqt.xml” to the full path of the rqt.xml file on the network share.
sha256sum install_batch.zip fae42dd640848150f88d4736e9a68610fc7314c8e737359968606c776b73d677install_batch.zip (Password = reaqta) - Upload the ReaQta-Hive installation packages (.msi file), the edited installation batch file (.bat), and the rqt.xml file on a network-shared drive where local SYSTEM and Authenticated User accounts have at least read-only and execute privileges
- The rqt.xml file is the export of a scheduled task to ensure that QRadar EDR components are running healthy. This scheduled task runs every day at 12am. If you want to change the timings, import the xml to your scheduled task, amend the timings according to your requirements, then export it as rqt.xml to replace the original copy.
- Go to the domain controller. Start Group Policy Editor GPMC.msc.
- Create a new policy under the domain.
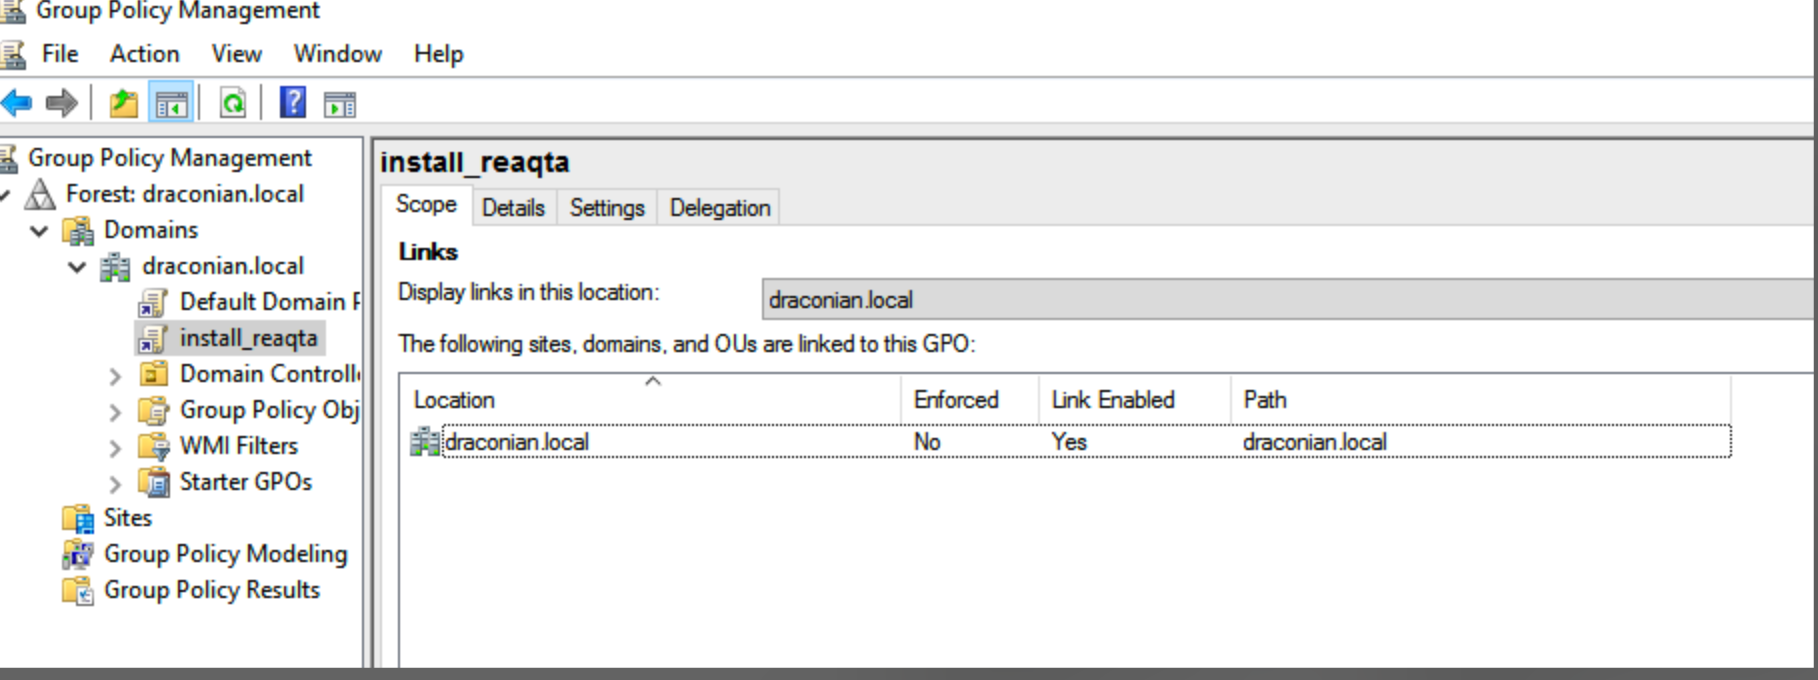
- Right-click on the policy to edit and when the Group Policy Management Editor opens navigate to Computer Configuration > Preferences > Control Panel Settings > Scheduled Tasks
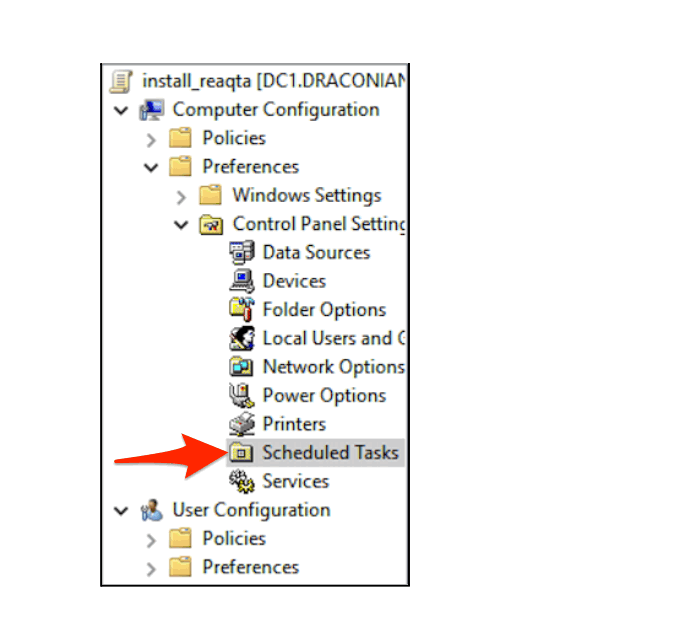
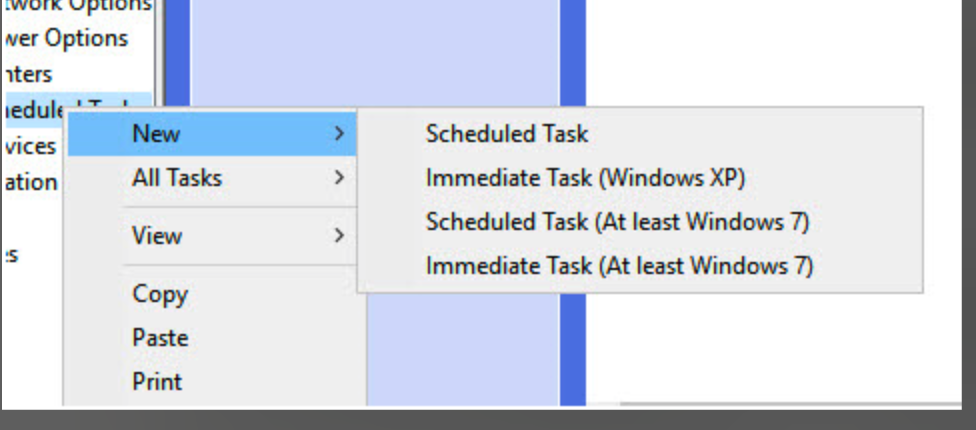
- Right-click on Scheduled Tasks and choose Immediate Task (At least Windows 7)
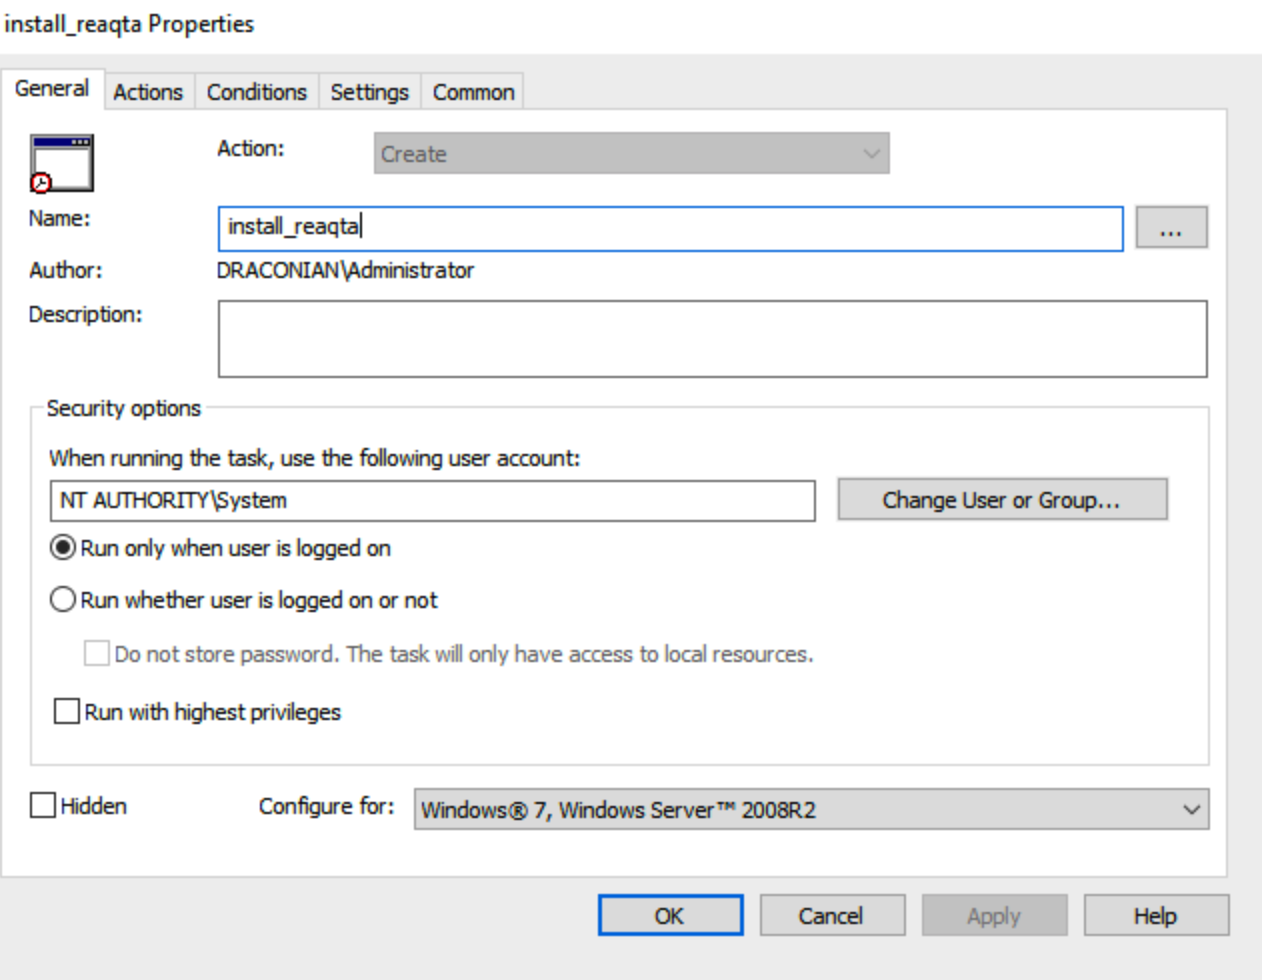
- Add a name for the policy, select SYSTEM as the user to run the task and choose Windows 7, Windows server2008R2 as the Configure for field.
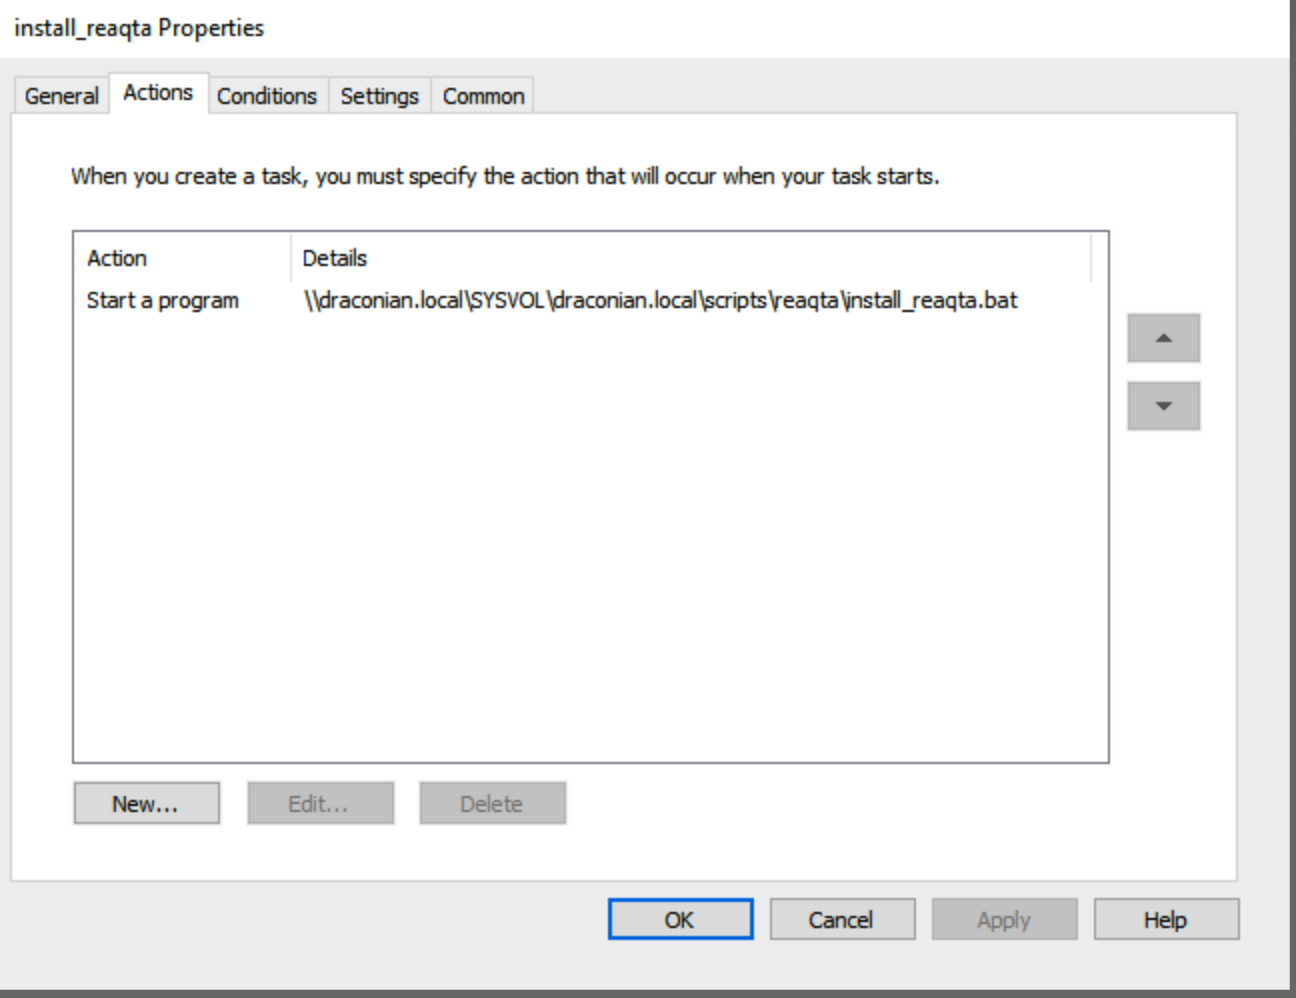
- Under the Actions tab, create a new action to start the installation batch file from the network share and click OK to complete the creation of the policy.
- The policy is pushed to the endpoints connected to the domain controller and the installation is started immediately.
- Go to the Hive dashboard, if the policy is working, you should see new endpoints registered to the hive server.
How to uninstall the QRadar EDR agent on a Windows endpoint?
Uninstalling from the Hive Dashboard
This should be the method used in all circumstances unless the agent is unreachable or offline.
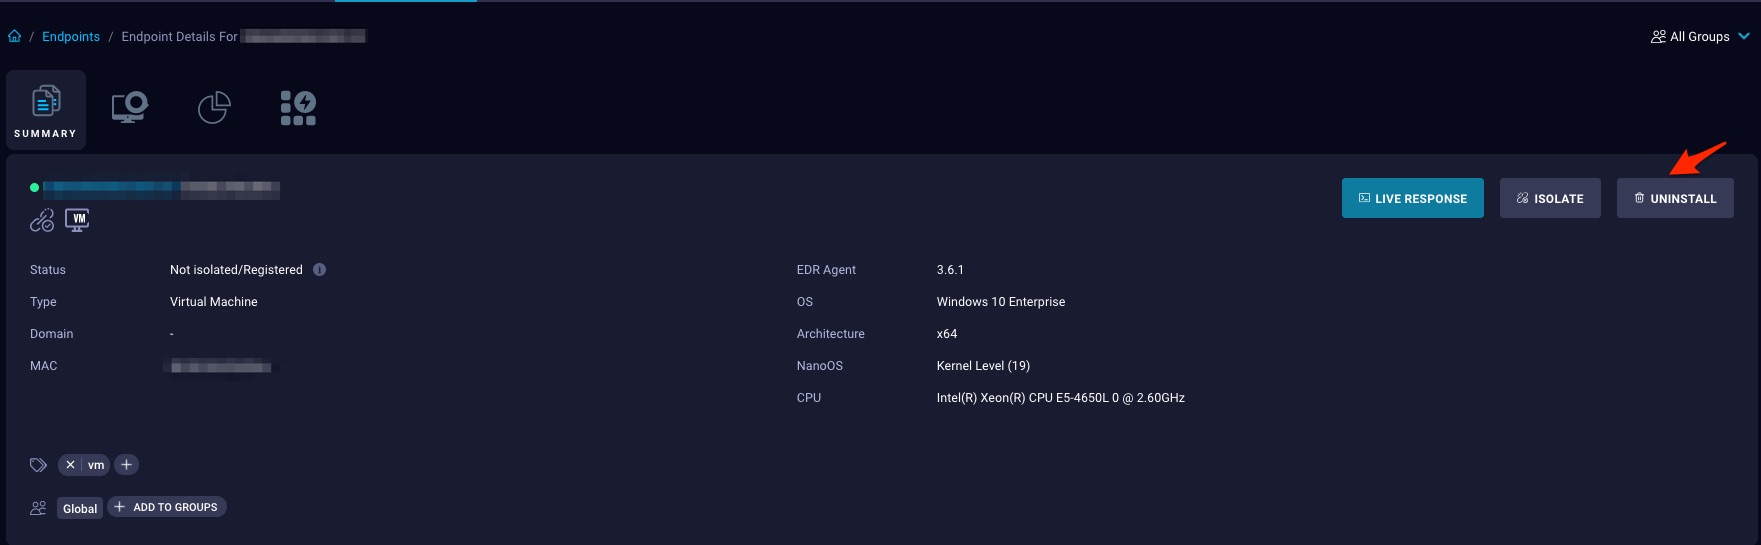
- Log in to the Hive Dashboard and click the Endpoints tab
- Locate the endpoint in question and click View Endpoint
- Once the endpoint details page opens, click Uninstall
Uninstalling from the Endpoint Locally
This should strictly be used when the endpoint is unreachable from the UI
- As local or Domain Administrator, open the Control Panel
- Select Programs > Uninstall a program > ReaQta-Hive-Installer
If you have access to the Hive Dashboard, remove the corresponding entry for the endpoint.
How to uninstall the agent manually?
In a situation where the agent needs to be reinstalled, and attempting to uninstall the agent from the endpoint's Control Panel fail the agent can be manually removed.
- Log in to the Hive Dashboard and remove the endpoint as described using the previous steps
- On the endpoint, open a command prompt as an Administrator
- Stop and remove these services
sc stop keeper sc delete keeper sc stop rqtsentry sc delete rqtsentry sc stop rqtnetsentry sc delete rqtnetsentry sc stop i00 sc delete i00 - Delete the following files and folders.
Note: If the Anti-Malware Module (Guardian) is installed and running, it may need to be removed also, as it will prevent deleting the above files and folders. It can be removed by uninstalling from the Control Panel.
To check for the presence of the Anti-Malware module, review the steps here: How to confirm Anti-Malware is actually installed on an Endpointc:\Program Files\ReaQta c:\windows\system32\drivers\rqtsentry.sys c:\windows\system32\drivers\rqtnetsentry.sys c:\windows\system32\drivers\i00.sys - Open the Registry Editor using the keyboard shortcut Windows Key + R and then typing regedit
- Right-click on HKEY_LOCAL_MACHINE and click Export to back up the registry file
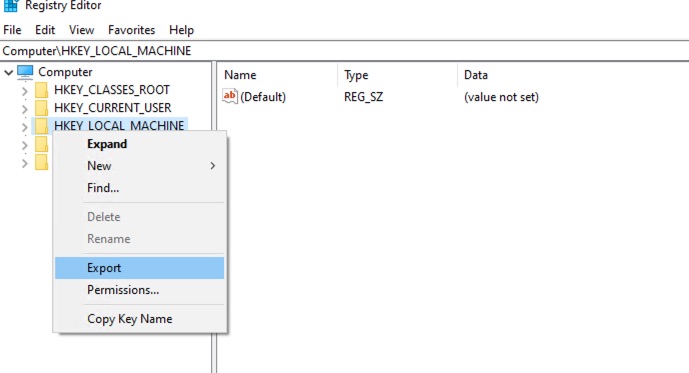
- Choose a name and location for the backup file and click Save
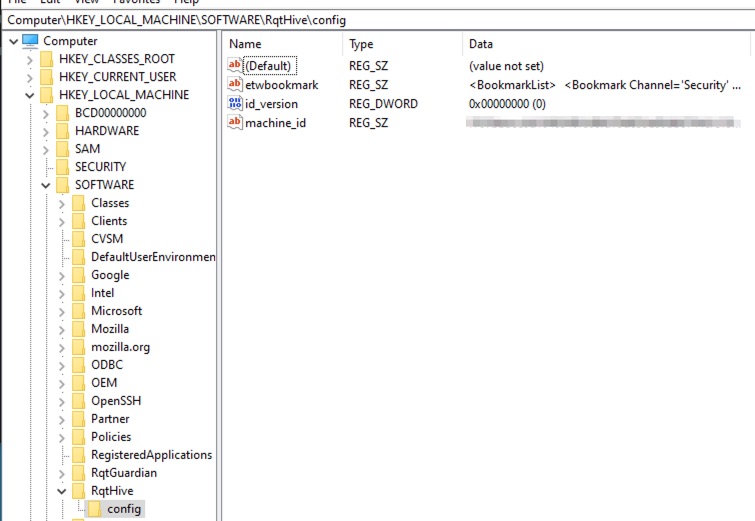
- Once the backup is complete, search for ReaQta in HKEY_LOCAL_MACHINE and remove the registry keys found
Uninstalling the Hive Agent on a Windows endpoint locally when protected uninstallation is enabled
If you're trying to uninstall the agent on a Windows endpoint locally when password protection is enabled, please refer to the following documentation
How to troubleshoot QRadar EDR agent installation issues on Windows?
Agent Registration Errors
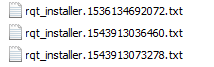
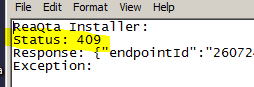
The registration error log file is located in the %TEMP% folder under C:\Users\<Username>\AppData\Local\Temp and starts with rqt_installer. When opening the log file, look for the status code
| Backend Communication Problem |
The agent is unable to reach the backend server, verify the following
1. The registration address is correct. 2. The endpoint is able to directly reach the backend server (no Man-in-The-Middle products/Authenticated proxies). 3. Firewall settings. 4. Status of the server. 5. Open the command line with admin privilege. Run the following commands to determine whether there is a winhttp proxy
|
| 403 invalid CSRF Token | The registration address is invalid |
| 409 | The endpoint is already registered. This error is usually seen with a cloned machine, in that case it is necessary to perform a sysprep. |
| 442 invalid-license-max-endpoints | Too many registered endpoints, the license cap is reached. You need to add more licenses or remove existing endpoints. |
| 442 invalid-license-error-during-into-group-registration | The --gids parameter is missing, it’s mandatory in an MSSP installation. |
| 503 license-not-ready-error | Contact Support |
Network Resource Unavailable
In this scenario, the Windows agent installation fails with a message stating that a network resource is unavailable. The failure is caused by a missing package that was previously used for installation, typically through GPO. To resolve this error, follow these steps:
- As an Administrator, open the Registry Editor by using the keyboard shortcut Windows Key + R and then typing regedit
- Navigate to HKEY_LOCAL_MACHINE\SOFTWARE\Classes\Installer\Products
- Delete any registry keys related to ReaQta
- Attempt to reinstall the agent once again.
[{"Type":"MASTER","Line of Business":{"code":"LOB24","label":"Security Software"},"Business Unit":{"code":"BU059","label":"IBM Software w\/o TPS"},"Product":{"code":"SSVOEH","label":"IBM Security ReaQta"},"ARM Category":[{"code":"a8m3p000000hBSGAA2","label":"Agent-\u003EInstallation-\u003EWindows"}],"ARM Case Number":"","Platform":[{"code":"PF025","label":"Platform Independent"}],"Version":"All Versions"}]
Product Synonym
ReaQta
Was this topic helpful?
Document Information
Modified date:
15 August 2023
UID
ibm16558026