Troubleshooting
Problem
The Installation of the QRadar Console to v7.3.0 fails when the administrator selects the UTC time zone. This article includes workaround information from APAR IV96860 that was opened to track this issue in QRadar Support.
Symptom
When attempting to install QRadar 7.3.0 and when UTC time is selected, the following error message might be displayed at the end of the installation:
ERROR: Failed. Exit code: 1 Case 1.

ERROR: System setup failed. Please logout /login on the console terminal to reconfigure system.

Failed to install QRadar Log manager 7.3.0. on this server!
To subscribe to this APAR to be notified of a software fix to this issue, see: APAR IV96860. See below for a detailed workaround for this issue.
Diagnosing The Problem
Look or entries in /var/log/setup-7.3.0.version/qradar_netsetup.log that include error text that the Time Zone is not selected.
For example:
Apr 11 10:45:15 qradar_netsetup.py[22875]: ibm_command_utils executeCommand [DEBUG] 'Serial Hash: NONE' Apr 11 10:45:15 qradar_netsetup.py[22875]: ibm_command_utils executeCommand [DEBUG] results = [0, 'KEY:

040H6M-37337B-3Y1J2T-302Y71', 'OEM ID: 0', 'Customer ID: 1369', 'Appliance ID: 3124', 'Serial Hash: NONE']

Apr 11 10:45:15 qradar_netsetup.py[22875]: ibm_qradar_setup_ui fun_city_Screen_validate [ERROR] Time Zone is not selected.
Resolving The Problem
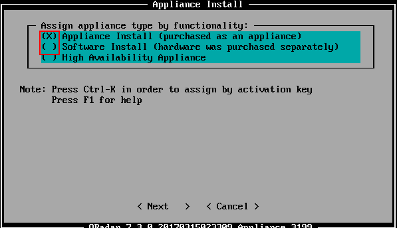
Steps to resolve this issue once in the QRadar Appliance install Wizard.
- Select one of the Appliance type by functionality options.
- Appliance Install (purchased as an Appliance).
- Software install (Hardware was purchased separately).

- Choose a Console from the appliance functionality options.
NOTE: The hardware capabilities of your appliance determine the options in this list. The options listed below in the screen capture might vary based on the appliance hardware.

- Select Normal as the Setup Type in the Installation Wizard.

- Set the Date and Time.

- In the Continent/Area Choose a time zone that is NOT UTC.

- Complete the Network setup and Password screens.
- After the installation completes log in to the QRadar user interface.
- Click Admin tab > System and Licence Management.
- From Display Systems > Highlight the Console.
- Click Actions > View and Manage System.

- Click System Time.
- Change the Time Zone to UTC.

- Click Save.
NOTE: A pop-up window notify you that a Deploy Full Configuration is required after you click Save. A full deploy temporarily interrupts data collection and the interface will be unavailable while services are restarted and managed hosts generate new configurations based on the time zone update. - Click OK to complete time setup.
Results
Time zone configuration is complete for the QRadar Console appliance. This issue does not impact managed hosts as all other appliances in the deployment synchronize their time to the QRadar Console.
Where do you find more information?
Was this topic helpful?
Document Information
Modified date:
16 June 2018
UID
swg22004288