Product Documentation
Abstract
The server comes with one microprocessor installed on the system board. If you install an additional microprocessor, the server can operate as a symmetric multiprocessing (SMP) server. With SMP, certain operating systems and application programs can dis
Content
The server comes with one microprocessor installed on the system board. If you install an additional microprocessor, the server can operate as a symmetric multiprocessing (SMP) server. With SMP, certain operating systems and application programs can distribute the processing load between the microprocessors.
Notes:
- Before you install a new microprocessor, review the documentation that comes with the microprocessor, so that you can determine whether you need to update the server basic input/output system (BIOS). Click here to download the latest level of BIOS for the server.
- Click here to review a list of supported SMP operating systems.
- The microprocessor that is installed in connector U17 is CPU or processor 1. If a microprocessor is installed in connector U3, it is CPU 2 or processor 2. If the server has only one microprocessor installed, that microprocessor is installed in connector U17 and is the startup (boot) processor. If more than one microprocessor is installed, the microprocessor with the lower stepping level is the startup processor and the microprocessor with the higher stepping level is the application processor. If both microprocessors have the same stepping level, the microprocessor installed in connector U17 is the startup processor and the microprocessor installed in U3 is the application processor.
Note: You can determine the stepping levels of the installed microprocessors using the Configuration/Setup utility program.
WARNING: To avoid damage and ensure proper server operation when you install a new or an additional microprocessor, use microprocessors that have the same cache size and type, and the same clock speed. Microprocessor internal and external clock frequencies must be identical.
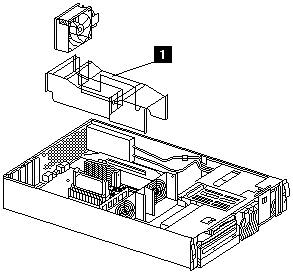
1. Air baffle
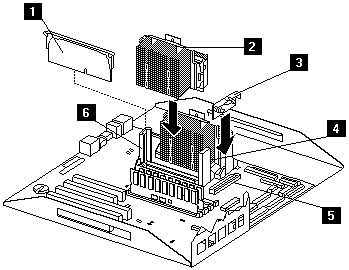
1. Terminator card
2. Microprocessor 2
3. VRM
4. Microprocessor 1
5. VRM connector
6. Microprocessor 2 connector
| Installing an additional microprocessor |
|---|
- Turn off the server and peripheral devices and disconnect all external cables and power cords; then remove the cover
- Remove the air baffle by grasping it at the sides and lifting it from the server.
- Remove the terminator card from the microprocessor connector. Store the terminator card in a safe place in the static-protective package that the new microprocessor is shipped in; you will need to install it again, if you ever remove the microprocessor.
- Install the microprocessor:
- Touch the static-protective package containing the new microprocessor to any unpainted metal surface on the server; then, remove the microprocessor from the package.
- Center the microprocessor over the microprocessor connector and carefully press the microprocessor into the connector.
Note: To remove a microprocessor, pull upward on the microprocessor handle.
- Install the VRM included in the microprocessor kit:
WARNING: When installing or replacing a VRM, use only a VRM specified for use with the Netfinity 4500R server. Use of other VRMs might cause the server to overheat.
- Center the VRM over the VRM connector. Make sure that the VRM is oriented and aligned correctly.
- Press the VRM into the connector.
Note: If you remove the microprocessor later, remember to install the terminator card in the appropriate microprocessor connector and to remove the VRM.
- If you replaced the microprocessor with a different speed microprocessor, change switches 1-4 on the switch block to the appropriate settings, as shown in the following table.
Microprocessor
speedSwitch 1 Switch 2 Switch 3 Switch 4 733/133 On Off Off Off 800/133 Off On On On
- Install the air baffle. Make sure the sides of the air baffle fit inside the brackets on the server.
- Install any other options for the server.
Document Location
Worldwide
Was this topic helpful?
Document Information
Modified date:
24 January 2019
UID
ibm1MIGR-45570