Product Documentation
Abstract
Memory installation for the Netfinity 6000R.
Content
Adding memory to the server is an easy way to make programs run faster. You can increase the amount of memory in the server by installing memory-module options. You must install a bank of four matched dual-inline memory modules (DIMMs).
NOTES:
1. The DIMM options available for the server are 128MB, 256MB, 512MB, and 1 GB. The server supports a minimum of 512MB (4 x 128MB) and a maximum of 16GB (16 x 1GB) of system memory.
2. When 4 GB of memory is installed in the server, the amount of usable memory will be reduced depending on the system configuration. A certain amount of memory must be reserved below 4 GB for system resources. A second reduction in the usable memory is made when 16 GB of memory is installed.
3. The server comes with a minimum of 512 MB (4x128) memory installed in bank 1. When you install additional DIMMs, be sure to follow the DIMM population sequence in Table 11.
4. All the DIMMs installed in a bank must be the same size, speed, type, and technology. You can mix compatible DIMMs from various manufacturers.
5. All the banks do not have to contain DIMMs of the same size, speed, type, and technology. You can mix compatible DIMMs from various manufacturers.
6. The memory board contains 16 DIMM connectors and utilizes 4-way memory interleaving. See Table 11. The 4-way memory interleave technology in the server requires that you install DIMMs in all four connectors in each populated bank.
7. Install only 3.3 V, 168-pin, 8-byte, 100 MHz, PCI, PC100-322-622R, registered synchronous dynamic random-access memory (SDRAM) with error correcting code (ECC), DIMMs. Only 100MHz, 72-bit, registered, synchronous, x4 SDRAM configuration DIMM memory is supported for the 128MB, 256MB, 512MB, and 1GB DIMMs.
8. Installing or removing DIMMs changes the configuration information in the server. Therefore, after installing or removing a bank of DIMMs, you must save the new configuration information using the Configuration/Setup Utility program. When you restart the server, the system displays a message indicating that the memory configuration has changed. Start the Configuration/ Setup Utility program and select Save Settings. See “Configuring the server” in the HMM for more information.
Install the DIMMs in the order provided in Table 11 below.
| Table 11. DIMM installation order | |
|---|---|
| Bank of 4 DIMMs | Install DIMMs in these connectors |
| Bank 1 (shipped as standard) | J1, J5, J9, J13 |
| Bank 2 | J2, J6, J10, J14 |
| Bank 3 | J3, J7, J11, J15 |
| Bank 4 | J4, J8, J12, J16 |
The following illustration shows how to install memory on the memory board.
NOTE: The illustrations in this document might differ slightly from your hardware.
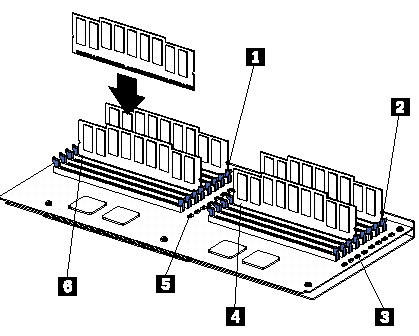
1. Memory slot 1
2. Memory slot 9
3. Error LEDs
4. Memory slot 13
5. Error LEDs
5. Memory slot 5
Before you begin
- Review “Before you begin” in the HMM.
- Read the documentation that comes with your option.
To install a DIMM
Attention: When you handle Electrostatic Discharge-Sensitive devices (ESD), take precautions to avoid damage from static electricity. For details on handling these devices, refer to the following Web site and search for ESD: http://www.ibm.com
1. Turn off the server and disconnect all power cords and external cables; then, remove the top cover (see “Removing the server top cover and bezel” in the HMM).
2. Remove the memory board assembly:
a. Lift up on the memory board assembly and remove it from the server.
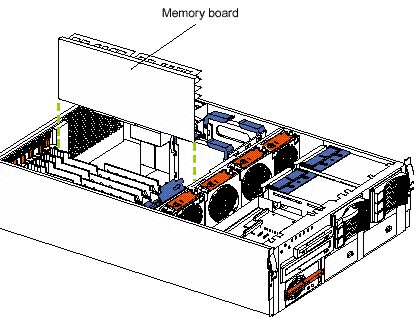
b. Place the memory board assembly on a static-protective surface, such as the static-protective package in which an option comes.
3. Locate the DIMM connectors on the memory board. Determine the DIMM connectors into which you will install the DIMMs. (See the notes at the beginning of this procedure.)
4. Touch the static-protective package that contains the DIMM option to any unpainted metal surface on the server. Then, remove the DIMM from the package.
NOTE: To avoid breaking the retaining clips or damaging the DIMM connectors, handle the clips gently.
5. To install the DIMMs, repeat the following steps for each DIMM that you install:
a. Turn the DIMM so that the DIMM keys align correctly with the connector.
b. Insert the DIMM by pressing the DIMM straight into the connector. Be sure that the retaining clips snap into the closed positions.
c. Make sure that the retaining clips are in the closed position. If a gap exists between the DIMM and the retaining clips, the DIMM has not been properly installed. In this case, open the retaining clips and remove the DIMM; then, reinsert the DIMM.
6. Install the memory board assembly:
a. Hold the memory board assembly, and align it into the card guides and over the memory board connector.
Attention: When you insert the memory board assembly into the connector, press on the flat metal projection on the board.
b. Insert the memory board assembly into the connector.
7. If you have other options to install or remove, do so now; otherwise, go to “Installing the server top cover and bezel” in the HMM.
Document Location
Worldwide
Was this topic helpful?
Document Information
Modified date:
23 January 2019
UID
ibm1MIGR-4MVU4C