Product Documentation
Abstract
In earlier versions of Data Studio, it was not possible to view the partitions of tables in Data Studio. In addition, it was also not possible to perform any function on the partitions. However, now you can view partitions of the table in Data Studio and can also generate DDL for those partitions.
Content
Support for partition for Db2 I database
Generation of DDL for Db2 I tables with partitions is now supported. If there exists a table in Db2 for I database, then Data Studio generates a DDL with partition for that table. These partitions are now visible in the tables.
The steps to generate a DDL with partition for a table are as follows:
1. In Data Studio, open IBM SQL and Routine Development view.
Figure 1. Routine Development view
2. Open the Data Source Explorer and browse to the table for which you want to generate DDL with partition. Right click the table and select Generate DDL.

Figure 2. Data Source Explorer

Figure 3. Generate DDL
Both Hash and Range partitions are supported for Db2 for I. Partitions are visible in the table in Data Partition tab as shown in the images below.
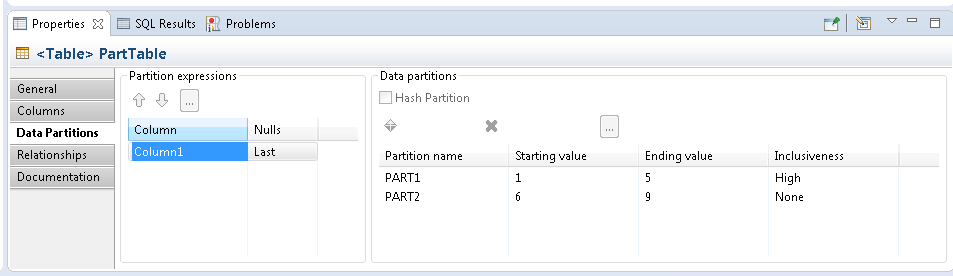
Figure 4. Range partition
Figure 5. Hash partition
1. Click the table and go to Data Partitions tab.
2. Click the ellipses button ![]() to add partition expression. Data partitions cannot be added unless partition expression is added.
to add partition expression. Data partitions cannot be added unless partition expression is added.
Figure 6. Select columns for range partition
3. Press OK for displaying partition expressions in the table.
4. Select ![]() button to add data partition (this button is enabled only when Hash Partitioned is unchecked).
button to add data partition (this button is enabled only when Hash Partitioned is unchecked).
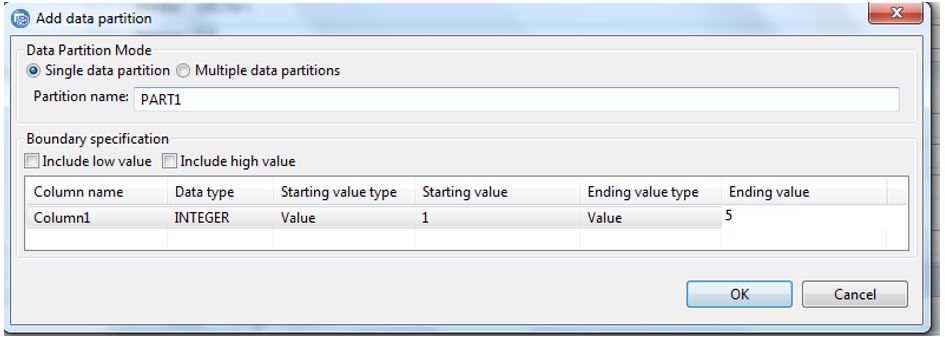
Figure 7. Single data partition
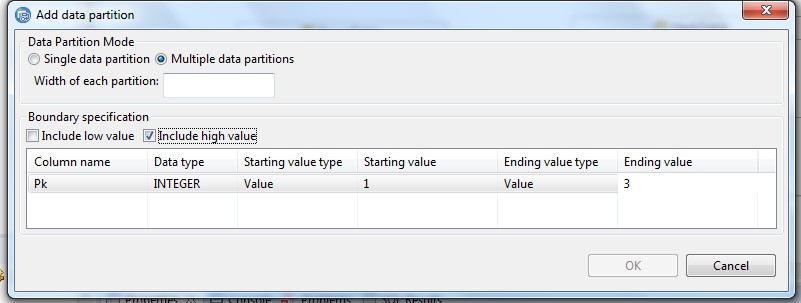
Figure 8. Multiple data partitions
5. In the Add data partition window, perform the following steps and click OK.
- Select either single or multiple data partitions
- Enter the name of the partition (if you select single data partition)
- Enter the width for each partition (if you select multiple data partitions)
- Select to include low and high values in Boundary specification
- Enter the starting and ending values
The OK button is enabled only when all the data is entered.
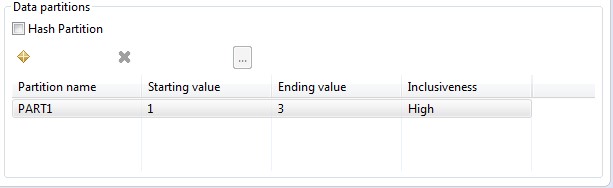
Figure 9. Selecting a data partition
Modifying a range partition
1. Click the table and go to Data Partitions tab.
2. Click the ellipses button ![]() to modify partition expressions.
to modify partition expressions.
Deleting a range partition
Figure 10. Deleting a range partition
1. Click the table and go to Data Partitions tab.
2. Select the partition name and click ![]() button.
button.
Creating a partitioned index
A partitioned index can be created for both hash and range partition.
When you add index to a partitioned table, you can view the Partitioning tab.
Figure 11. Creating a partitioned index
- Deselect the check box for partitioning the index.
- The checkbox is enabled only when index is created for a table that has partitions.
Was this topic helpful?
Document Information
Modified date:
14 December 2018
UID
ibm10742699