Release Notes
Abstract
This firmware update (v2.1) provided by IBM updates QRadar® M3 appliances with microcode security fixes and includes updates for UEFI, IMM2, RAID controllers, and HDD software. This firmware update is intended for local USB updates of on-premise M3 2U form factor hardware on QRadar xx05 and xx24 Consoles, Event Processors, Flow Processors, or Data Node appliances.
Content
Administrator notes and important information
- Important: Administrators should ensure that all firmware check boxes are selected when the comparison screen displays the firmware changes to be installed. We have reports that not all check boxes were selected and administrators had to apply the update again. To prevent additional downtime, administrators should verify all check boxes are selected as defined in the instructions on Tab 2.
- Important: If your appliance is in a HA pair, there are configuration steps required to set the status properly for your primary and secondary high-availability appliances. For more information, see: http://www.ibm.com/support/docview.wss?uid=swg27047121#HA.
- IMPORTANT: Administrators must enable IMM.Over.LAN on the xSeries appliance BEFORE the firmware update is applied. For information on how to enable this setting, see: http://www.ibm.com/support/docview.wss?uid=swg21982944.
- Important: This release includes a microcode update to address security vulnerabilities CVE-2018-3639 & CVE-2018-3640 for Intel Xeon 55xx and 56xx series processors.
- A new .IMG file is now used to create bootable USB drives for M3 appliances to provide more flexibility for Windows operating systems when creating a USB key for your firmware update. The 2nd tab contains new installation instructions to guide customers through their firmware installations. For M4 or M5 firmware, see our Firmware FAQ page at https://ibm.biz/qradarfirmware.
- No IMM or remote installation option is available for M3 xSeries appliances.
Supported appliances, types, and model information
This firmware update applies to the following IBM Security QRadar M3 (2U form factor) appliances, server type, or Machine type models:
| Hardware | Details | Size |
|---|---|---|
| Appliance | IBM Security QRadar xx05 G1 IBM Security QRadar xx24 G1 | 2U |
| Server Type | x3650 M3 | 2U |
| Server Machine Type | 7377 | 2U |
| Machine type models (MTM) | 4379-Q05 4379-Q24 | 2U |
File changes and prerequisites in this firmware update
The table below lists important updates in the Base System Pack and HDD update. Administrators must ensure that their M3 appliance includes the minimum version outlined in the Prerequisite version column. If your M3 appliance does not meet the prerequisite versions outlined in the table below, the administrator will need to contact IBM QRadar Support to have a custom upgrade path defined for the M3 appliance.
| Component | Prerequisite version | Firmware version | Name |
|---|---|---|---|
| IMM2 | yuoo57h-1.1.0 | yuooh5a-1.55 | ibm_fw_imm_yuooh5a-1.55_linux_32-64 |
| UEFI/BIOS | None | hse127a-1.16 | ibm_fw_uefi_hse127a-1.16_linux_32-64 |
| DSA | None | dsytc5c-9.42 | ibm_fw_dsa_dsytc5c-9.42_linux_32-64 |
| Server RAID Controller M5000 | None | 12.15.0-0248 | ibm_fw_sraidmr_m5000-12.15.0-0248_linux_32-64 |
| HDD Update | None | sas-1.23.02 | ibm_fw_hddlenovo_sas-1.23.02_linux_32-64 |
Full Release Notes from Lenovo for firmware 2.1 updates
A full list of changes can be found in the attached HTML file and opened by any browser or a text editor. These files contain the full release notes provided by Lenovo to IBM for both CVEs and resolved issues that administrators might want to review.
| Component | Name | CVEs resolved in this update |
|---|---|---|
| IMM2 | ibm_fw_imm_yuooh4b-1.53_anyos_noarch.chg | None |
| UEFI/BIOS | ibm_fw_uefi_d6e163a-1.21_linux_32-64 | CVE-2018-3639, CVE-2018-3640 |
| DSA | ibm_fw_dsa_dsytc5f-9.53_linux_32-64 | None |
| Server RAID Controller M5000 | ibm_fw_sraidmr_m5000-12.15.0-0248_linux_32-64 | None |
| HDD Update | ibm_fw_hddlegacy_sas-1.22.01_linux_32-64.chg | None |
NOTE: A full change log of all files that can be read by creating the USB drive and navigate to \BootableMediaCreatorv9_66_05\workingdir\.. This directory has a historical list of all files that are packaged with the firmware update, not just the latest changes as outlined below in the attached file. Administrators can use any text editor to review the attached change list.
Before you begin
IMPORTANT: Administrators must enable IMM.Over.LAN on the xSeries appliance BEFORE the firmware update is applied. For information on how to enable this setting, see: http://www.ibm.com/support/docview.wss?uid=swg21982944.
Creating your USB flash drive for the firmware update requires a Windows host and the administrator or USB drive must be on-site with the appliance. The firmware update can take up to 60 minutes complete per appliance and the administrator will be required to reboot the appliance after the firmware install completes. The firmware upgrade procedures should only be done during a change window or during maintenance time for your QRadar appliances. There is no IMM or remote option available to apply xSeries M3 v2.1 firmware.
You must have access to the following items:
- An 8 GB or larger USB flash drive
- A desktop or notebook system running one the following operating systems:
- Windows 10
- Windows 7
- Windows 2008R2
- Windows 2008
- Windows Vista
- Windows XP
Creating the bootable USB drive
- Download the M3 v2.1.0 firmware IMG file from IBM Fix Central.
(http://www.ibm.com/support/fixcentral/swg/quickorder?parent=IBM%20Security&product=ibm/Other+software/IBM+Security+QRadar+SIEM&release=7.3.0&platform=All&function=fixId&fixids=7.2.8-QRADAR-FIRMWARE-2U-M3-xx05-xx24-2.1&includeSupersedes=0&source=fc) - Download the Rufus tool from Rufus Downloads (http://rufus.akeo.ie/downloads/).
- Insert the USB flash drive into a USB port on your Windows laptop or workstation.
- Open Rufus and configure the properties.
Parameter Value Device Select your USB drive Boot Selection Select Qradar_2U_M3_MT7377_xx05_xx24_2_1.img Partition scheme MBR (Default) Target system BIOS (or UEFT-CSM) (Default) File system FAT32 (Default) Cluster size 4096 bytes (Default) - Click Start. The image is loaded on the USB drive.
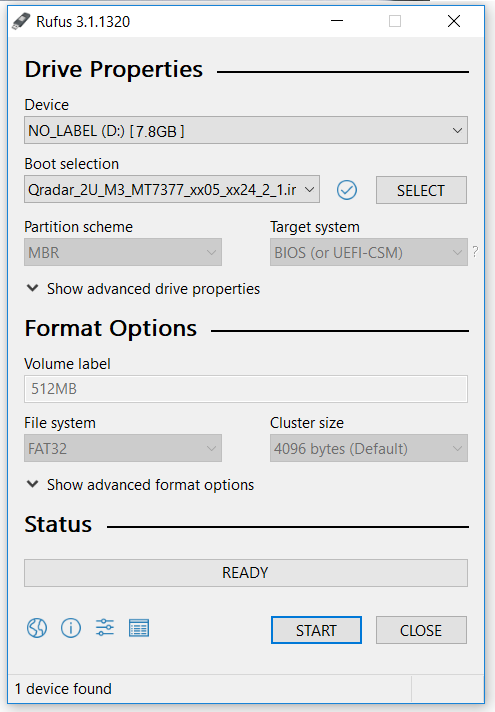
- After the installation finishes, safely eject the USB flash drive from your computer.
Installing the firmware update
This procedure requires you to reboot your QRadar appliance after the firmware update is installed. Administrators should expect a data outage while firmware updates are applied.
- Insert the USB drive in to the 2U form factor M3 QRadar appliance.
- Reboot the system to start the software installation process.
- As the appliance is rebooting, press the F12 key to select a boot device.
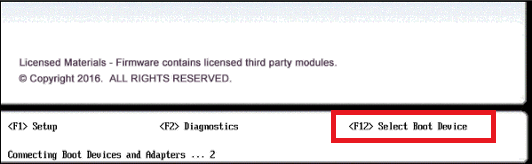
- Select the bootable firmware image, for example, USB Storage and Press Enter.

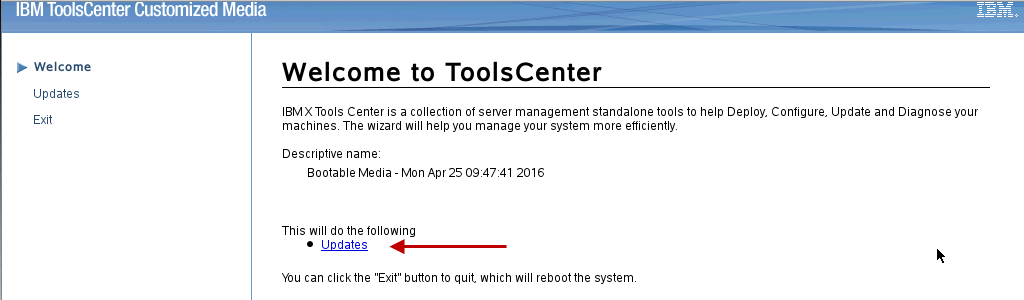
- The IBM ToolsCenter Welcome page is displayed.
- When prompted, select the Updates option.
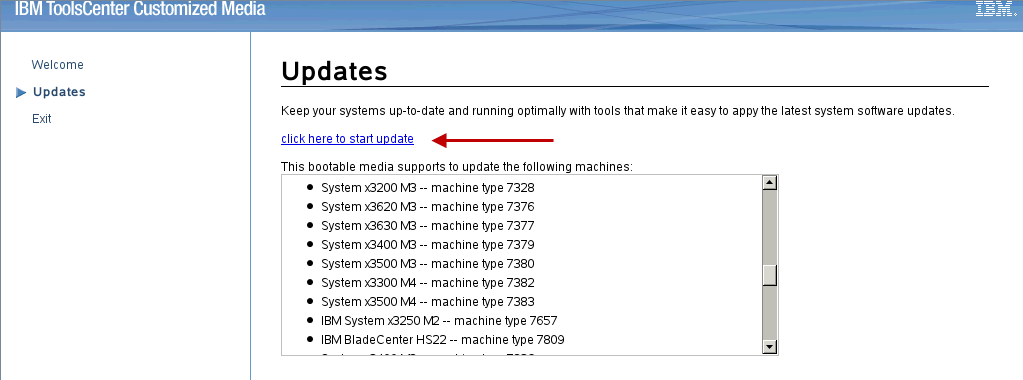
- Verify that the bootable media shows the correct machine type for the appliance.
Hardware Value System Server x3650 M3 Machine type 7944 - To start the update, select Click here to start update.
- Select your language and click I accept the terms in the license agreement to continue.

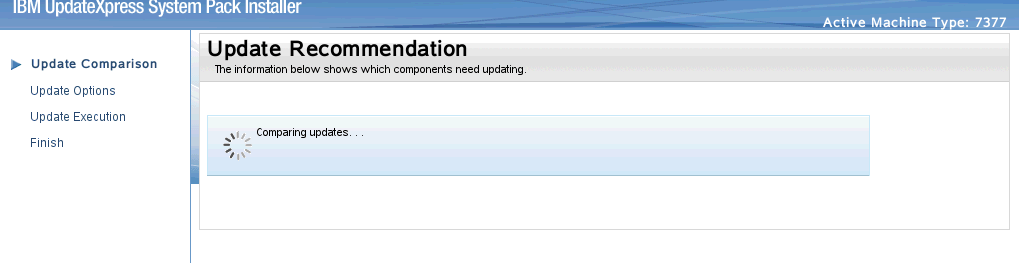
- The IBM UpdateXpress System Pack Installer compares the current package with the installed firmware
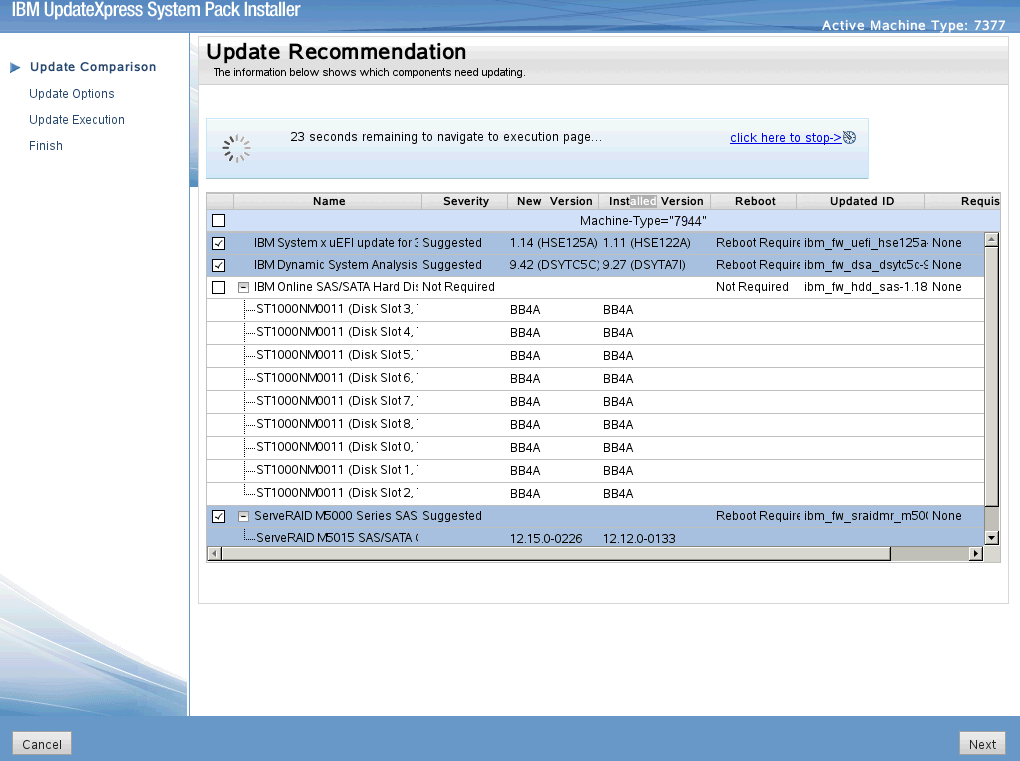
- **IMPORTANT:** Review the list of updates and confirm that all Suggested updates are included. It has been reported that some suggested updates are not selected by default. Administrators should verify check boxes are selected to prevent additional downtime.
- To apply the firmware updates, click Next on the Update Options page.
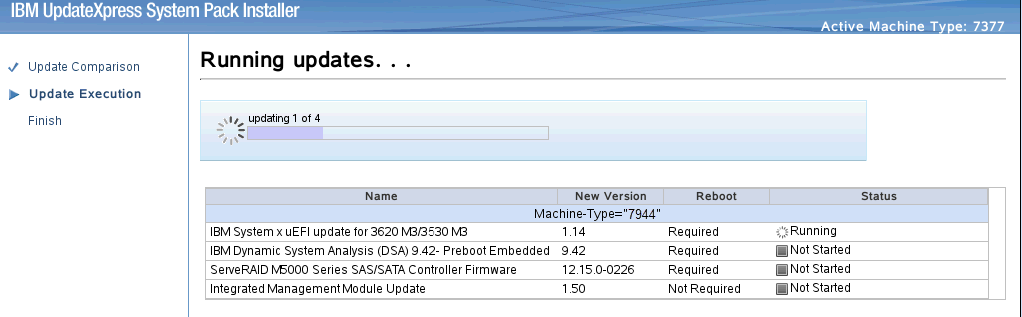
- Verify that all the firmware updates are applied, and click Next to complete the update.
- After the update is complete, click Save Log to save the installation log to the USB flash drive. This file can be provided to support in case any issues occurred during the update.

- Select the USB flash drive and click OK.
- After the log is saved, click Finish to reboot the appliance.
Results
After the appliance boots, the system is ready to be used normally.
Was this topic helpful?
Document Information
Modified date:
31 March 2020
UID
ibm10725747