This document provides instructions for updating HMC V10R3M1050 with the latest fixes for V10R3M1050.
Update the HMC to the current service level.
7063-CR1, 7063-CR2, vHMC x86, vHMC Power
Prerequisites
Before updating, review the following:
The HMC can no longer be updated directly from public.dhe.ibm.com. HMC network update is supported from Fix Central using SFTP option or by staging the updates on a local server. HMC V10R2 and later also supports updates using the IBM website repository.
1. Verify the HMC is at least at V10R3M1050
If the HMC is not at V10R3M1050, you must first upgrade to V10R3M1050. To upgrade the HMC to V10R3M1050, refer to document -
Or vHMC on x86: Upgrading the HMC from Version V10R1 or V10R2M1030 to V10R3M1050
2. Determine the type of HMC (x86 versus ppc)
Determine which PTF download is needed based on the HMC model or vHMC component.
x86 This term is used to reference HMCs running on vHMC hosted by x86, Intel, AMD hardware and hypervisors (KVM, VMWare, Xen).
ppc Term is used to reference HMCs running on 7063 type or vHMC hosted by Power servers.
3. Review the readme files:
Service Pack -
MF71737 HMC V10 R3 M1063.0 - for 7063 Types, or vHMC for PowerVM (5765-HMB)
MF71736 HMC V10 R3 M1063.0 - for vHMC for x86_64 hypervisors (5765-VHX)
Readme file:
https://delivery04-mul.dhe.ibm.com/sar/CMA/HMA/0dhoj/0/MF71737.readme.html
**These fixes cannot be ordered on media.
4. Note: HMC V10R3 release for x86 is not supported on bare metal (7042 hardware appliances).
5. Reboot the HMC (only if you did not restore a backup on this release.)
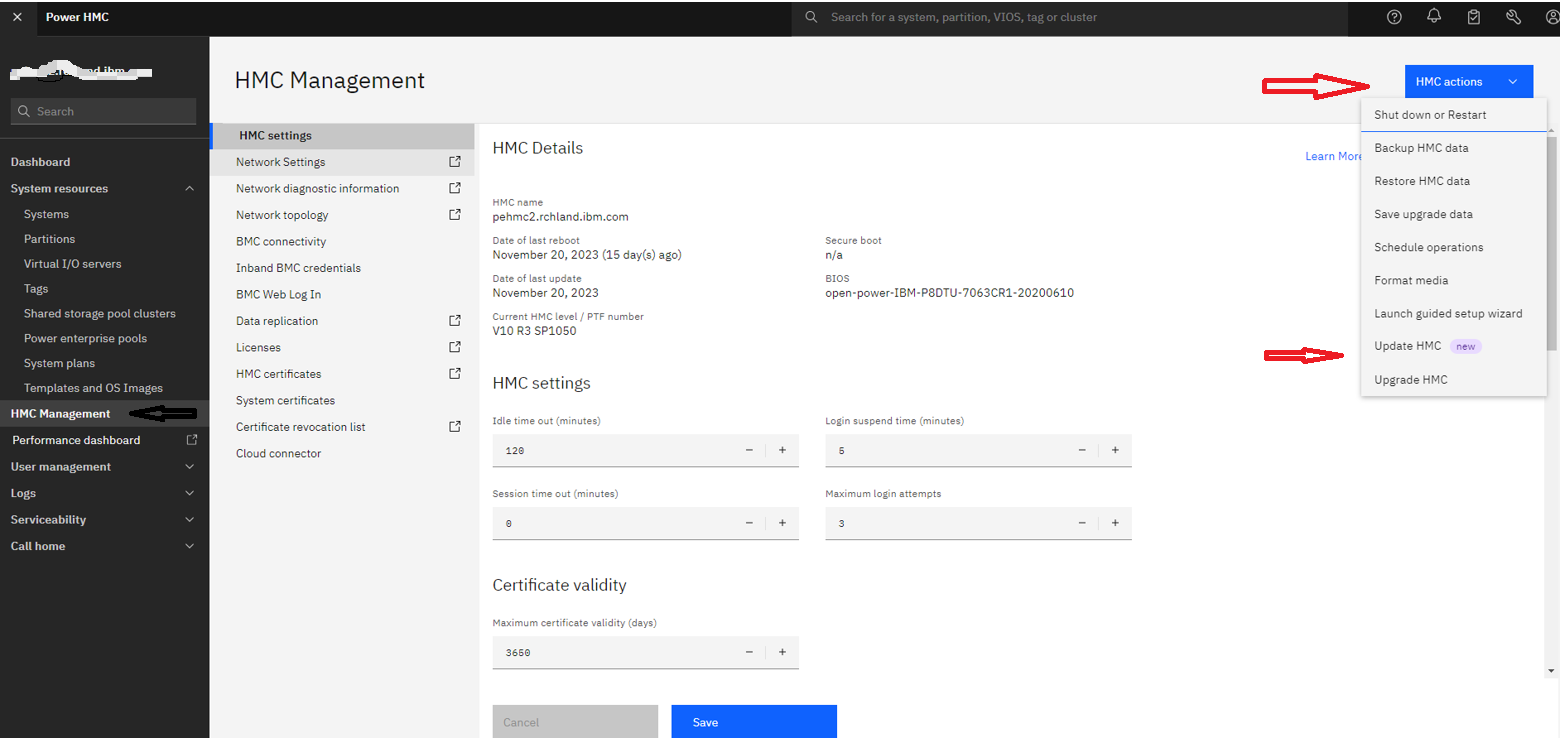
If the HMC has not been restarted recently, restart before you begin the updates. To check the last reboot use the command who -b. To restart the HMC, click HMC Management > HMC Actions (drop down arrow) > Shut Down or restart > restart HMC then click OK
*****************************************************************************************************************************************************************
New GUI Update option
Service Pack -
1. Go to
Fix Central 7063 ppc or
Fix Central vHMC x86 set the download option to Download using bulk FTPS/SFTP. Then select the Service Pack 1063, depending on your type of HMC. Click Continue, and sign on with IBMid. This will give you the Server name, user and password that will need to be used in the following screens, and note the file name. Example - HMC_Update_V10R3M1063_ppc.iso or HMC_Update_V10R3M1063_x86.iso
2. On the GUI, select HMC Management, then click the HMC Actions drop down arrow to select Update HMC-
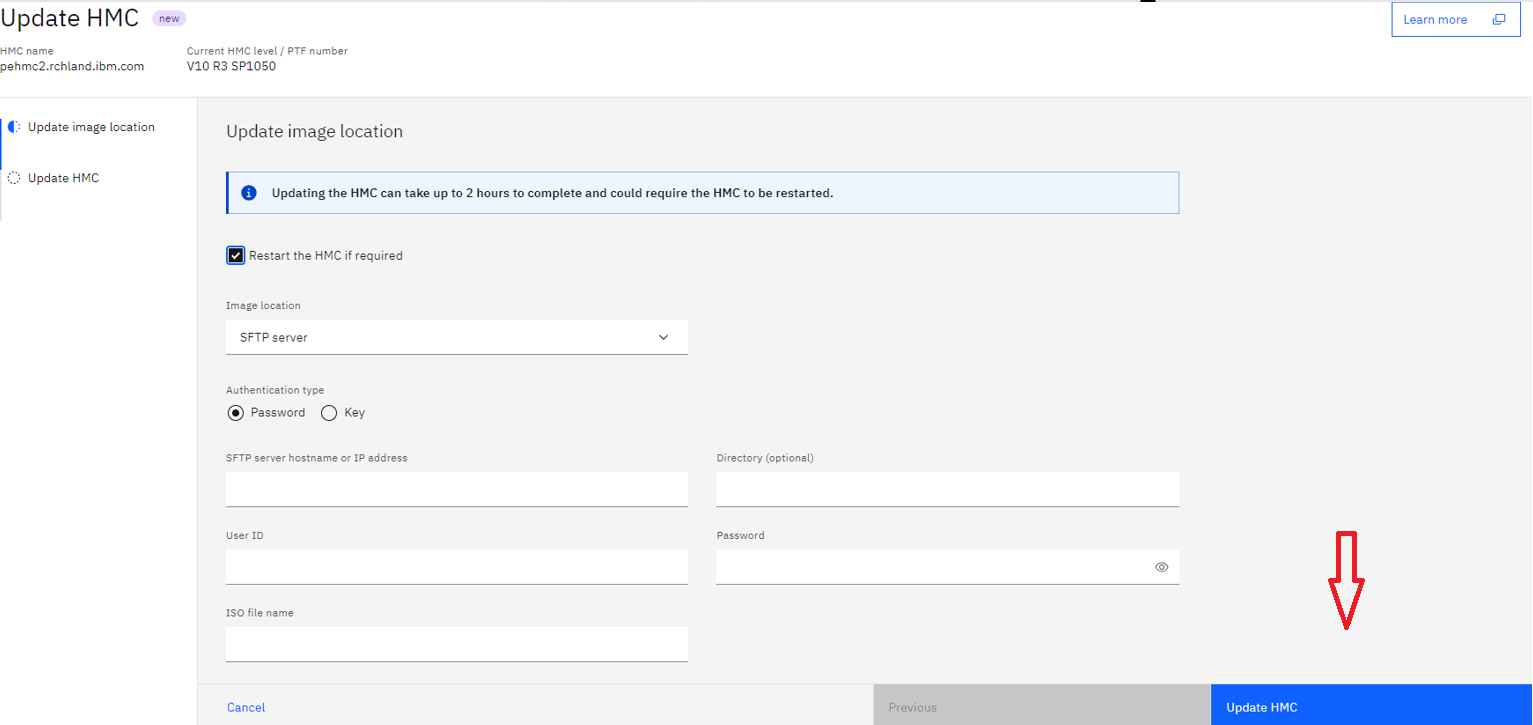
3. In the next screen, Check the box for Restart the HMC if required, make sure the Image location is set to SFTP server. Enter the Server name, User ID and Password that you got from Fix Central, along with the file name from step 1 above. Then click Update HMC button.
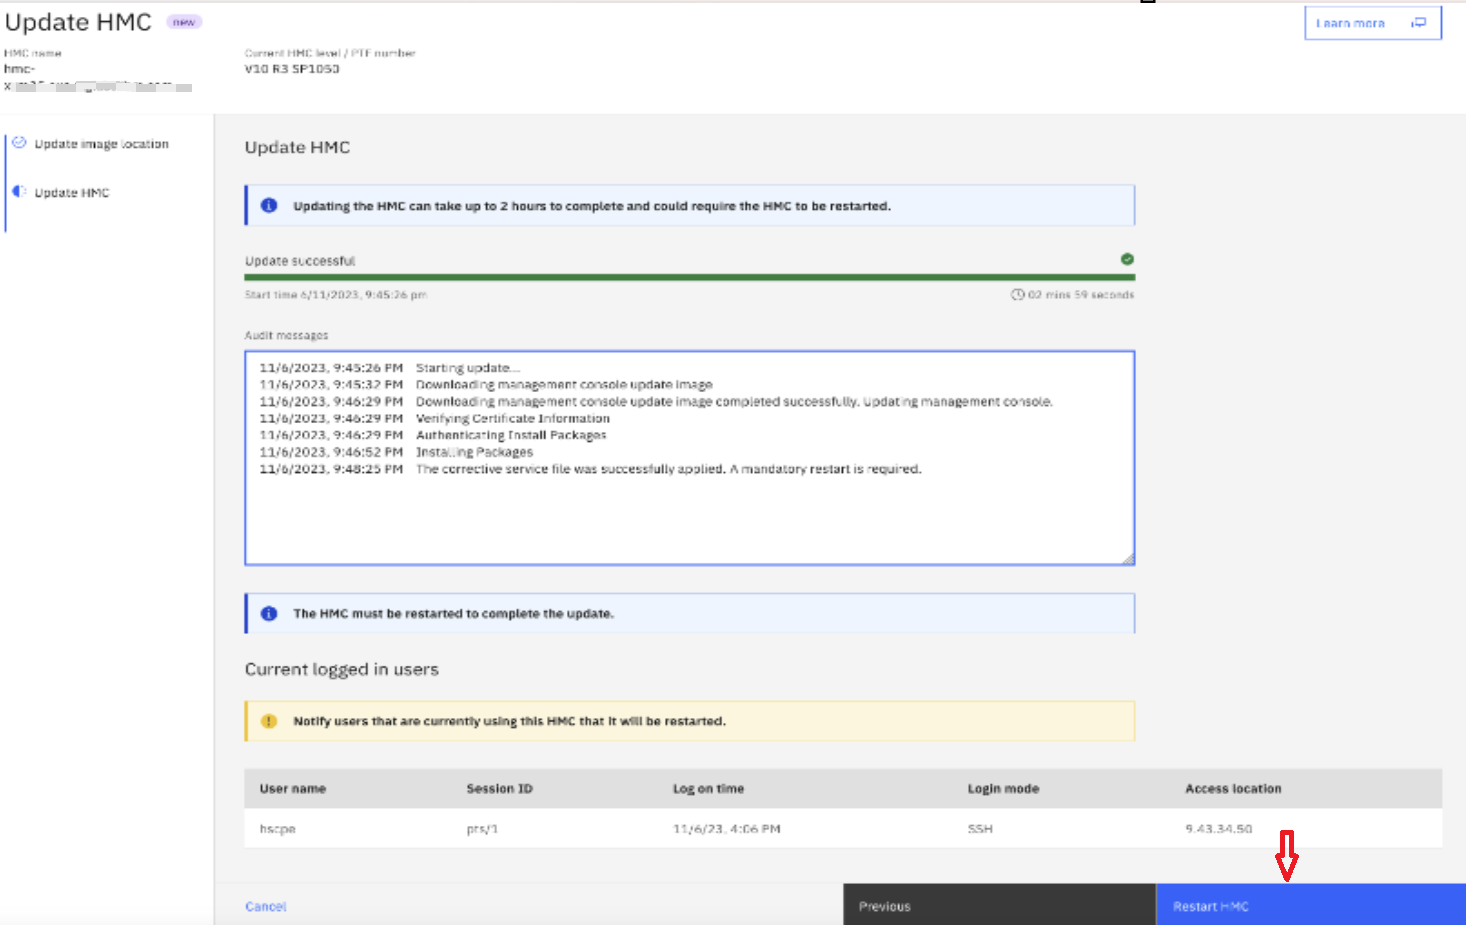
4. If successful, you should get a screen like this, where you would need to click the Reboot HMC button.
**************************************************************************************************************************************************************
SSH Command line update options for Service Pack
IBM Website: (Service Pack)
vHMC on x86: updhmc -t ibmwebsite --ptf vMF71736 -r
7063 on ppc: updhmc -t ibmwebsite --ptf MF71737 -r
vHMC on ppc: updhmc -t ibmwebsite --ptf vMF71737 -r
There is an option in the GUI Update HMC now for IBM Website if you prefer the GUI. Just set the Image location to IBM Website.
SFTP: (Service Pack)
Go to
Fix Central 7063 or
Fix Central vHMC x86, select the fix you want, then continue. Use the Download files using bulk FTPS/SFTP option. Agree to the terms, and you will get the
Fix package location. delivery04.dhe.ibm.com along with a User and Password. The user given and password given are good for 24hrs.
vHMC on x86: updhmc -t sftp -h delivery04.dhe.ibm.com -u {User given} -p {Password given} -r -f HMC_Update_V10R3M1063_x86.iso
7063 or vHMC on ppc: updhmc -t sftp -h delivery04.dhe.ibm.com -u {User given} -p {Password given} -r -f HMC_Update_V10R3M1063_ppc.iso
*Make sure to reboot after the fix is installed. command is - hmcshutdown -t now -r
*************************************************************************************************************************************************************
Alternative: Stage the updates on a local server
If the HMC does not have direct access to the IBM website, the files can be downloaded and placed on a local server. The HMC supports installing fixes over the network by using sftp, and nfs protocols. To update from a local server instead of direct from the IBM website, do the following:
a. Use Fix Central to download the fix to your PC, then FTP to your local server
*PTFs for a Service Pack will be under "+ Show patched by"
b. For this option, you would need to go to Fix Central, select the Service Pack or iFix, and set the download option to HTTPS.
c. Once the file or files are downloaded to your PC, then move to your local server using ftp or sftp.
d. You can either use the new GUI option shown above, or SSH command line. Be sure to use the credentials for that remote server.
**************************************************************************************************************************************************************
USB Update
(This only works if you have a Linux box) - reason, Windows does not write to EXT4 USB, which is needed for this update.
Instructions for downloading the fixes and installing them from USB media using a Linux box (7063 ppc only)
Step 1: Format the USB on the HMC. (HMC must be at V10R3M1050 (minimum) which will now format EXT4, which is needed for the fixes)
(USB 8GB or larger)
Step 2: Download the Corrective Fixes (see above)
Go to Fix Central and download the fix to your PC, (download option should be HTTPS) then Move the file to a Linux box.
(Windows does not write to EXT4 USB)
Download the Service Pack-
Fix Central : 7063 or vHMC on ppc (MF71737) HMC V10 R3 M1063.0 :
HMC_Update_V10R3M1063_ppc.iso Step 3: Copy the fixes to USB media.
a) Use the formatted USB and insert into your Linux box
b) Copy one or more iso files to media.
The fixes are copied to media as data.
Step 4: Install the fixes by using the following installation instructions. (Service Pack goes on first)
Step 5: Insert the USB into the HMC that has the copied Fix on it.
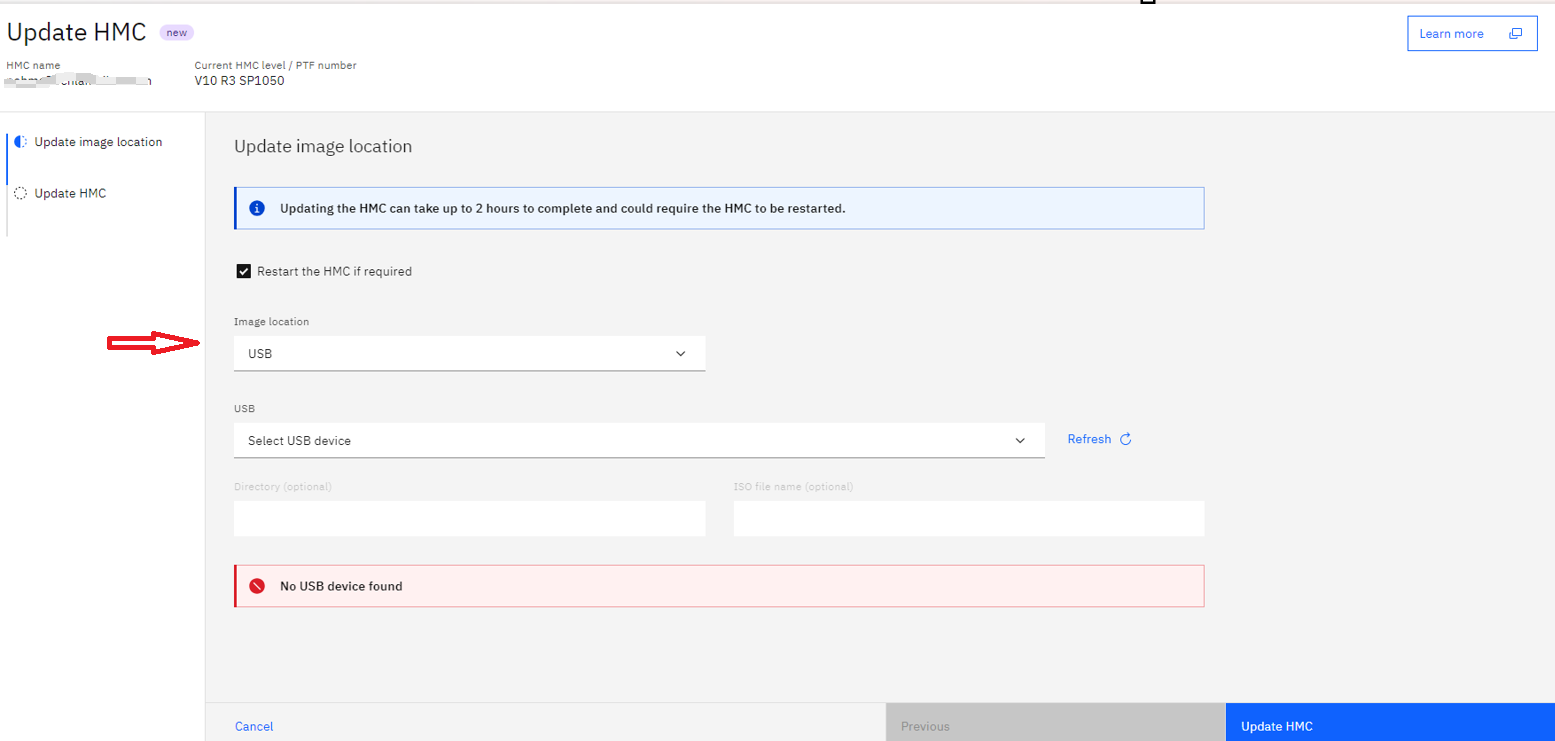
Step 6: From the GUI screen, select HMC Management>HMC Actions>Update HMC. (Screen shot is shown above.) Select USB in the Image location drop down.
Check the box for Restart the HMC if required.
Step 7: Once it finds the USB click Update HMC
Reboot the HMC after the install.
**************************************************************************************************************************************************************
Verifying a Successful Update
After the HMC was restarted, do the following to verify that the HMC updated was successful:
| 1. | In the upper right of the page, click the ? with circle around it. ... |
| 2. | In the drop down menu, click the About HMCV10. 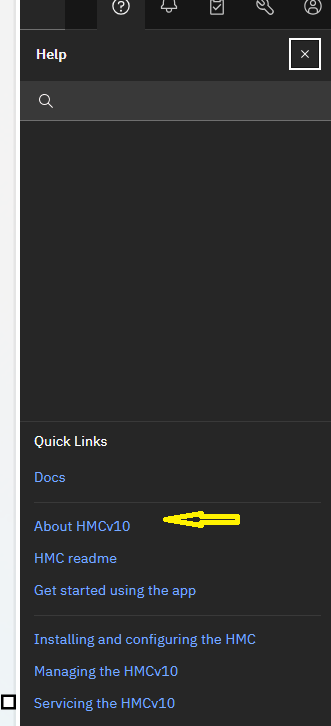 You see the following: |
| | | |
x86:
"version= Version: 10
Release: 3
Service Pack: 1063
HMC Build level 2510312159
MF71736 - HMC V10R3 M1063
","base_version=V10R3
ppc: "version= Version: 10
Release: 3
Service Pack: 1063
HMC Build level 2510312159
MF71737 - HMC V10R3 M1063
","base_version=V10R3 |
|
It is recommended that you perform a backup of the HMC. Record the current HMC version and fix information in the backup description field. Instructions for the HMC backup are provided at the following link:Backup HMC data
[{"Type":"MASTER","Line of Business":{"code":"LOB08","label":"Cognitive Systems"},"Business Unit":{"code":"BU054","label":"Systems w\/TPS"},"Product":{"code":"SSOQ2E","label":"Hardware Management Console V10"},"ARM Category":[{"code":"a8m0z0000001jEzAAI","label":"HMC Enhanced UI"}],"ARM Case Number":"","Platform":[{"code":"PF025","label":"Platform Independent"}],"Version":"10.1.0;and future releases"}]