IBM Support

Migrating Clients using NIM on PowerVS

Question & Answer


Question

This document will cover the procedure on configuring NIM on a PowerVS and migrating an AIX VM NIM Client from AIX 7.1 to AIX 7.2/7.3, as well as other operations.

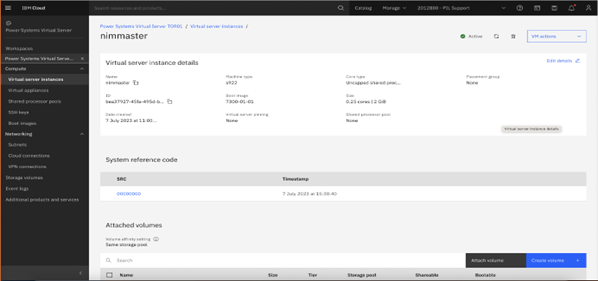
This document explains the procedure on how to configure NIM on PowerVS  and migrate a AIX VM client from AIX 7.1 to AIX 7.2/7.3, how to deploy a AIX 7.2/7.3 VM on the same subnet where AIX 7.1 is. This VM is deployed using the PowerVS stock image and configured as an AIX 7.2/7.3 NIM Master.


Note: For customer who want to migrate Virtual server from 7.1 to 7.2. it is recommended to configure a NIM Master on a 7.2 AIX LPAR so that we can access the /usr/sys/inst.images directory for 7.2 base fileset to create lpp_resource and spot at 7.2 level


Answer

Introduction

The purpose of this document is to explain the procedure on configuring NIM on PowerVS, migrating a NIM Client from AIX 7.1 to AIX 7.2/7.3, deploying an AIX 7.2/7.3 VM on the same subnet as the AIX 7.1 VM using a PowerVS stock image configured as an AIX 7.2/7.3 NIM Master.


Note: For users who want to migrate a virtual server from 7.1 to 7.2. It is recommended to configure NIM Master on 7.2 machine so that we can access the /usr/sys/inst.images directory for 7.2 base fileset to create lpp_resource and spot at 7.2 level.

Requirements

Deploying an AIX 7.3 VM as a NIM Master.

For users planning to migrate clients from 7.1 to 7.2, as mentioned earlier deploy a 7.2 VM as a NIM Master.
 
image-20230918110830-2
Deploying an AIX 7.1 VM as a NIM Client (hostname nimclient1)
image-20230918110941-3
Note that the NIM Master and Client are on the same subnet in this example.
Hostname Resolution
We need to always make sure that hostname resolution works properly between the two VMs before we start configuring our NIM Master and Client. Hostname resolution needs to work both by hostname and by IP address. Some checks that you can do are:
> Make sure there's identical entries in /etc/hosts for both the NIM Master and the NIM Client on both VMs.
> Check /etc/netsvc.conf - the last line should be hosts=local4,bind4
image-20230918111317-4image-20230918111324-5
Here we have added the IP address and hostname in both /etc/hosts files and the # host command resolves correctly.

Setting up your NIM environment

Setting up a NIM Master on a PowerVS VM is identical to the regular AIX configuration. You need to install the required additional filesets - bos.sysmgt.nim.master and bos.sysmgt.nim.client. Irrespective of the version of AIX, the filesets are available as part of the bos.sysmgt fileset package located in /usr/sys/inst.images/installp/ppc.
image-20230918112117-1
Install the bos.sysmgt.nim.master fileset on the NIM Master
image-20230918112206-2
image-20230918112215-3
Verify the installation was successful
image-20230918112220-4
Configuring the NIM Master
You can configure either with SMIT or with the CLI. You can use the SMIT fastpath nimconfig:
Using SMIT
# smitty nimconfig
Provide the network name and select the network interface your Master
image-20230918112423-5
image-20230918112428-6
Using command line:
# nimconfig -a pif_name=enX -a netname=master_net -a cable_type=bnc

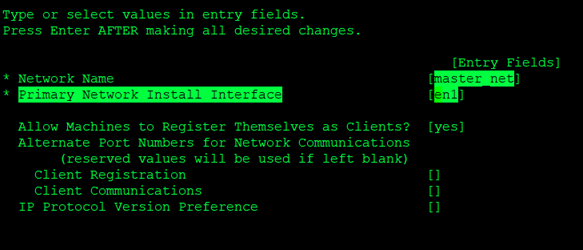
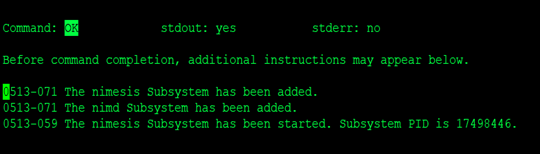
Once this is complete, we have a functioning NIM master.
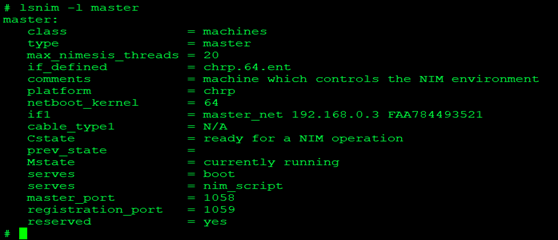
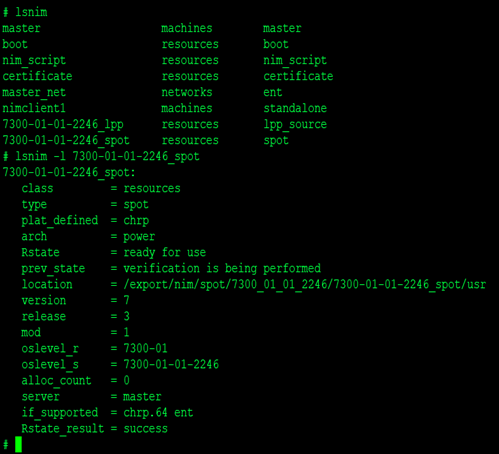
Look at the following output and you’ll see information about your master
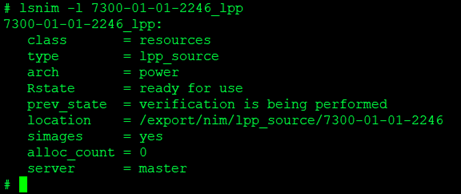
# lsnim -l master
image-20230918112601-7
image-20230918112607-8
Configuring the NIM Client
Similar to the NIM Master, you can configure it either through SMIT or through the CLI.
Using SMIT:
# smitty niminit
image-20230918112739-9
Here we selected client name as nimclient1 and selected en1 for the client network and the communication protocol selected is nimsh.
image-20230918112807-10
Using command line:
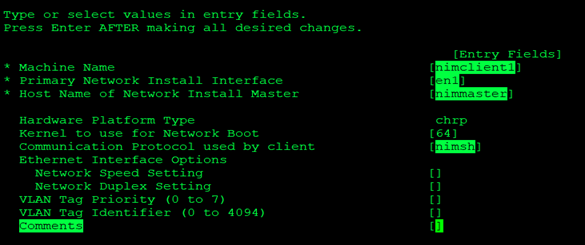
#niminit –a name=<client hostnam> –a master=<master hostname>  -a pif_name=enX–a connect=shell/nimsh
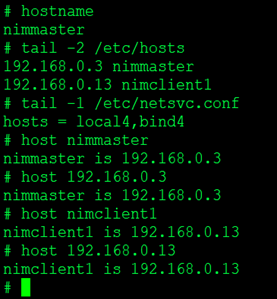
To verify the communication between the Master and the Client, you can run the nim -o lslpp command from the NIM Master to list installed filesets on the NIM Client.

On the NIM Master:
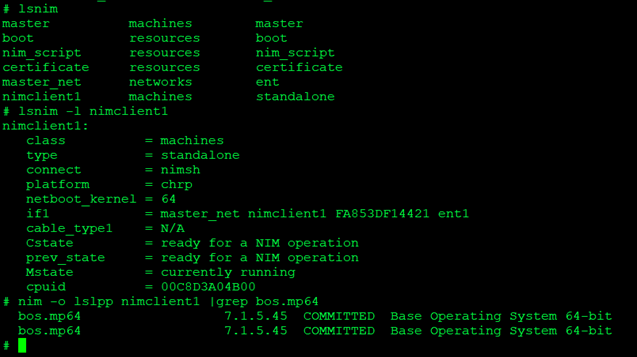
#nim –o lslpp <client name>
image-20230918113004-11
 

Defining NIM resources

To interact with the defined NIM clients, you first need to define NIM resources. The most commonly used resources are lpp_source, SPOT, mksysb, bosinst_data and others, but for the purpose of this document, we'll only be using an lpp_source and a SPOT resource.
Before we get into that, we need to specify where we will keep them. A good standard is to use “/export” for the filesystem nomenclature
We created a new vg (nimvg) to put the resources and created a filesystem and mounted to /export.
image-20230918113554-12
> lpp_source
The lpp_source is created from base AIX Image.
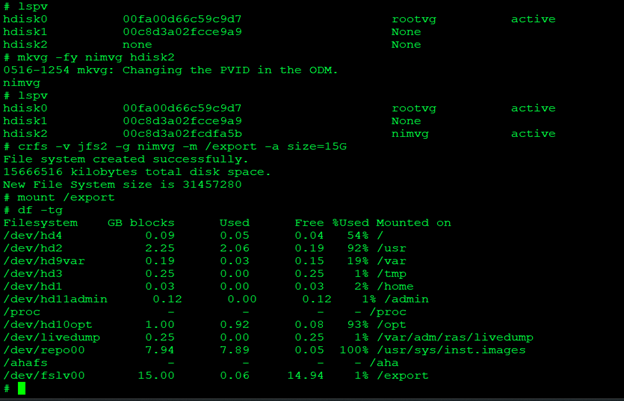
The lpp_source is just a folder that stores all the filesets that needs to be installed during an installation or update operation
We are creating 7.3 resources. Base image filesets are available under /usr/sys/inst.images/installp/ppc.
#smitty nim_mkres > select lpp_resource
image-20230918113749-13
Provide the resource name, location to store and the source of Image to create the lpp_source.
image-20230918113825-14
Verify it is created correctly with lsnim -l <resource name>
image-20230918113848-15
> SPOT
The Shared Product Object Tree (SPOT) is a fundamental resource in the NIM environment. It is required to install or initialize all types of machine configurations.
A SPOT provides a /usr filesystem as well as the network boot support for all clients.
Everything that a machine requires from a /usr filesystem, such as the AIX kernel, executable commands, libraries, and applications are included in the SPOT resource.
#smitty nim_mkres > select spot
image-20230918114031-16

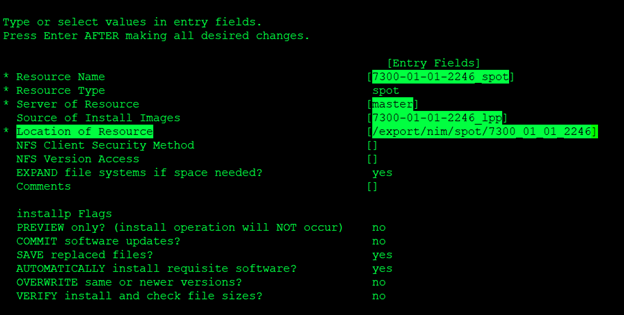
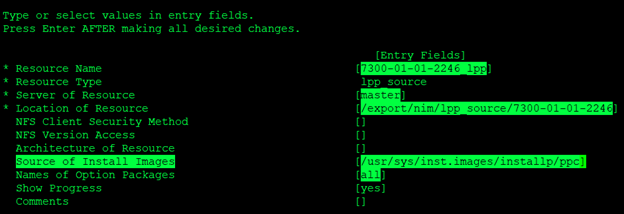
Fill the Resource Name, pick the previously created lpp_source as a source of install image and provide the location where the SPOT needs to be defined.
image-20230918114041-17
Verify it is created correctly with lsnim -l <resource name>
image-20230918114145-18
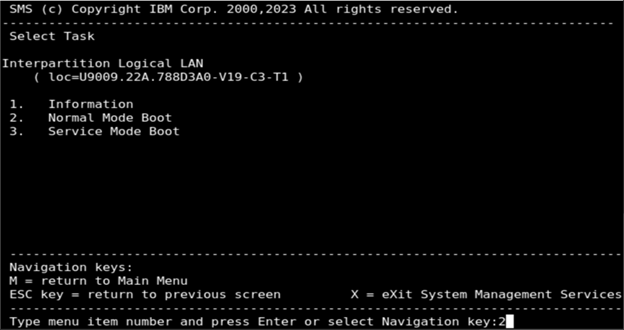
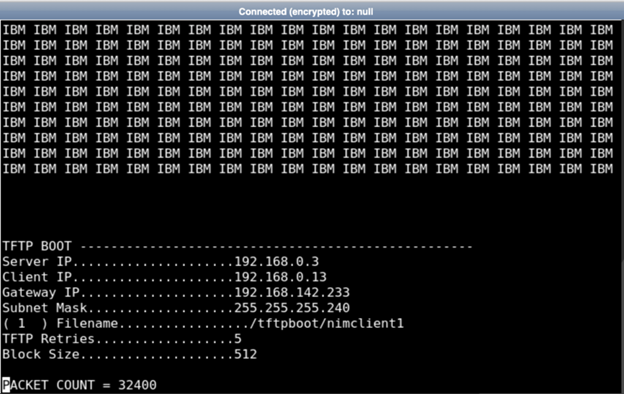
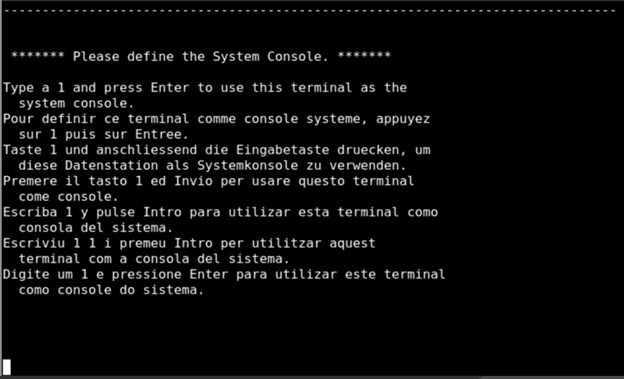
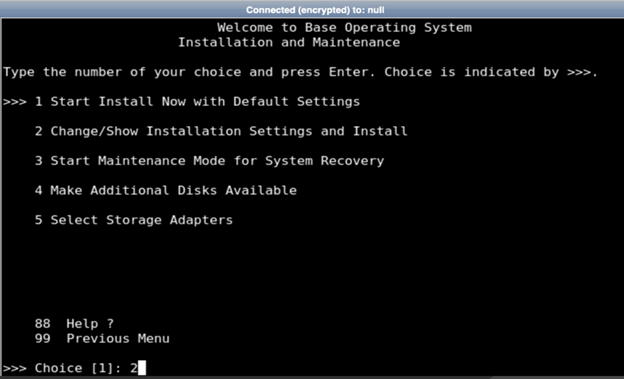
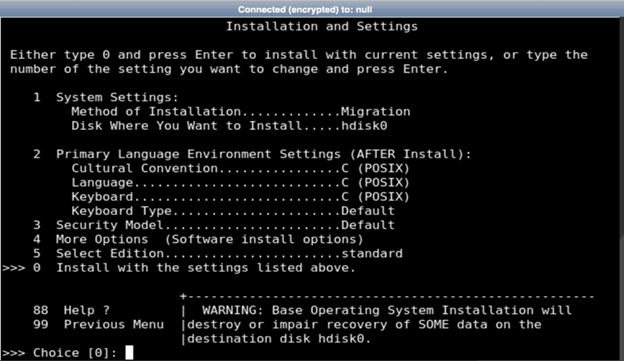
NIM Installation/Migration
Setup used in this example:
NIM Master = nimmaster (oslevel 7300-01-01-2246)
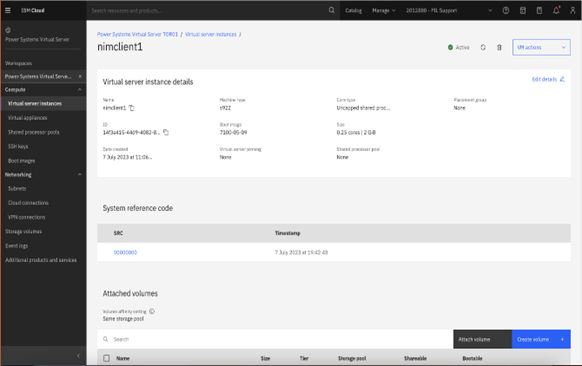
NIM Client= nimclient1 (oslevel 7100-05-09-2148)

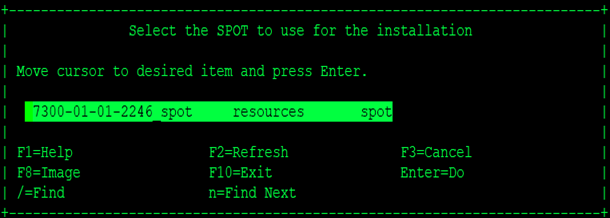
We are migrating the client (nimclient1) to 7.3 using resource using AIX-7300-01-01-2246_lpp and AIX-7300-01-01-2246_spot.
image-20230918114437-19
#smitty nim_bosinst  > To initiate NIM BOS Installation

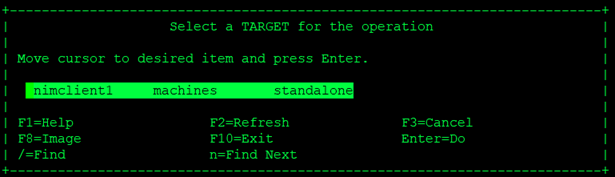
Select the Client listed, here our client name is nimclient1
image-20230918114505-20
Next, select the lpp_source that we previously defined for the installation.
image-20230918114552-21
Next, select the SPOT resource.
image-20230918114637-22
On the following screen, most of the information is populated. You need to change only a few options:
image-20230918114846-23
Change:

Accept License Agreement to Yes
Initiate Reboot and Installation to No
Again Accept License Agreement to Yes
Then hit Enter and the installation will be set up for initiating.
Now we need to go to the VM GUI, Open a Console of the client first then shut it down and activate it again
image-20230918115120-24
Now go to the previously opened terminal and press 1 continuously to boot in SMS mode. Then we get a Prompt as below.
image-20230918115151-25
Select 2 to configure the IP Parameters for network boot
image-20230918115226-26
Select the IP Version here, we selected IPv4. Select 1 and hit Enter
image-20230918115309-27
Select the Network Service as BOOTP
image-20230918115334-28
Select Option 1 for Setting IP Parameters and hit Enter
image-20230918115415-29
Fill the Client and Master ip, Gateway and subnet of client. Then do an ESC and go to previous screen to do Ping Test
image-20230918115454-30
image-20230918115501-31
image-20230918115509-32
We can see ping is successful. Now Press M to go back to Main Menu.
Select Option 5 - Boot Options
image-20230918115549-33
Select Option 1 - Select Install/Boot device
image-20230918115615-34
Select Option 4 - Network
image-20230918115703-35
Select Option 1 - BOOTP
image-20230918115723-36
Select your respective NIM install interface
image-20230918115740-37
Select Option 2 - Normal Mode Boot
image-20230918115821-38
Select Option 1 - Yes, exit the System Management Services menu.
image-20230918115841-39
After that, the NIM packet count will start, which is essentially trasnferring the boot image from the Master to the Client using TFTP.
 
image-20230918115942-40
Once its finished, you will be presented with the Base Operating System installation menus:
image-20230918120014-41
image-20230918120044-42
From here, you can verify the correct hdisk to install on, or if it's a Migration, verify the installation method. If you have multiple instances of your rootvg (alt_disk etc.) you can pick the correct one to Migrate.
image-20230918120140-43
If everything looks correct, press 0 and enter to start the installation. Once its finished, you will be presented with the OS Login screen.

Useful links:

NIM Setup Guide: https://www.ibm.com/support/pages/nim-setup-guide#7
Creating a Power Systems Virtual Server: https://cloud.ibm.com/docs/power-iaas?topic=power-iaas-creating-power-virtual-server
NIM Communication within a Firewall environment: https://www.ibm.com/support/pages/nim-communication-within-firewall-environment

[{"Type":"MASTER","Line of Business":{"code":"LOB57","label":"Power"},"Business Unit":{"code":"BU058","label":"IBM Infrastructure w\/TPS"},"Product":{"code":"SSVEF8","label":"AIX 7.2 Enterprise Edition"},"ARM Category":[{"code":"a8m0z000000cvz2AAA","label":"Install-\u003ENIM"}],"ARM Case Number":"","Platform":[{"code":"PF025","label":"Platform Independent"}],"Version":"All Versions"}]

Document Information

Modified date:
18 September 2023

UID

ibm17033798