How To
Summary
In this tutorial, you learn how to install instana-agent on an airgap environment with Kubernetes package manager HELM.
Objective
Installation guide on how to correctly install instana-agent on an airgap environment in Kubernetes cluster.
Environment
Prerequisites
- Linux CentOS 7 or 8
- Docker
- Helm
- Minikube
- Instana/helm-charts
Note: In this example, we use the CentOS Linux distribution, but installation steps are valid for all distributions.
Steps
Follow the steps and execute the commands:
Step 1: Docker installation
sudo yum install -y yum-utils
sudo yum-config-manager --add-repo https://download.docker.com/linux/centos/docker-ce.repo

sudo yum install -y docker-ce docker-ce-cli containerd.io docker-buildx-plugin docker-compose-plugin
sudo systemctl start docker
Step 2: HELM installation
sudo su
sudo yum install -y epel-release
sudo yum install -y snapd
sudo systemctl enable --now snapd.socket
sudo ln -s /var/lib/snapd/snap /snap
sudo snap install helm --classic
PATH="$PATH:/snap/bin/"
helm version
Step 3: Minikube installation
cat <<EOF | sudo tee /etc/yum.repos.d/kubernetes.repo
[kubernetes]
name=Kubernetes
baseurl=https://packages.cloud.google.com/yum/repos/kubernetes-el7-x86_64
enabled=1
#gpgcheck=1 #without this
#repo_gpgcheck=1 #without this
gpgkey=https://packages.cloud.google.com/yum/doc/yum-key.gpg
EOF

sudo yum install -y kubectl

curl -LO https://storage.googleapis.com/minikube/releases/latest/minikube-latest.x86_64.rpm

sudo rpm -Uvh minikube-latest.x86_64.rpm

minikube start --force --driver=docker

eval $(minikube docker-env)

kubectl cluster-info
Step 4: Instana agent - pulling images on the host with an internet connection
Note: Put the <agentKey>.
docker login https://containers.instana.io/v2 -u _ -p <agentKey>
docker pull containers.instana.io/instana/release/agent/static:latest
docker pull icr.io/instana/k8sensor:latest
docker logout
- convert those images into tar files:
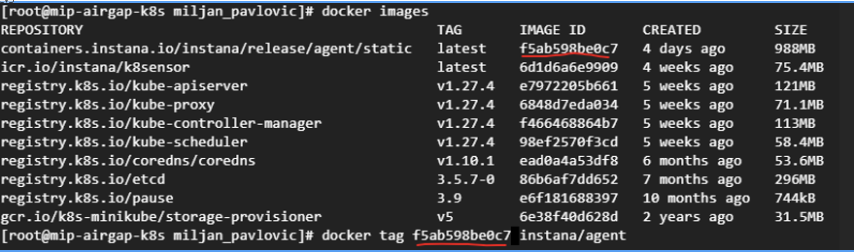
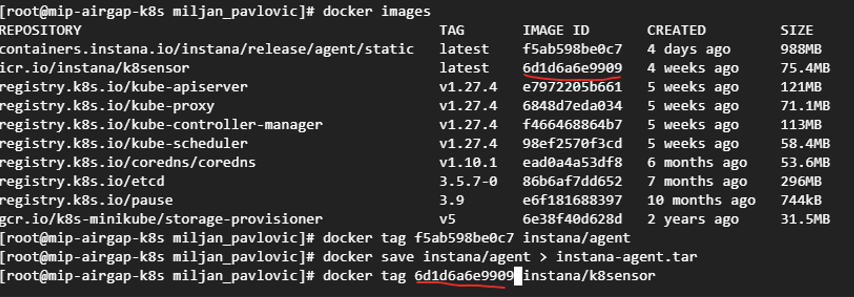
docker images
docker tag <instanaAgentImageID> instana/agent
docker save instana/agent > instana-agent.tar
docker tag <sensorID> instana/k8sensor
docker save instana/k8sensor > instana-k8sensor.tar
Note: Copy files/export (instana-agent.tar and instana-k8sensor.tar) to desired host (airgap machine, which has all mentioned prerequisites satisfied).
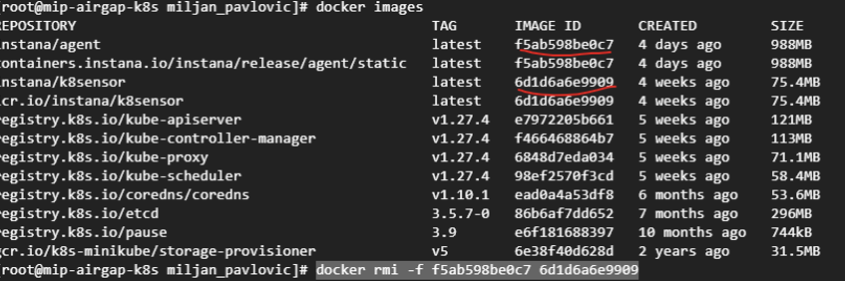
- After copying files, it’s time to create images on the airgap machine. For testing purposes, we will use the same host, let's say that we have moved our tar files into a new host. From now this is the new host (airgap) but first, let’s go and delete current images
docker rmi -f <instanaAgentImageID> <sensorID>
- Import images from tar files (instana-agent.tar and instana-k8sensor.tar)
docker load --input instana-agent.tar
docker load --input instana-k8sensor.tar
Step 5: Run the docker registry server and push images
docker run -d -p 5000:5000 --restart=always --name registry registry:2

docker tag instana/agent:latest localhost:5000/instana-agent
docker push localhost:5000/instana-agent

docker tag instana/k8sensor:latest localhost:5000/instana-k8sensor
docker push localhost:5000/instana-k8sensor

#Now we can delete all images related to the agent:
docker rmi -f <instanaAgentImageID> <sensorID>

Step 6: Pull instana charts from the below repository
helm pull instana-agent --repo https://agents.instana.io/helm instana-agent

Step 7: Finally, we can deploy our agent into Kubernetes cluster
Note: Put the <agentKey> and edit <agent.endpointHost>, <agent.endpointPort>, <k8_senosr.image.name>, <agent.image.name>.
helm upgrade --install --create-namespace \
   --namespace instana-agent \
   --set agent.key=<agentKey> \
   --set agent.endpointHost=ingress-red-saas.instana.io \
   --set agent.endpointPort=443 \
   --set cluster.name='mip-back-test' \
   --set zone.name='mip-gke-zone' \
   --set k8s_sensor.deployment.enabled=true \
   --set k8s_sensor.image.name=localhost:5000/instana-k8sensor \
   --set k8s_sensor.image.tag=latest \
   --set k8s_sensor.image.pullPolicy=IfNotPresent  \
   --set agent.image.name=localhost:5000/instana-agent \
   --set agent.image.tag=latest \
   --set agent.image.pullPolicy=IfNotPresent  \
   instana-agent instana-agent-1.2.61.tgz
- Then, let’s go to check our pods with the command and after this step, open your Instana dashboard to check the monitored Kubernetes cluster
kubectl get all -n instana-agent
Document Location
Worldwide
[{"Type":"MASTER","Line of Business":{"code":"LOB45","label":"Automation"},"Business Unit":{"code":"BU059","label":"IBM Software w\/o TPS"},"Product":{"code":"SSE1JP5","label":"IBM Instana Observability"},"ARM Category":[{"code":"a8m3p000000UoUGAA0","label":"Agent"},{"code":"a8m3p000000UoUHAA0","label":"Agent-\u003EReq - Install - Config"}],"ARM Case Number":"","Platform":[{"code":"PF025","label":"Platform Independent"}],"Version":"All Versions"}]
Was this topic helpful?
Document Information
Modified date:
20 October 2023
UID
ibm17029281