News
Abstract
The following updates are available in release 2.0.88 SC of Planning Analytics Workspace.
Content
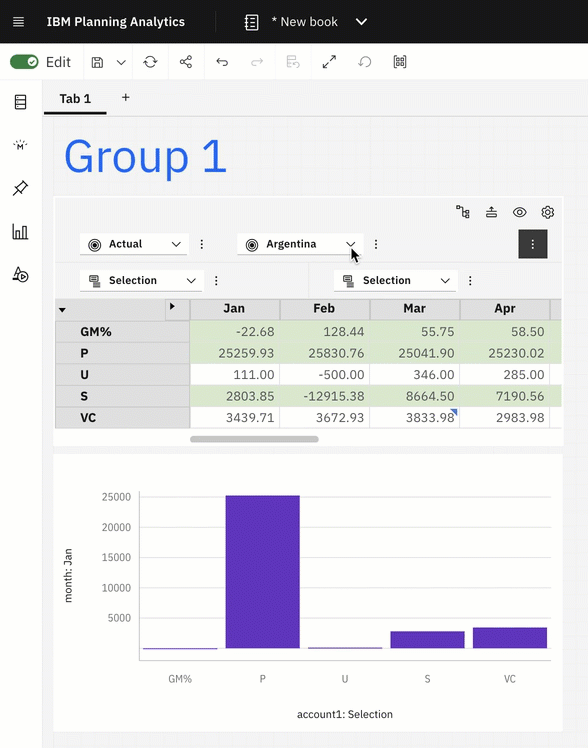
Synchronize widgets at a group level
You can now synchronize widgets (explorations, visualizations, synchronization tiles, selector widgets, and websheets) at the group level with group synchronization. Previously, you could set the scope of synchronization at the book or sheet level only.
You can start by creating a synchronization group in book properties.
- In edit mode, click Properties.
- Under Synchronization, click Create and manage custom groups.
- Click Create to create a group.
- Enter a name and description for the group, and click Create.
- Click Apply changes to finish creating the group.
You can now add widgets to your group. Select a widget in your book and under Properties > Synchronization > Synchronization group, select the group you created. Repeat this process for all the widgets that you want to assign to the group. Widgets in the group are now synchronized together.
Note: Only changes (such as hierarchy changes) that affect the data in a widget are shared with other widgets.
Synchronization groups can span the entire book.
When you have two or more synchronization groups, you can have one group impact another group to achieve a cascading effect. To achieve this effect, assign multiple source groups to a target group in the Manage groups dialog.
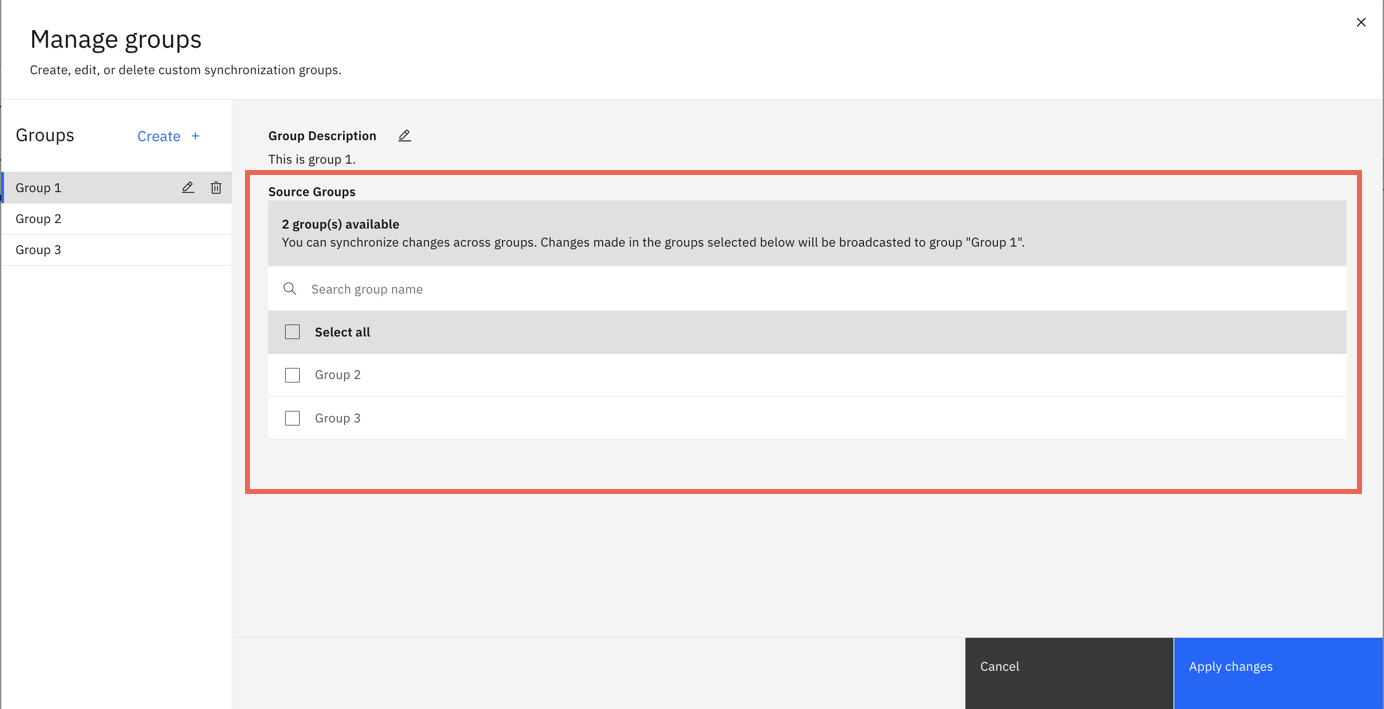
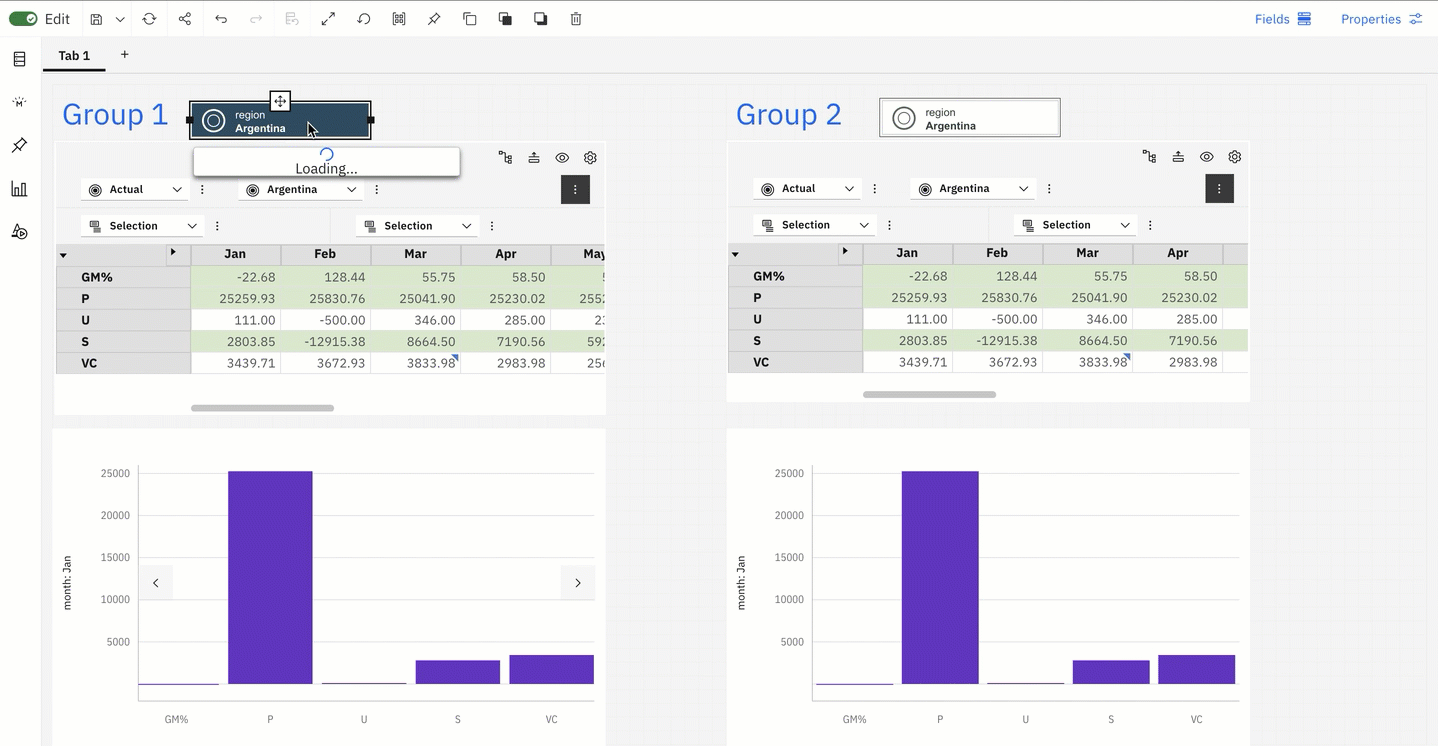
In the following example, the hierarchy change in Group 1 cascades to all the widgets in Group 1 and Group 2.
Note: Synchronization changes cascade only one level. For example, if Group 1 is a source group for Group 2 and Group 2 is a source group for Group 3, changes in Group 1 impact only Group 2.
- Book level synchronization - widgets in all the sheets in a book synchronize
- Sheet level synchronization - widgets in the selected sheet synchronize
- Custom group level synchronization - widgets in the book synchronize with changes in the custom group
By default, synchronization is set to sheet level.
Click the new View synchronization groups icon in the toolbar to view an overlay for all widgets that are part of synchronization. The overlay displays the name of the group that the widgets belong to. Click the icon again to interact with the widget.
![]()
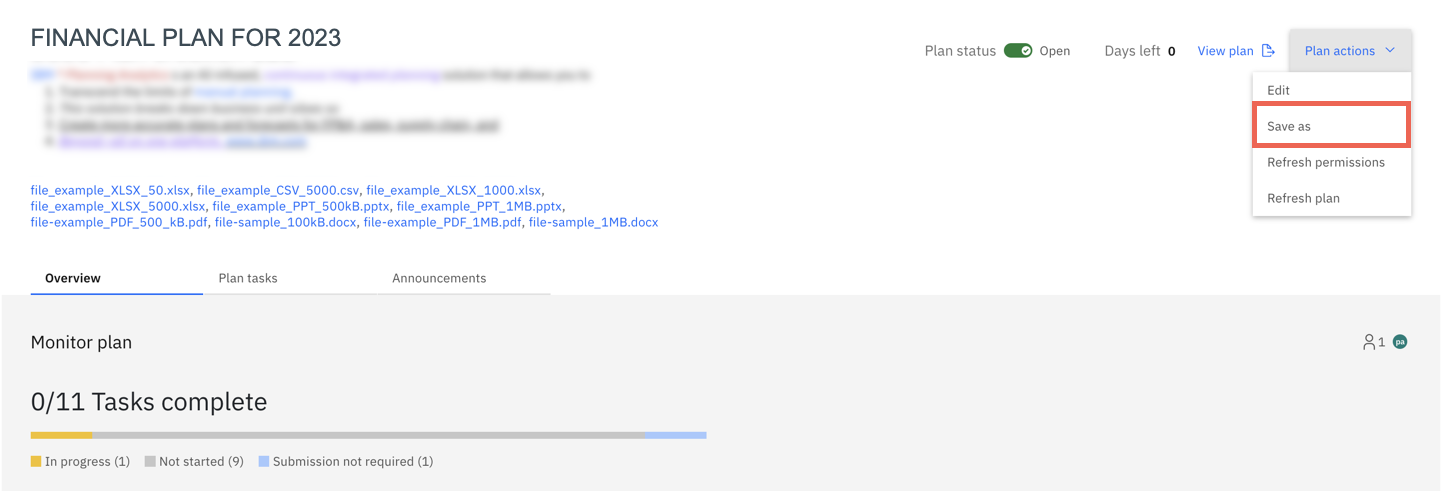
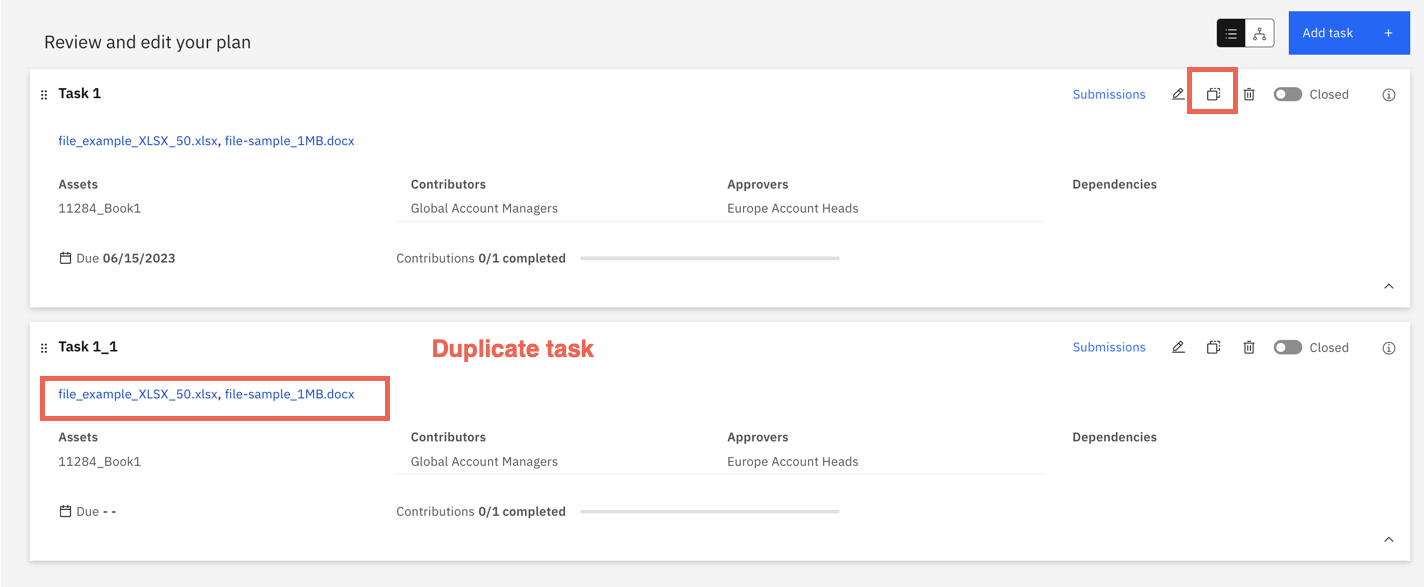
Duplicate applications and plans with attachments
The duplication feature in Applications and Plans now supports attachments. When you duplicate an application or plan, any attachments in the original now automatically copy over to the duplicate. Attachments are also duplicated when you duplicate a section in Applications or a task in Plans.
-
From the home page, click Applications and Plans.
-
On the Applications and Plans page, click the menu icon next to the plan or application you want to duplicate.
-
Click Edit.
-
Under Application actions or Plan actions, select Save as.
-
Rename the duplicate and click OK.
To duplicate sections in Applications or tasks in Plans , click the duplicate option in the section or task that you want to duplicate. All attachments in the original task or section now copy over to the duplicate automatically.
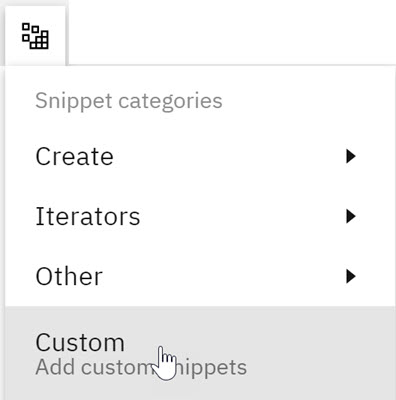
Create and insert custom snippets for processes
If you have TurboIntegrator process code that you use frequently, you can now save the code as a custom snippet. You can insert a custom snippet into the Script tab of a process
When you click the Snippet ![]() icon on the process editor, a new Custom category is available. Select any of the snippets that you've created to insert your custom code into a process.
icon on the process editor, a new Custom category is available. Select any of the snippets that you've created to insert your custom code into a process.
Use subset calculations on the context section of a view
The subset calculation feature in the cube viewer is now available for dimensions on the context section of a view.
To create a subset calculation, click the Options menu on a context dimension, then click Subset calculation options.
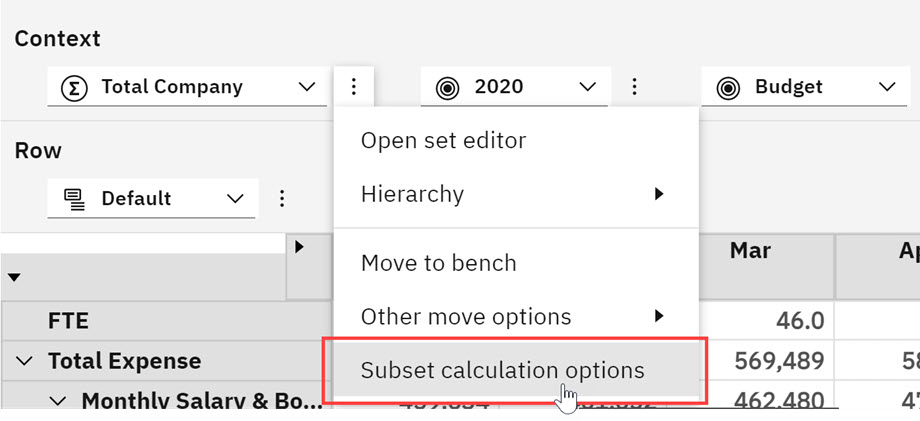
To learn more about subset calculations, see Add a subset calculation to a view.
Use the new 'Expand to' and 'Keep with' options to organize members in a set
Expand to and Keep with options are now available in the set editor. These new features display a set of members, based on hierarchy.
Expand to adds members to the set, allowing you to display members of one level higher or one level lower, based on the selected hierarchy. To access this feature, right-click on a member, select Expand to, and select the hierarchy you want to display from the menu.
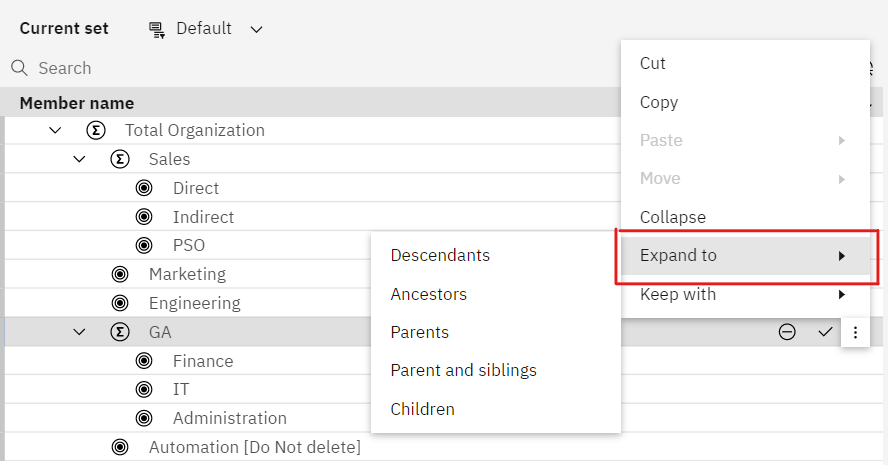
Keep with, previously named Show, replaces members in the set, based on the selected hierarchy. To access this feature, right-click on a member, select Keep with, and select the hierarchy you want to display from the menu.
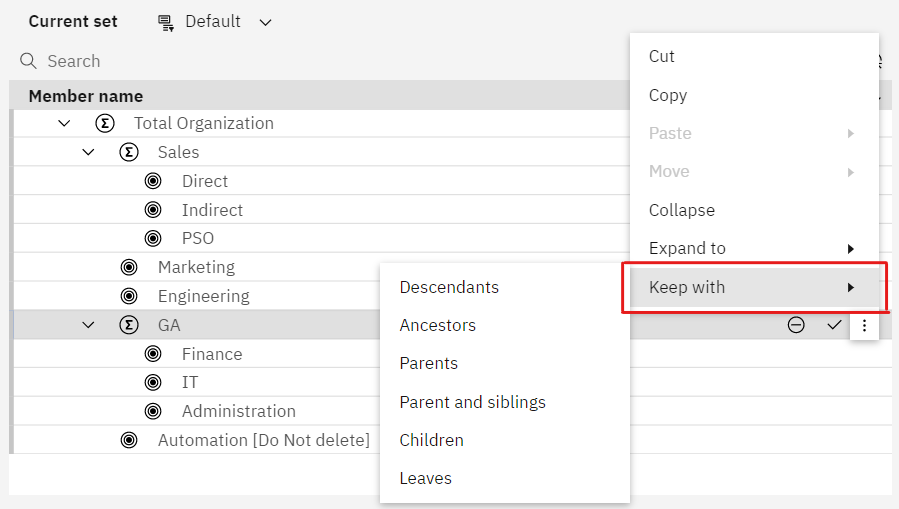
The Expand to and Keep with features both have a new menu item, named Parent and siblings. In Expand to, this allows you to expand a set member to its parents and siblings. In Keep with, this allows you to replace a set member with its parents and siblings.
Use the new experience dimension editor in books
The new experience dimension editor, which was previously available only on the modelling workbench, is now available in books.
To edit a dimension in the new experience editor, right-click a dimension on the Databases tree, then click Edit dimension
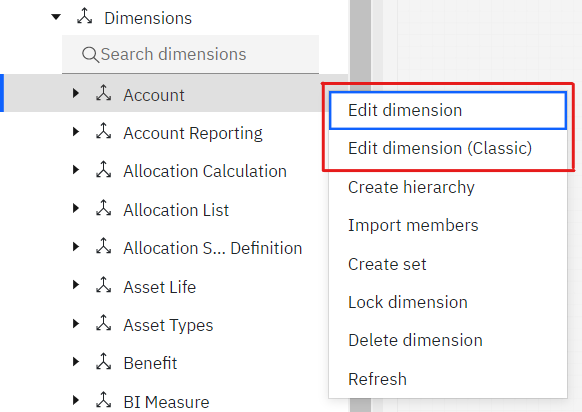
When you save a book with the new editor, you can reopen the book and retain your editor preferences in the same state as in the classic editor.
For more information on the new experience dimension editor, see Welcome to the new experience dimension editor.
Access process error logs from the Databases tree
You can view or download process error logs from the Processes node on the Databases tree in a modeling workbench.
- On a modeling workbench, expand the database where you want to examine process log files.
- Right-click the Processes node, then click Error logs.
The Process error logs page displays all available logs, identified by Process name and Date created. You can click a column heading to sort the list of logs.
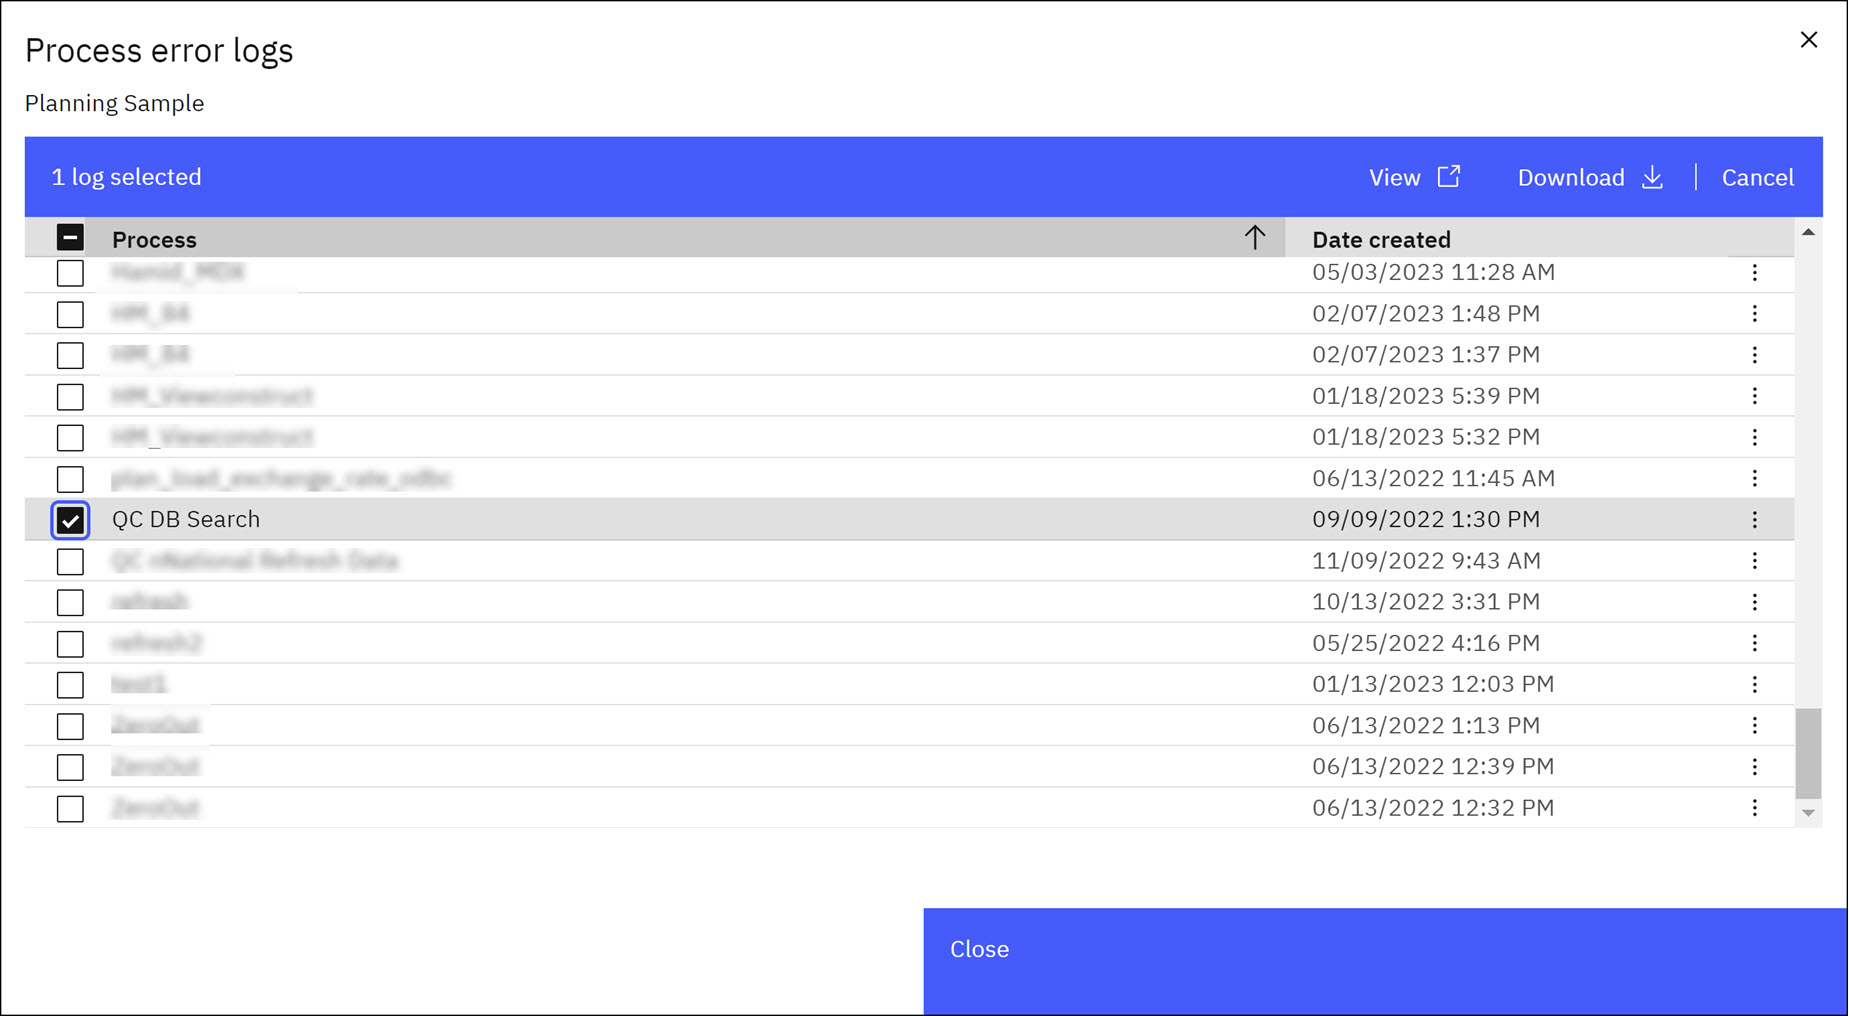
- Select the individual log that you want to examine.
- Click View to view the log in a temporary viewer or click Download to download the error log as a text file.
Temporarily pause thread or activity refresh
A new Auto refresh option on the database page controls automatic thread or activity refresh. You can use this option to pause refresh when you want to examine database activity without being interrupted by updates.
The option is available in Planning Analytics Workspace on all platforms, but is located slightly differently according to platform.
-
In Planning Analytics Workspace Local and Planning Analytics Workspace on Cloud, the option is available on the database Threads tab.

-
In Planning Analytics Workspace on Cloud Pak for Data and Planning Analytics Workspace on Planning Analytics as a Service, the option is available on the database Activity tab.
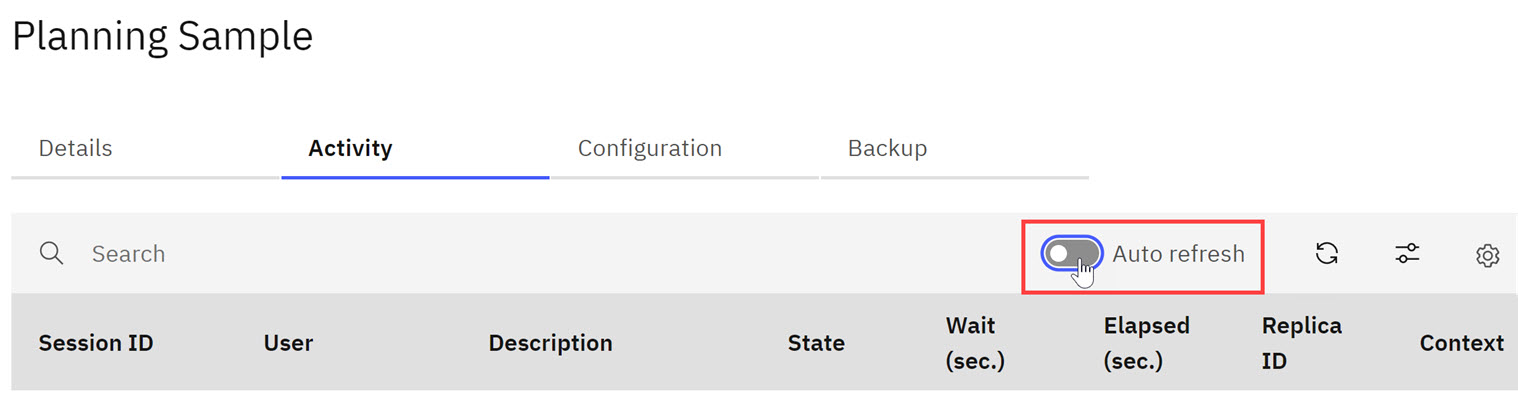
To temporarily pause automatic refresh, toggle the Auto refresh option to the off position.
Thread or activity collection continues while automatic refresh is paused. You can click Refresh ![]() to manually refresh the thread or activity list while automatic refresh is paused.
to manually refresh the thread or activity list while automatic refresh is paused.
When you toggle the Auto refresh option to the off position, the setting does not persist when you leave the Thread or Activity tab. If you click a different tab or a different database, the Auto refresh option is reset to the on position.
Deprecation notices
The following deprecation notices are applicable to Planning Analytics Workspace 2.0.88.
Classic cube viewer to be removed from Planning Analytics Workspace 2.0.90
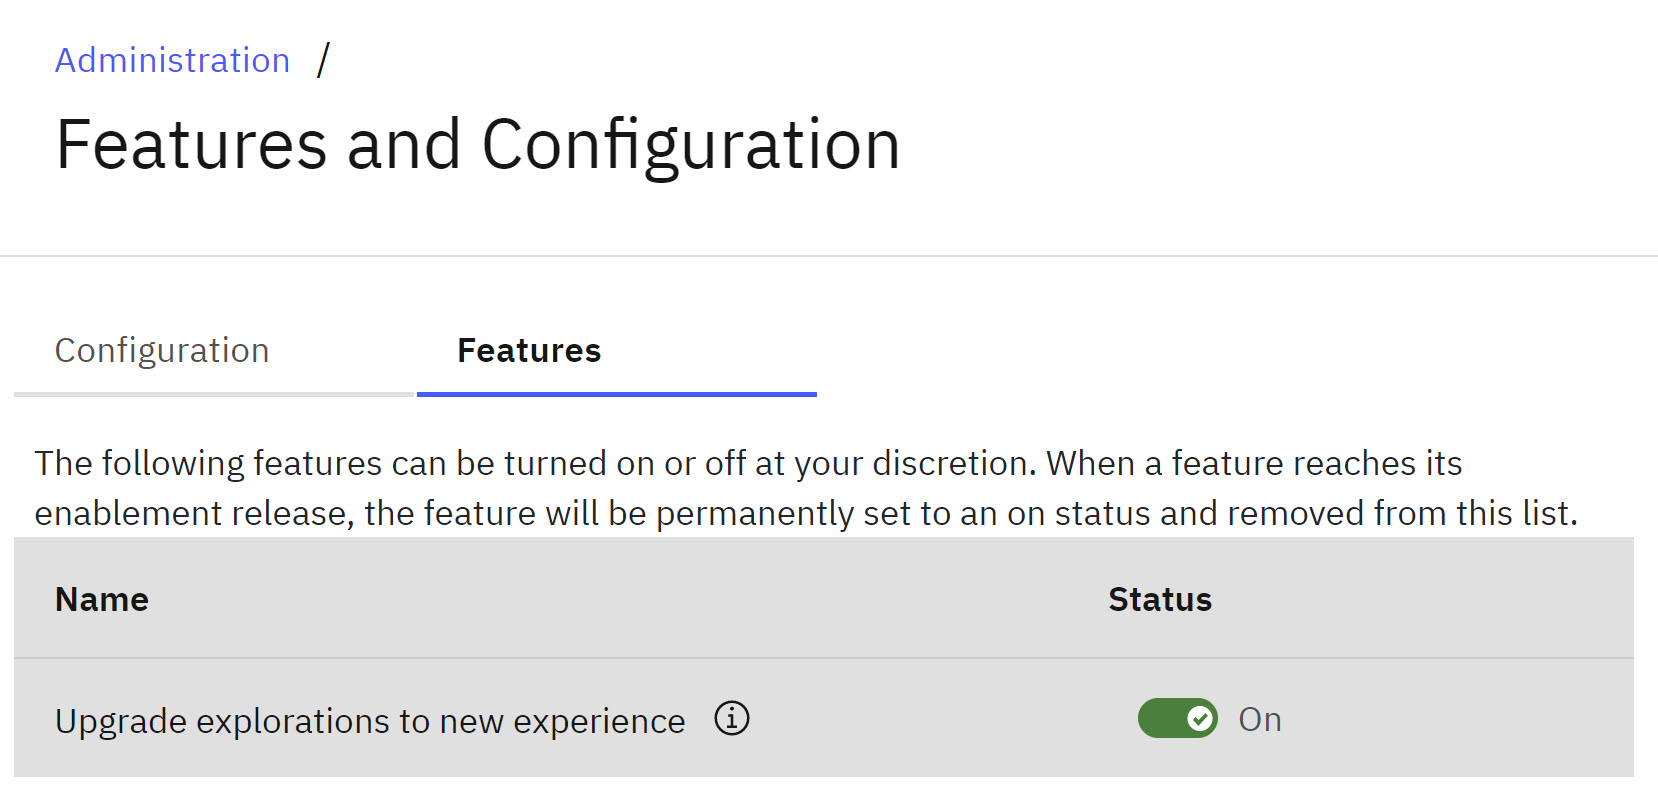
As of Planning Analytics Workspace 2.0.90, the classic cube viewer will be removed from Planning Analytics Workspace.
Any existing classic cube viewer will be converted to a new experience cube viewer when first opened in Planning Analytics Workspace 2.0.90.
The option to upgrade all cube views (explorations) to the new experience remains available on the Features and Configuration page in Planning Analytics Workspace Administration until the 2.0.90 release. An administrator can enable this option at any time prior to 2.0.90.
- Open a dimension on your database.
- Reserve the dimension
- Browse for any import file and import it into the dimension.
Was this topic helpful?
Document Information
Modified date:
14 June 2023
UID
ibm17001777