How To
Summary
How to set up MAS SAML with different IdPs.
Objective
- Set up SAML on the Identity Provider (IdP) side, including creating of Encryption Certificate and uploading it to the configuration.
- Complete SAML configuration on the MAS side.
Environment
- The configurations are meant as examples only, and all configuration changes need to be approved by your business personnel responsible for these functions.
- If your environment is hosted by an IBM Cloud provider, the MAS configuration screens for SAML authentication are hidden and the XMLs generated and provided by IBM SRE team.
- If unsure what attribute the claim needs to be sent as, when User Identifier (Name ID) format is chosen, then select unspecified. (urn:oasis:names:tc:SAML:1.1:nameid-format:unspecified). This attribute allows MAS to accept any format that is returned by the Name ID claim.
-
Currently, bypassing the MAS/Manage log-in screen directly after IdP initiated sign-on is not possible. You need to enter your userid into the MAS login page either before or after the IdP login.
Steps
- Log in to MAS Administration
- Go to Configurations > SAML Authentication
- Click 'Generate file' so that the SP metadata file configuration file can be created. Then, click 'OK'.
- Download the SP metadata file by clicking 'Download file'
- Log in to your Okta account https://developer.okta.com/login with your email ID and go to Applications
- Click 'Create App Integration', select SAML 2.0, and click Next.
- Enter the App name and click Next.
- Under SAML Settings > General, enter 'Single sign-on URL'. You can find it as Location URL in the SP metadata that you downloaded. It is the URL ending with context /saml20/mas-saml-sp/acs. Mas-saml-sp here is the default Service provider name that can be seen in MAS Administration > Configurations > SAML Authentication. You can change to whatever name you want.
- Enter 'Audience URI (SP Entity ID)'. It is the entityID URL in the SP metadata. It is the URL ending with /saml20/mas-saml-sp.
- Enter 'Default RelayState'. It is the URL where you want Okta application gets redirect to. It can be MAS Admin or Home or a Manage URL.
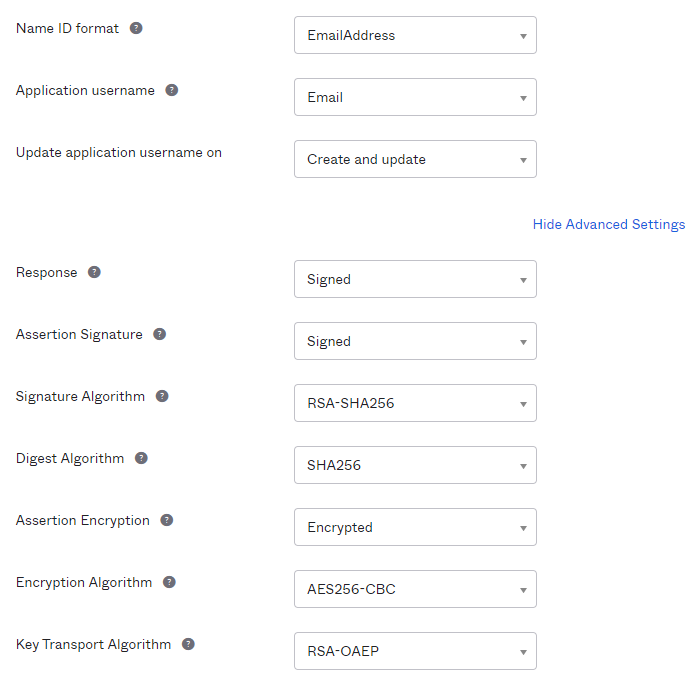
- Rest of the next fields you can match according to the screen capture shown here:
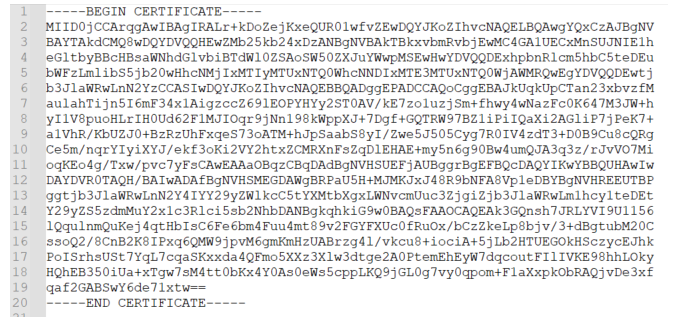
- Create an Encryption Certificate. For it, go to the SP metadata file, copy the Base 64 certificate, and paste it into a text file as shown here. Keep the file format as .crt.
- Then, upload it to the Encryption Certificate field.

- Click Next.
- Select option 'I'm an Okta customer adding an internal app' and check the App type.
- Then, click Finish.
- On the Sign-On tab, scroll down, and under SAML Signing Certificates, click Generate New Certificate.
- Then, click Actions and select View IdP metadata.
- Right-click the IdP metadata XML file and save it.
- Then, go to the Assignments tab, click Assign > Assign to People, search for your Okta user and click Assign. Click the 'Save and Go Back' button > Done.
- Once it is done, then go to MAS Administration > Users and create a user with the same Okta user ID (email ID). Make sure it gets added and synced successfully.
- Then, go to MAS Administration > Configurations > SAML Authentication. Under the 'Upload the SAML IdP metadata' section, upload the saved IdP metadata xml file.
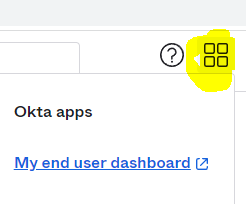
- Once it gets loaded sync successfully, go back to Okta, and click the highlighted option and select 'My end usXMLdashboard' link.
- Then, click your SAML application and you see it redirecting to MAS Admin, Home, or the Manage log in screen. Depending on what you set in the Default RelayState field at Okta.
- Log in with your Okta ID and you get logged in without entering the password.
Document Location
Worldwide
[{"Type":"MASTER","Line of Business":{"code":"LOB59","label":"Sustainability Software"},"Business Unit":{"code":"BU048","label":"IBM Software"},"Product":{"code":"SSRHPA","label":"IBM Maximo Application Suite"},"ARM Category":[{"code":"a8m3p000000F80hAAC","label":"Maximo Application Suite-\u003EMAS Applications-\u003EAdministration"}],"ARM Case Number":"","Platform":[{"code":"PF025","label":"Platform Independent"}],"Version":"8.10.0;8.7.0;8.8.0;8.9.0"}]
Was this topic helpful?
Document Information
Modified date:
11 June 2024
UID
ibm16854177