How To
Summary
This document provides instructions to upgrade vHMC for PowerVM and HMC 7063 machine type from V9R2M950 or V10R1M1010 to V10R2M1030
Objective
Prerequisites
Before upgrading, complete the following:
1. Verify HMC model is compatible with V10R2M1030
HMC V10 R2 M1030 supports the following HMC models:
- Open Power : 7063-CR1
- Open Power : 7063-CR2
- (vhmc) PowerVM Power 8, Power 9 and Power 10
- HMC V9 R2
- Mandatory fix for vHMC on PowerVM and 7063 Machine type: MH01942 (9.2.950.7 ppc64le)
- (This fix must be the last fix installed, prior to performing this Upgrade. It is not cumulative)
- HMC V10 R1
-
Mandatory fix for vHMC on PowerVM and 7063 Machine type: MF70431 (10.1.1010.3 ppc64le)
-
(This fix must be the last fix installed, prior to performing this Upgrade. It is not cumulative)
-
"The file disk1.img appeared to be missing, or the transfer did not complete successfully, resulting in an incorrect file size or checksum. Please retry the operation."
Review all additional "upgrade notes" found in the V10 R2 M1030 release notes. The readme file release notes for HMC V10 R2 M1030 Recovery Media can be found in IBM Fix Central at https://download4.boulder.ibm.com/sar/CMA/HMA/0b1ly/4/MF70433.readme.html
If the HMC has not been restarted recently, you should restart before you begin the upgrade. To reboot, either:
- Use the GUI task HMC Management > Console Management > Shut Down or restart the Management Console > restart HMC then click OK.
OR
- Use the CLI hmcshutdown -r -t now
Environment
Steps
This section describes how to perform the upgrade over the network instead of from Recovery DVD. The network upgrade can be done using FTP, sftp or nfs protocol from your local server.
This upgrade method requires restricted shell command-line access.
From a remote location, restricted shell is available through the ssh protocol. For information on how to access HMC command line remotely see
Perform a Save Profile Data for each managed system to save an additional copy of partition/profile configurations. For dual HMCs managing the same server this step is only needed on the upgrade of the first HMC. It cannot be run on HMC with a server in "version mismatch - save area version mismatch" state.
At the command prompt, enter the following command tol save profile data for all servers:
lssyscfg -r sys -F type_model*serial_num | while read machine; do bkprofdata -m "$machine" -f Beforeupgrade$(date +%Y%m%d) ; done
A Save Upgrade Data task must be done to preserve information on the HMC before performing the upgrade. You must upgrade immediately after the Save Upgrade Data task. If you restart the HMC again without doing the upgrade, you must log in and run the Save Upgrade Data task (to hard disk) again before performing the upgrade. If your not using a USB, run the command saveupgdata -r disk then skip to Step 3.
| a. | Prepare media to use for Save Upgrade Data. You will need a USB flash drive. USB flash drive must be formatted FAT32 with a single partition and it cannot be password protected. Plug the flash drive into a USB port on the front of the HMC. Wait until you hear 3 beeps (or approximately 1 minute) for the HMC to detect the flash drive. Note: Save Upgrade Data will overwrite any existing save upgrade data on the media. It will not overwrite any backup Management Console Data already on the media. |
| b. | Use the following command specifying "diskusb" for USB flash drive. saveupgdata -r diskusb. |
| c. | Wait for the Save Upgrade Data task to complete. If the task fails, contact your next level of support before proceeding. If the Save Upgrade Data task is successful, the following optional procedure can be performed to verify the data: 1. Mount the media: Run the command lsmediadev to determine the mount point of the USB flash drive. In the example below, USB flash drive is /media/sda1 device=/dev/cdrom,mount_point=/media/cdrom,type=1,description=CD/DVD device=/dev/fd0,mount_point=/media/floppy,type=2,description=internal diskette drive device=/dev/hda,type=6,description=internal hard disk drive device=/dev/sda1,mount_point=/media/sda1,type=3,description=USB flash memory device Run the command mount 2. Run the command ls –l 3. Verify that there are five tar files with the following names: ACMSaveData.tar RSCTSaveUpgrade.tar SaveCCFWUpgradeData.tar SaveHSCSystemUpgradeData.tar SaveProfileDataUpgrade.tar If any of these tar files are missing, contact your next level of support. 4. Issue the command umount |
|
| a. |
Download the V10R2_network_images_ppc.zip from Fix Central. From the Fix Central site, select MF70433 HMC Recovery V10R2M1030 for 7063 Machine Type, click continue. Download option is set to HTTPS. Then find V10R2_network_images_ppc.zip and download to your PC. Then get the .zip file moved to your local server. Make sure the file is unzipped, which will give you the necessary network files to perform this upgrade, or use https://public.dhe.ibm.com/software/server/hmc/network/v1030/ppc/ to download the network files to your local server.
Open Restricted Shell (or ssh session) and type the following command: getupgfiles -r sftp -h myserver -u myuser --passwd mypassword -d /mydirectory The parameters of the getupgfiles command:
The following files will be downloaded to the directory indicated:
Once the files have all been downloaded successfully, the getupgfiles command returns to the command prompt. |
||||||||||||||||||||||||||||||||||||||||
| b. |
Set the HMC to do the next reboot from the special location on the hard disk where the downloaded V10 files are stored by typing the following command:
chhmc -c altdiskboot -s enable --mode upgrade Note: Remove any USB flash drive that contains HMC backup Management Console Data before performing a network upgrade. Failure to remove the drive will result in failed network upgrade. |
||||||||||||||||||||||||||||||||||||||||
| c. |
Reboot the HMC using one of the following methods:
Option 1. HMC GUI: HMC Management > Console Management > Shut Down or restart the Management Console > restart HMC then click OK Option 2. Restricted shell command: hmcshutdown -t now -r Note: The initial reboot can take 30-45 minutes. Do not reboot or power off; wait for the boot to complete. Once the HMC reboots, (the Petitboot screen should appear and you may need to arrow up and wait a bit for the Install from alternate disk option) then installation starts and typically takes about an hour. (See #10 under Prerequisites) After the installation of V10R2M1030 is complete, you should be able to remotely access the HMC again.
|
||||||||||||||||||||||||||||||||||||||||
| d. | At the Hardware Management Console login prompt, log in using your user ID and password. | ||||||||||||||||||||||||||||||||||||||||
|
|
|||||||||||||||||||||||||||||||||||||||||
This section shows how to use the BMC console viewer to upgrade using a remote virtual DVD. An external USB DVD drive can be used instead of remote virtual media. You may need to connect the USB DVD drive to an external power source (7063-CR1) or use a USB Y cable to connect to an extra USB port to provide sufficient power to the DVD drive.
Step 1: Download the Recovery DVD image Download the HMC Version 10R2M1030 Recovery DVD: HMC_Recovery_V10R2M1030_ppc.iso
External USB DVD drive: Burn the .iso as an image to DVD+R DL media. (This recovery media MF70433 cannot be ordered)
Step 2: Save Profile Data
Use one of the following options to perform a Save Profile Data for each managed system to save an additional copy of partition/profile configurations.
For dual HMCs managing the same server this step is only needed on the upgrade of the first HMC. It cannot be run on HMC with a server in "version mismatch - save area version mismatch" state.
Option 1: Use HMC GUI interface
| a. | Expand Resources, then All Systems |
| b. | Select the first managed system by checking the box in front of the server name. |
| c. | Under Actions select View All Actions > Legacy > Manage Partition Data > Backup. |
| d. | In the Profile Data backup window, type a name for the backup file, and click OK. |
| e. | You will get a popup window that the profile data has been backed up. Click OK. |
| Repeat a through e for each additional system managed by this HMC. Once you have a partition data backup for each managed system, continue with Step 3. |
At the command prompt, enter the following command which will save profile data for all servers:
lssyscfg -r sys -F type_model*serial_num | while read machine; do bkprofdata -m "$machine" -f Beforeupgrade$(date +%Y%m%d) ; done
Step 3: Save Upgrade Data
A Save Upgrade Data task must be done to preserve information on the HMC before performing the upgrade. You must upgrade immediately after the Save Upgrade Data task. If you restart the HMC again without doing the upgrade, you must log in and run the Save Upgrade Data task again before performing the upgrade.
| a. | Prepare media to use for Save Upgrade Data. You will need a USB flash drive. USB flash drive must be formatted FAT32 with a single partition and it cannot be password protected. Plug the flash drive into a USB port on the front of the HMC. Wait until you hear 3 beeps (or approximately 1 minute) for the HMC to detect the flash drive. Note: Save Upgrade Data will overwrite any existing save upgrade data on the media. It will not overwrite any backup Management Console Data already on the media. |
| b. | Save Upgrade Data can be performed using either HMC GUI or restricted shell command line. Use the HMC GUI: 1) Select HMC Management. > Console Management 2) Select Save Upgrade Data. 3) Select media type USB flash drive, click Next, and then click Finish. Use restricted shell command line: Run the following command specifying "diskusb" for USB flash drive: saveupgdata -r diskusb |
| c. | Wait for the Save Upgrade Data task to complete. If the task fails, contact your next level of support before proceeding. If the Save Upgrade Data task is successful, the following optional procedure can be performed to verify the data: 1. Open a restricted shell terminal Local HMC: Select HMC Management > Console Management > Open a Restricted Shell Terminal Remotely: Log in via ssh. 2. Mount the media: a. Run the command lsmediadev to determine the mount point of the USB flash drive. In the example below, USB flash drive is /media/sda1 device=/dev/cdrom,mount_point=/media/cdrom,type=1,description=CD/DVD device=/dev/fd0,mount_point=/media/floppy,type=2,description=internal diskette drive device=/dev/hda,type=6,description=internal hard disk drive device=/dev/sda1,mount_point=/media/sda1,type=3,description=USB flash memory device b. Run the command mount 3. Run the command ls –l 4. Verify that there are five tar files with the following names: ACMSaveData.tar RSCTSaveUpgrade.tar SaveCCFWUpgradeData.tar SaveHSCSystemUpgradeData.tar SaveProfileDataUpgrade.tar If any of these tar files are missing, contact your next level of support. 5. Issue the command umount |
| 4. | Once the Save Upgrade Data task is successful, remove the USB flash drive. |
Step 4: Upgrade HMC to V10R2M1030 (from Recovery DVD)
| a. |
Load the Recovery DVD
External USB DVD drive 1. Insert the USB drive (external power or Y-cable required 7063-CR1) 2. Insert the Recovery DVD into the drive. 3. Reboot the HMC
4. Select the option to Upgrade
|
|
(Remote user) For 7063-CR1
BMC Virtual media
Mount the iso image using BMC remote virtual media. 1. Log in to the BMC web interface (https:// 2. Select Remote Control. 3. Select Console Redirection. 4. Click Launch Console. Accept any Java prompts. 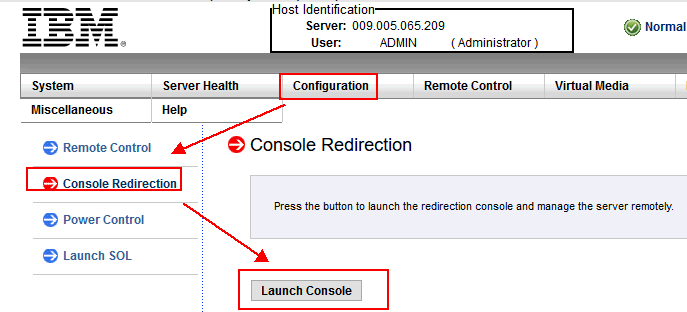  6. Under Logical Drive Type, select ISO File. 7. Click Open Image and locate the Recovery ISO file on your system. 8. Press plug-in to mount the ISO file. 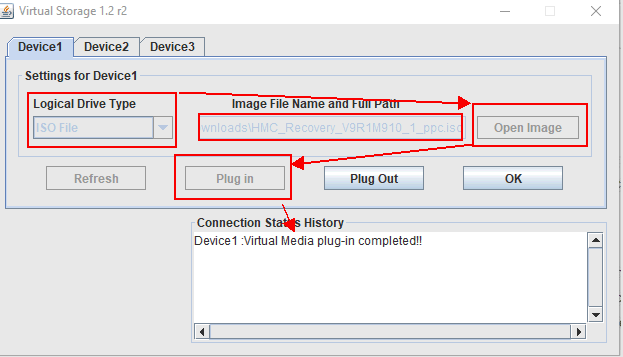 The rest of the instructions would be the same for Virtual Image, just select it from the Petitboot menu.
|
| b. | Reboot the HMC. Click HMC Management > Console Management, then click the Shutdown or restart menu option Select restart HMC and click OK. |
| c. |
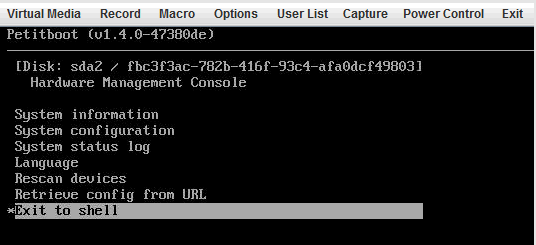
At the Petitboot panel cursor up to halt the automatic boot.
 |
| d. |
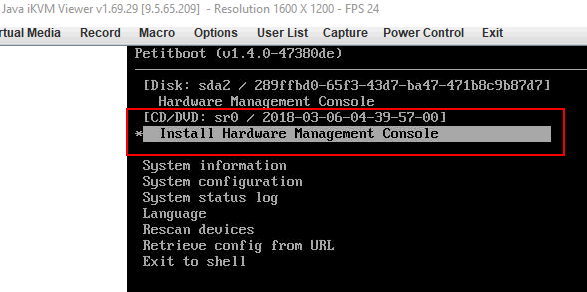
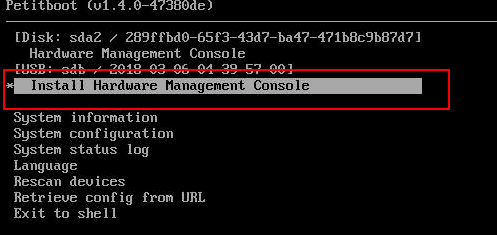
Wait for the CD/DVD device to appear in the boot list (this may take up to a minute). Note: If the device does not automatically appear within in one minute, select Rescan devices and hit enter to rescan. After the CD/DVD option appears, cursor up to select the Install Hardware Management Console option that is located under CD/DVD. Press enter.
|
| e. | The HMC reads the media in the drive and displays the Hardware Management Console Install Wizard window. Highlight Next button (use tab/alt-Tab or arrow keys to move), and press Space bar or Enter to select. Note: If the Save Upgrade Data (Step 3 above) was not performed, you will see a warning window that save upgrade data was not found on the hard disk. Cancel the upgrade, remove the recovery media from the DVD drive, reboot the HMC, complete Step 3 above to Save Upgrade Data, then start the upgrade process again. |
| f. | Using tab or arrow keys to move the cursor and the space bar to select an option, select Upgrade to a new version (need asterisk on Upgrade to a new release as shown below): ( * ) Upgrade to a new version ( ) Install Highlight Next button, and press Enter. Note: If the Save Upgrade Data (Step 3 above) was not performed, you will see a warning window that save upgrade data was not found on the hard disk drive. Cancel the upgrade, remove the recovery media from the DVD drive, reboot the HMC, complete Step 3 above to Save Upgrade Data, then start the upgrade process again. |
| g. | On Upgrade Confirmation screen, highlight Finish and press Enter to start the Upgrade process. |
| h. | The HMC installs V10R2M1030 from the media, restores the data preserved by the Save Upgrade Data task, and then completes the booting process. Note: The initial reboot can take 30-45 minutes. Do not reboot or power off; wait for the boot to complete. |
| i. | Select "Log on and launch the Hardware Management Console web application", then log in using your user ID and password. |
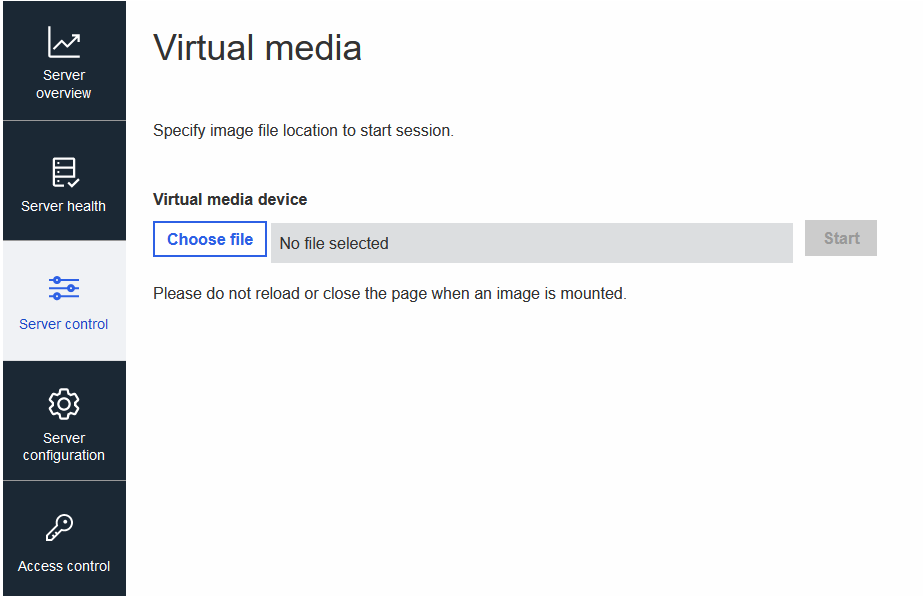
Mount the iso image using BMC remote virtual media.
1. Log in to the BMC web interface (https:// ). Default login is root/OpenBmc.
2. Select Server Control.
3. Select Virtual Media
Step 1: Obtain HMC V10R2M1030 .iso image
a. Download the HMC Version V10R2M1030 Recovery iso:
b. Use this link to create a bootable USB https://www.ibm.com/support/pages/node/6454883
Step 2: Save Profile Data
Use one of the following options to perform a Save Profile Data for each managed system to save an additional copy of partition/profile configurations.
For dual HMCs managing the same server this step is only needed on the upgrade of the first HMC. It cannot be run on HMC with a server in "version mismatch - save area version mismatch" state.
Option 1: Use HMC GUI interface
| a. | Expand Resources, then All Systems |
| b. | Select the first managed system by checking the box in front of the server name. |
| c. | Under Actions select View All Actions > Legacy > Manage Partition Data > Backup. |
| d. | In the Profile Data backup window, type a name for the backup file, and click OK. |
| e. | You will get a popup window that the profile data has been backed up. Click OK. |
| Repeat a through e for each additional system managed by this HMC. Once you have a partition data backup for each managed system, continue with Step 3. |
Option 2: Use restricted shell command line
At the command prompt, enter the following command which will save profile data for all servers:
lssyscfg -r sys -F type_model*serial_num | while read machine; do bkprofdata -m "$machine" -f Beforeupgrade$(date +%Y%m%d) ; done
Step 3: Save Upgrade Data
A Save Upgrade Data task must be done to preserve information on the HMC before performing the upgrade. You must upgrade immediately after the Save Upgrade Data task. If you restart the HMC again without doing the upgrade, you must log in and run the Save Upgrade Data task again before performing the upgrade.
| a. | Prepare media to use for Save Upgrade Data. You will need a USB flash drive. USB flash drive must be formatted FAT32 with a single partition and it cannot be password protected. Plug the flash drive into a USB port on the front of the HMC. Wait until you hear 3 beeps (or approximately 1 minute) for the HMC to detect the flash drive. Note: Save Upgrade Data will overwrite any existing save upgrade data on the media. It will not overwrite any backup Management Console Data already on the media. |
| b. | Save Upgrade Data can be performed using either HMC GUI or restricted shell command line. Use the HMC GUI: 1) Select HMC Management. > Console Management 2) Select Save Upgrade Data. 3) Select media type USB flash drive, click Next, and then click Finish. Use restricted shell command line: Use the following command specifying "diskusb" for USB flash drive: saveupgdata -r diskusb |
| c. | Wait for the Save Upgrade Data task to complete. If the task fails, contact your next level of support before proceeding. If the Save Upgrade Data task is successful, the following optional procedure can be performed to verify the data: 1. Open a restricted shell terminal Local HMC: Select HMC Management > Console Management > Open a Restricted Shell Terminal Remotely: Log in via ssh. 2. Mount the media: a. Run the command lsmediadev to determine the mount point of the USB flash drive. In the example below, USB flash drive is /media/sda1 device=/dev/cdrom,mount_point=/media/cdrom,type=1,description=CD/DVD device=/dev/fd0,mount_point=/media/floppy,type=2,description=internal diskette drive device=/dev/hda,type=6,description=internal hard disk drive device=/dev/sda1,mount_point=/media/sda1,type=3,description=USB flash memory device b. Run the command mount 3. Run the command ls –l 4. Verify that there are five tar files with the following names: ACMSaveData.tar RSCTSaveUpgrade.tar SaveCCFWUpgradeData.tar SaveHSCSystemUpgradeData.tar SaveProfileDataUpgrade.tar If any of these tar files are missing, contact your next level of support. 5. Issue the command umount Note: The Save Upgrade Data will be saved to the hard disk drive on the HMC as well as the USB flash drive. The Save Upgrade Data on the media is used only to recover from an unexpected error under the direction of support personnel. |
| d. | Once the Save Upgrade Data task is successful, remove the USB flash drive. |
Step 4: Upgrade HMC to V10R2M1030 (from Bootable USB)
Do the following at the HMC interface to upgrade the HMC by means of the Bootable USB.
| a. | Insert V10R2M1030 formatted USB flash drive. |
| b. | Reboot the HMC Click HMC Management > Console Management, then click the Shutdown or restart the Management Console option Select restart HMC and click OK. |
| c. |
When the Petitboot menu is displayed, select the Install Hardware Management Console option that is located under USB. Press enter.
 |
| d. | The HMC reads the media in the drive and displays the Hardware Management Console Install Wizard window. Highlight Next button (use tab/alt-Tab or arrow keys to move), and press Space bar or Enter to select. Note: If the Save Upgrade Data (Step 3 above) was not performed, you will see a warning window that save upgrade data was not found on the hard disk drive. Cancel the upgrade, remove the recovery media from the DVD drive, reboot the HMC, complete Step 3 above to Save Upgrade Data, then start the upgrade process again. |
| e. | Using tab or arrow keys to move the cursor and the space bar to select an option, select Upgrade to a new version (need asterisk on Upgrade to a new release as shown below): ( * ) Upgrade to a new version ( ) Install Highlight Next button, and press Enter. |
| f. | On Upgrade Confirmation screen, highlight Finish, and press Enter to start the Upgrade process. |
| g. | The HMC installs V10R2M1030 from the media, restores the data preserved by the Save Upgrade Data task, and then completes the booting process. Note: The initial reboot can take 30-45 minutes. Do not reboot or power off; wait for the boot to complete. . |
| h. | Select "Log on and launch the Hardware Management Console Web application", then log in using your user ID and password. |
Document Location
Worldwide
Was this topic helpful?
Document Information
Modified date:
27 January 2025
UID
ibm16845980