White Papers
Abstract
This document provides information preparing IBM Power Systems running AIX or PowerVM(VIOS) for concurrent SAS or SSD disk replacement. It is important to first determine disk array configuration including protection level and then follow appropriate procedure. To perform these procedures AIX root access is required. On VIOS run "oem_setup_env" to switch from user padmin to root.
If you already established your level of protection, you can go directly to the Procedure.
• Procedure 1 - Replacing an AIX System Disk, hdisk JBOD (Just a Bunch Of Disks)
• Procedure 2 - Replacing a pdisk that is part of a RAID0 unprotected array with a single pdisk
• Procedure 3 - Replacing a pdisk in a RAID5 or RAID10 protected array
• Procedure 4 - Replacing a pdisk in a protected RAID array that was previously a Hot Spare
• Procedure 5 - Replacing a pdisk in an unprotected RAID0 array with multiple pdisks
• Procedure 6 - Replacing a pdisk in a RAID6 array
• Procedure 7 - Replacing a hot spare disk that is either failed or has a PFA (Predictive Failure Analysis) indication
Note: It is a customer responsibility to perform these tasks, when an IBM service representative is replacing the disk unit then they are only responsible for the physical replacement of the disk unit.
Content
How to determine whether the error logged is on a hdisk or pdisk
All hdisk and pdisk errors are listed in the error log. They can be viewed by using 'errpt |more' or'errpt -a |more' for details. Check 'RESOURCE NAME' field.
You can also display the diagnostic results by issuing 'diagrpt -a'.
IDENTIFIER TIMESTAMP T C RESOURCE_NAME DESCRIPTIONa6
B6267342 0108232670 P H hdisk0 DISK OPERATION ERROR
B6267342 0108232670 P H hdisk0 DISK OPERATION ERROR
B6267342 0108232670 P H hdisk0 DISK OPERATION ERROR
B6267342 0108232670 P H hdisk0 DISK OPERATION ERROR
LABEL: SC_DISK_ERR2
IDENTIFIER: B6267342
Sequence Number: 105982
Machine Id: 00F68B244C00
Node Id: localhost
Class: H
Type: PERM
WPAR: Global
Resource Name: hdisk0
Resource Class: disk
Resource Type: scsd
Location: U78AB.001.#######-P3-D1
VPD:
Manufacturer................IBM
Machine Type and Model......MBE2073RC
FRU Number..................44V4429
ROS Level and ID............36303130
Serial Number...............D3A04P4V
EC Level....................L36403
Part Number.................44V6847
Device Specific.(Z0)........000005329F001002
Device Specific.(Z1)........601060106010
Device Specific.(Z2)........0001
Device Specific.(Z3)........11042
Device Specific.(Z4)........
Device Specific.(Z5)........22
Device Specific.(Z6)........L36403
DISK OPERATION ERROR
DASD DEVICE
DISK DRIVE
DISK DRIVE ELECTRONICS
PERFORM PROBLEM DETERMINATION PROCEDURES
PATH ID
0
SENSE DATA
0600 0000 0000 0000 0000 0000 0000 0000 0000 0000 0000 0000 0102 0000 7000 0200
0000 0028 0000 0000 0404 0080 0000 0000 6010 0100 FFFF FFFF FFFF 0000 0000 0022
2100 0000 0000 0000 0000 0000 0000 0000 0000 0000 0000 0000 0000 0000 0000 0000
0000 0000 0000 0000 0000 0000 0000 0000 0000 0000 0000 0000 0000 0000 0000 0000
0000 0000 0000 0000 0000 0000 0000 0000 0000 0000 0000 0000 0000 0000 0000 0000
0000 0000 0000 0000 0000 0000 0000 0000 0000 0000 0000 0000 0000 0000 0000 0000
0000 0000 0000 0000 01A4 0000 E3C0 0000 0000 0000 0000 0000 0000 0000 0083 0000
0000 0012 0019
2820 VRSAS_ERR23T Nov 22 06:14:08 XXXXXXX H TEMP sissas1
2819 VRSAS_RECONSTRUCT. Nov 22 06:14:02 XXXXXXX H TEMP sissas1
2818 VRSAS_ERR21PD Nov 22 06:13:57 XXXXXXX H PERM sissas1 DLL: 21000000 PRC: 00000FE8 IOASC: 04440000
2817 VRSAS_ARY_DEGRADED Nov 22 06:13:57 XXXXXXX H TEMP sissas1
2816 VRSAS_ERR21TD Nov 22 06:13:30 XXXXXXX H TEMP sissas1 Operation aborted by device : Status Check S/N WFJ1606Z
2815 VRSAS_ERR21TD Nov 22 06:12:49 XXXXXXX H TEMP sissas1 Operation aborted by device : Status Check S/N WFJ1606Z
2814 VRSAS_ERR21TD Nov 22 06:11:44 XXXXXXX H TEMP sissas1 Operation aborted by device : Status Check S/N WFJ1606Z
2813 VRSAS_ERR21TD Nov 22 06:08:58 XXXXXXX H TEMP sissas1 Operation aborted by device : Status Check S/N WFJ1606Z
2812 VRSAS_ERR21TD Nov 22 06:02:00 XXXXXXX H TEMP sissas1 Device PFA threshold exceeded : Status Check S/N WFJ1606Z
2811 VRSAS_ERR21TD Nov 22 06:01:59 XXXXXXX H TEMP sissas1 Device PFA threshold exceeded : Status Check S/N WFJ1606Z
IDENTIFIER: 7346AB4B
Sequence Number: 2818
Machine Id: 00XXXXXXXX00
Node Id: HOSTNAME
Class: H
Type: PERM
WPAR: Global
Resource Name: sissas1
Resource Class: adapter
Resource Type: 1410fe03
Location: U78C9.001.XXXXXXX-P1-C15-T1
PCIe3 x8 SAS RAID Internal Adapter 6Gb :
Part Number.................01DH734
FRU Number..................00WV564
Serial Number...............YL10UE68XXXX
Manufacture ID..............00UE
EC Level....................0
ROM Level.(alterable).......19512b00
Customer Card ID Number.....57D8
Product Specific.(Z1).......1
Product Specific.(Z2).......2D36
DEVICE OR MEDIA ERROR
PERFORM PROBLEM DETERMINATION PROCEDURES
PROBLEM DATA
0001 0800 1910 00F0 0444 0000 0101 0000 1951 2B00 0000 0021 57D8 FFF4 0000 0000 [.........D.......Q+....!W.......]
000C 11FF FFFF FFFF 5000 C500 BC4C 2293 0000 0000 0000 0000 0000 000C E328 99CD [........P....L"..............(..]
5000 C500 BC4C 2293 0000 0000 0000 0000 0000 0000 0000 0000 0000 0000 0000 0000 [P....L".........................]
Operation aborted by device
Status Check
Resource Vendor Product S/N World Wide ID
000C11FFFFFFFFFF IBM ST600MM0 WFJ1606Z 5000C500BC4C22930000000000000000 [........IBMST`0MM0WFJ..ZP....L".........]
7000 0B00 0000 0018 0000 0000 4400 0000 0000 0000
pdisk0 Available 01-08-00 Physical SAS Disk Drive
pdisk1 Available 01-08-00 Physical SAS Disk Drive
pdisk2 Available 01-08-00 Physical SAS Disk Drive
pdisk3 Available 01-08-00 Physical SAS Disk Drive
pdisk4 Available 01-08-00 Physical SAS Disk Drive
pdisk5 Available 01-08-00 Physical SAS Disk Drive
# lscfg -vl pdisk0
pdisk0 U78AB.001.XXXXXXX-P3-D5 Physical SAS Disk Drive
Machine Type and Model......MBE2073RC
FRU Number..................44V4429
ROS Level and ID............36303130
Serial Number...............WFJ1606Z
EC Level....................L36403
Part Number.................44V6847
Device Specific.(Z0)........000005329F001002
Device Specific.(Z1)........601060106010
Device Specific.(Z2)........0001
Device Specific.(Z3)........11042
Device Specific.(Z4)........
Device Specific.(Z5)........22
Device Specific.(Z6)........L36403
Hardware Location Code......U78AB.001.XXXXXXX-P3-D5
IDENTIFIER:		DAFE

Date/Time:		Tue Nov 22 06:13:58
Sequence Number:	14396
Event type:		SRN Callout

Resource Name:		sissas1
Resource Description:	PCIe3 x8 Cache SAS RAID Internal Adapter 6Gb
Location:		U78C9.001.XXXXXXX-P1-C15-T1

Diag Session:		15007952
Test Mode:		No Console,Non-Advanced,Normal IPL,ELA,Option Checkout

Error Log Sequence Number:	2818
Error Log Identifier:		7346AB4B

SRN:			2D36-FFF4

Description:		Device problem.

Probable FRUs:
    pdisk0           FRU: 00E9951              U78C9.001.XXXXXXX-P2-D18
                     Physical SAS 4K Disk Drive
How to determine level of protection for disk Array
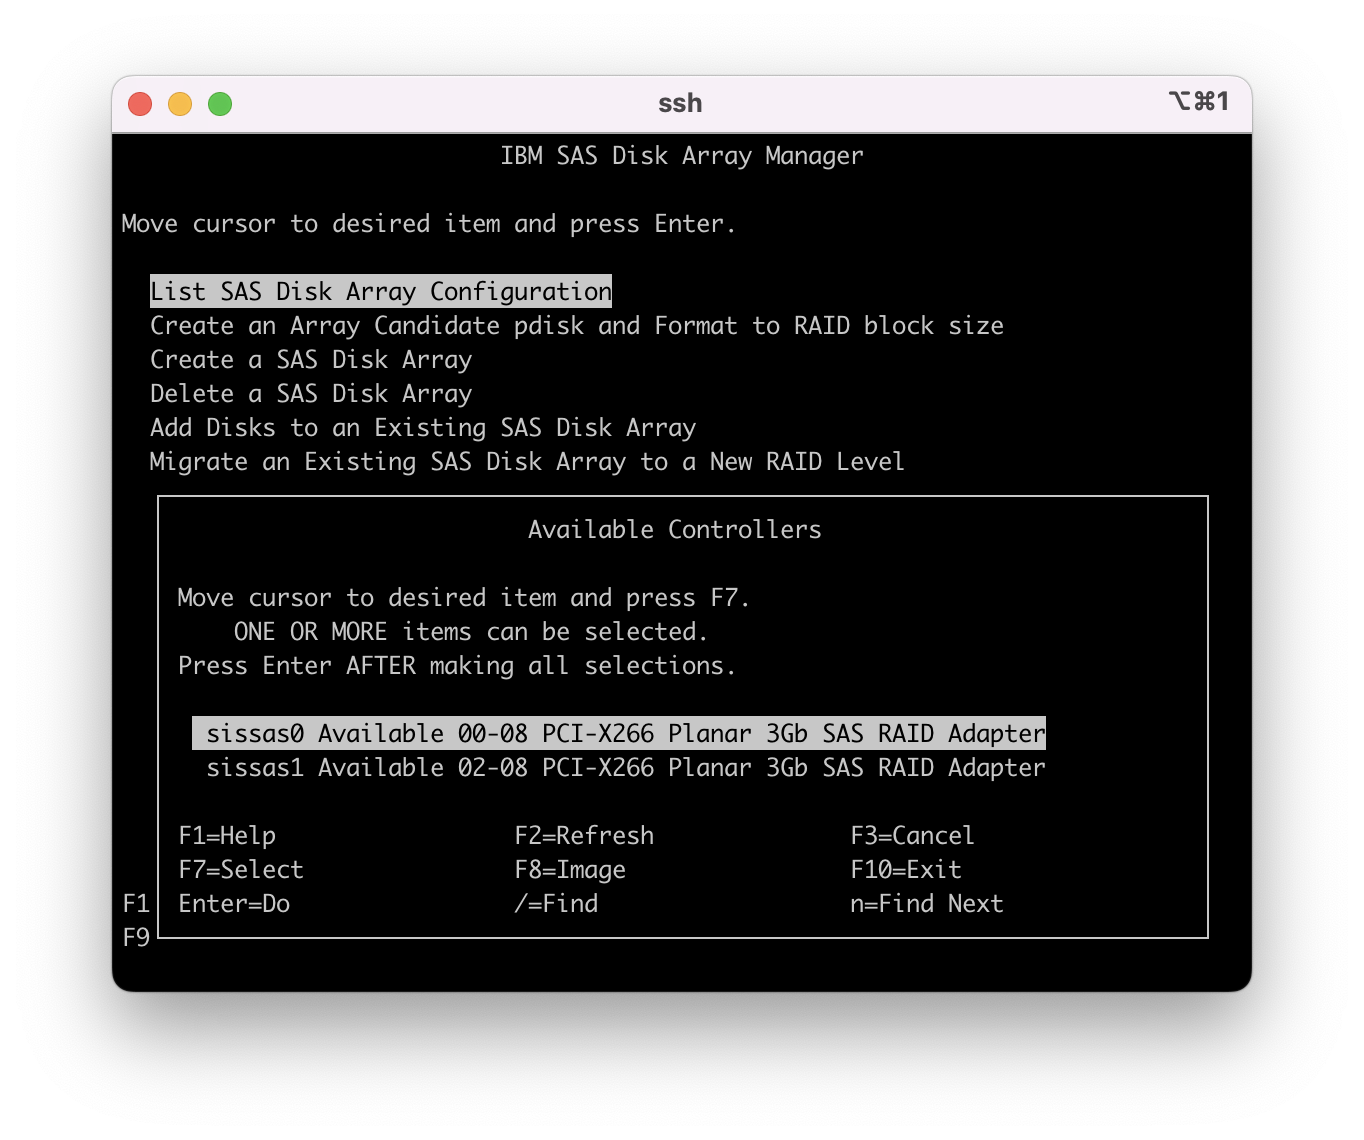
# smit sasdam

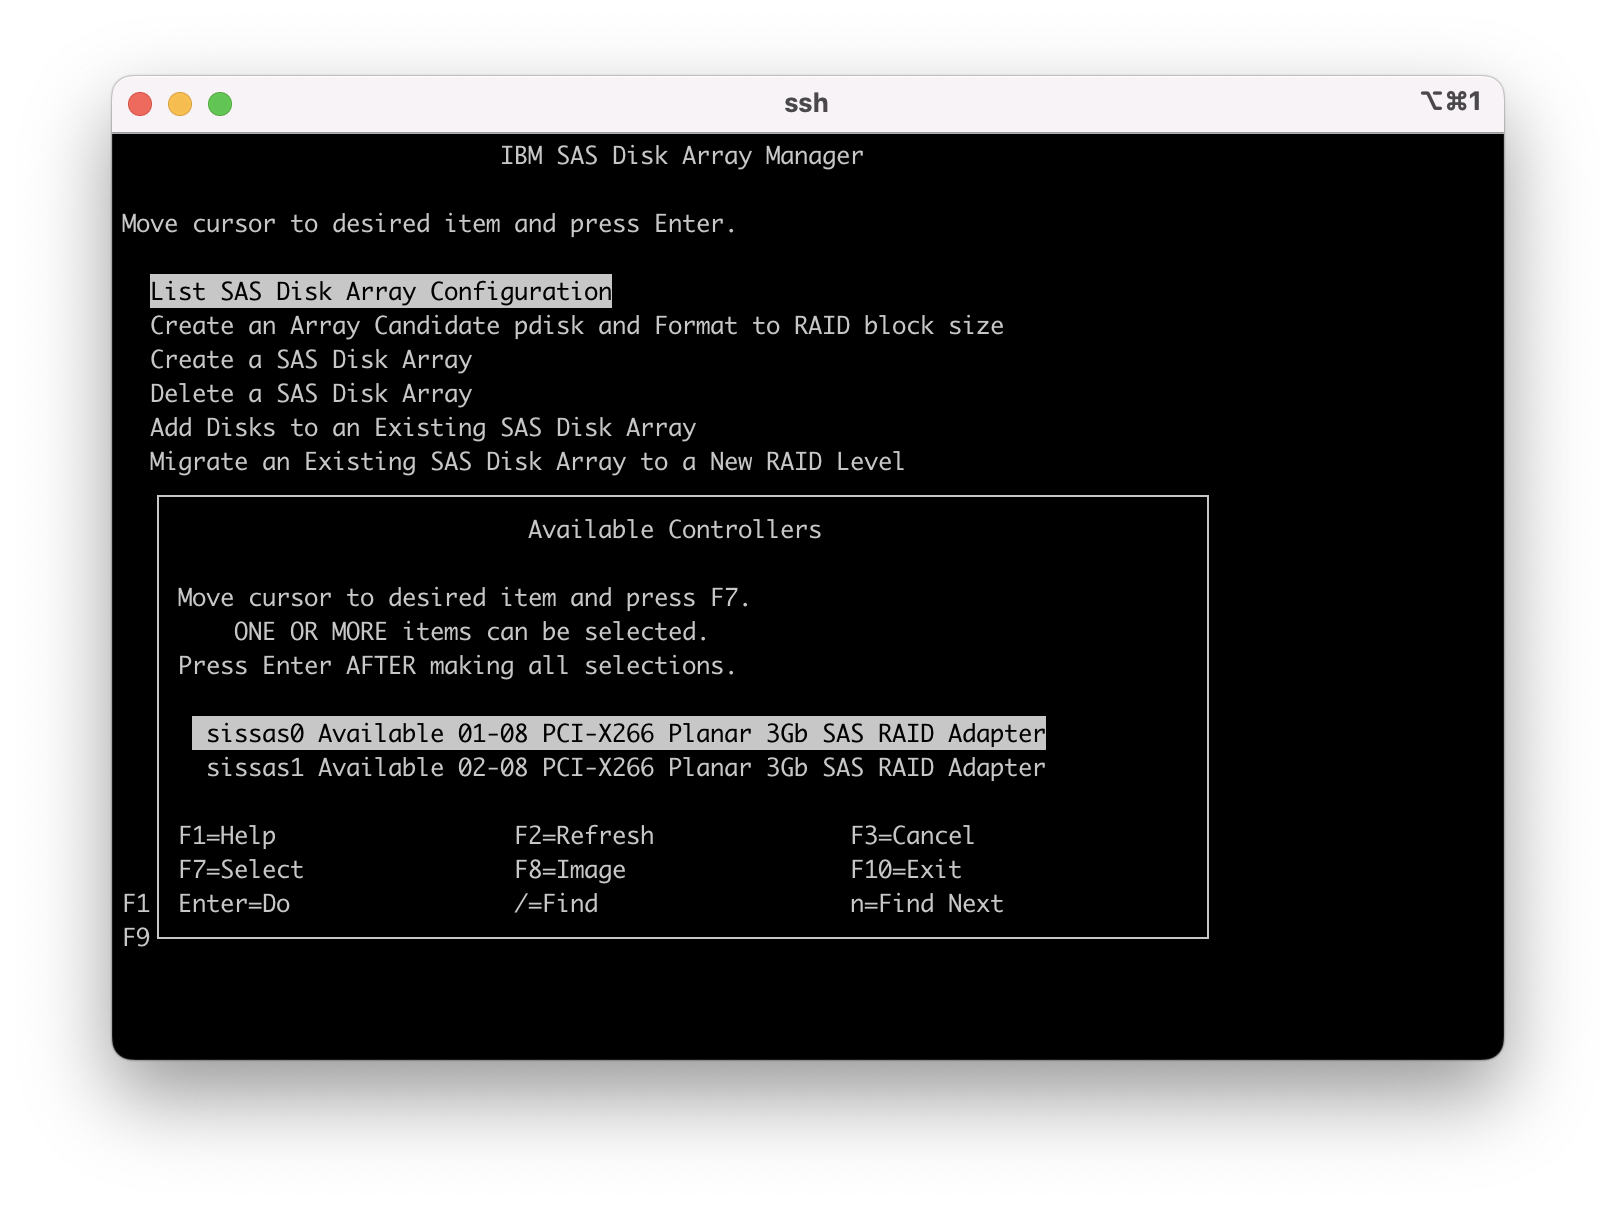
2. Select the target sissas controller from the list that the target disk attached to it, or if redundant adapters select the primary SAS controller.

Once the SAS controller is selected, the output displays the "SAS Disk Array Configuration".
3. Use the following examples to determine your level of protection
Example 01: JBOD hdisk (with or without mirrored Volume Group)
Name Resource State Description Size
------------------------------------------------------------------------
sissas0 FFFFFFFF Primary PCI-X266 Planar 3Gb SAS RAID Adapter
sissas1 FFFFFFFF HA Linked Remote adapter SN 01041024
pdisk2 00000700 Active Array Member 69.7GB
pdisk4 00000900 Active Array Member 69.7GB
pdisk1 00000600 Active Array Member 69.7GB
hdisk1 00000800 Available SAS Disk Drive 73.4GB (JBOD Disk Unit)
hdisk0 00f68b243f7b0dfe rootvg active
hdisk1 00f68b243f68cd7a rootvg active
hdisk2 00f68b243d6a3920 datavg active
rootvg:
LV NAME TYPE LPs PPs PVs LV STATE MOUNT POINT
hd5 boot 1 2 2 closed/syncd N/A
hd6 paging 4 8 2 open/syncd N/A
hd8 jfs2log 1 2 2 open/syncd N/A
hd4 jfs2 3 6 2 open/syncd /
hd2 jfs2 17 34 2 open/syncd /usr
hd9var jfs2 2 4 2 open/syncd /var
hd3 jfs2 1 2 2 open/syncd /tmp
hd1 jfs2 1 2 2 open/syncd /home
hd10opt jfs2 1 2 2 open/syncd /opt
hd11admin jfs2 1 2 2 open/syncd /admin
livedump jfs2 2 4 2 open/syncd /var/adm/ras/livedump
#
Proceed to Procedure 1 for detailed instructions.
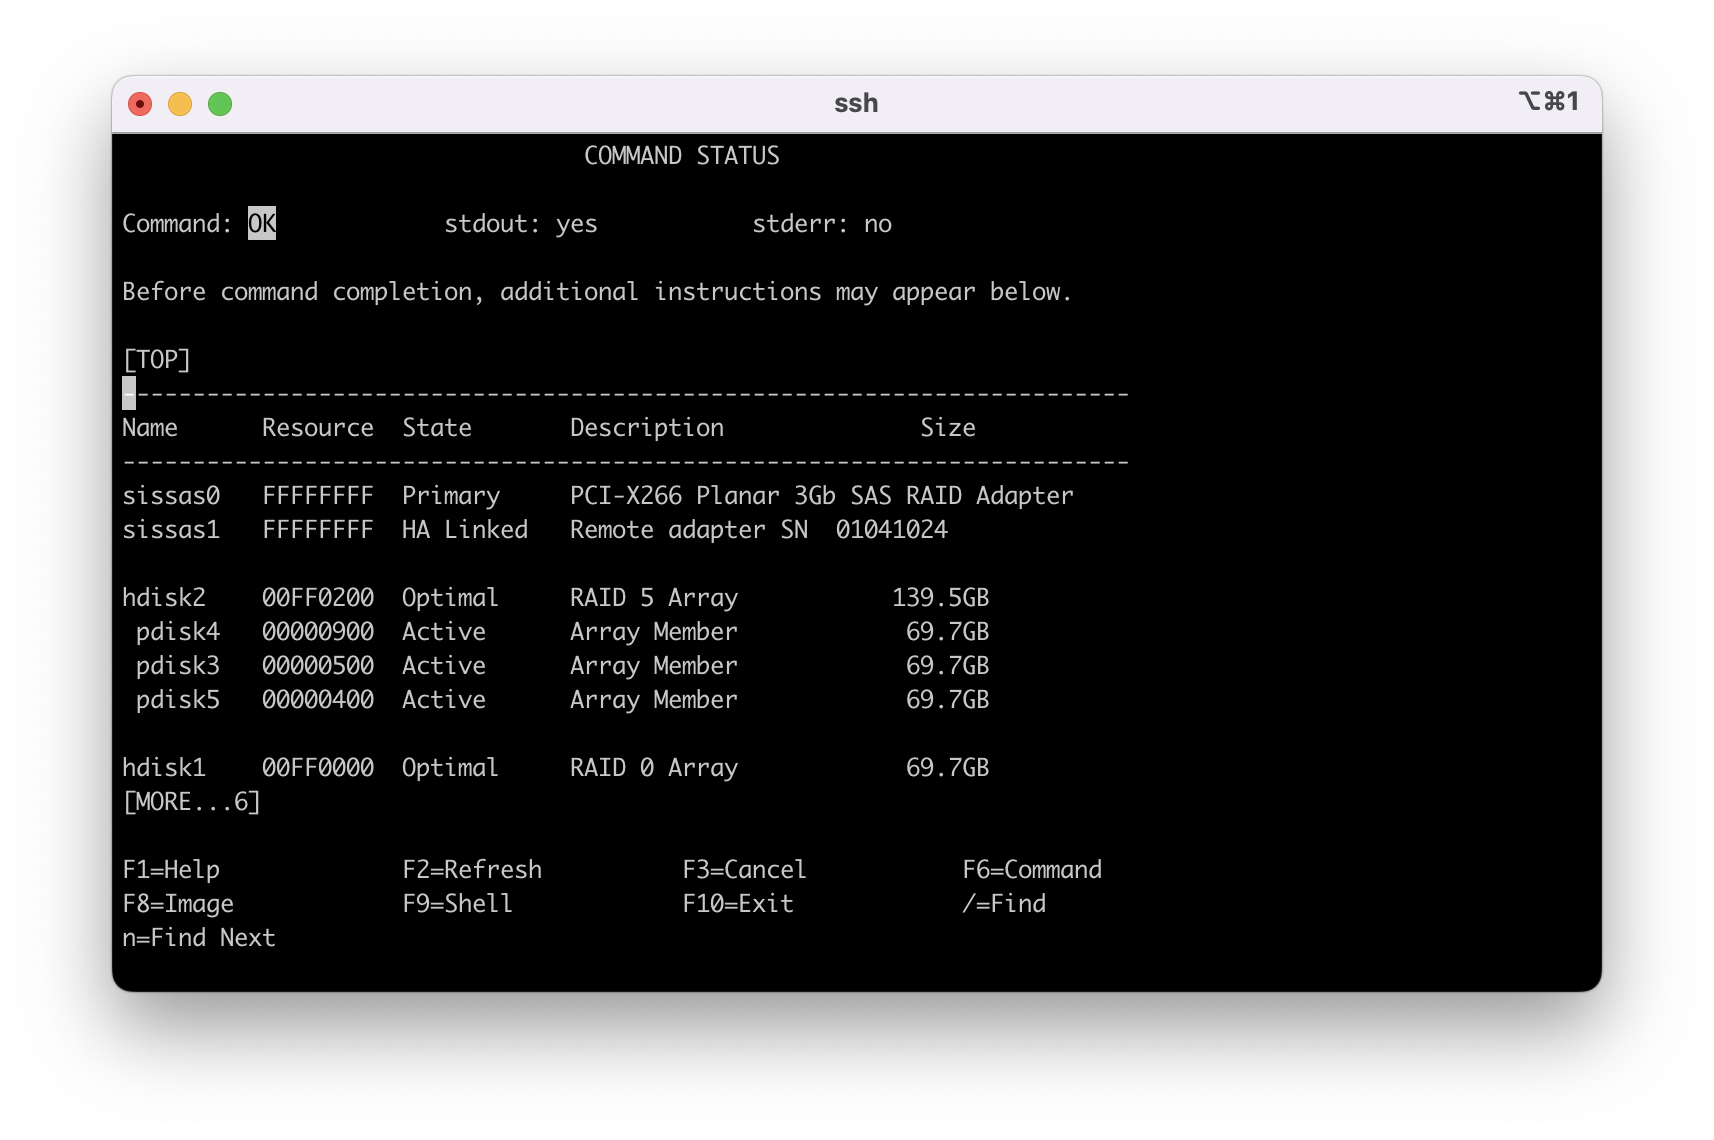
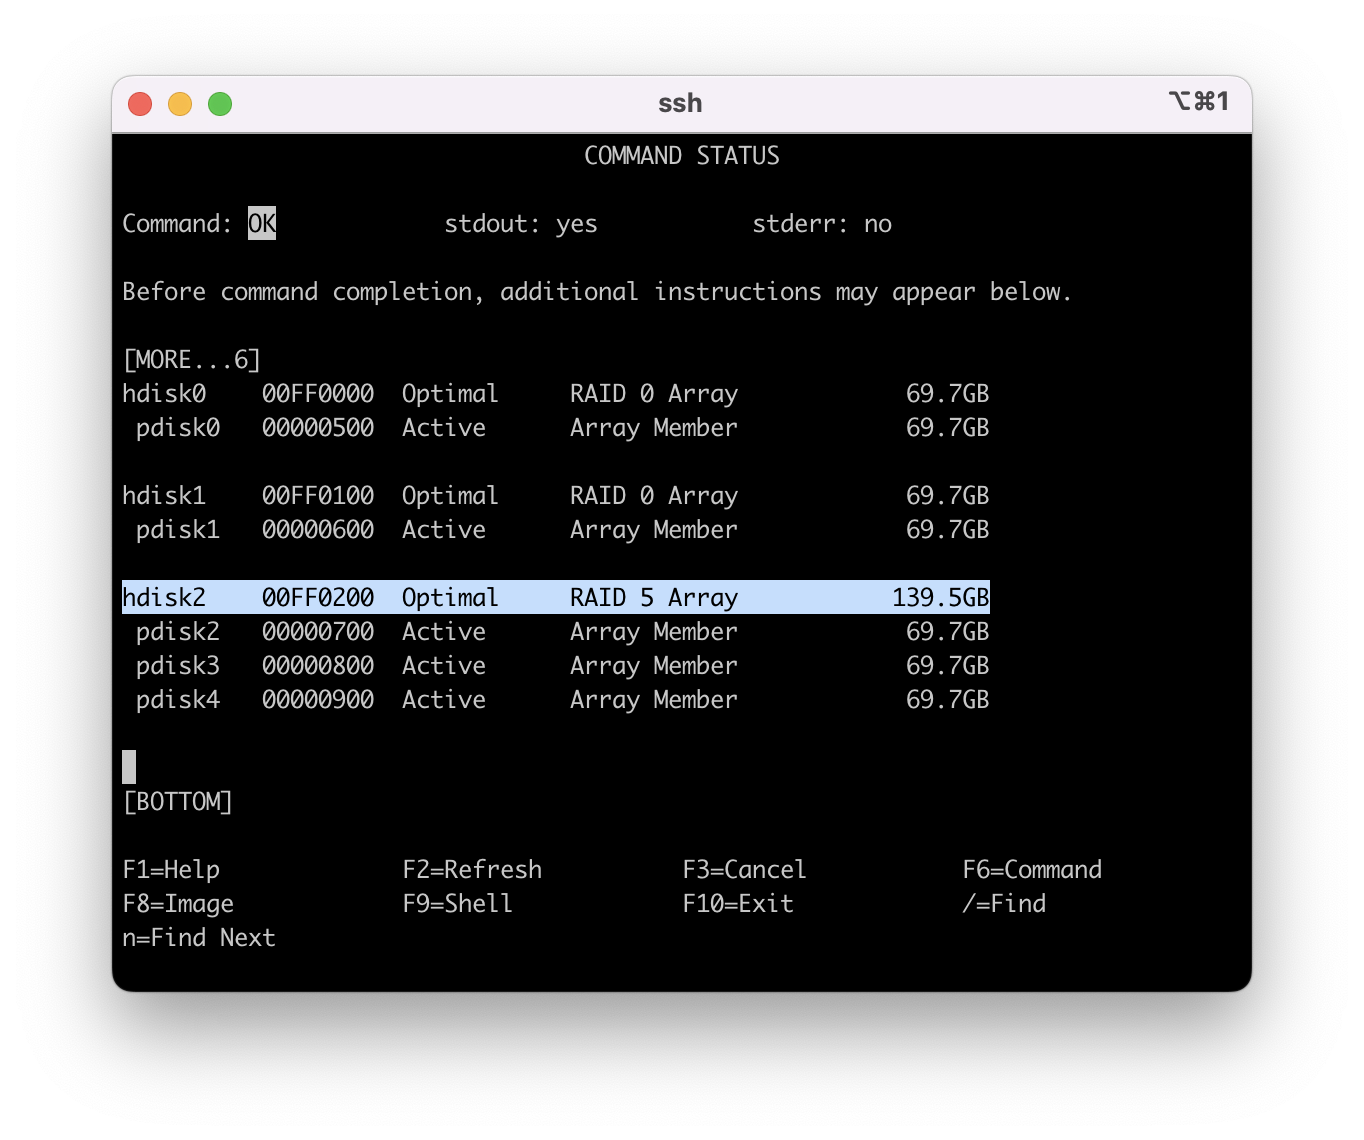
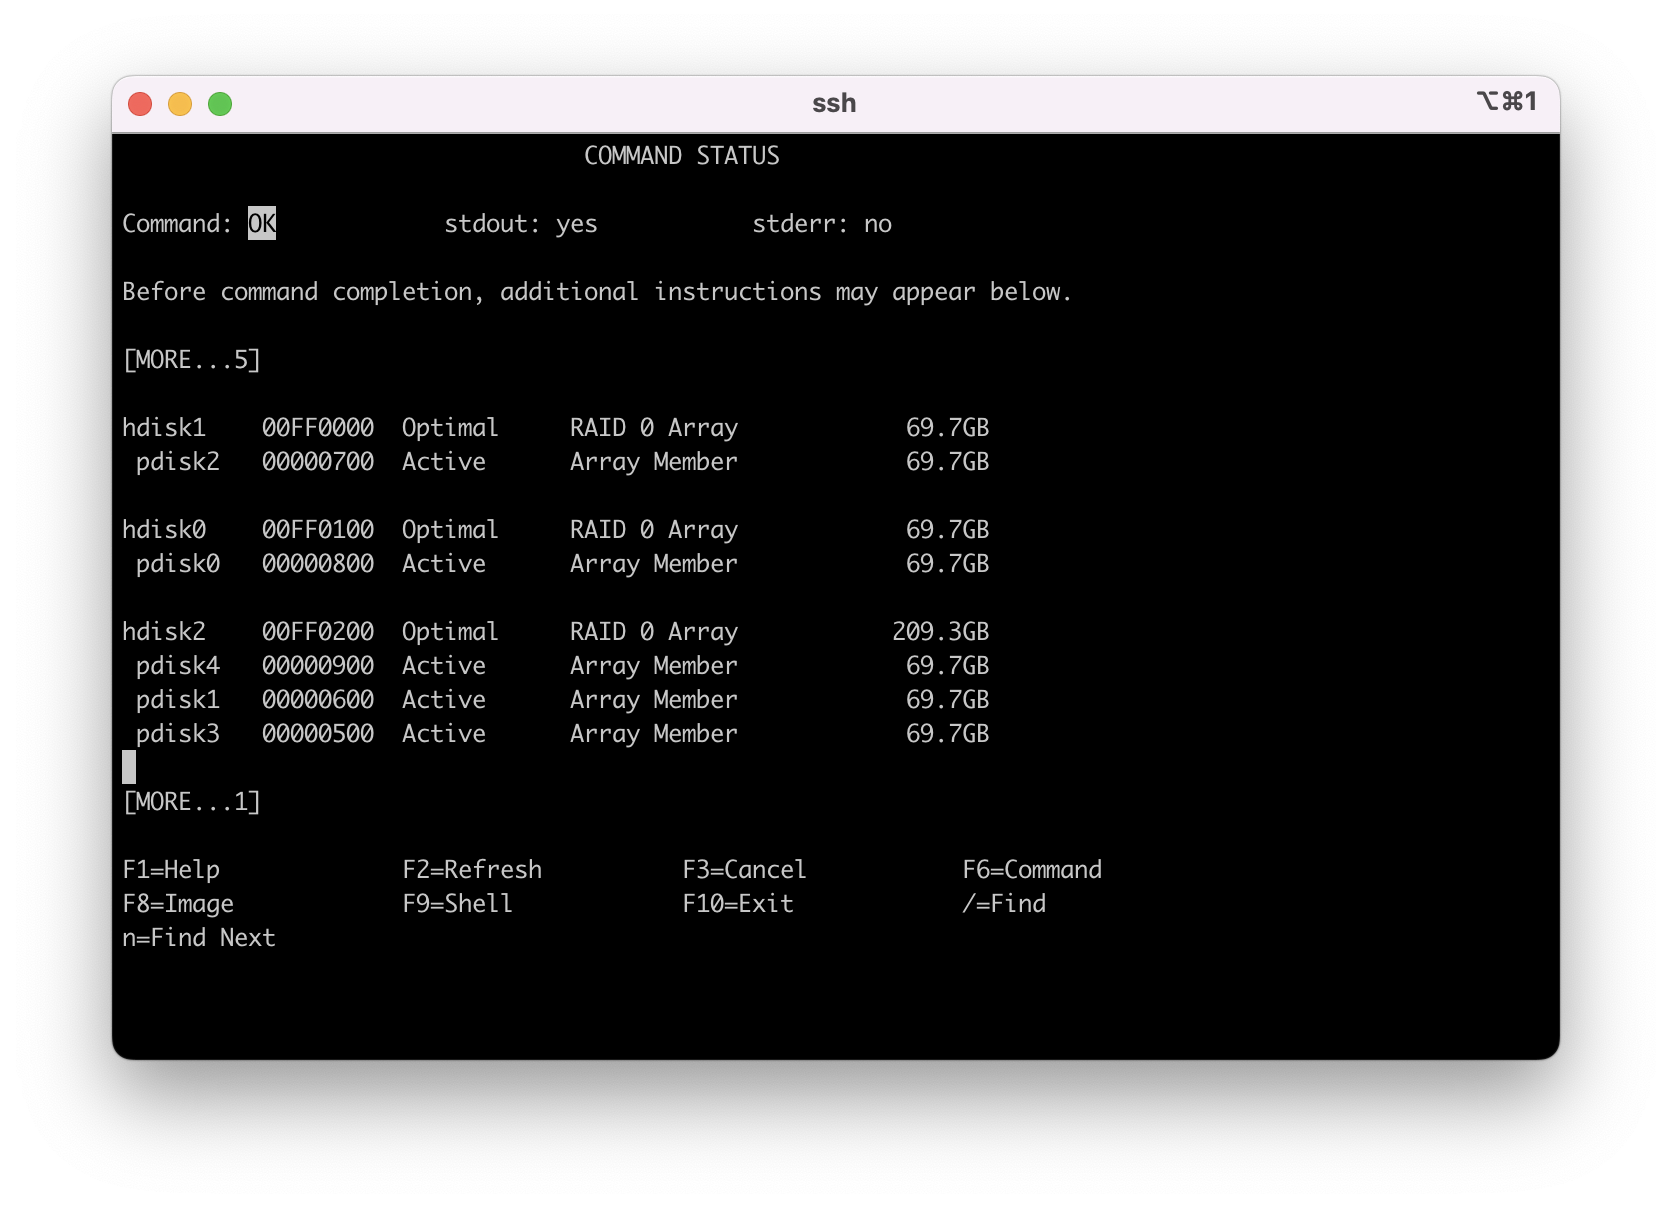
Example 02: RAID0 array with a hdisk and a single pdisk.
------------------------------------------------------------------------
Name Resource State Description Size
------------------------------------------------------------------------
sissas0 FFFFFFFF Primary PCI-X266 Planar 3Gb SAS RAID Adapter
sissas1 FFFFFFFF HA Linked Remote adapter SN 01041024
pdisk0 00000500 Active Array Member 69.7GB
pdisk1 00000600 Active Array Member 69.7GB
hdisk3 00FF0200 Optimal RAID 0 Array 69.7GB
pdisk2 00000800 Active Array Member 69.7GB
hdisk4 00FF0300 Optimal RAID 0 Array 69.7GB
pdisk3 00000900 Active Array Member 69.7GB
hdisk0 00000400 Available SAS Disk Drive 73.4GB
Name Resource State Description Size
------------------------------------------------------------------------
sissas0 FFFFFFFF Primary PCI-X266 Planar 3Gb SAS RAID Adapter
sissas1 FFFFFFFF HA Linked Remote adapter SN 01041024
pdisk3 00000900 Active Array Member 69.7GB
pdisk0 00000500 Active Array Member 69.7GB
pdisk2 00000800 Active Array Member 69.7GB
pdisk1 00000600 Active Array Member 69.7GB
Name Resource State Description Size
------------------------------------------------------------------------
sissas0 FFFFFFFF Primary PCI-X266 Planar 3Gb SAS RAID Adapter
sissas1 FFFFFFFF HA Linked Remote adapter SN 01041024
pdisk0 00000500 Active Array Member 69.7GB
pdisk2 00000800 Active Array Member 69.7GB
pdisk3 00000900 Active Array Member 69.7GB
pdisk1 00000600 Active Array Member 69.7GB
------------------------------------------------------------------------
Name Resource State Description Size
------------------------------------------------------------------------
sissas0 FFFFFFFF Primary PCI-X266 Planar 3Gb SAS RAID Adapter
sissas1 FFFFFFFF HA Linked Remote adapter SN 01041024
pdisk0 00000500 Active Array Member 69.7GB
pdisk1 00000600 Active Array Member 69.7GB
pdisk2 00000800 Active Array Member 69.7GB
pdisk3 00000900 Active Array Member 69.7GB
hdisk0 00000400 Available SAS Disk Drive 73.4GB
------------------------------------------------------------------------
Name Resource State Description Size
------------------------------------------------------------------------
sissas0 FFFFFFFF Primary PCI-X266 Planar 3Gb SAS RAID Adapter
sissas1 FFFFFFFF HA Linked Remote adapter SN 01041024
pdisk0 00000500 Active Array Member 69.7GB
pdisk2 00000800 Active Array Member 69.7GB
pdisk1 00000600 Active Array Member 69.7GB
Name Resource State Description Size
------------------------------------------------------------------------
sissas0 FFFFFFFF Primary PCI-X266 Planar 3Gb SAS RAID Adapter
sissas1 FFFFFFFF HA Linked Remote adapter SN 01041024
pdisk3 00000900 Active Array Member 69.7GB
pdisk2 00000800 Active Array Member 69.7GB
pdisk0 00000500 Active Array Member 69.7GB
pdisk1 00000600 Active Array Member 69.7GB
Procedure 1 - Replacing an AIX System Disk, hdisk JBOD (Just a Bunch Of Disks)
Before a JBOD hdisk can be physically replaced, it needs to be removed from the operating system(OS) to prevent phantom disk definitions in AIX ODM database. Remove the disk from volume group(VG) and then remove from OS. You might need to stop applications or any processes that use the disk first.
This task needs to be performed by client. If you are unfamiliar with performing this task, then contact IBM Software Support for AIX or PowerVM/VIOS.
- Electronic support, visit the IBM Support Community:
https://www.ibm.com/mysupport
-Telephone support, visit the web page:
https://www.ibm.com/planetwide/
Note 1: If the disk is not mirrored or protected, then backup your data if possible. Restore your data after the disk unit is replaced. If the disk unit is mirrored, unmirror it, and then mirror it again once the disk unit is replaced.
Note 2: The error could be a temporary or predictive error or the disk unit might be failed and the data unreadable. For a predictive, failure the hdisk might still be active and in functional state. In both cases, it needs to be removed from the VG.
The following link provides procedure for preparing VIOS with mirrored rootvg.
https://www.ibm.com/support/pages/how-replace-failing-disk-vios-mirrored-rootvg
Most commands are same for preparing an AIX system for disk replacement with following exceptions -
- in step 3 use 'unmirrorvg rootvg <failing hdisk#>' instead of 'unmirrorios <failing disk#>'
- in "step 7" replace VIOS command "$ rmdev -dev <failing_hdisk>" with AIX command "# rmdev -l <failing hdisk>"
Once the disk is removed from VG and OS, continue to next step of physically replacing the disk. Remaining steps can be completed by the client or an "IBM Service Representative". If an "IBM Service Representative" is requested to perform the physical replacement, "root login credentials" must be provided.
1.1 - Confirm the disk is prepared for concurrent replacement by running "lspv" and ensure that under the Volume Group column it displays "None".
Example 01 - hdisk1 is still showing attached to a VG:
# lspv
hdisk0 00f68b24022aa42d rootvg active
hdisk1 00f68b2434e0f788 rootvg active (Disk cannot be replaced concurrently, it belongs to a VG)
hdisk2 00f68b240242297e datavg active
Example 02 - hdisk0 is properly removed from the VG
# lspv
hdisk0 00f68b24022aa42d rootvg active
hdisk1 00f68b2434e0f788 None <== "None" means the disk is ready for Concurrent replacement
hdisk2 00f68b240242297e datavg active
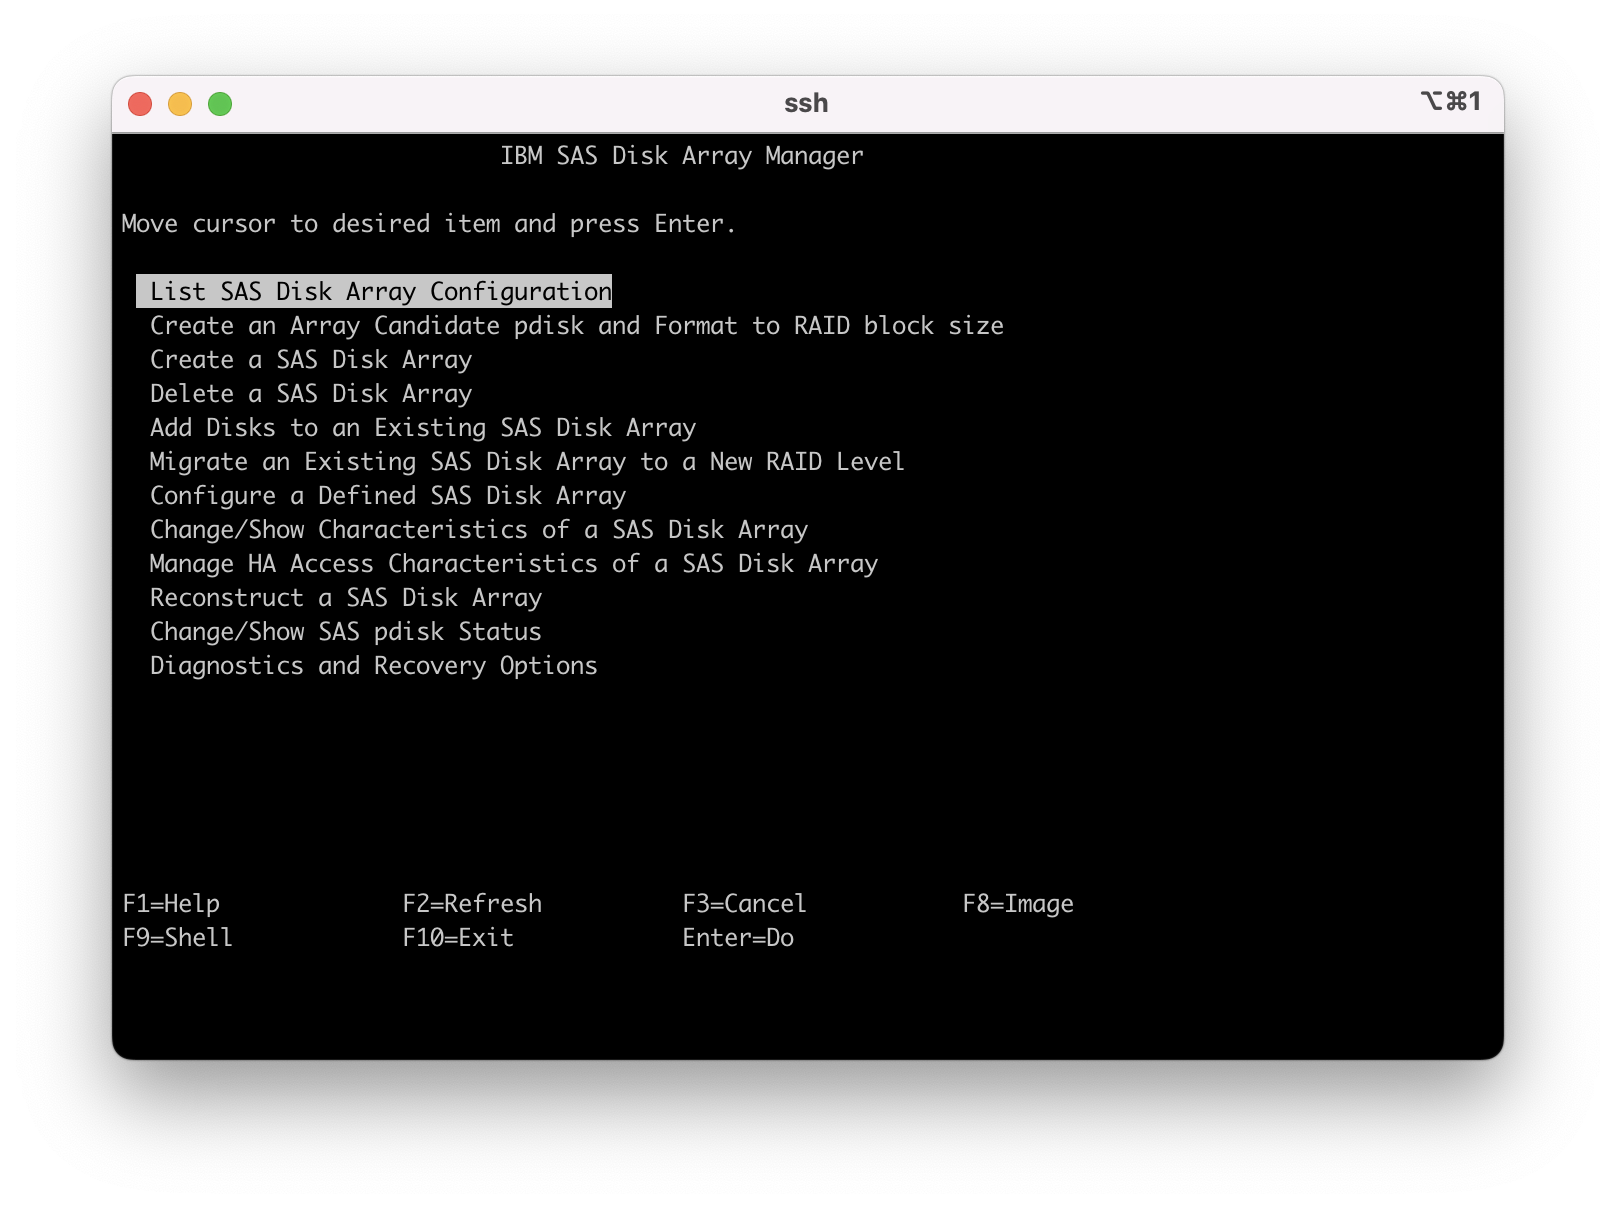
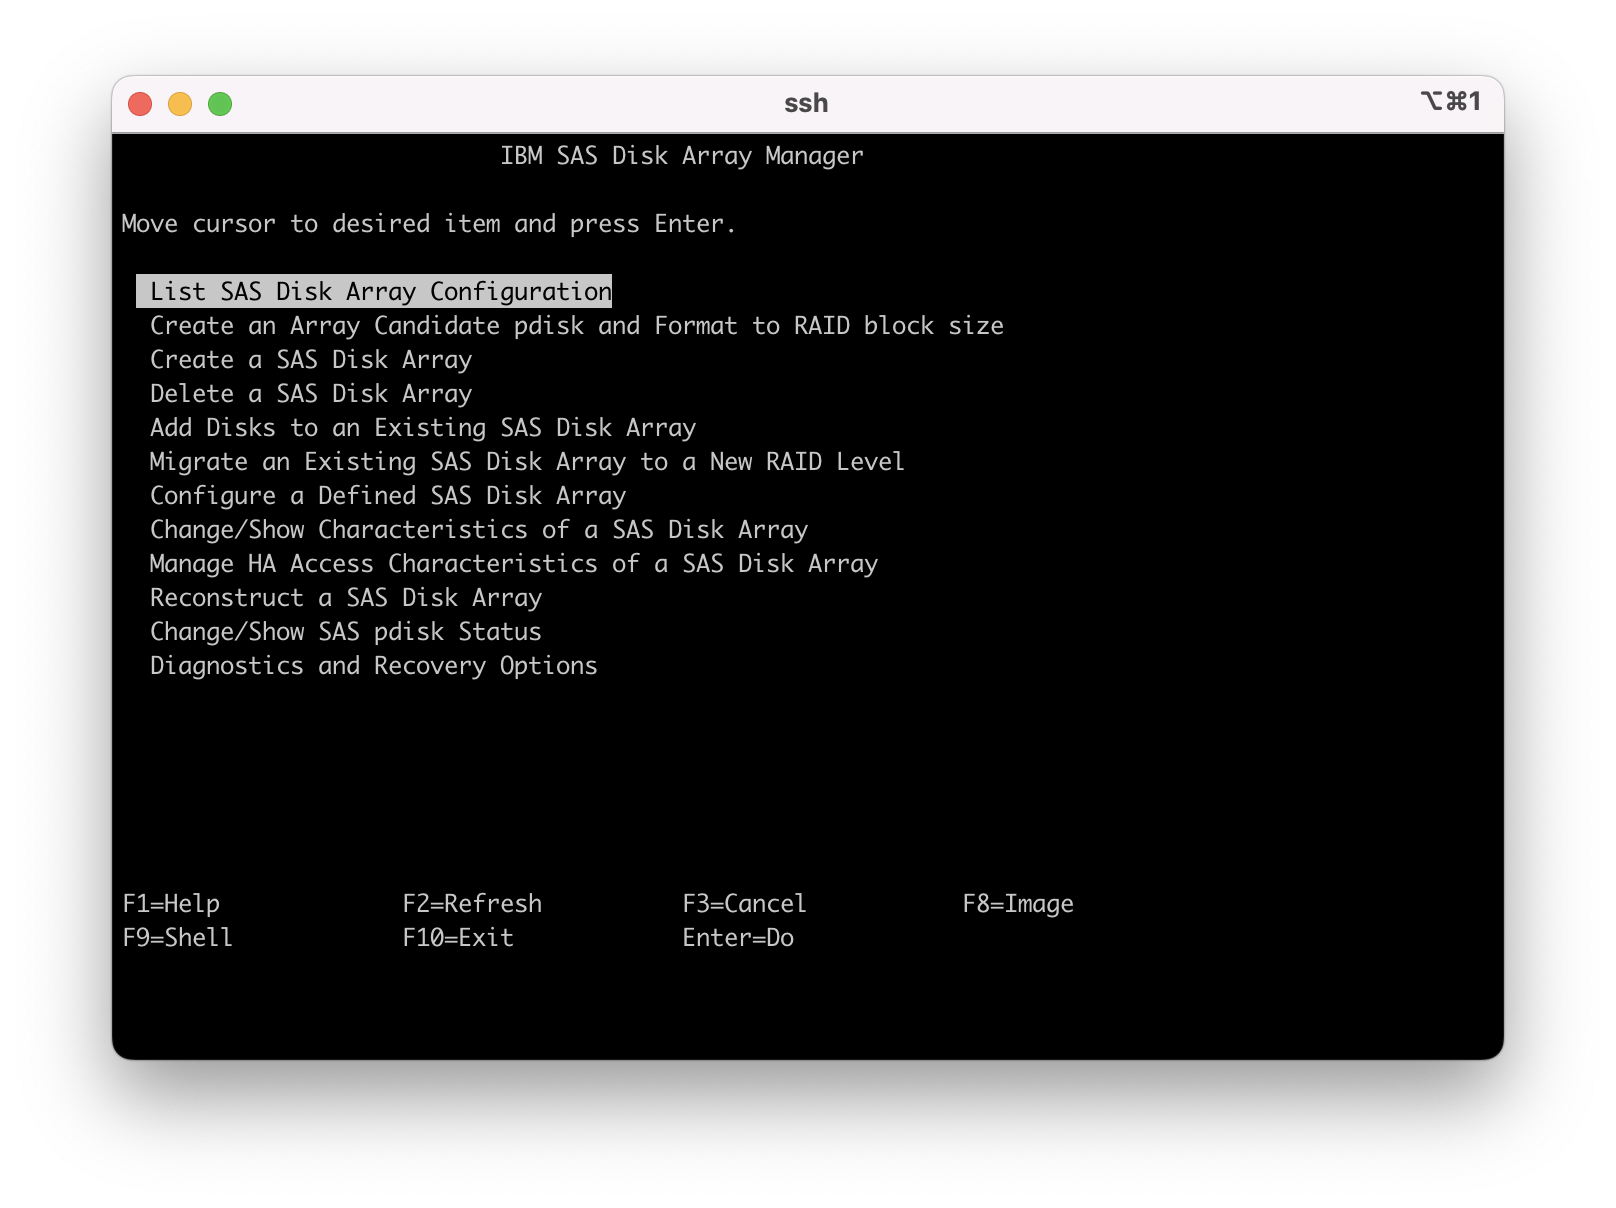
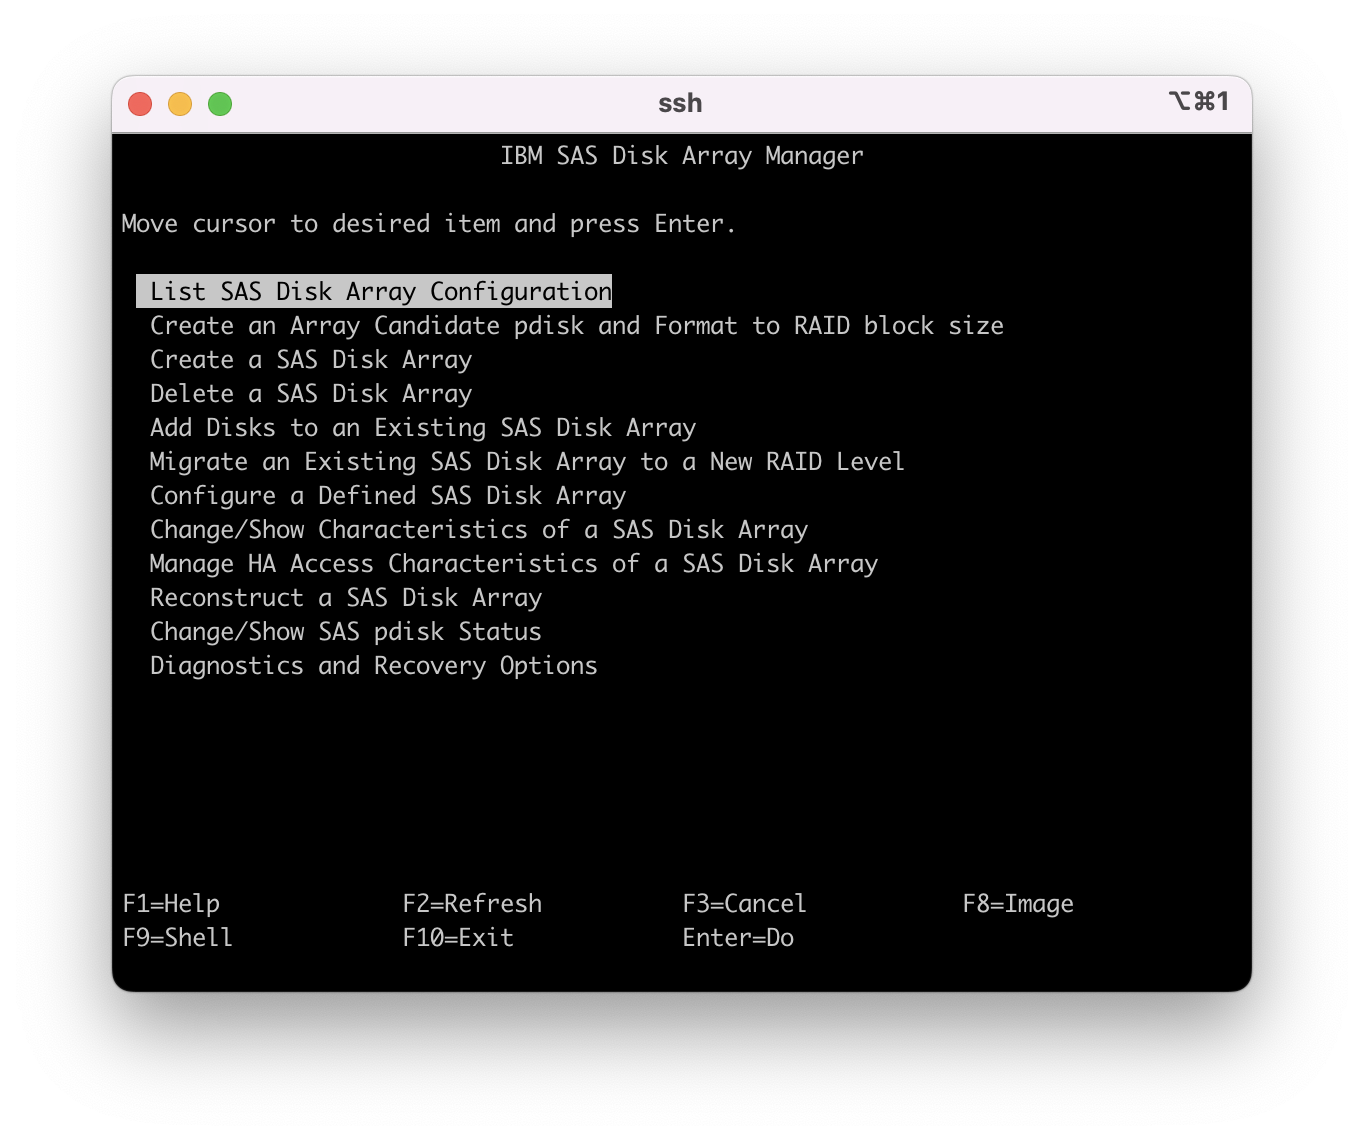
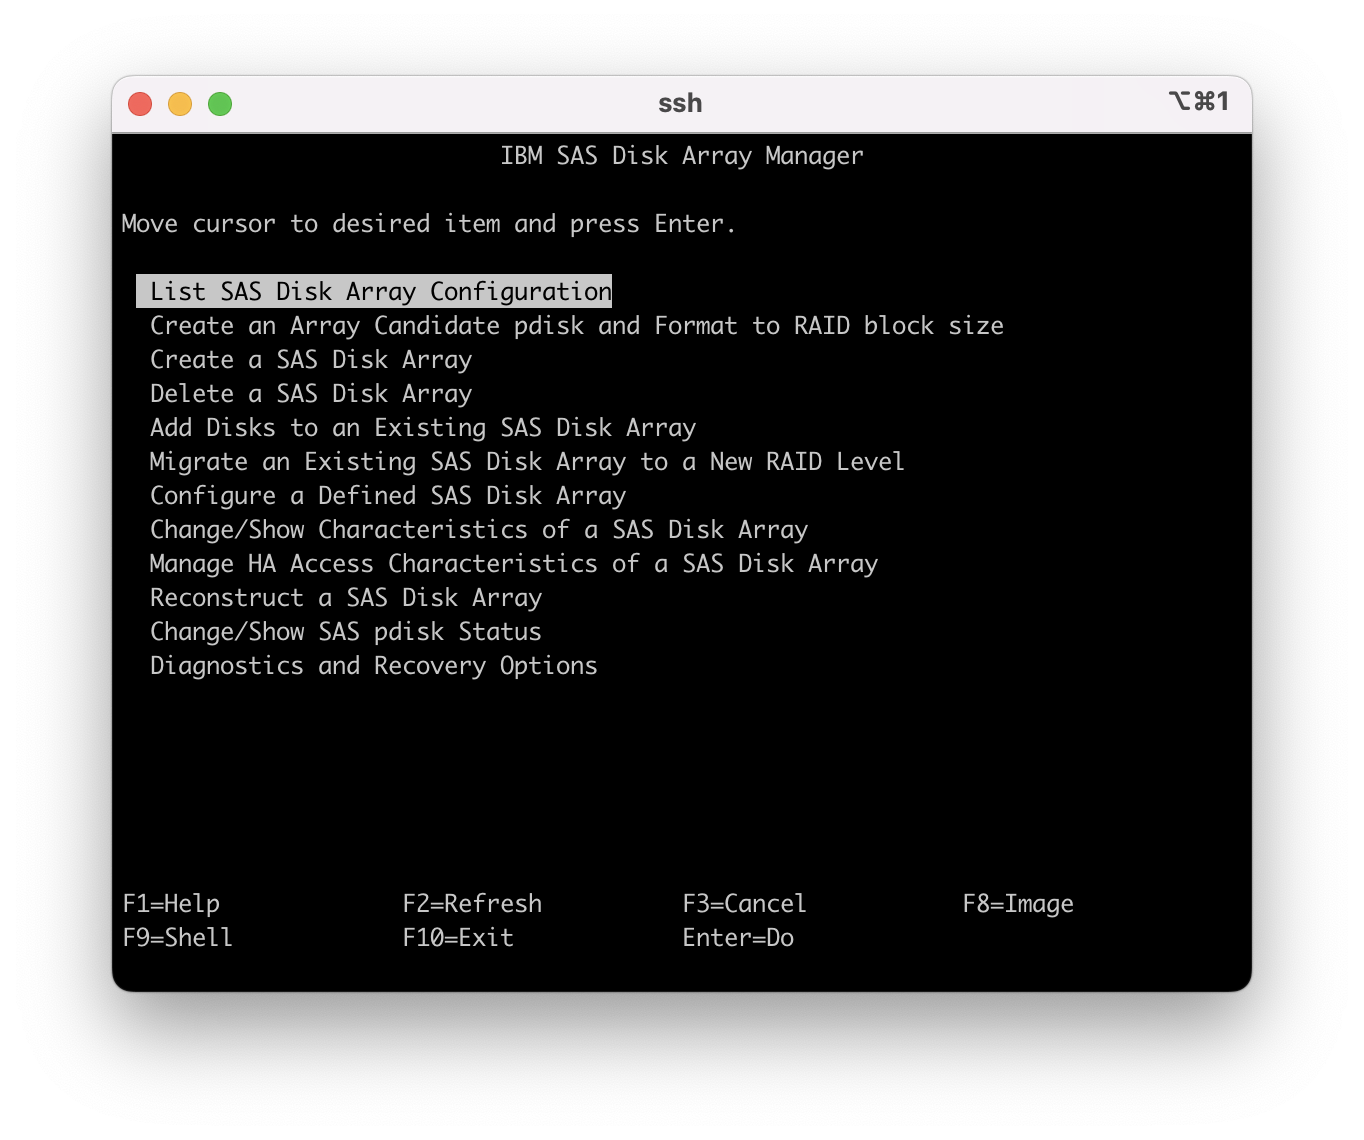
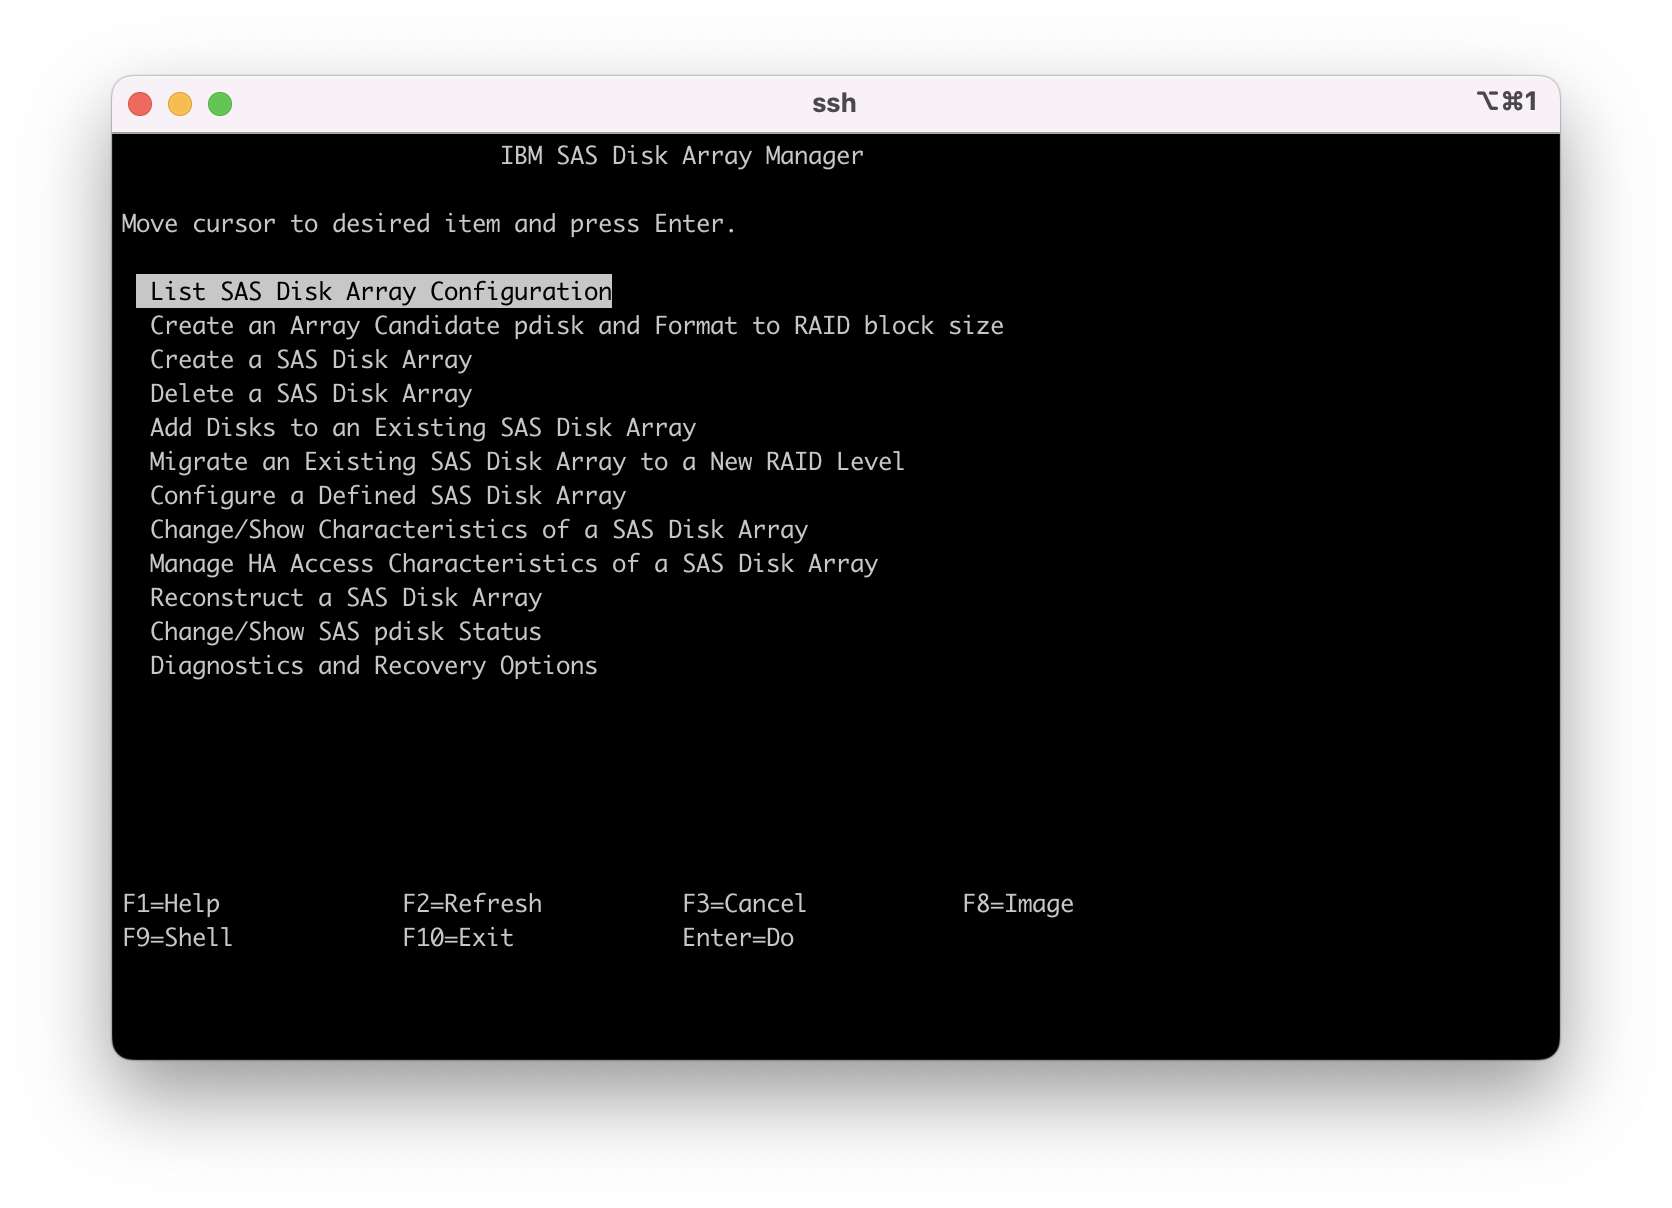
1.2 - In this example, hdisk1 is a JBOD disk and it needs to be replaced. First, we need to list the array status. On the command line, enter "smit sasdam"; move the cursor to highlight "List SAS Disk Array Configuration" and press enter.
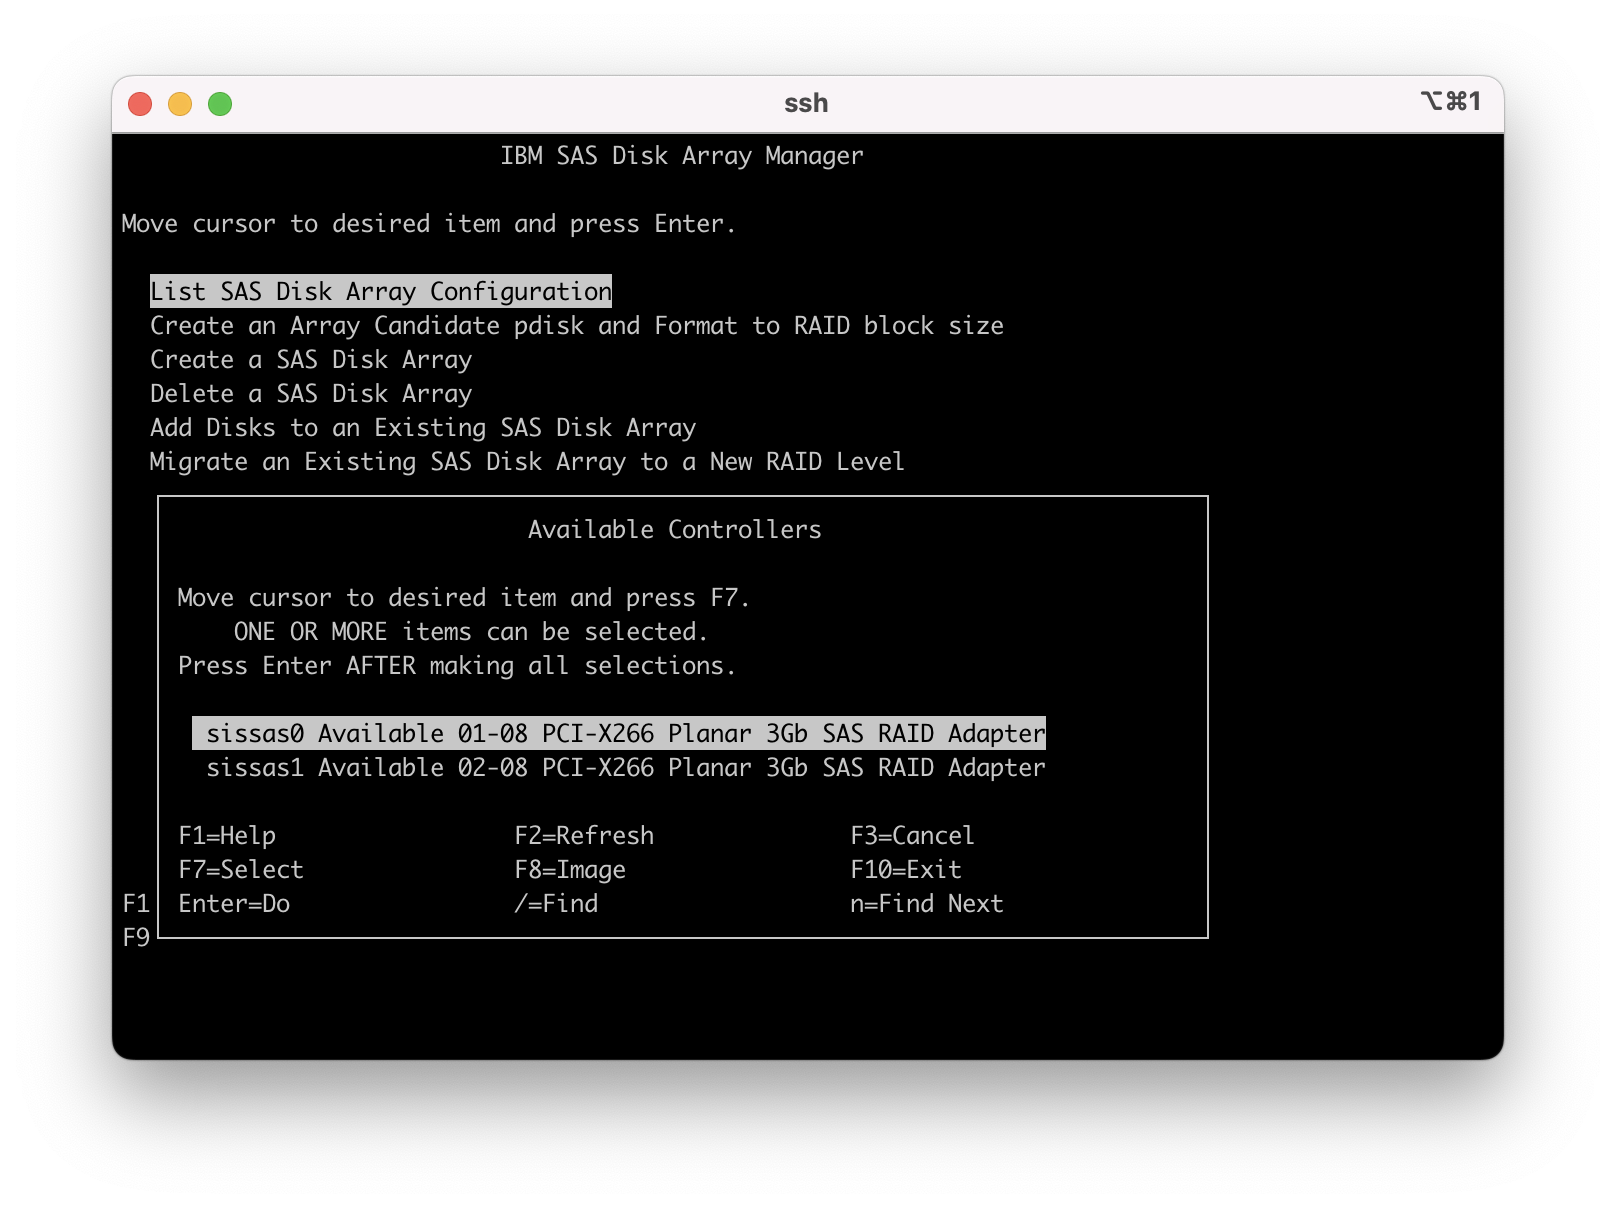
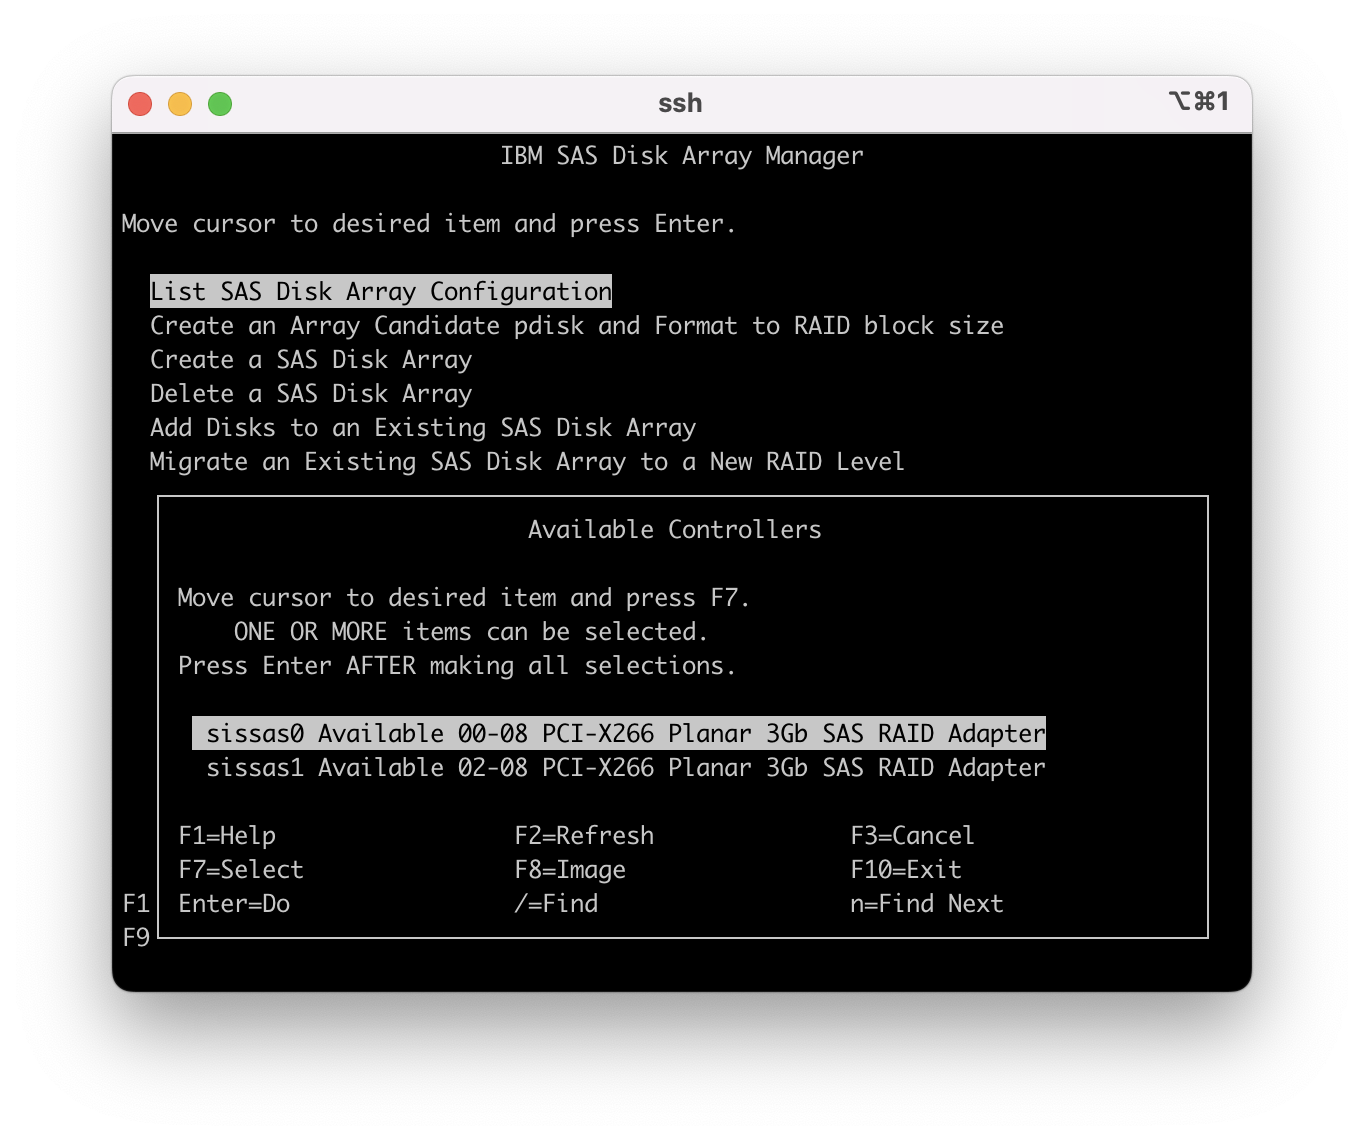
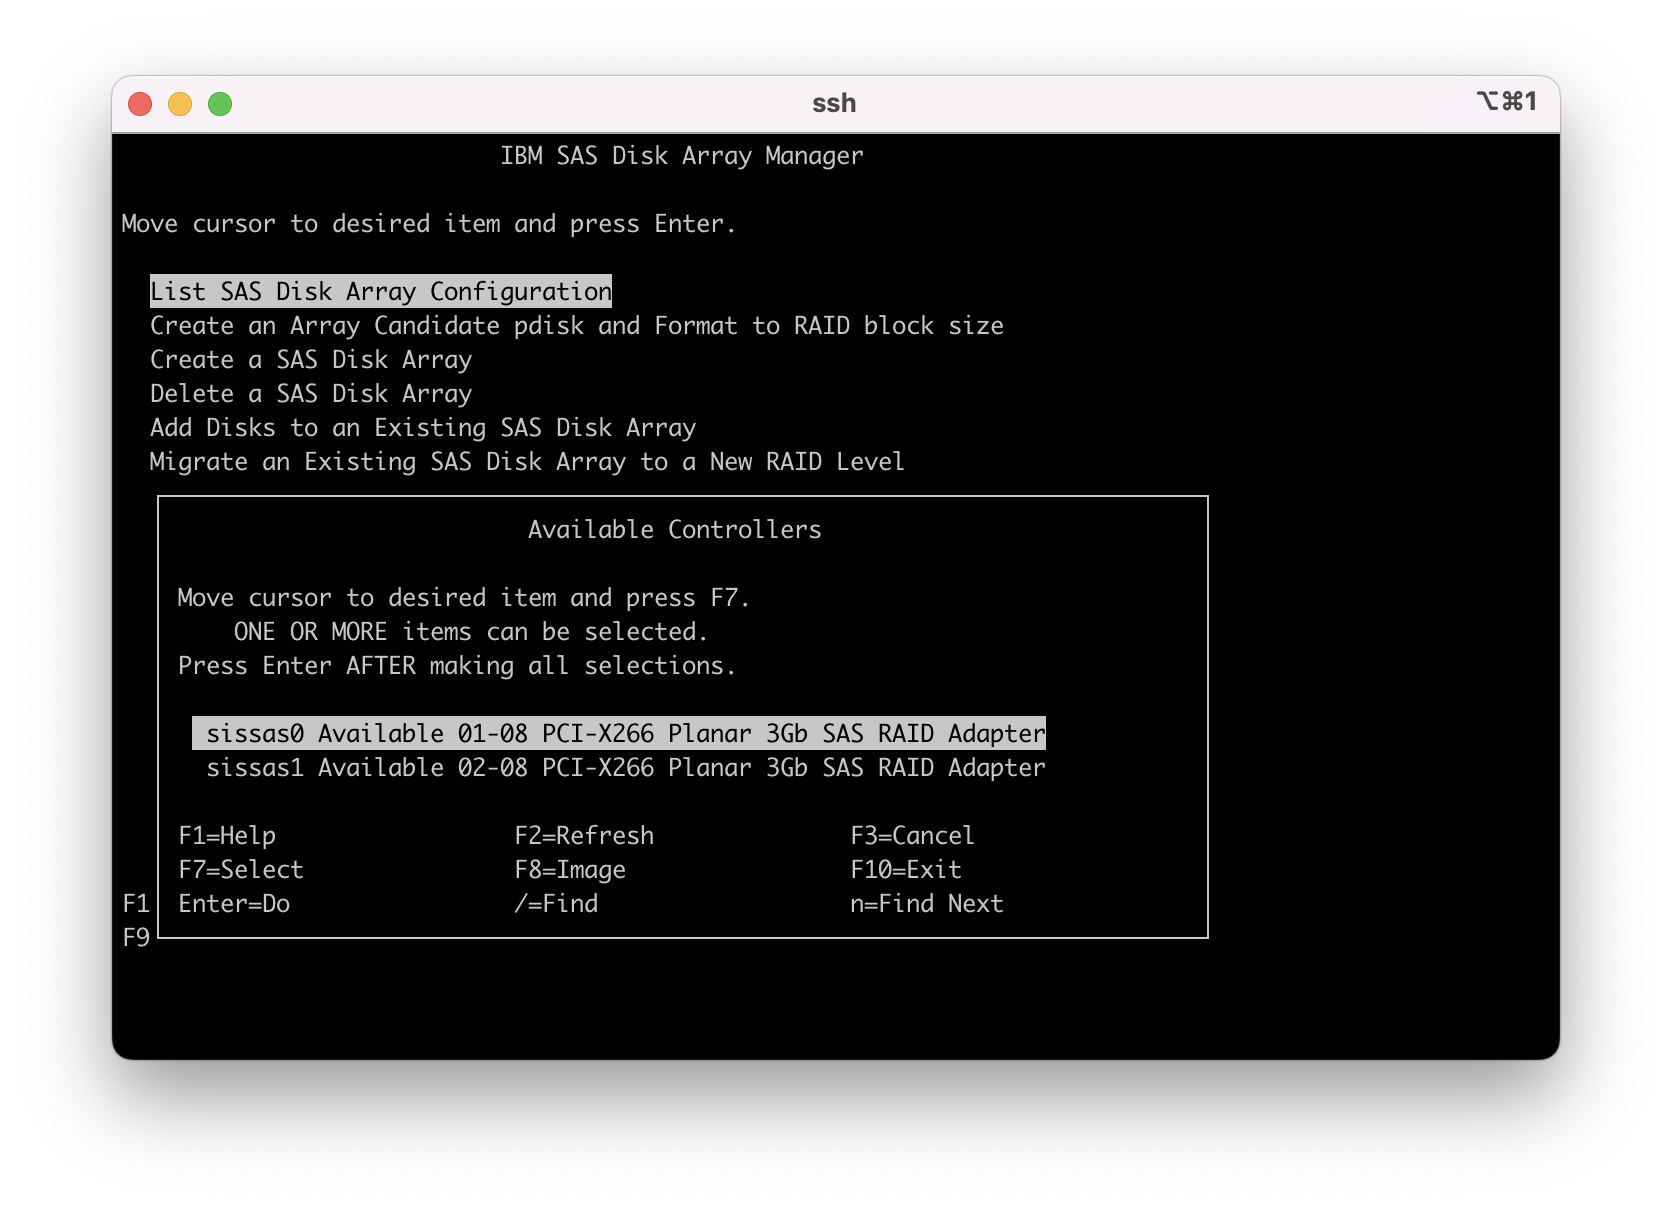
1.3 - Select the primary SAS controller with the disk units attached to it.
1.4 - Cursor down to the end of the list and you see hdisk1 the target disk to replace.

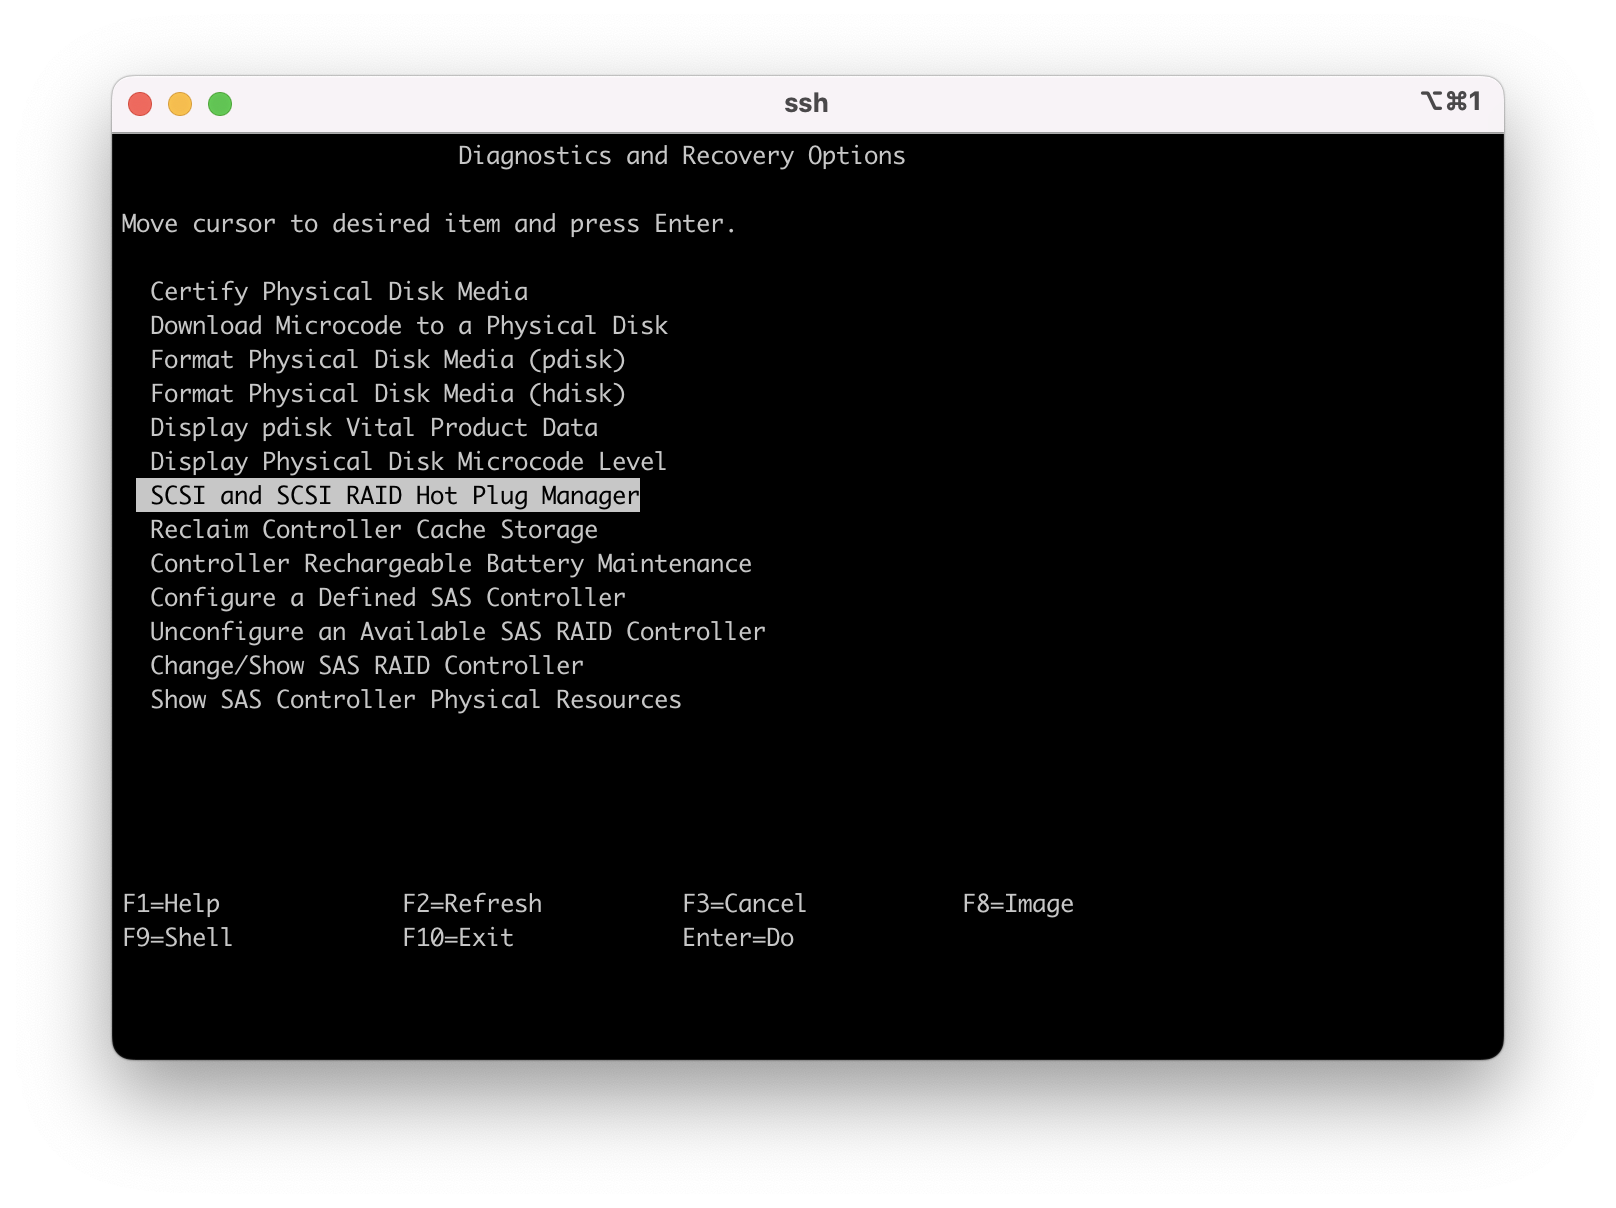
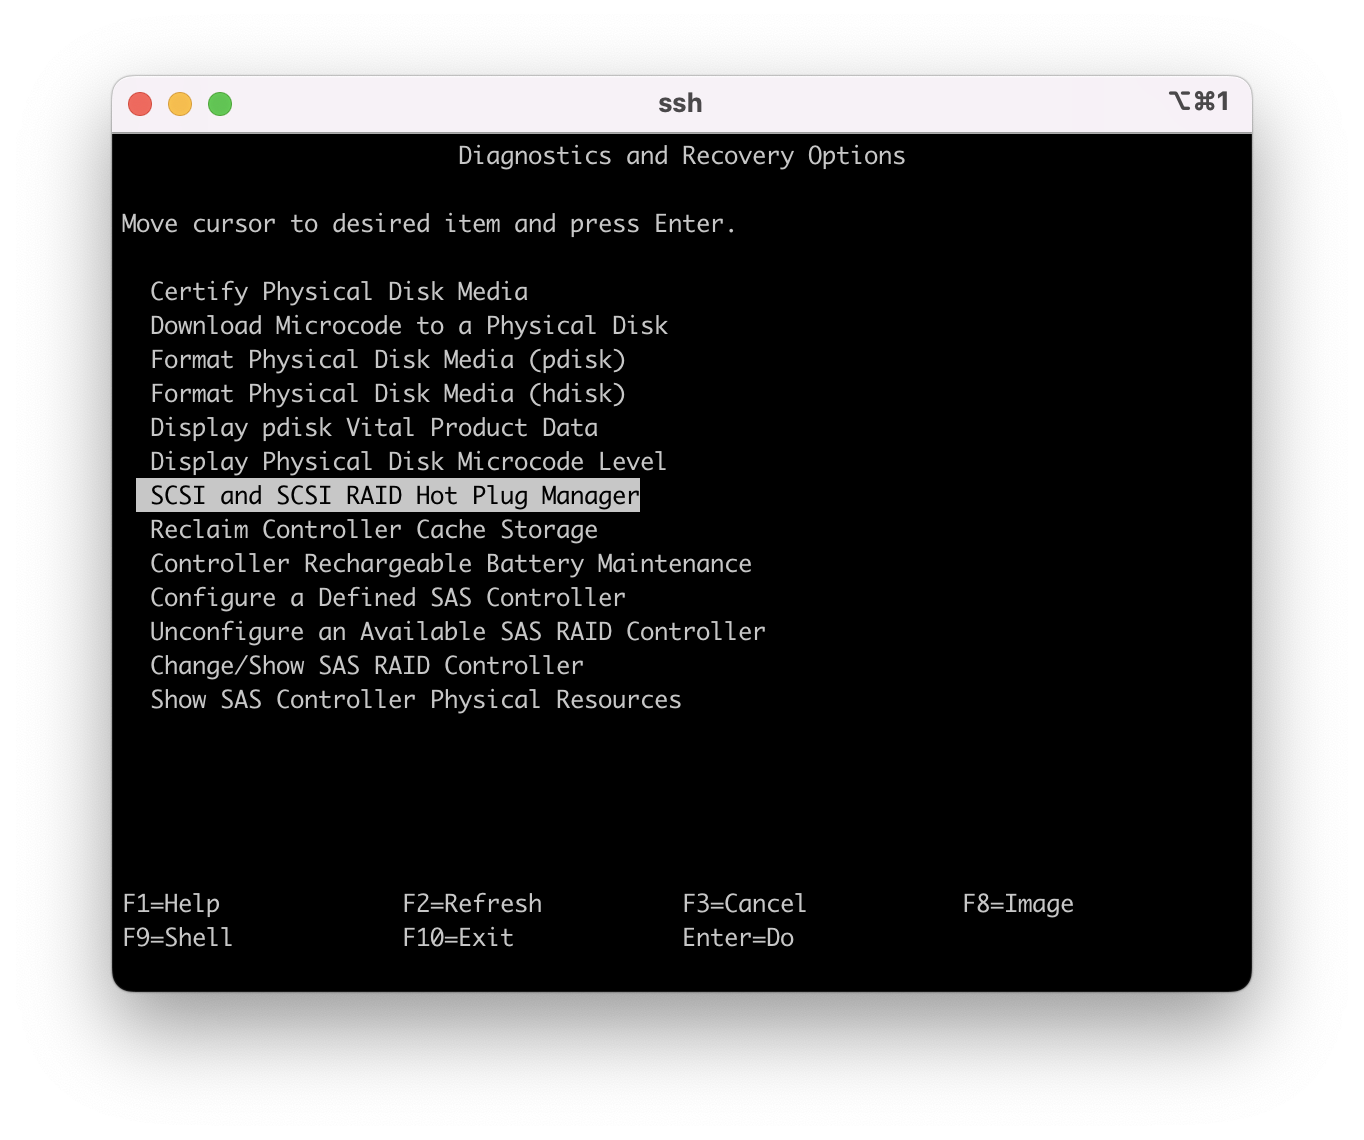
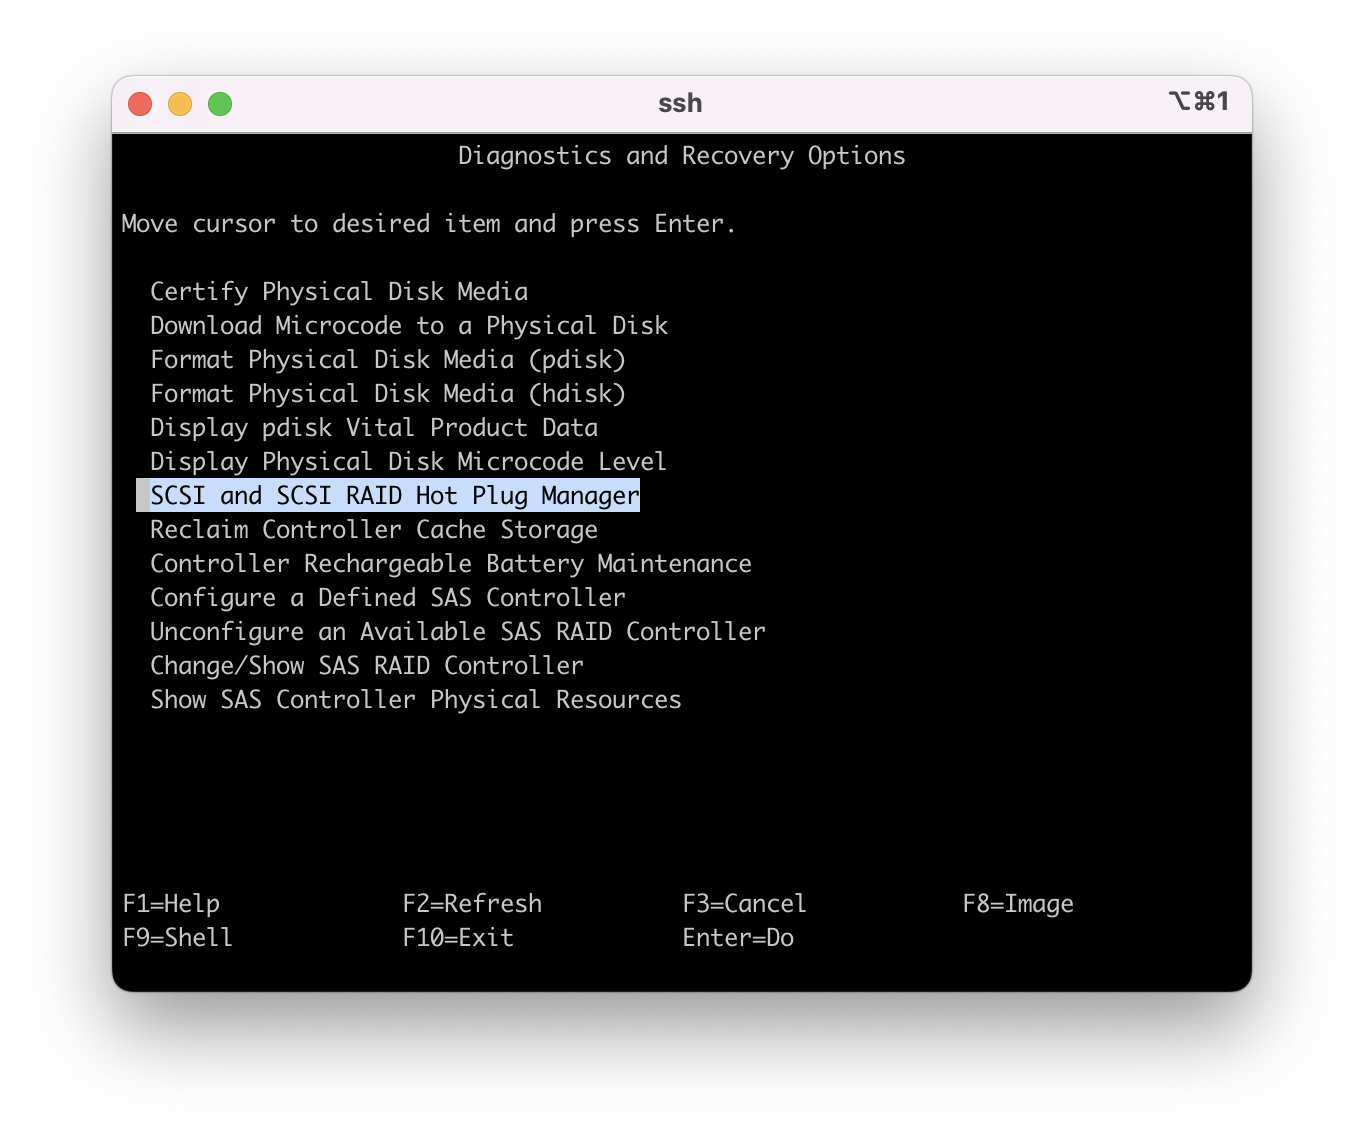
1.5 - Press F3 or ESC 3 to back out to the main menu then cursor down to "Diagnostics and Recovery Options" and press enter.

1.6 - Cursor down to " SCSI and SCSI RAID Hot Plug Manager: and press enter.
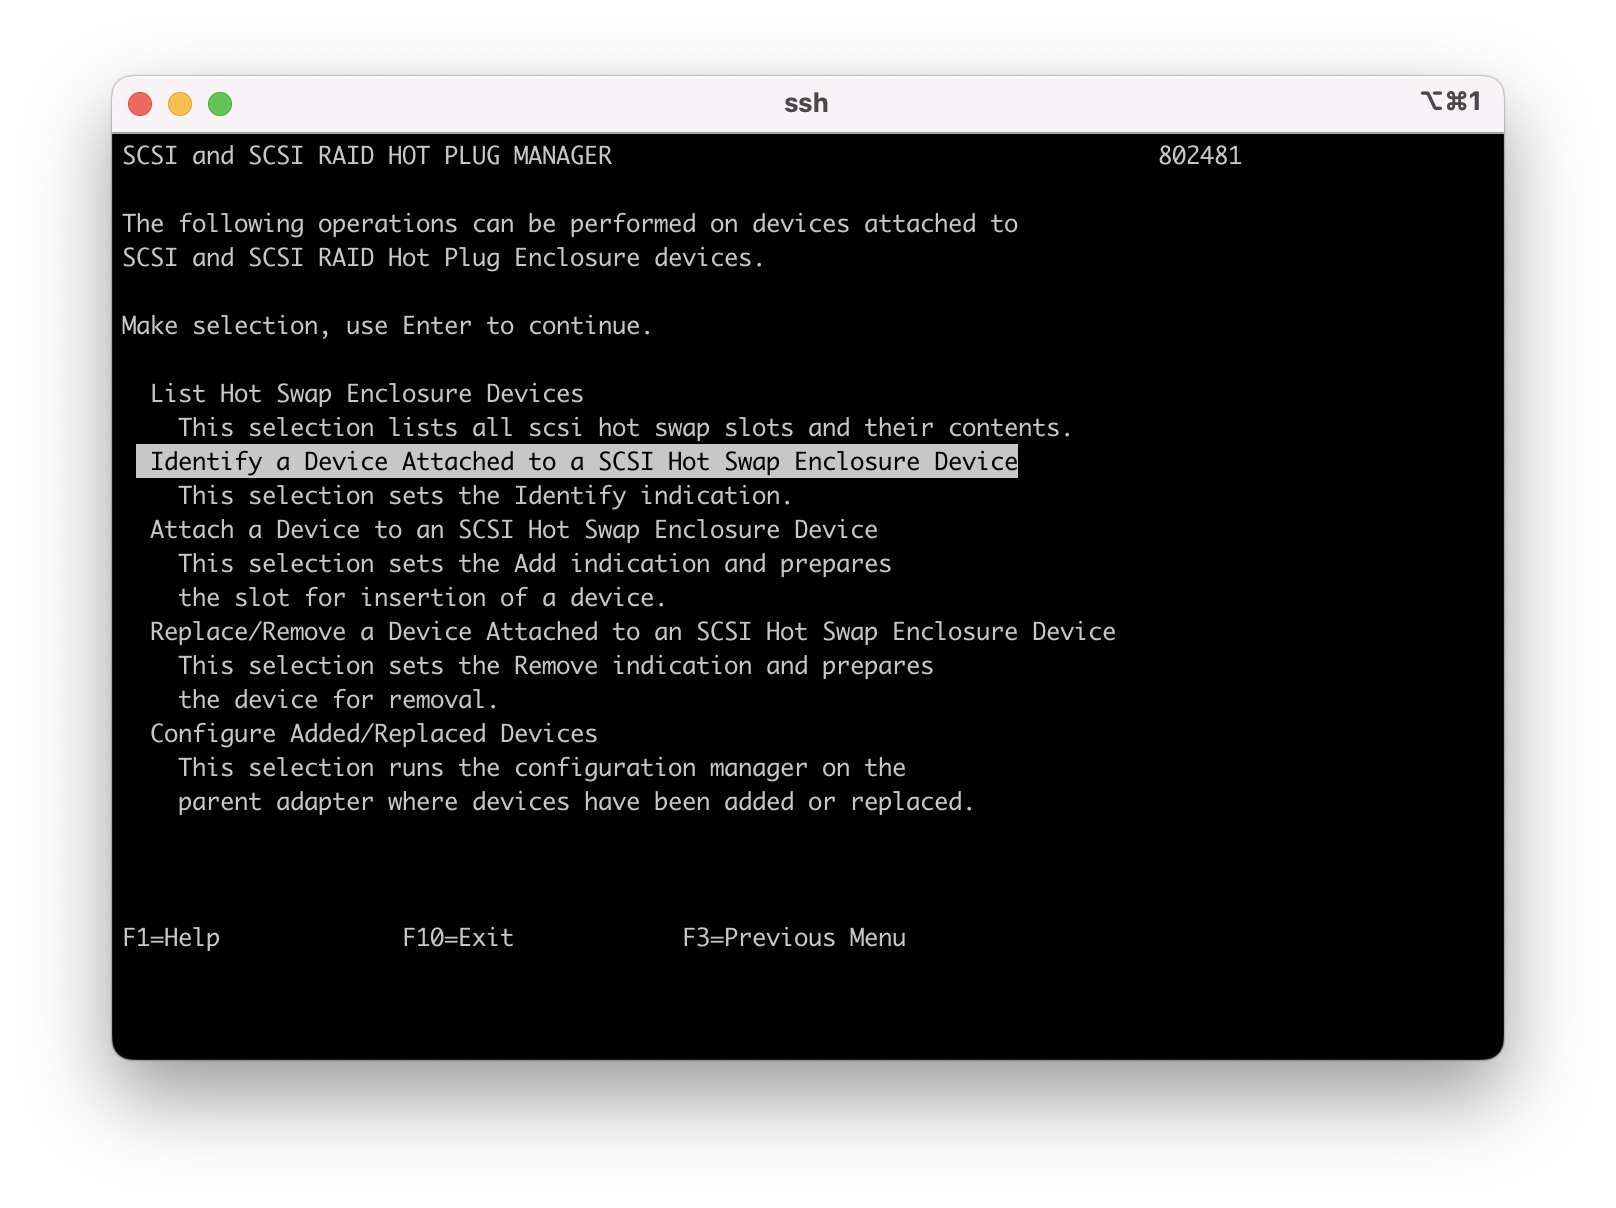
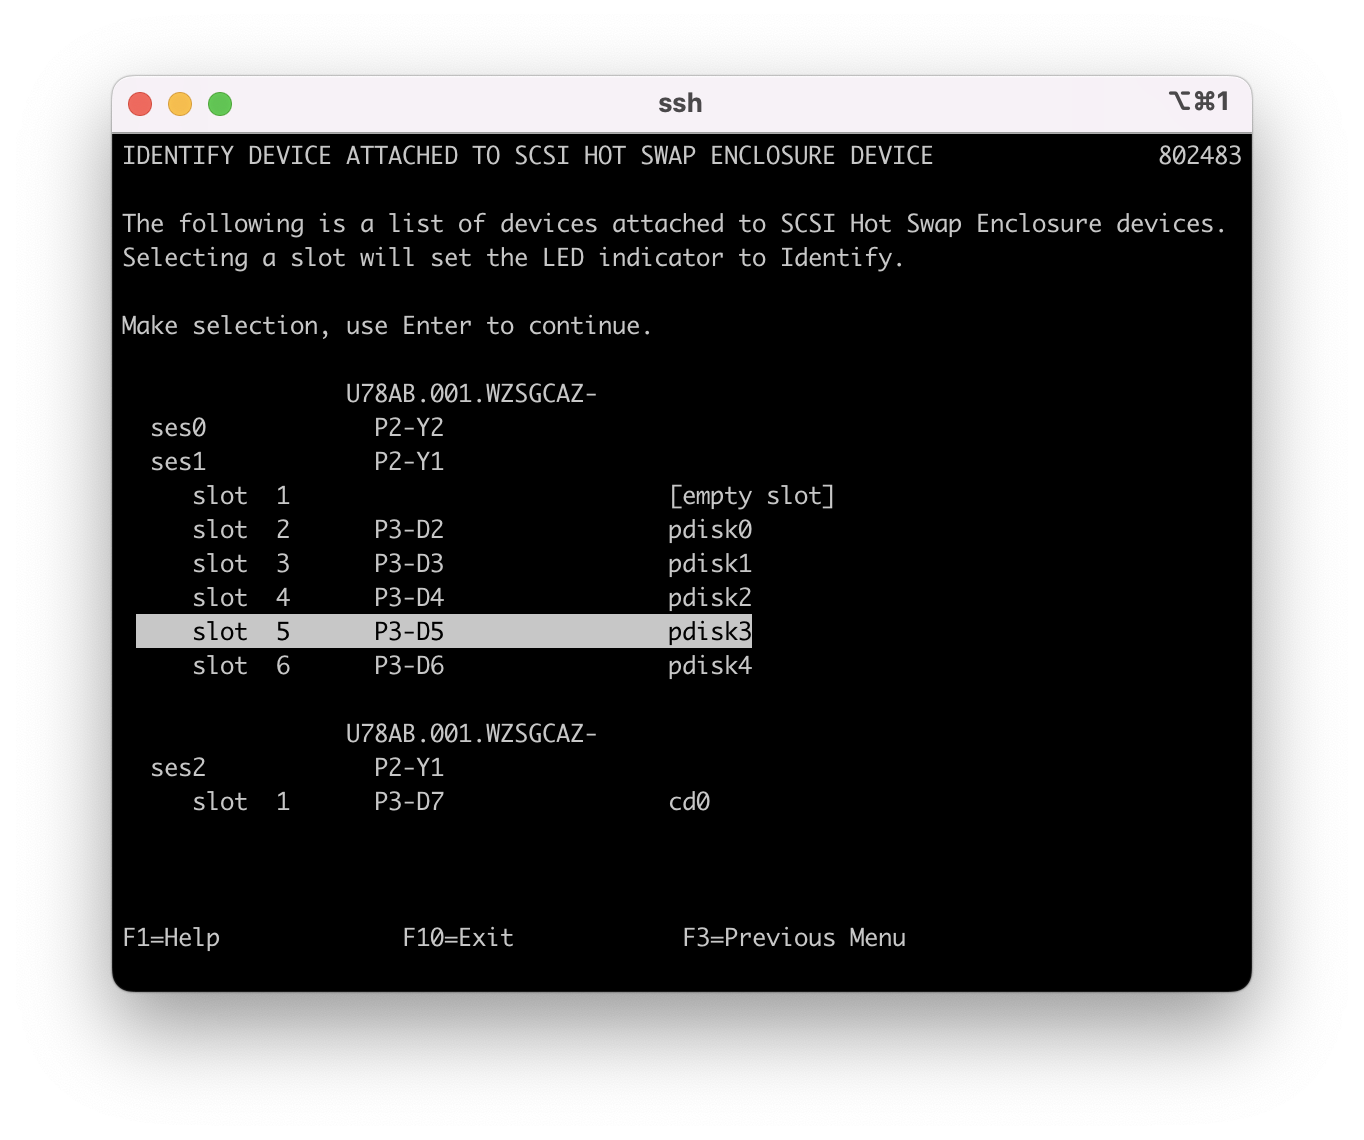
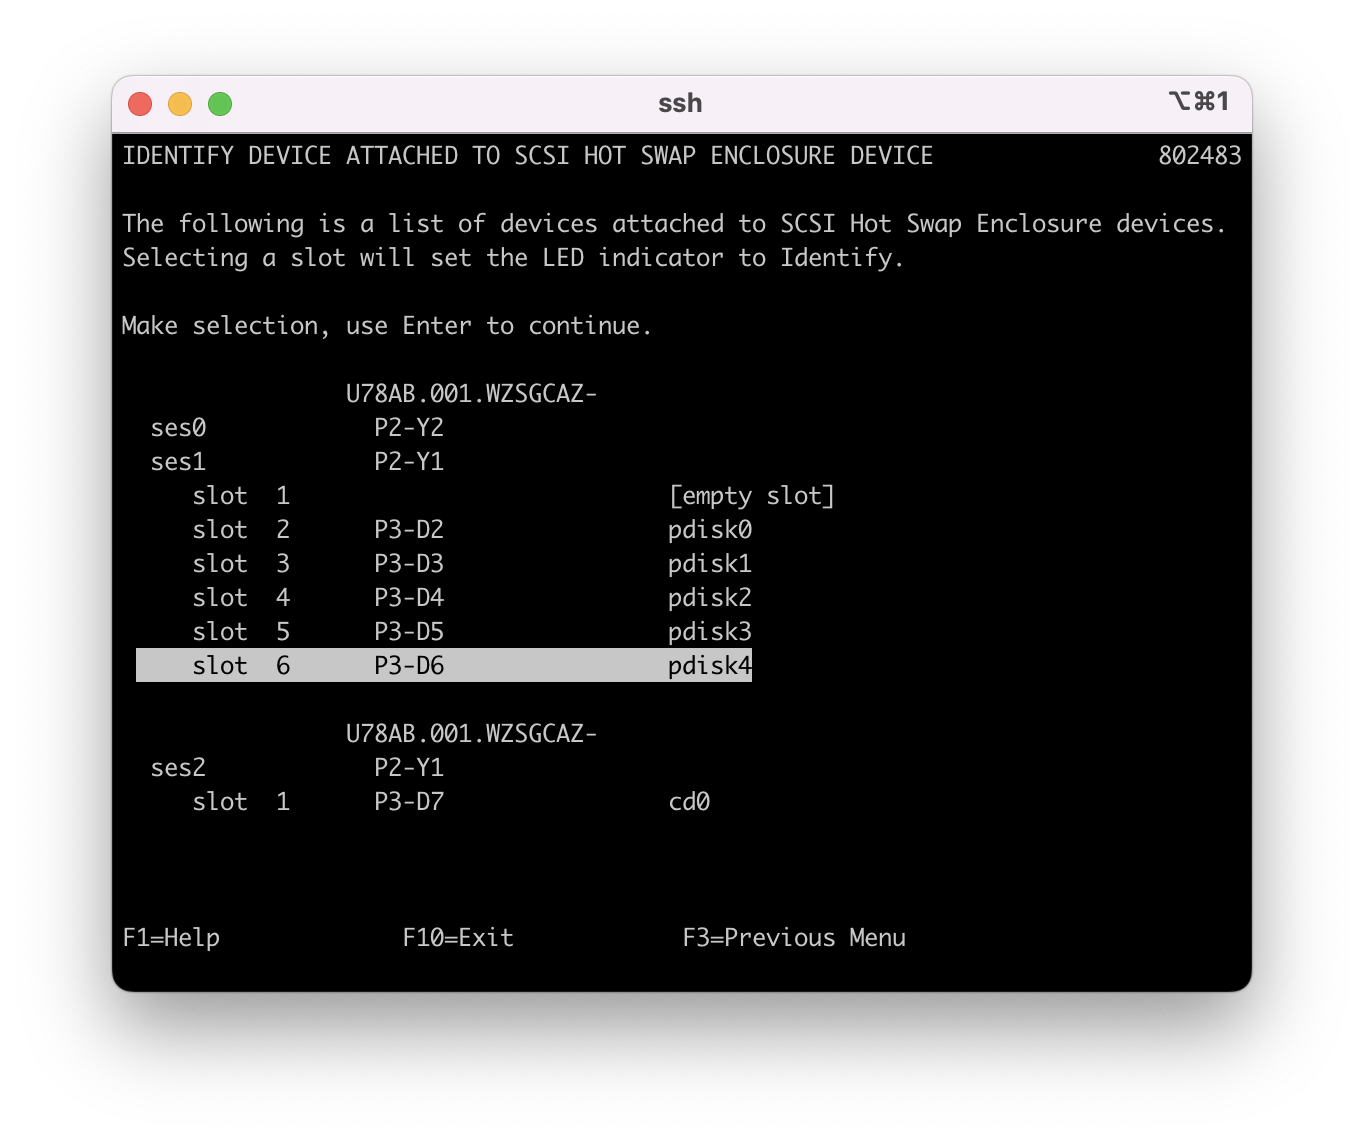
1.7 - If you are unsure of the physical location of the disk unit cursor down to "" and press enter. This procedure flashes the identify LED on the disk so that you can locate it in the system unit or attached IO drawer.
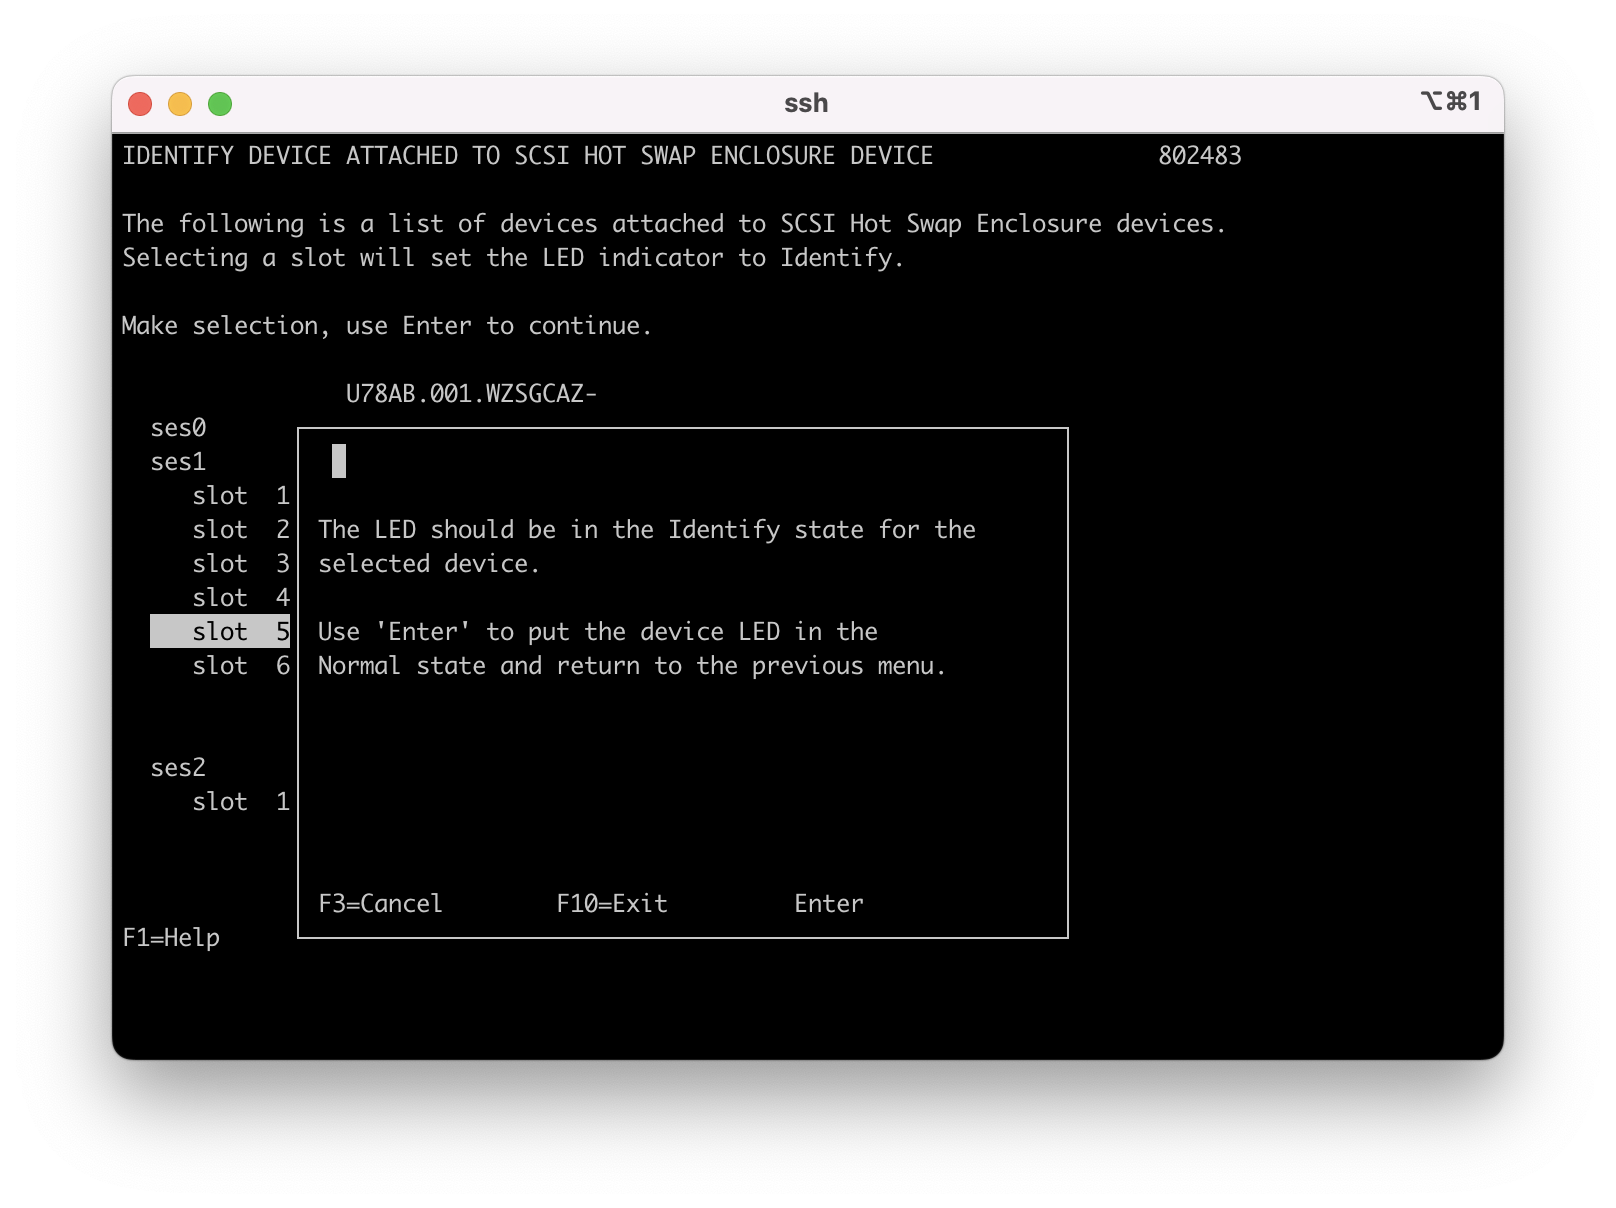
1.8 - Cursor down to the target disk unit and press enter, in this example it is hdisk1 that we are physically replacing.

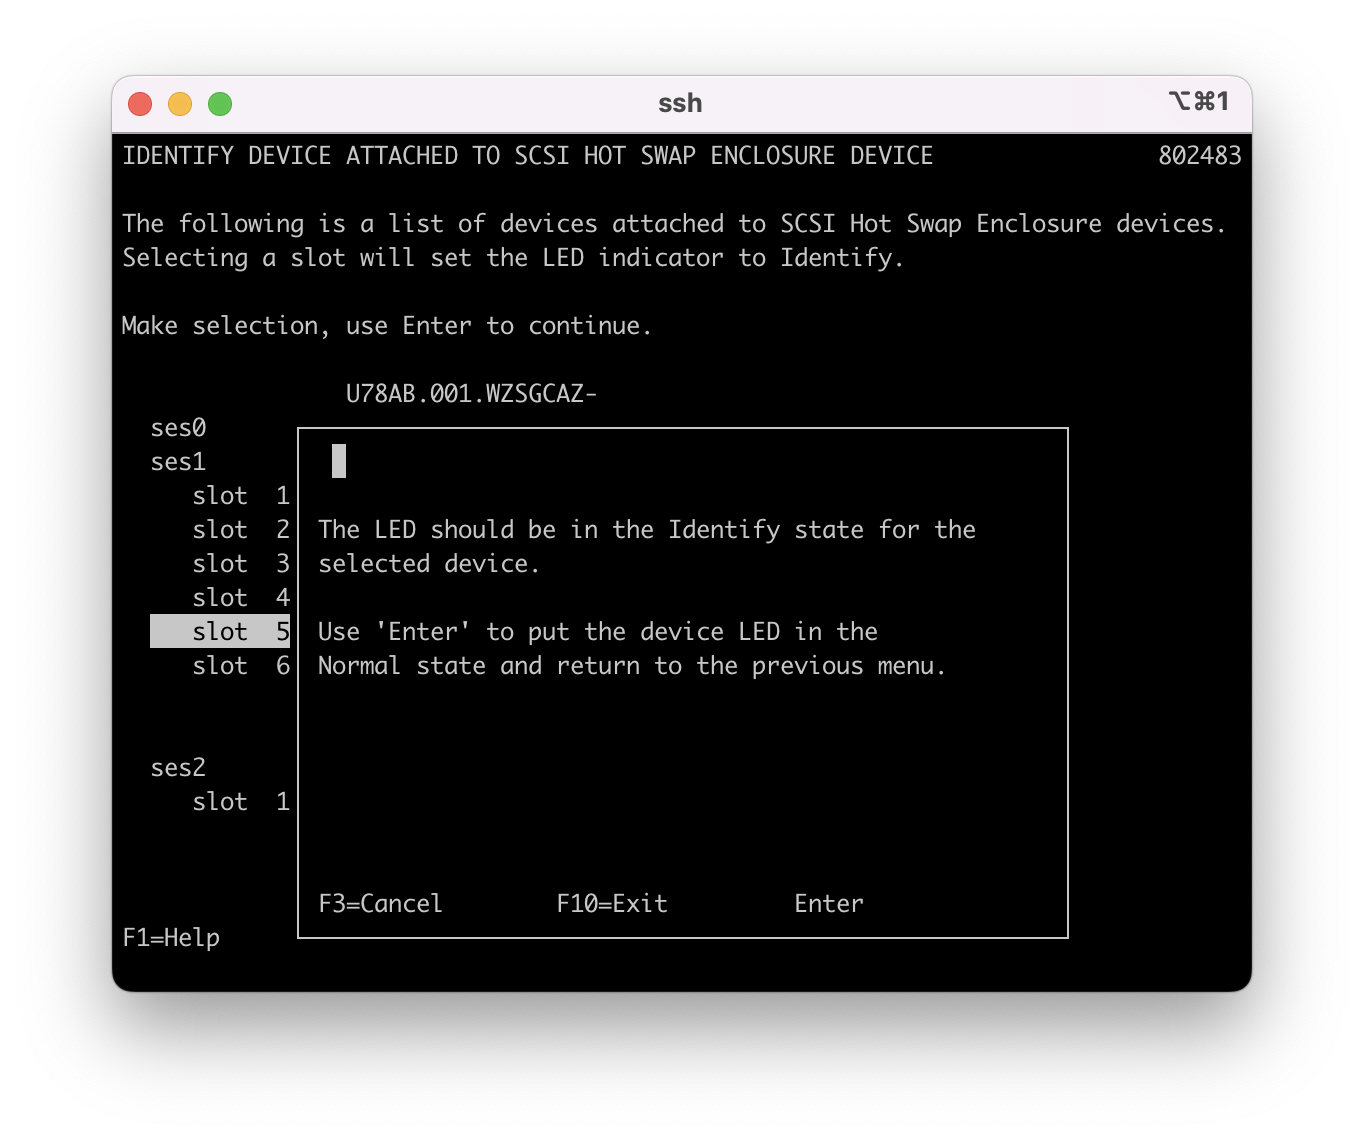
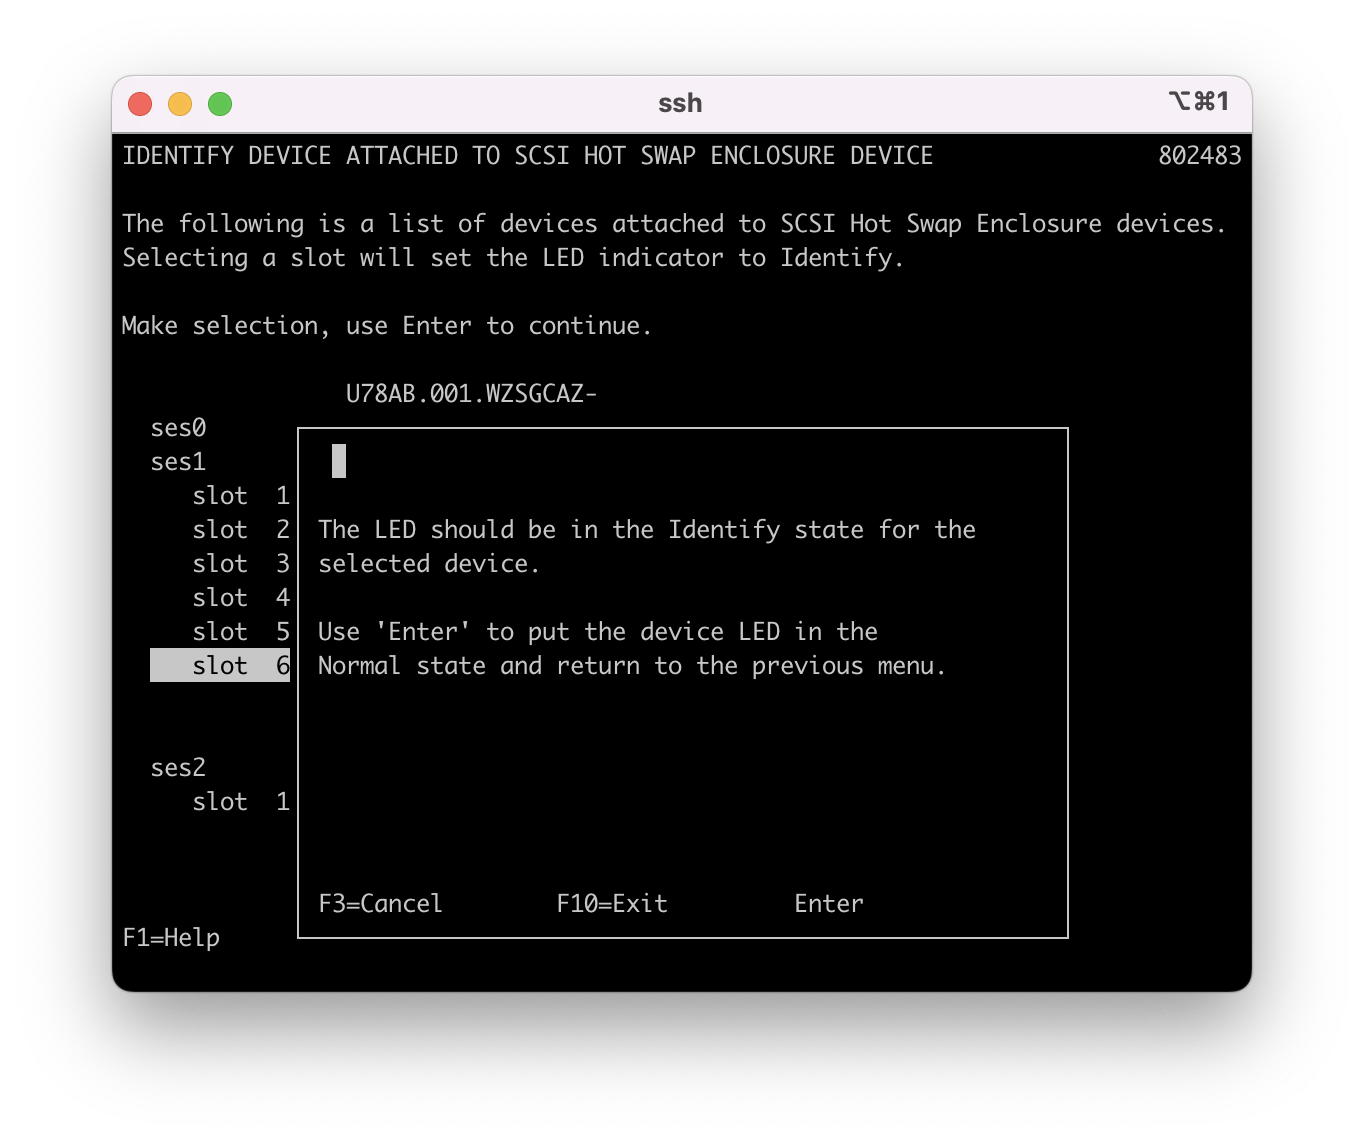
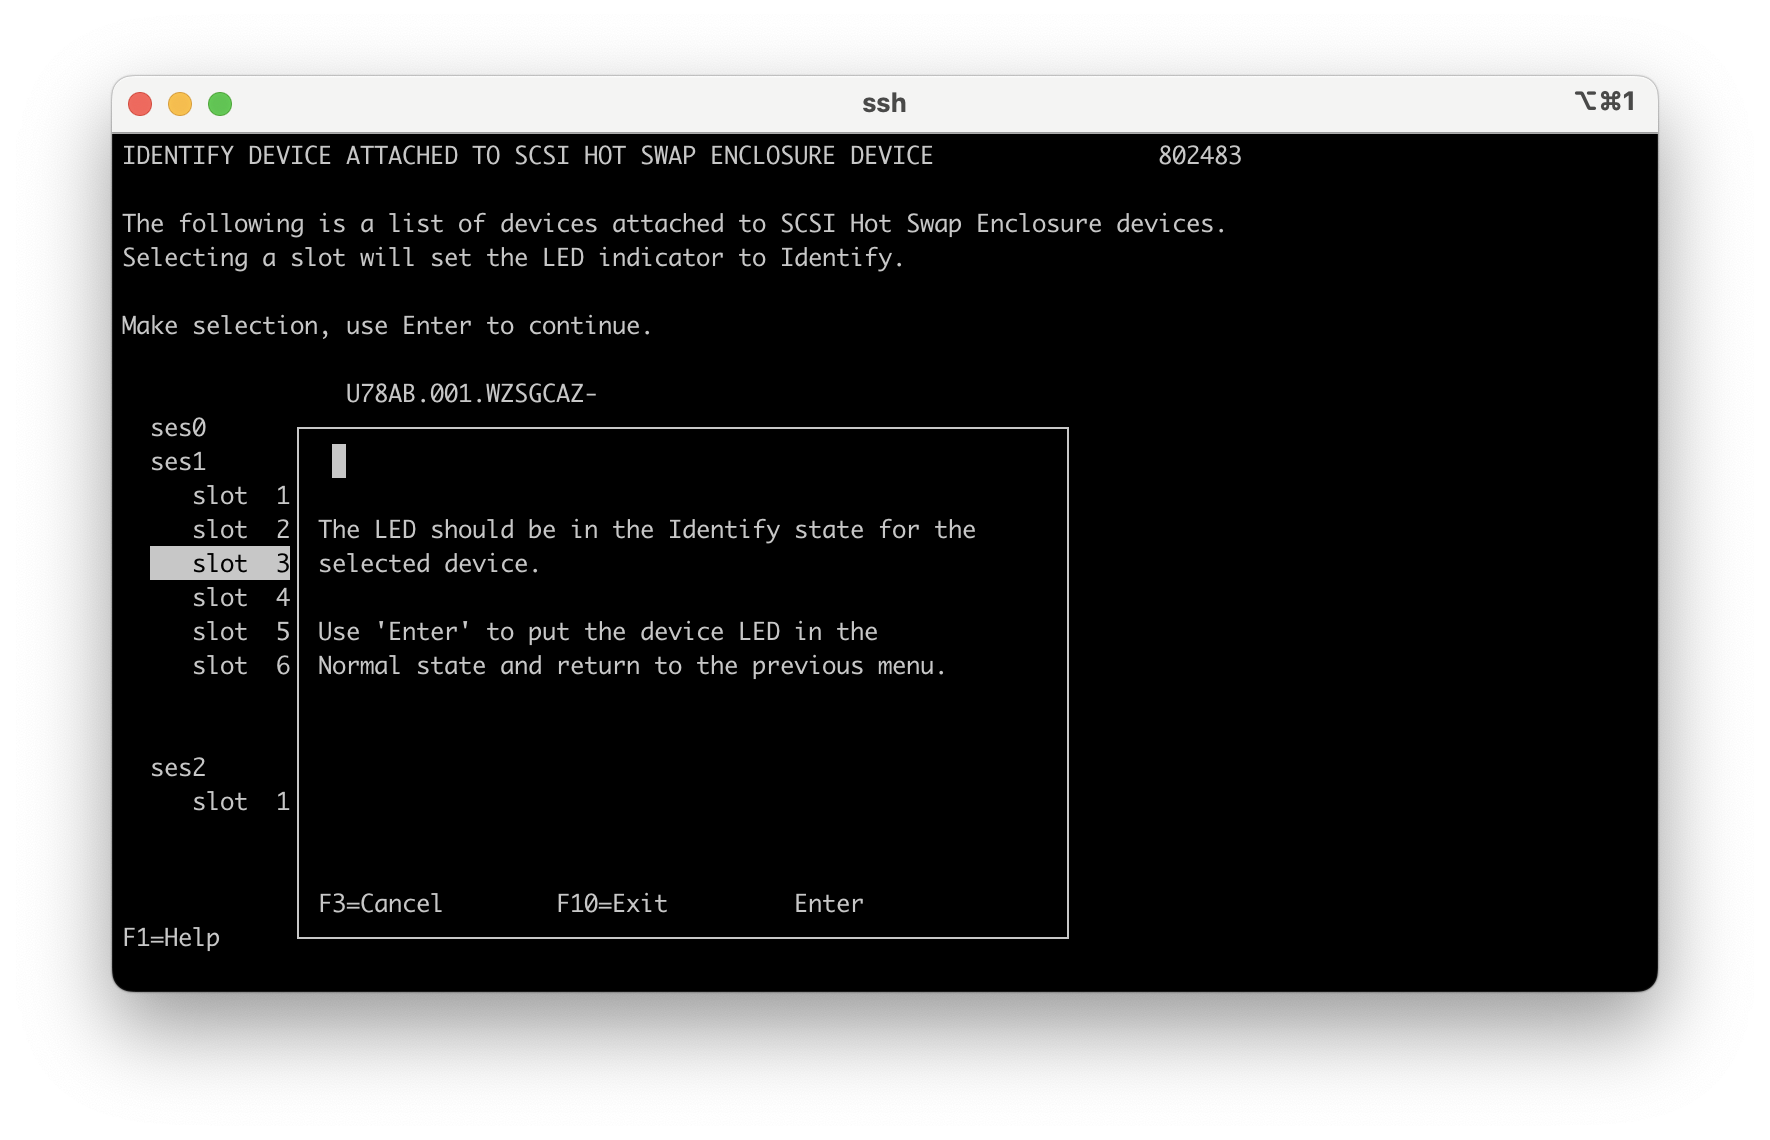
1.9 - The disk is now in identify state where you can go and physically locate it. Once located hit enter once mire to turn of the identify state.
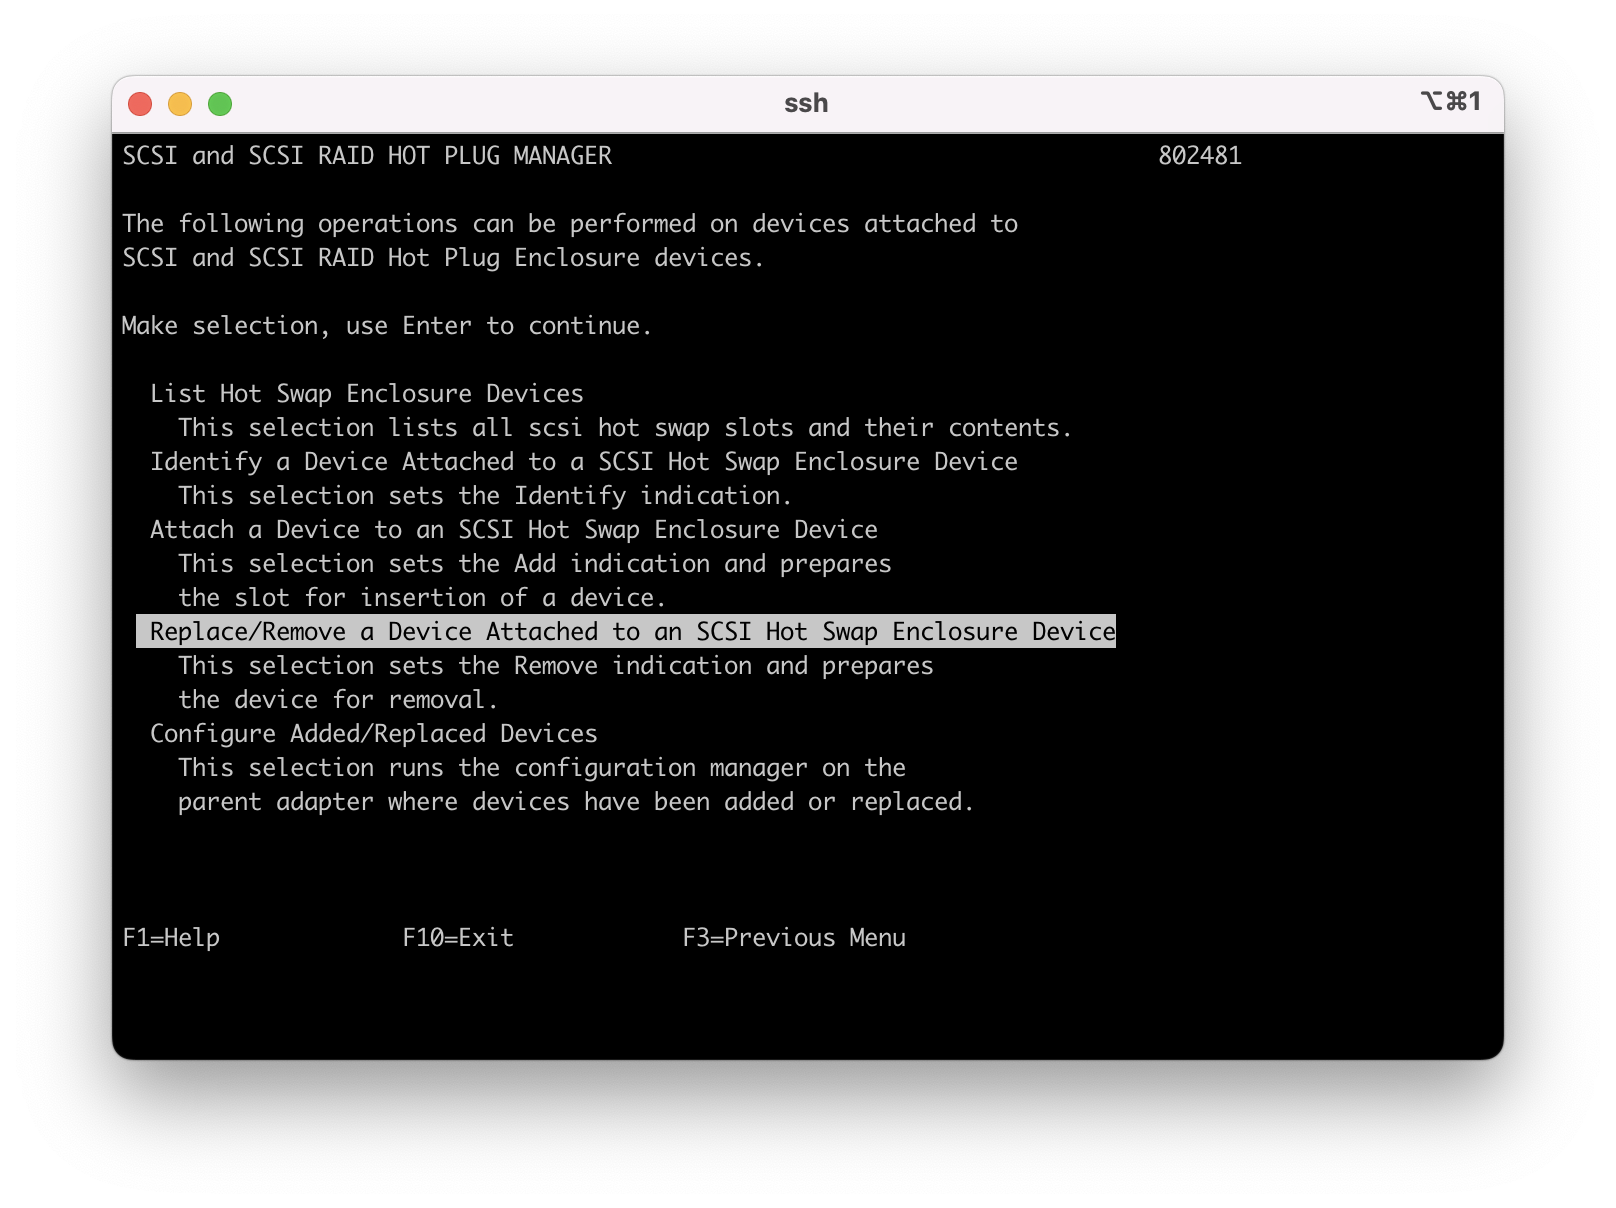
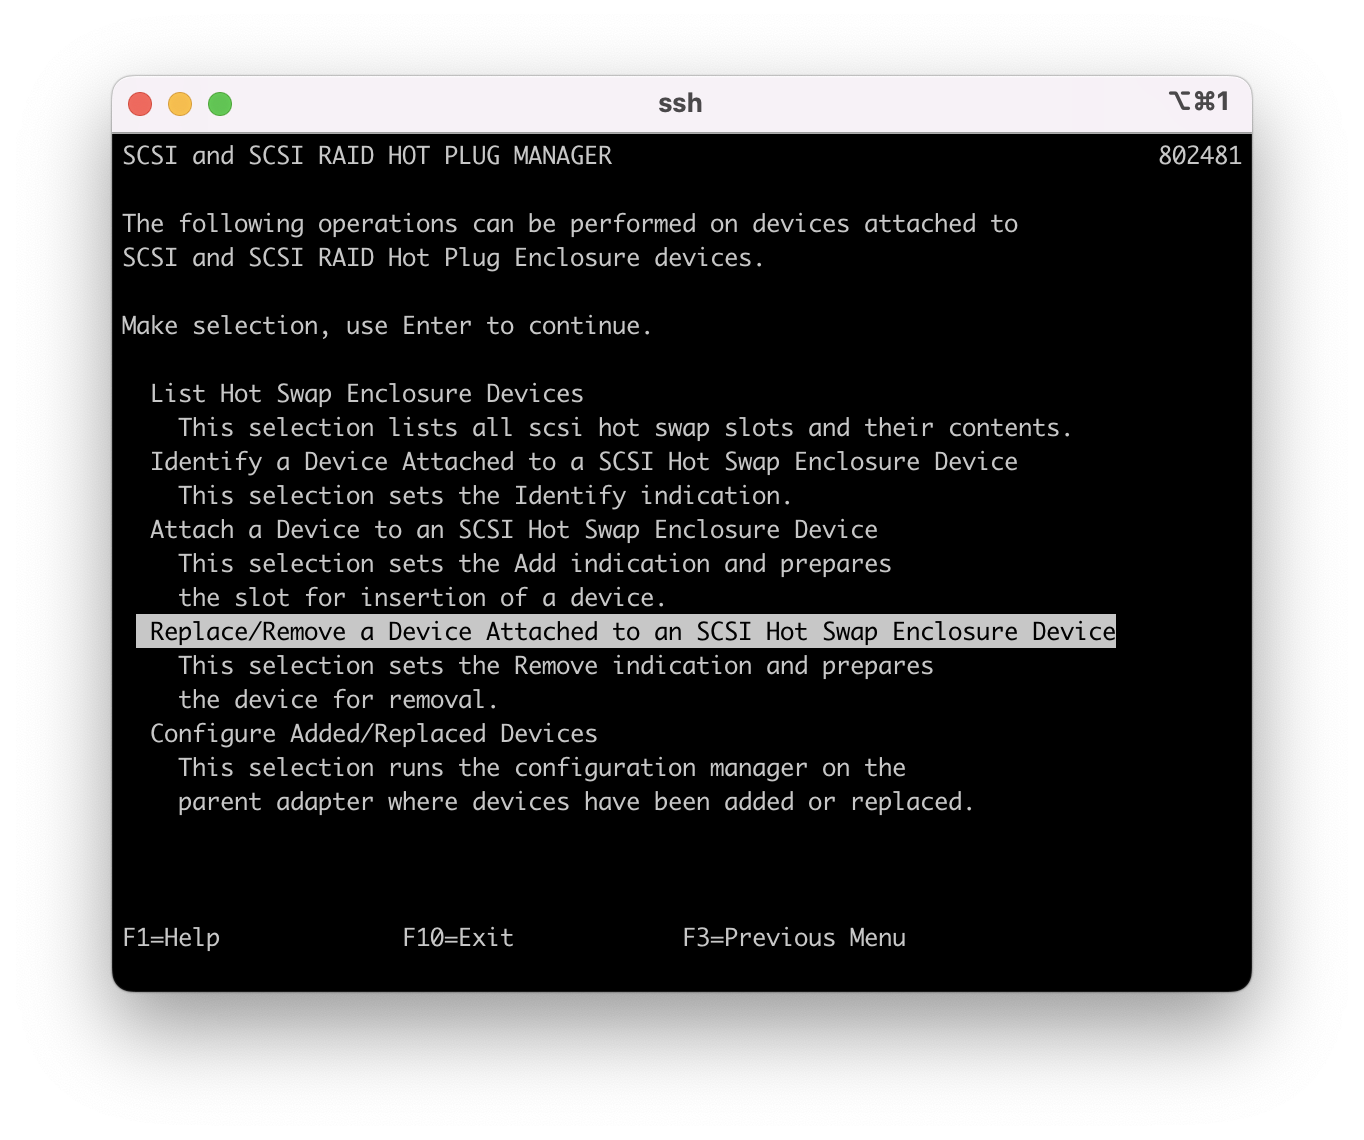
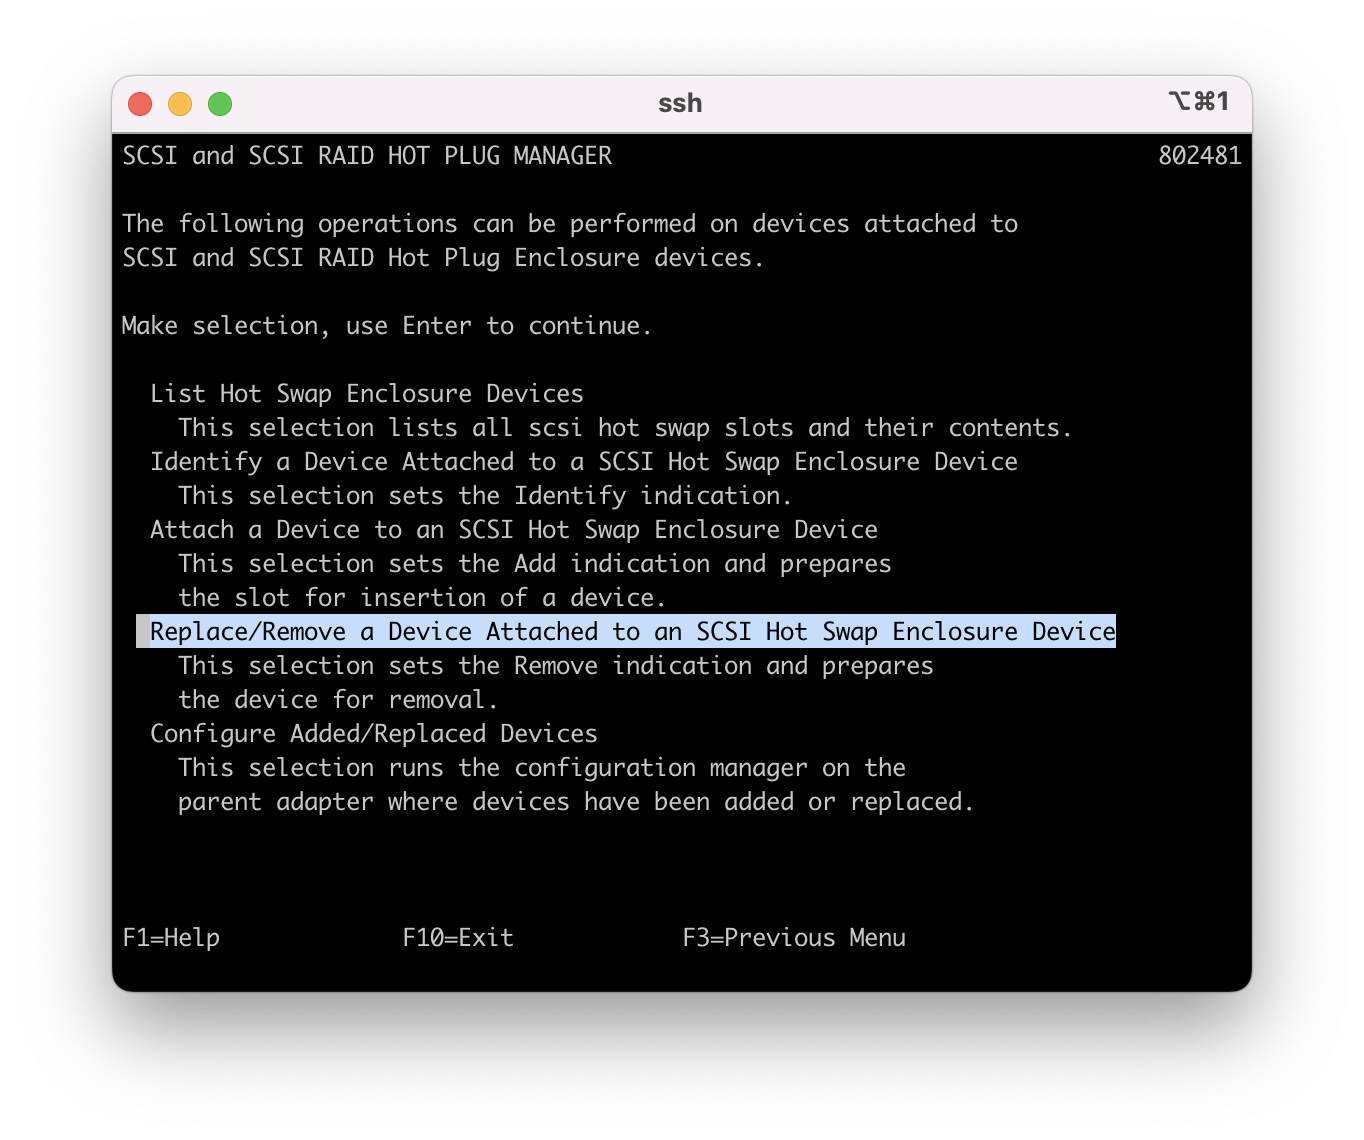
1.10 - Press F3 or Esc 3 back one menu then select "" to start the replacement process. Cursor down to "Replace/Remove a Device Attached to a SCSI Hot Swap Enclosure Device" and press enter.
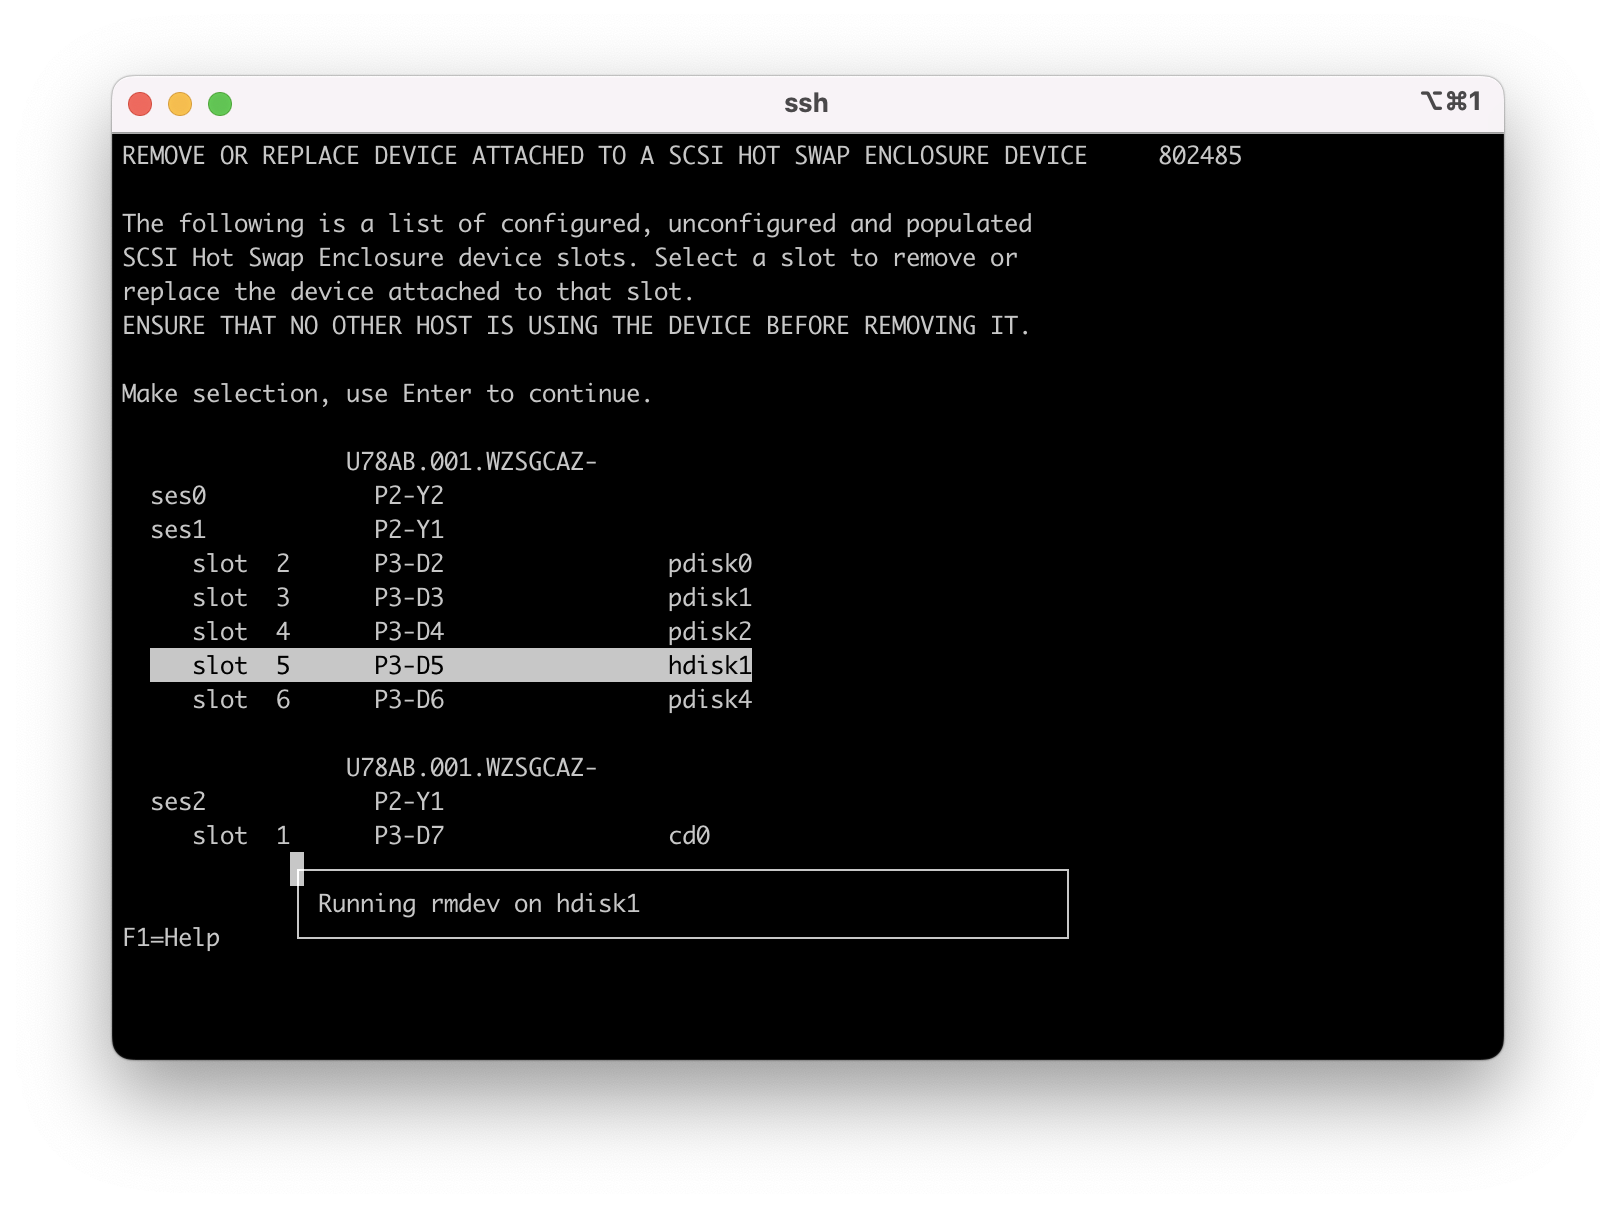
1.11 - Cursor down to the target disk of hdisk1 and press enter.
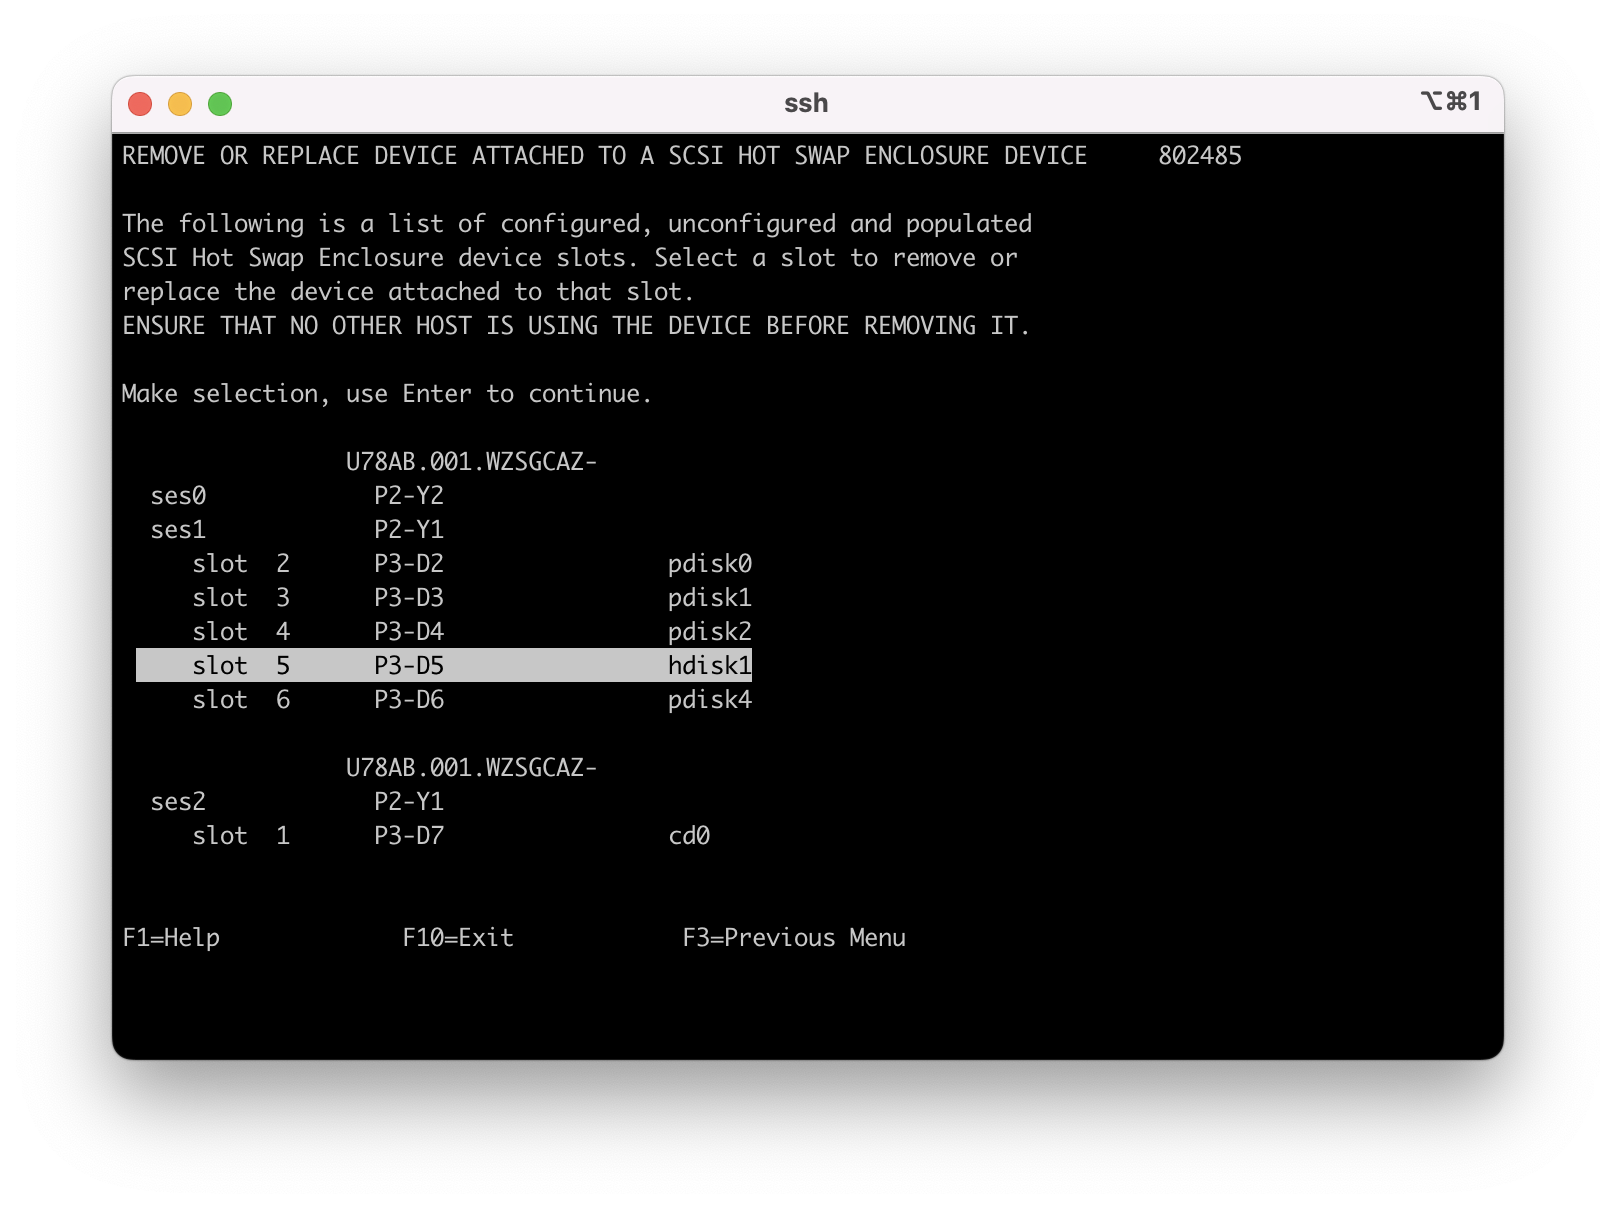
Message "rmdev running on hdisk1" is displayed, then the removal screen displays and hdisk1 is listed as populated.
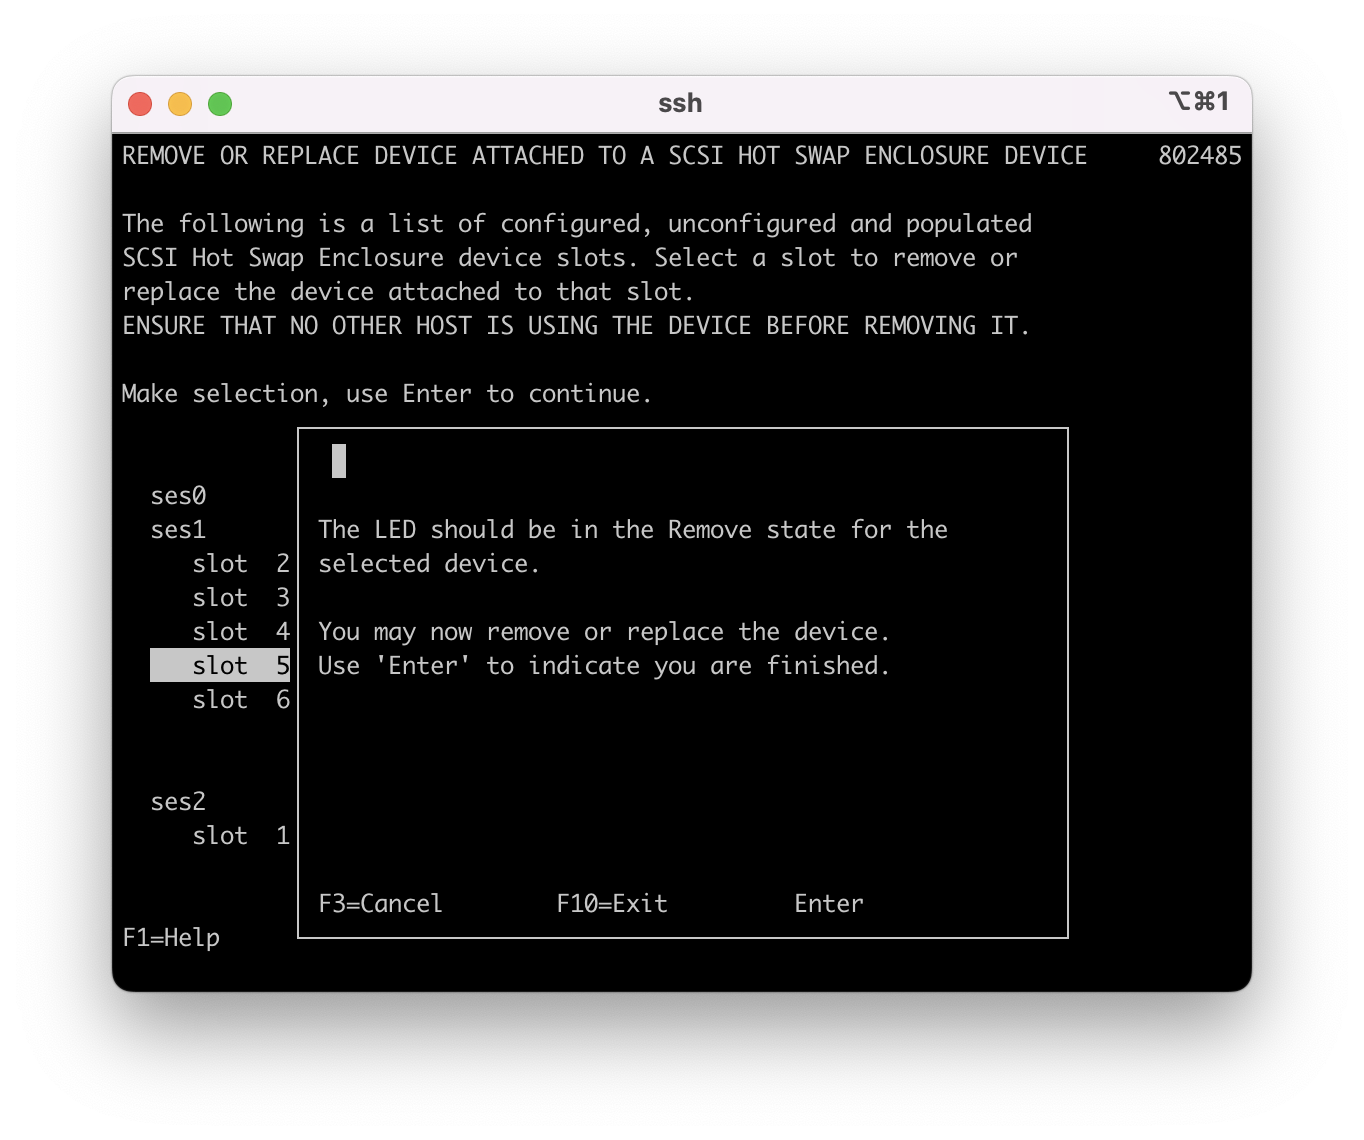
1.12 - The disk is now in replacement mode. This step is where you physically pull out the defective disk unit and insert the new disk unit. Press enter after you replace the disk unit.
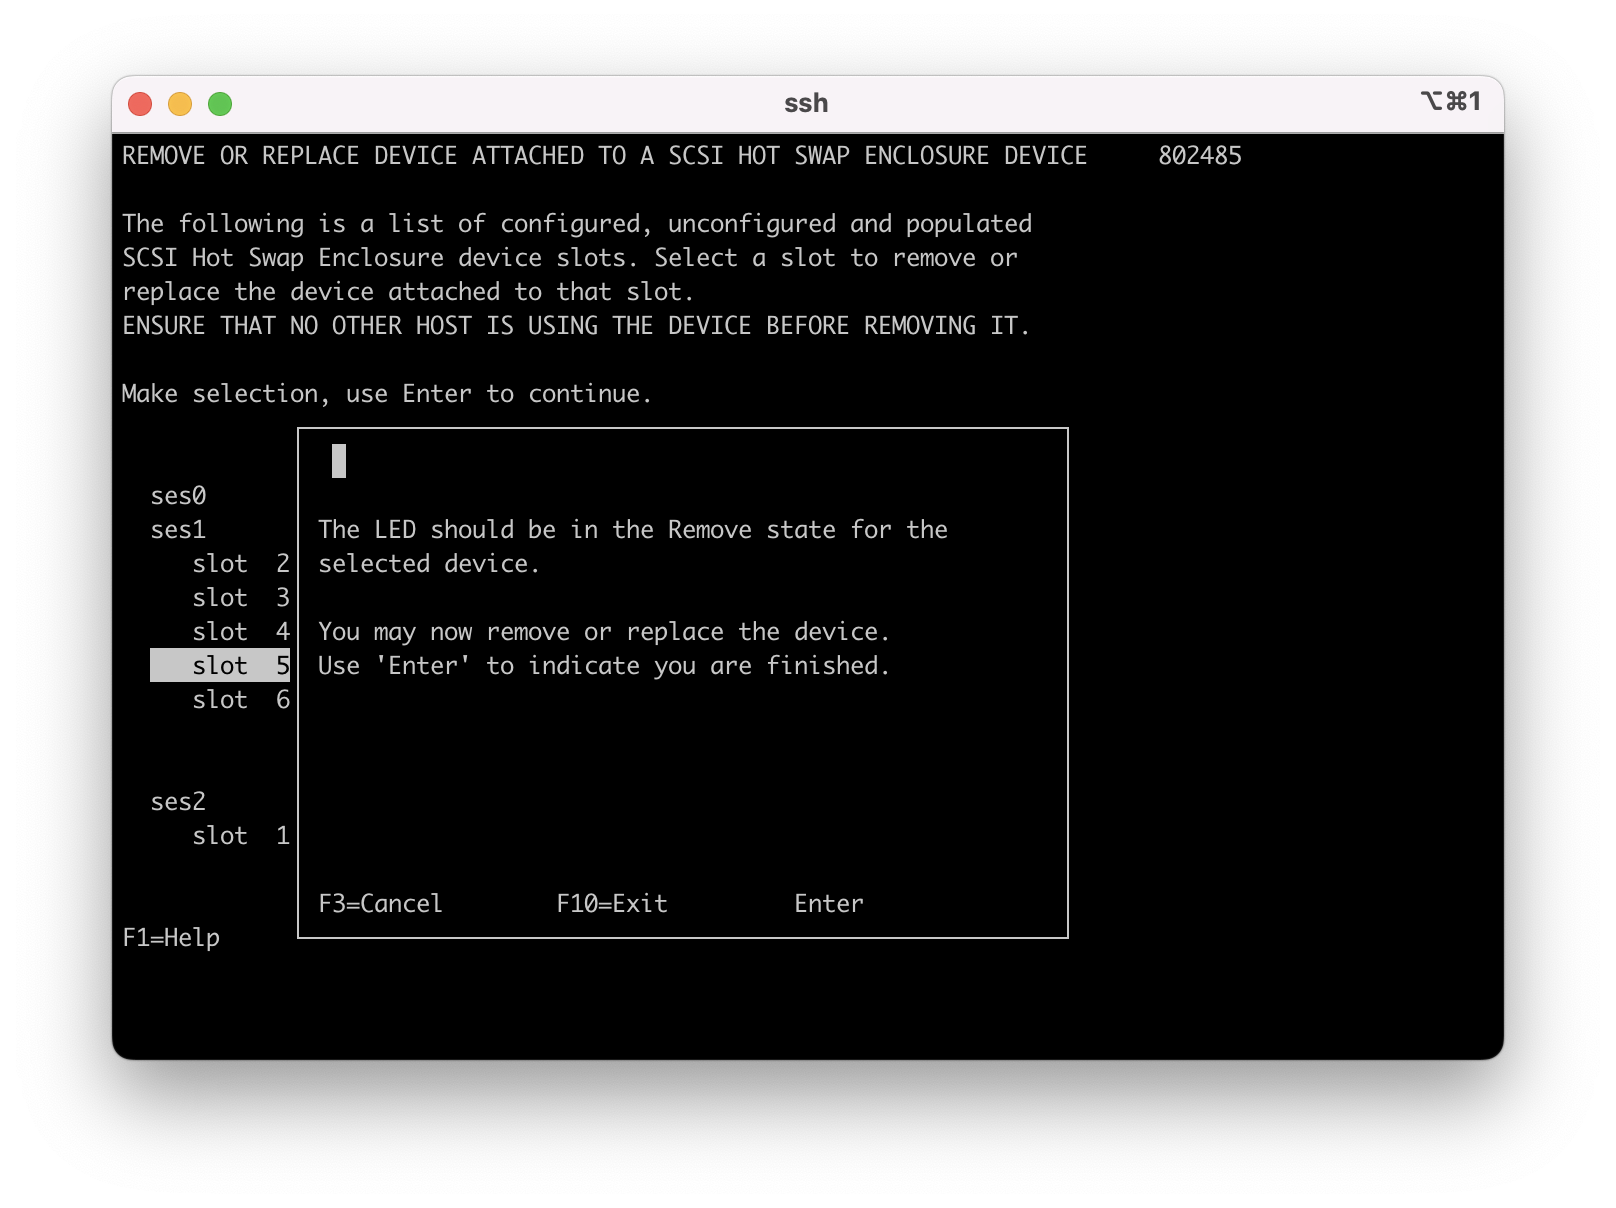
The new disk unit shows in a "Populated" state. The status is expected since the disk was not previously attached to a VG.

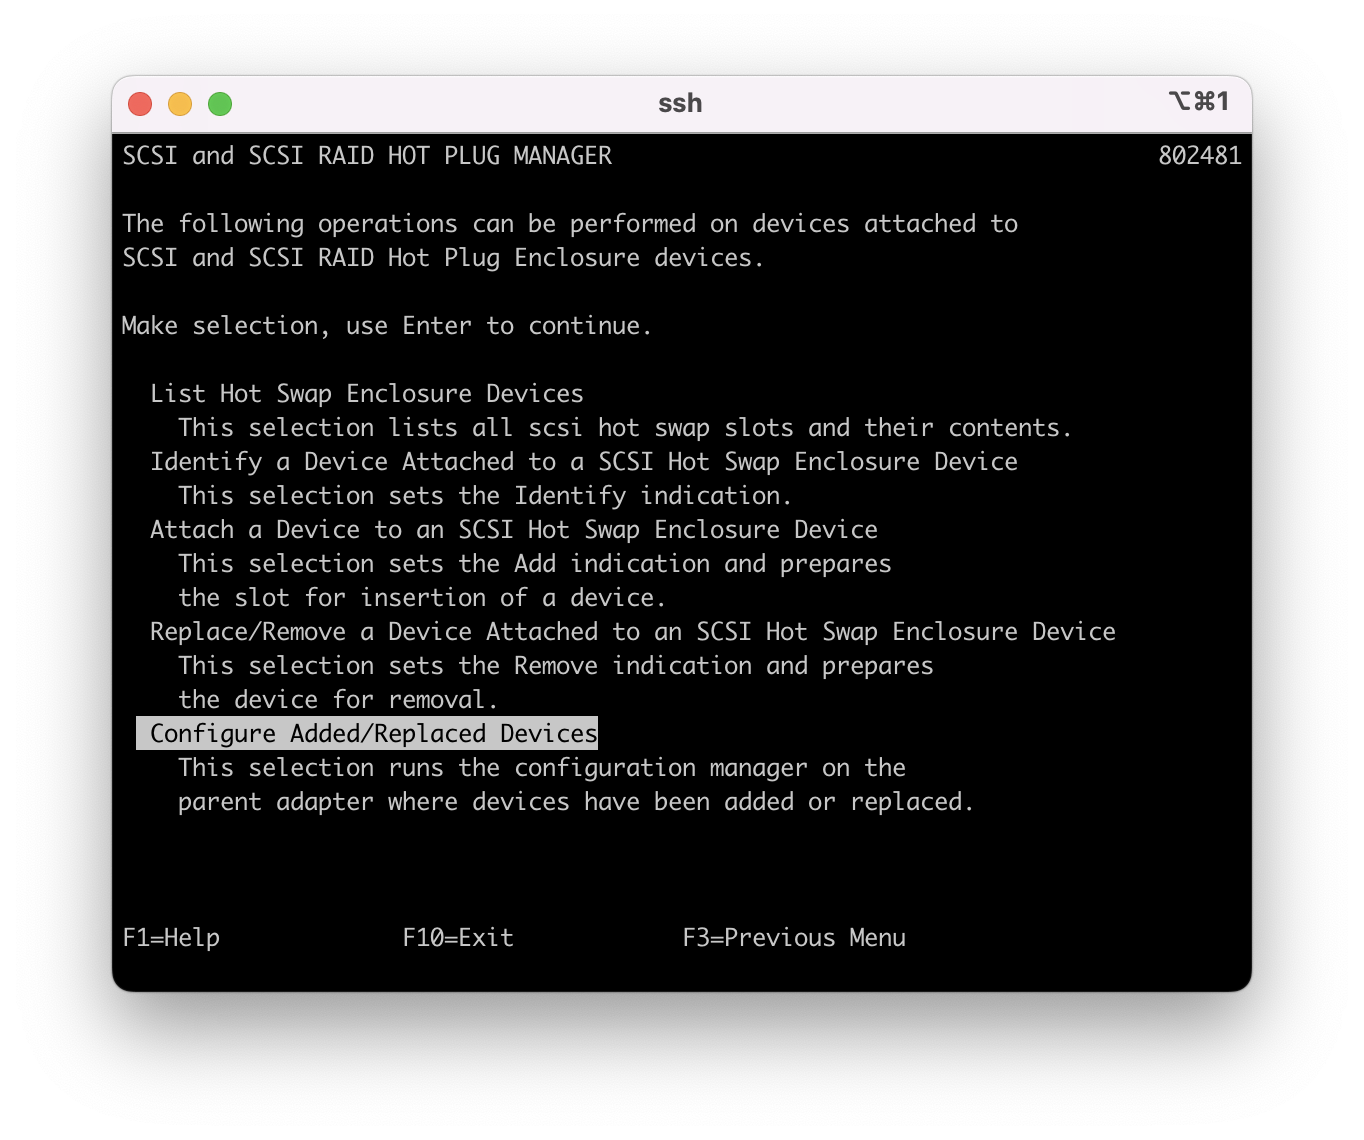
1.13 - Press F3 or ECS 3 to back out one menu then select "Configure Added/Replaced Devices".

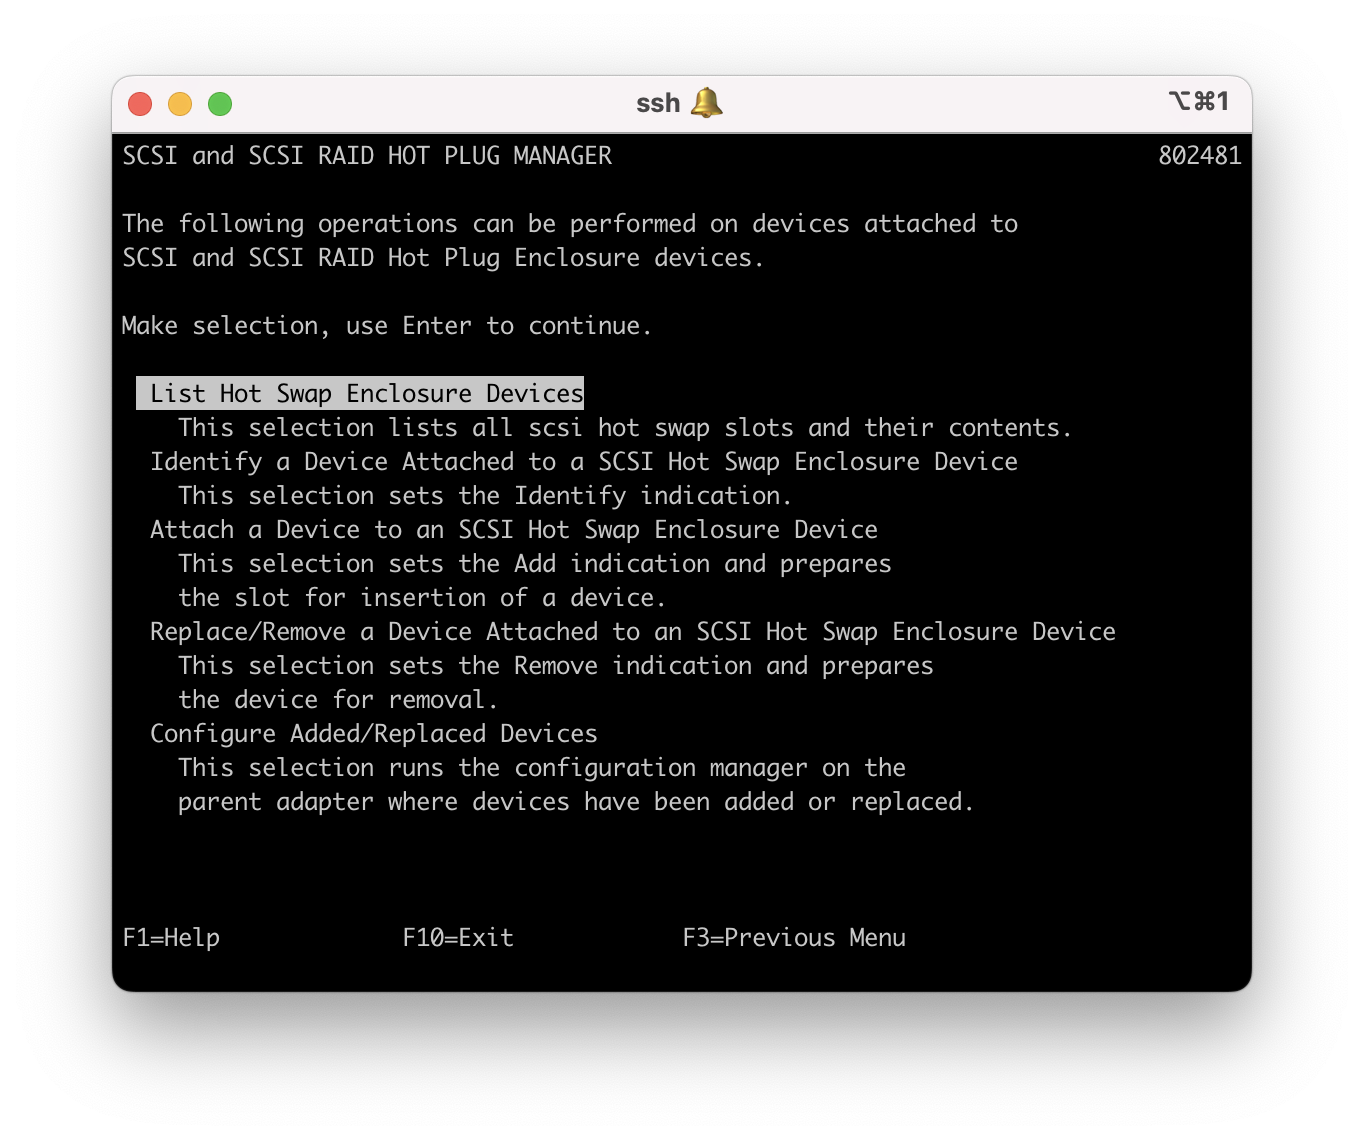
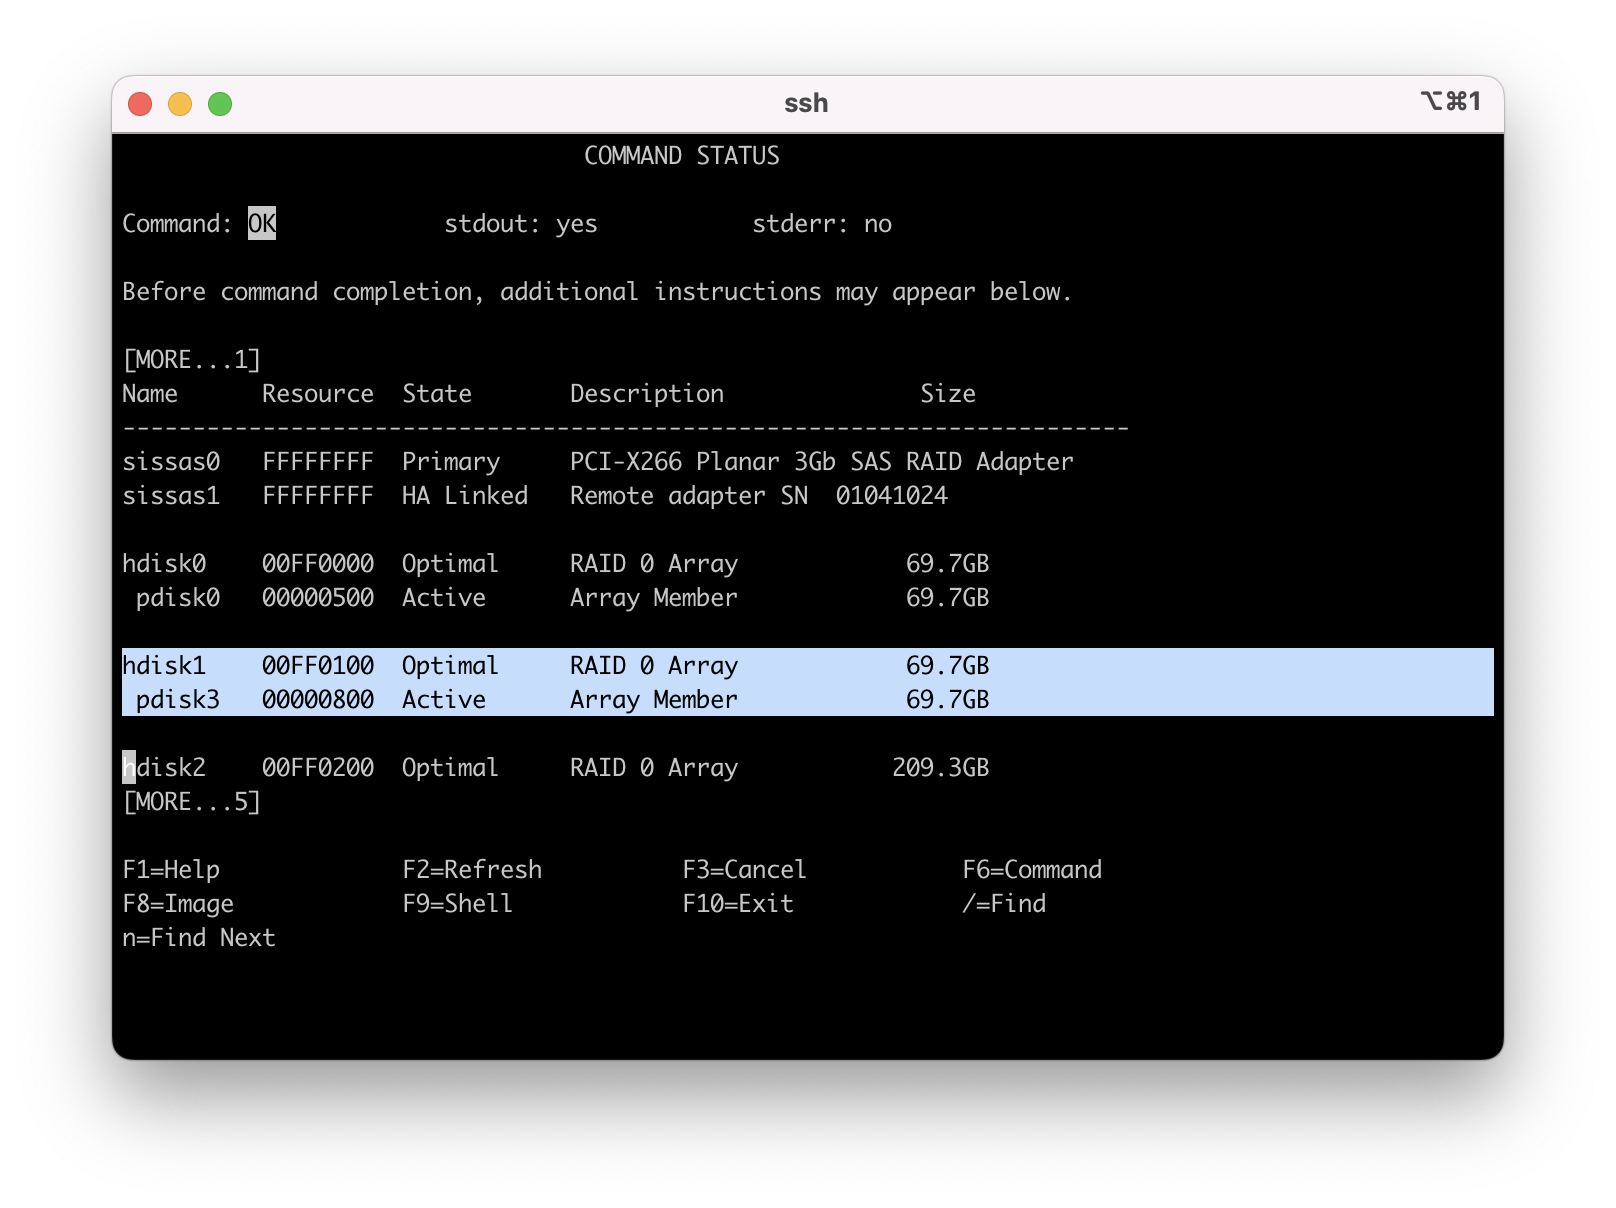
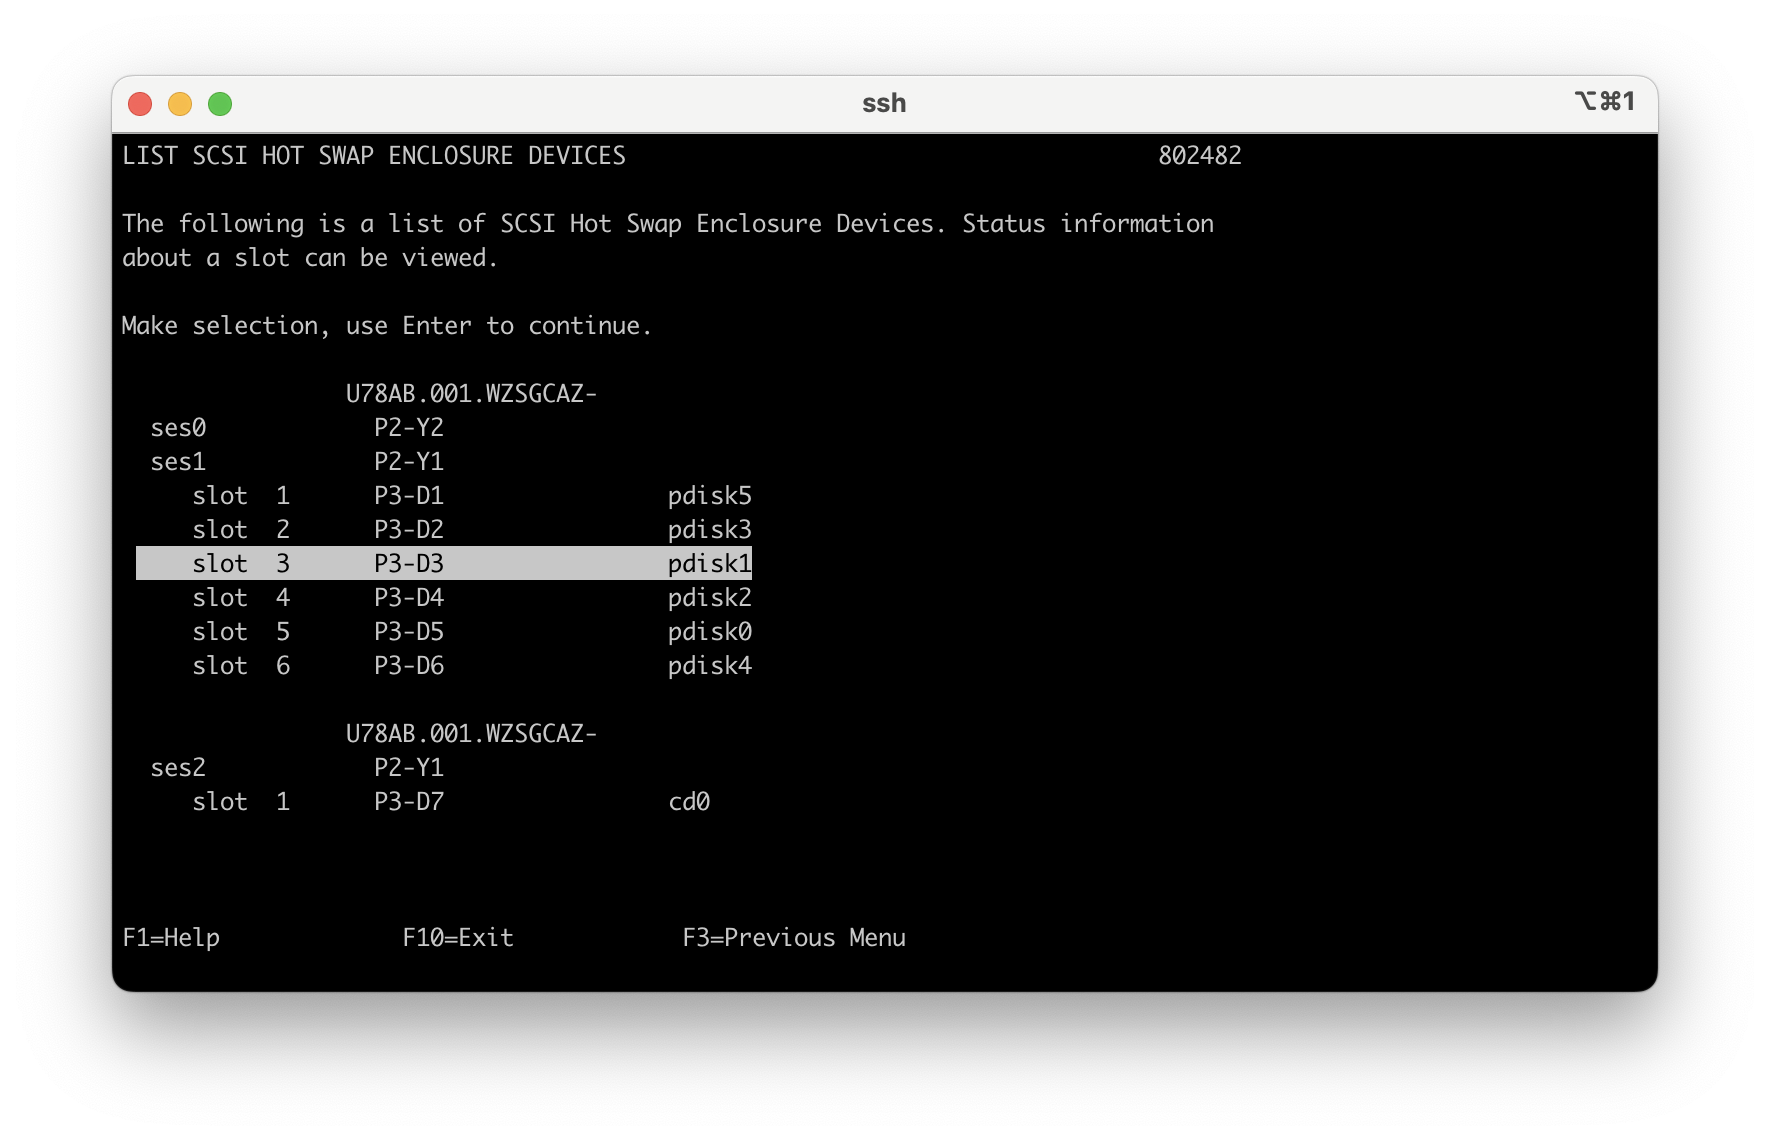
1.14 - This task returns you to the main menu "SCSI and SCSI RAID HOT PLUG MANAGER" where you move your cursor to "List Hot Swap Enclosure Devices" and press enter. Disk unit pdisk3 is in the list now.

1.15 - press F3 or ESC 3 to back out to the main menu "IBM SAS Disk Array Manager" and then select "List SAS Disk Array Configuration".
1.16 - Select the primary SAS adapter that has your disk unit attached to it and press enter.
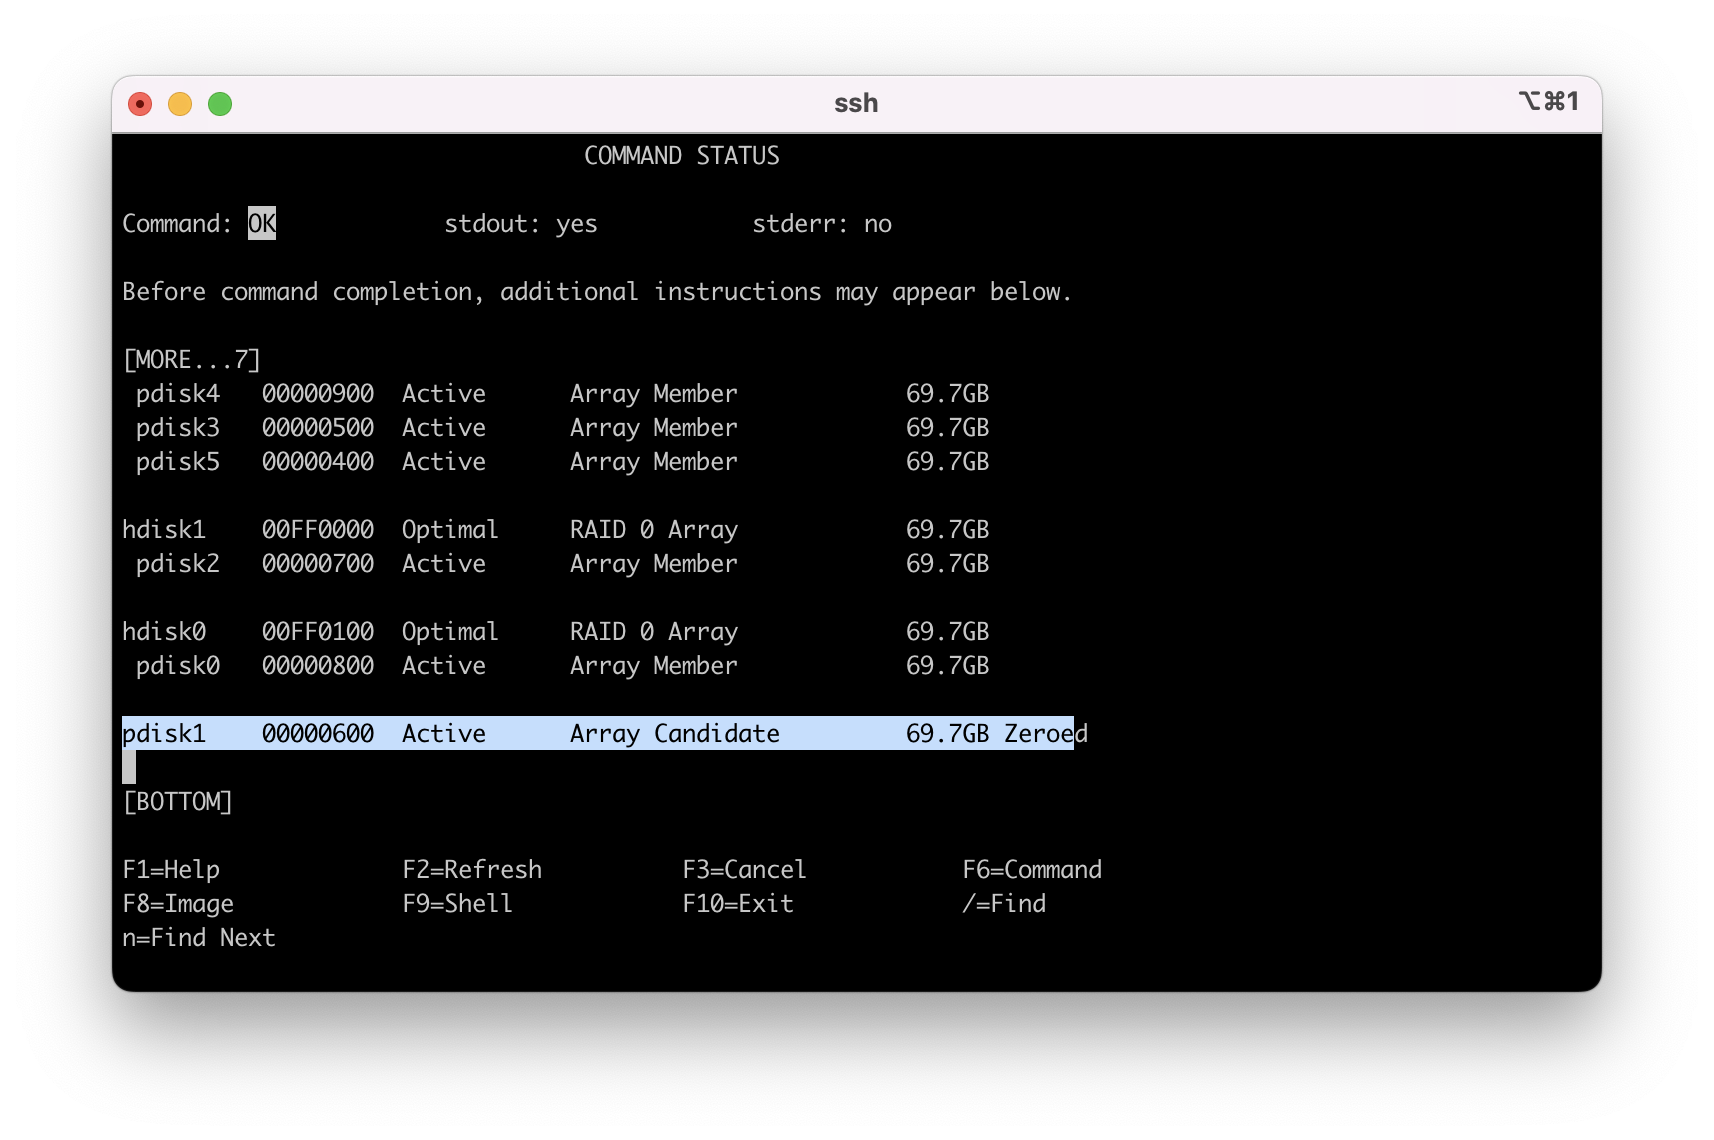
The newly installed pdisk3 is listed as an "Array Candidate". In the following steps, format the new disk to a JBOD disk, which deletes the pdisk and configures a hdisk.
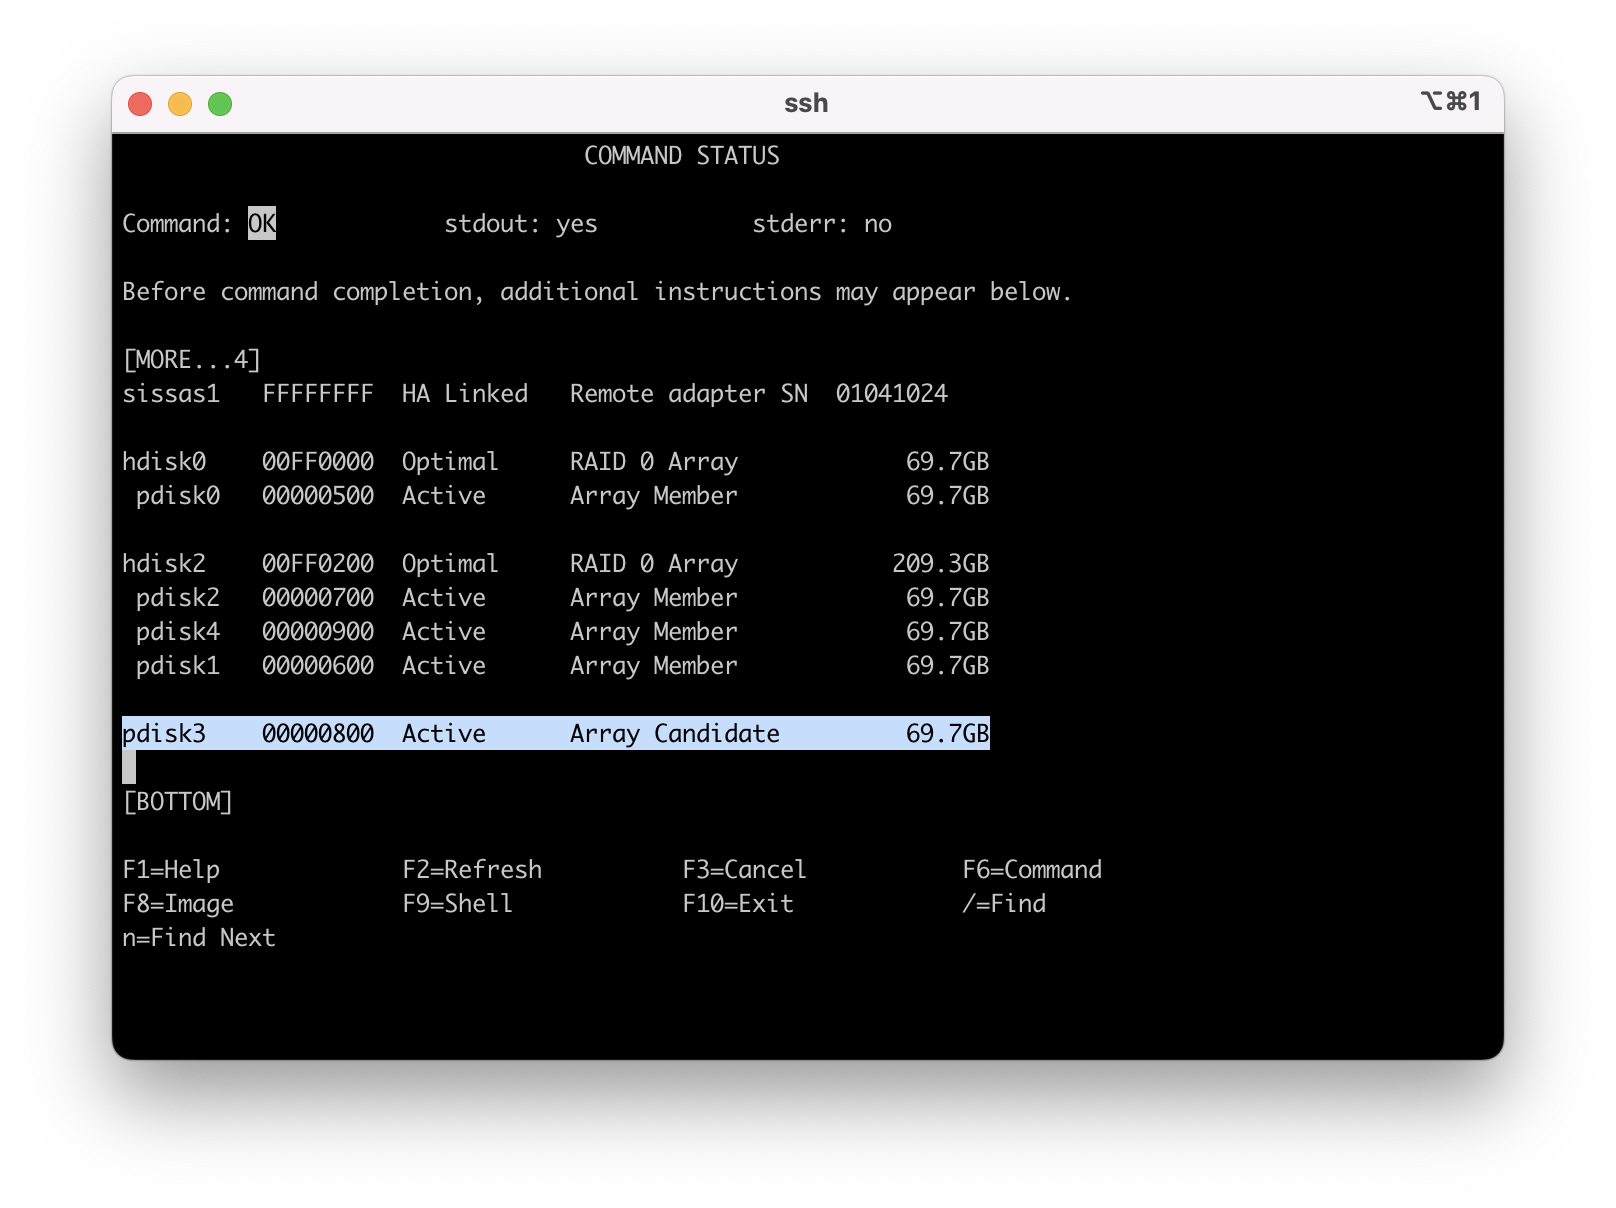
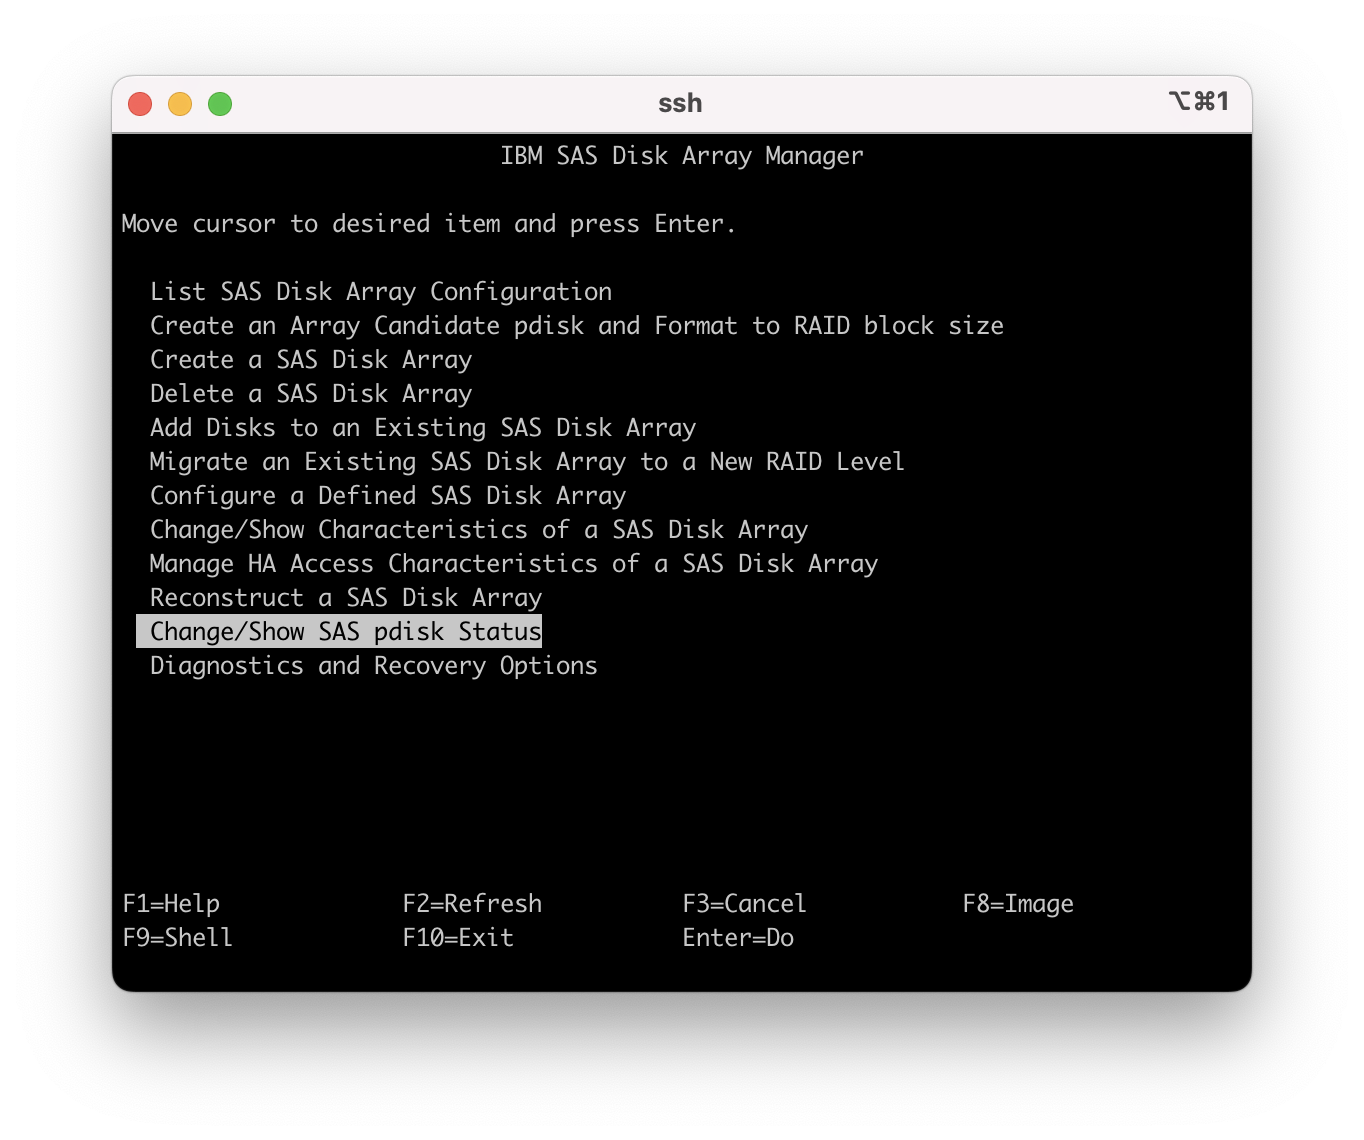
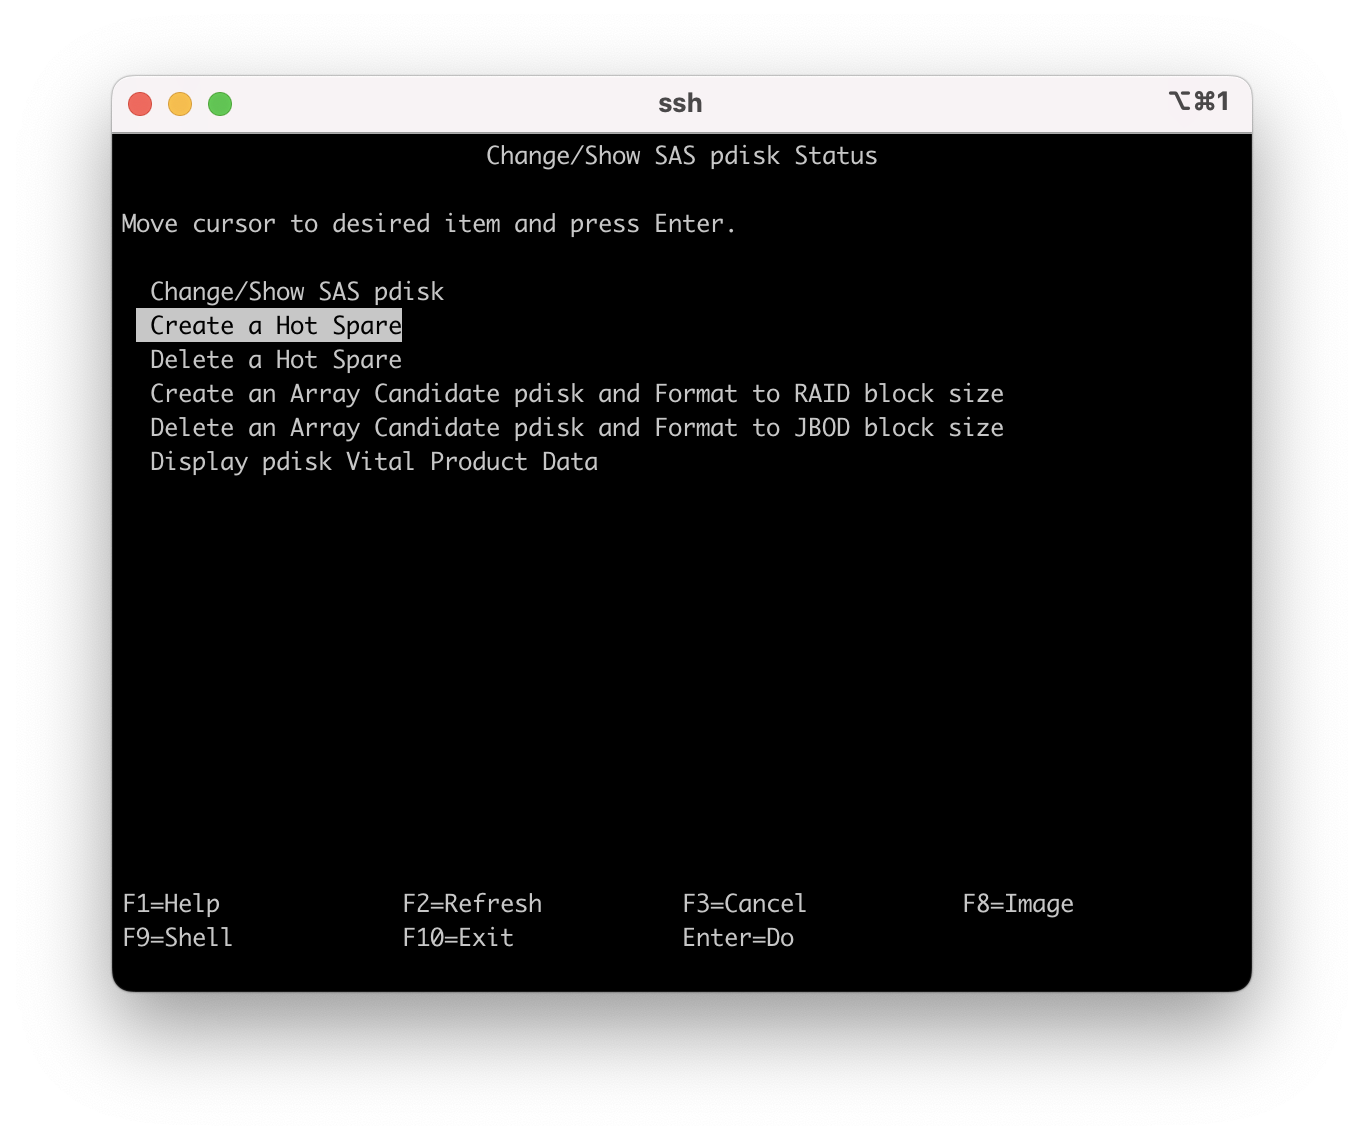
1.17 - Press F3 or ESC 3 to reach back to the main menu and move the cursor to "Change/Show SAS pdisk Status" and press enter.
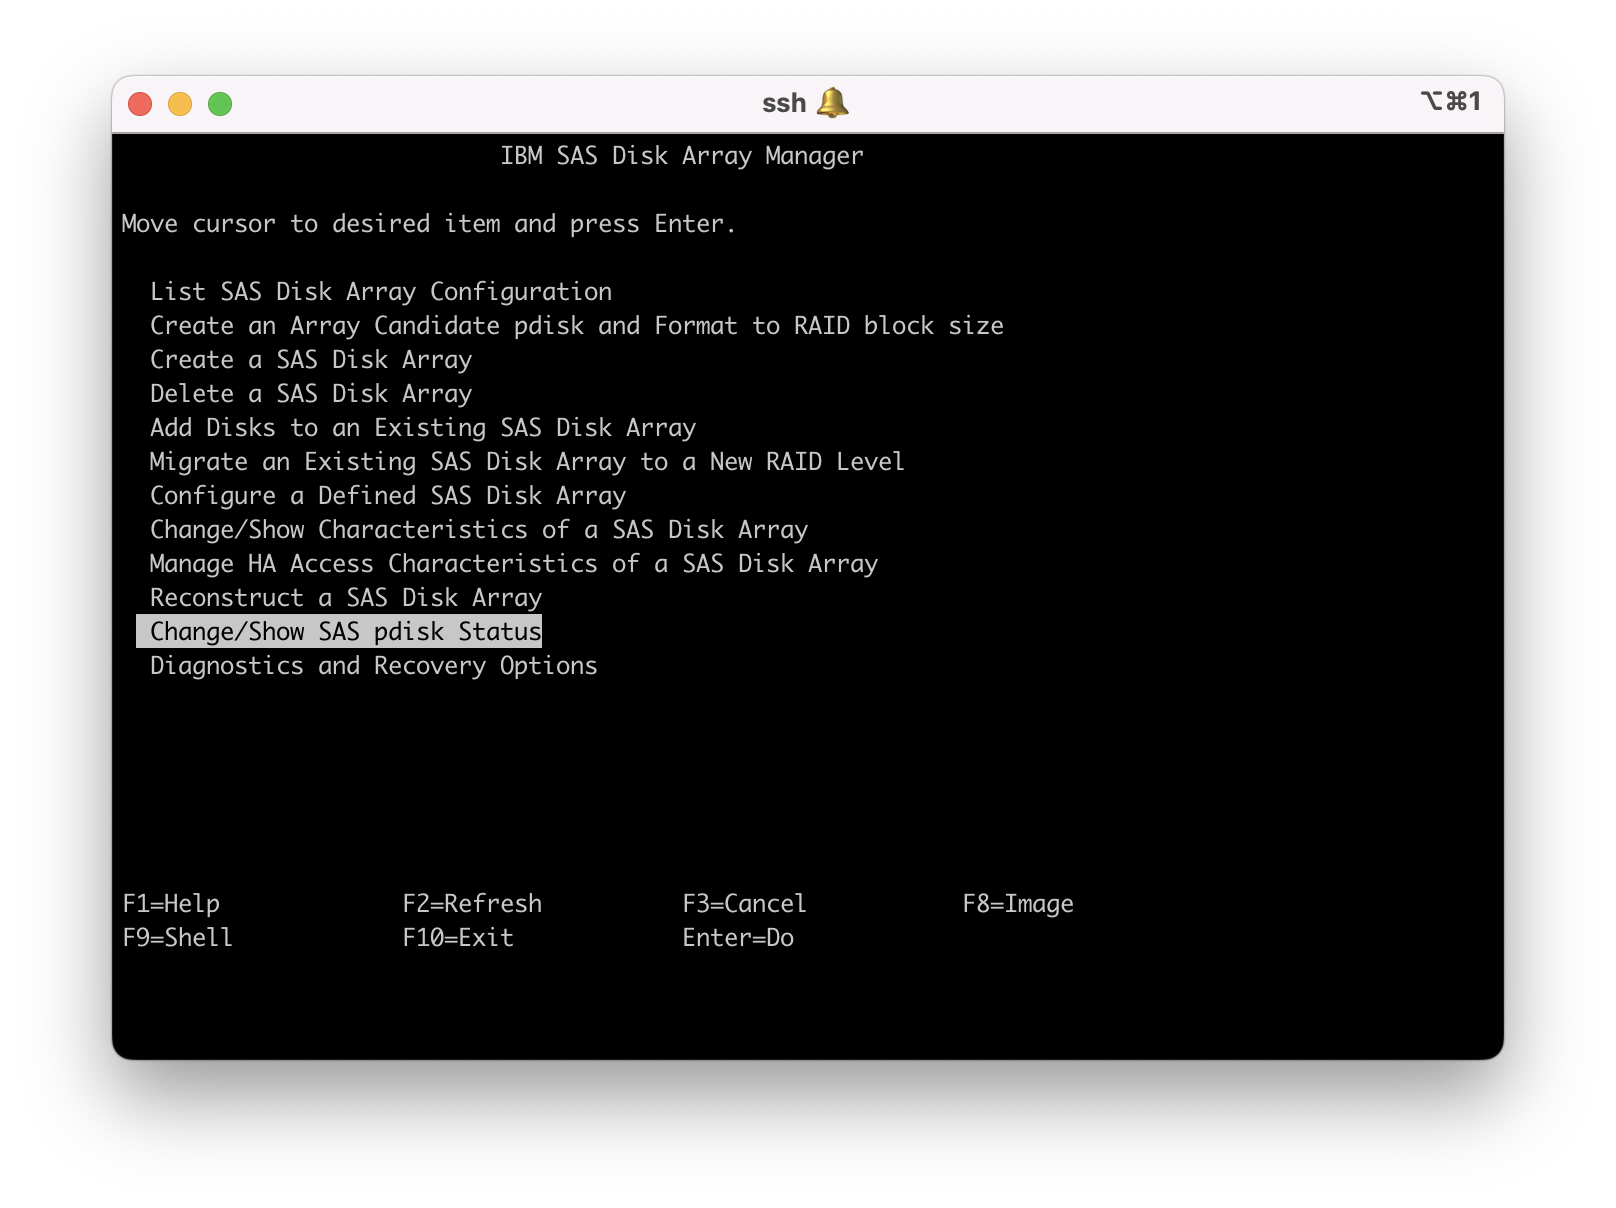
1.18 - Move the cursor to "Delete an Array Candidate pdisk and Format to JBOD block size" and press enter.
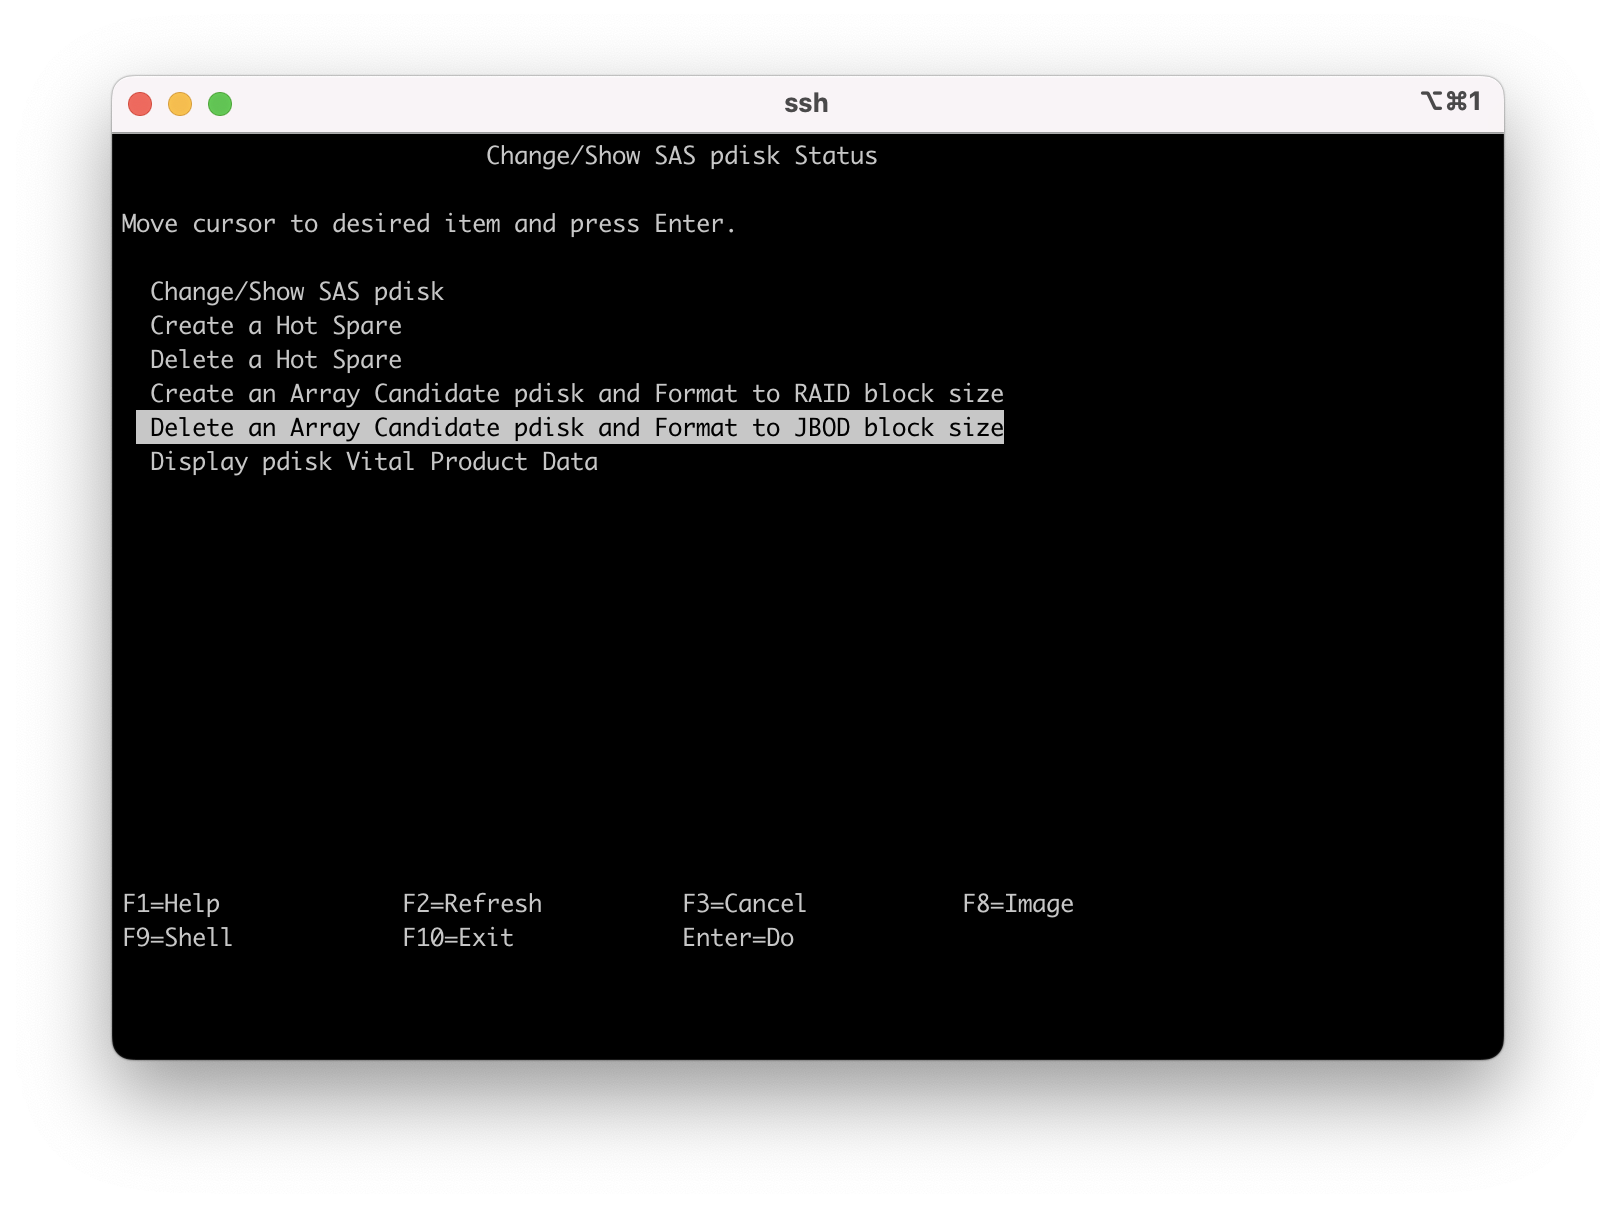
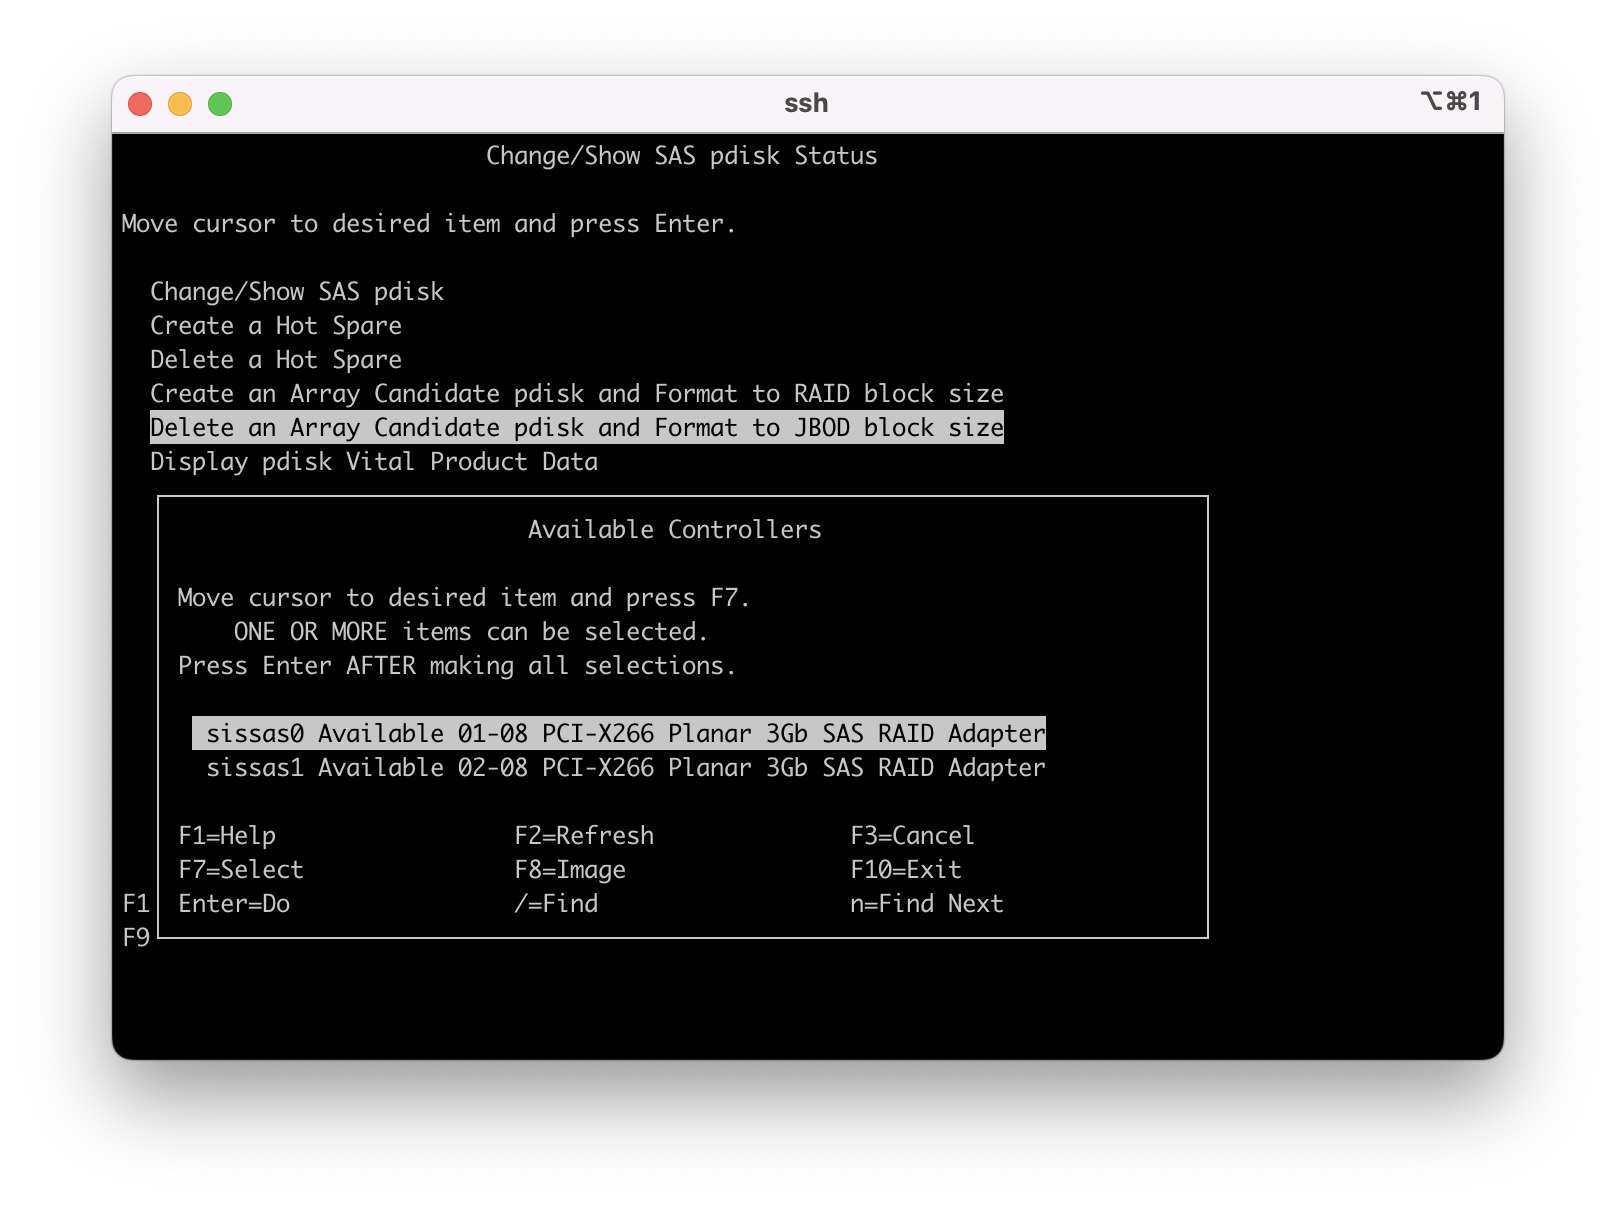
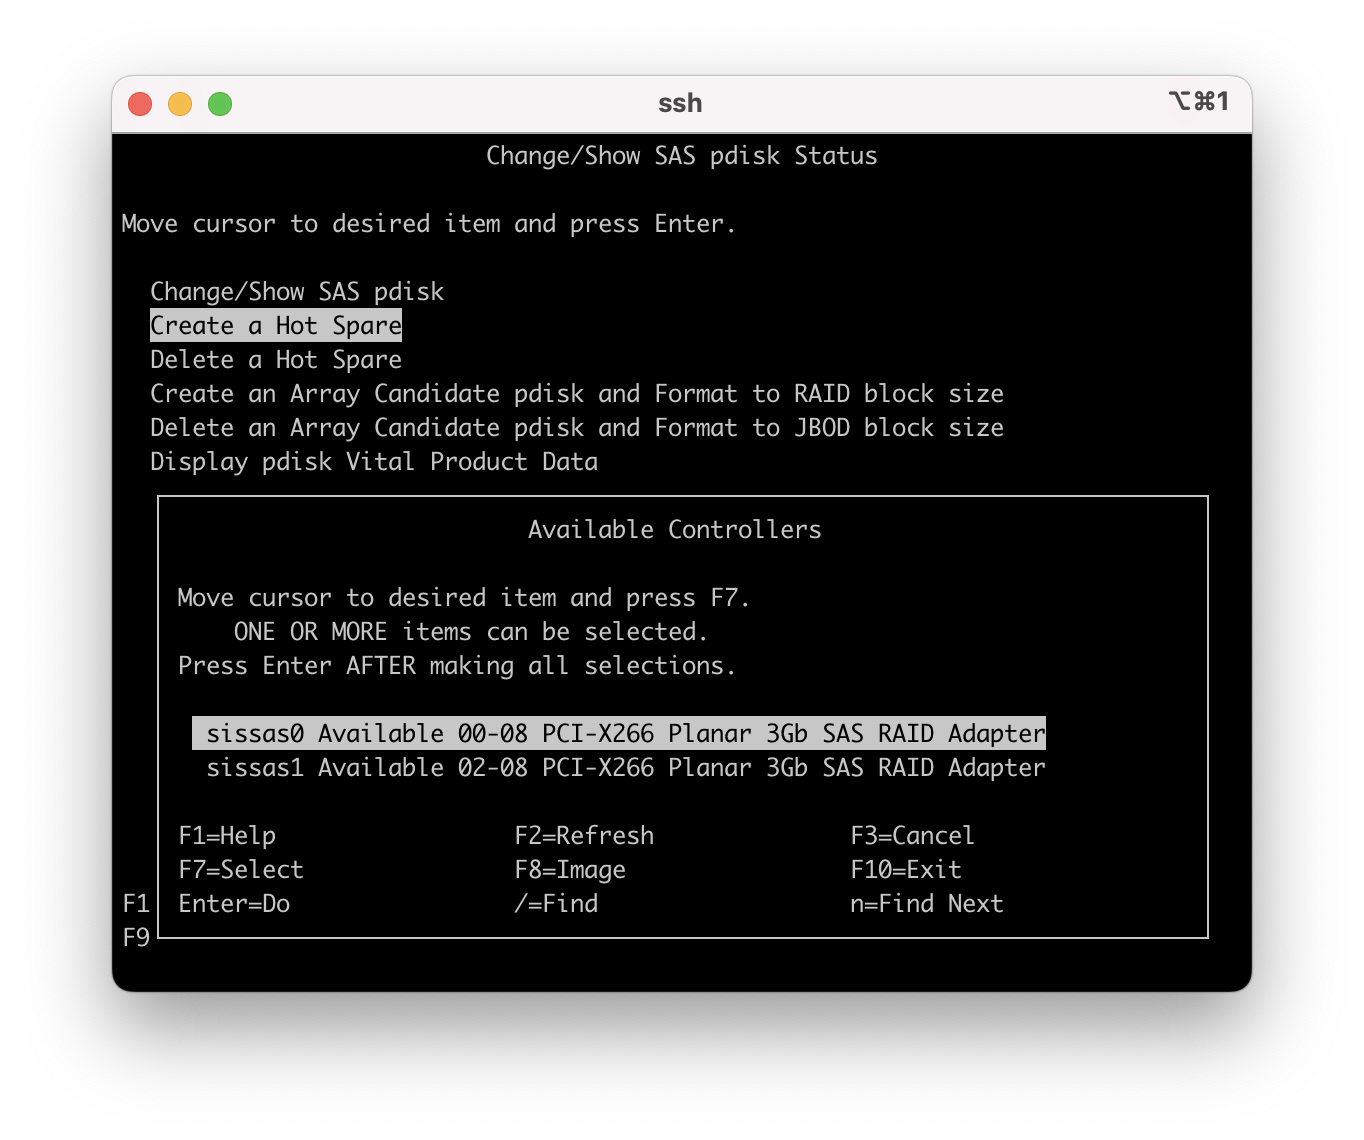
1.19 - Select the primary SAS adapter with the disk unit attached to it and press enter.
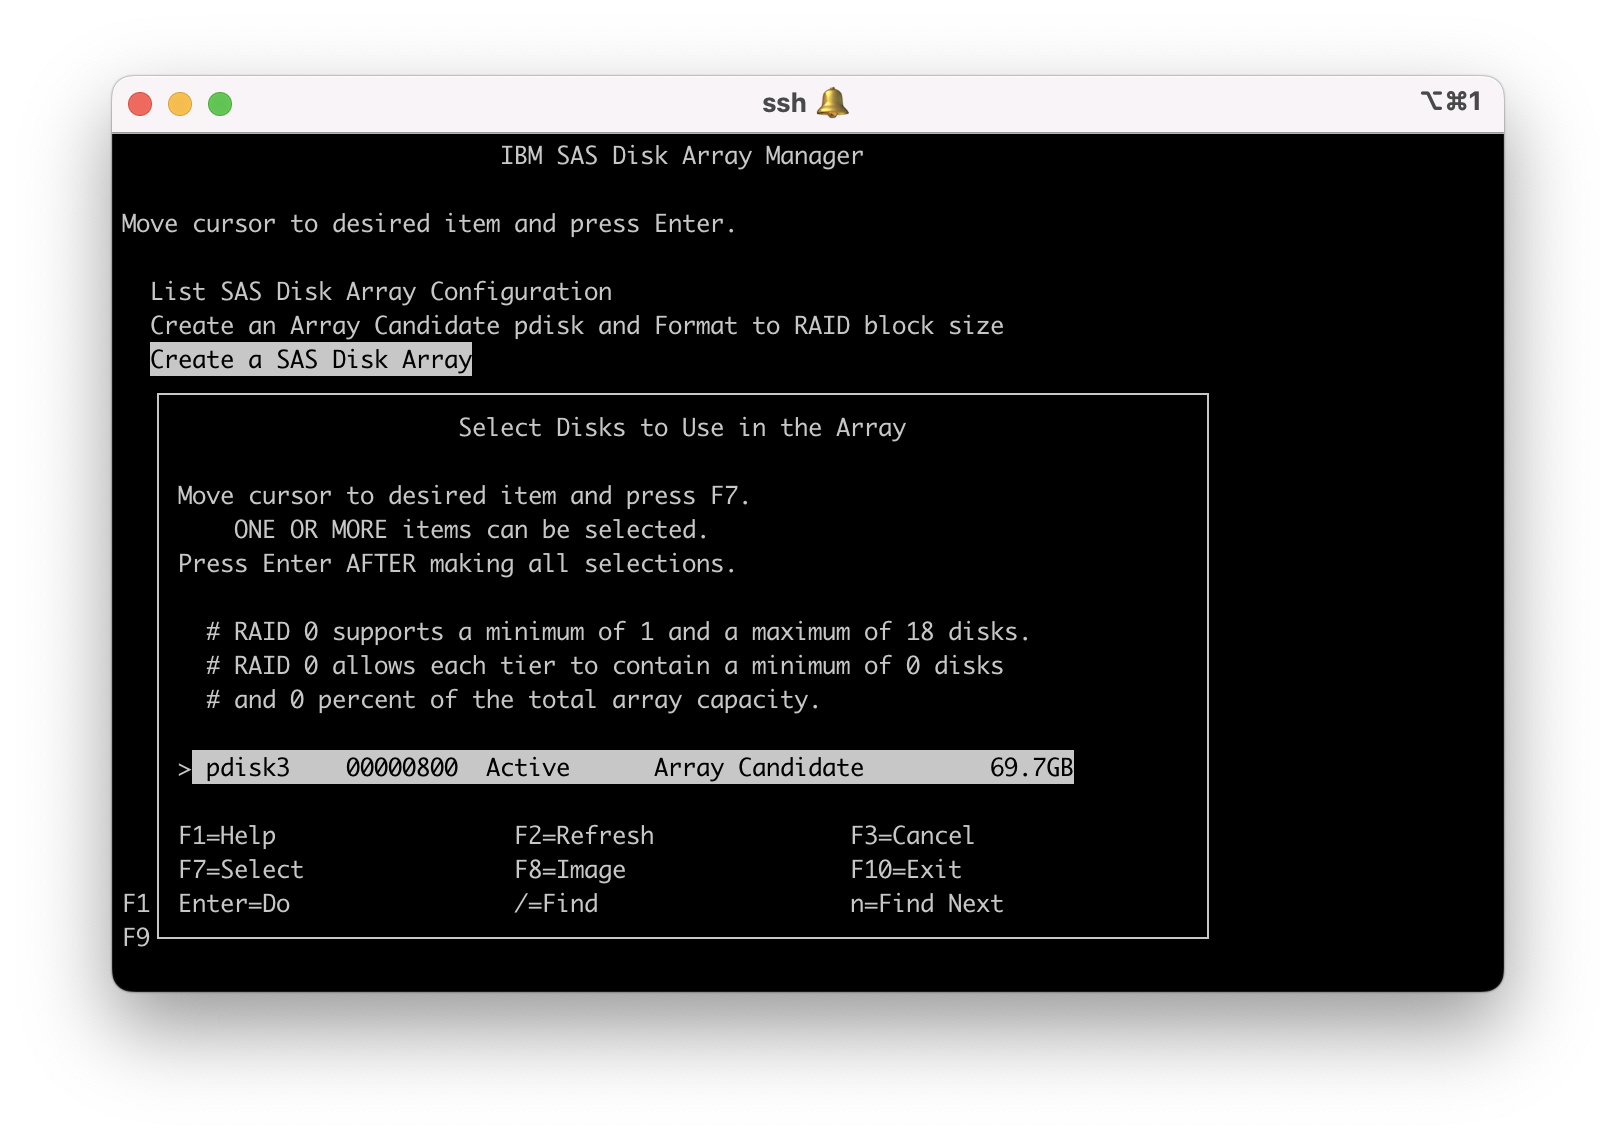
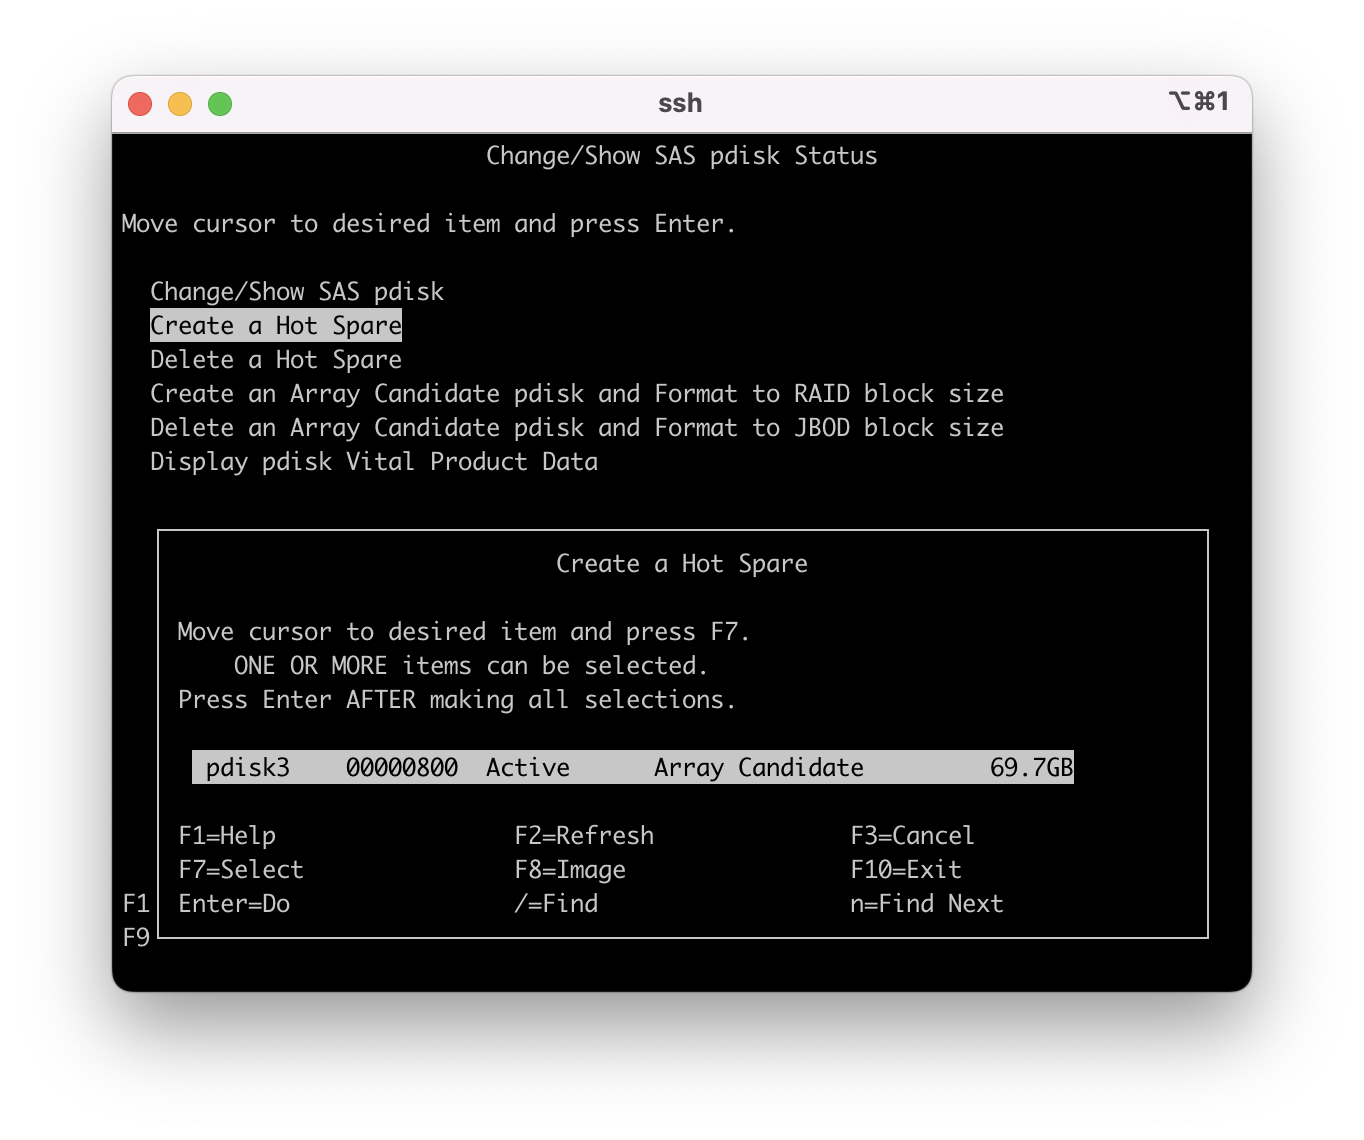
1.20 - Move the cursor to highlight the target pdisk that was replaced, in this example it is pdisk3. Press F7 or ESC7 to select the pdisk then press enter. Notice that there is a ">" before the pdisk that you selected.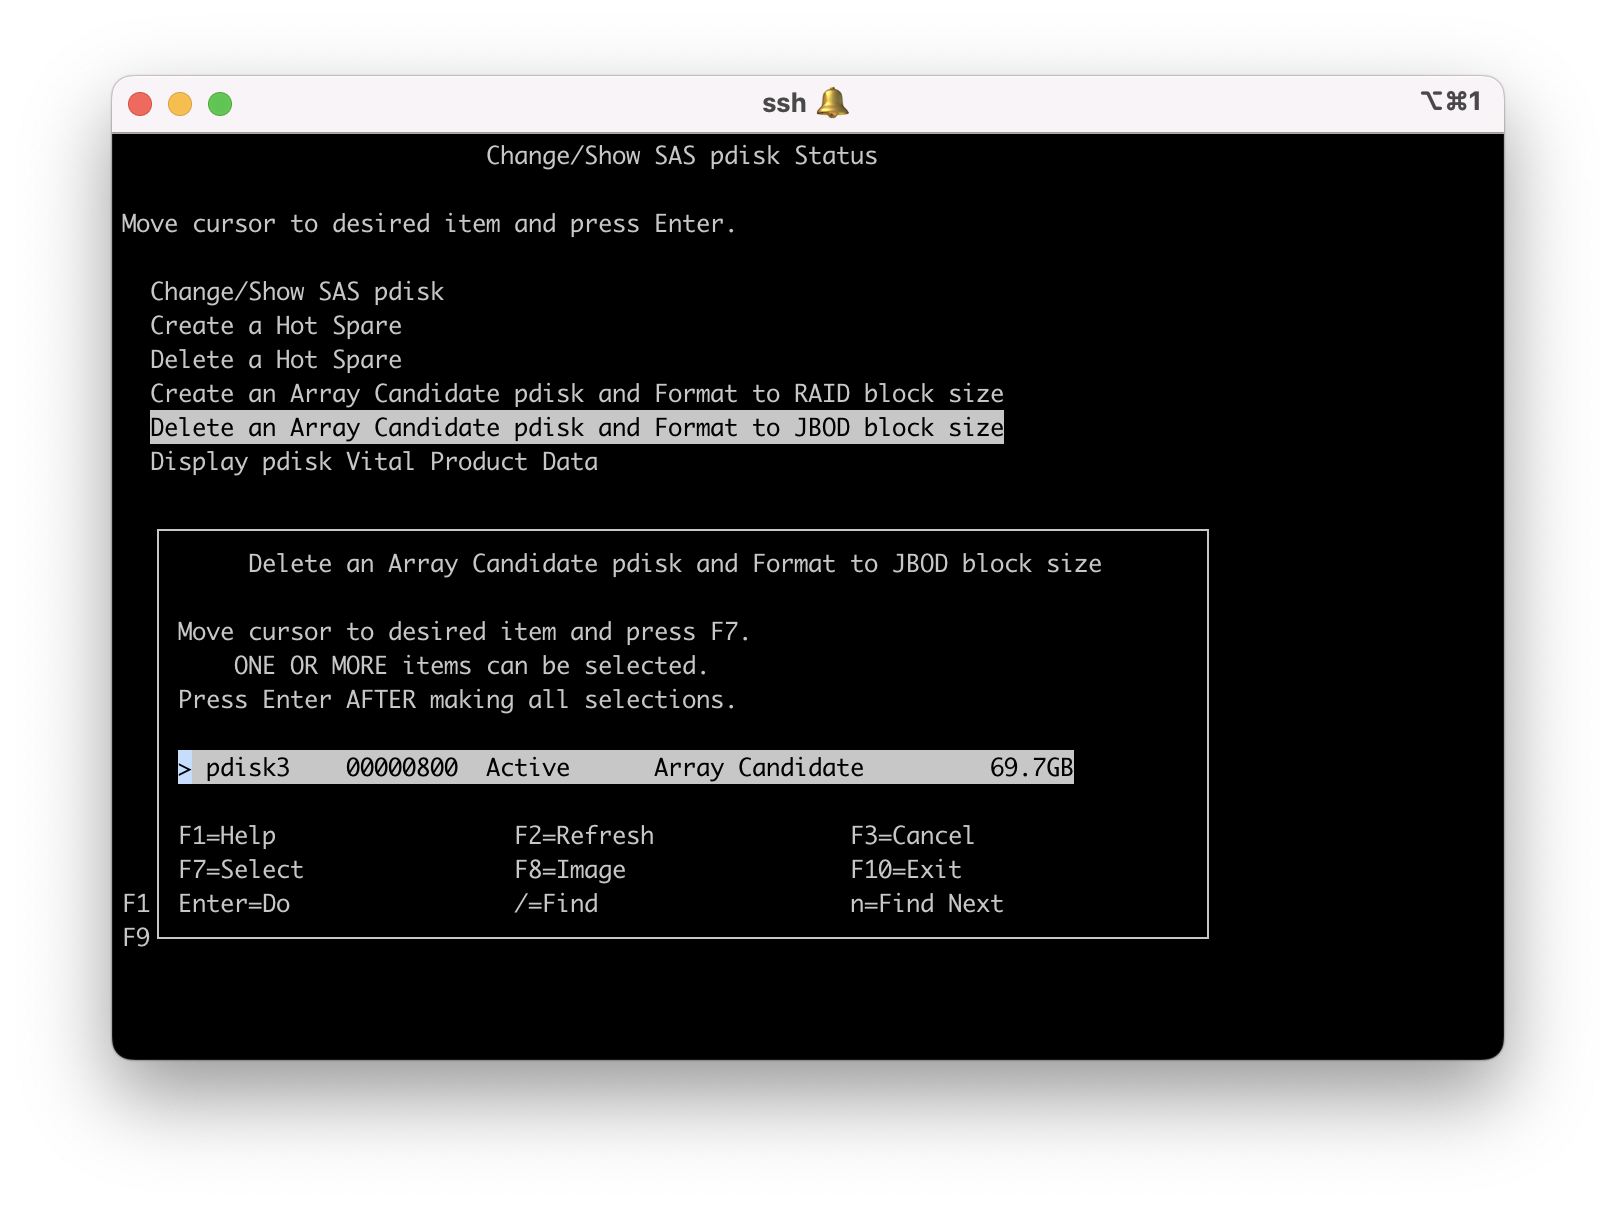
1.21 - A warning message is displayed. Confirm you have the correct disk press enter to continue the format.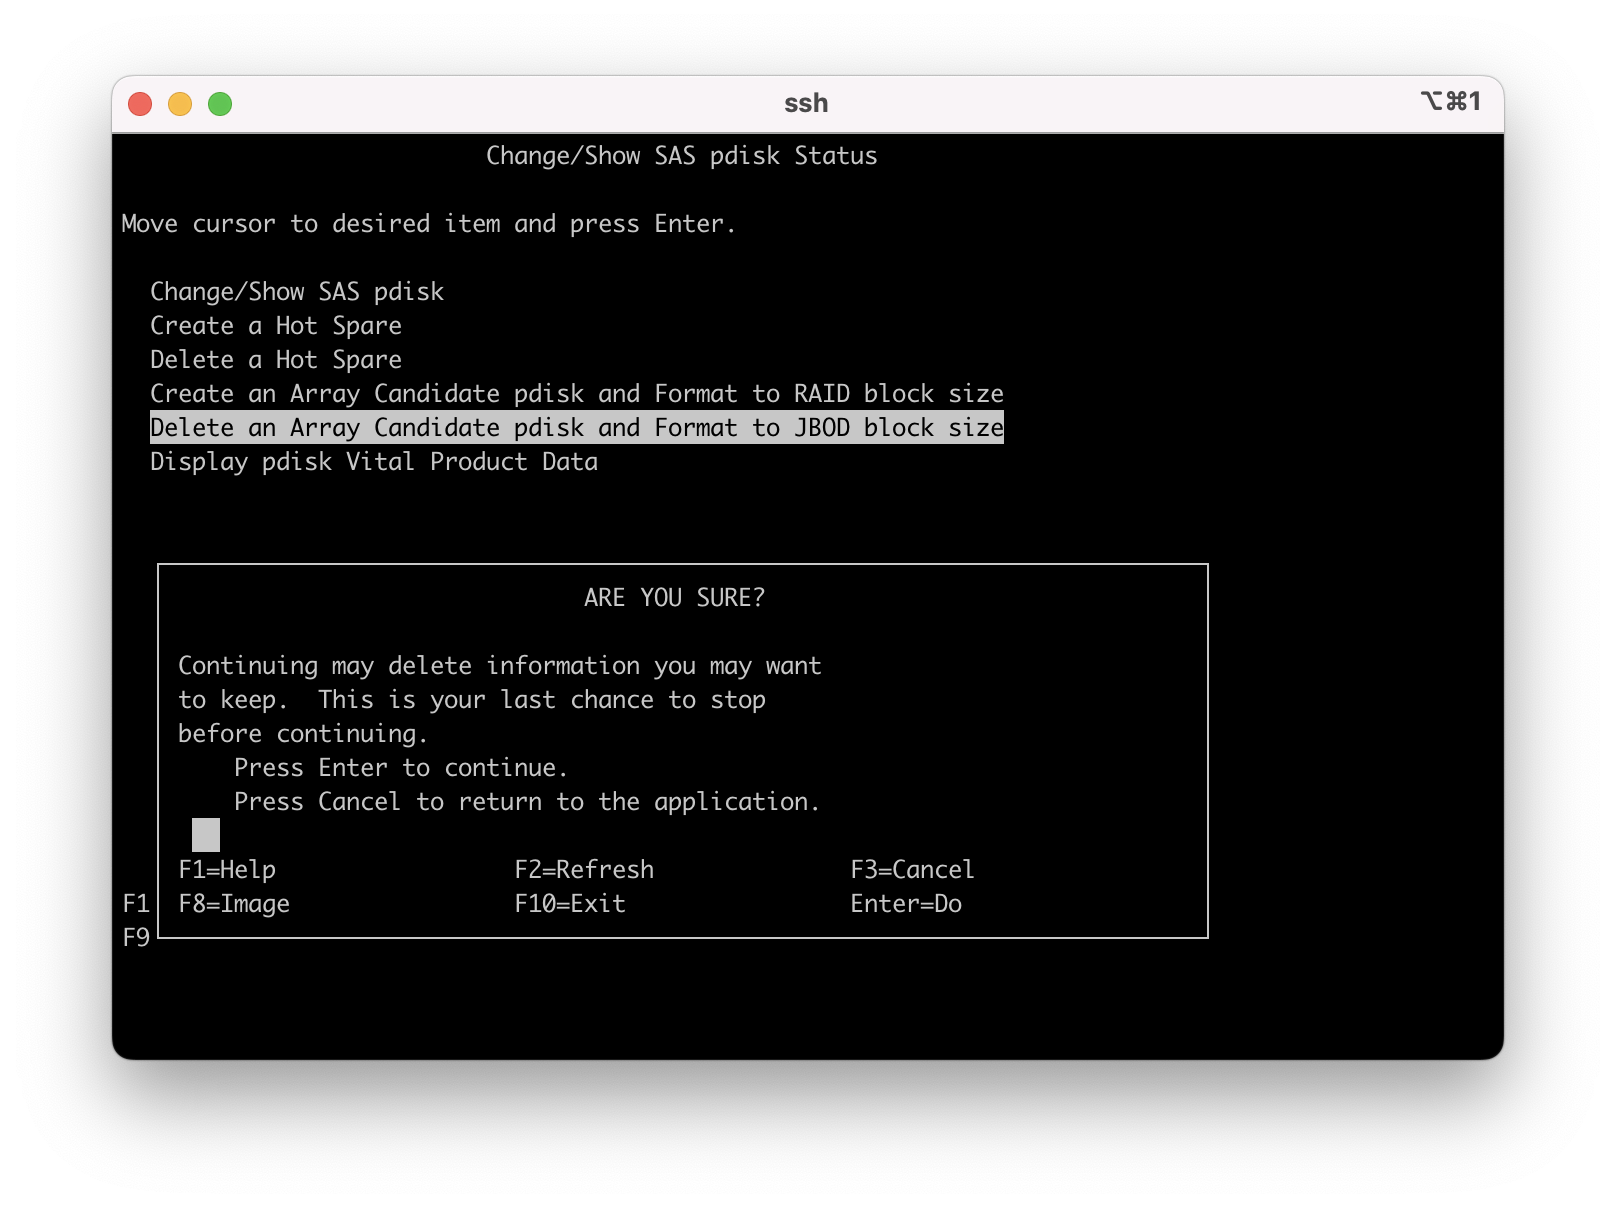
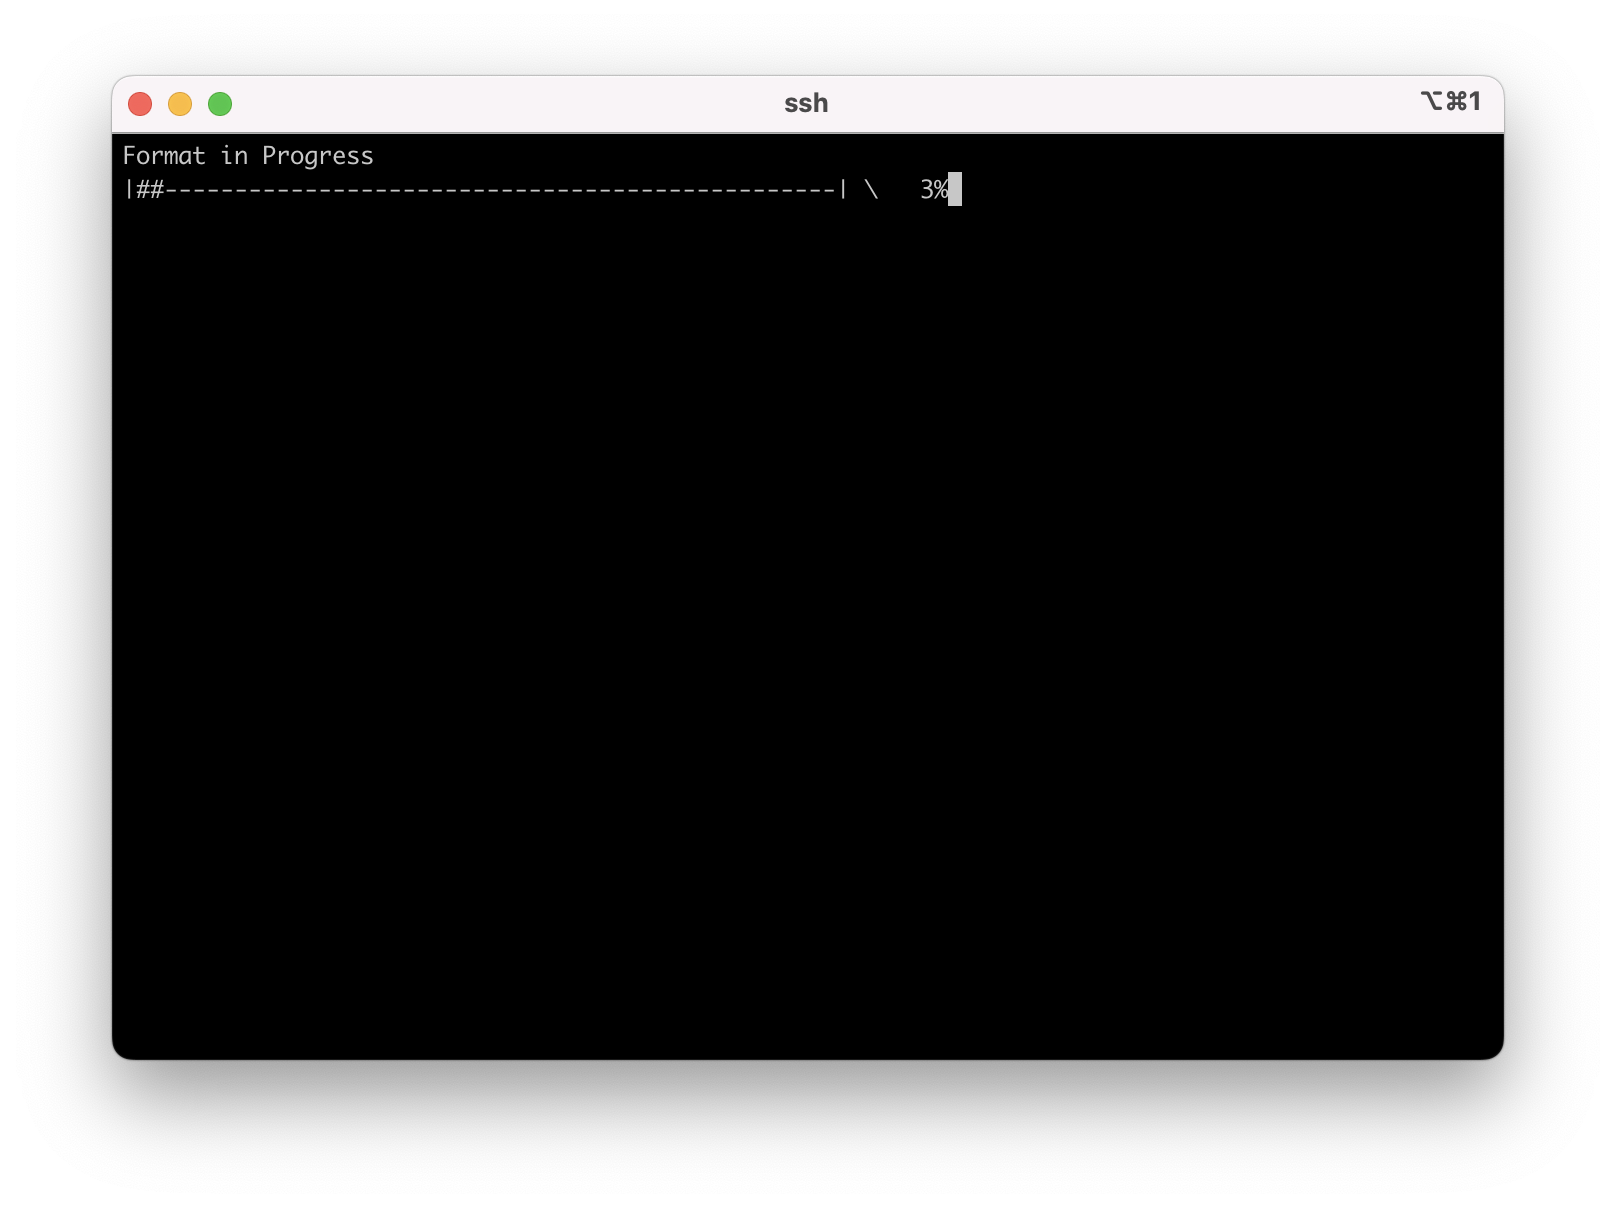
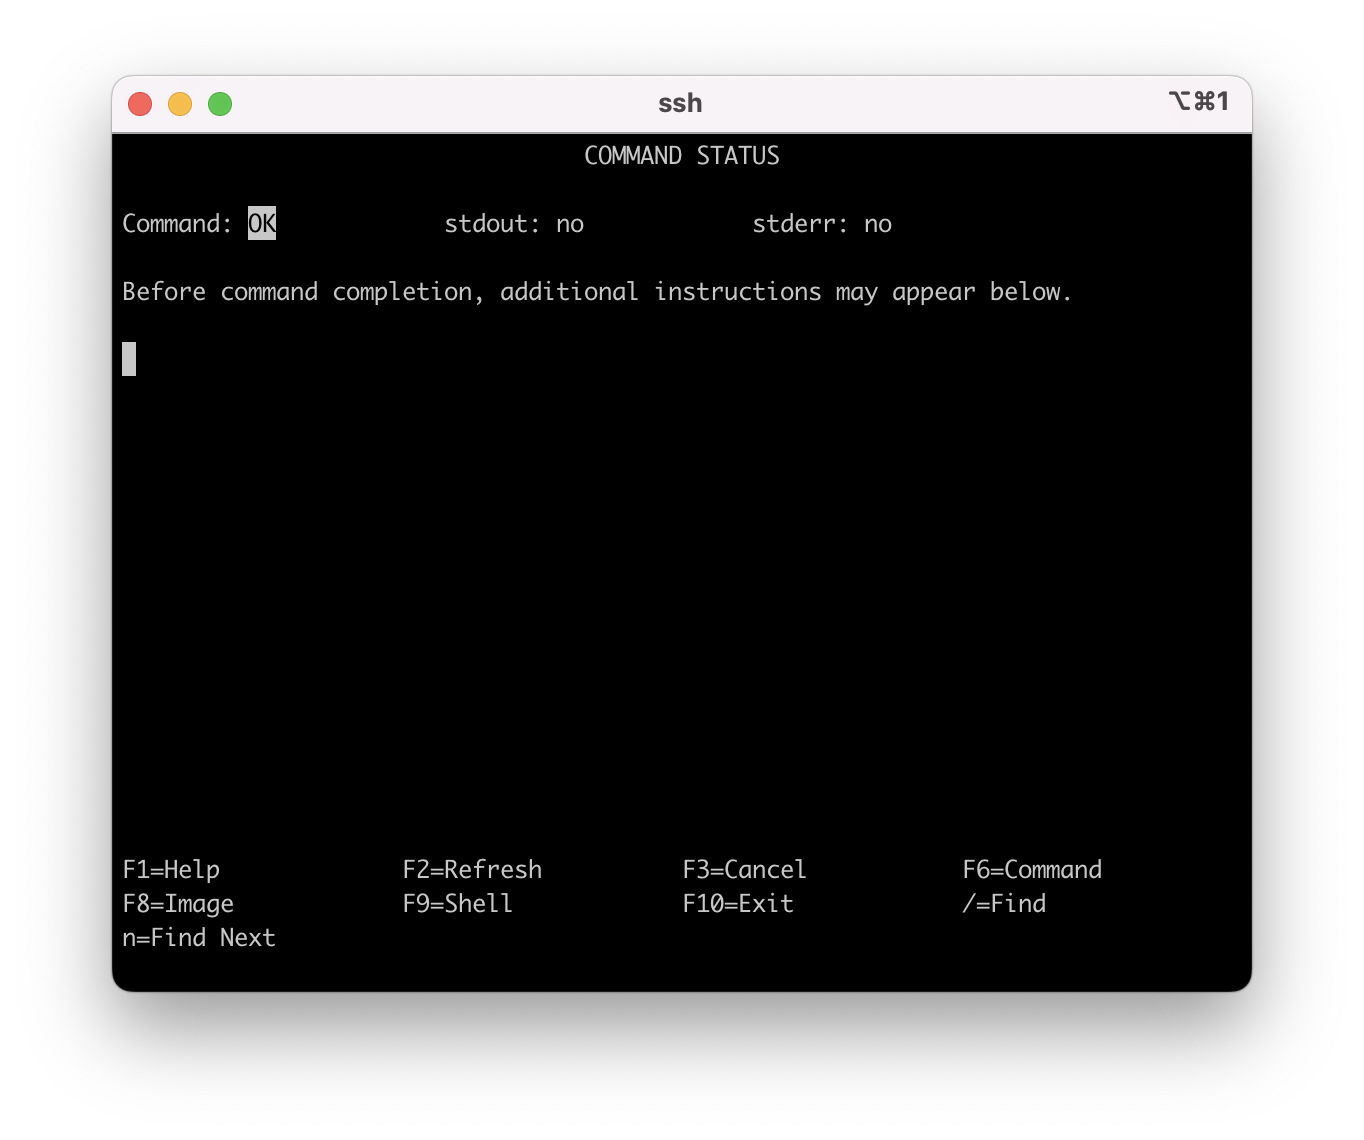
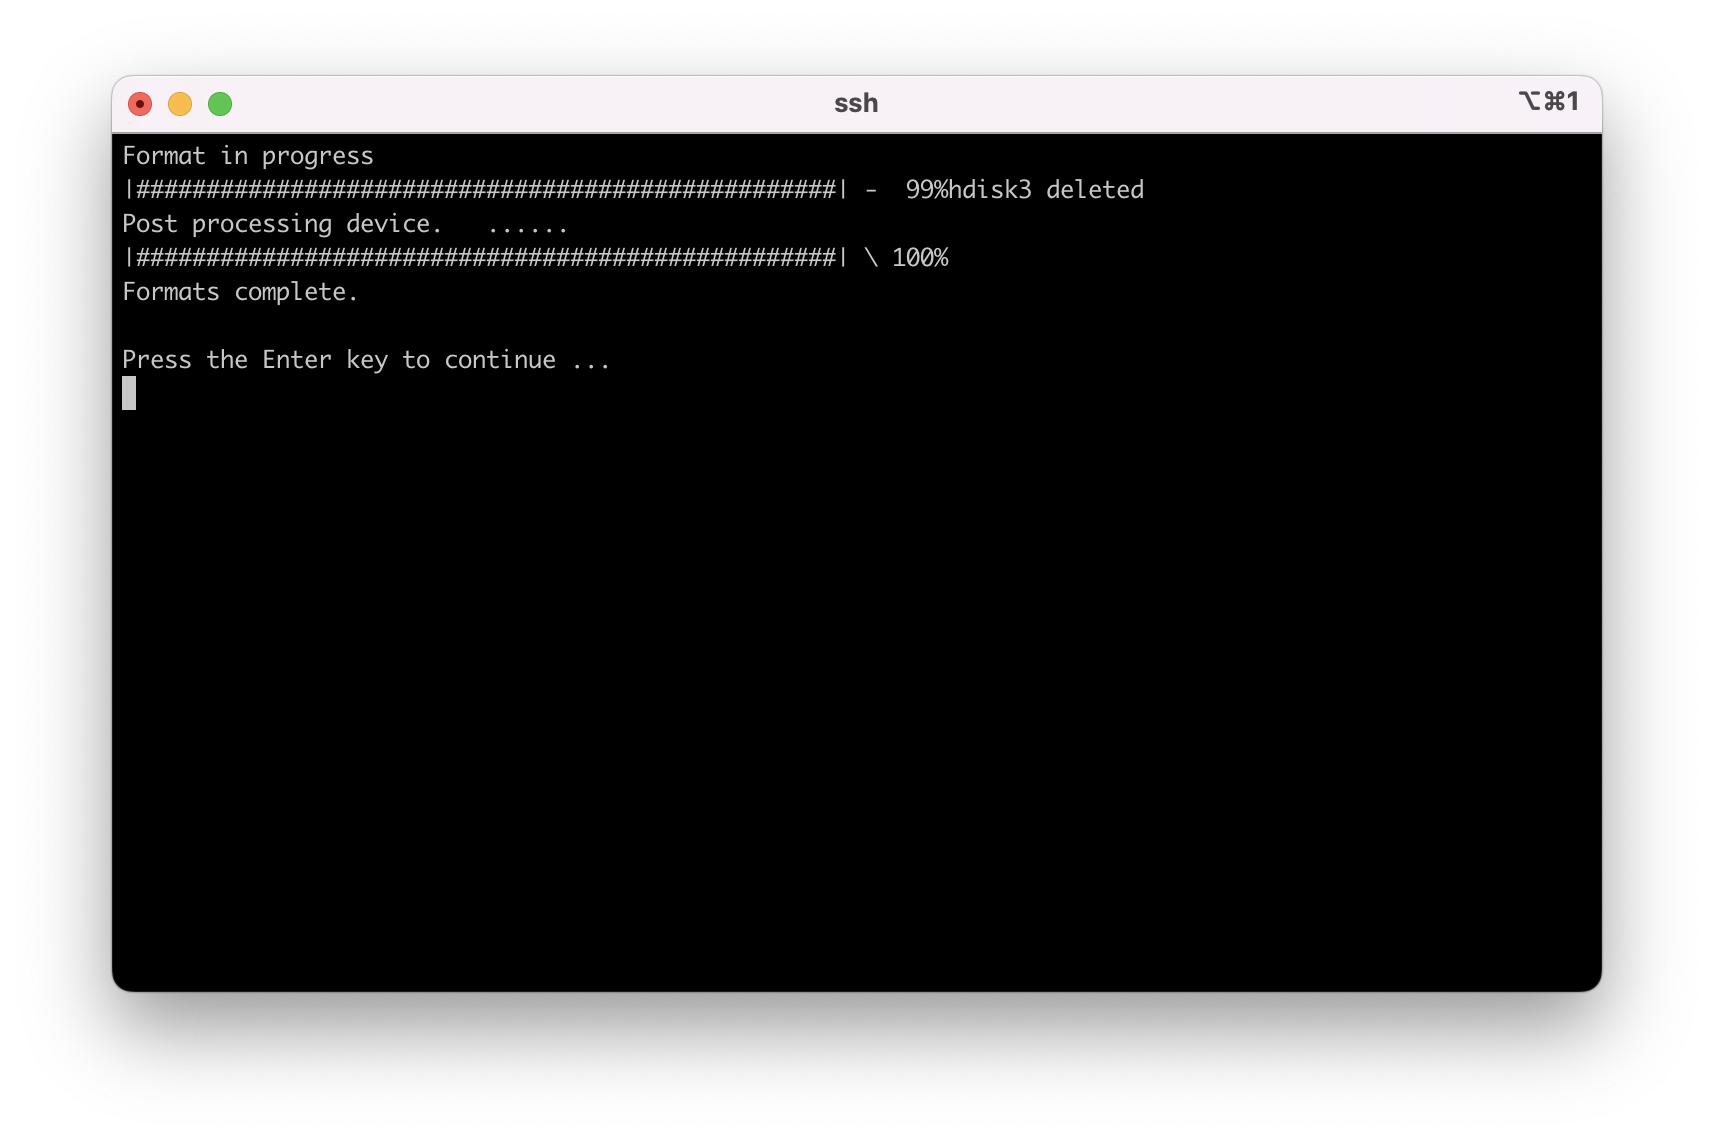
The format starts, the progress is shown.
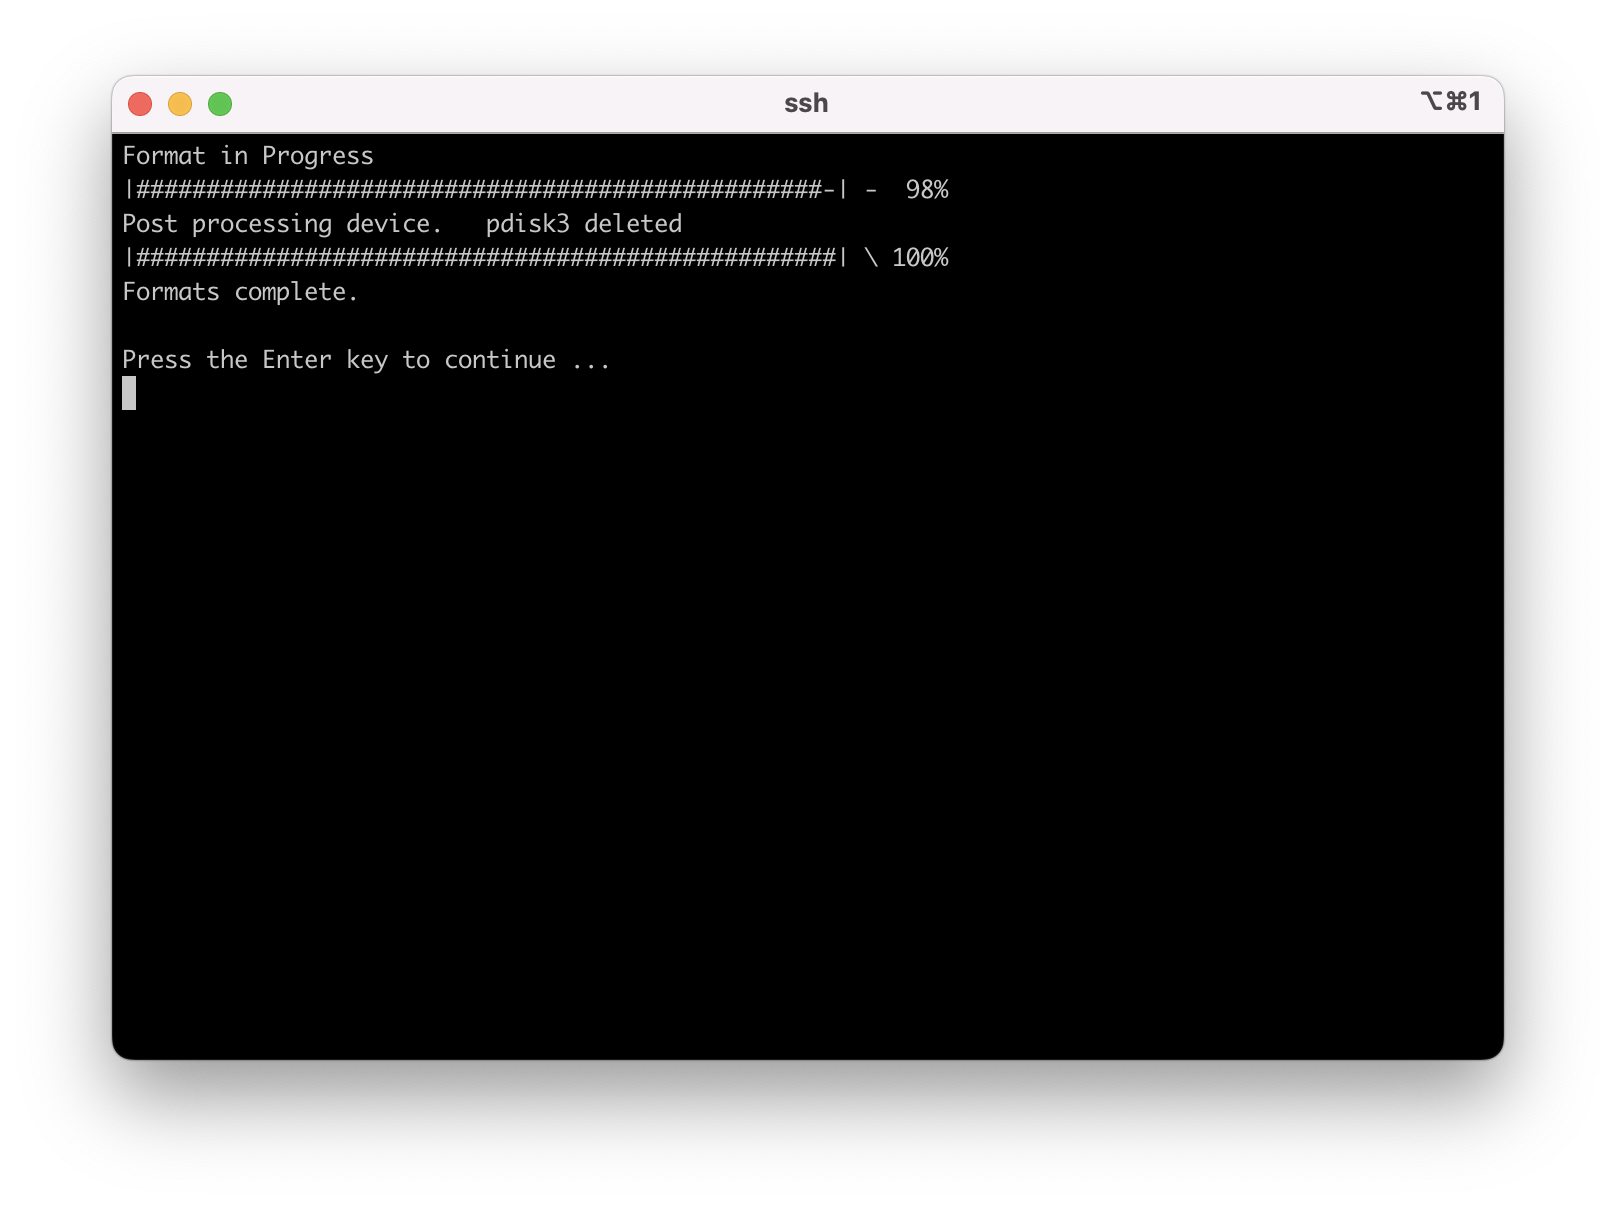
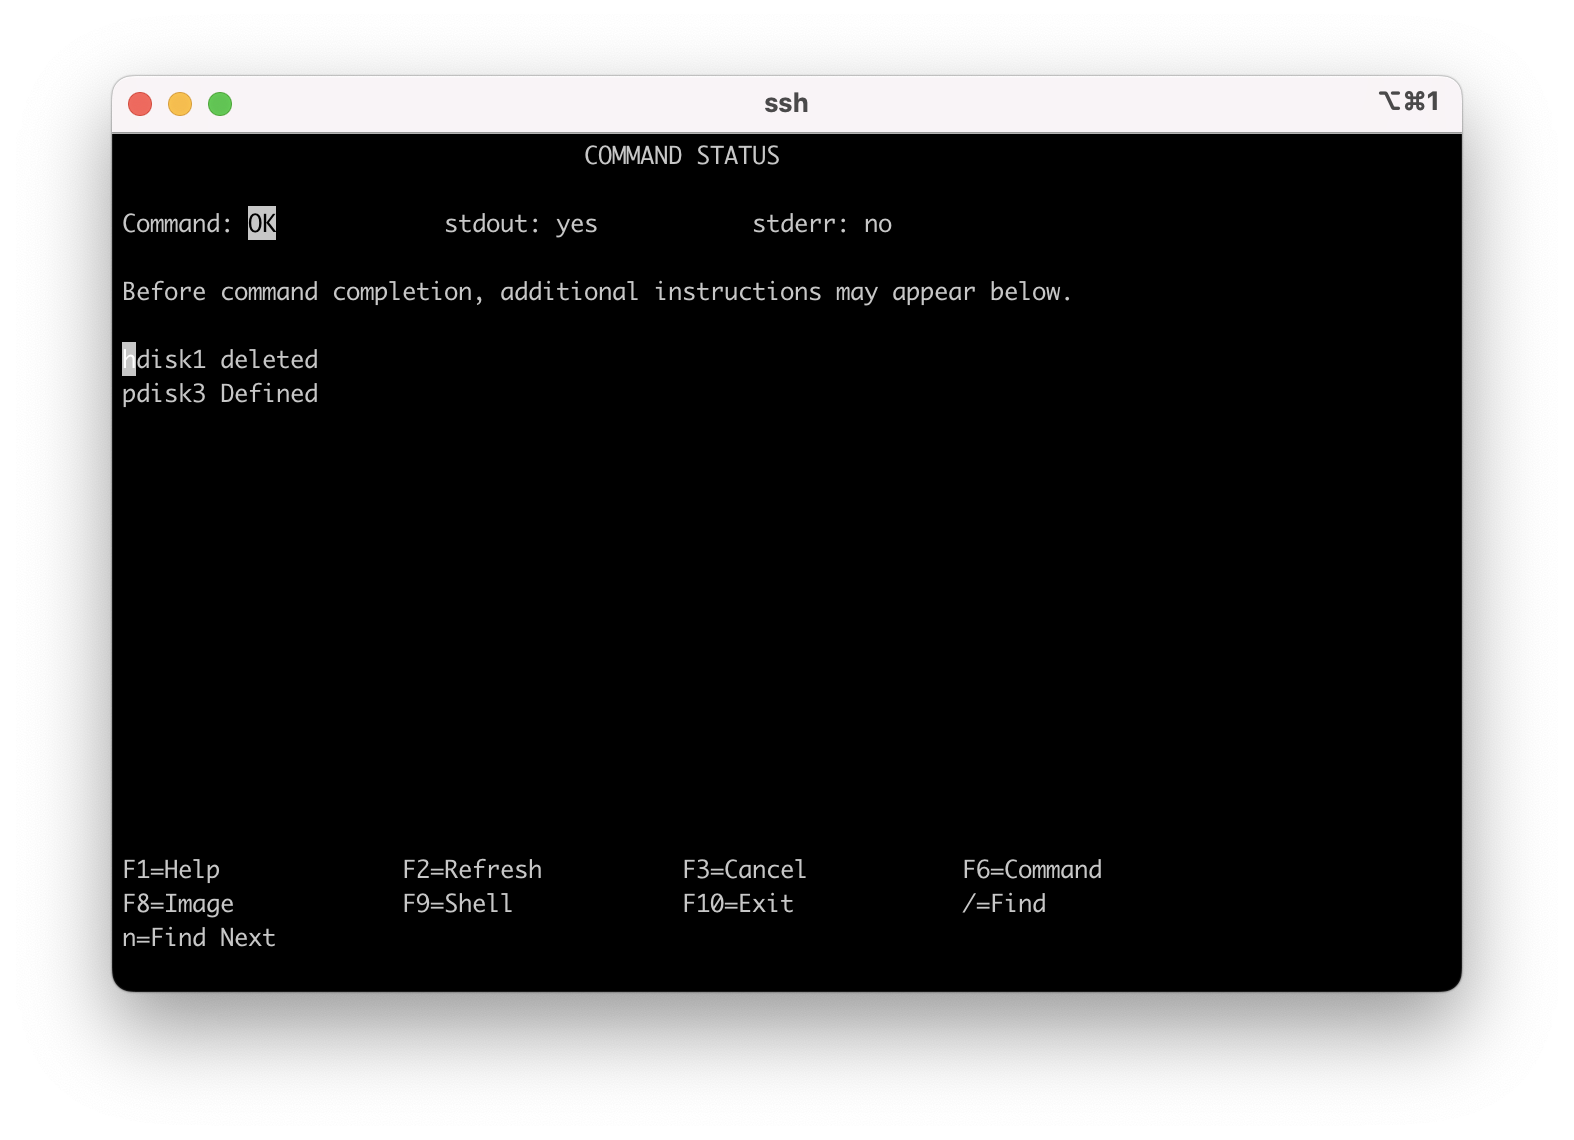
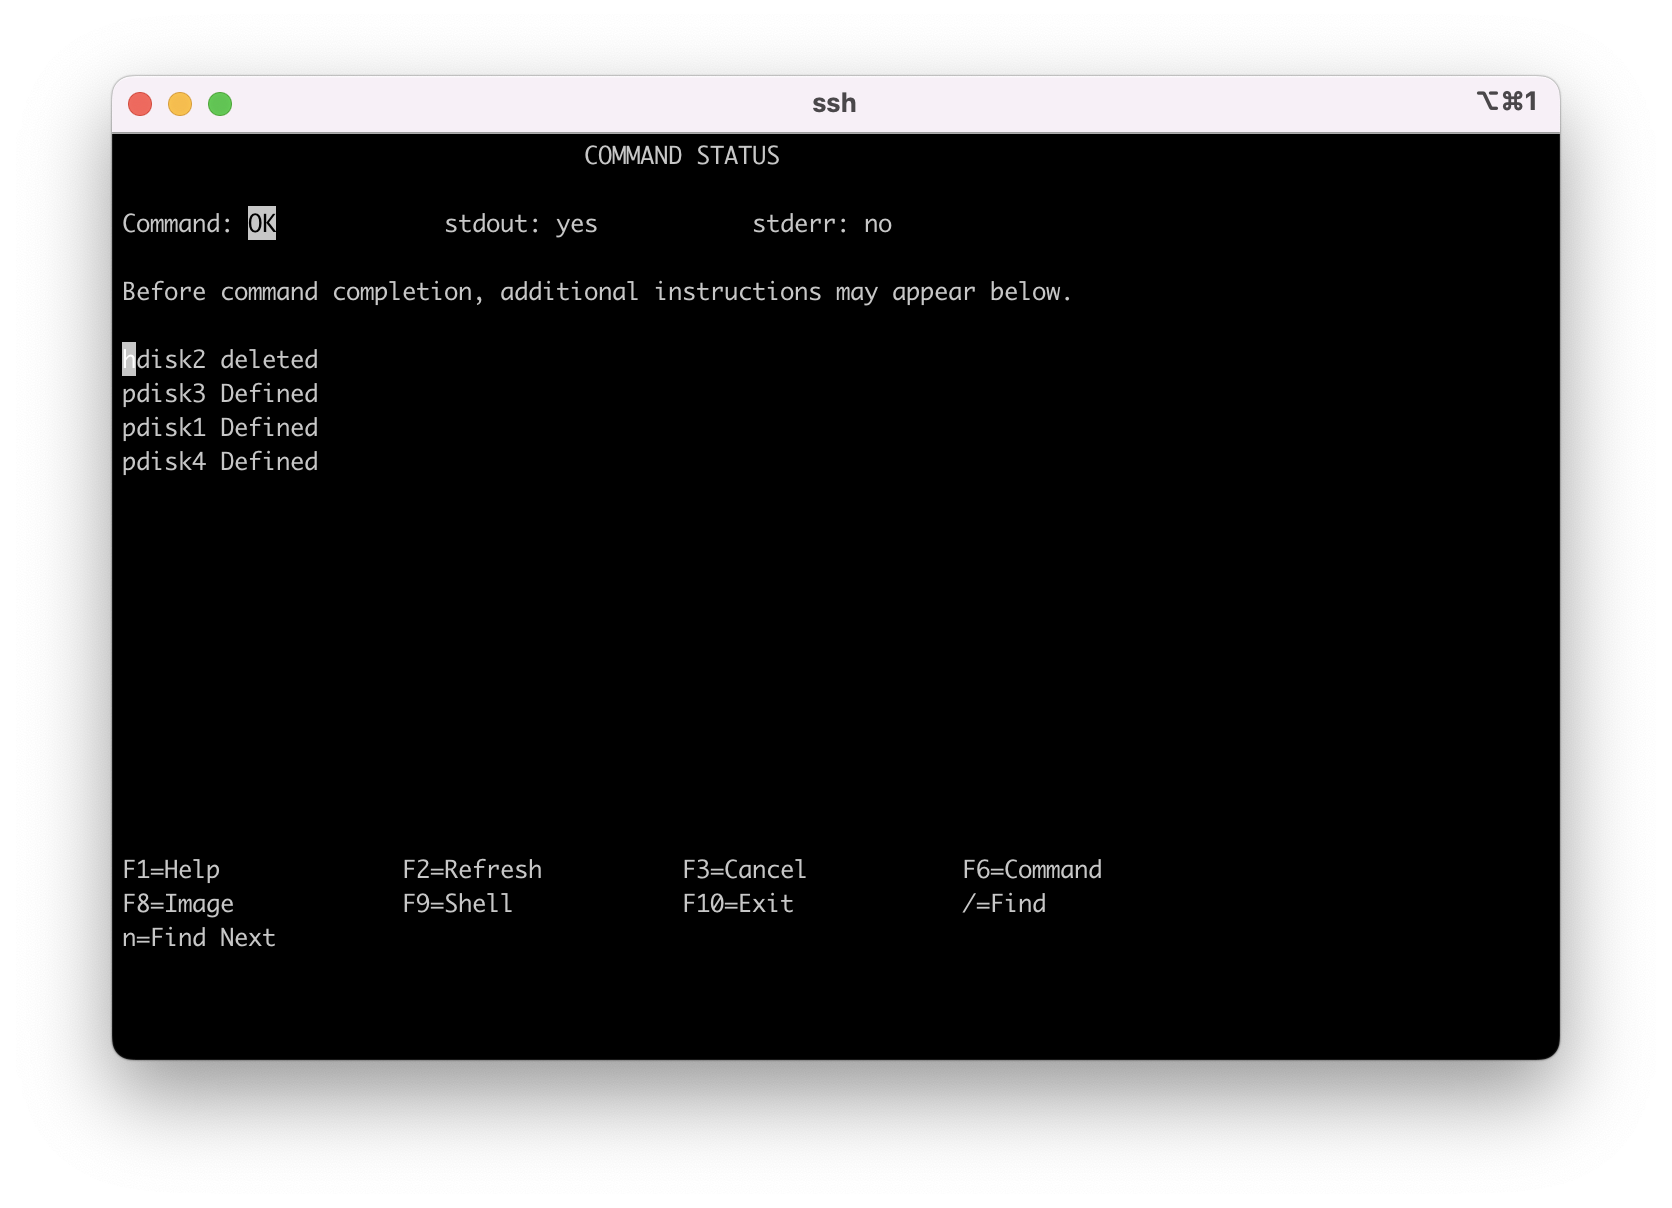
1.22 - Once the format is complete the pdisk is deleted, press enter to continue.
1.23 - Press F3 or ESC 3 back out to the main menu "IBM SAS Disk Array Manager" and select "List SAS Disk Array Manager" to list the array config and confirm the new JBOD hdisk is listed.

1.24 - Press F3 or ESC 3 out to the command line and run 'lspv' to see your new hdisk with no "pvid" or VG (volume group) attached to it. The disk is now ready to attach to the Volume Group and remirror.
# lspv
hdisk1 none . None
hdisk0 00f68b243dad3725 rootvg active
hdisk2 00f68b243d6a3920 datavg active
#
If needed, contact IBM to open a case:
-For electronic support, visit the IBM Support Community:
https://www.ibm.com/mysupport
-If you require telephone support, visit the web page:
https://www.ibm.com/planetwide/
Procedure 2 - Replacing a pdisk that is part of a RAID0 unprotected array with a single pdisk
The hdisk must be removed from its Volume Group and operating system before a hdisk in a RAID0 array can be replaced. You might need to stop applications or any processes that use the disk first.
https://www.ibm.com/mysupport
-Telephone support, visit the web page:
https://www.ibm.com/planetwide/
2.1 - For VIOS a support document was written to assist with this step. The following link provides the procedure for preparing VIOS with mirrored rootvg.
https://www.ibm.com/support/pages/how-replace-failing-disk-vios-mirrored-rootvg
Most commands are same for preparing an AIX system for disk replacement with following exceptions -
- in step 3 use 'unmirrorvg rootvg <failing hdisk#>' instead of 'unmirrorios <failing disk#>'
- in "step 7" replace VIOS command "$ rmdev -dev <failing_hdisk>" with AIX command "# rmdev -l <failing hdisk>"
Once the disk is removed from VG and OS, continue to next step of physically replacing the disk.
For the following procedures, we assume that there is a predictive failure on hdisk0 and hdisk0 needs to be replaced. The hdisk associated with the pdisk must be removed from the VG (Volume Group) before the RAID_0 array is deleted, missing this step results in a busy disk and it cannot be replaced concurrently.
2.2 - Confirm the hdisk in question is not attached to a VG
Example 01 - hdisk0 is still showing attached to a VG:
# lspv
hdisk0 00f68b2434e0f788 rootvg active (Disk cannot be replaced concurrently when attached to a VG)
hdisk1 00f68b24022aa42d rootvg active
hdisk2 00f68b240242297e datavg active
Example 02 - hdisk0 is properly removed from the VG
# lspv
hdisk0 00f68b2434e0f788 None <== You need to see "None" here
hdisk1 00f68b24022aa42d rootvg active
hdisk2 00f68b240242297e datavg active
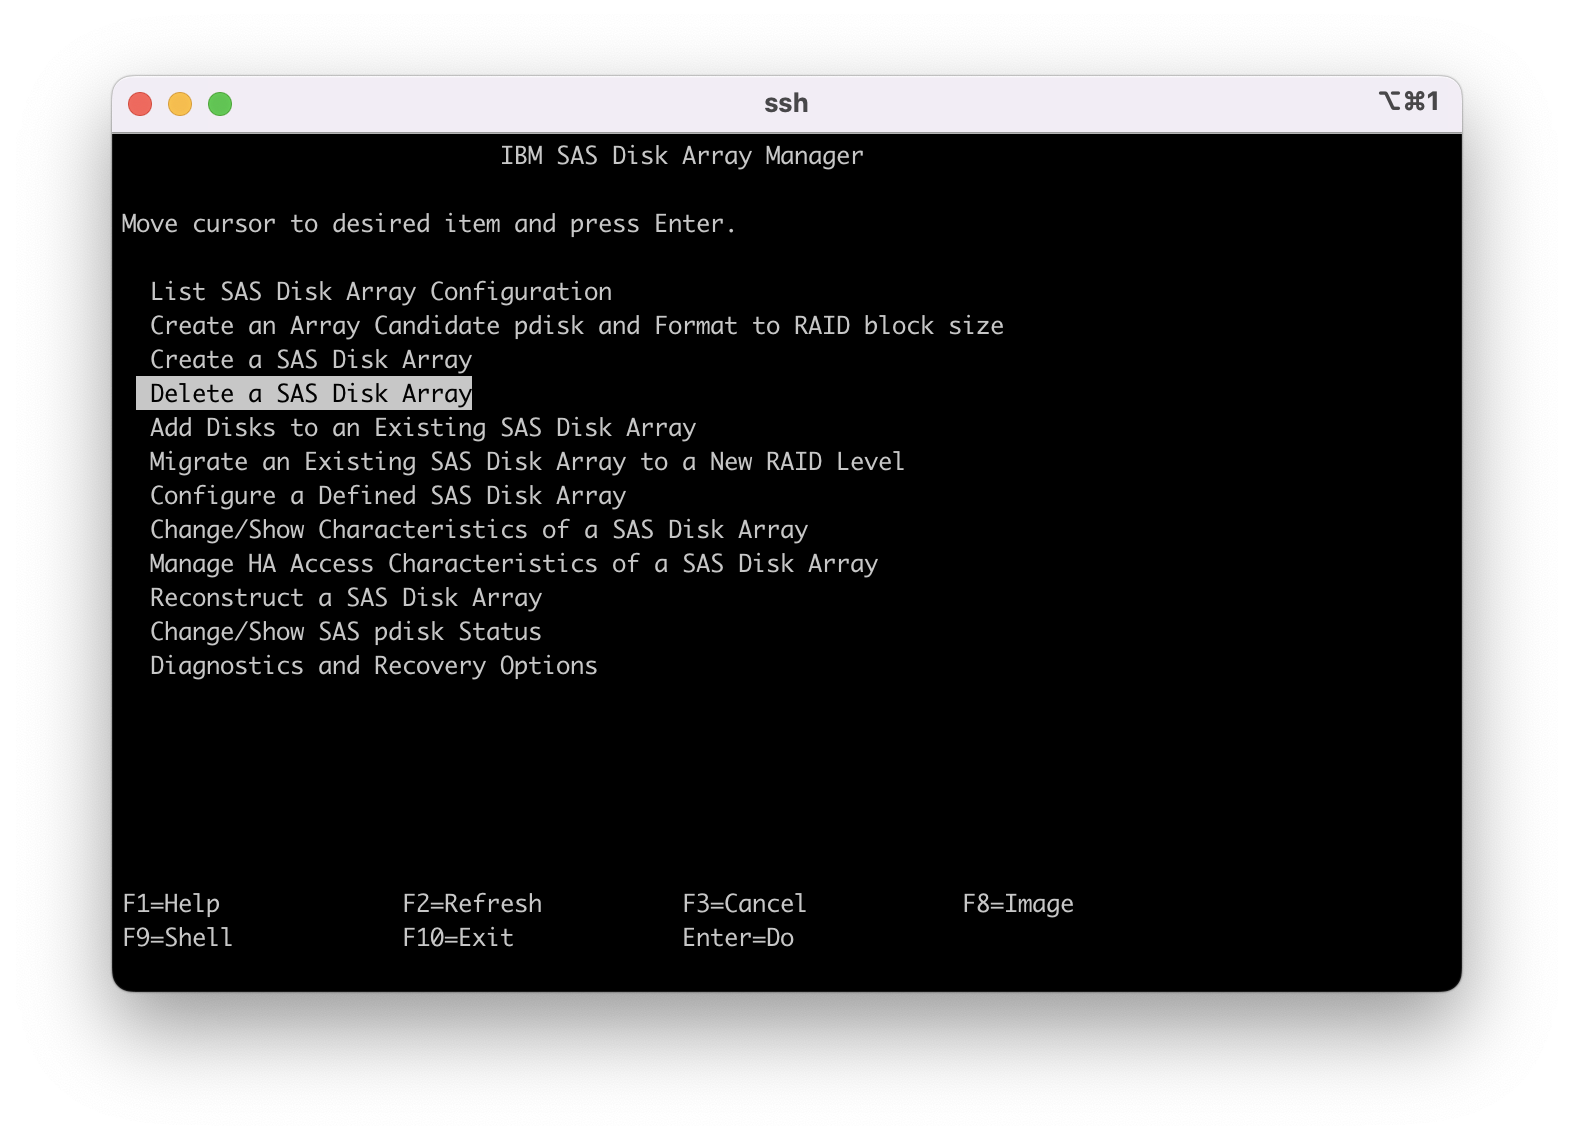
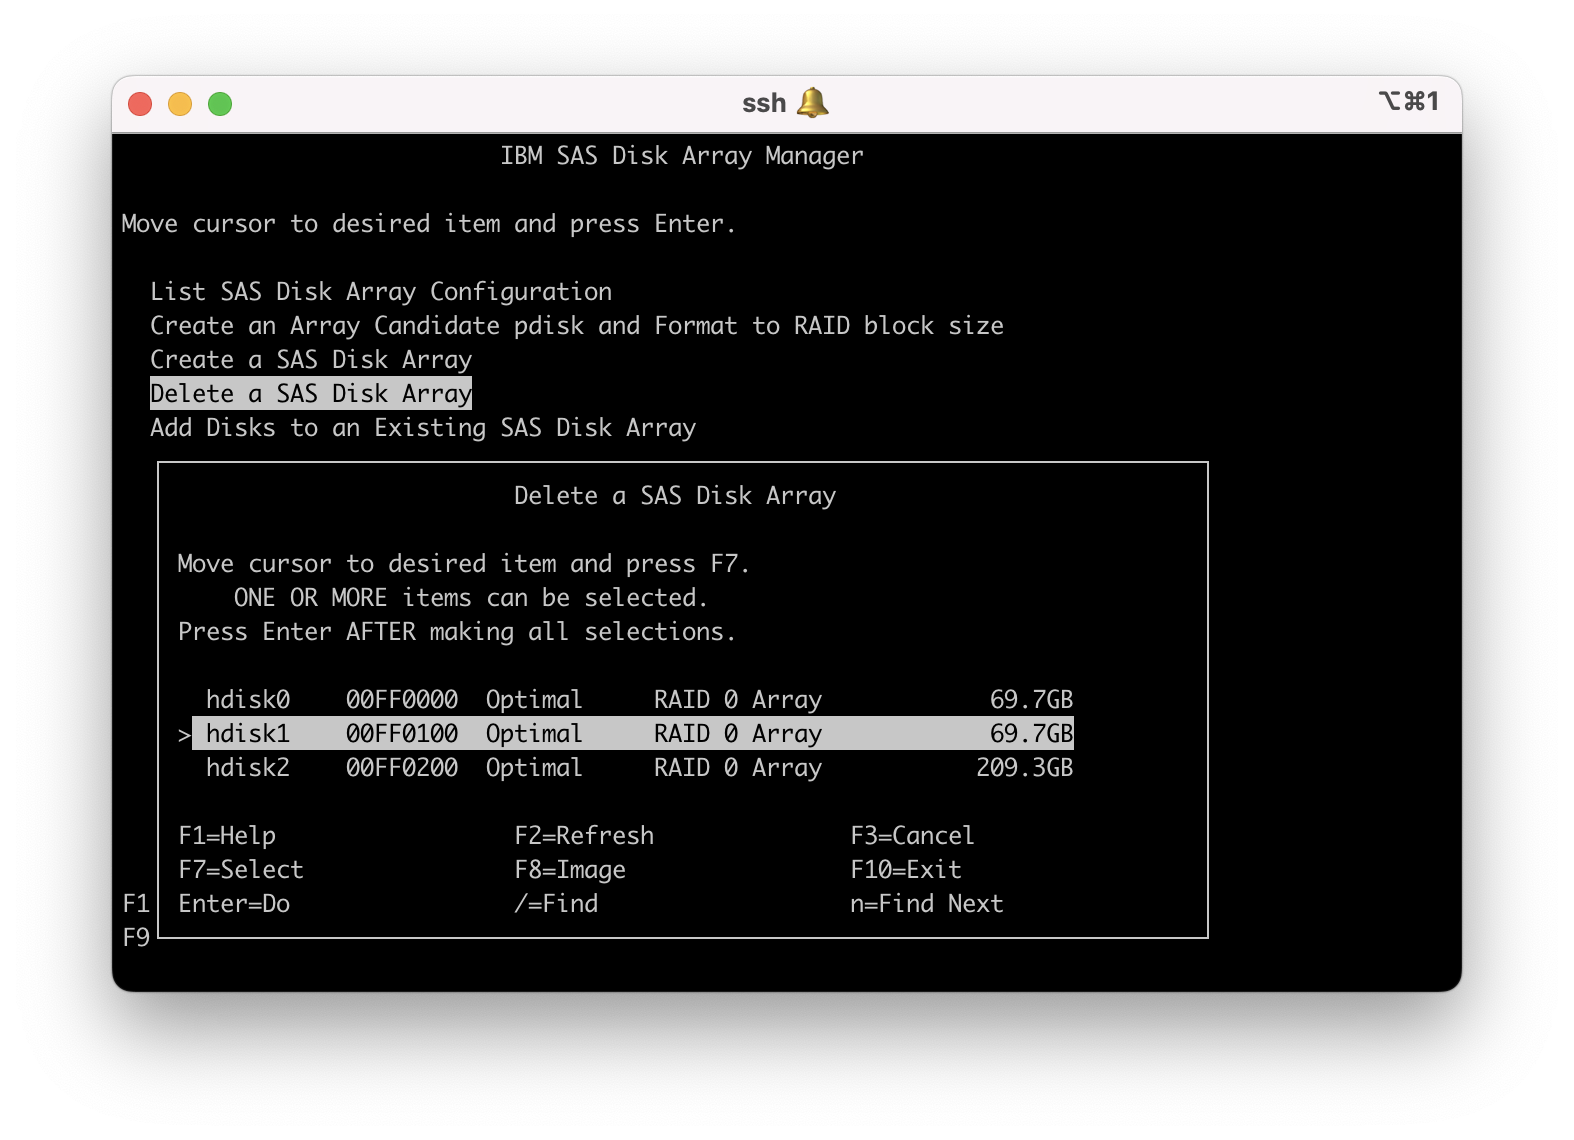
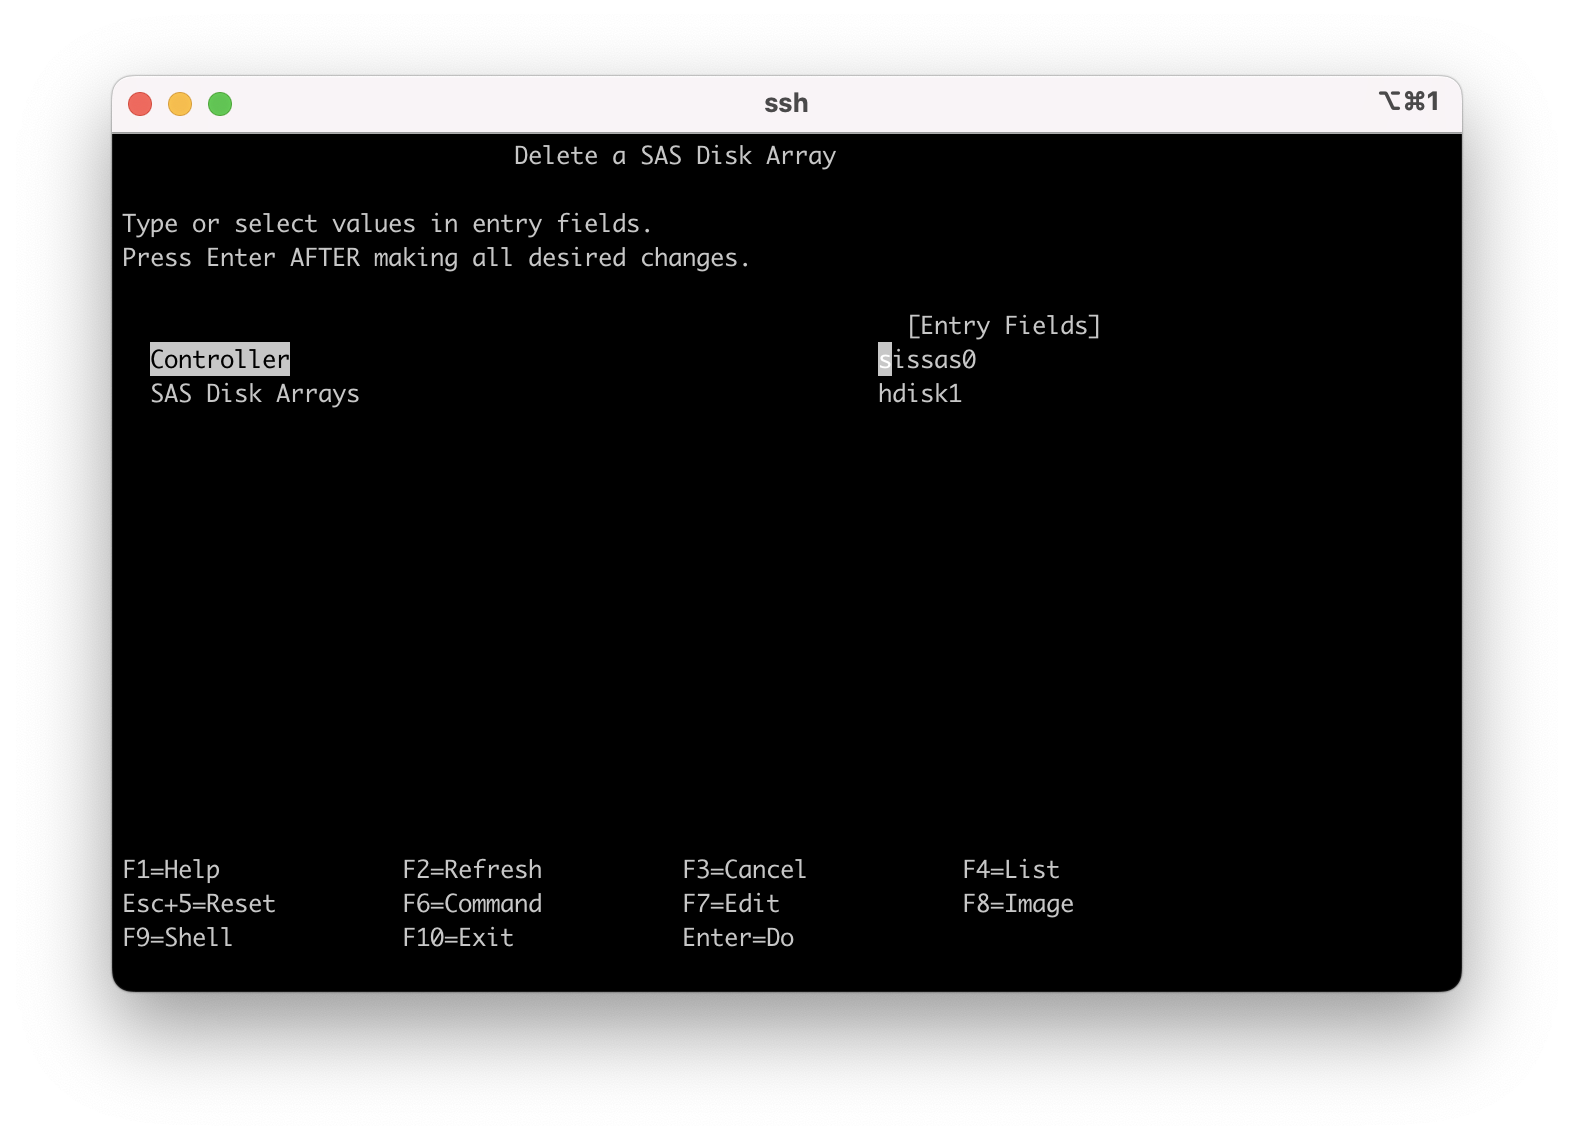
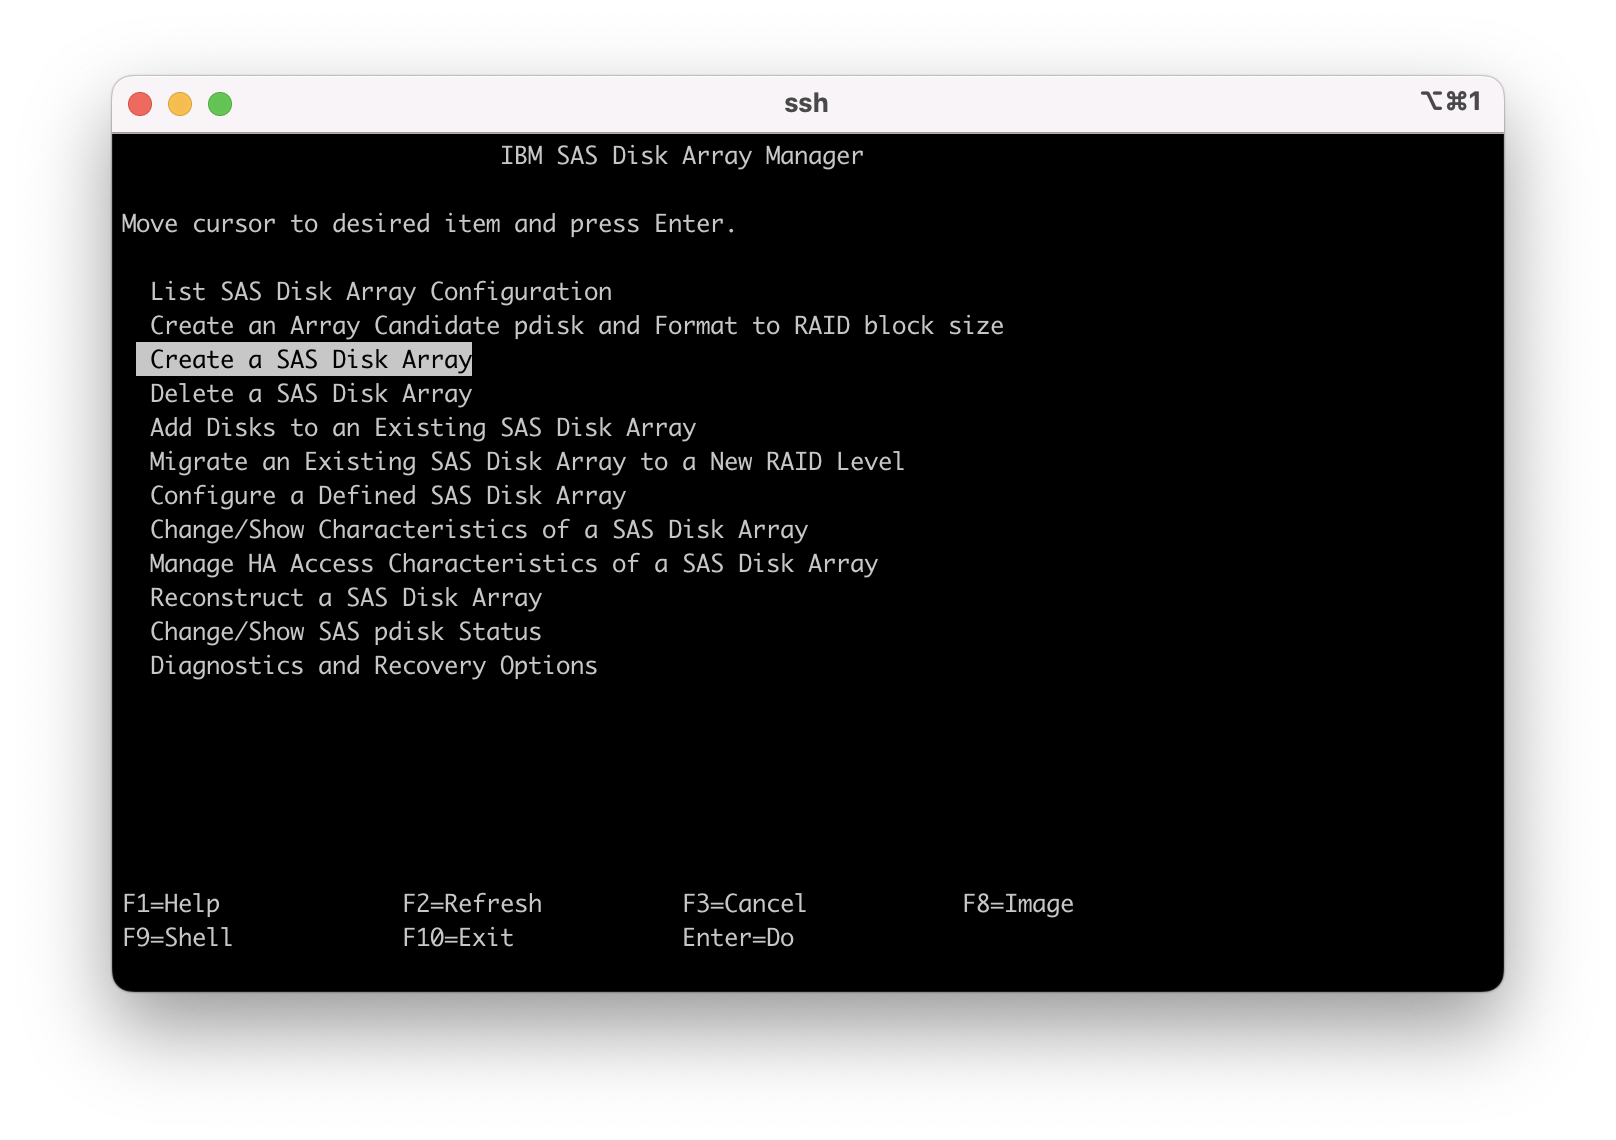
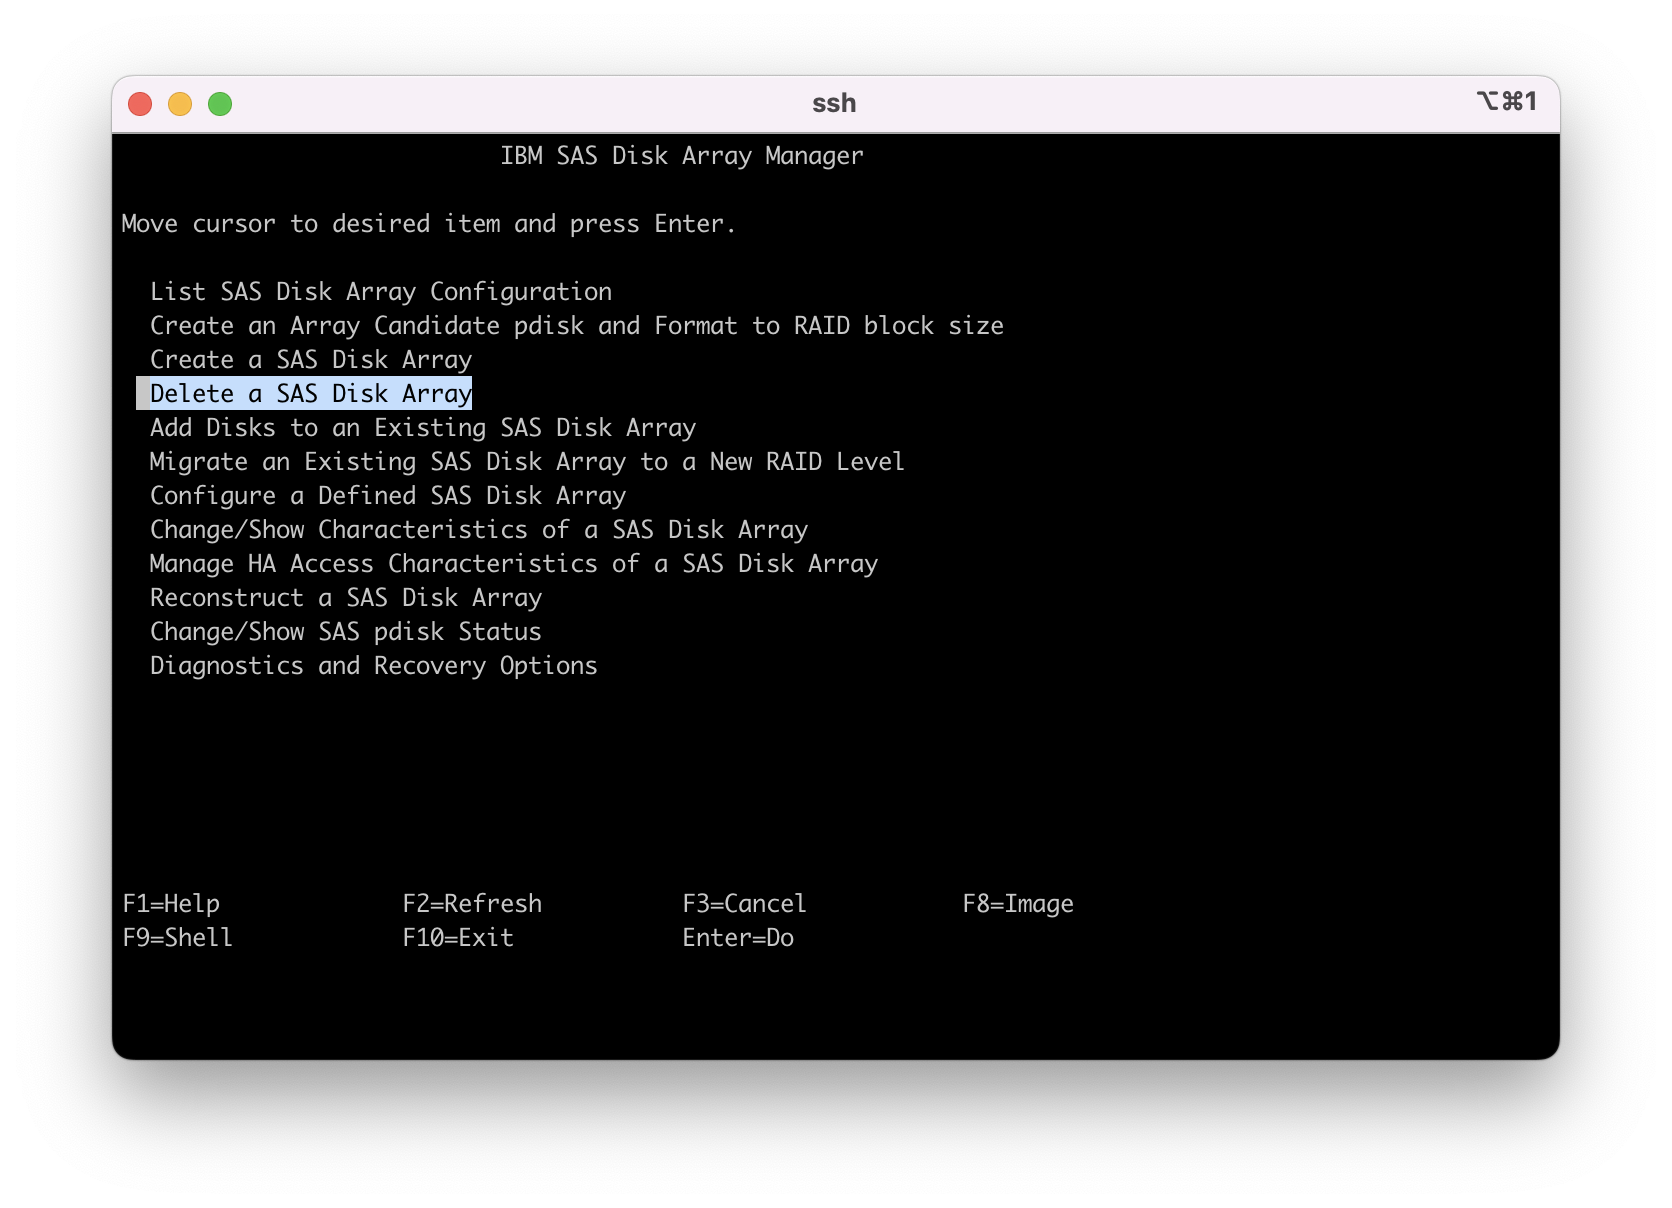
2.3 - Delete the hdisk0 RAID_0 array, "smit sasdam" then select "Delete a SAS Disk Array"

2.8 - F3 back out to command line and use 'lspv' command to confirm the disk is deleted. You can see hdisk1 is no longer listed.
hdisk0 00f68b243dad3725 rootvg active
hdisk2 00f68b243d6a3920 datavg active
#
pdisk0 Available 02-08-00 Physical SAS Disk Drive
pdisk1 Available 02-08-00 Physical SAS Disk Drive
pdisk2 Available 02-08-00 Physical SAS Disk Drive
pdisk3 Available 02-08-00 Physical SAS Disk Drive
pdisk4 Available 02-08-00 Physical SAS Disk Drive
#

2.12 - Locate the disk unit in the system or IO drawer. Once the disk unit is located, you can press enter on the keyboard again to remove the disk from the "Identify" state. Use F3 or ESC 3 to go back one menu.
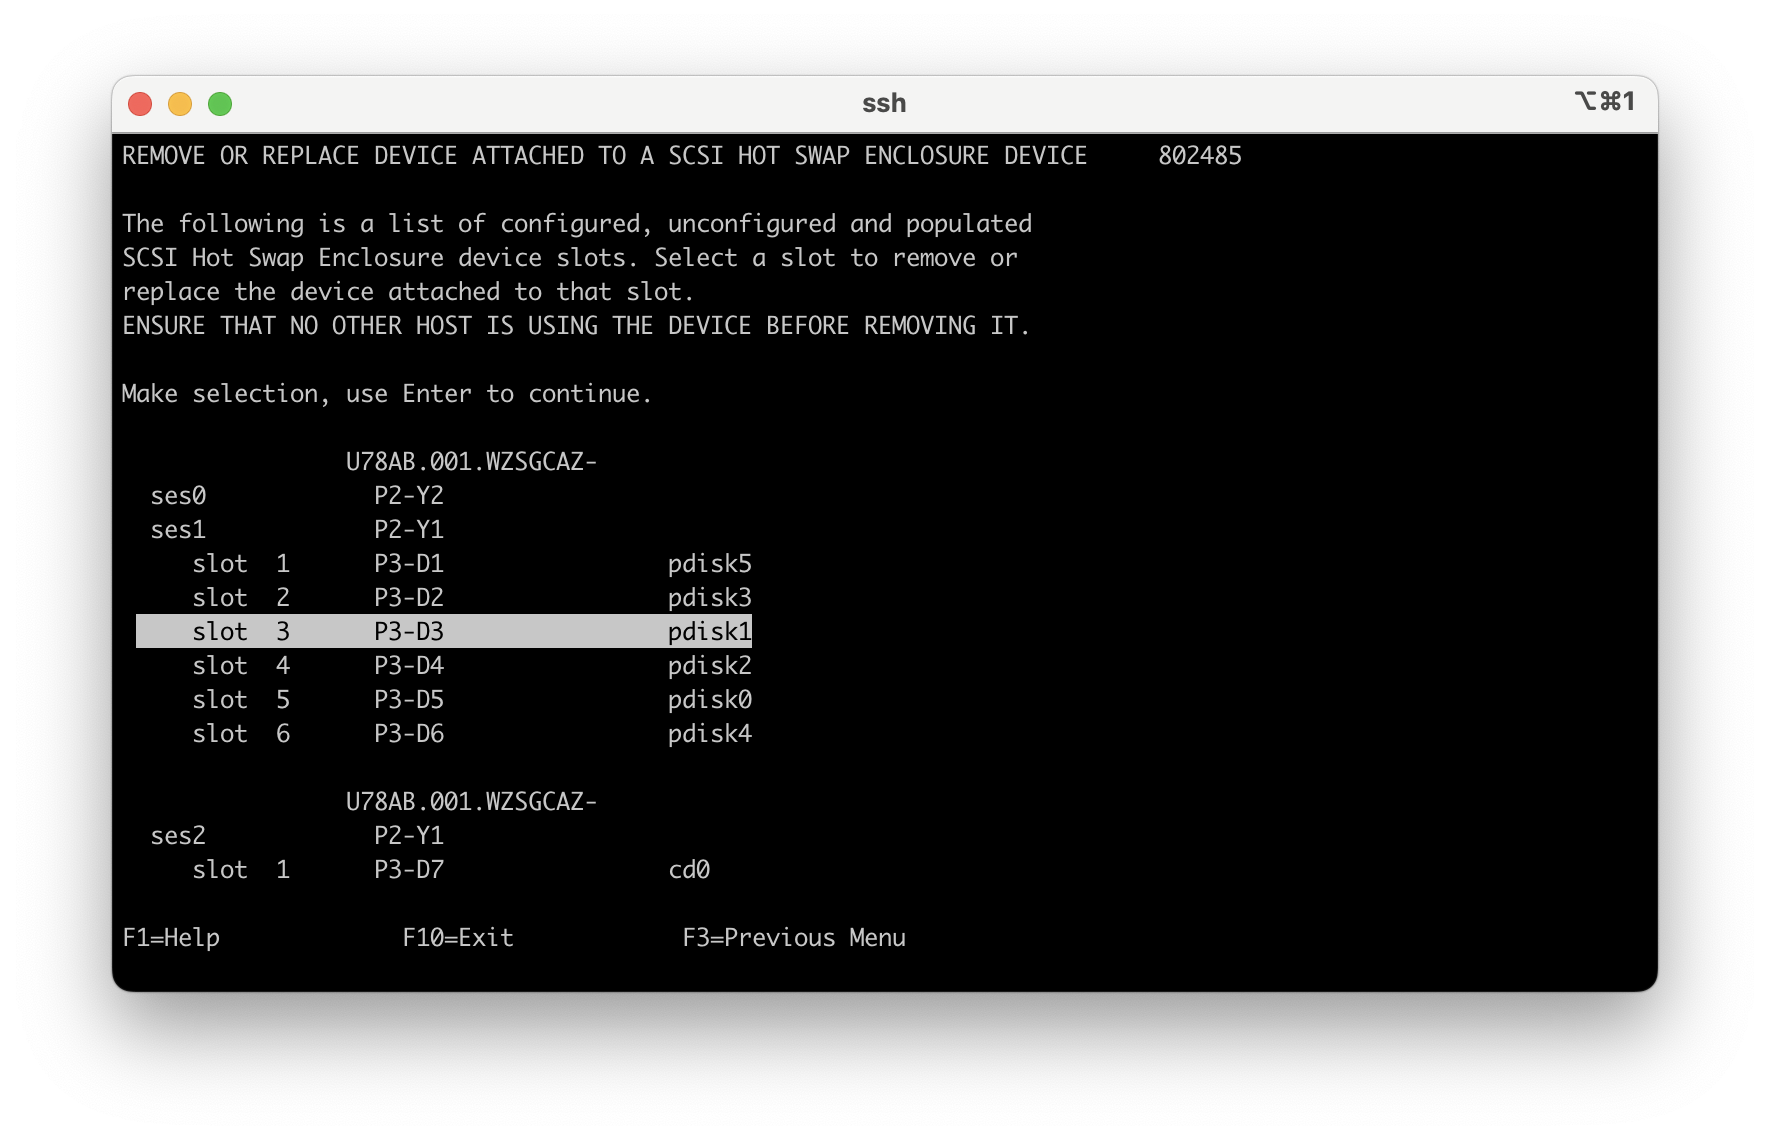
Move the cursor to "Replace/Remove a Device Attached to an SCSI Hot Swap Enclosure Device" and press enter to start the concurrent replacement of the disk unit.

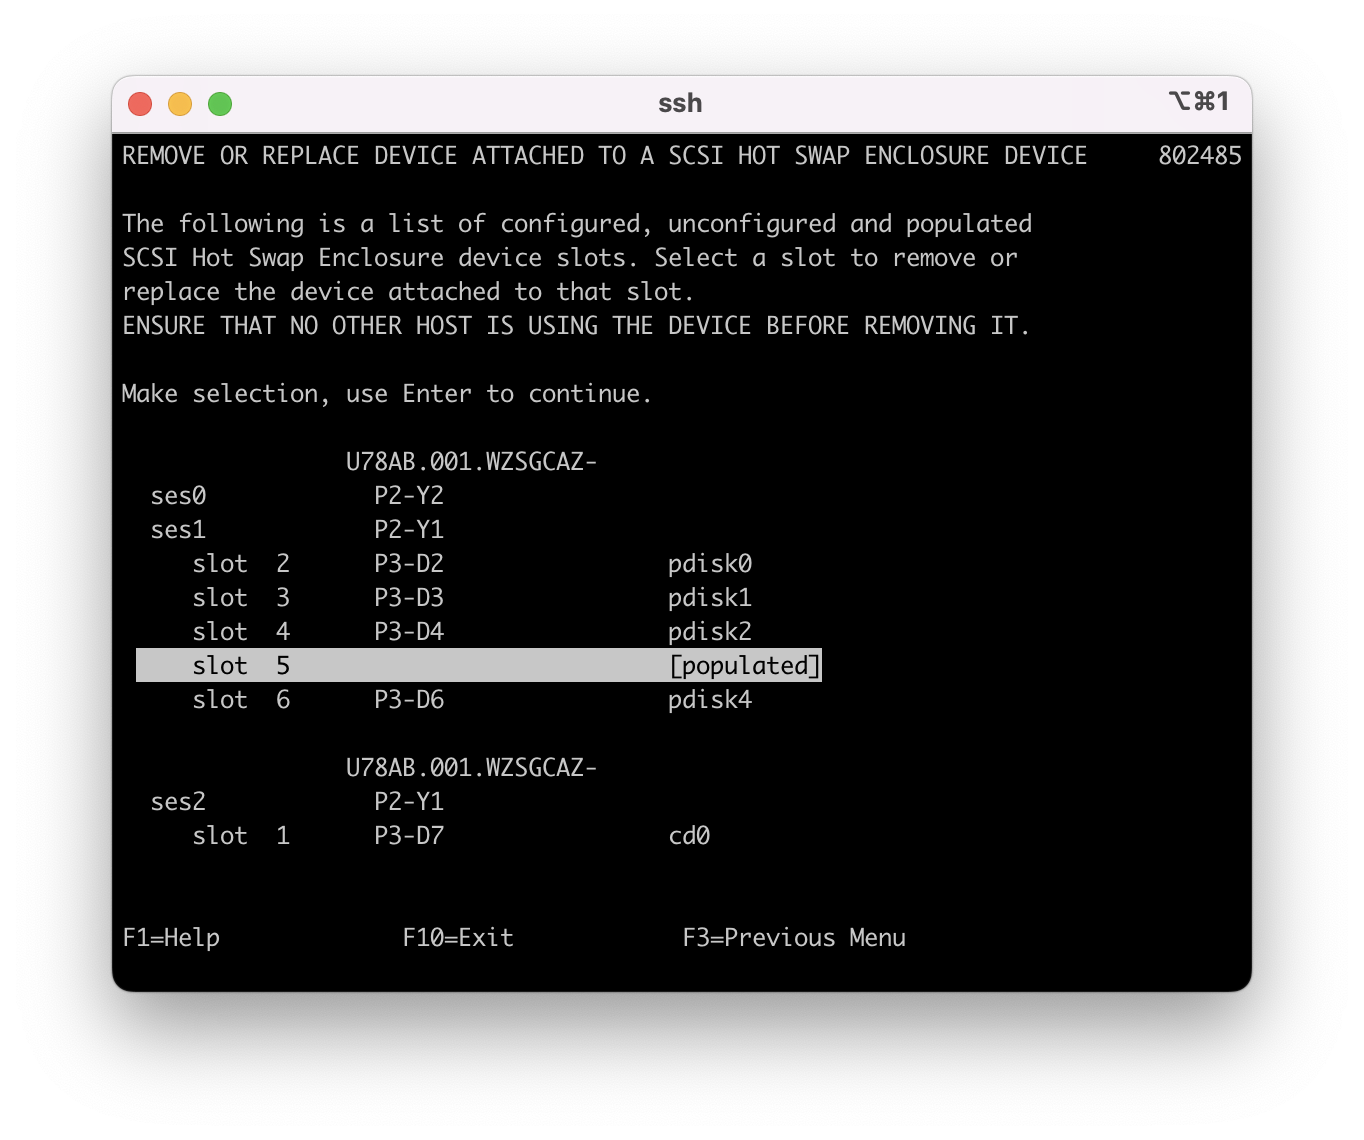
2.15 - Now that the disk is replaced hit enter on the keyboard. The pdisk3 is now list as "[populated]", this state is normal, which means there is a disk unit in that slot but it is not assigned to an array or a Volume Group.


2.25 - Press F3 or ESC 3 out to the command line and run 'lspv' to see your new hdisk with no "pvid" or VG (volume group) attached to it. The disk is now ready to attach to the Volume Group and remirror.
hdisk0 00f68b243dad3725 rootvg active
hdisk1 none None
hdisk2 00f68b243d6a3920 datavg active
#
If needed, contact IBM to open a case:
-For electronic support, visit the IBM Support Community:
https://www.ibm.com/mysupport
-If you require telephone support, visit the web page:
https://www.ibm.com/planetwide/
Procedure 3 - Replacing a pdisk in a RAID5 or RAID10 protected array
Note 1: The error could be a temporary or predictive error or the disk unit might be in a failed state. For a predictive failure, the pdisk is active and in a functional state, it can still be replaced concurrently.
Note 2: In a protected array where the array is active or degraded (not failed) there is no need to remove the hdisk from the Volume Group.
3.1 - In this example we are replacing pdisk4, which is part of a RAID5 array, the procedures are the same for RAID10. To see an example of how RAID10 looks see "Step 2c / Example 05" then return here. First, we need to list the array status. On the command line enter "smit sasdam", move the cursor to highlight "List SAS Disk Array Configuration" and press enter.
3.2 - Move the cursor to select the primary SAS controller that the disk to be replaced is attached to and press enter.
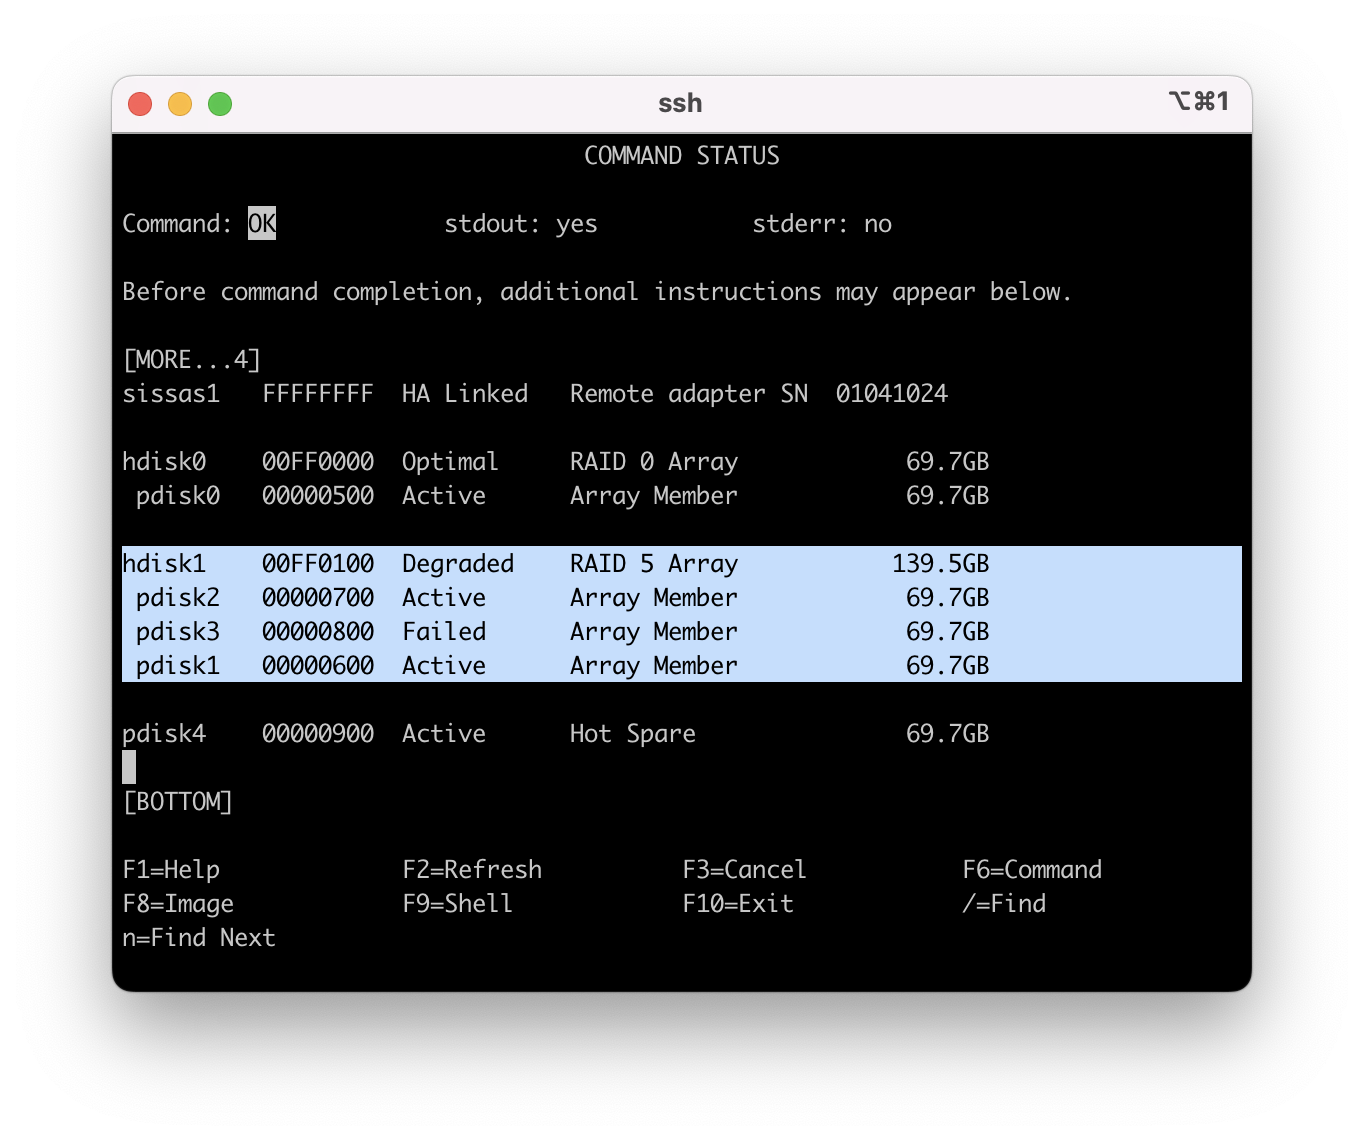
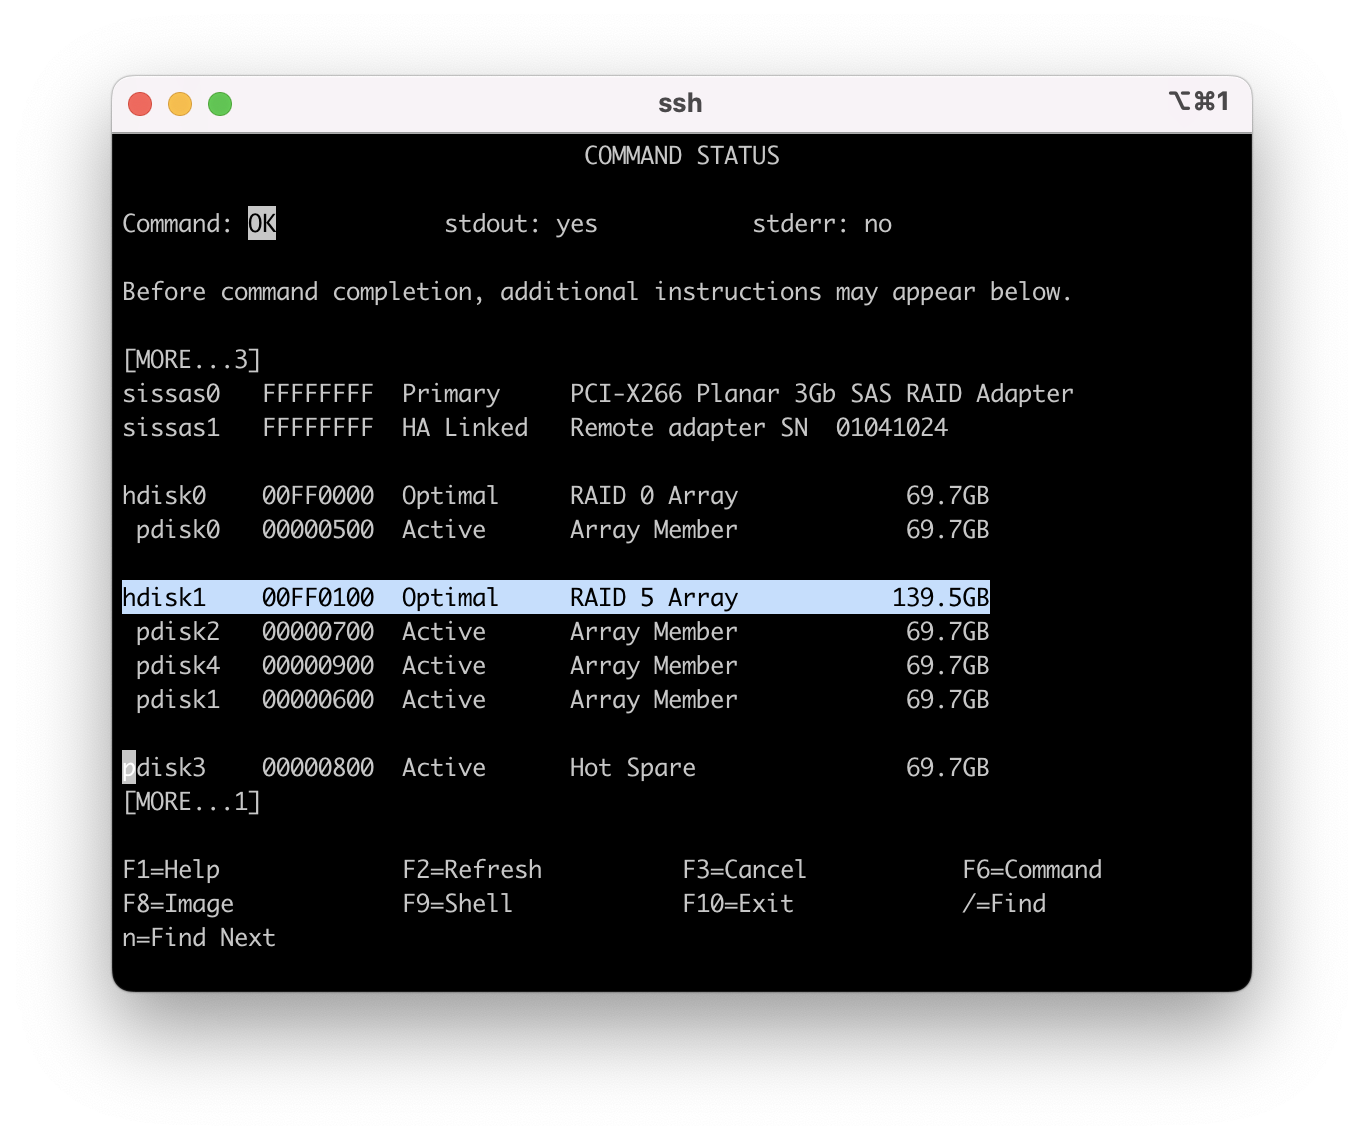
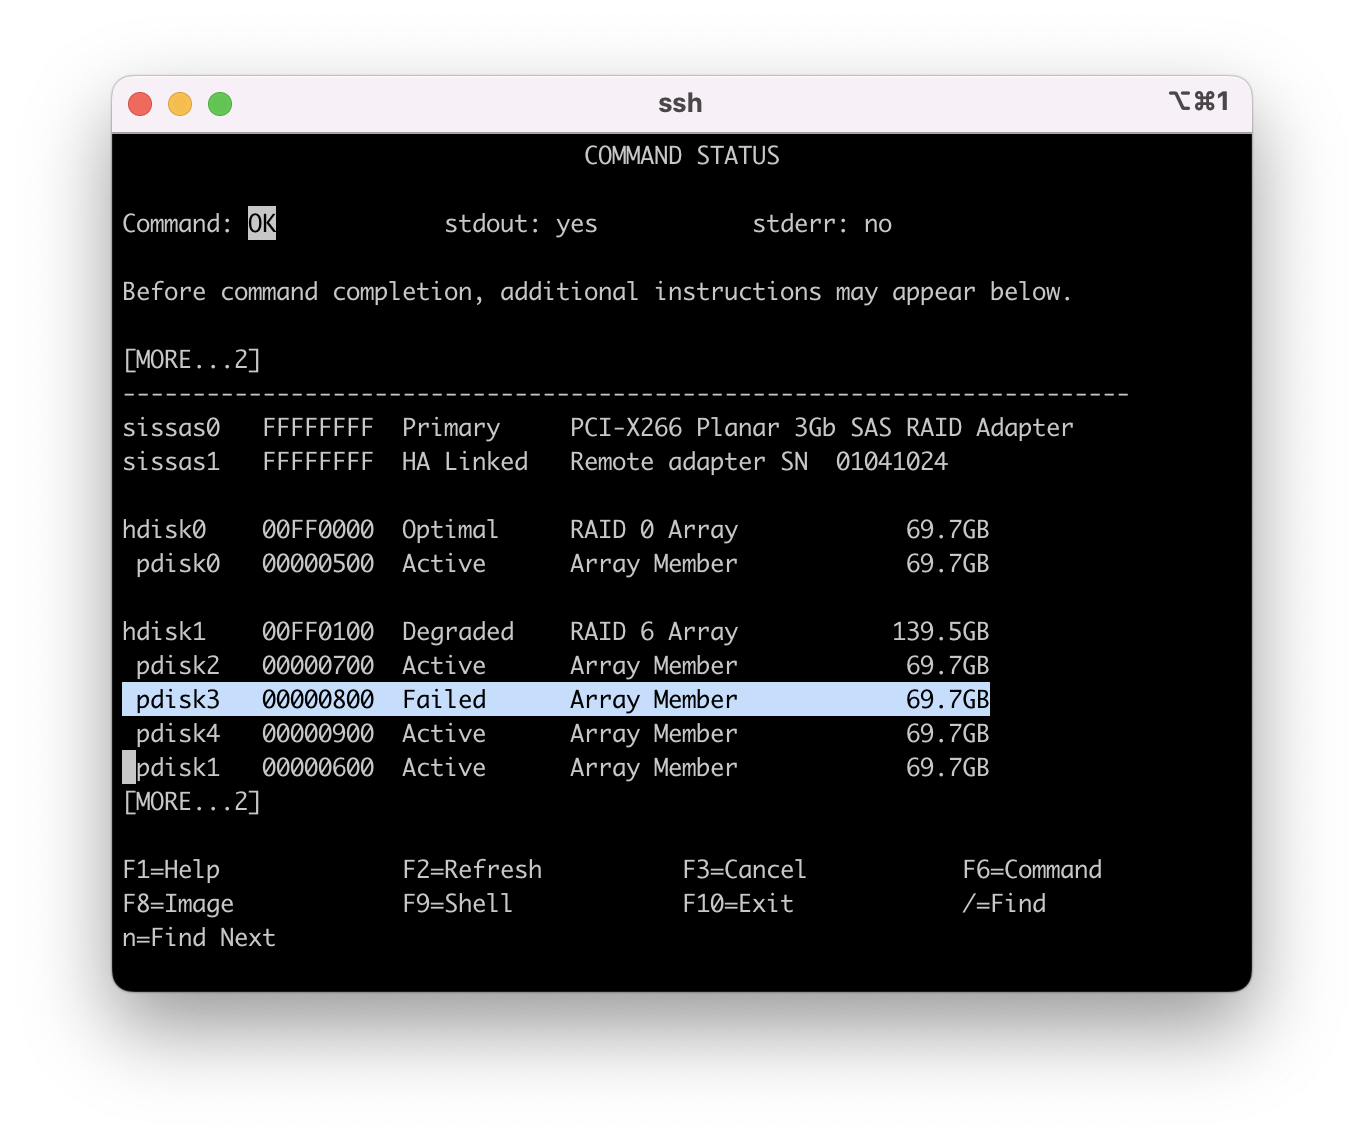
You receive the following output. Cursor down in the list to see the hdisk array and the pdisk's that are listed under it.
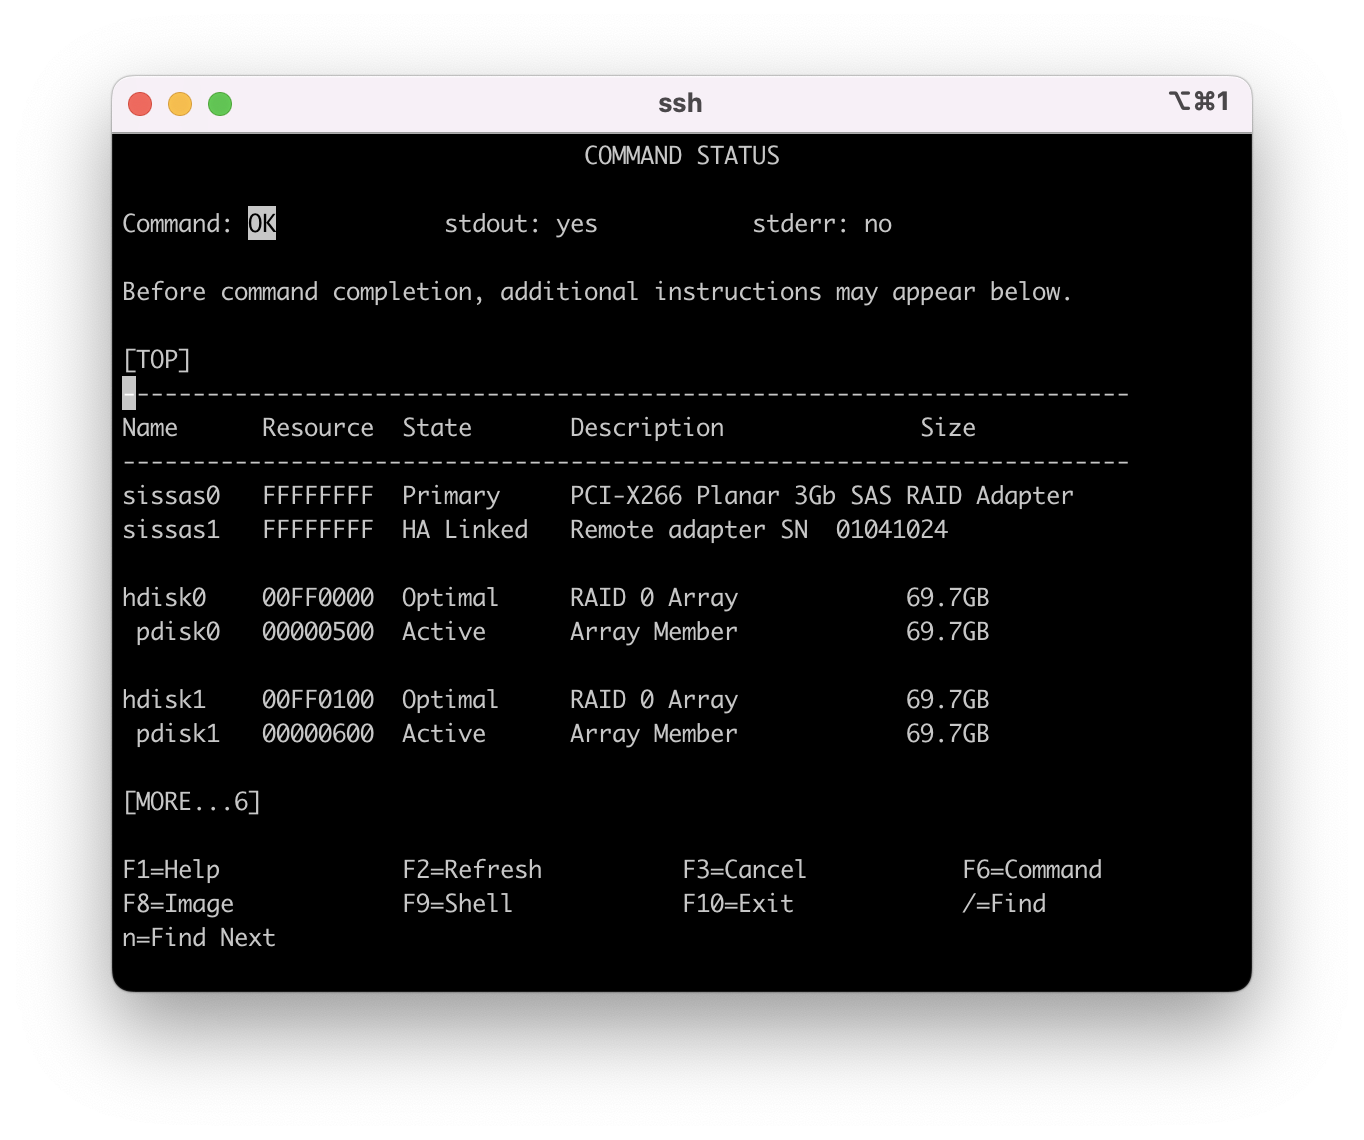
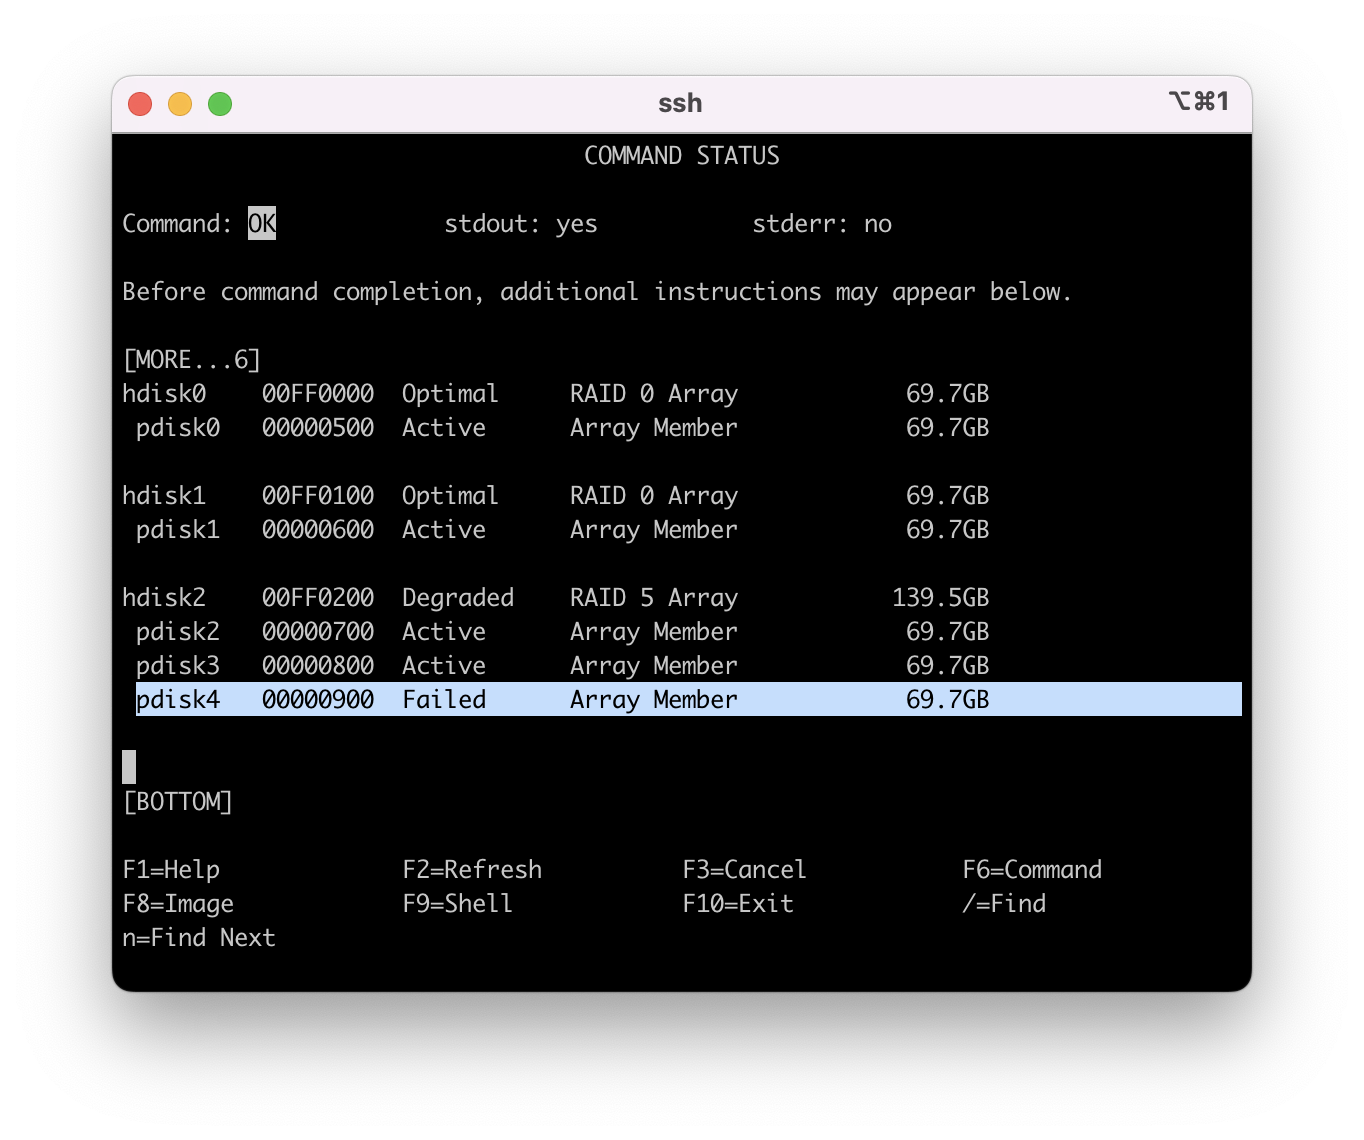
3.3 - Move your cursor down to see the end of the list where you see pdisk4 listed in a "Failed" status and the hdisk2 RAID5 array in a "Degraded" state. The state shows that pdisk4 needs to be replaced and the array reconstructed with a new disk unit.
3.4 - Press F3 or ESC 3 to back out one menu to the "IBM SAS Disk Array Manager" main menu then cursor down to "Diagnostics and Recovery Options" and press enter.
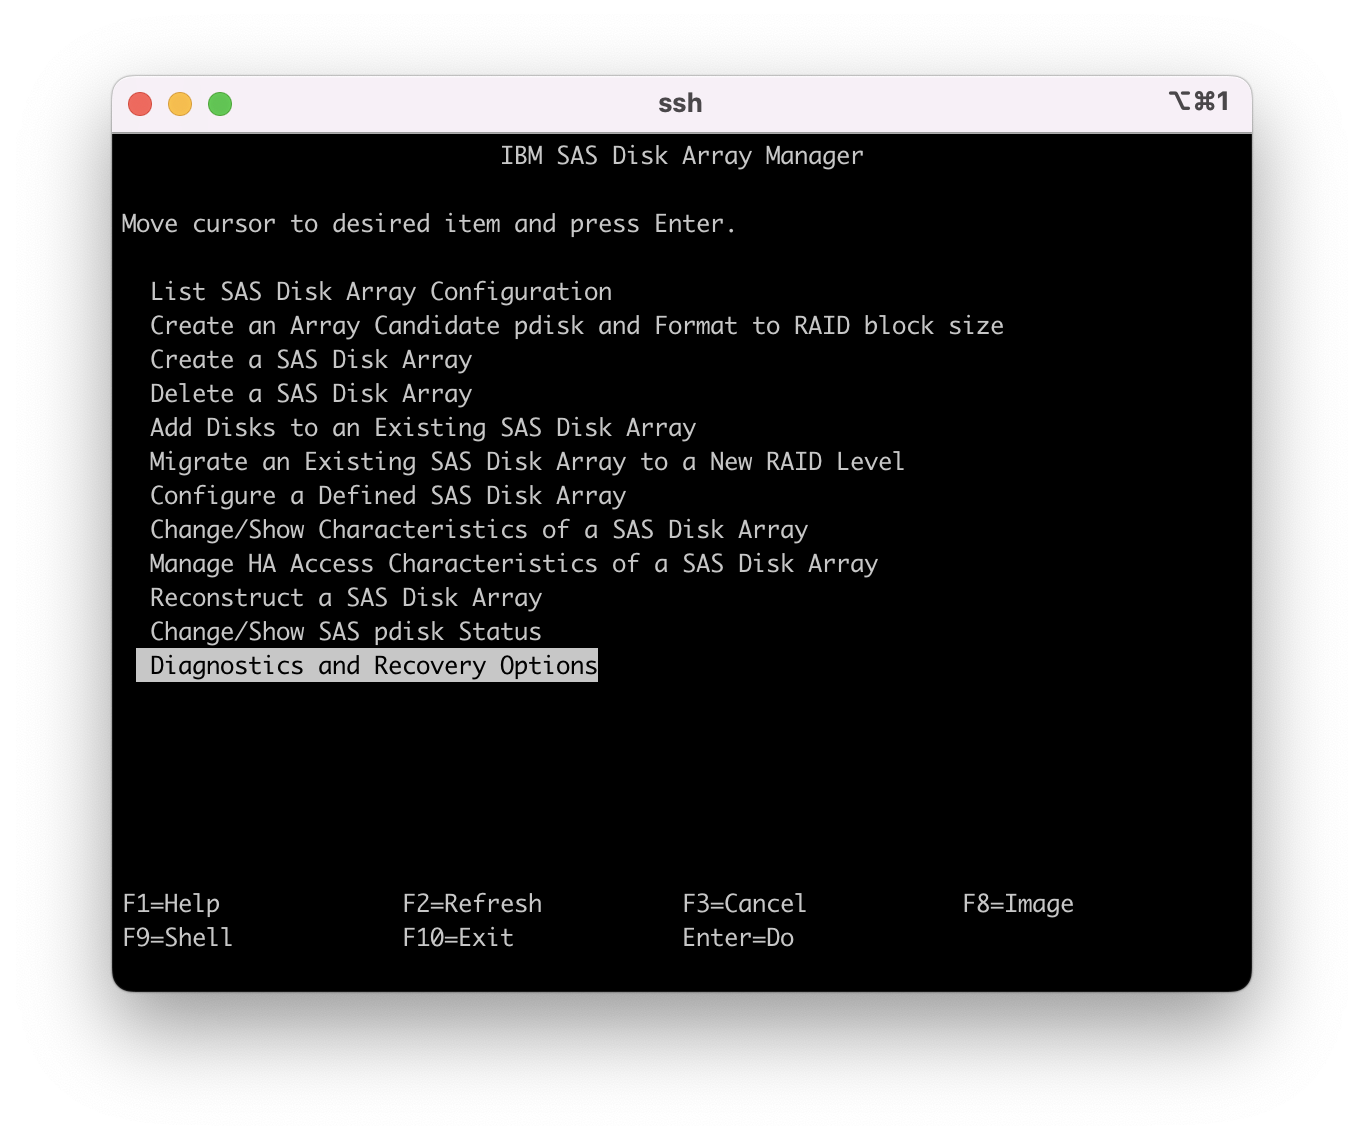
3.5 - Move the cursor to "SCSI and SCSI RAID Hot Plug Manager" and press enter.
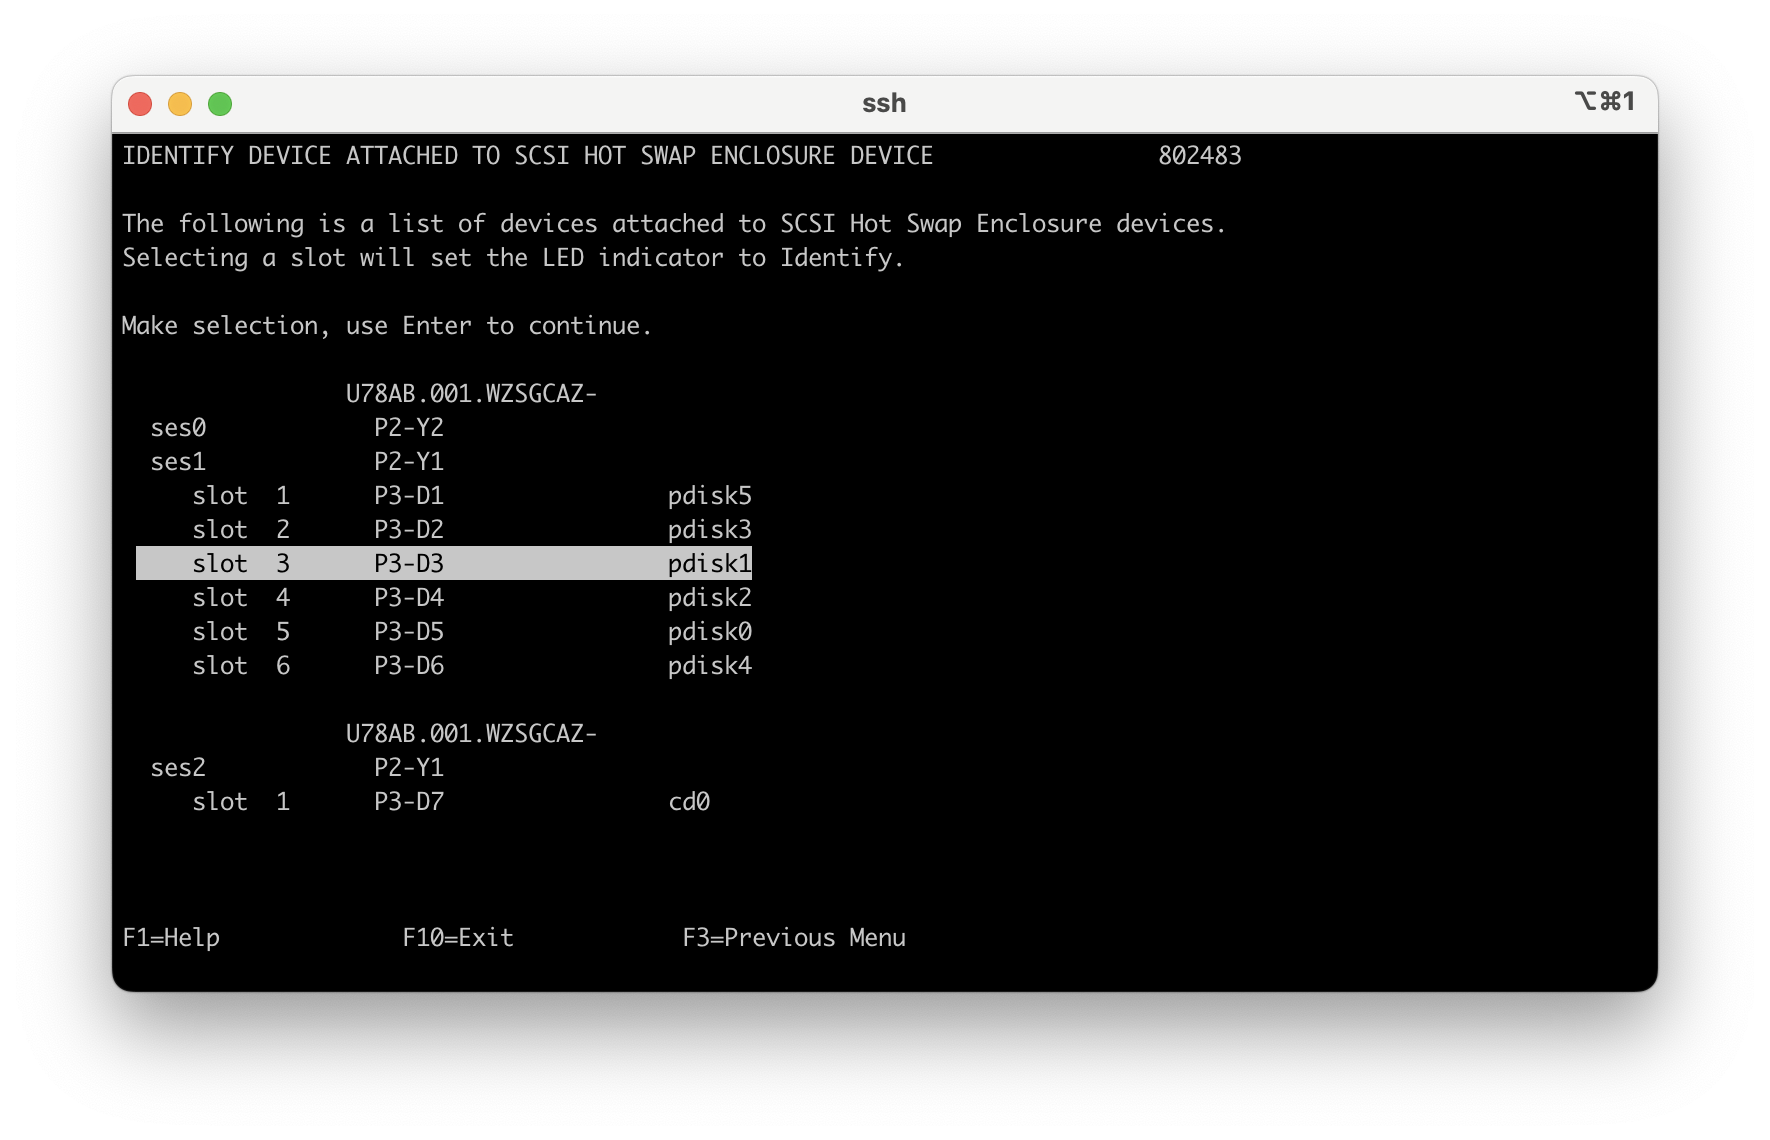
3.6 - If you do not have the physical location of the disk unit or want to verify which disk it is you can move the cursor to "Identify a Device Attached to a SCSI Hot Swap Enclosure Device" and press enter. This task flashes the LED on the disk unit you selected.
3.7 - Locate the disk unit in the system or IO drawer. Press enter on the keyboard again to remove the disk from the "Identify" state. Use F3 or ESC 3 to go back one menu. Move the cursor to "Replace/Remove a Device Attached to an SCSI Hot Swap Enclosure Device" and press enter to start the concurrent replacement of the disk unit.
3.8 - Move the cursor to select the target disk unit to be replaced and press enter.
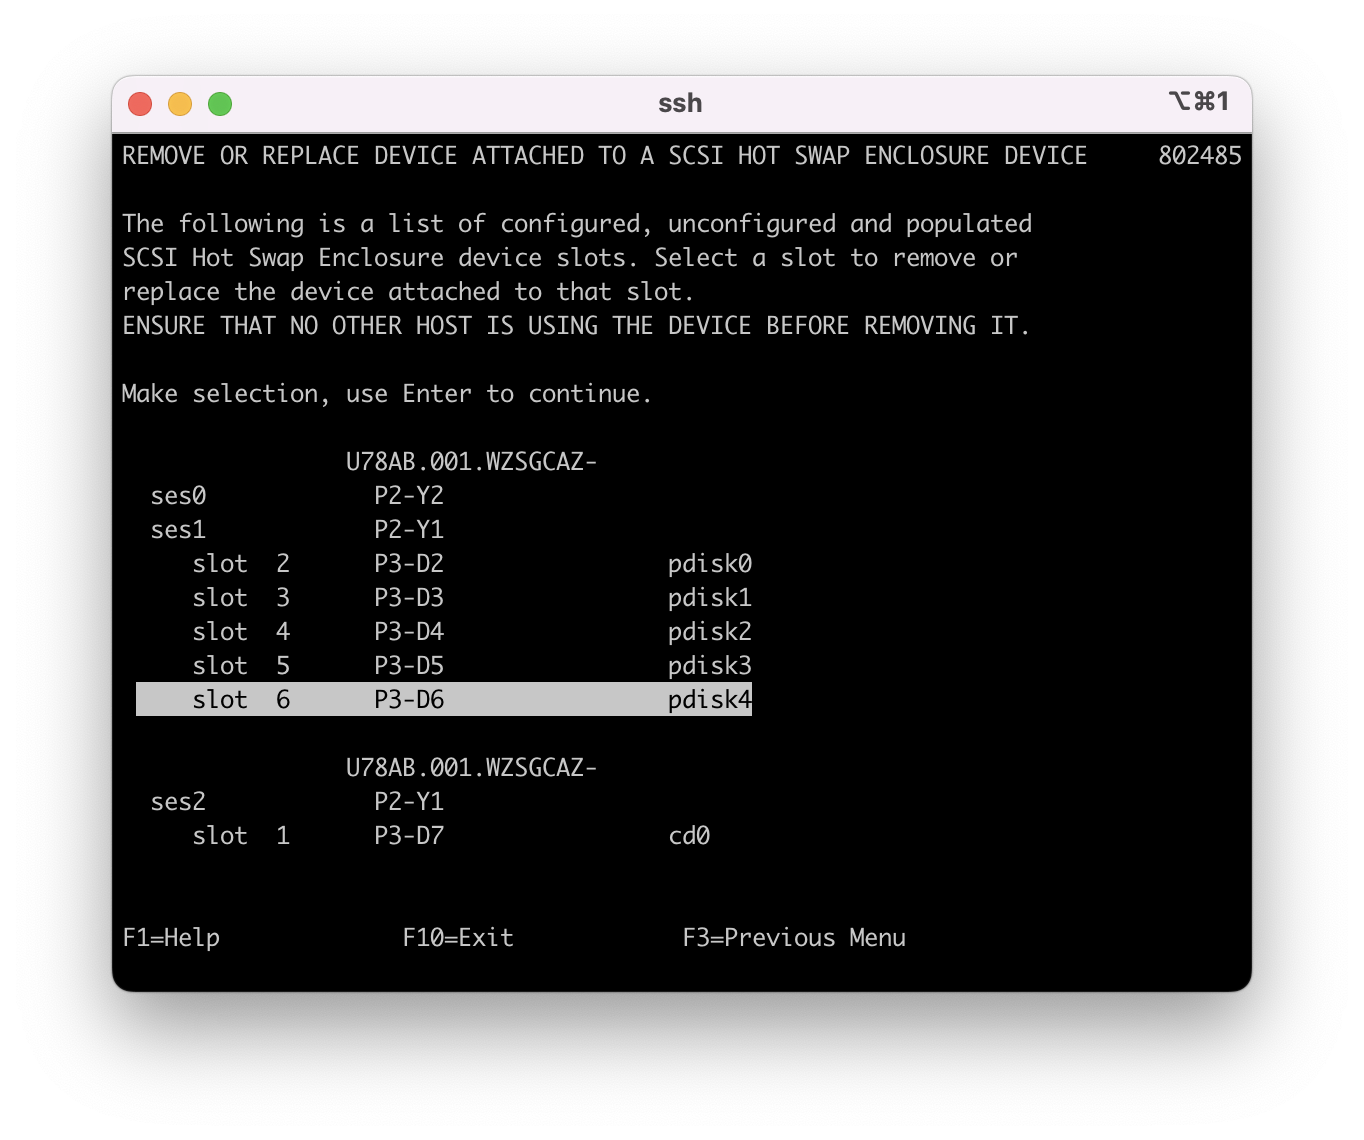
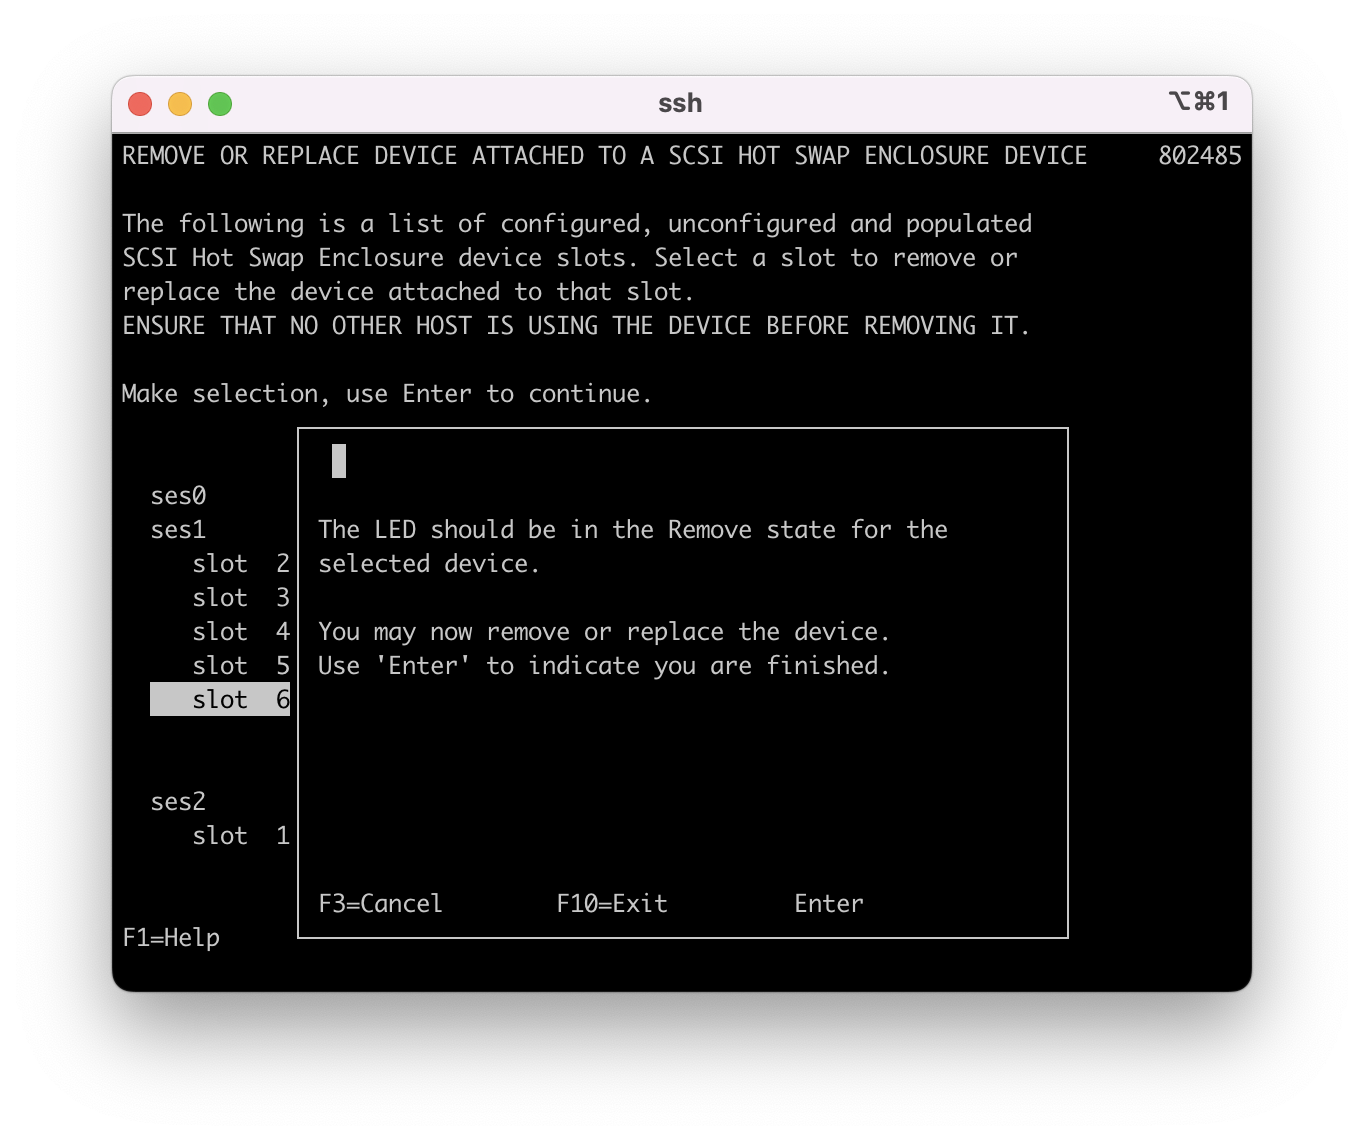
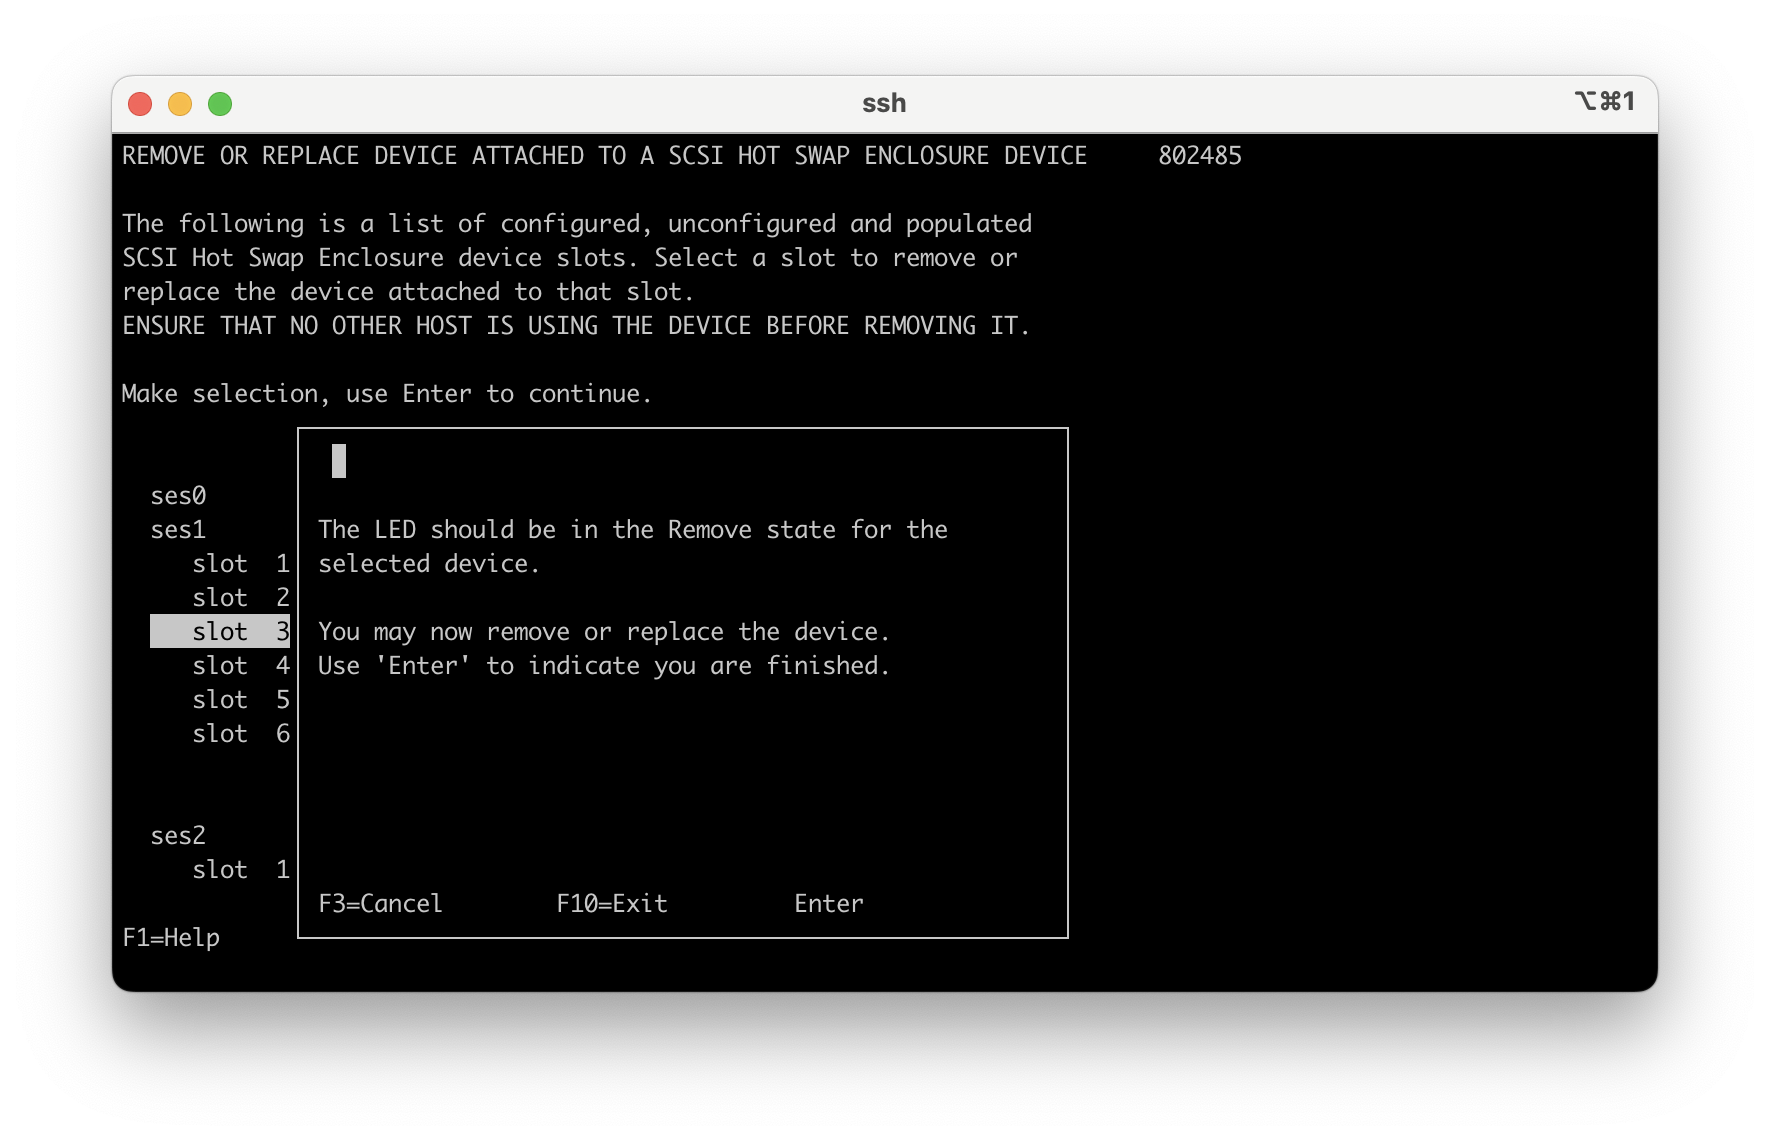
3.9 - You can see the disk unit is now in the remove state. Now you can physically pull out the disk unit and put the new replacement disk unit in.
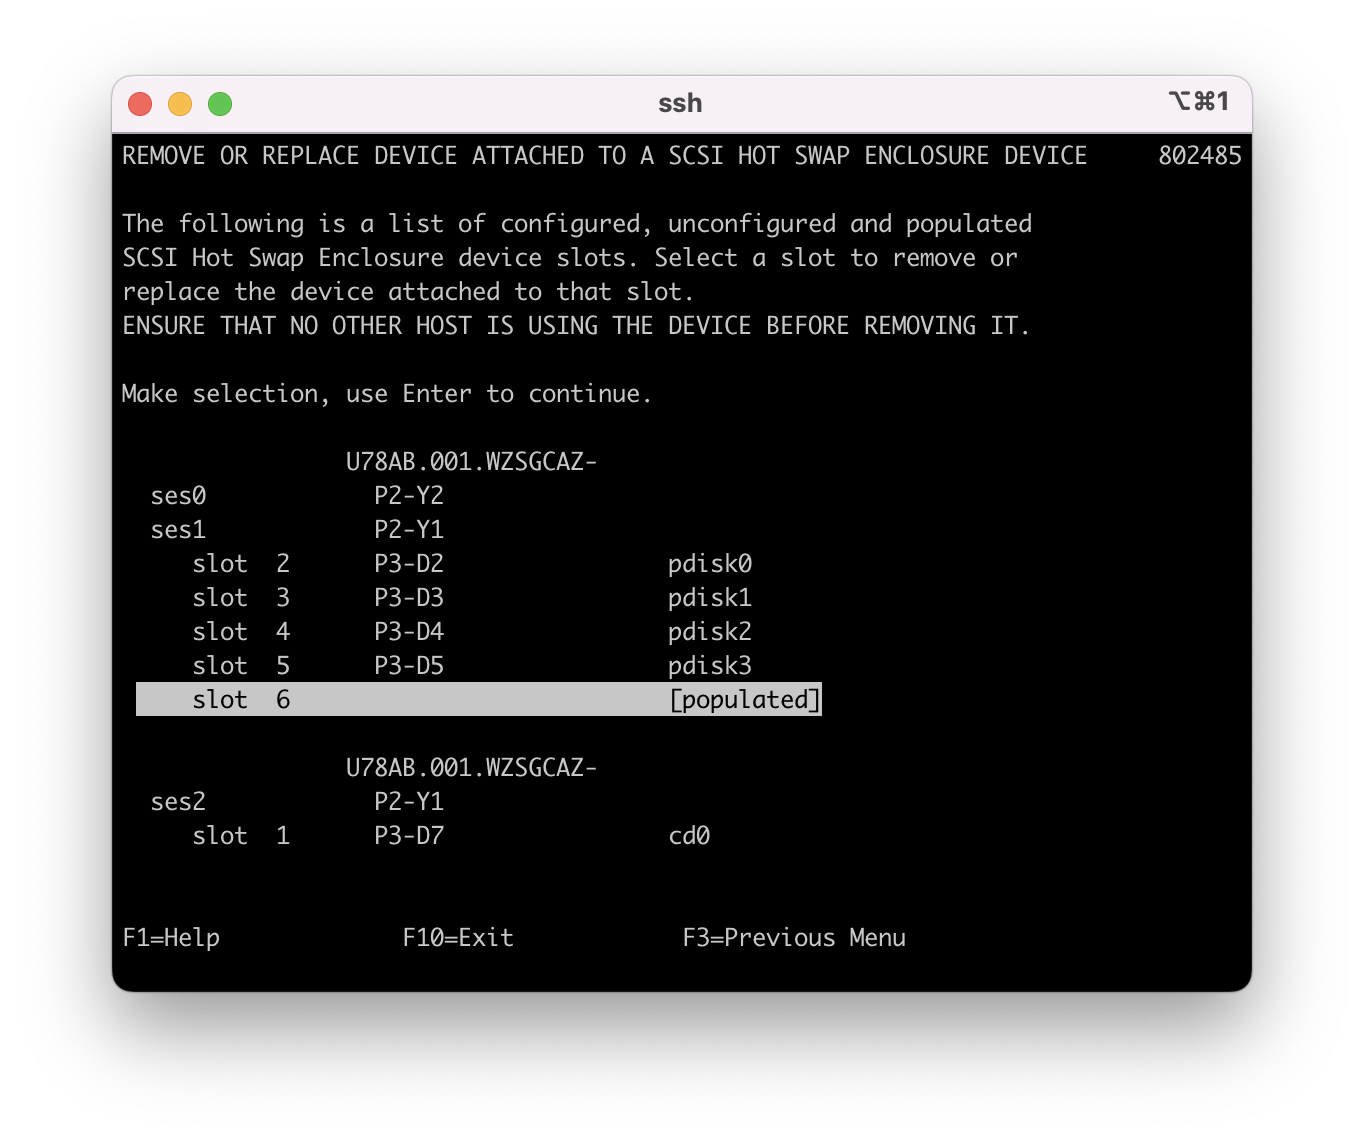
3.10 - Now that the disk is replaced, hit enter on the keyboard. The pdisk4 is now listed as "[populated]", this state is normal and means that there is a disk unit in that slot but it is not assigned to an array or a Volume Group.
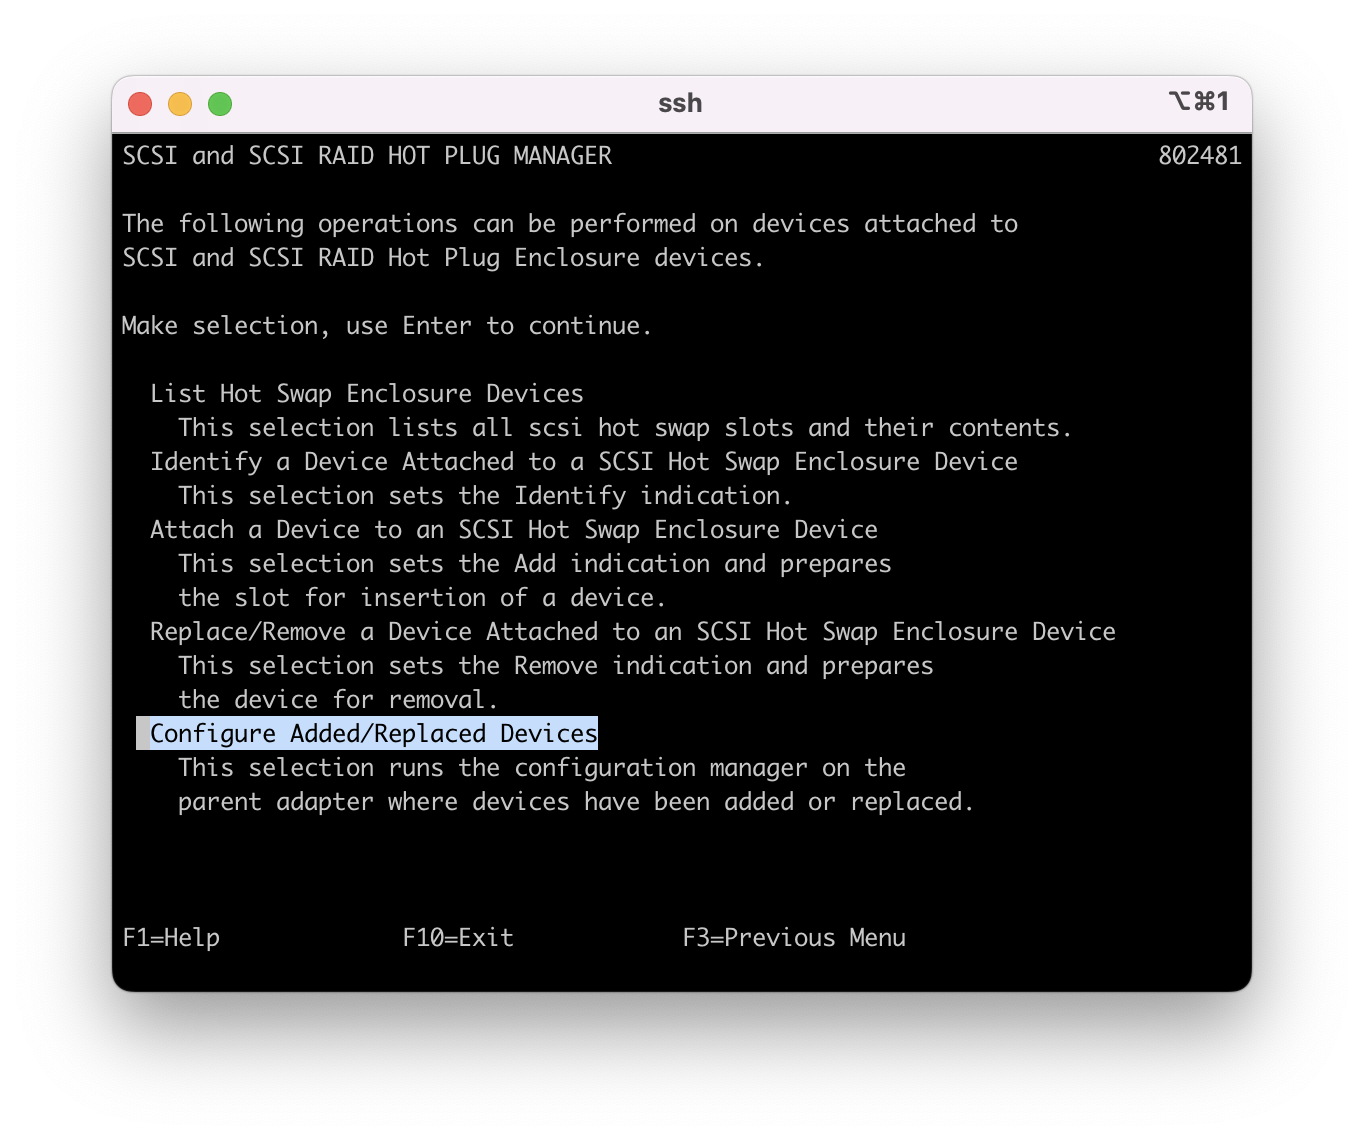
3.11 - This step is important and it is often missed. From command line, you either need to run "cfgmgr" or use this menu "Configure Added/Replaced Devices" to configure in the new pdisk. Move the cursor to "Configure Added/Replaced Devices" and press enter on the keyboard.
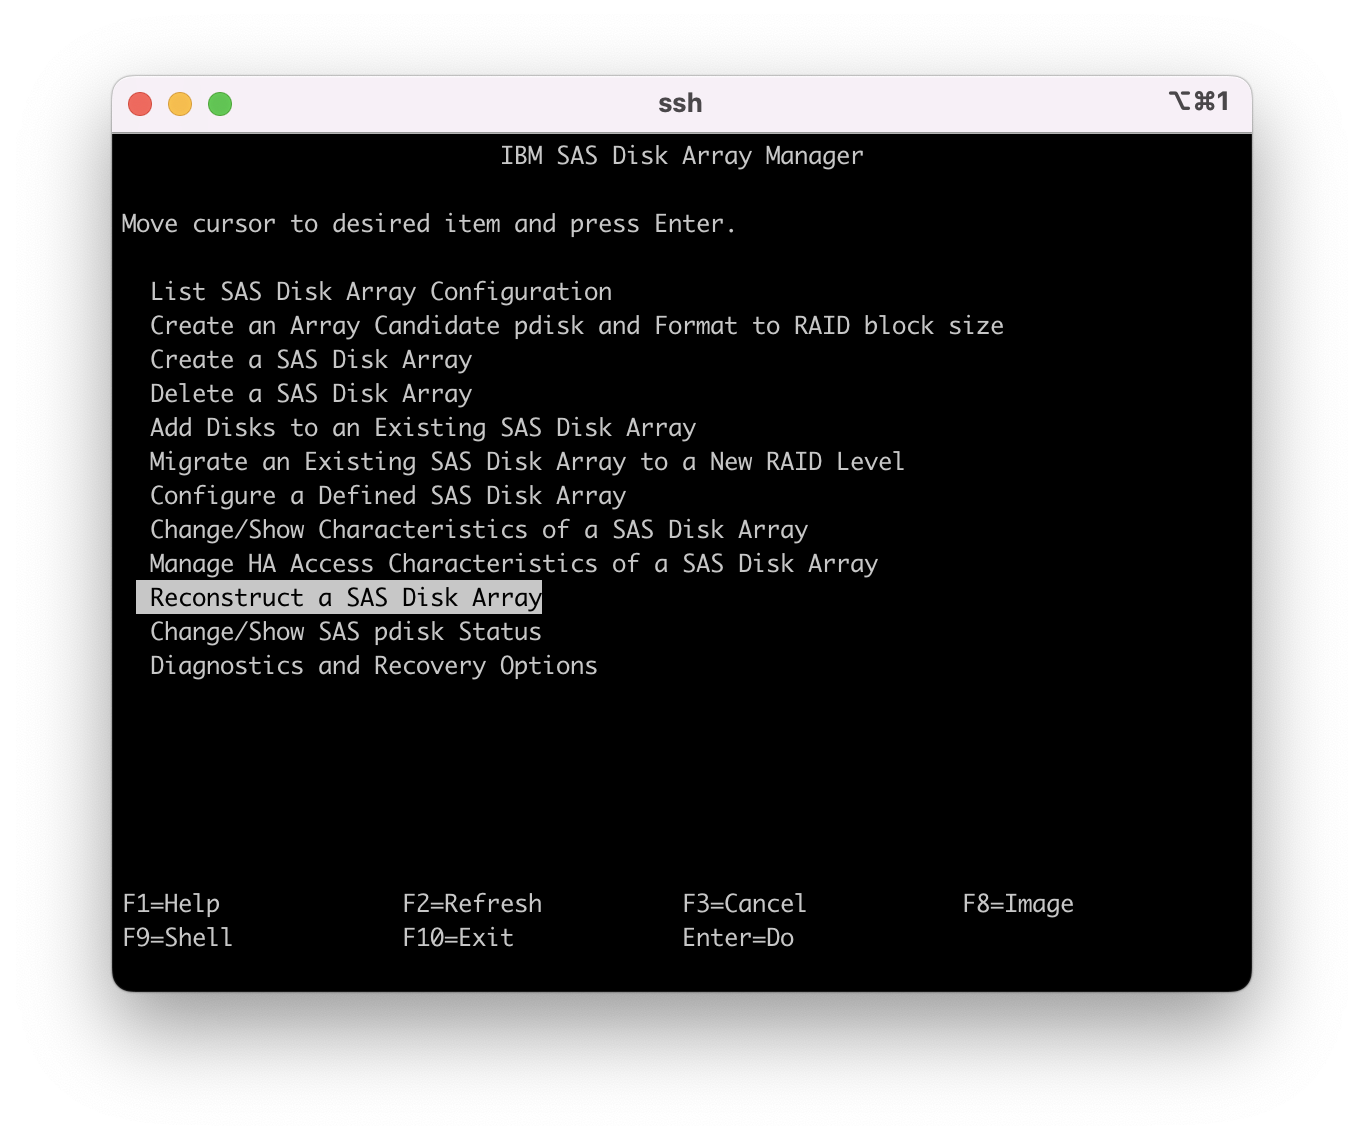
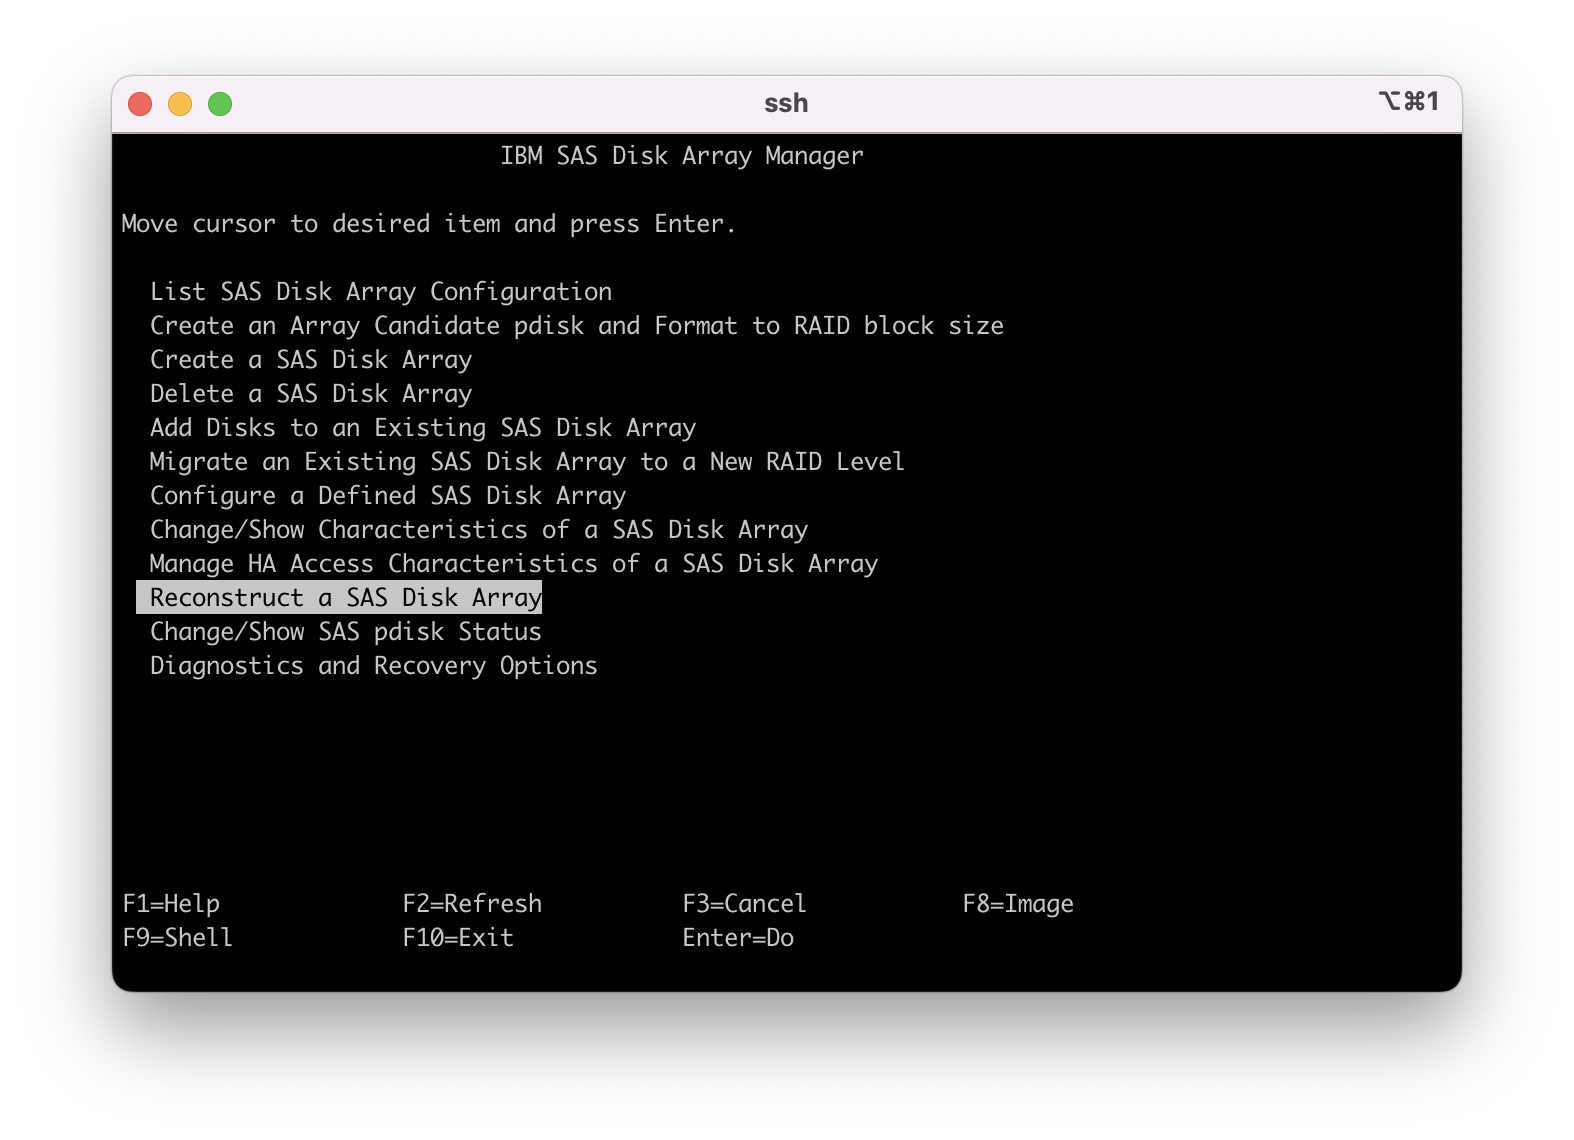
3.12 - Once the command completes it returns to the "SCSI and SCSI RAID HOT PLUG MANAGER" main menu. Hit F3 or ESC 3 twice to return to the "IBM SAS Disk Array Manager" main menu. Move the cursor to "Reconstruct a SAS Disk Array" and press enter on the keyboard.
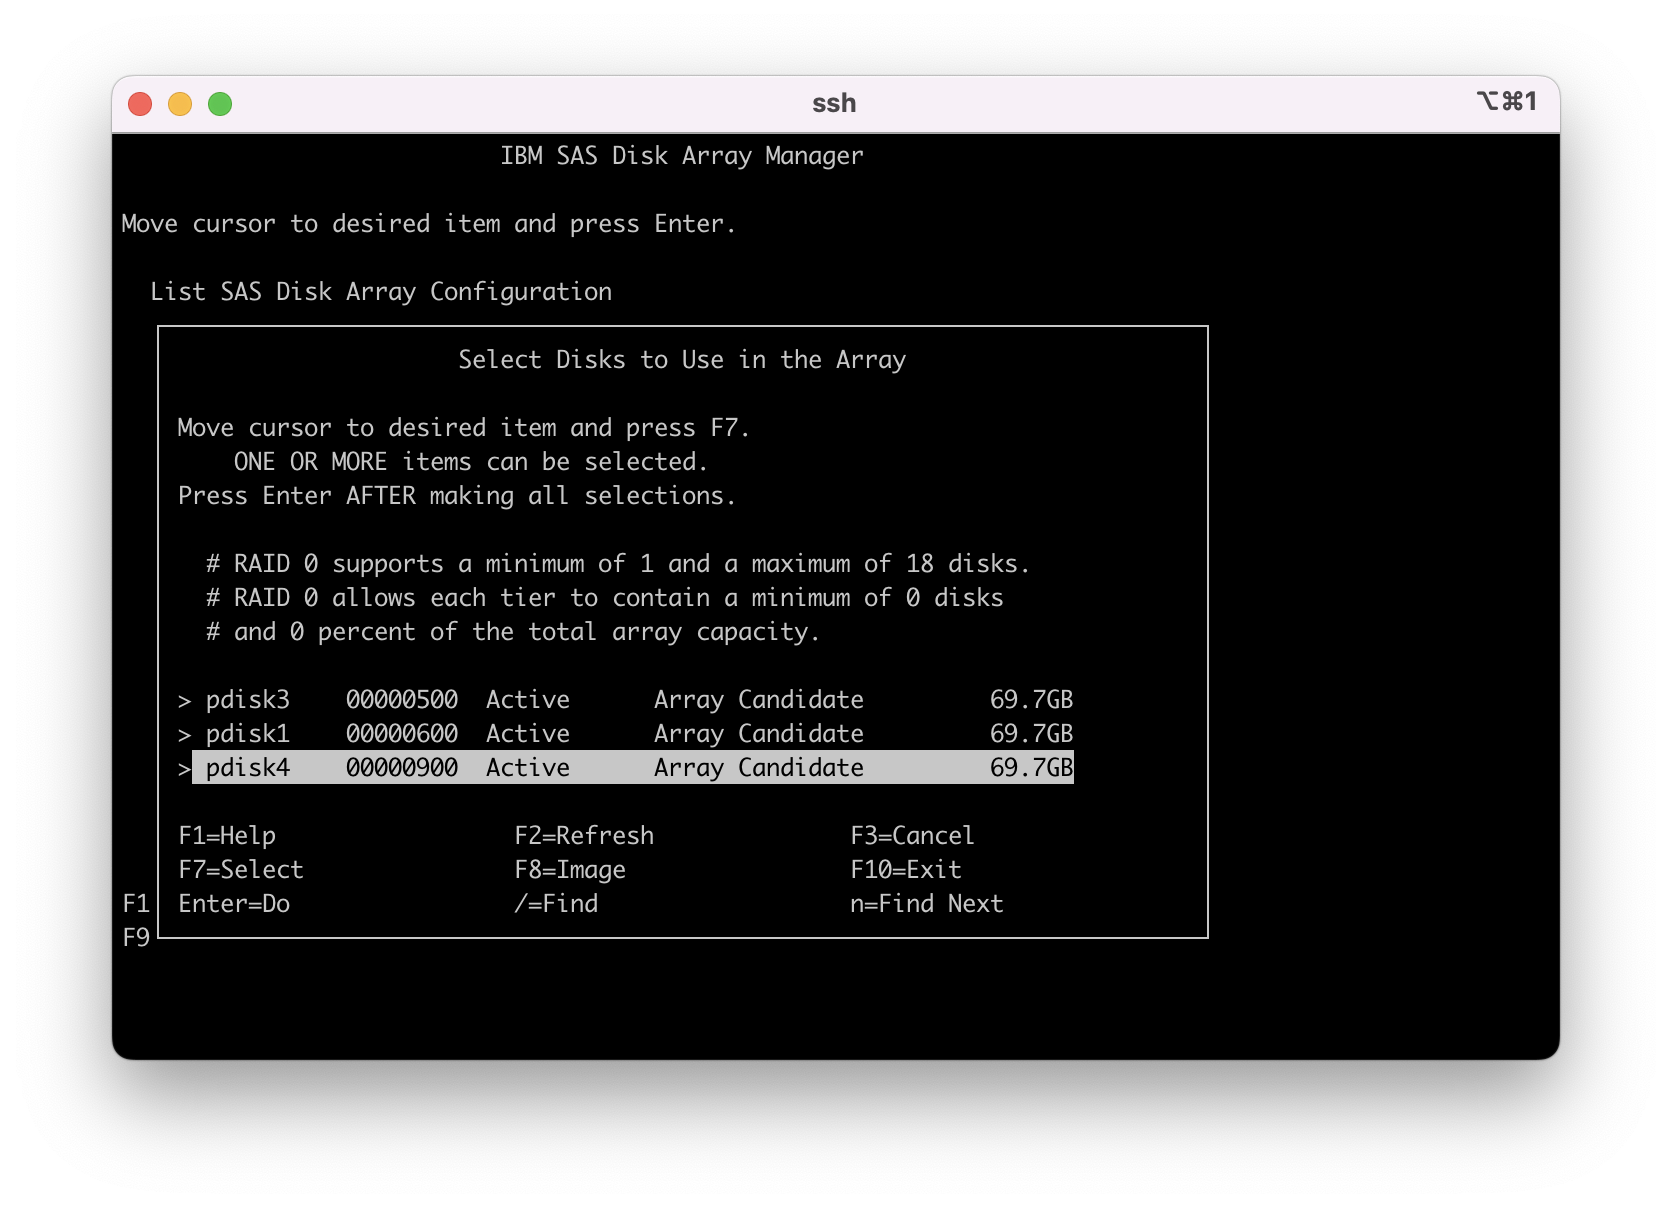
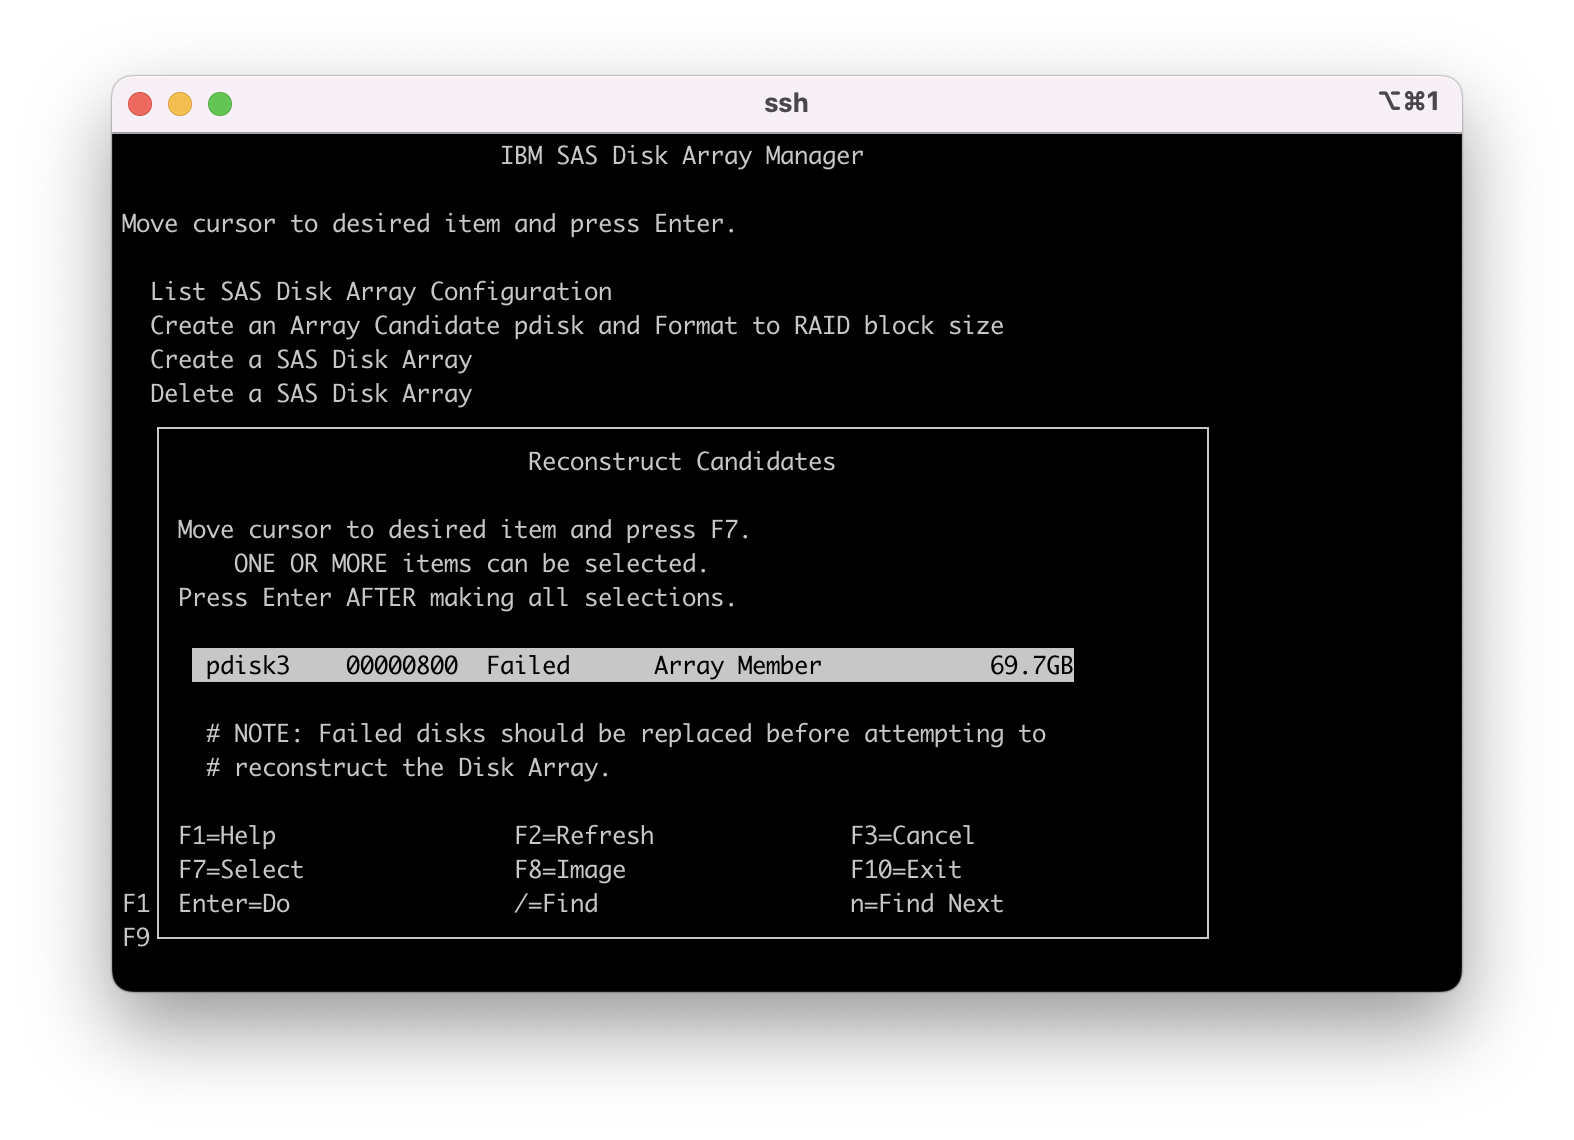
3.13 - You get a window that pops up and displays your pdisk that was replaced. Ensure the cursor highlights the pdisk, then press F7 or ESC 7 to select this disk unit. Once selected, press enter and the reconstruct process starts.
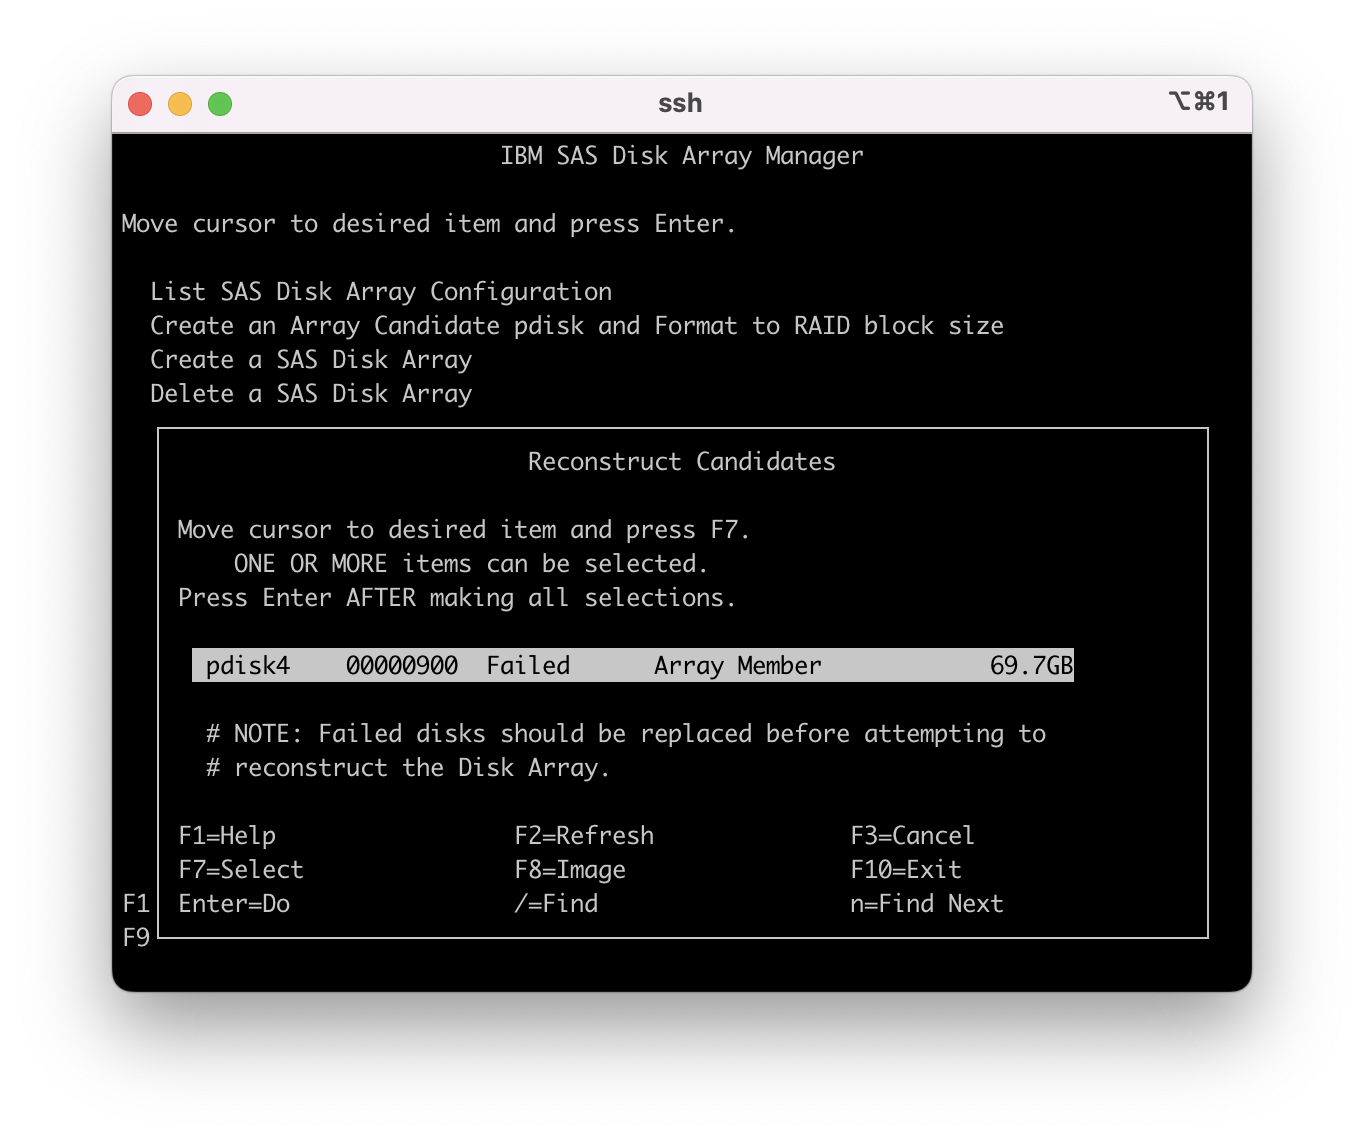
Now that it is selected you see the ">" preceding the pdisk.

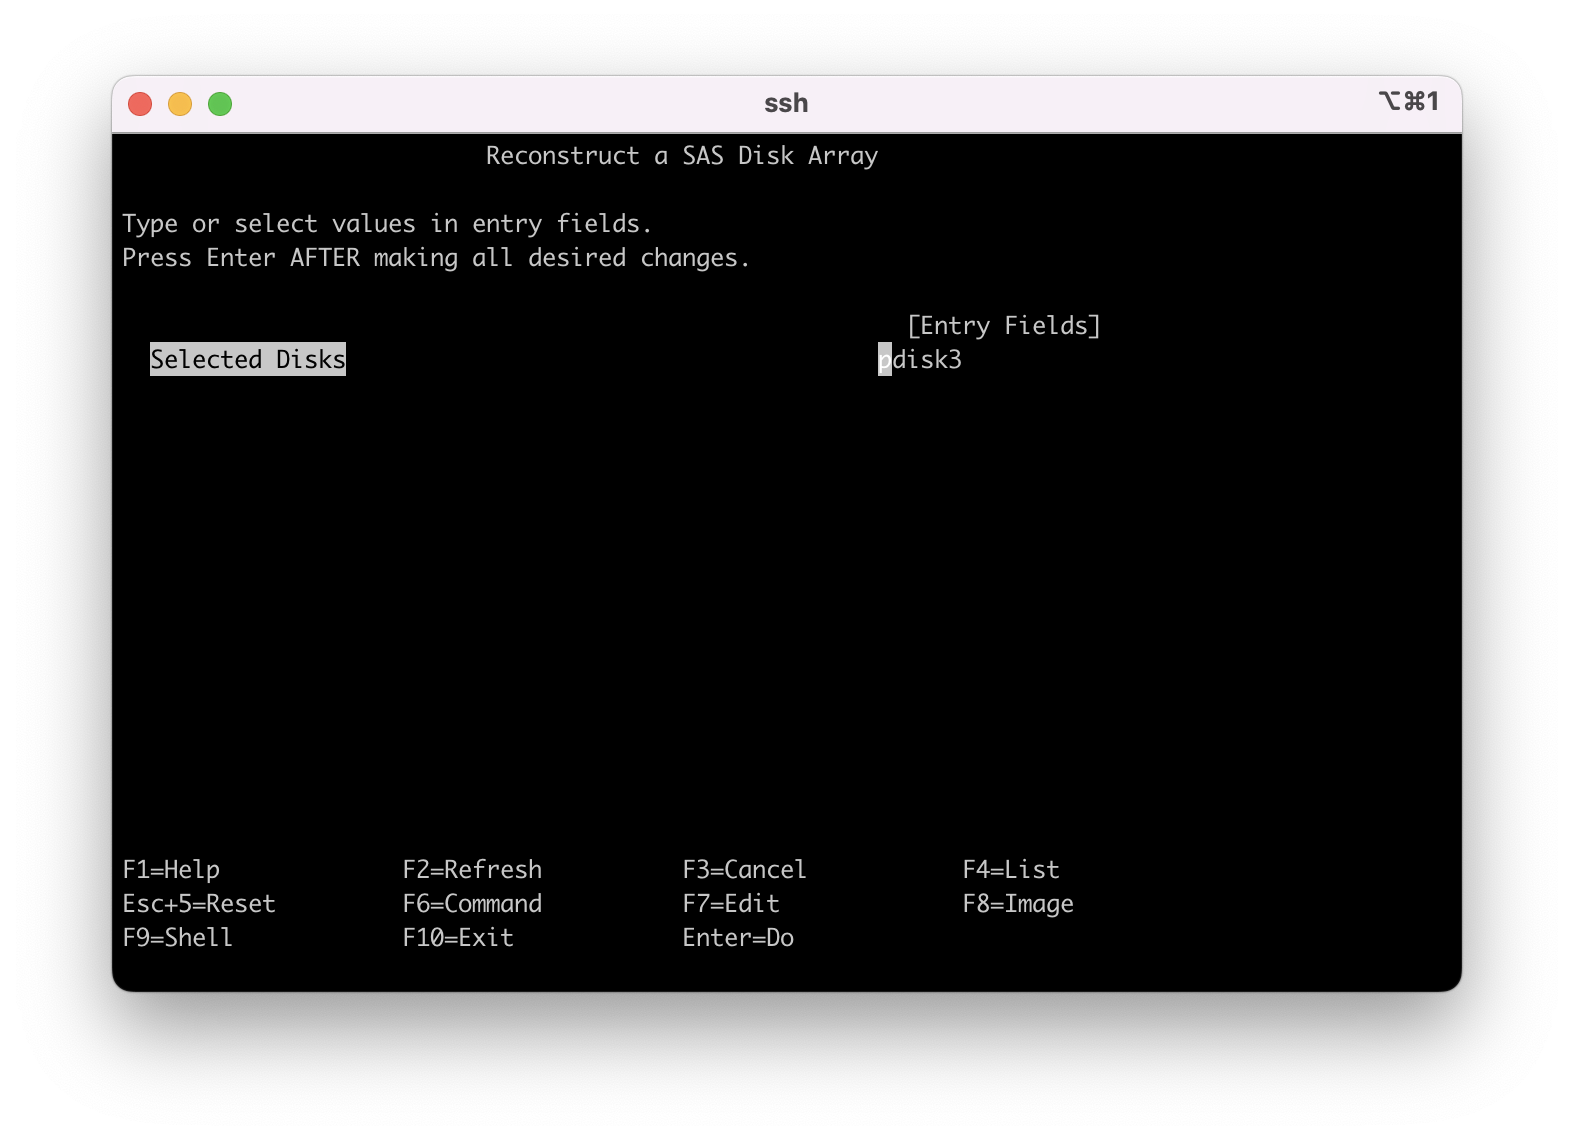
3.14 - You get a summary display of the pdisk that you selected, press enter on the keyboard and the reconstruct starts and it returns you to the main menu.

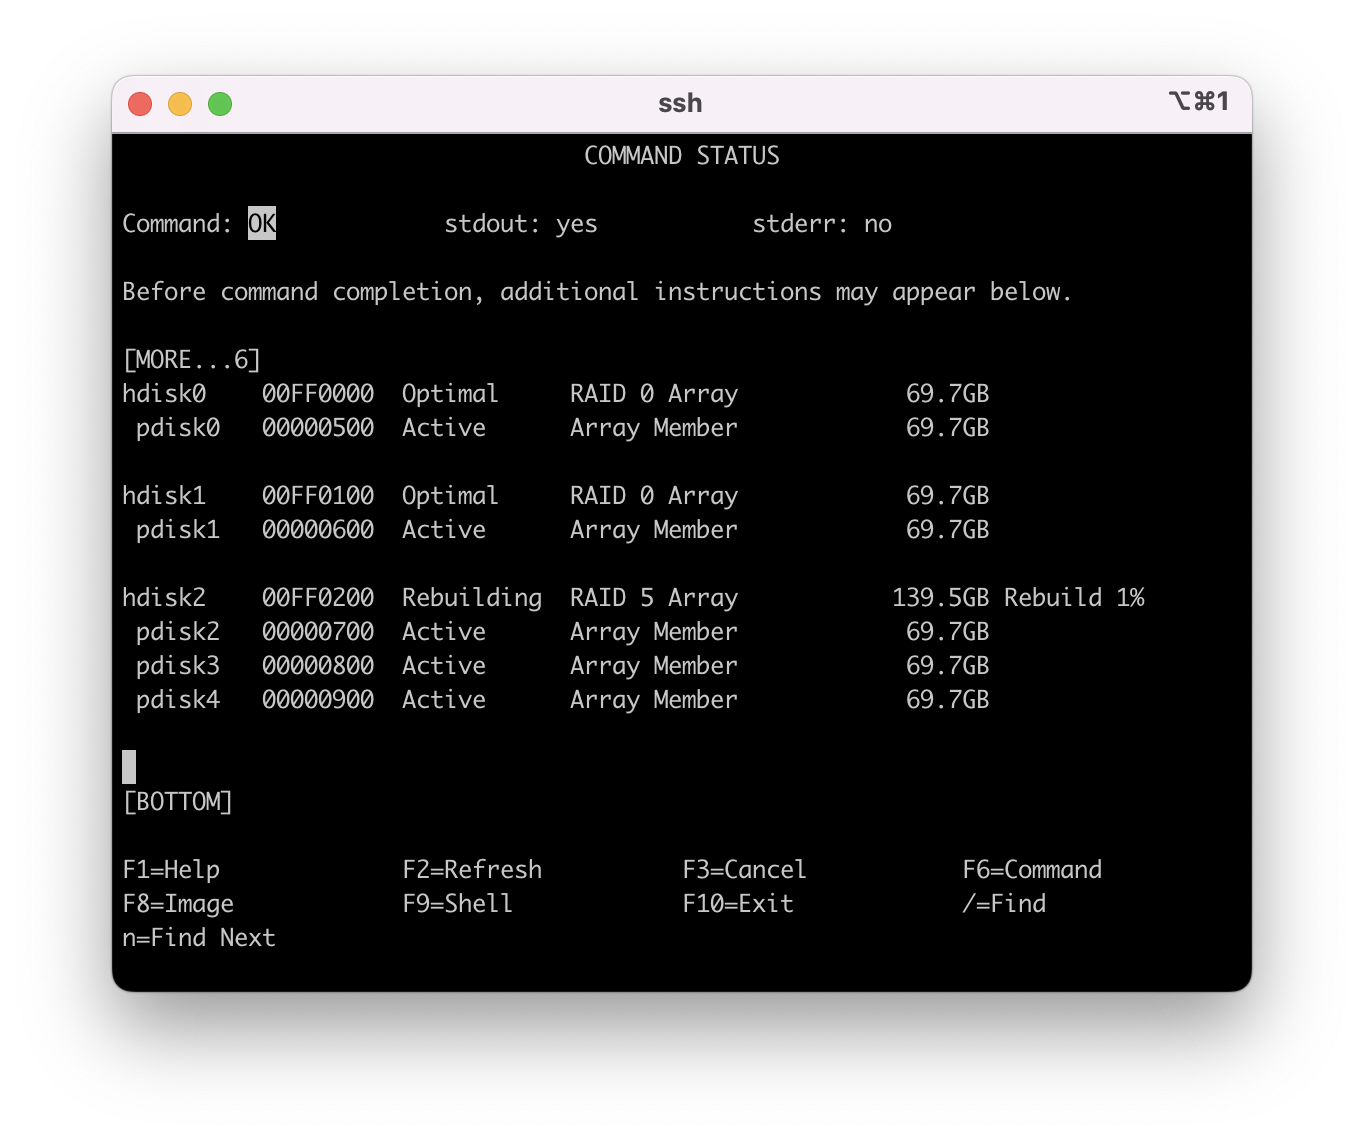
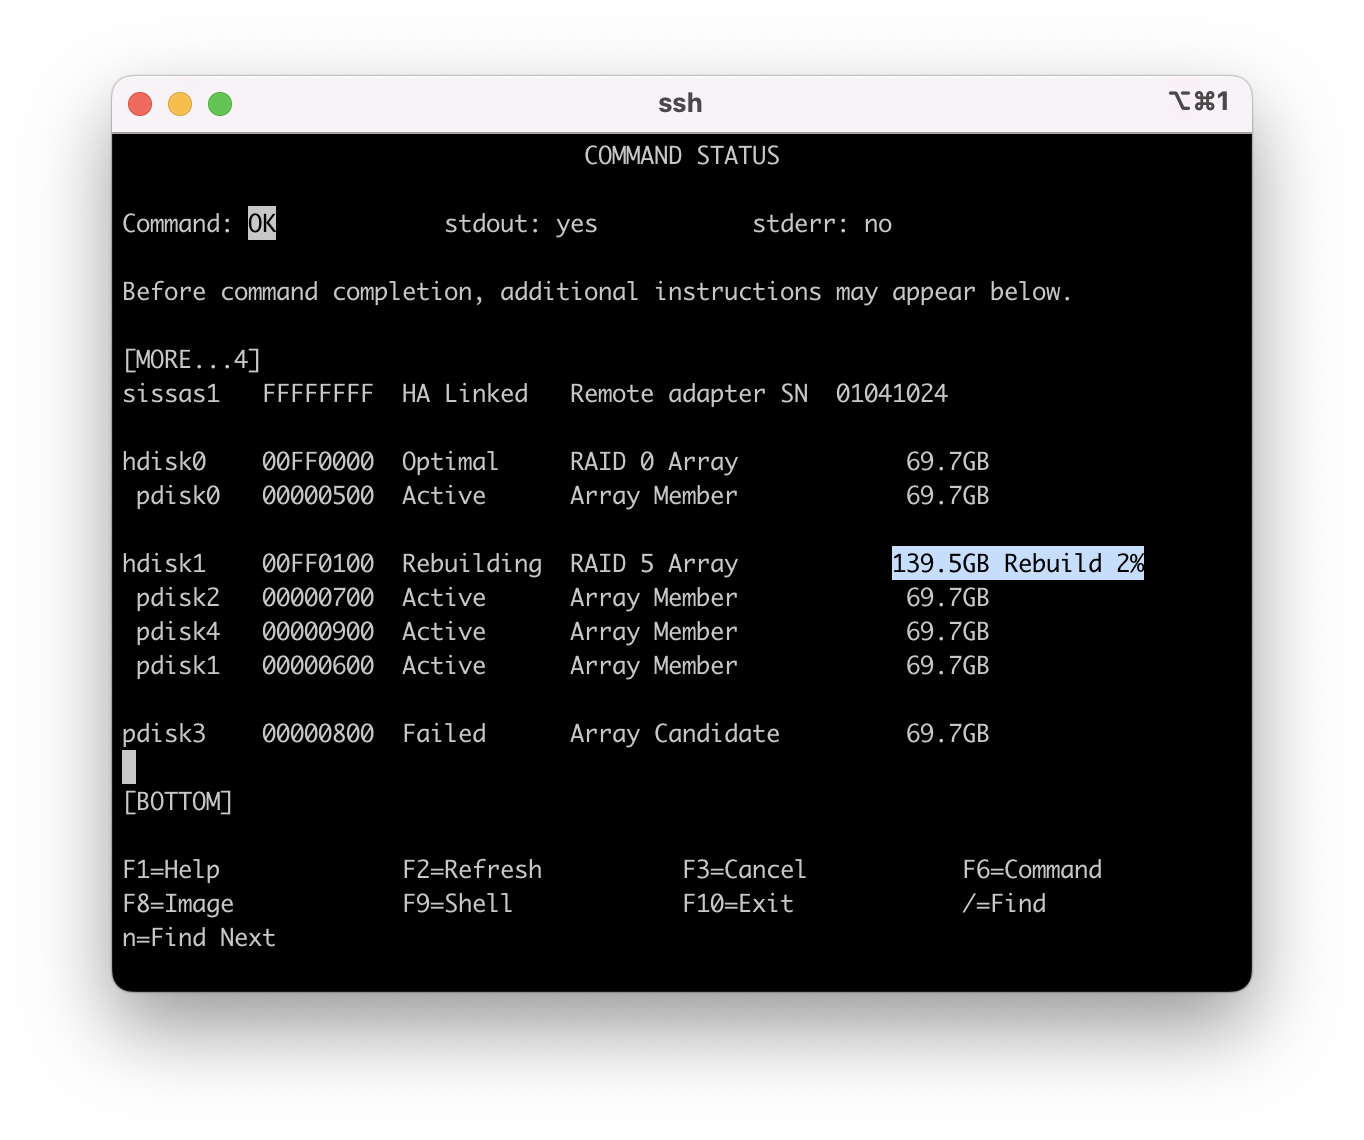
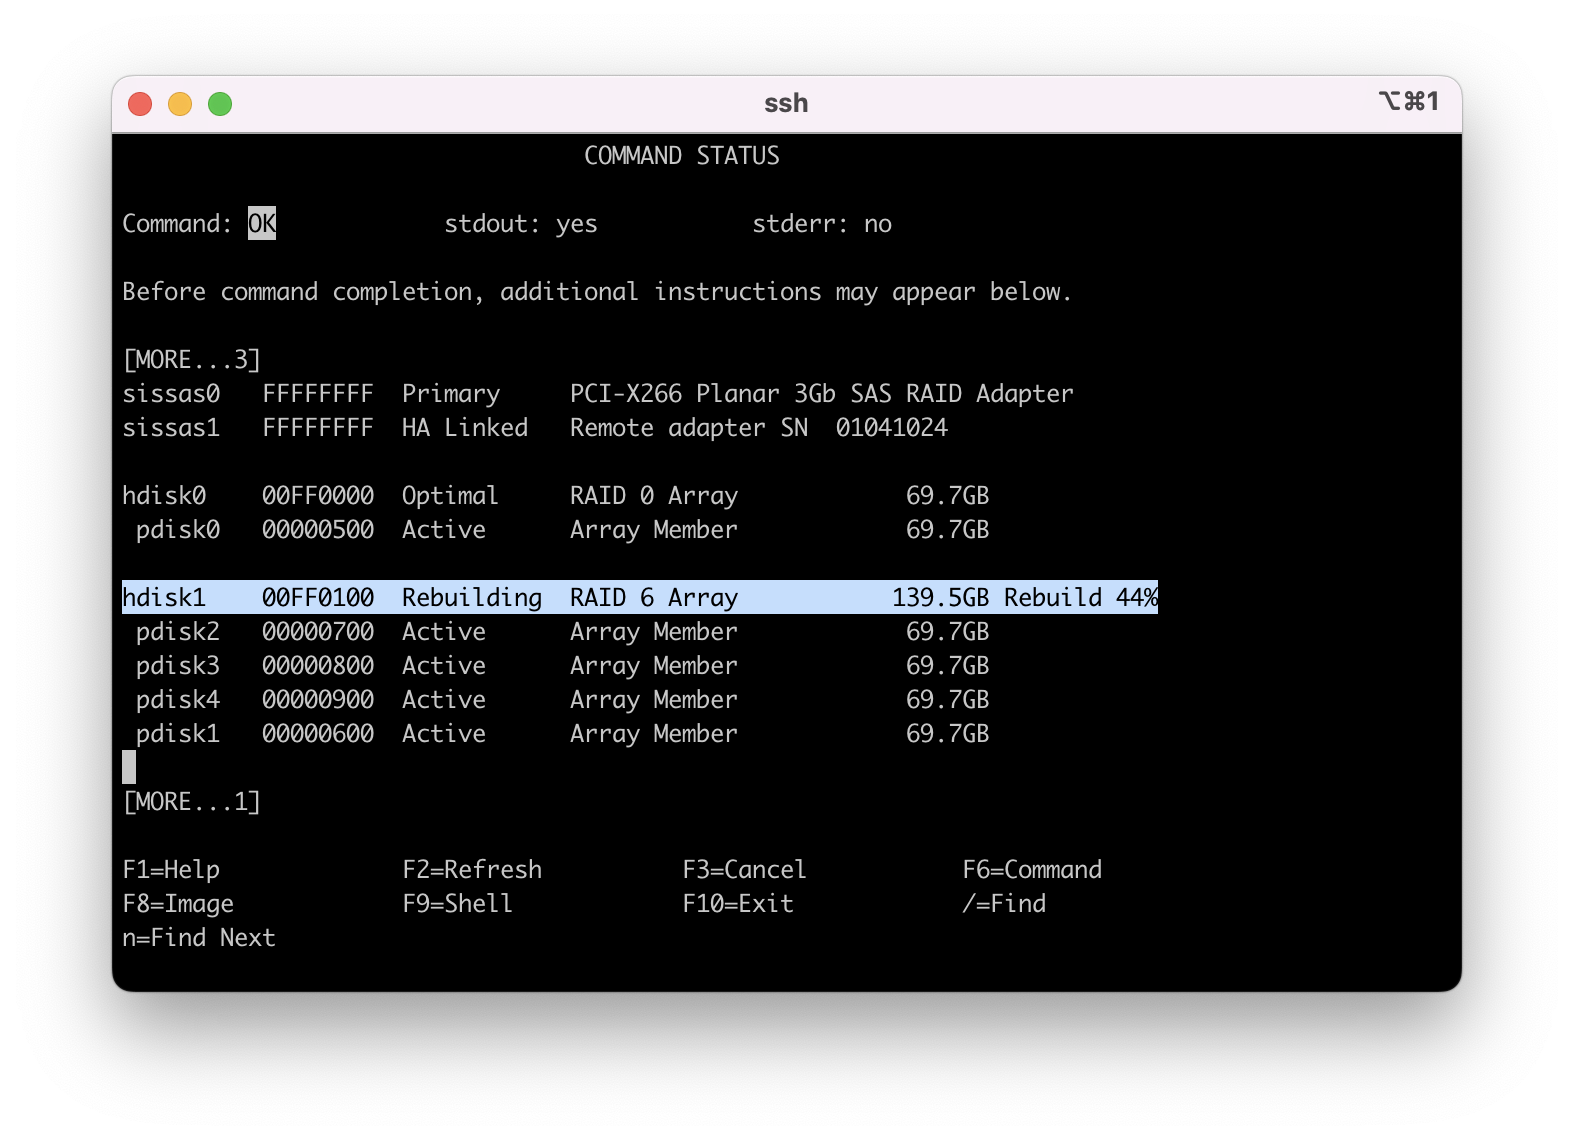
3.15 - You can monitor the rebuild status by selecting "List SAS Disk Array Configuration" from the main menu "IBM SAS Disk Array Manager" (Steps 5A through 5C). In the next example, cursor down to see the target hdisk array and pdisk.
Note: The rebuild started and is 1% rebuilt.
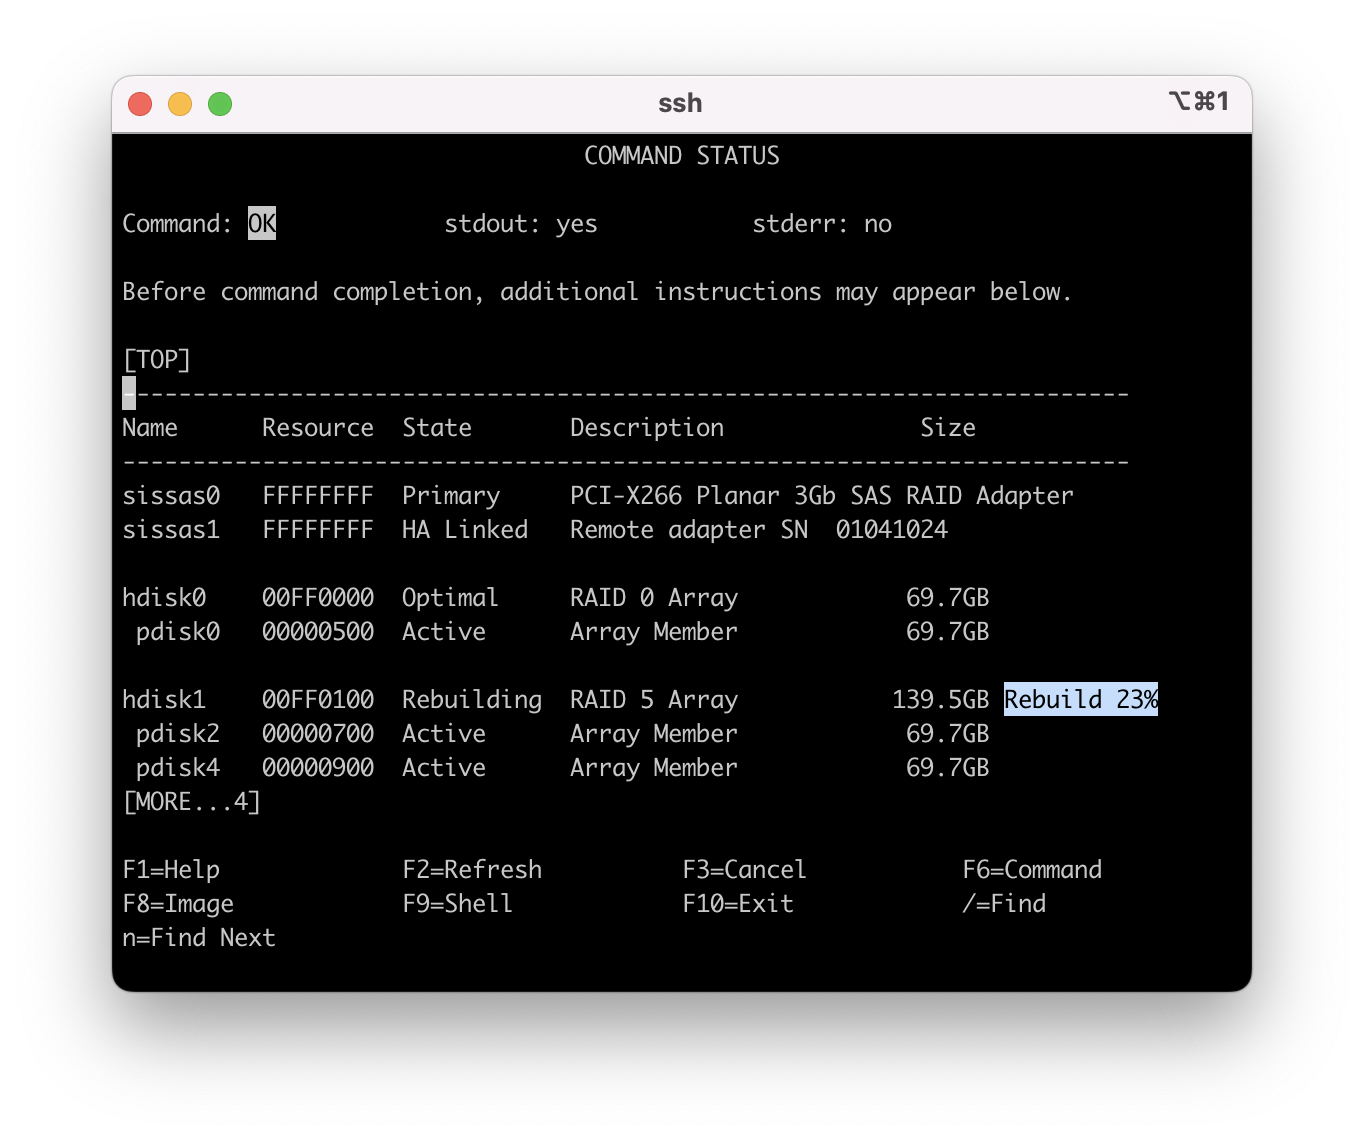
3.16 - To recheck the status and progress of the rebuild you have to F3 or ECS 3 back one menu and then reselect "List SAS Disk Array Configuration" (Steps 3.1 through 3.2).
Note: F2 or ESC 2 does not refresh this screen. You have to back out and go back in to this menu.
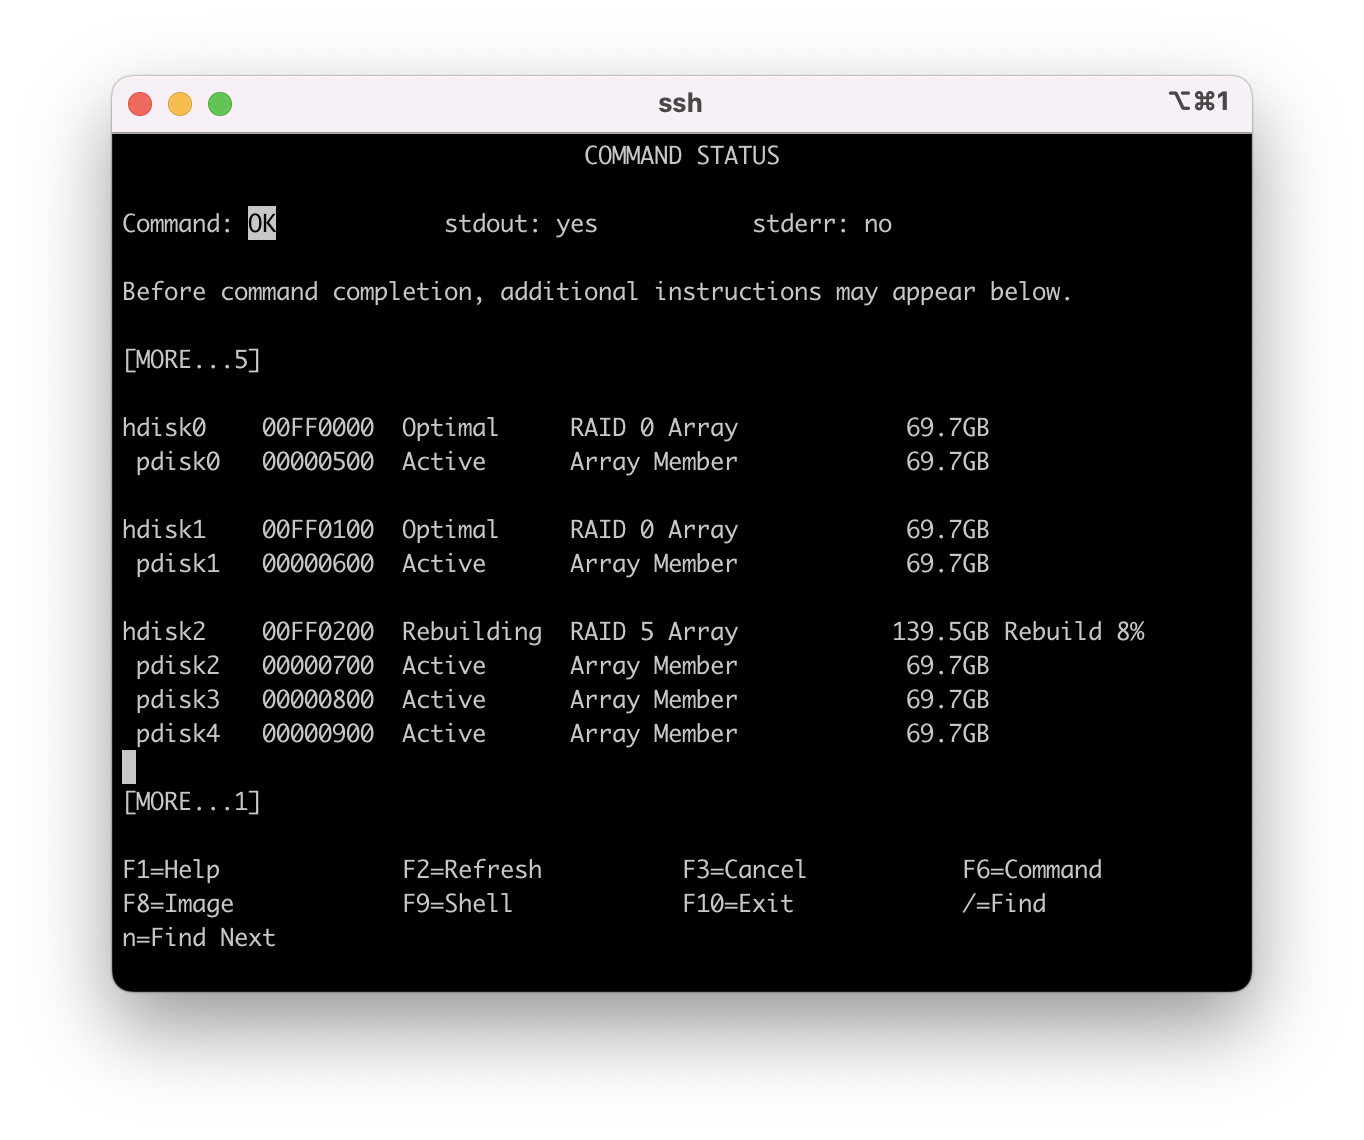
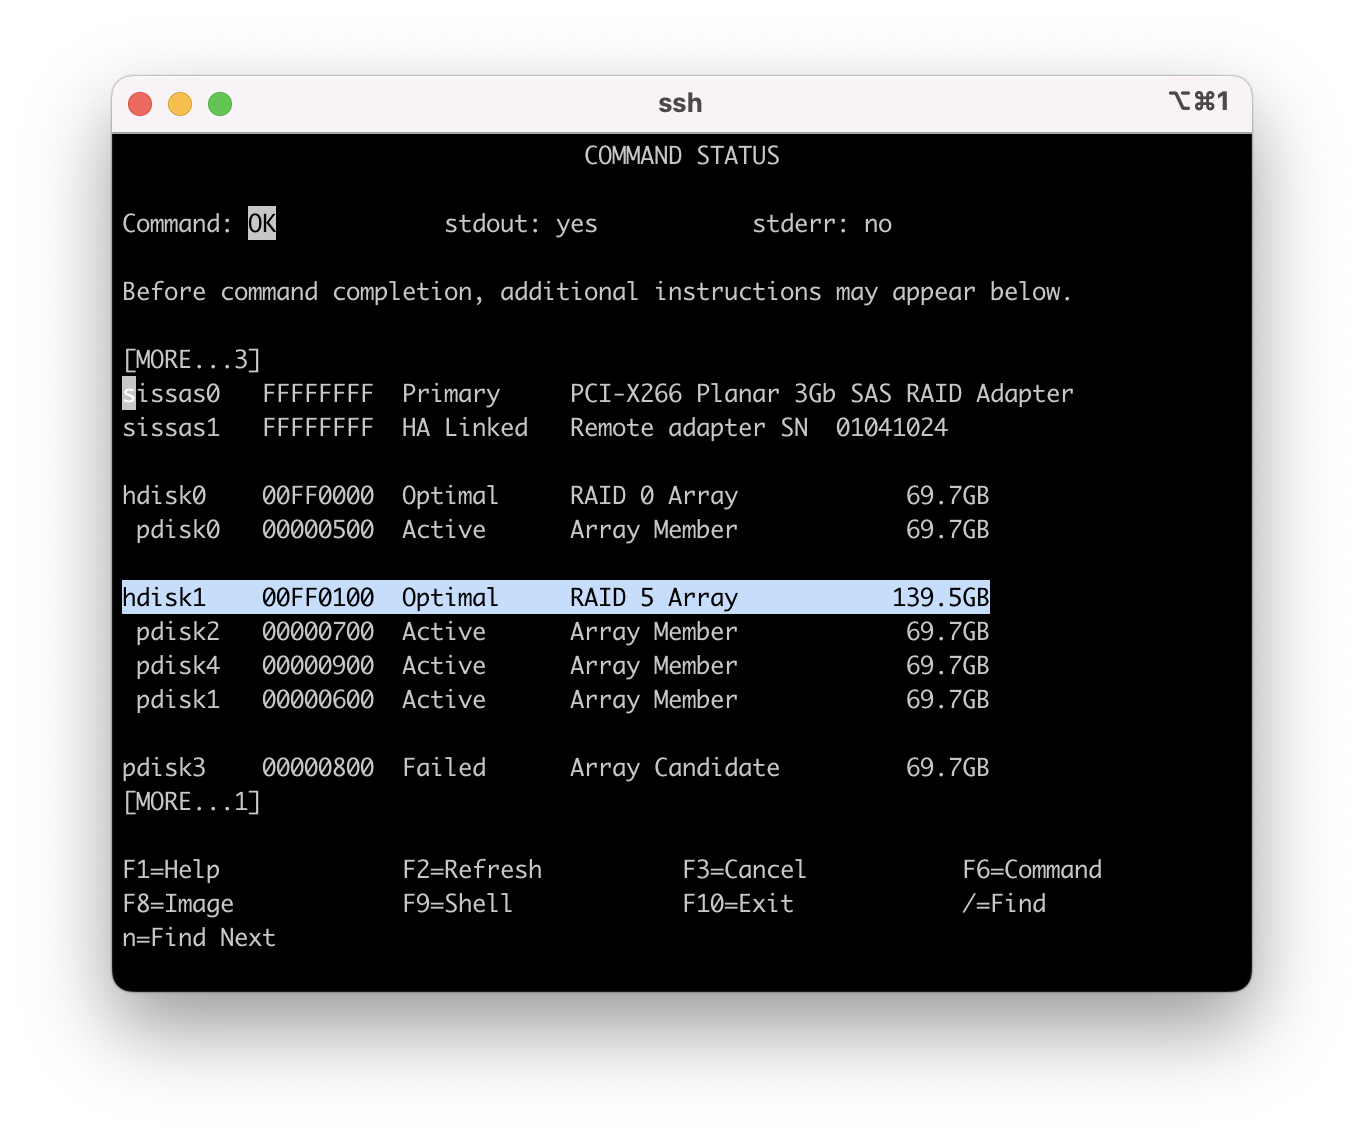
The time to rebuild varies depending on the size of disk units and arrays, array types and how busy the system is. A test system was used with no workload and it took approximately 60 minutes to complete the "Reconstruct". Do not be too concerned on the time it takes to rebuild as it is done on low priority. Keep checking the status, expect to see it progressing. The rebuild is complete and the array goes to an "Optimal" state.
The "Reconstruct" completed and this service action is now complete.
Procedure 4 - Replacing a pdisk in a protected RAID array that was previously a Hot Spare
Note 1: In a protected array where the array is active or degraded (not failed) there is no need to remove the hdisk from the Volume Group.
# smit sasdam
4.2 - Select "List SAS Disk Array Manager" then select the primary SAS controller that your disk unit is attached to. This menu displays the status of the array.
pdisk3 failed and the array went to a "Degraded" state. The hot spare was not automatically brought into the array and displays this state for a minute or so.
4.7 - Locate the disk unit in the system or IO drawer. Press enter on the keyboard again to remove the disk from the "Identify" state. Use F3 or ESC 3 to go back one menu.
Move the cursor to "Replace/Remove a Device Attached to an SCSI Hot Swap Enclosure Device" and press enter to start the concurrent replacement of the disk unit.
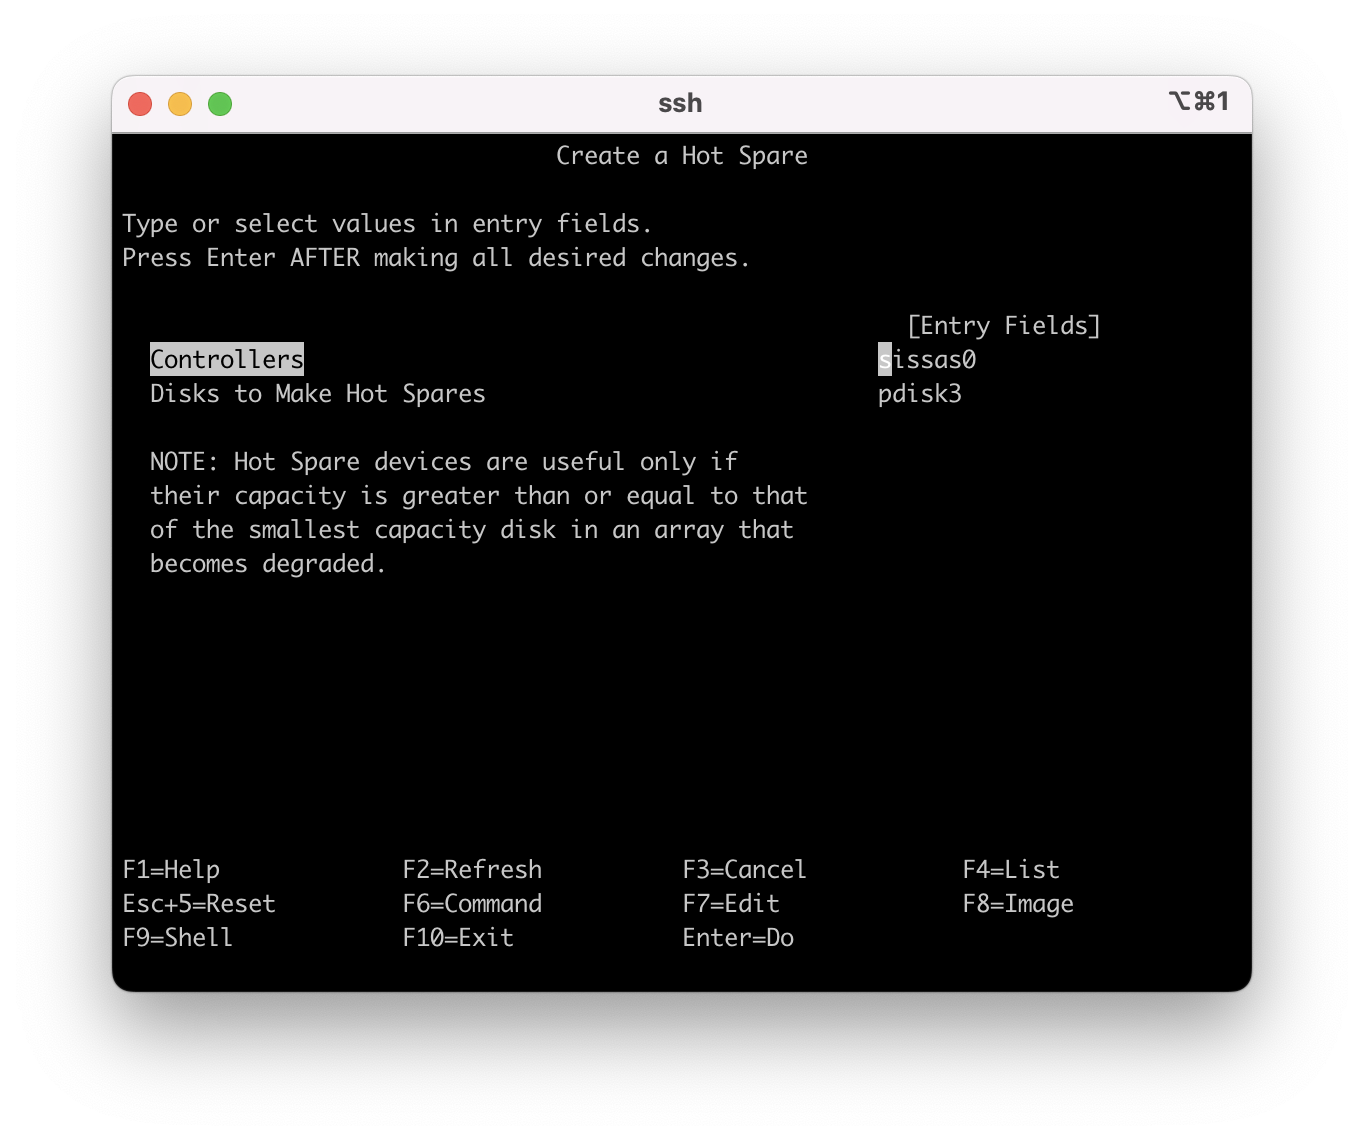
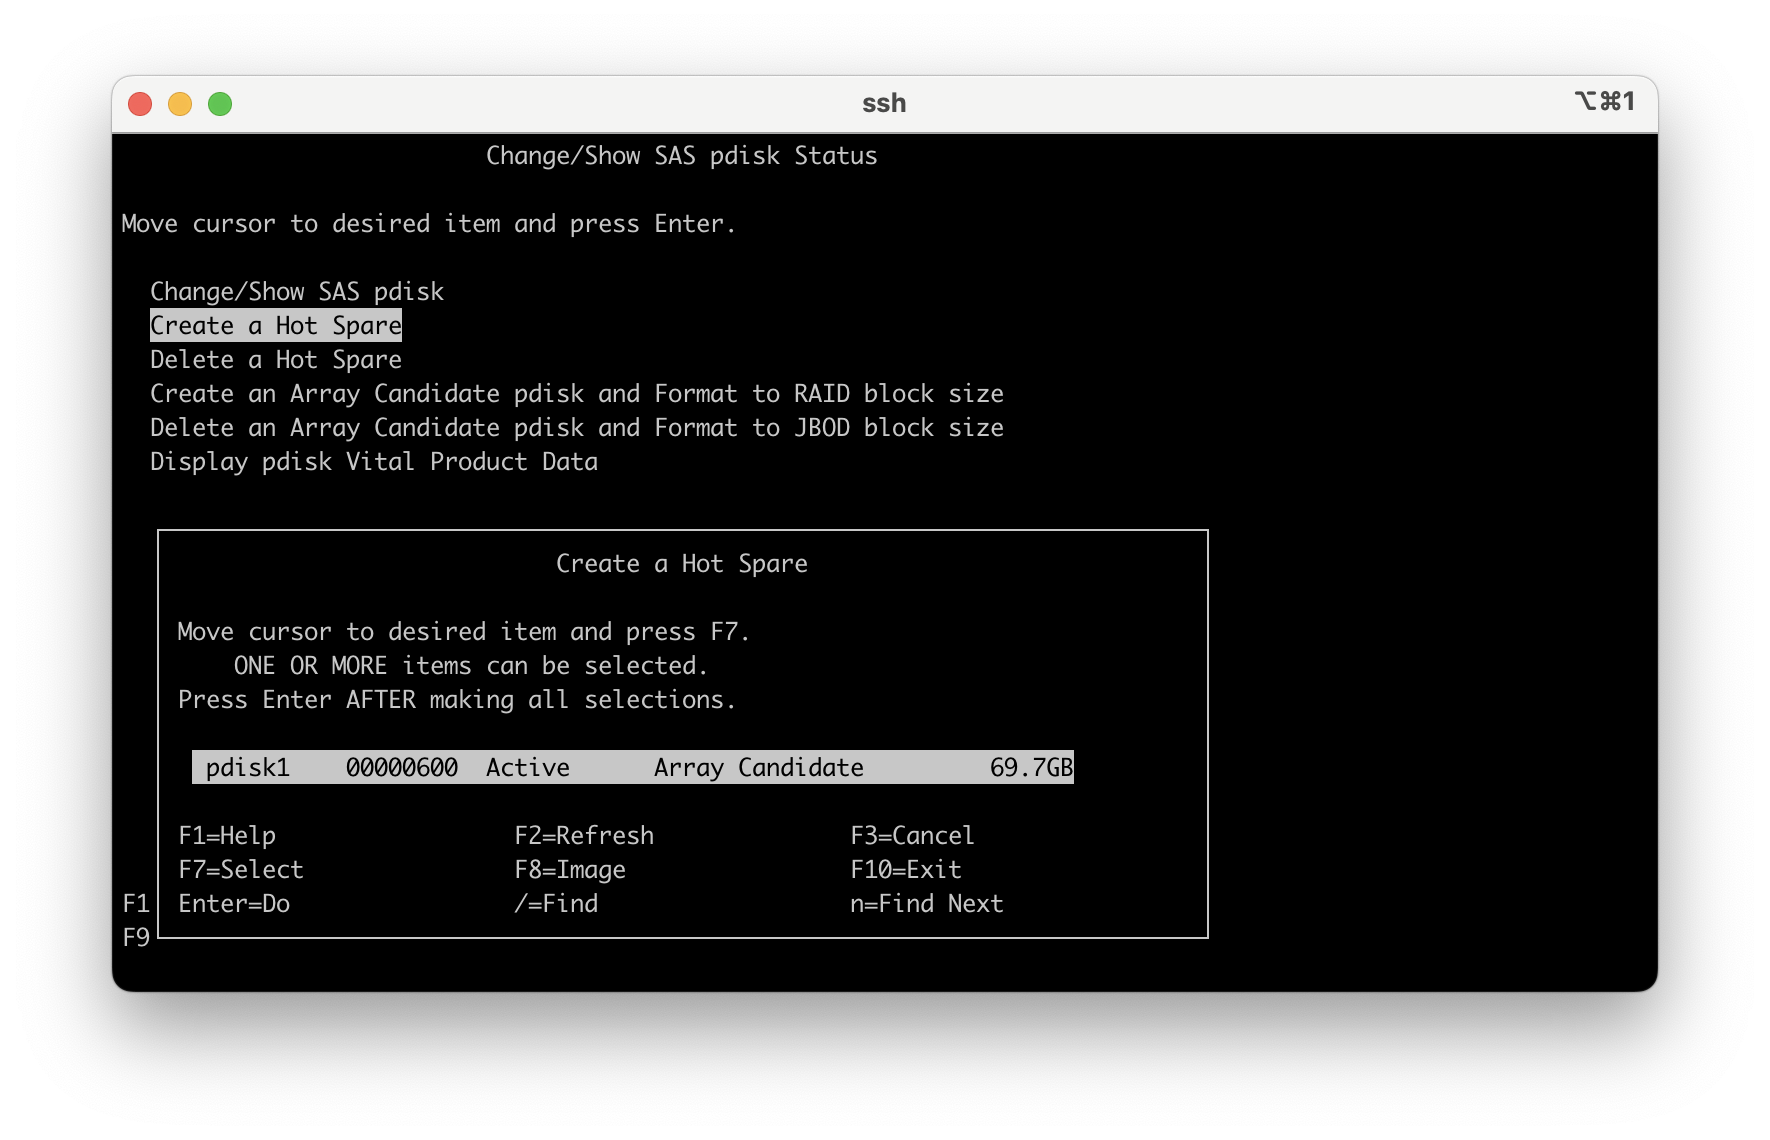
4.15 - A second window pops up where you can select the new pdisk and change it to a hot spare.
4.16 - Press enter once more and you get a summary page
Procedure 5 - Replacing a pdisk in an unprotected RAID0 array with multiple pdisks
The hdisk must be removed from its Volume Group before a hdisk in a RAID0 array with multiple pdisks can be replaced concurrently. These steps are for the client to perform. If you are unfamiliar with performing these tasks, then open a call to IBM Software Support under AIX or for VIOS PowerVM/VIOS.
Note 1: If the hdisk is not mirrored or protected, then you have to back up the data before, if it is possible, and then restore the data after the disk is replaced. It is more common that the hdisk is mirrored, therefore unmirror the hdisk and then mirror it again once the disk is replaced.
Note 2: The error could be a predictive error on the disk unit or it could be a failed disk unit. When it is a predictive failure and the disk is still active (shows a normal state), it would be a good time to take a full backup of the Volume Group while data is still okay. If the pdisk is failed, the hdisk still needs to be removed from the VG and then the array deleted.
5.1 - If assistance is needed in backing up data and removing the Volume Group for the hdisk array then open a Software Case from IBM support under AIX or VIOS/PowerVM.
Contact IBM to open a case:
-For electronic support, visit the IBM Support Community:
https://www.ibm.com/mysupport
-If you require telephone support, visit the web page:
https://www.ibm.com/planetwide/
5.2 - Confirm the hdisk in question is not attached to a VG,
Example 01 - hdisk2 is still showing attached to a VG:
# lspv
hdisk1 00f68b243d6a3920 rootvg active
hdisk0 00f68b24597a910f rootvg active
hdisk2 00f68b24597e6e8c datavg active <== with a VG attached the array cannot be deleted
#
Example 02 - hdisk2 is properly removed from the VG. The pdisk can be replaced concurrently.
# lspv
hdisk1 00f68b243d6a3920 rootvg active
hdisk0 00f68b24597a910f rootvg active
hdisk2 00f68b245dcefb96 None <== you need to see "None" here
5.3 - First we need to list the array status. On the command line enter "smit sasdam", select "List SAS Disk Array Configuration".
5.4 - Move the cursor to the primary SAS adapter with the disk units attached and press enter.
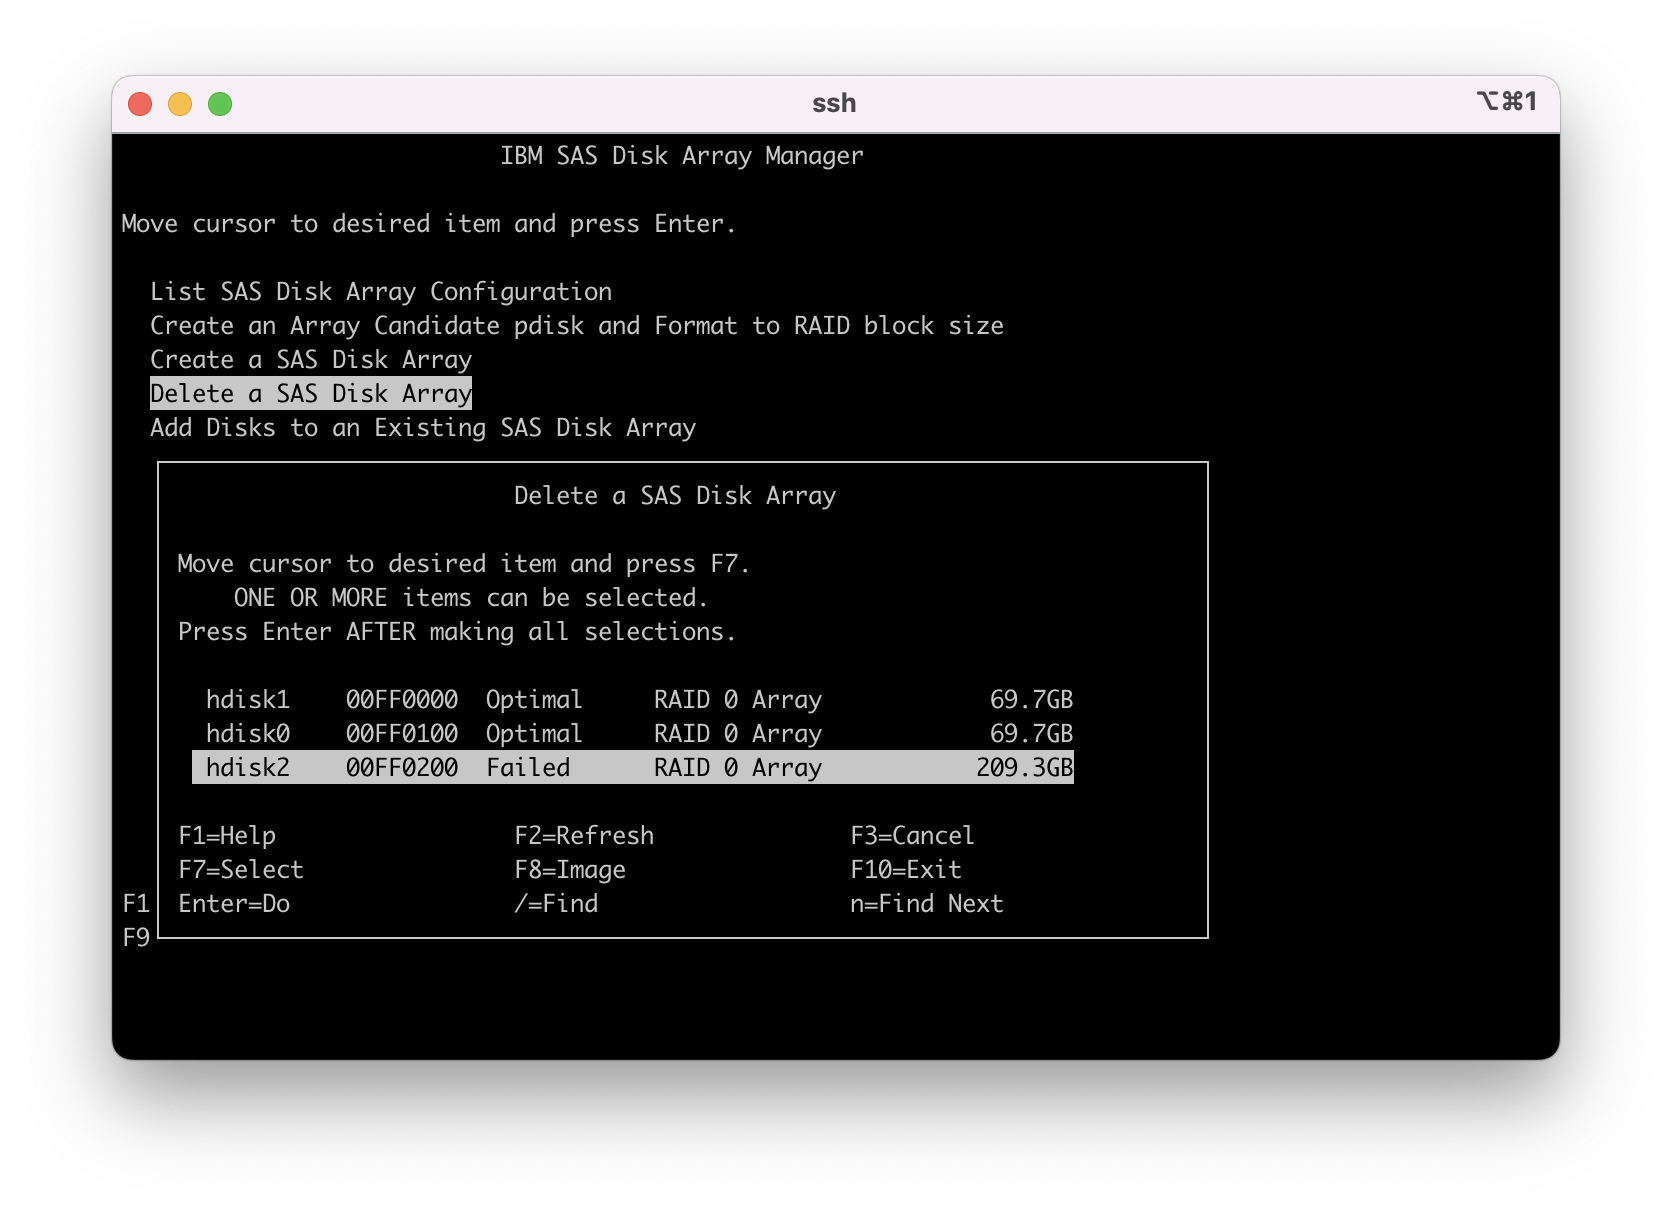
5.5 - This step confirms that pdisk3 is in a 'Failed' state and therefore the hdisk2 RAID0 array is also in a 'Failed' state.

5.6 - Press F3 or ESC 3 to back up one menu and then select 'Delete a SAS Disk Array'. Select the primary SAS adapter that the disk units are attached to.
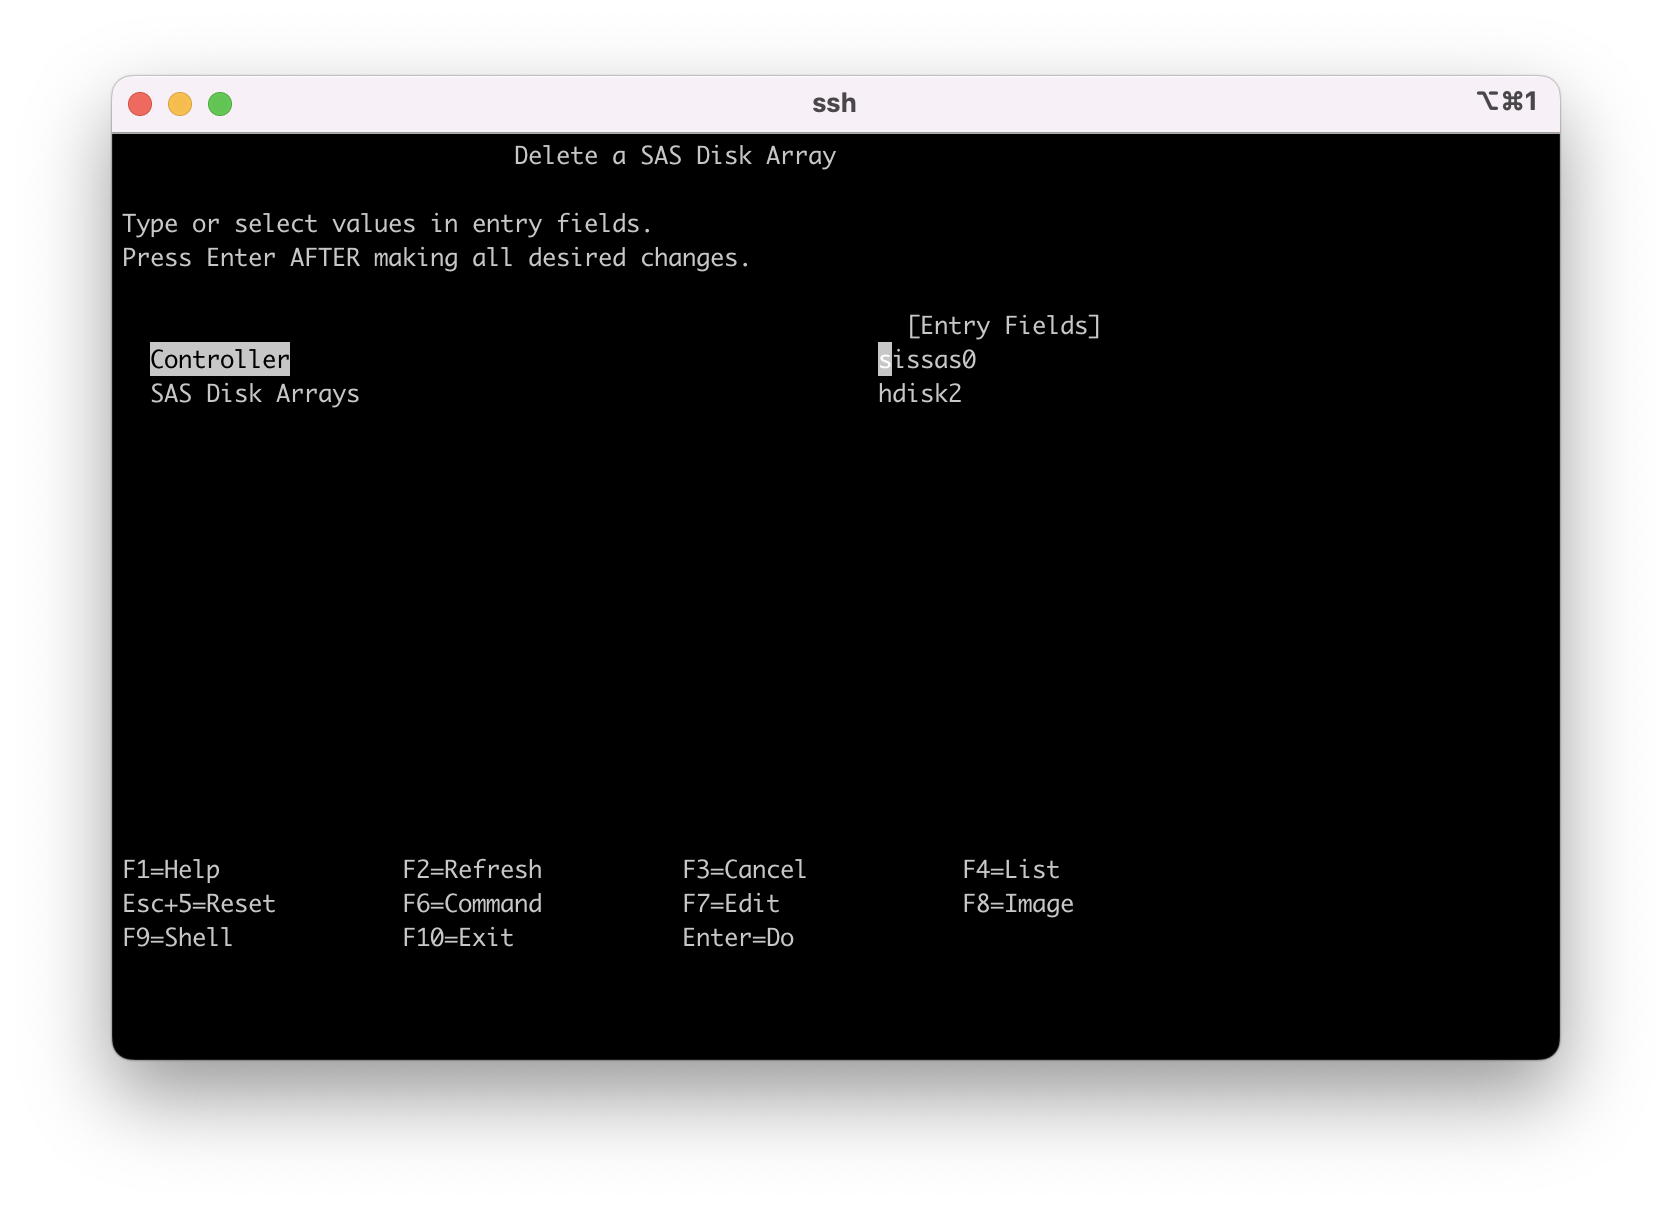
5.7 - Move the cursor to highlight the target hdisk and press enter to delete the array.
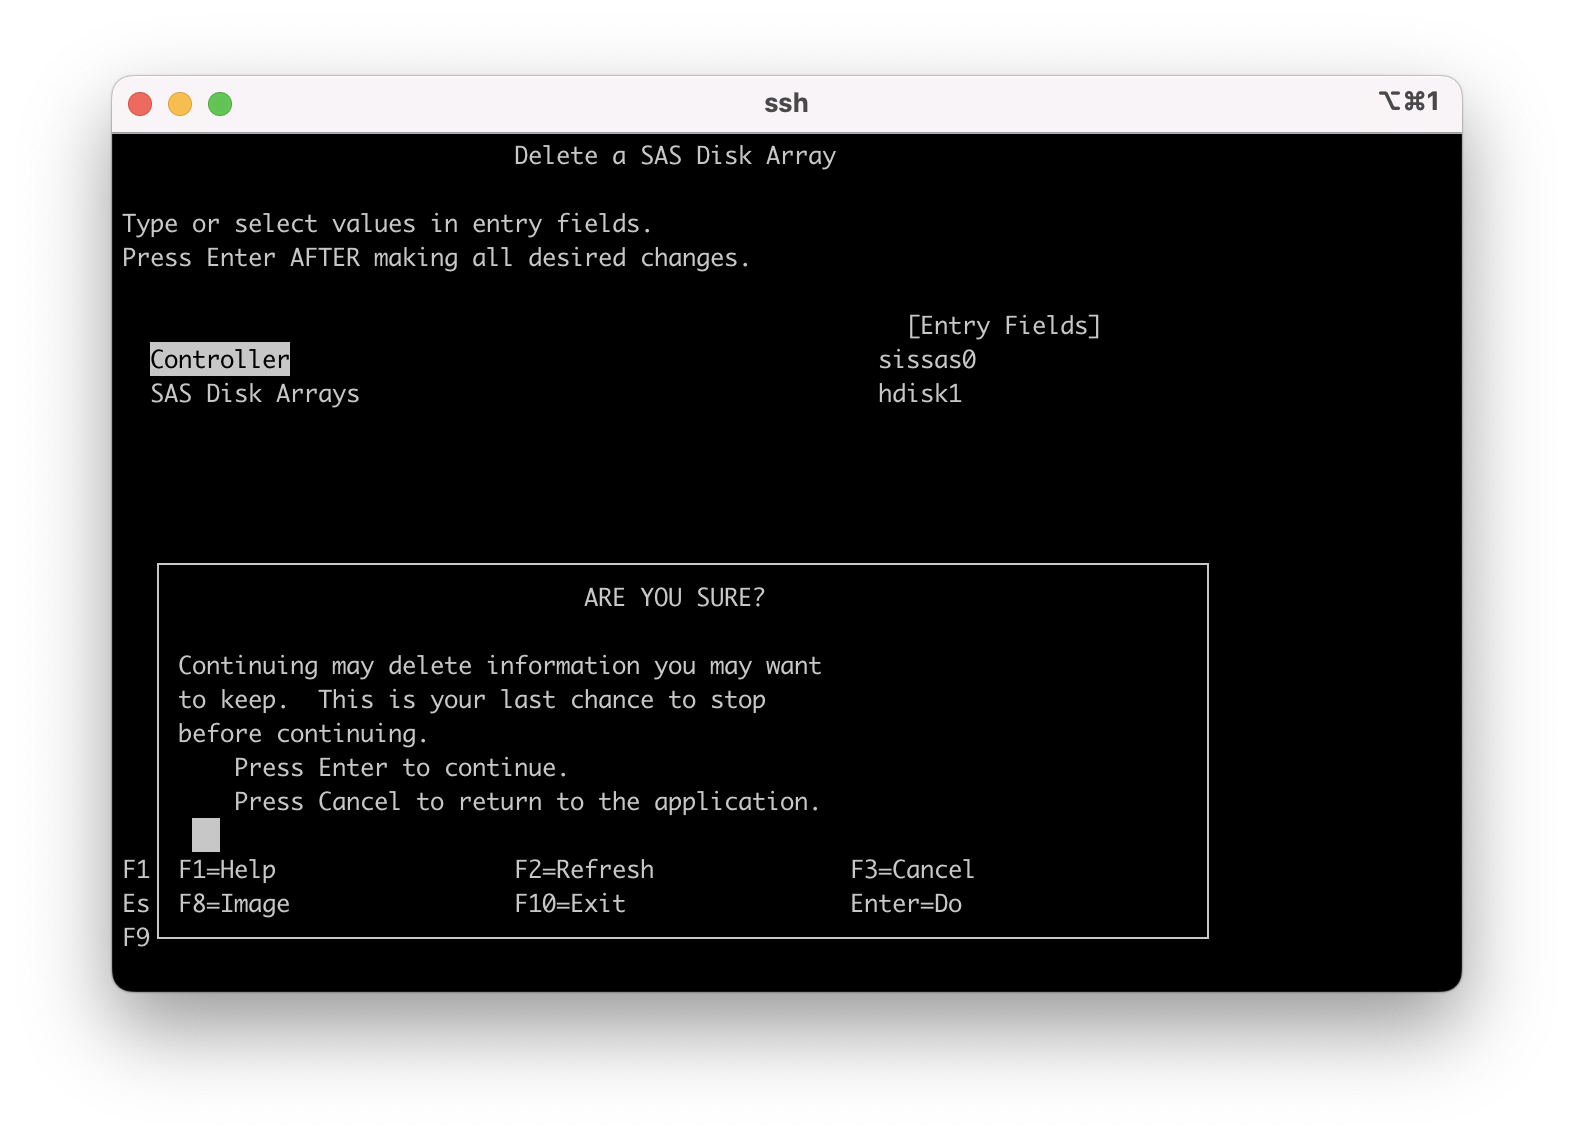
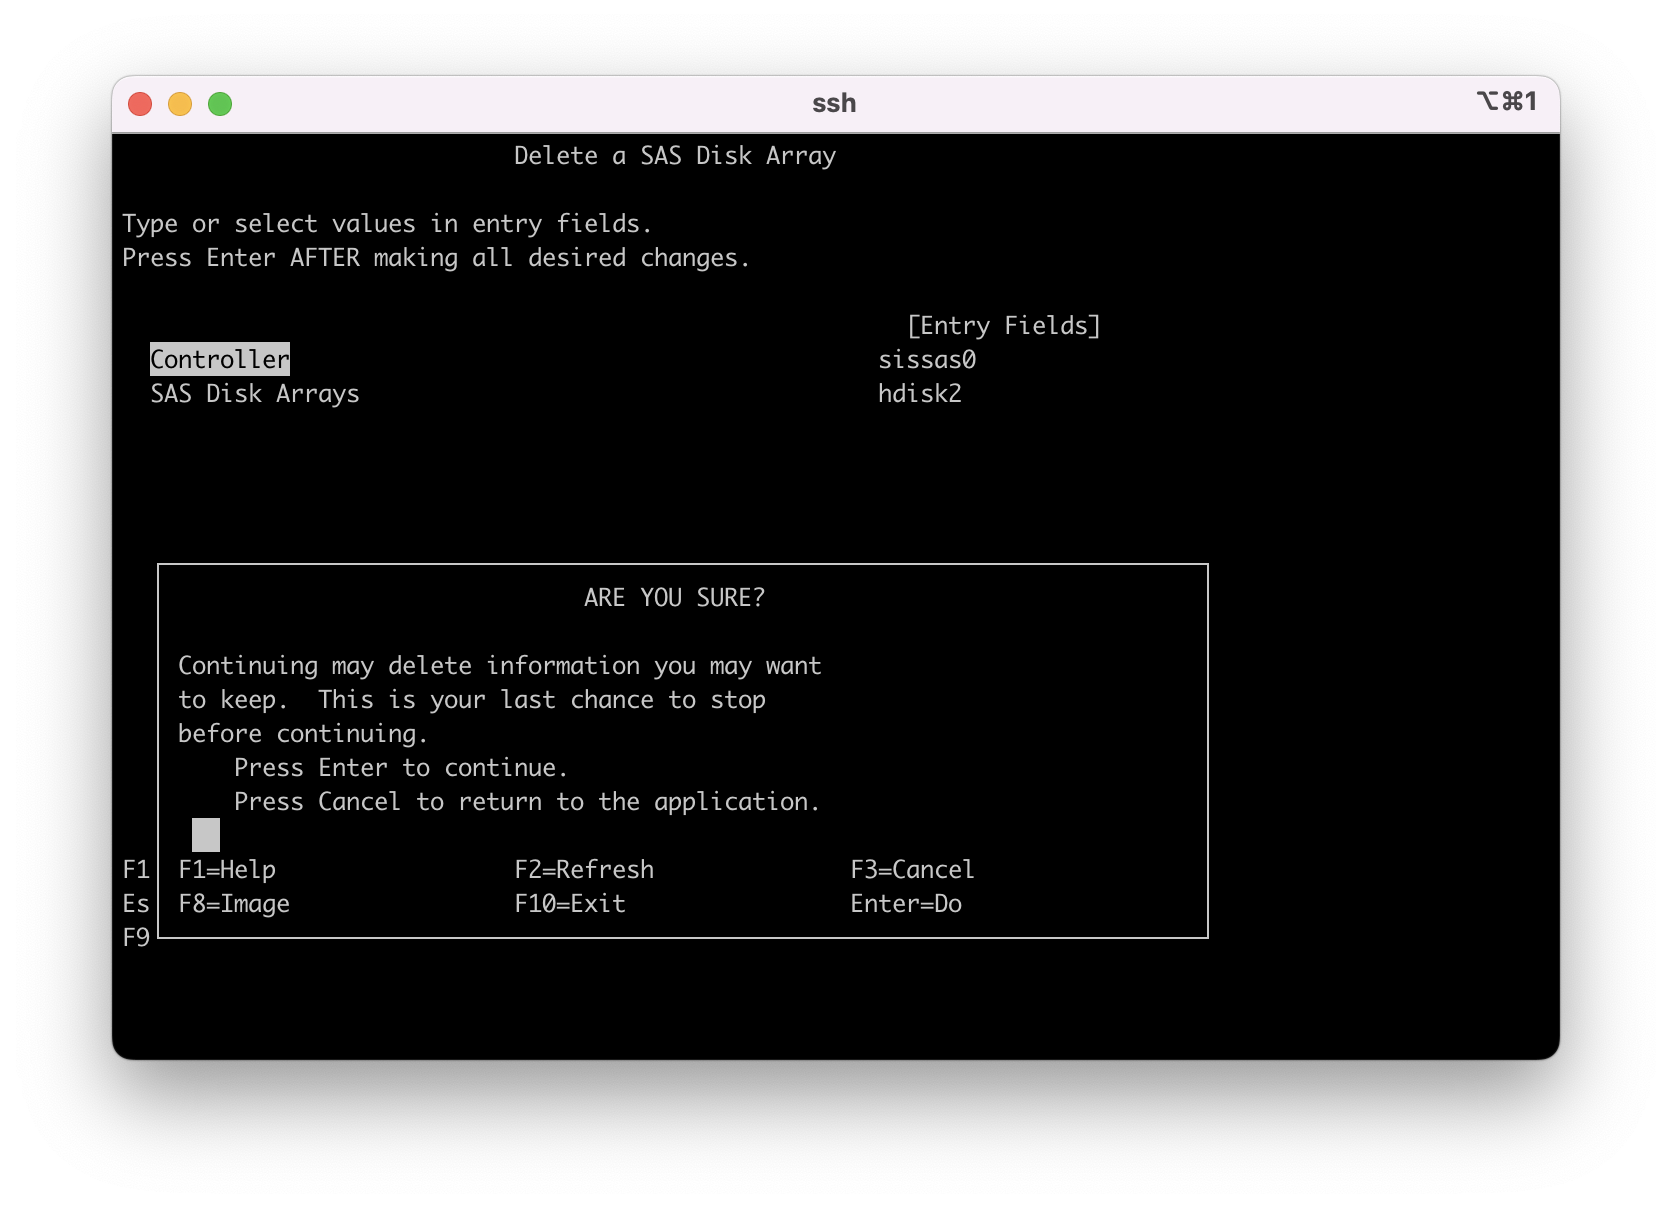
5.8 - A summary screen is displayed. Confirm and press enter to continue. You get one last warning message. Press enter and the array is deleted.
5.9 - The hdisk2 array is deleted.
5.13 - Locate the disk unit in the system or IO drawer. Press enter on the keyboard again to remove the disk from the "Identify" state. Use F3 or ESC 3 to go back one menu.
Move the cursor to "Replace/Remove a Device Attached to an SCSI Hot Swap Enclosure Device" and press enter to start the concurrent replacement of the disk unit.

hdisk1 00f68b243d6a3920 rootvg active
hdisk0 00f68b24597a910f rootvg active
hdisk2 00f68b245dcefb96 None
#
Contact IBM to open a case:
-For electronic support, visit the IBM Support Community:
https://www.ibm.com/mysupport
-If you require telephone support, visit the web page:
https://www.ibm.com/planetwide/
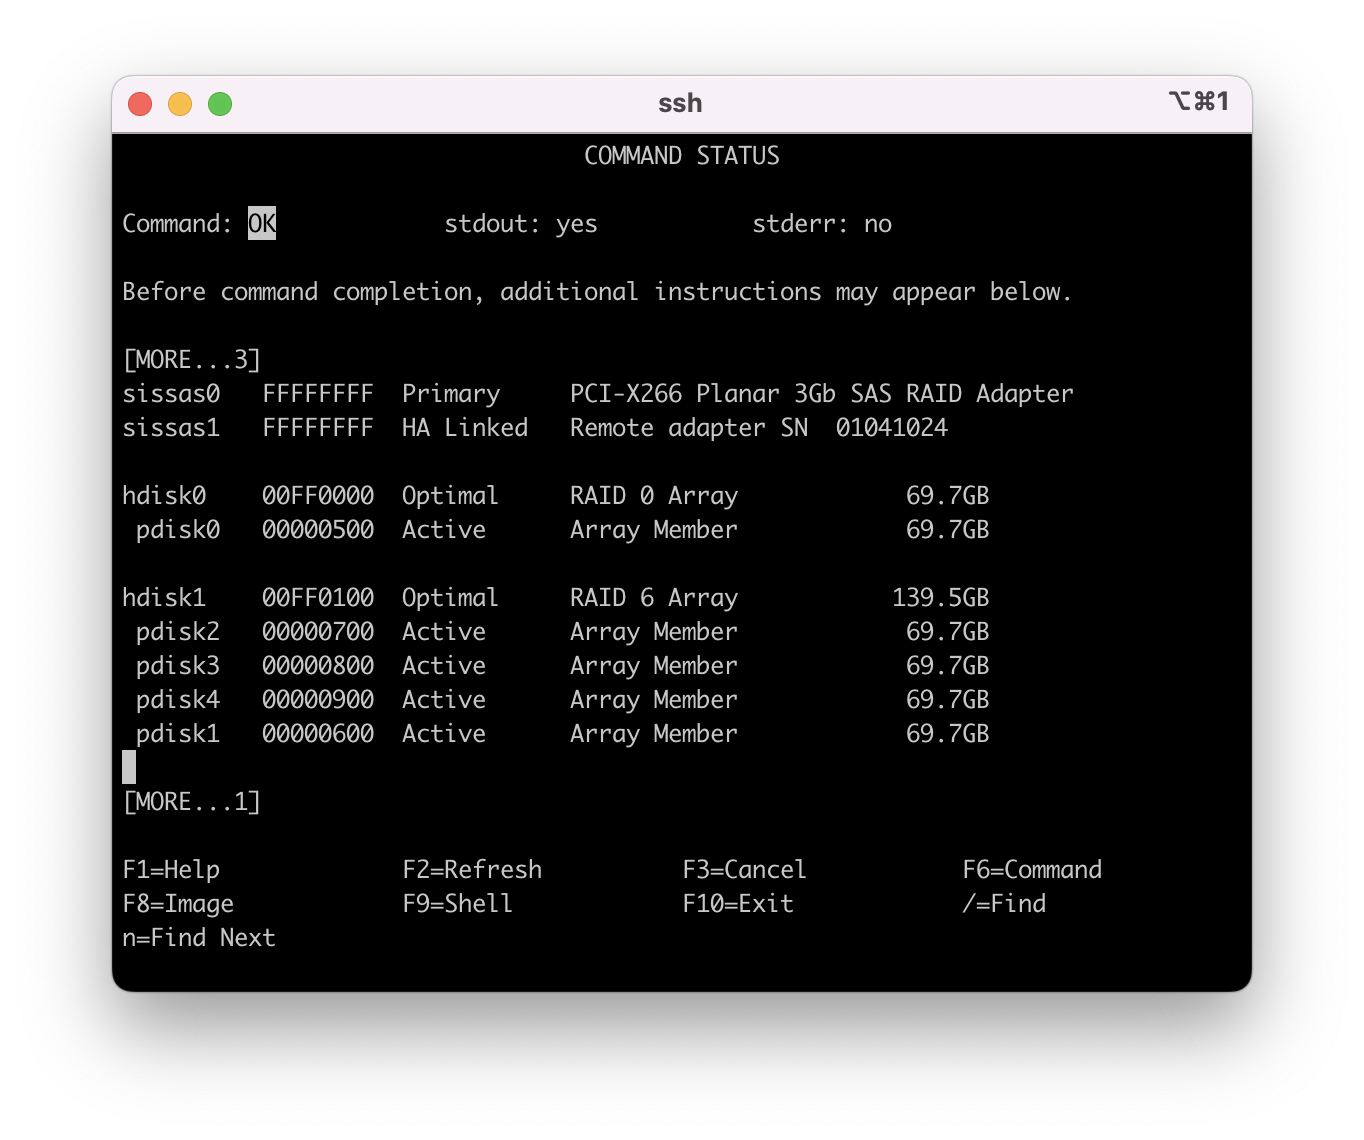
Procedure 6 - Replacing a pdisk in a RAID6 array
RAID6 is similar to RAID5 and RAID10 configured with a hot spare. The difference is that in RAID6 the hot spare is not a physical disk. The hot spare is striped across all disks in the array and when one disk fails the array goes to a degraded state. No hot spare (striping) is available. A second disk unit can fail and data is protected, although with a second disk failure the array is degraded and exposed.
Note 1: In a protected array where the array is active or degraded (not failed) there is no need to remove the hdisk from the Volume Group.
6.1 - In this example we are replacing pdiskx, which is part of a RAID6 array. On the command line enter "smit sasdam", next move the cursor to highlight "List SAS Disk Array Configuration" and press enter.
6.2 - Move the cursor to select the primary SAS controller that the disk to be replaced is attached to and press enter.
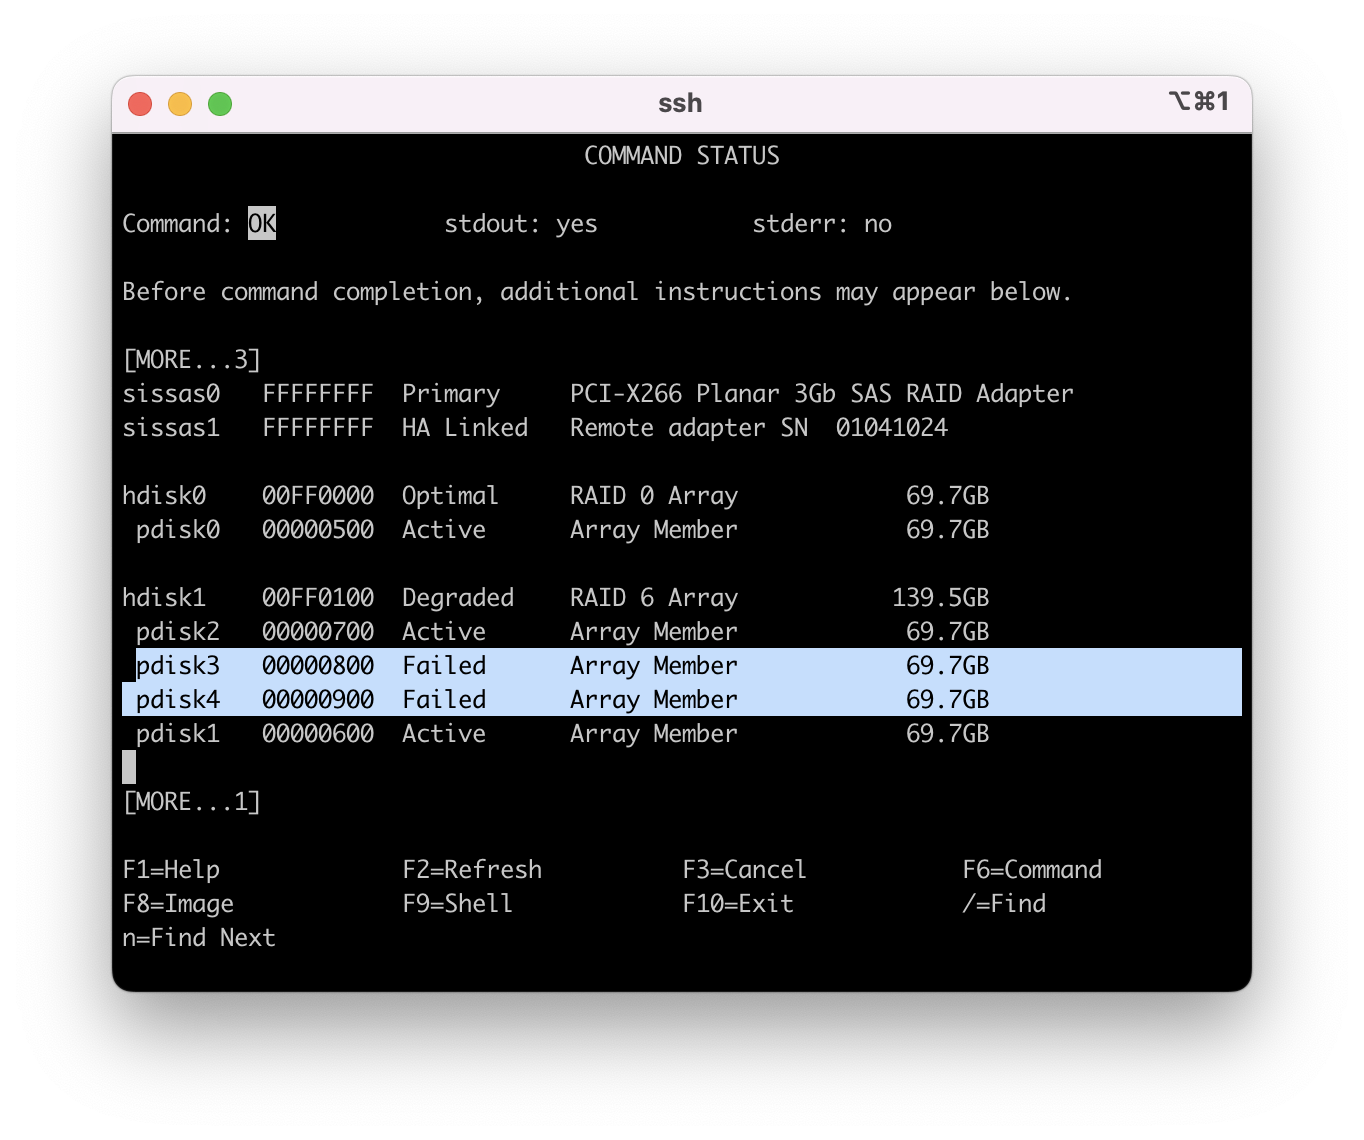
pdisk3 is in a "Failed" state and the array is "Degraded".
6.3 - A second disk unit failed in the RAID6 array, pdisk4. You can see that the array is still in a "Degraded" mode therefore with 2 failed disk units the array is still functional. I put pdisk4 back in the array for the remaining replacement steps.
6.7 - Locate the disk unit in the system or IO drawer. Press enter on the keyboard again to remove the disk from the "Identify" state. Use F3 or ESC 3 to go back one menu.
Move the cursor to "Replace/Remove a Device Attached to an SCSI Hot Swap Enclosure Device" and press enter to start the concurrent replacement of the disk unit.

The "Reconstruct" finished and the array is in an "Optimal" state, service is complete.
Procedure 7 - Replacing a Hot Spare disk that is either failed or has a PFA (Predictive Failure Analysis) indication
7.1 In this example we are replacing pdisk1, which is a Hot Spare disk unit. On the command line enter "smit sasdam", next move the cursor to highlight "List SAS Disk Array Configuration" and press enter.
7.2 - Move the cursor to select the primary SAS controller that the disk to be replaced is attached to and press enter.
7.3 This first example is how your array configuration would show up when there is a PFA for the Hot Spare disk unit.
Name Resource State Description Size
------------------------------------------------------------------------
sissas0 FFFFFFFF Primary PCI-X266 Planar 3Gb SAS RAID Adapter
sissas1 FFFFFFFF HA Linked Remote adapter SN 01041024
pdisk3 00000500 Active Array Member 69.7GB
pdisk5 00000400 Active Array Member 69.7GB
pdisk4 00000900 Active Array Member 69.7GB
pdisk2 00000700 Active Array Member 69.7GB
hdisk0 00FF0100 Optimal RAID 0 Array 69.7GB
pdisk0 00000800 Active Array Member 69.7GB
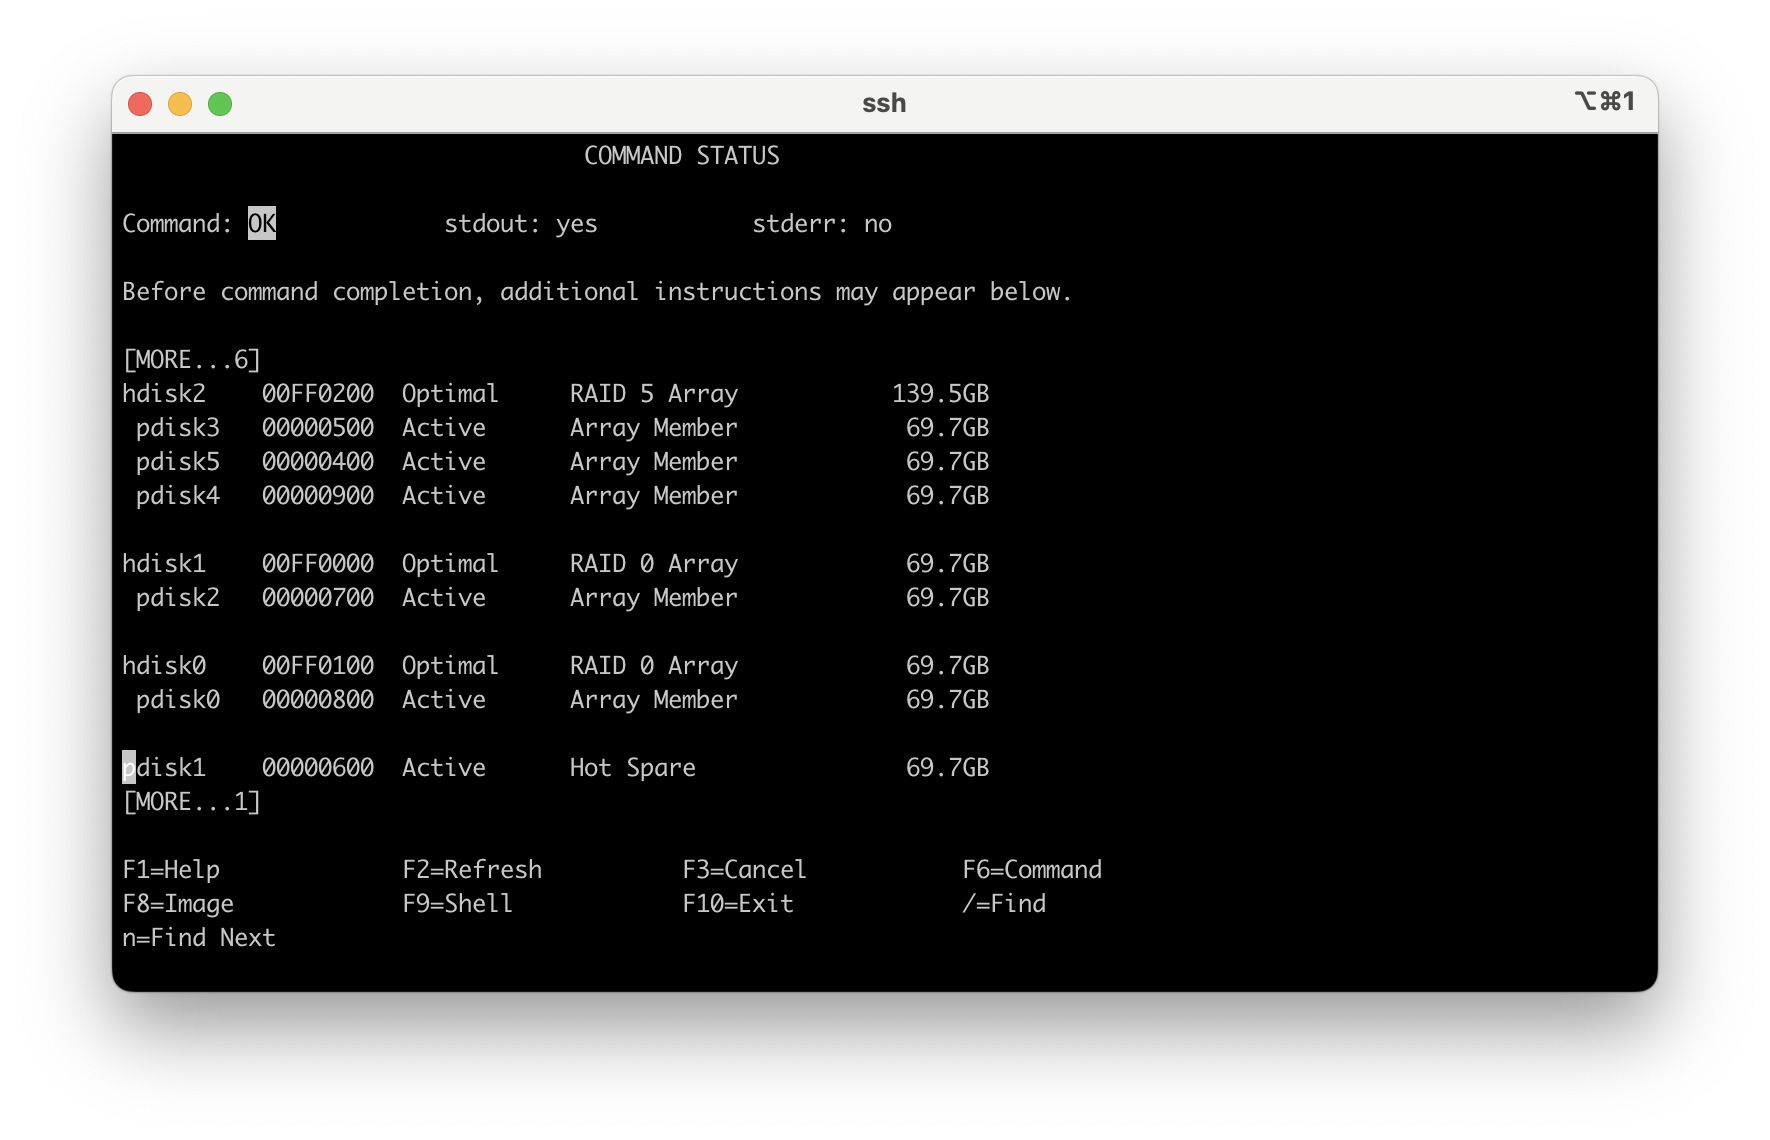
pdisk1 00000600 Active Hot Spare 69.7GB
Name Resource State Description Size
------------------------------------------------------------------------
sissas0 FFFFFFFF Primary PCI-X266 Planar 3Gb SAS RAID Adapter
sissas1 FFFFFFFF HA Linked Remote adapter SN 01041024
pdisk3 00000500 Active Array Member 69.7GB
pdisk5 00000400 Active Array Member 69.7GB
pdisk4 00000900 Active Array Member 69.7GB
pdisk2 00000700 Active Array Member 69.7GB
hdisk0 00FF0100 Optimal RAID 0 Array 69.7GB
pdisk0 00000800 Active Array Member 69.7GB
pdisk1 00000600 Failed Hot Spare 69.7GB
7.8 - Locate the disk unit in the system or IO drawer. Press enter on the keyboard again to remove the disk from the "Identify" state. Use F3 or ESC 3 to go back one menu.
Move the cursor to "Replace/Remove a Device Attached to an SCSI Hot Swap Enclosure Device" and press enter to start the concurrent replacement of the disk unit.

7.16 - A second window pops up where you can select the new pdisk and change it to a hot spare.

7.17 - Press enter once more and you get a summary page, when multiple disks are listed use F7 or ECS 7 to select the target disk unit that you replaced.
Appendix
A1 - If you are having trouble displaying the SMIT menus, check the TERM variable setting
Check TERM variable setting by running:
A2 - No disk units show up when you run the procedure to "Remove/Replace" a disk unit
A2.1 - You are running through the hdisk or pdisk replacement procedures and you are at the step to "Indentify" or "Replace" a disk and you receive a window with a blank list. The most common cause of this is that either your system does not support hot swap disk units or more likely you have no SES (SAS Enclosure Services) device. This blank list can be a result of other failed hardware in the system.
Example 01: From "SCSI and SCSI RAID HOT PLUG MANAGER" move your cursor to "Replace/Remove a Device Attached to an SCSI Hot Swap Enclosure Device" and press enter, you receive the following screen:
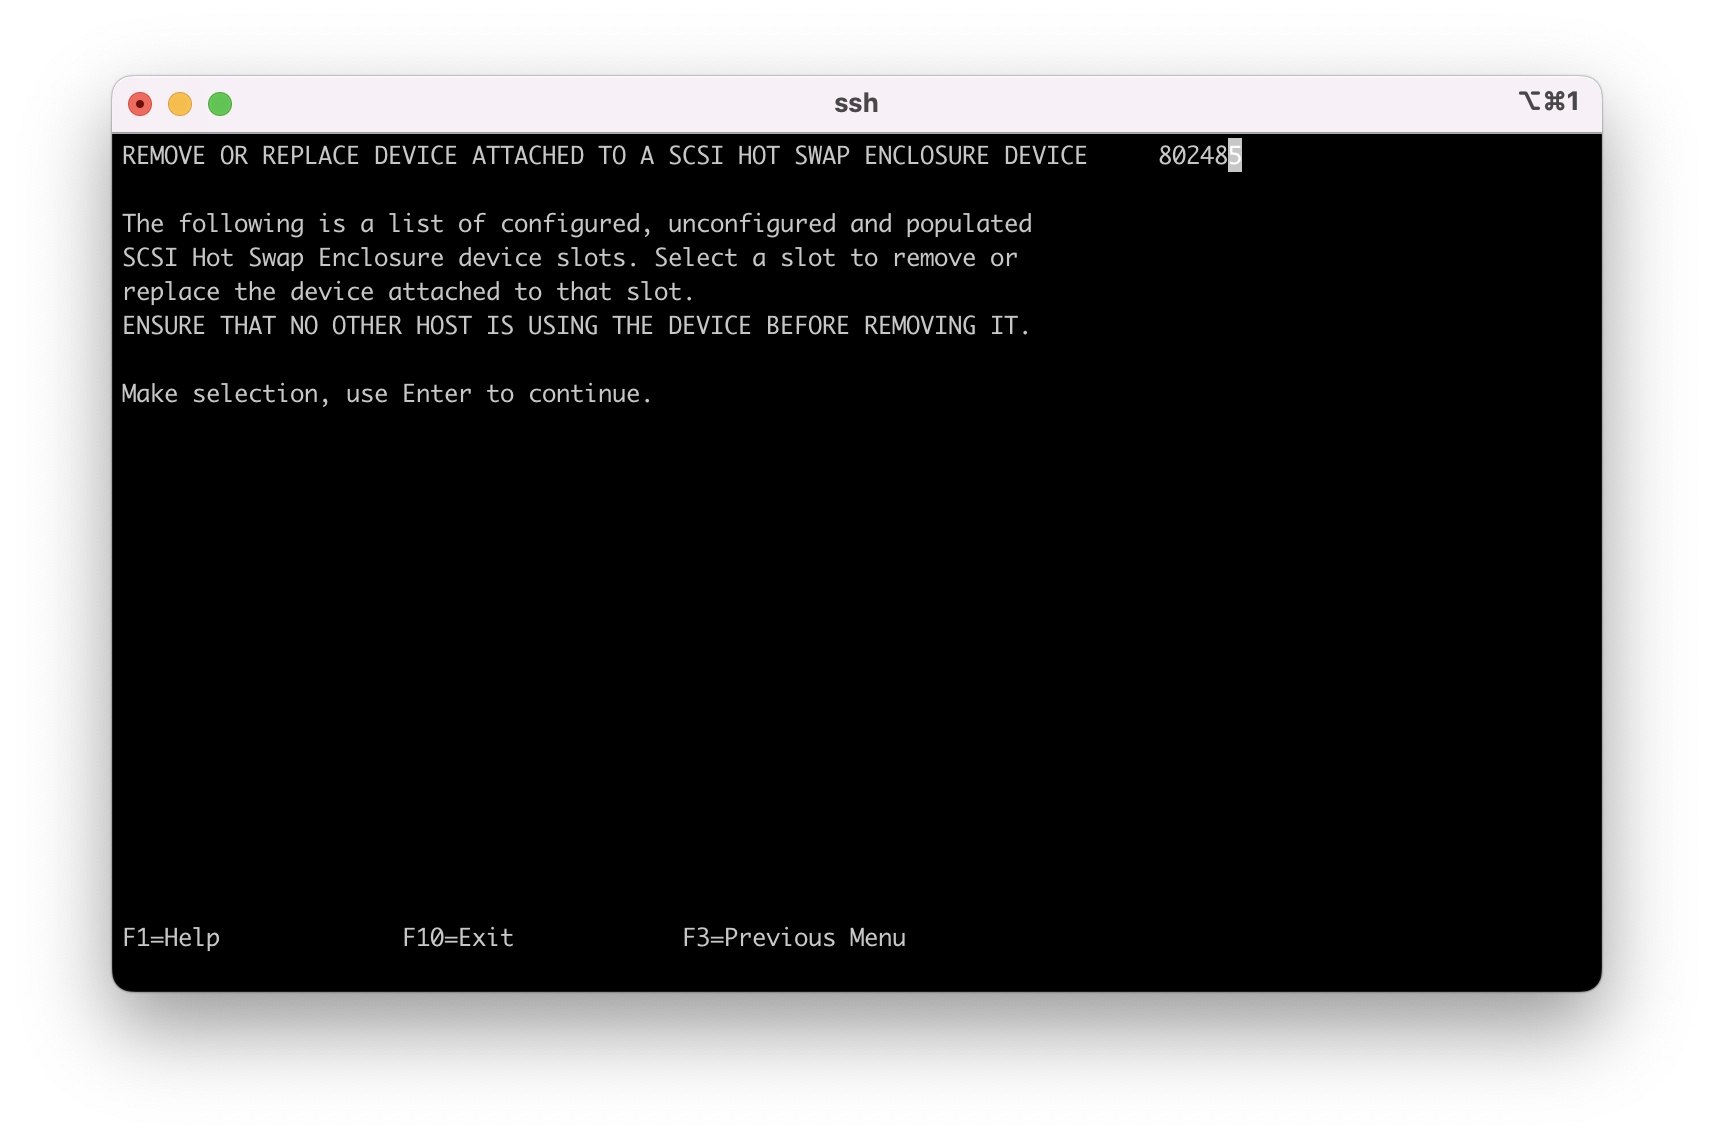
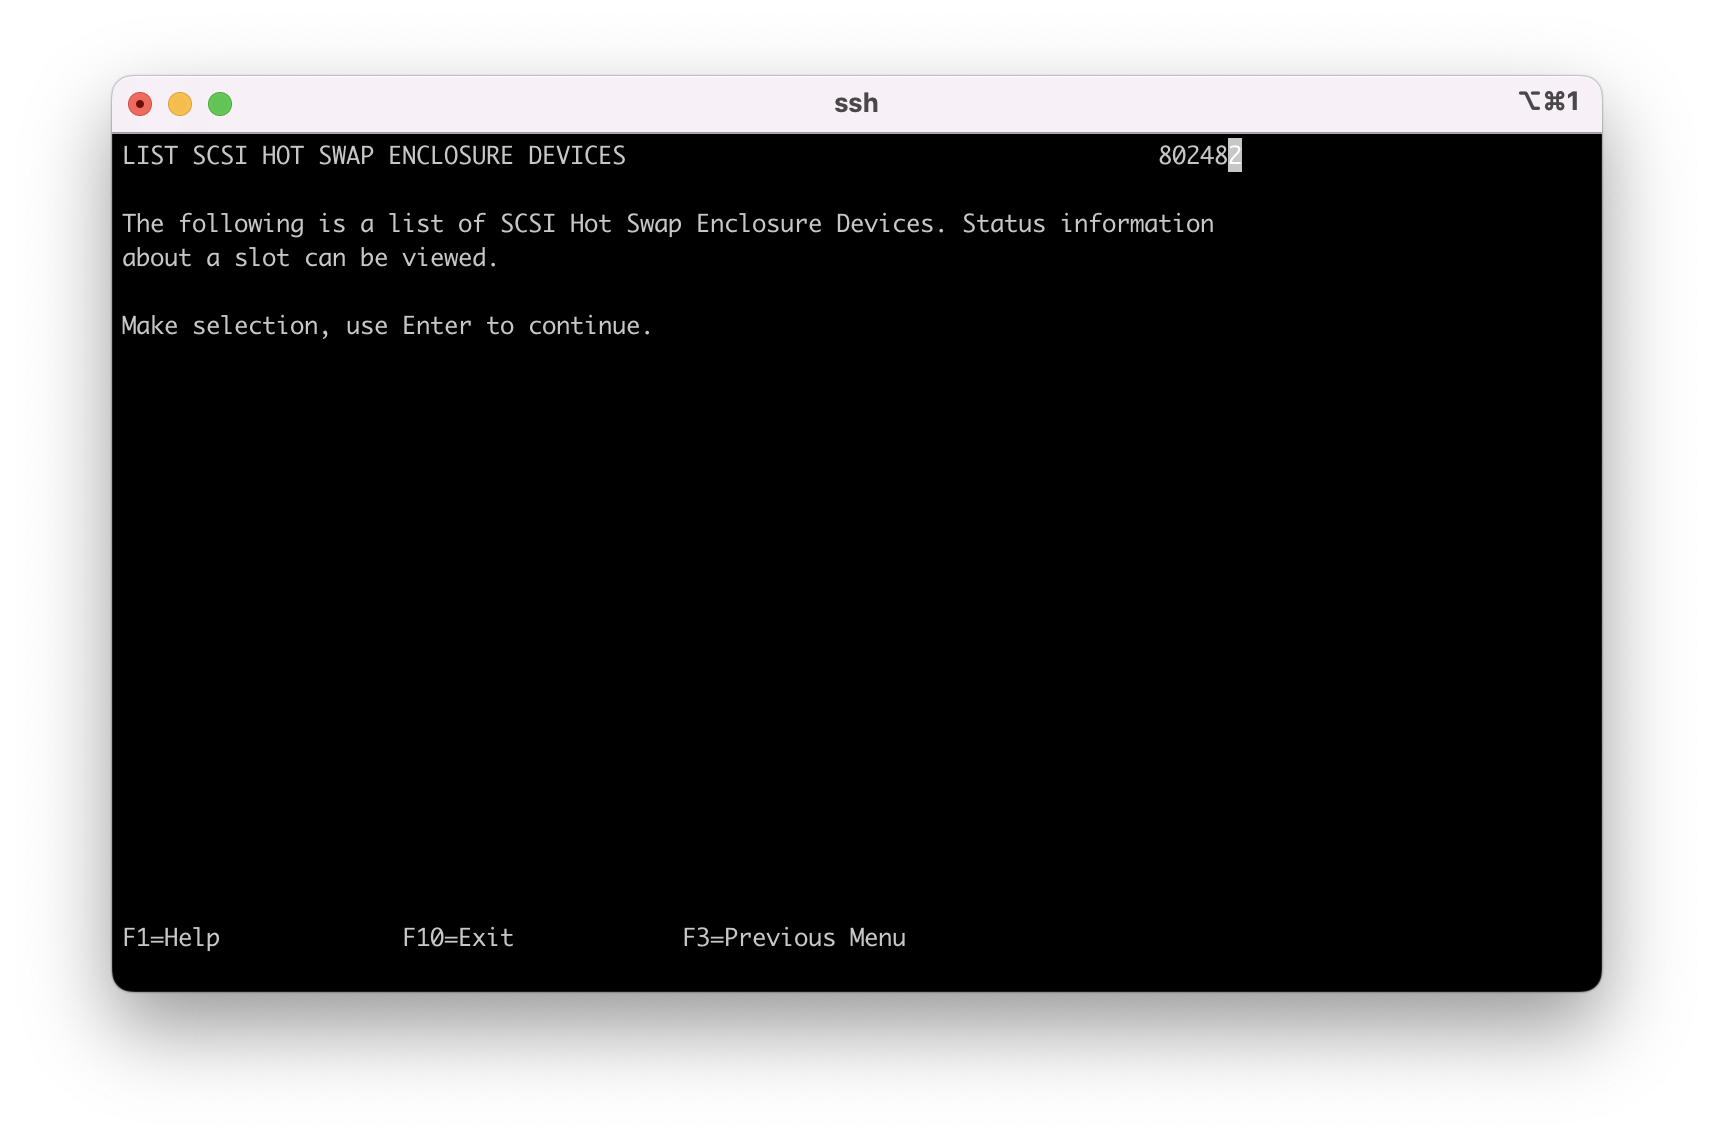
Example 02: From "SCSI and SCSI RAID HOT PLUG MANAGER" cursor to "List Hot Swap Enclosure Devices" and press enter, you receive the following screen:
Example 03: From "SCSI and SCSI RAID HOT PLUG MANAGER" cursor to "Identify a Device Attached to a SCSI Hot Swap Enclosure Device" and press enter, you receive the following screen:

A2.2 - This blank list requires some further investigation. There are several ways to see whether you have a SES device or not. The first is from the Raid Manager menus.
# smit sasdam
Diagnostics and Recovery Options
Show SAS Controller Physical Resources
Show Fabric Path Data View
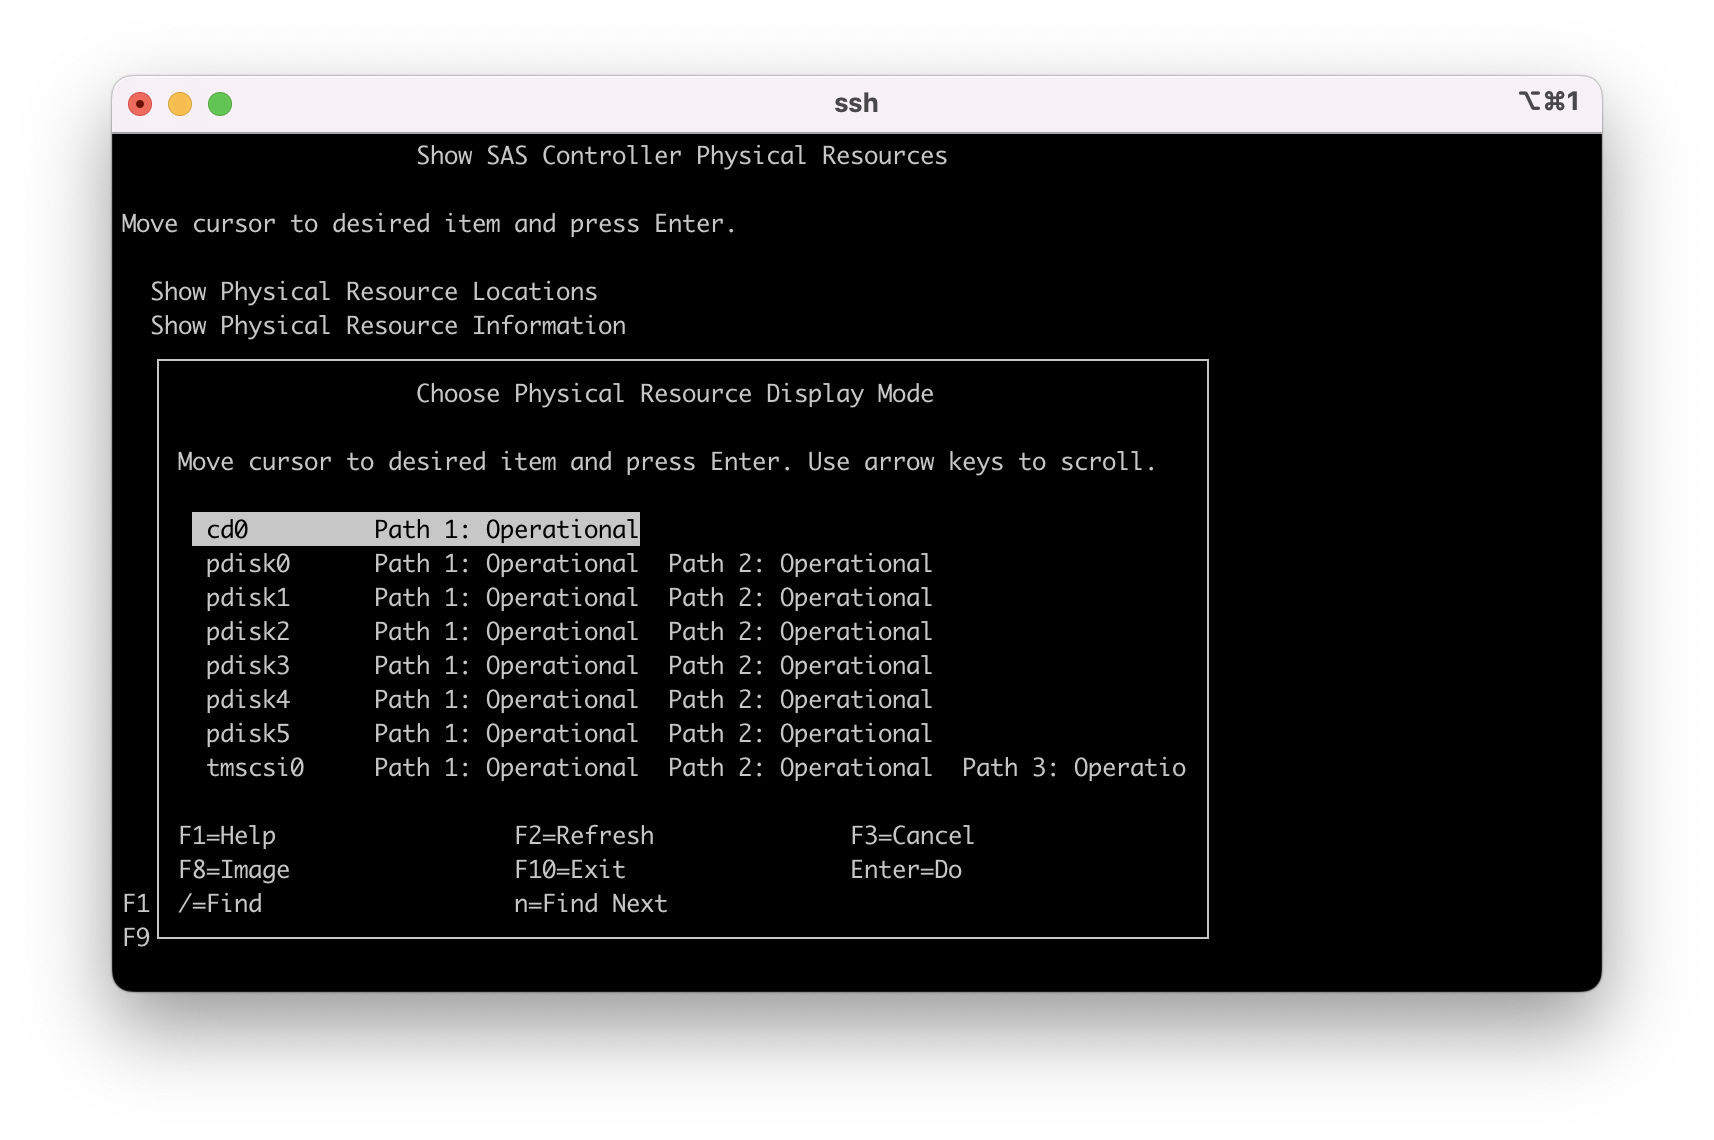
Example 04 Shows a wrong state with no SES devices listed.
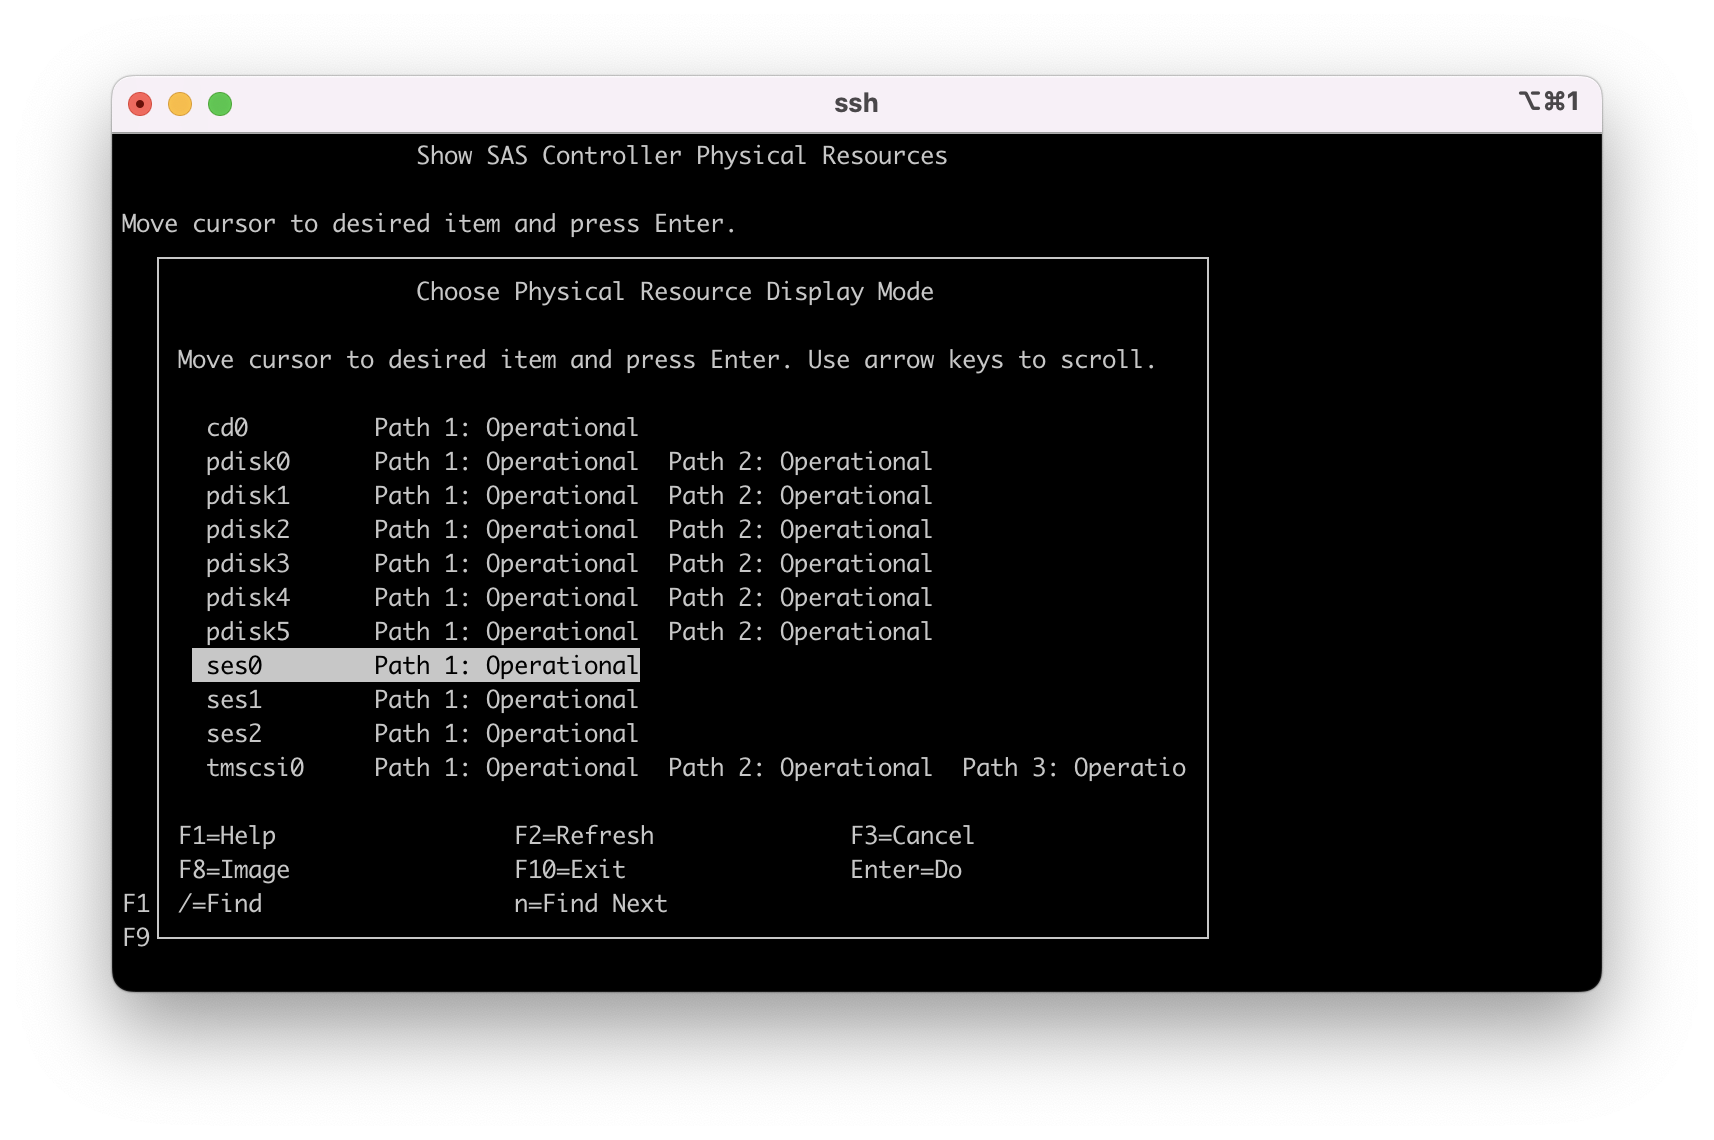
Example 05 Shows a good state with SES devices listed (ses0, ses1, ses2).
A2.3 - Use command line to investigate. The following is a good example of what you want to see.
# lsdev -Cc adapter
ent0 Available Logical Host Ethernet Port (lp-hea)
ent1 Available Logical Host Ethernet Port (lp-hea)
ent2 Available Logical Host Ethernet Port (lp-hea)
ent3 Available Logical Host Ethernet Port (lp-hea)
ent4 Available 03-00 10 Gb Ethernet-SR PCI Express Dual Port Adapter (771000801410b003)
ent5 Available 03-01 10 Gb Ethernet-SR PCI Express Dual Port Adapter (771000801410b003)
fcs0 Available 03-02 10 Gb FCoE PCI Express Dual Port Adapter (771001801410af03)
fcs1 Available 03-03 10 Gb FCoE PCI Express Dual Port Adapter (771001801410af03)
lhea0 Available Logical Host Ethernet Adapter (l-hea)
pkcs11 Available ACF/PKCS#11 Device
sissas0 Available 01-08 PCI-X266 Planar 3Gb SAS RAID Adapter
sissas1 Available 02-08 PCI-X266 Planar 3Gb SAS RAID Adapter
usbhc0 Available 00-08 USB Host Controller (33103500)
usbhc1 Available 00-09 USB Host Controller (33103500)
usbhc2 Available 00-0a USB Enhanced Host Controller (3310e000)
vsa0 Available LPAR Virtual Serial Adapter
# lsdev -C |grep ses
ses0 Available 01-08-00 SAS Enclosure Services Device
ses1 Available 01-08-00 SAS Enclosure Services Device
ses2 Available 01-08-00 SAS Enclosure Services Device
A2.4 - Use command line to investigate. The following is an example of missing or defined SES devices.
# lsdev -C |grep ses
ses0 Defined 01-08-00 SAS Enclosure Services Device
ses1 Defined 01-08-00 SAS Enclosure Services Device
ses2 Available 01-08-00 SAS Enclosure Services Device
or with no SES device
# lsdev -C |grep ses
#
A2.5 - Attempt to recover by running cfgmgr. From the example you can see that once cfgmgr was run, the SES devices came back.
# cfgmgr -l sissas0
# lsdev -C |grep ses
ses0 Available 01-08-00 SAS Enclosure Services Device
ses1 Available 01-08-00 SAS Enclosure Services Device
ses2 Available 01-08-00 SAS Enclosure Services Device
#
A2.6 - If you are unable to recover your SES devices then you might have another hardware issue on your system that needs to be reported to your "IBM Support Representative". The disk unit cannot be replaced concurrently until this problem is resolved.
A3 - New disk unit configures as a hdisk and a pdisk array candidate is needed
Replacement disk units from IBM normally come formatted as a pdisk array candidate. If your replacement disk unit comes formatted as a JBOD hdisk, then it needs to be formatted before it can be used in an array.
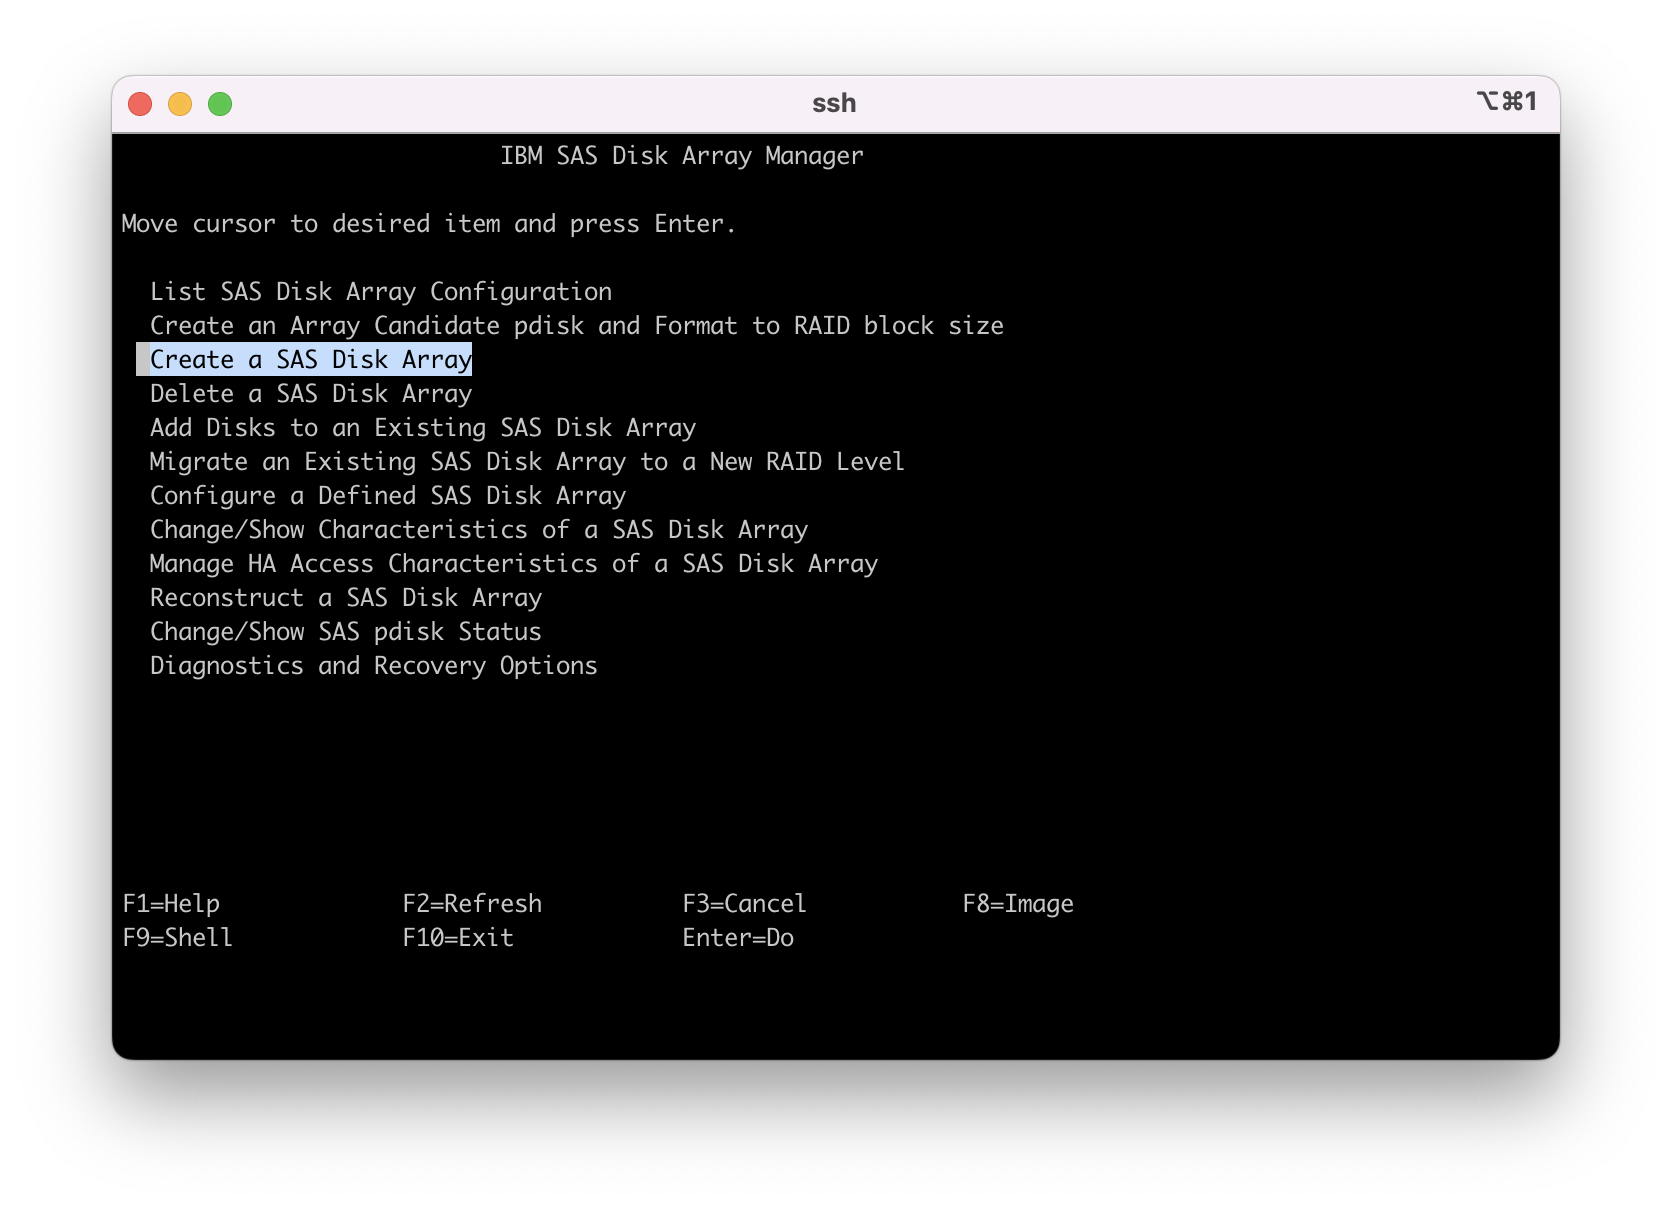
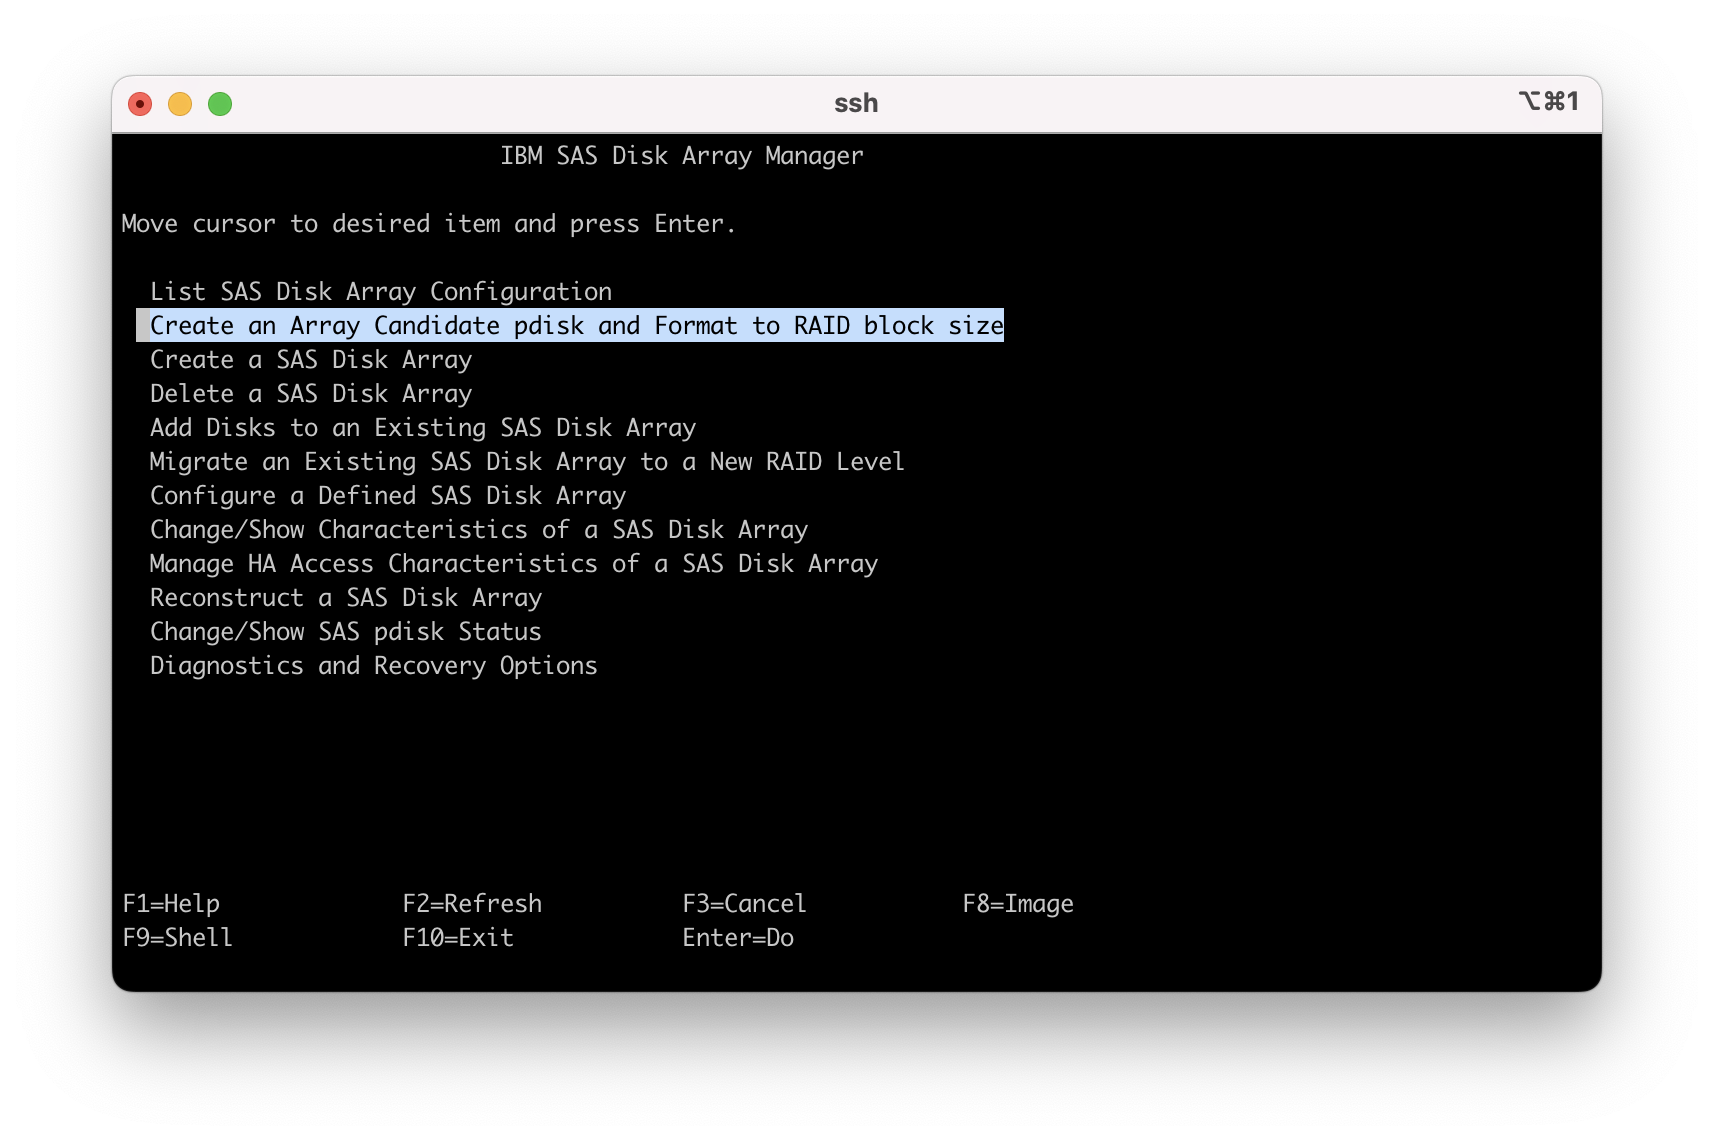
A3.1 - Enter "smit sasdam" to access the "IBM SAS Disk Array Manager Menu".
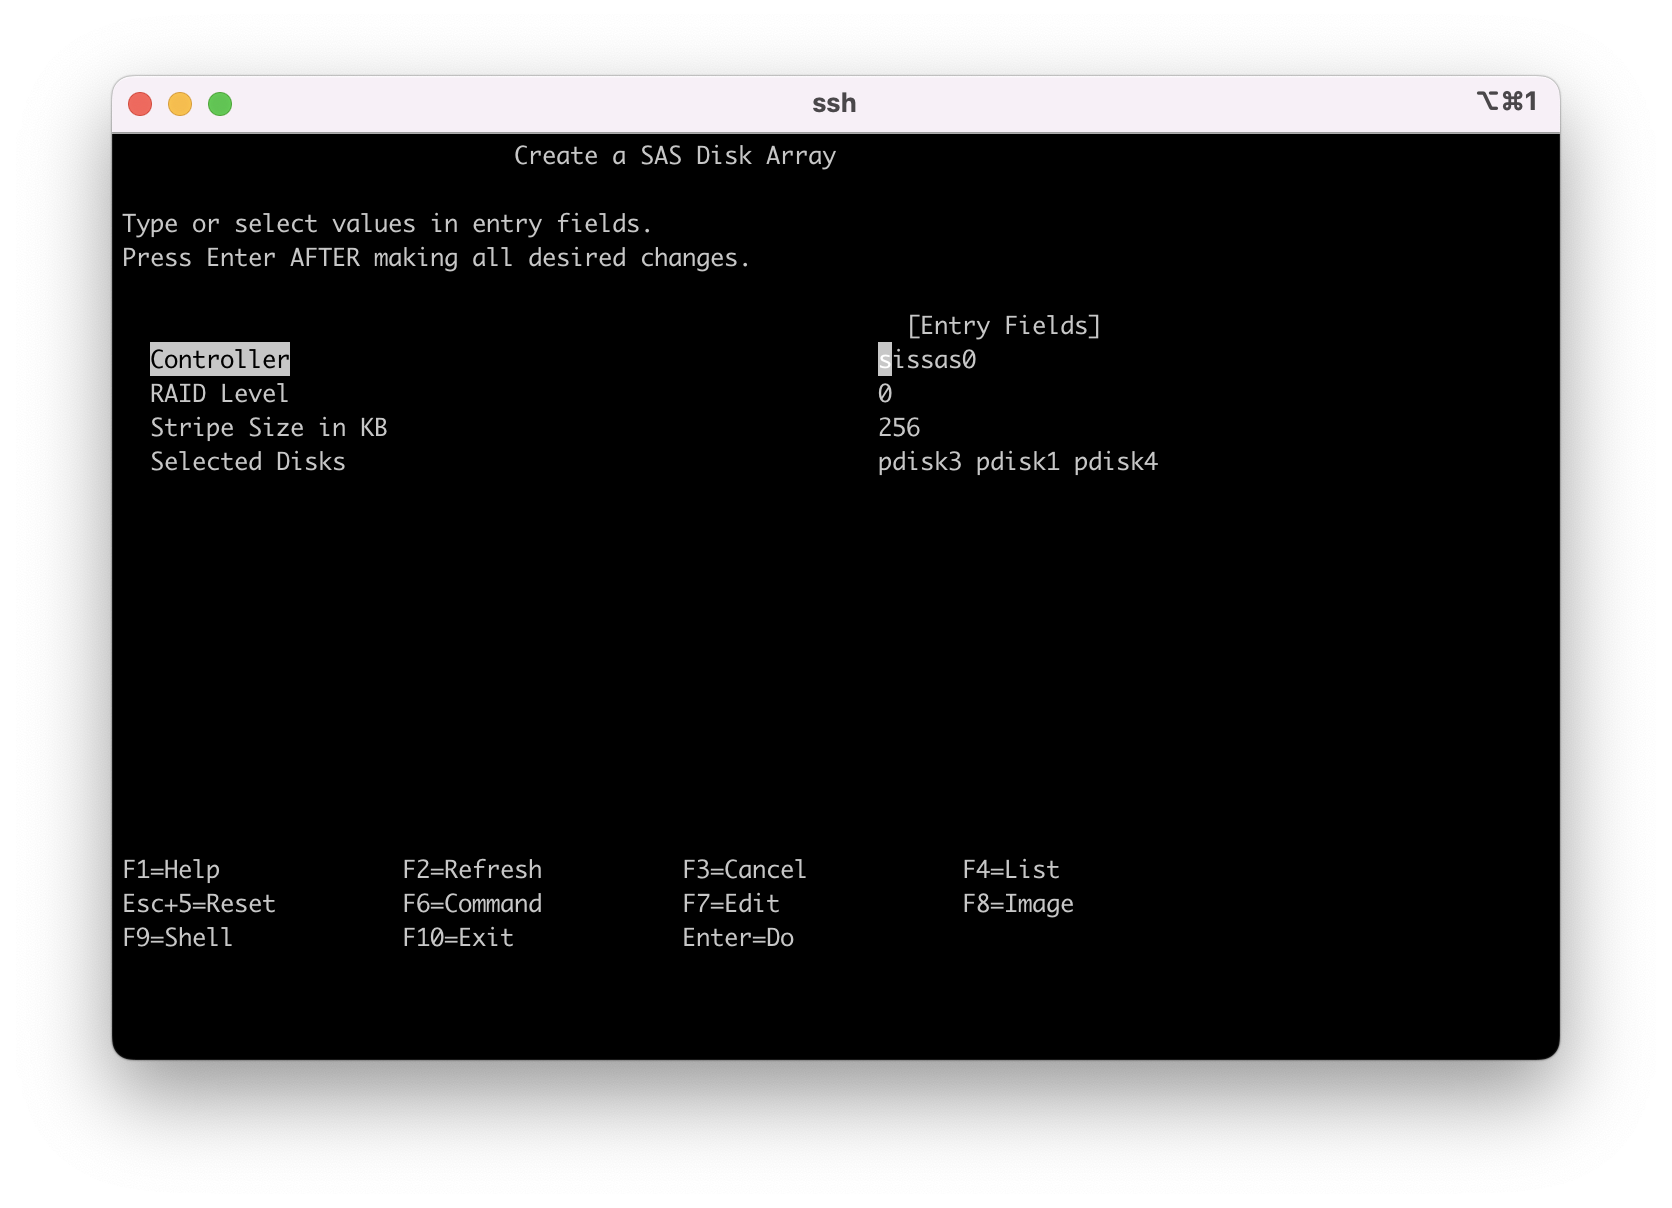
A3.2 - Moved the cursor to "Create an Array Candidate pdisk and Format to RAID block size" and press enter.
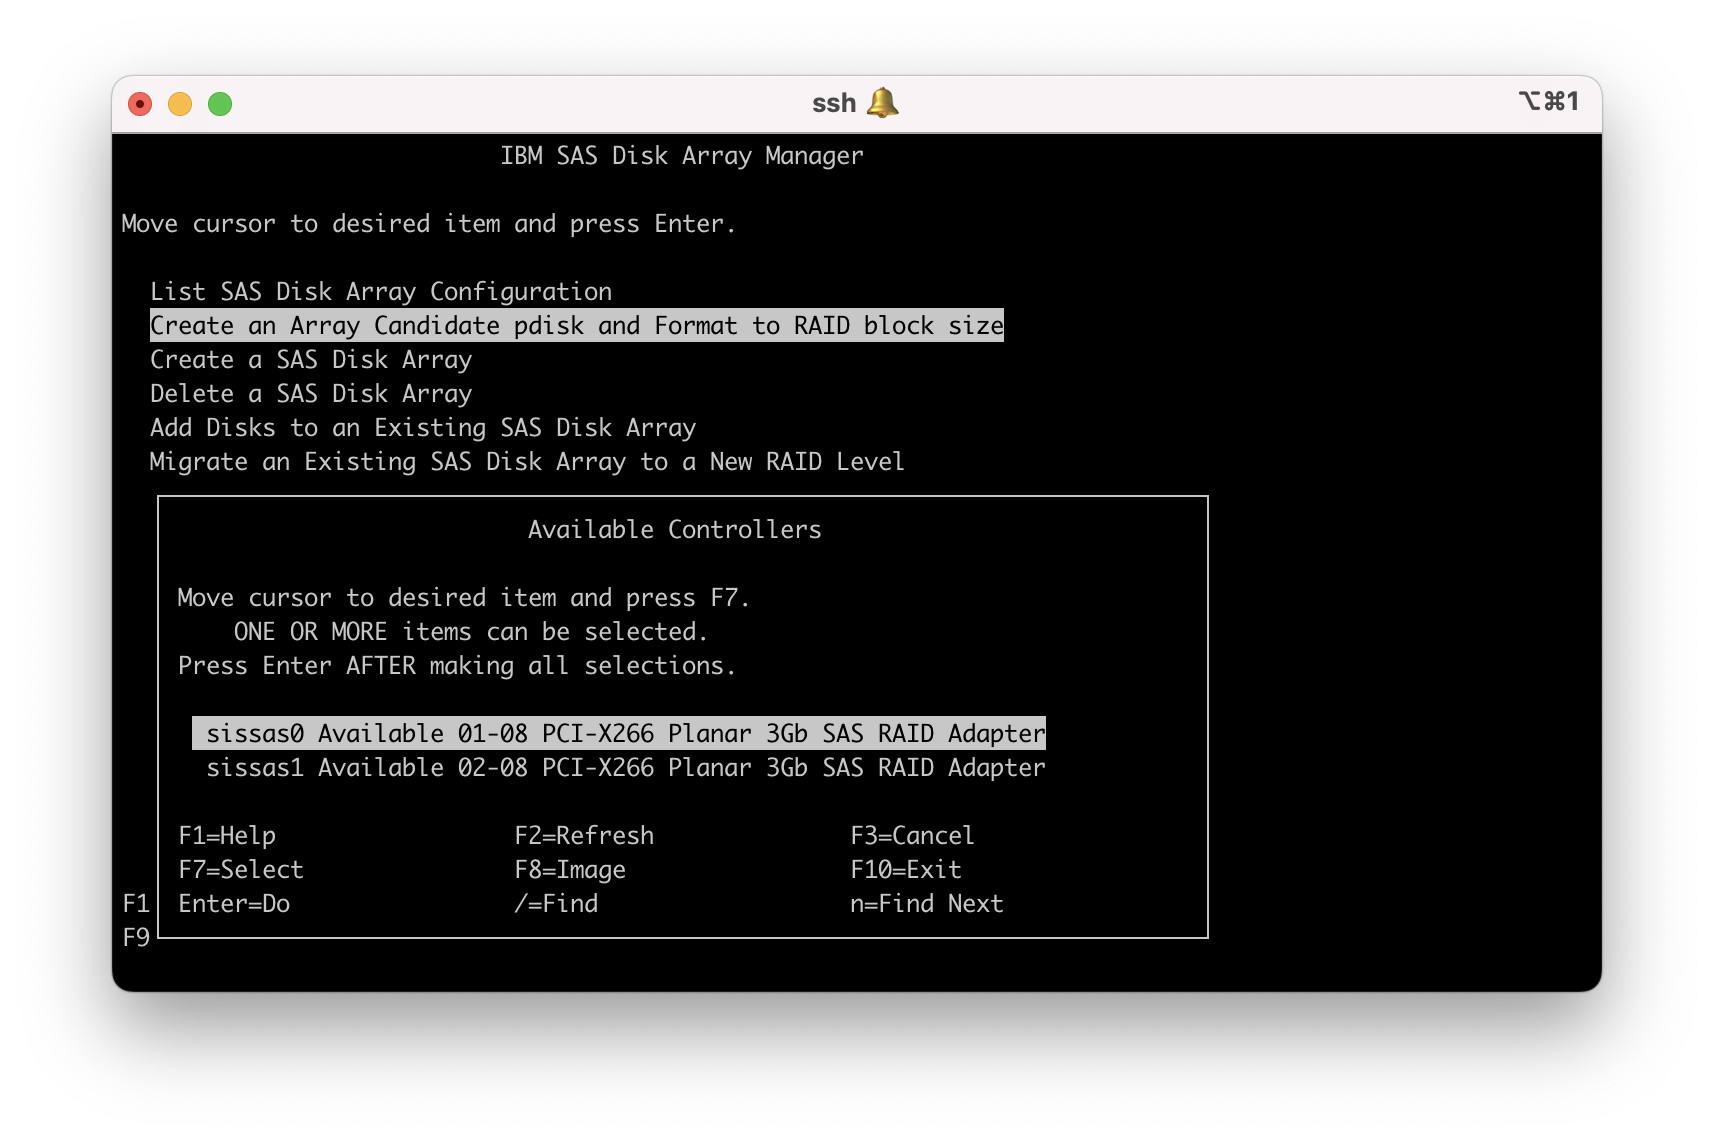
A3.3 - Select the primary SAS controller that the disk is attached to.
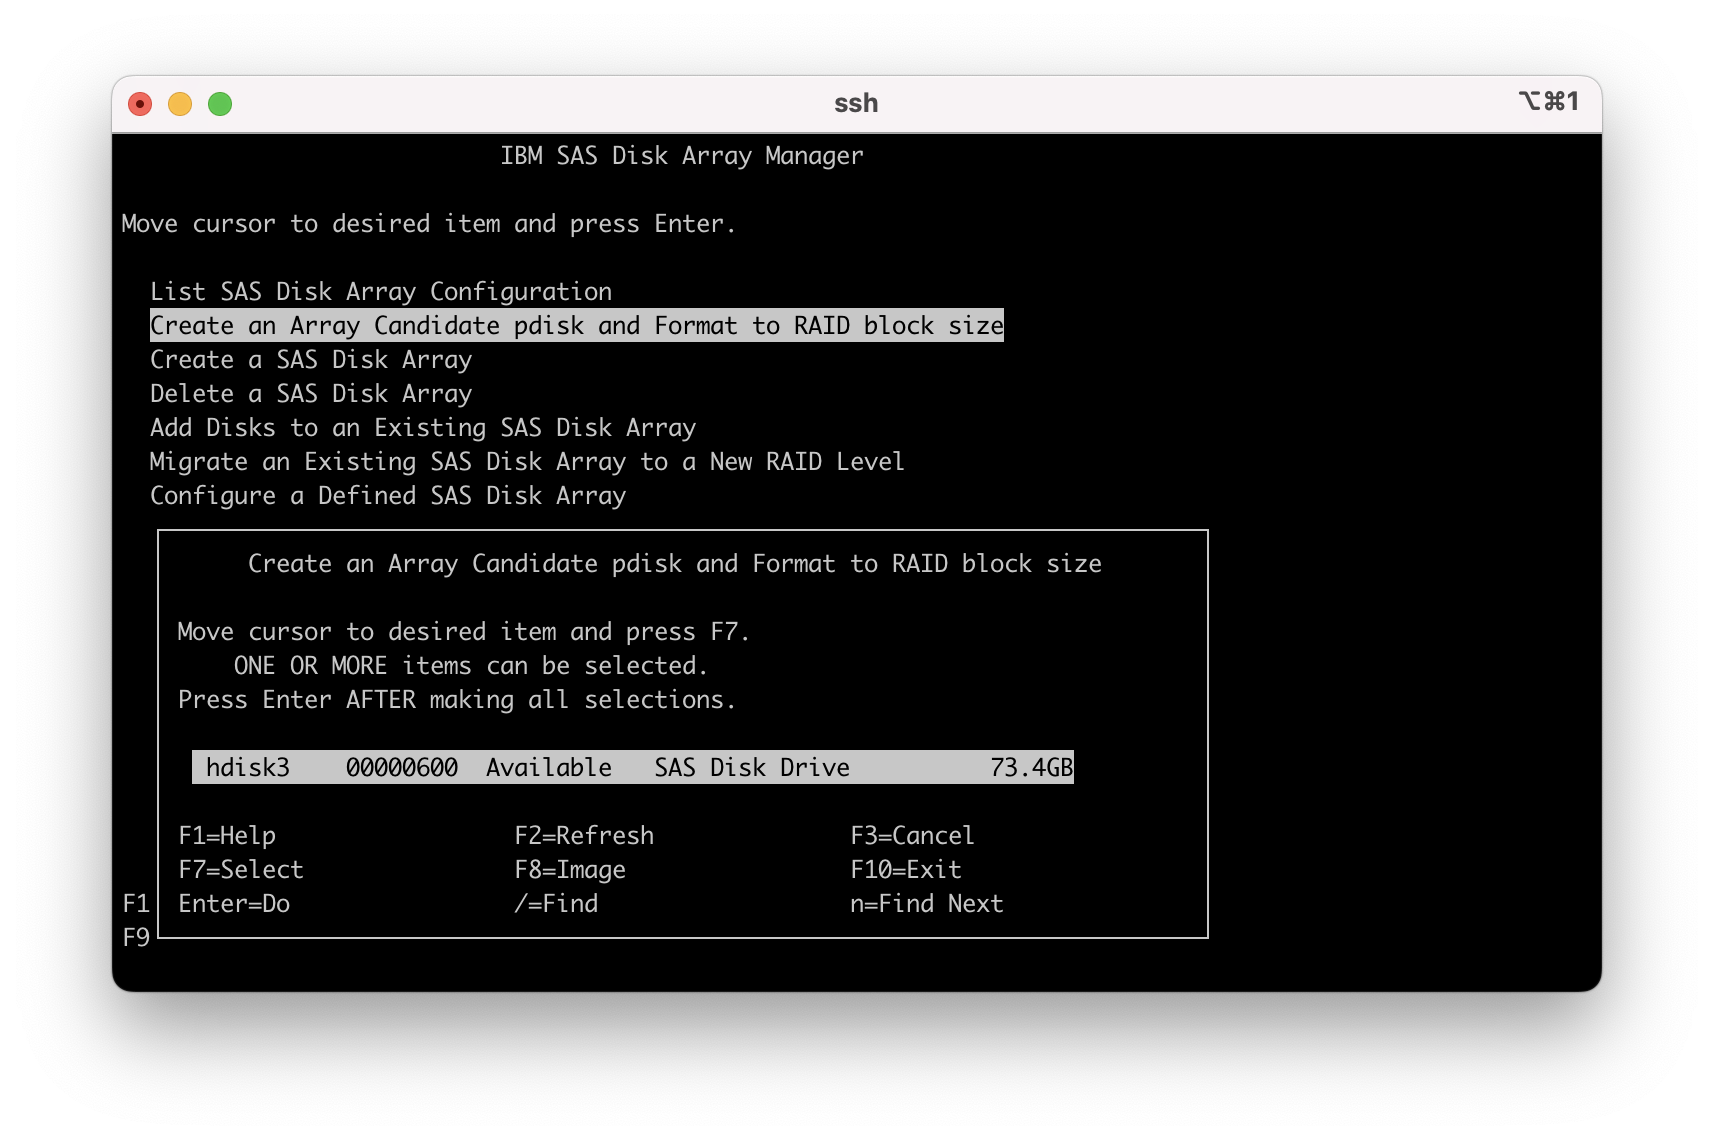
A3.4 - Move cursor to highlight the newly added hdisk and press enter.
A3.5 - You get a "Warning" message, press enter to continue

A3.6 - The format progresses
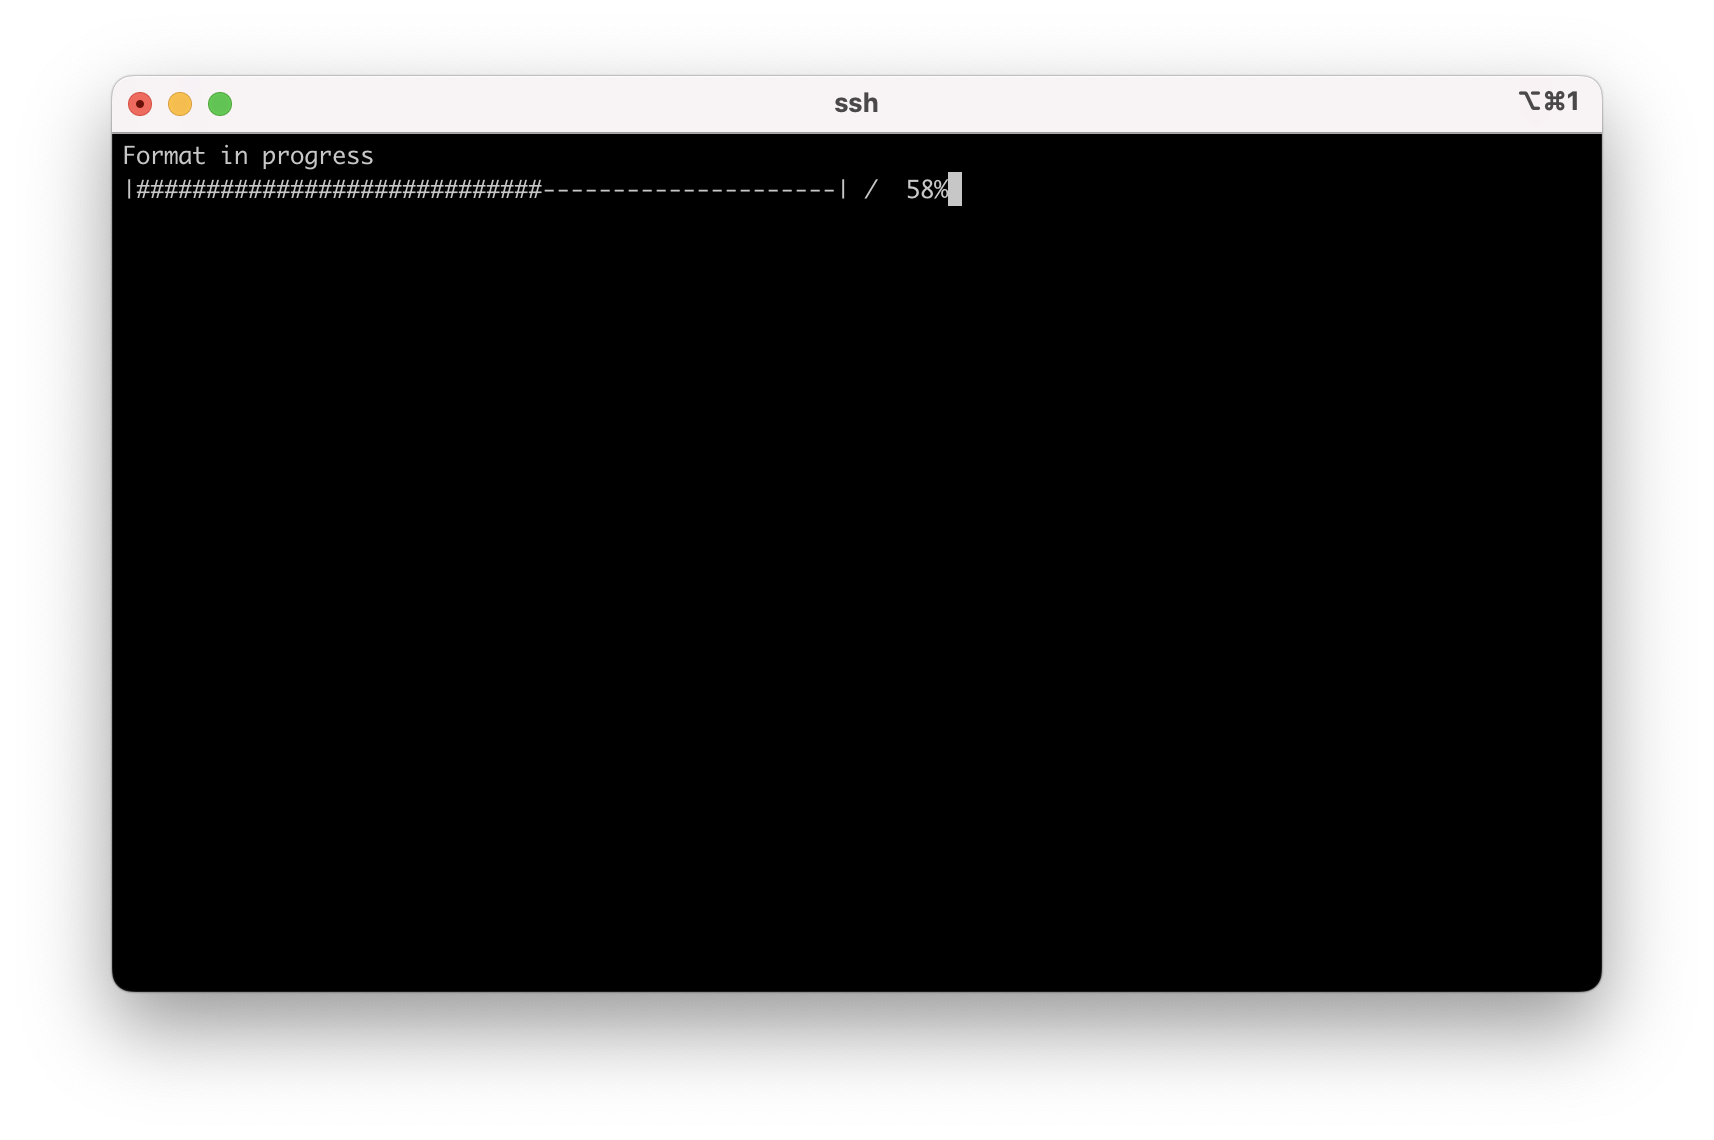
A3.7
A3.8 - Press enter to continue then select to display your array config where you see the newly formatted array candidate pdisk.
A3.9 - The format is complete, return to the procedure that brought you here.
A4 - Backing up your data
It is recommended to have backups of your data even if you have a protected array.
Back up the data on the drive you plan to remove depending on the operating system you are using.
- AIX®: Ensure that all data on that drive or the array that contains the drive is backed up and removed from the drive.
- If the drive that is being replaced is protected by Raid-5, Raid-6, or Raid-10 and the array remains functional once the dusk unit is re moved, it is not necessary to back up or remove data.
- If the drive you are removing is a mirrored drive, you must suspend mirror protection on the drive before you remove the drive. Contact your system administrator for assistance.
- If the drives are just a bunch of disks (JBOD) or a Raid array that does not remain functional when the drive is removed (that is, Raid-0). Ensure that the disks are in the
definedstate by completing the following steps:- Remove data access methods from the JBOD or failing array (that is, file systems, databases, and so on).
- Delete the array.
- Unconfigure the JBOD.
A5 - Some Useful commands:
1. sissasraidmgr: This command can be used to list,manage, create SAS disk array configuration and might be helpful if client cannot run or upload snap.
For example -
Viewing the Disk Array Configuration:
# sissasraidmgr -Ll controller_name -j1
Displaying Rechargeable Battery Information:
# sissasraidmgr -M -o0 -l adapter_name
See following document for details on the command
https://www.ibm.com/docs/en/power8/8247-42L?topic=tasks-aix-command-line-interface
Support document "How do I create, list, and manage SAS Disk Array?" has some examples.
https://www.ibm.com/support/pages/how-do-i-create-list-and-manage-sas-disk-array
Note: If unsure or have questions, it is advised to contact IBM support for assistance. Use caution when the command to modify the disk array is used.
2. AIX command for listing disk and volume group information.
To list disks or pdisks in system:
#lsdev -Cc disk
#lsdev -Cc pdisk
To list volume groups with disk names:
#lspv
To list list free disk on VIOS:
#lspv -free
To list details about a voulme group:
#lsvg <VG name>
A6 - Erasing data from disk units and Disk Retention Services
If it is required to erase data for a defective disk unit that is still functional, you can use the following link.
https://www.ibm.com/support/pages/erasedecommission-disks-aix-environment
IBM also provides Disk Retention Services, contact IBM Marketing or your IBM Business Partner.
https://www.ibm.com/downloads/cas/P78OLQZV
IBM contact information.
Was this topic helpful?
Document Information
Modified date:
12 September 2023
UID
ibm16616709