News
Abstract
This technote provides how-to details for IBM Cloud Pak System customers setting up Red Hat Satellite Server V6.10 and moving from V6.7 (earlier Satellite version) to V6.10. It is imperative that you review each section of this technote to fully understand each step in the process and to properly configure and set up your Red Hat Satellite Server. If you do not do the configuration, it might result in failed deployments or unregistering of your Red Hat Satellite Server.
Content
Key dates and information
- End of service for Satellite Server V6.7: 30 November 2021
- End of service for Satellite Server V6.4: 30 April 2020
-
After 30 November 2021, errata or software updates are not provided to Satellite Server V6.7 but still be able to sync repositories.
-
Red Hat is not providing any technical support for Satellite Server V6.7. IBM Cloud Pak System continues to support existing Satellite Server V6.7 beyond 30 November 2021 until customers are able to migrate to Satellite Server V6.10. No technical support is available for new Satellite Server V6.7 pattern deployments.
-
IBM Cloud Pak System customers who are currently using Red Hat Satellite Server V6.7 or older must migrate to Red Hat Subscription Manager (RHSM) V6.10.
-
Important: Do not upgrade to RHSM V6.8 or V6.9. IBM Cloud Pak System does not support these versions. You must migrate from 6.7 Red Hat Satellite to V6.10 directly to be in support.
-
Red Hat support for RHSM V6.10 is estimated until November 2023.
How to process the order of this technote
-
Import Red Hat Satellite Server V6.10 pattern on IBM Cloud Pak System.
-
Request subscription codes. See the following section: Requesting new (or renewal) Red Hat Satellite Server V6.10 subscription codes. (Same subscriptions that are used in Satellite V6.7 work on Satellite V6.10)
-
Deploy the Red Hat Satellite Server V6.10 pattern.
-
Post-Satellite V6.10 installation virt-who configuration.
-
Deploy the Red Hat Satellite Server V6.10 Shared Service pattern at the end.
Import Satellite Server V6.10 pattern on IBM Cloud Pak System
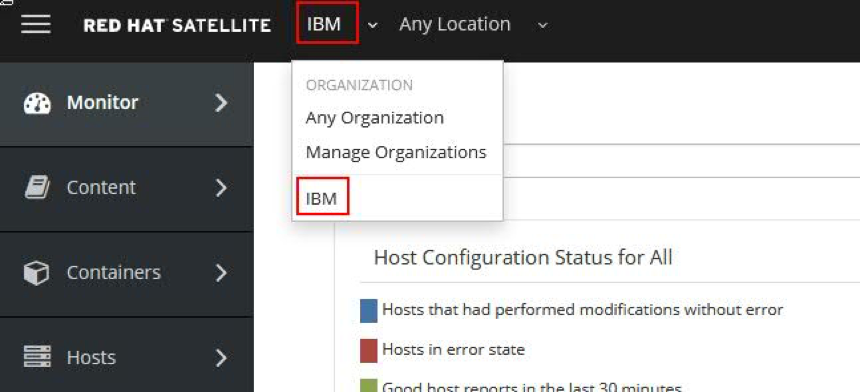
On the Platform System Manager (PSM) user interface (UI), click Patterns > Virtual System Patterns and verify that Red Hat Satellite Server 6.10 Pattern is listed.
Note: If the pattern is not on your system, then complete the following steps:
- Use the following link to download the Satellite Server V6.10 pattern as a .tgz file from IBM Fix Central:
RHUS 1.0.17.0 for 2.3.3.4
(Note: If you click the link and get a failure, you might want to clear your web browser cookies and then try again.) - Click Catalog > Pattern Types to upload the pattern directly to IBM Cloud Pak System.
- After the upload completes, the pattern is available in Patterns > Virtual System Patterns.
Migrating from Red Hat Satellite Server V6.7 to V6.10
Import Satellite Server V6.10 Pattern on IBM Cloud Pak System by using the preceding steps.
- Deploy a new Satellite Server V6.10 by using the IBM Cloud Pak System Red Hat Satellite Server 6.10 pattern.
- Delete the existing Satellite Shared Service V6.7 (or older) to unregister all the Satellite client virtual machines from Satellite Server V6.7. Go to the Platform System Manager (PSM) user interface (UI) and click Patterns > Shared Service instances. Select Red Hat Satellite 6 shared service instance and click the delete icon.
- Deploy a new Satellite Shared Service V6.10 in the same cloud group as the virtual machines in step 1. For more information, see this section in the technote: 'Deploying Satellite Server 6.10 Shared Service.'
Requesting new (or renewal) Red Hat Satellite Server V6.10 subscription codes
Step 1: Requesting the Red Hat subscription Codes for Satellite Server 6.10 installation
Determine how and where you would use the Red Hat subscription files.
If you register a SINGLE Red Hat Satellite server on IBM Cloud Pak System: Open a single CASE with the IBM Cloud Pak System support team requesting Red Hat subscription files. You must provide the following before the IBM Cloud Pak System support team can process your request.
Open one CASE for each Red Hat Satellite Server that would run on IBM Cloud Pak System and if the Red Hat Satellite Server on IBM Cloud Pak System is separate and does not have network connections to each other.
- IBM Cloud Pak System machine serial number and Machine Type (M/T). Click the PSM user interface > Hardware > Infrastructure Map to find the M/T on the hardware map images. You would see 82*/ on the upper left side of the image. The 82 is the M/T.
- M/T 8558 represents W3500 systems.
- M/T 8564 represents W3550 systems.
- M/T 8536 represents W3700 systems.
- M/T 9568 represents W4600 systems.
- The * is the serial number of the system, which starts with a "1" or a "2".
- For the system being addressed in the current CASE, provide the total number of compute nodes that are in the IBM Cloud Pak System. From the IBM Cloud Pak System console, click Hardware > Compute Nodes to obtain the compute node details. Alternatively, click Hardware > Infrastructure map.
- Important: Provide the IBM Cloud Pak System serial number where the Red Hat Satellite Server is running.
If you register MULTIPLE Red Hat Satellite servers on IBM Cloud Pak System systems:
If you have more than one IBM Cloud Pak System but are using only one Red Hat Satellite Server, use the following guidelines.
Open one CASE and list ALL the IBM Cloud Pak System systems, which are part of the Red Hat Satellite infrastructure. List the serial numbers for each IBM Cloud Pak System and provide the details outlined as follows.
If you have multiple IBM Cloud Pak System systems and if you want to use one Red Hat Satellite Server for all of the IBM Cloud Pak System systems, you must provide the following information before the IBM Cloud Pak System support team can process your request:
- IBM Cloud Pak System machine serial number and Machine Type (M/T). Click the PSM user interface > Hardware > Infrastructure Map to find the M/T on the hardware map images. You see 82*/ on the upper left side of the image. The 82 is the M/T.
- M/T 8283/8558 represents W1500/W2500/W3500 systems.
- M/T 8278/8536 represents W1700/W2700/W3700 systems.
- The * is the serial number of the system, which starts with a "1" or a "2".
- The total number of compute nodes for all of the IBM Cloud Pak System systems by using the single server. From the IBM Cloud Pak System console, click Hardware > Compute Nodes to obtain the compute node details. Alternatively, click Hardware > Infrastructure map.
- Important: If the Compute node has more than 8 sockets (physical CPU) then double the amount of subscription needed. It is because the subscription is valid for up to 8 socket per compute node.
- Important: List which IBM Cloud Pak System serial number can serve as the Red Hat Satellite Server. This system is the IBM Cloud Pak System where the Red Hat Satellite Server is running.
Step 2: Reviewing the prerequisites
- While IBM Cloud Pak System support is working to obtain the subscription codes on your behalf from Red Hat, use the following link to review the prerequisites. Ensure that they are met in your environment to allow the Satellite Server to successfully set up:
https://access.redhat.com/documentation/en-us/red_hat_satellite/6.10/html/installing_satellite_server_from_a_connected_network/preparing-environment-for-satellite-installation - Use the following link to set up a Red Hat account so that you can input your subscription codes that IBM Cloud Pak System support provides to you into this account: http://access.redhat.com.
Step 3: Activate subscription codes
- Activate the subscription codes after you receive the subscription code files from IBM Cloud Pak System support:
https://access.redhat.com/subscriptions/activate/ - Generate a new manifest file. The manifest file is used later when you deploy the Red Hat Satellite Server V6.10 pattern.
- For more information about 1 and 2, see this PDF link: "How do I create Red Hat manifest file and deploy Red Hat Satellite Server 6.10_0.pdf"
Deploying Red Hat Satellite Server V6.10 Pattern
- Complete the technote steps in 'Import Satellite Server V6.10 Pattern on Cloud Pak System' and 'Requesting new (or renewal) Red Hat Satellite Server V6.10 subscription codes'.
Note: Same subscriptions that are used in Satellite V6.7 work in Satellite V6.10. Deploy the Red Hat Satellite Server V6.10 Pattern to install Satellite Server V6.10. Input field notes: Satellite Server Organization Name: It can be any name, but this name is the default satellite organization and is used in the next section of the virt-who configuration. The manifest is a file that defines the number and type of client virtual machines that the Satellite Server can support. Refer to the previous section "Requesting new (or renewal) Red Hat Satellite Server V6.10 subscription codes" for instructions on generating this file. Red Hat Customer Portal username and password are the credentials to log in to the Red Hat Customer Portal at https://access.redhat.com/ If the network does not have access to the internet, specify the proxy information. The Satellite Server administrator username and password are the ones that you use to log in to the Satellite Server user interface.
When you deploy Satellite Server V6.10 pattern, make sure that the base OS is the recent RHEL 7. If not, choose the recent available RHEL 7 instead of RHEL 6 because Red Hat supports only the recent RHEL 7 for Satellite V6.10.
Use the following configuration for the pattern deployment:
- 20 GB Memory
- 4 CPU
- 300 GB Storage (add more if you are planning to use multiple repositories)
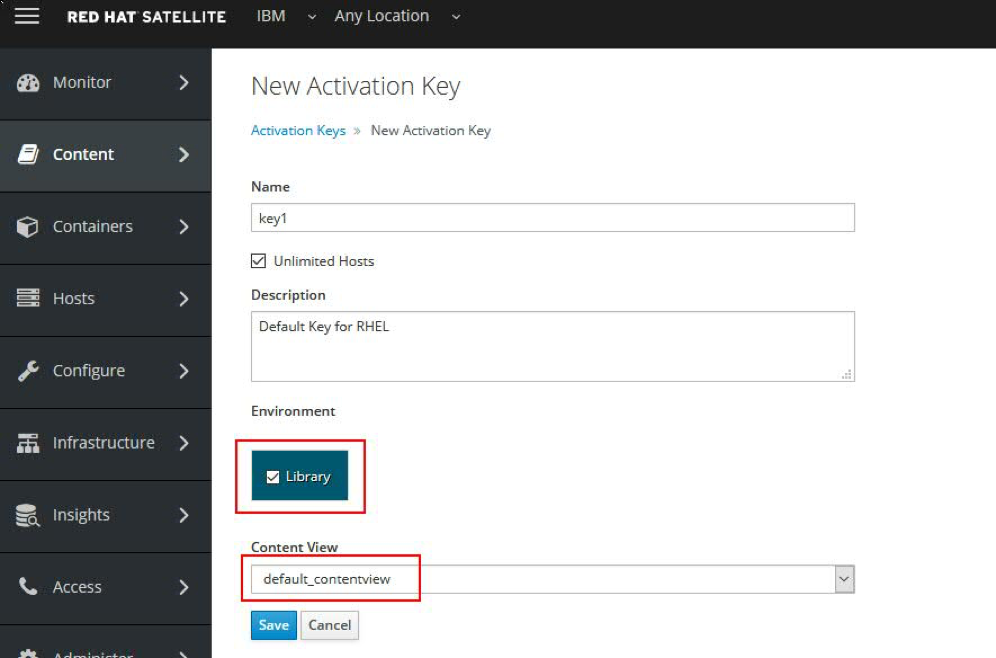
When the Satellite Server is deployed, you can access the Satellite Server UI on a browser: https://<Satellite Server IP address>. After you confirm that the deployment is complete, configure the Satellite Server. Note: All the following steps are done on the Satellite Server: a. Click Content > Content Views to create a new content view.
b. Click Yum Content > Repositories to add all required repositories to the content and publish the content view.
c. Click Content > Activation Keys to create a new activation key and associate it with the newly created content view.
d. Click the Subscriptions tab and add sufficient subscriptions to the activation key entry.
e. Click the Repository Sets tab for the activation key. Choose Override to Enabled under Select Action for the Red Hat Satellite Tools V6.10 (for RHEL 7 Server) (RPMs) and Red Hat Satellite Tools V6.10 (for RHEL 8 Server) (RPMs) repositories. Note: Do this step before
Configure external vCenter access and virt-who for host-guests mappings so that the Red Hat subscriptions can be attached to the correct hypervisors. For more information, see the technote sections: 'Post-Satellite installation virt-who configuration.' Continue with 'Deploying Satellite Server V6.10 Shared Service.'
Post-Satellite V6.10 installation virt-who configuration
After Satellite Server V6.10 is installed by using the IBM Cloud Pak System pattern, you must complete the following steps for it to be fully functional.
Configuring the Red Hat subscription
Step 1: Enabling VMware vCenter external access for the Satellite Server virtual machine
This step is required to enable access to the VMware vCenter from the Satellite Server virtual machine. This step allows the satellite server agent virt-who to obtain a mapping of ESXi hypervisors and guest virtual machines from the VMware vCenter in the following steps.
-
Enable the VMware vCenter IP address.
a. From the IBM Cloud Pak System console, click System > Network Configuration.
b. Expand Virtual Manager external IP address under the Optional entries.
c. Select the Configure IPv4 addresses checkbox.
d. In the Virtual manager IP address field, specify an IP address that is on the same subnet as the gateway listed.
Note: Select an IP address that is not currently in use and pingable.
e. Click Save.
f. Make note that this value is your purevc IP address. The IP address must become pingable after a few minutes. - Add external access to VMware vCenter.
a. From the Cloud Pak System console, click System > System Settings.
b. Expand External Application Access Settings.
c. Click Create to create a new entry.
d. Specify any value in the Name field.
e. Select Everything for the access scope.
f. Select the cloud group. If the cloud group cannot be selected, skip this step and continue to the next step.
g. Select Read Only for the Virtual Manager Privilege Set field.
h. Do not select the storage and compute node access fields.
i. Click OK. A new entry is created in the table.
j. In the row for the entry that was created, select the Details icon in the Actions column. A dialog box showing multiple user IDs and passwords is displayed. Make a note of the Virtual Manager ID and passwords. - Modify the local hosts' file to resolve the purevc name.
a. Use the following file paths to locate the host file for your local operating system:
Windows: C:\Windows\System32\drivers\etc\hosts
Note: Right-click the file and select Run as Administrator to start the editor in administrator mode to save changes made to the host file. UNIX/Linux: /etc/hosts
b. Add the virtual manager IP address to the host file. As a mandatory step, run the following command to create a new row to associate your virtual manager IP address with the purevc hostname: <Vmware IP address> purevc
c. Open the VMware vSphere web client to test the VMware vCenter connection. Find the credential in the external access created in the previous step: https://purevc/vsphere-client/
Note: You must use purevc for the hostname. Attempting to connect by using an IP address or another name is rejected.
Step 2: Configuring virt-who and host-guests mappings
This step is required so that the subscription manager on the Satellite Server knows how to properly entitle client virtual machines based on the host and guest mappings.
- Install virt-who.
a. Run the following command to subscribe to the Satellite Tools repository for V6.10:
# subscription-manager repos --enable=rhel-7-server-satellite-tools-6.10-rpms
b. Run the following command to verify that the server is subscribed to the Satellite Tools repository for V6.10:
# subscription-manager repos --list-enabled
c. Run the following command to install the virt-who package:
# yum install virt-who
- Configure virt-who to connect to VMware vCenter and Satellite.
a. Copy the template configuration file to a new file.
Note: Use the VMware vCenter hostname as the new file name to identify the configuration file for each vCenter.
In the following example, the hostname is vCenterhost1.
# cp /etc/virt-who.d/template.conf /etc/virt-who.d/vcenterhost1.conf
b. Edit the configuration file you just created ensuring to change the example values with those values that are specific to your configuration.
This configuration file has two sections:
I. VMware vCenter configuration and
II. Red Hat Satellite Server configuration.
I. VMware vCenter configuration:

Parameter 5: Specifies the environment in which the host is placed. You must use "Library".
Parameter 6: Specifies the VMware vCenter server’s fully qualified hostname or IP address. We got this IP from the step Enabling VMware vCenter external access for the Satellite Server virtual machine.
Parameter 7: Specifies the account name by which virt-who is to connect to the hypervisor. In this case, vCenter. You must use the [username=administrator@vsphere.local → change].
We can get this username from step 2 suboption, Enabling VMware vCenter external access for the Satellite Server virtual machine.
Note: You must use the "domain_name/account_name" format. A single backslash separates the two values. If you are using a domain account and the global configuration /etc/sysconfig/virt-who file, then two backslashes are required.
II: Red Hat Satellite Server configuration
For example, satellite.example.com

type=esx → Remains same
hypervisor_id=uuid → Remains same
owner=IBM → change
env=Library → Remains same
server=10.11.12.13 → change
username=administrator@vsphere.local → change
encrypted_password=813873a394a9c1f2ca442e1dfa6da3e3 → change
rhsm_hostname=ipas-vm01.ibm.com → change
rhsm_username=satellite_admin → change
rhsm_encrypted_password=51ddcbac0a5f4171fc9357d859f21119 → change
rhsm_prefix=/rhsm → Remains same
- Edit the configuration files required for the virt-who.
a. Edit the global /etc/sysconfig/virt-who configuration file to set the following parameter to specify that virt-who is to communicate with a Satellite host. For example, VIRTWHO_SATELLITE6=1.
b. Allow an HTTP proxy between virt-who and guest virtual machines. If there is an HTTP proxy between the server on which virt-who is running and the hypervisors or virtualization managers, edit the global /etc/sysconfig/virt-who configuration file and set the following parameter:
http_proxy=http://proxy-ip-or-hostname:port-number. If there is no proxy, then add "NO_PROXY=*" to the file.
c. Add no_proxy parameter entry to the file /etc/rhsm/rhsm.conf.
no_proxy = ipas-vm01.ibm.com
#Where, ipas-vm01.ibm.com is the RHUS hostname.
Run the "hostname -f" command on the Satellite Server.
d. Start and enable the virt-who service. Run the following commands:
# systemctl start virt-who.service
# systemctl enable virt-who.service
e. Verify that the virt-who service started successfully.
Run the following command:
# systemctl status virt-who.service
Logs can be viewed at /var/log/rhsm/rhsm.log - Restart the virt-who service.
If one or more of the virt-who configuration files is changed or if the environment in the Satellite configuration changes, you must restart the virt-who service.
For example, you must restart virt-who after you change the virt-who account password or when you move a hypervisor to a new organization.
Run the following command:
# systemctl restart virt-who.service
Step 3: Attaching host-based subscriptions to the newly created hypervisors
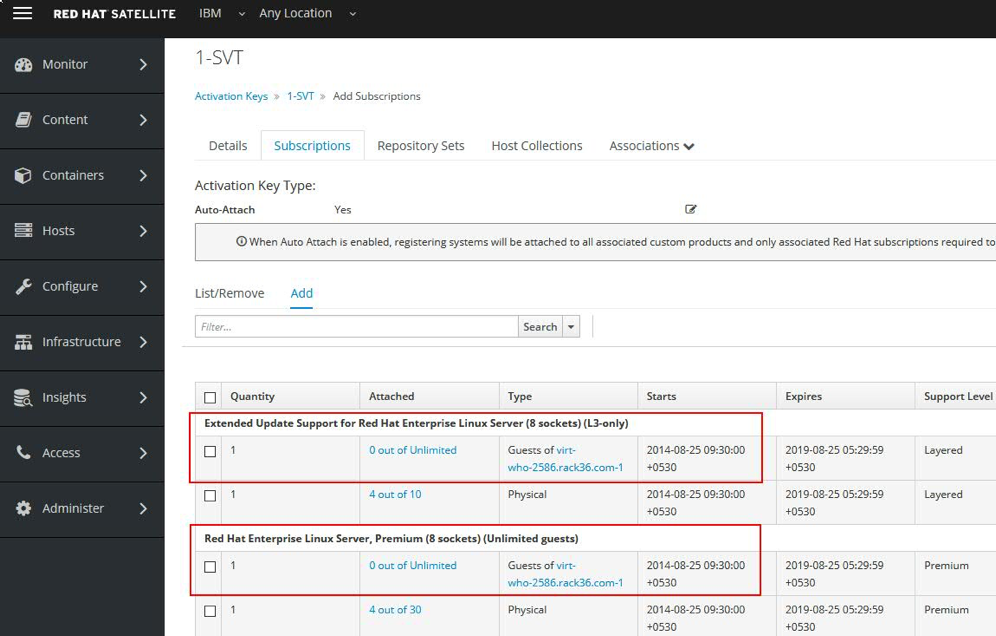
All hypervisors are displayed in the Red Hat Satellite Server user interface, distinguished by their universally unique identifiers.
1. Log in to the Satellite Server user interface. (https://<Satellite Server IP address>)
Go to Hosts => Content Hosts => search for virt-who.
This event lists all the compute nodes (ESXi).
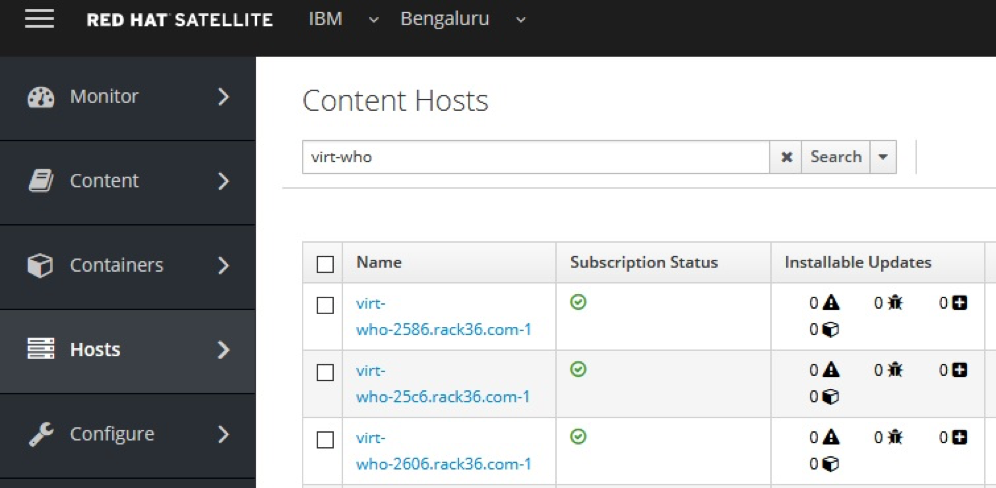
Note: Obtain the subscriptions from IBM Support.
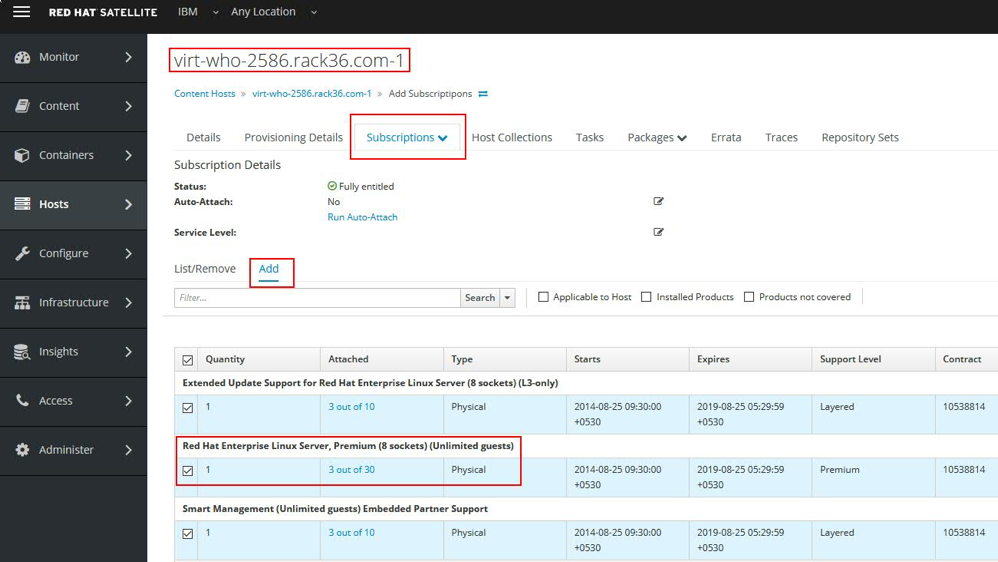
b. Click the Add tab.
c. Select the subscription to add.
Required: Red Hat Enterprise Linux Server, Premium (8 sockets) (Unlimited guests)
Optional: Extended Update Support for Red Hat Enterprise Linux Server (8 sockets) (L3-only)
Optional: Smart Management (Unlimited guests) Embedded Partner Support
d. Repeat for all virt-who hypervisors.
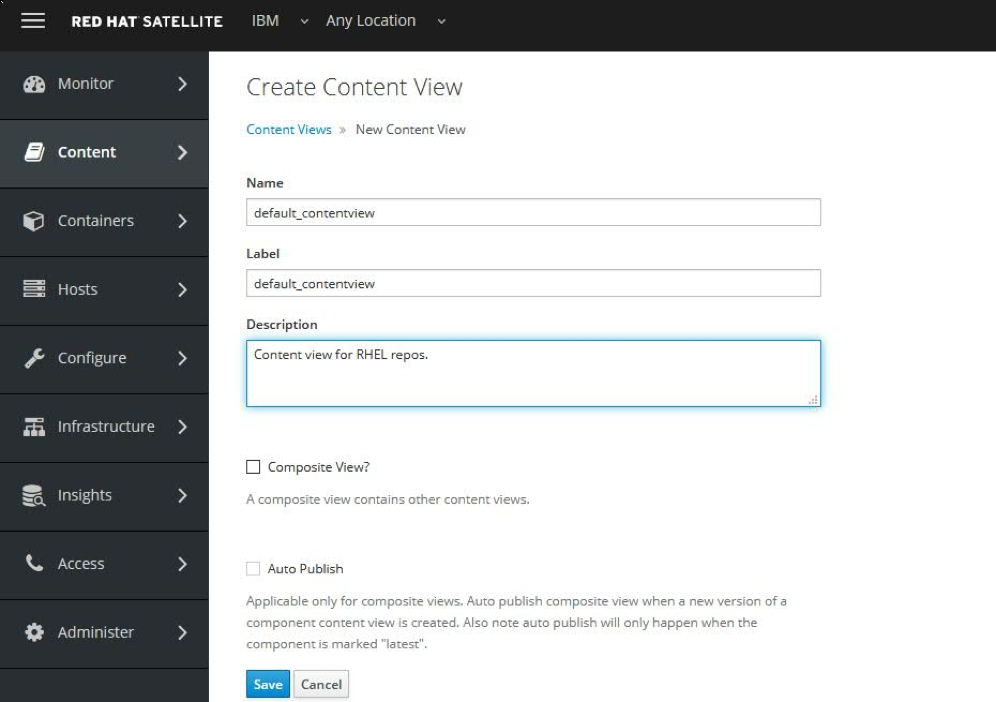
- Click Create New View.
- Enter details and click Save.
5. Use the newly created activation key to register client virtual machines.
When virtual machines are now able to get yum updates from their hypervisor hosts. The following figure displays the working state of the Satellite Server.
• All physical subscriptions are attached only to hypervisor hosts.
• The "x out of Unlimited" virtual guest subscriptions are used by the client virtual machines that are registered to those hypervisor hosts.
Deploying Satellite Server V6.10 Shared Service
- Deploy the Red Hat OS Update Services (For Satellite V6.*) shared server that points to the newly deployed Satellite Server V6.10.
Note: Ensure that the Satellite Server activation key and the Organization Name fields are the same as defined earlier in this procedure. - Deploy the client virtual machines in the same cloud group in which the Shared Service was deployed. The newly deployed virtual machines can now register and receive updates from the Satellite Server.
Mandatory fields:
URL to connect to Satellite Server (Hostname must be FQDN) => Use the IP or FQDN address of the Satellite Server that you deployed.
Satellite Server activation key => It is the same key that we see at Satellite Server UI in step, Post-Satellite V6.10 installation virt-who configuration > Step 3: Attaching host-based subscriptions to the newly created hypervisors, subsection 2.
Organization Name (as used in Satellite) => It is the Satellite Server Organization Name that is used when you deploy the Satellite Server pattern. It was earlier used in, Post-Satellite V6.10 installation virt-who configuration >> Step 2: Configuring virt-who and host-guests mappings >> i. VMware vCenter configuration

Related Information
Was this topic helpful?
Document Information
Modified date:
10 May 2022
UID
ibm16514457