How To
Summary
Covers the importance of configuring the BMC on the 7063-CR2 and explains the interfaces available to do so, among other BMC concepts.
Objective
Explain what is the purpose of the BMC on the 7063-CR2 HMC, and how to configure its networking such that it can be accessed for service and for self-monitoring of platform events.
Environment
7063-CR2 Power Hardware Management Console
Steps
The Baseboard Management Controller (BMC) on the 7063-CR2 is based on the OpenBMC standard.
The BMC is a part of the appliance and it is required to configure its networking so it can be accessed for service purposes.
In addition, the HMC operating system communicates with its own BMC to monitor any platform events reported for problem diagnosis.
The BMC provides many management functions, for example, controlling the power state of the HMC remotely, event logging, remote console access through KVM, serial over LAN, updating firmware, and many others.
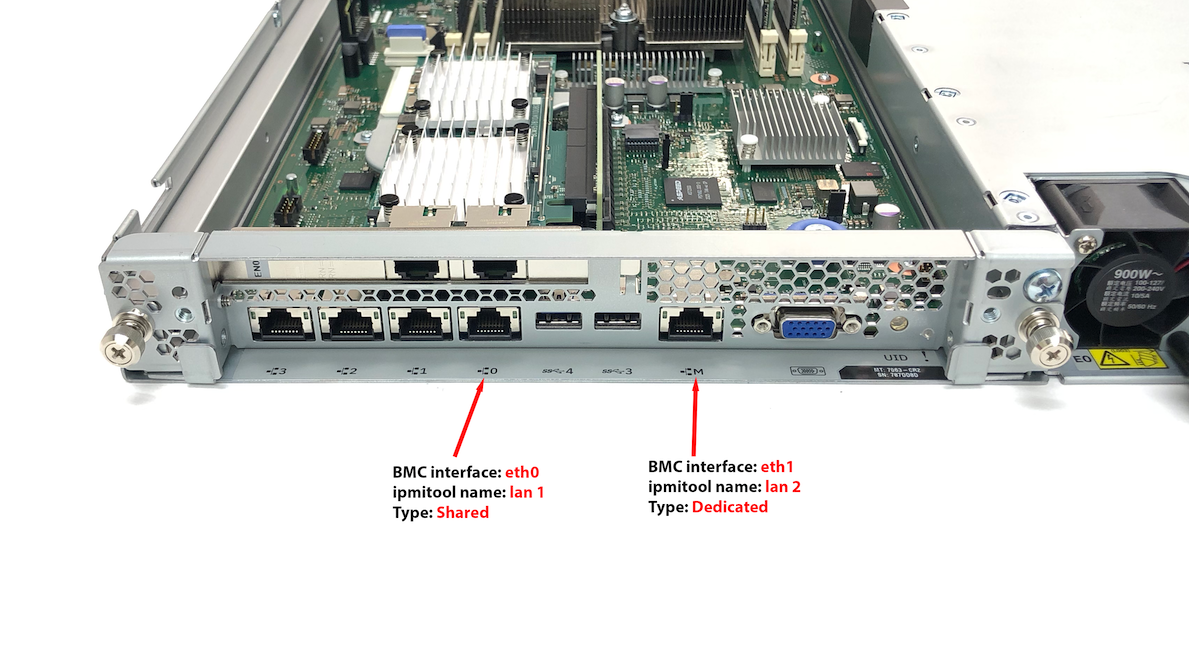
To configure the BMC on the network, it is necessary to first understand the available network interfaces and how they map to the physical ports on the HMC.
- The 7062-CR2 BMC provides two network interfaces to configure.
- Each interface maps to a different physical port on the system.
- Different management tools name the interfaces differently.
The following table shows the relationship between the two network interfaces on the BMC and how they map to the physical ports. In addition, it shows how each interface is known to the management tools available to configure them:
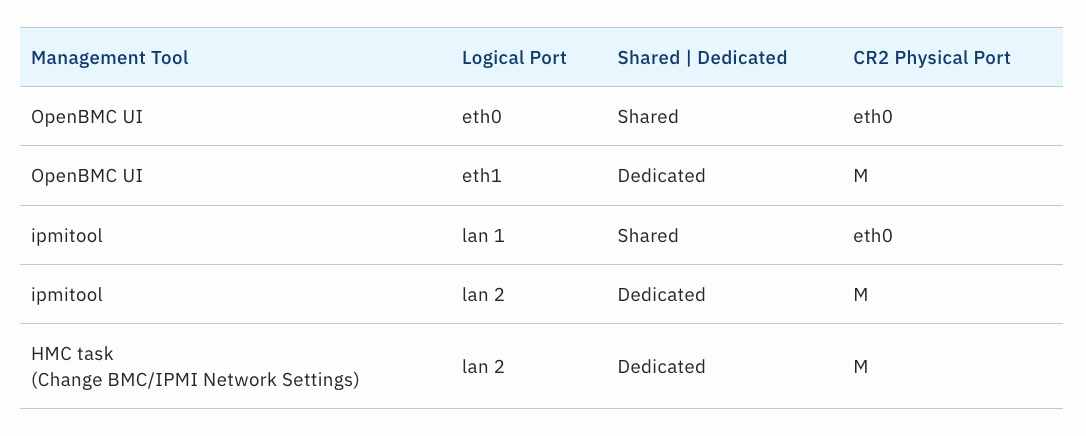
It is important to note that the BMC's eth0 and eth1 interfaces are not to be confused with the eth0 or eth1 interfaces as seen from the HMC OS. Each entity, BMC, and HMC, sees a different set of logical interfaces, but physically they can share port eth0.
The BMC can be accessed on either one of its network interfaces, or both.
When planning for which interface to use, consider the following:
- Given that the HMC and the BMC can share the port labeled eth0, this presents an opportunity to configure the BMC and the HMC's public interface on the same subnet. This way they can both share the cable. Each interface has its own IP and MAC address, but traffic can flow over the same wire.
- Typically users configure the HMC's service network on eth0 (although this is not a hard requirement), in that case, if configuring the service network on another port is not wanted, then the dedicated port of the BMC can be used and the shared interface can be left unconfigured. This allows for the cable on eth0 to be used for the service network which is usually defined as a private network.
 There are three methods to configure the network settings of the BMC:
- Using ipmitool from the Petitboot shell
- Using a task on the HMC UI
- Using the OpenBMC Web UI
The following three sections cover how to configure the BMC from each one of these management tools.
NOTE: The selected physical port must have an active network link at the time of configuration, for the configuration changes to be saved.
Configuring the BMC network interface(s) using ipmitool from the Petitboot shell
This method allows for the configuration of the BMC network interface before the HMC OS is even started. Once the network settings are configured, the user can connect to the BMC using a browser, and continue further configuration of BMC settings.
- Power On the HMC
- When the Petitboot bootloader is displayed, use the keyboard arrows to select Exit to shell and press Enter
- If configuring the shared Ethernet interface (eth0), use lan #1 as the interface for the next set of steps. If configuring the dedicated interface (port M), use lan #2 instead.
- Configure the interface to either static or dhcp (default is dhcp)
ipmitool lan set <lan #> ipsrc <static | dhcp>
where:
<lan #> is either 1 or 2
Example for the case where the shared interface (eth0 or lan 1) is set to static
ipmitool lan set 1 ipsrc static - Configure the IP address
ipmitool lan set <lan #> ipaddr <ip_address>
where:
<ip_address> is the ip wanted
Example:
ipmitool lan set 1 ipaddr 192.168.10.2 - Configure the netmask
ipmitool lan set <lan #> netmask <netmask>
where:
<netmask> is the netmask wanted
Example:
ipmitool lan set 1 netmask 255.255.255.0 - Configure the gateway
ipmitool lan set <lan #> defgw ipaddr <gateway_server>
where:
<gateway_server> is the ip of the gateway
Example:
ipmitool lan set 1 defgw ipaddr 192.168.10.1 - To display an interface's configuration settings use:
ipmitool lan print <lan #>
Example:
ipmitool lan print 1
- Configure the interface to either static or dhcp (default is dhcp)
Configuring the BMC network interface(s) using the HMC UI
HMC v9r2.950 and v10r1.1010
For CR2 HMCs installed with v9r2.950 and v10r1.1010 base, the Change BMC/IPMI Network Settings task modifies the BMC's dedicated interface's settings only. The dedicated interface is the one on physical port "M".
- Power On the HMC
- Login as hscroot
- Click Console Management
- Click Console Settings
- Click Change BMC/IPMI Network Settings
- Click the appropriate radio button to select DHCP or STATIC
If static is selected, complete the IP address, Subnet mask, and Gateway - Click OK
Following the completion of this task, the BMC Web UI can be accessed for further configuration via the Launch BMC/IPMI Login task.
HMC v10r2.103x - V10R2 105x
- Power On the HMC
- Login as hscroot
- Click HMC Management
- Click BMC Connectivity
- Select the wanted BMC interface port type (Dedicated and/or Shared) by checking the corresponding box. Checking the box, enables the fields to enter the network settings. One or both interfaces can be selected and configured simultaneously.
- For each interface port type selected, specify if it is to be configured using DHCP or STATIC.
- If static is selected, complete the IP address, Subnet mask, and Gateway
- Click OK
Following the completion of this task, the BMC Web UI can be accessed for further configuration via the BMC Web Log In task.
HMC V10R3 106x and newer
- Power On the HMC
- Login as hscroot
- Click HMC Management
- Click BMC settings
- In the Connectivity section, both the Dedicated port and the Shared port are configured to Obtain IP address automatically by default. To assign a static IP for either or both ports, select Specify a static IP address (IPv4) and fill in the required fields (IP address (IPv4), Subnet mask, and gateway)
- Click Save
Following the completion of this task, the BMC Web UI can be accessed for further configuration through the BMC Web Log In task.
Configuring the BMC network interface(s) using the BMC Web UI
The BMC interfaces (shared and dedicated), are pre-set with a randomly assigned IP in the 192.254.x.x range. This is a non-routable, link-local IP that is part of the OpenBMC standard. If removed, a new IP will be reconfigured automatically.
The BMC also has a default hostname set to "mowgli".
1. If the BMC already has an IP address set, skip this step, otherwise, if the BMC is being configured for the first time, set the system you will be using to configure the BMC, to have an address in the 192.254.x.x range, (ex. 192.254.50.17), with a subnet mask of 255.255.0.0.
2. Open a browser to:
https://<bmc ip or hostname>
Where:
<bmc ip> is the BMC IP, if known
<hostname> - the default hostname is mowgli.local
Ex. https://mowgli.local
Depending on browser settings, it may be necessary to accept security prompts.
https://<bmc ip or hostname>
Where:
<bmc ip> is the BMC IP, if known
<hostname> - the default hostname is mowgli.local
Ex. https://mowgli.local
Depending on browser settings, it may be necessary to accept security prompts.
3. At the login, enter the username (default is 'root')
Enter the password (default is '0penBmc', that is a zero instead of the letter O)
If the default password was used, you will be prompted to change it
4. From the left menu, click Server configuration
5. Click Bmc network settings
By default, the settings for eth0 are shown first. Use the drop-down menu under NETWORK INTERFACE to select the wanted interface. The eth0 interface maps to the physical eth0 port on the HMC and the eth1 interface, maps to the dedicated port (port M).
6. On the IPV4 SETTINGS section, select OBTAIN AN IP ADDRESS AUTOMATICALLY USING DHCP or ASSIGN A STATIC IP ADDRESS depending on the wanted setting. If ASSIGN A STATIC IP ADDRESS is selected, click Add IPV4 address to enter the values.
7. Under the DNS SETTINGS section, click Add DNS server to add the IP of a DNS server if applicable.
8. Click Save settings at the bottom of the page
Additional Information
In addition to setting up the BMC, the 7063-CR2 HMC requires that Console Inband Communication Credentials be configured for the purpose of self-monitoring of problems on the HMC. Click here for more information.
Related Information
Document Location
Worldwide
[{"Type":"MASTER","Line of Business":{"code":"LOB57","label":"Power"},"Business Unit":{"code":"BU058","label":"IBM Infrastructure w\/TPS"},"Product":{"code":"7063-CR2","label":"Hardware Management Console (7063-CR2)"},"ARM Category":[],"ARM Case Number":[],"Platform":[{"code":"PF025","label":"Platform Independent"}]}]
Was this topic helpful?
Document Information
Modified date:
27 June 2024
UID
ibm16483593