Troubleshooting
Problem
Once you have identified the query that is causing a performance issue, you may try running the same query through Run SQL Scripts from Access Client Solutions to verify the performance issue can be re-created. If so, this document gives the steps on how to collect further debug information for use by the IBM i Global Support Center.
Resolving The Problem
A QRO HASH value is a unique ID assigned to a query.
If you do not know the poor performing query's QRO HASH value, then use the following steps to collect a targeted tracing using Run SQL Script from IBM i Access Client Solutions (ACS).
If you know the QRO HASH value for the query in question, then set up the targeted tracing using these instructions: https://www.ibm.com/support/pages/node/685069
Step 1: Create the QAQQINI file and collect the trace.
| 1. | Open the Run SQL Script window from IBM i Access Client Solutions by doing the following: A. Launch IBM i Access Client Solutions B. Under the Database task, click Run SQL Scripts 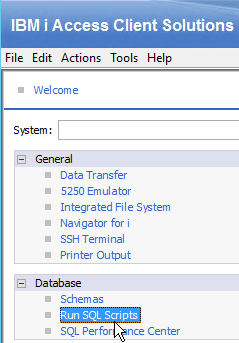 |
| 2. |
In the Run SQL Script window, go to Options and ensure that Display Results in Separate Window is selected.
 |
| 3. |
In the Run SQL Script window, type the following:
Note: This example creates and uses the library Tnnnnnnnnn, where nnnnnnnnn is your case number. If you do not want to create a Tnnnnnnnnn library, change the library to the library name that you want to use. Caution: Putting the QAQQINI file in QUSRSYS with full debug on can cause significant overhead.
Note: If you are currently using a QAQQINI file that uses values other than DEFAULT, talk to your Support Representative to determine if that should be included in the new QAQQINI file you create below. CL: CRTLIB Tnnnnnnnnn; CL: CRTDUPOBJ OBJ(QAQQINI) FROMLIB(QSYS) OBJTYPE(*FILE) TOLIB(Tnnnnnnnnn) DATA(*NO); INSERT INTO Tnnnnnnnnn.QAQQINI VALUES('MESSAGES_DEBUG','*YES', default); INSERT INTO Tnnnnnnnnn.QAQQINI VALUES('MESSAGES_INFORMATIONAL','*FULL', default); INSERT INTO Tnnnnnnnnn.QAQQINI VALUES('QUERY_TREE_DUMP','*DBPM', default); INSERT INTO Tnnnnnnnnn.QAQQINI VALUES('QUERY_TREE_DUMP_AT','*CLOSE', default); INSERT INTO Tnnnnnnnnn.QAQQINI VALUES('REOPTIMIZE_ACCESS_PLAN','*FORCE', default); INSERT INTO Tnnnnnnnnn.QAQQINI VALUES('MESSAGES_FINAL_PLAN','*FULL', default); INSERT INTO Tnnnnnnnnn.QAQQINI VALUES('MESSAGES_PLAN_IMPLEMENTATION', '*FULL', default); INSERT INTO Tnnnnnnnnn.QAQQINI VALUES('QUERY_INSTRUMENTATION', '*FULL ', default); CL: CHGQRYA QRYOPTLIB(Tnnnnnnnnn); Go to Run, and select All. |
| 4. | Delete the above statements, and run the poorly performing SQL statement. |
| 5. | Close the result set window, delete the SQL statement, and type the following statements: Note: This will set the QAQQINI file back to the default of QUSRSYS. If you use a different library, change the library name on the CHGQRYA command. CL: CHGQRYA QRYOPTLIB(QUSRSYS); Go to Run, and Select All. |
| 6. | Close the Run SQL Script window. |
Step 2: Prepare the Data
You should now have at least two objects in the /QIBM/UserData/OS400/SQE/Username_JobNumber or /tmp/sqe/Username_JobNumber directory in the IFS.
All of the objects in the sub-directory will need to be sent to IBM.
The object names will start with DBOP* and QEO*.
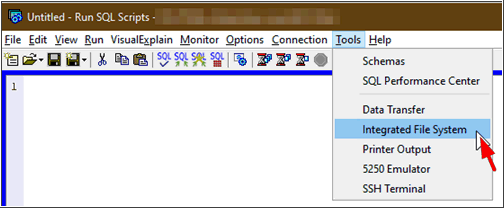
| 1. |
In your Run SQL scripts window select Tools menu and then Integrated File System:
 |
| 2. |
Enter /QIBM/UserData/OS400/SQE into the Directory field and press Enter:
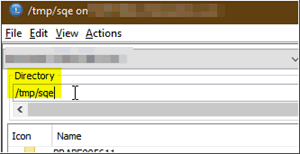
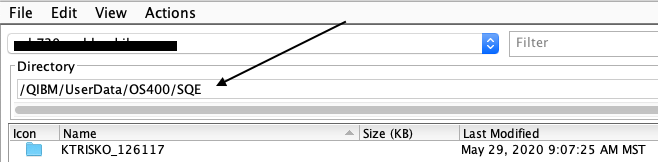 If your PTF level is before May 2020, you may need to enter /tmp/sqe into the Directory field and press Enter:
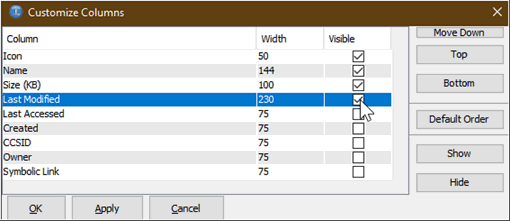
 Optionally, click twice on the Last Modified Column Title to sort the list accordingly and have the latest folders at the top. If the column is missing, select View/Columns:
 Select the column and click OK:
 |
| 3. |
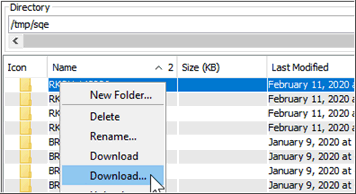
Select the folder that contains the targeted trace data. The folder name should be UserID_JobNumber for the User ID and Job Number that executed the query. Additionally, the folder will probably be the topmost folder when sorting by Last Modified. Once the folder is selected, right-mouse-button and then click the left-mouse-button to get the context menu, where you should choose Download...
 |
| 4. |
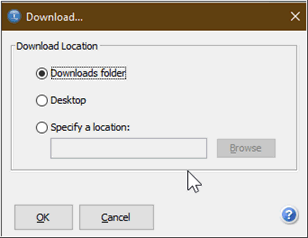
Choose where you would like to receive the folder and click OK:
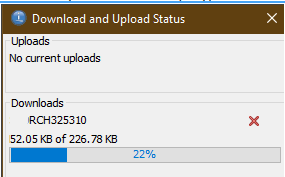
 After that, the download progress window will open and close when done:
 |
| 5. |
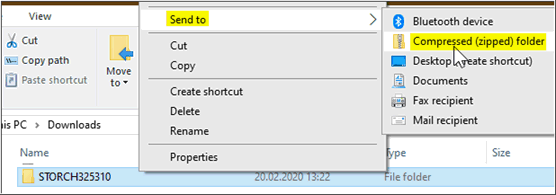
Before uploading the data to the case, the received folder should be compressed (zipped):
 |
|
Upload the data via the Support Portal
|
|
| Use the Enhanced Customer Data Repository Tool | |
| Alternate Method, including options for Blue Diamond Customers - other options |
Related Information
[{"Business Unit":{"code":"BU058","label":"IBM Infrastructure w\/TPS"},"Product":{"code":"SWG60","label":"IBM i"},"Component":"Db2 for i","Platform":[],"Version":"All Versions","Edition":"","Line of Business":{"code":"LOB57","label":"Power"}}]
Historical Number
N1018843
Was this topic helpful?
Document Information
Modified date:
15 June 2021
UID
nas8N1018843