How To
Summary
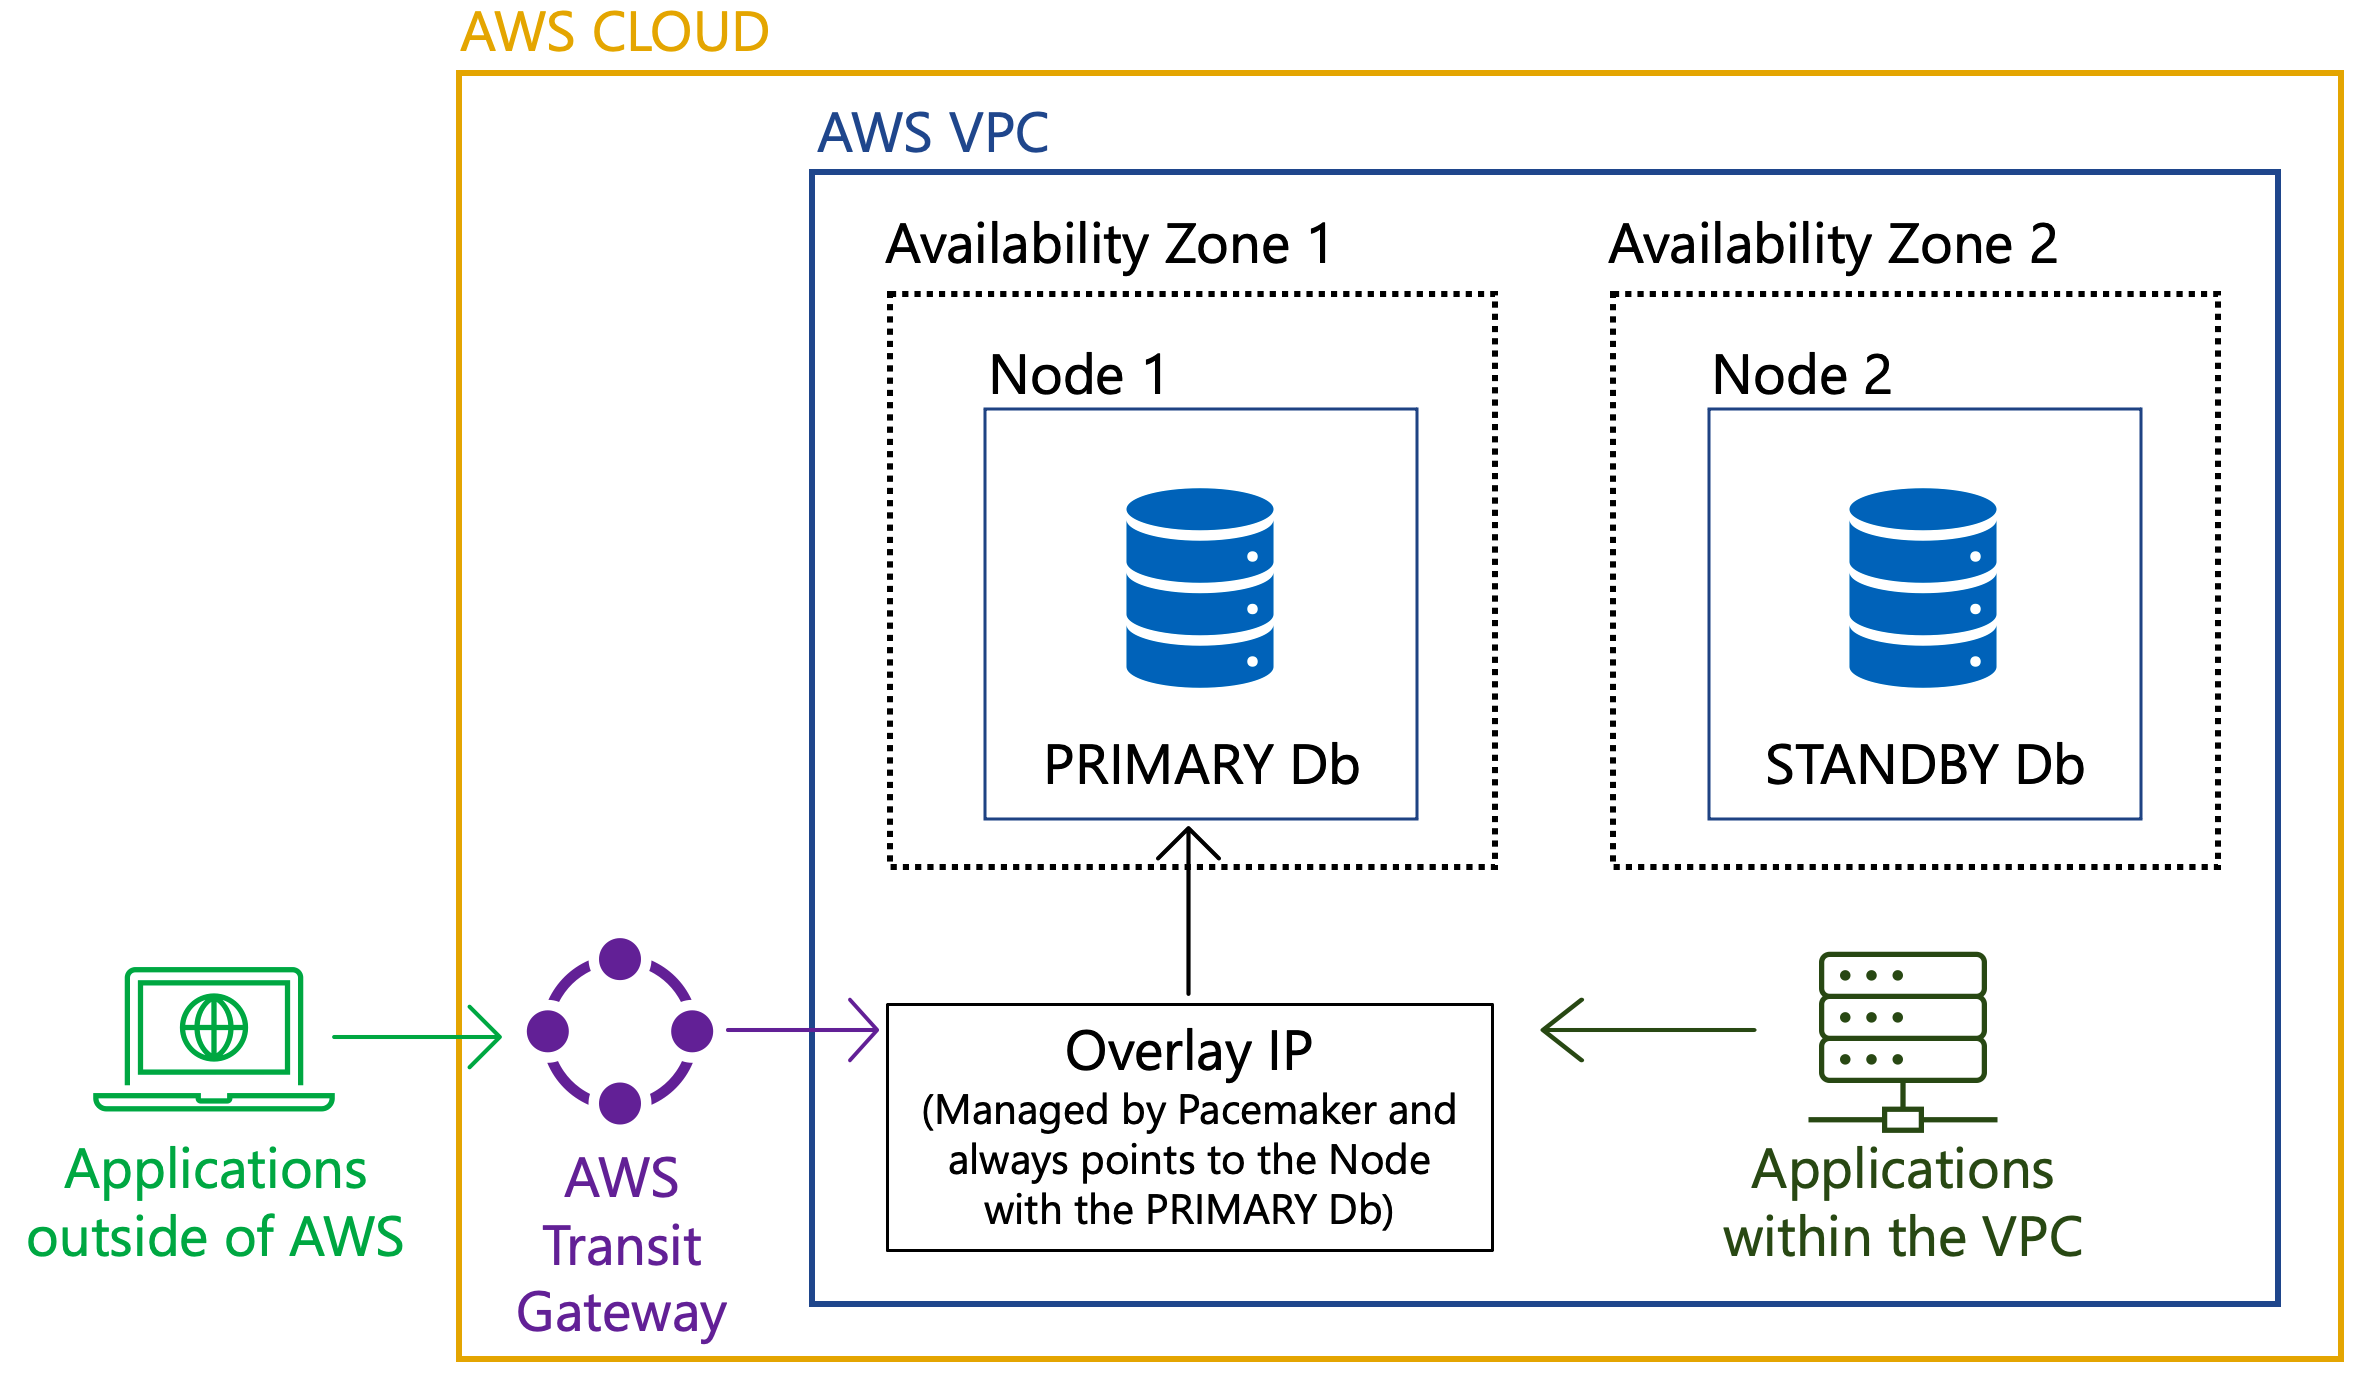
Setting up Virtual IP (VIP) for HADR enabled database provides a common connection point for clients without the need to disclose the actual IP address of the primary and standby server for the database. If a failover occurs, the client can still connect to the new primary by using the VIP, effectively achieving automatic client reroute at the network level. The prerequisite for VIP setup is for the primary and standby servers' IP address to be on the same IP subnet - a requirement that sometimes cannot be easily achieved on cloud servers. On AWS, Overlay IP address Routing provides the capability to send network traffic to the HADR servers within the AWS VPC by a route table. Effectively, that means one can set up the clients within the same AWS VPC but different availability zone as the Db2 HADR servers and establish connectivity through the Overlay IP address. If there is a need for clients outside of the Db2 HADR servers' VPC to connect to the Db2 HADR servers, more setup that uses the AWS Transit Gateway (TGW) or AWS NLB is required. The same is true for servers outside of AWS Cloud. The goal of this document is to provide step-by-step procedures to set up a Db2 HADR configuration with Pacemaker on AWS with Overlay IP address Routing. The configuration of features such as AWS TGW or NLB are out of the scope of this document.
Note: For primary and standby VIP configuration in Db2 HADR with Pacemaker on AWS, the Overlay IP solution in this technote must be used instead of the VIP configuration created by using the db2cm tool.
Objective
Environment
1. Refer to the following Db2 documentation page for a list of platforms supported by Pacemaker, these same restrictions apply here:
Restrictions on Pacemaker - IBM Documentation
2. In shared VPC environments, participant accounts cannot be grant themselves the authority to update the routing tables. The configured policy and credentials provided to allow the application to update the route tables must come from the VPC owning account. Otherwise the Overlay IP will encounter authorization errors when attempting to start the Overlay IP resource.
3. For deployments on Db2 V11.5.8.0 or later, see the updated documentation using db2cm to configure the Overlay IP address.
Setting up a two-node Db2 Pacemaker cluster with Overlay IP as Virtual IP on AWS with Db2 V11.5.8.0
Steps
Prior to installing Db2 with HADR, ensure you have set up your environment including the AWS Identity and Access Management (IAM) as described here:
What is IAM? - AWS Identity and Access Management (amazon.com)
A key requirement for the Overlay IP is that it must not be used elsewhere in your VPC or on-premises. It must be part of the private IP address range defined in RFC1918.
In this document, the following IP address and ethernet devices are used as an example:
- 192.168.1.81/32
- eth0
What is needed?
- EC2-instance-id: Instance ID for the Db2 primary instance
- EC2-instance-id: Instance ID for the Db2 secondary instance
3. Create a policy and attach it to your IAM role by using the IAM Management Console.
To do so, create a new role in the Identity and Access Management (IAM) Console or use the already existing role that you have created for fencing. Once the role is created, create a new policy based on the JSON template in the Access Management (IAM) Console.
What is needed?
- Region-name: the name of the AWS region
- Account-id: The name of the AWS account in which the policy is getting used
- rtb-000: The identifier of the routing table, which needs to be updated (This can be found in the VPC console under “Route Tables” section)
"Version": "2012-10-17",
"Statement": [
{
"Sid": "Stmt0",
"Effect": "Allow",
"Action": "ec2:ReplaceRoute",
"Resource": "arn:aws:ec2:region-name:account-id:route-table/rtb-00"
},
{
"Sid": "Stmt1",
"Effect": "Allow",
"Action": "ec2:DescribeRouteTables",
"Resource": "*"
}
]
}
Understanding and getting your AWS credentials - AWS General Reference (amazon.com)
On both virtual machines in the database cluster, create a profile with the AWS CLI.
{
"Return": true
}
- The name of the database resource agent, this can be found by running crm config show | grep primitive | grep DBNAME command.
- For this example we use: db2_db2stj_db2db2stj_STJ
- The Overlay IP address created on Step 5.
- Routing table ID used in Step 6.
- The profile name created on Step 4.
- The location of the "AWS" binary. (Can be found by executing which aws)
- The two node names. (Can be found by using crm_node -l)
crm configure colocation db2_db2stj_db2stj_STJ_AWS_primary-colocation inf: db2_db2stj_db2stj_STJ_AWS_primary-OIP:Started db2_db2stj_db2stj_STJ-clone:Master
crm configure order order-rule-db2_db2stj_db2stj_STJ-then-primary-oip Mandatory: db2_db2stj_db2stj_STJ-clone db2_db2stj_db2stj_STJ_AWS_primary-OIP
crm configure location prefer-node1_db2_db2stj_db2stj_STJ_AWS_primary-OIP db2_db2stj_db2stj_STJ_AWS_primary-OIP 100: dbprim00
crm configure location prefer-node2_db2_db2stj_db2stj_STJ_AWS_primary-OIP db2_db2stj_db2stj_STJ_AWS_primary-OIP 100: dbsec00
If you are using a single AWS Fencing Device starting with Db2 11.5.6, add a priority to the primary Overlay IP Address. This prefers fencing of the node, hosting the standby database in a broken network connection between the two nodes.
10.Validate the resources are running correctly and on the correct node.
The primary overlay IP must be started on the same node as the primary HADR node, which is shown as the master.
The standby overlay IP must be started on the standby HADR node, which is shown in the following output.
dbprim00:~/.aws # crm status
Cluster Summary:
* Stack: corosync
* Current DC: dbsec00 (version 2.0.4+20200616.2deceaa3a-1.2.db2pcmk-2.0.4+20200616.2deceaa3a) - partition with quorum
* Last updated: Fri Jun 11 07:38:21 2021
* Last change: Fri Jun 11 07:38:17 2021 by root via cibadmin on dbprim00
* 2 nodes configured
* 8 resource instances configured
Node List:
* Online: [ dbprim00 dbsec00 ]
Full List of Resources:
* db2_dbprim00_eth0 (ocf::heartbeat:db2ethmon): Started dbprim00
* db2_dbsec00_eth0 (ocf::heartbeat:db2ethmon): Started dbsec00
* db2_dbprim00_db2stj_0 (ocf::heartbeat:db2inst): Started dbprim00
* db2_dbsec00_db2stj_0 (ocf::heartbeat:db2inst): Started dbsec00
* Clone Set: db2_db2stj_db2stj_STJ-clone [db2_db2stj_db2stj_STJ] (promotable):
* Masters: [ dbprim00 ]
* Slaves: [ dbsec00 ]
* fence_db2_aws_STJ (stonith:fence_aws): Started dbsec00
* db2_db2stj_db2stj_STJ_AWS_primary-OIP (ocf::heartbeat:aws-vpc-move-ip): Started dbprim00
Document Location
Worldwide
Was this topic helpful?
Document Information
Modified date:
11 November 2024
UID
ibm16359155