How To
Summary
This technote is intended for administrators who plan to implement an IBM Spectrum Protect Plus environment and plan to use new or existing IBM Spectrum Scale resources in this environment. To follow the procedures in this technote, you must be generally familiar with Linux® operating systems, IBM Spectrum Scale, and IBM Spectrum Protect Plus.
Objective
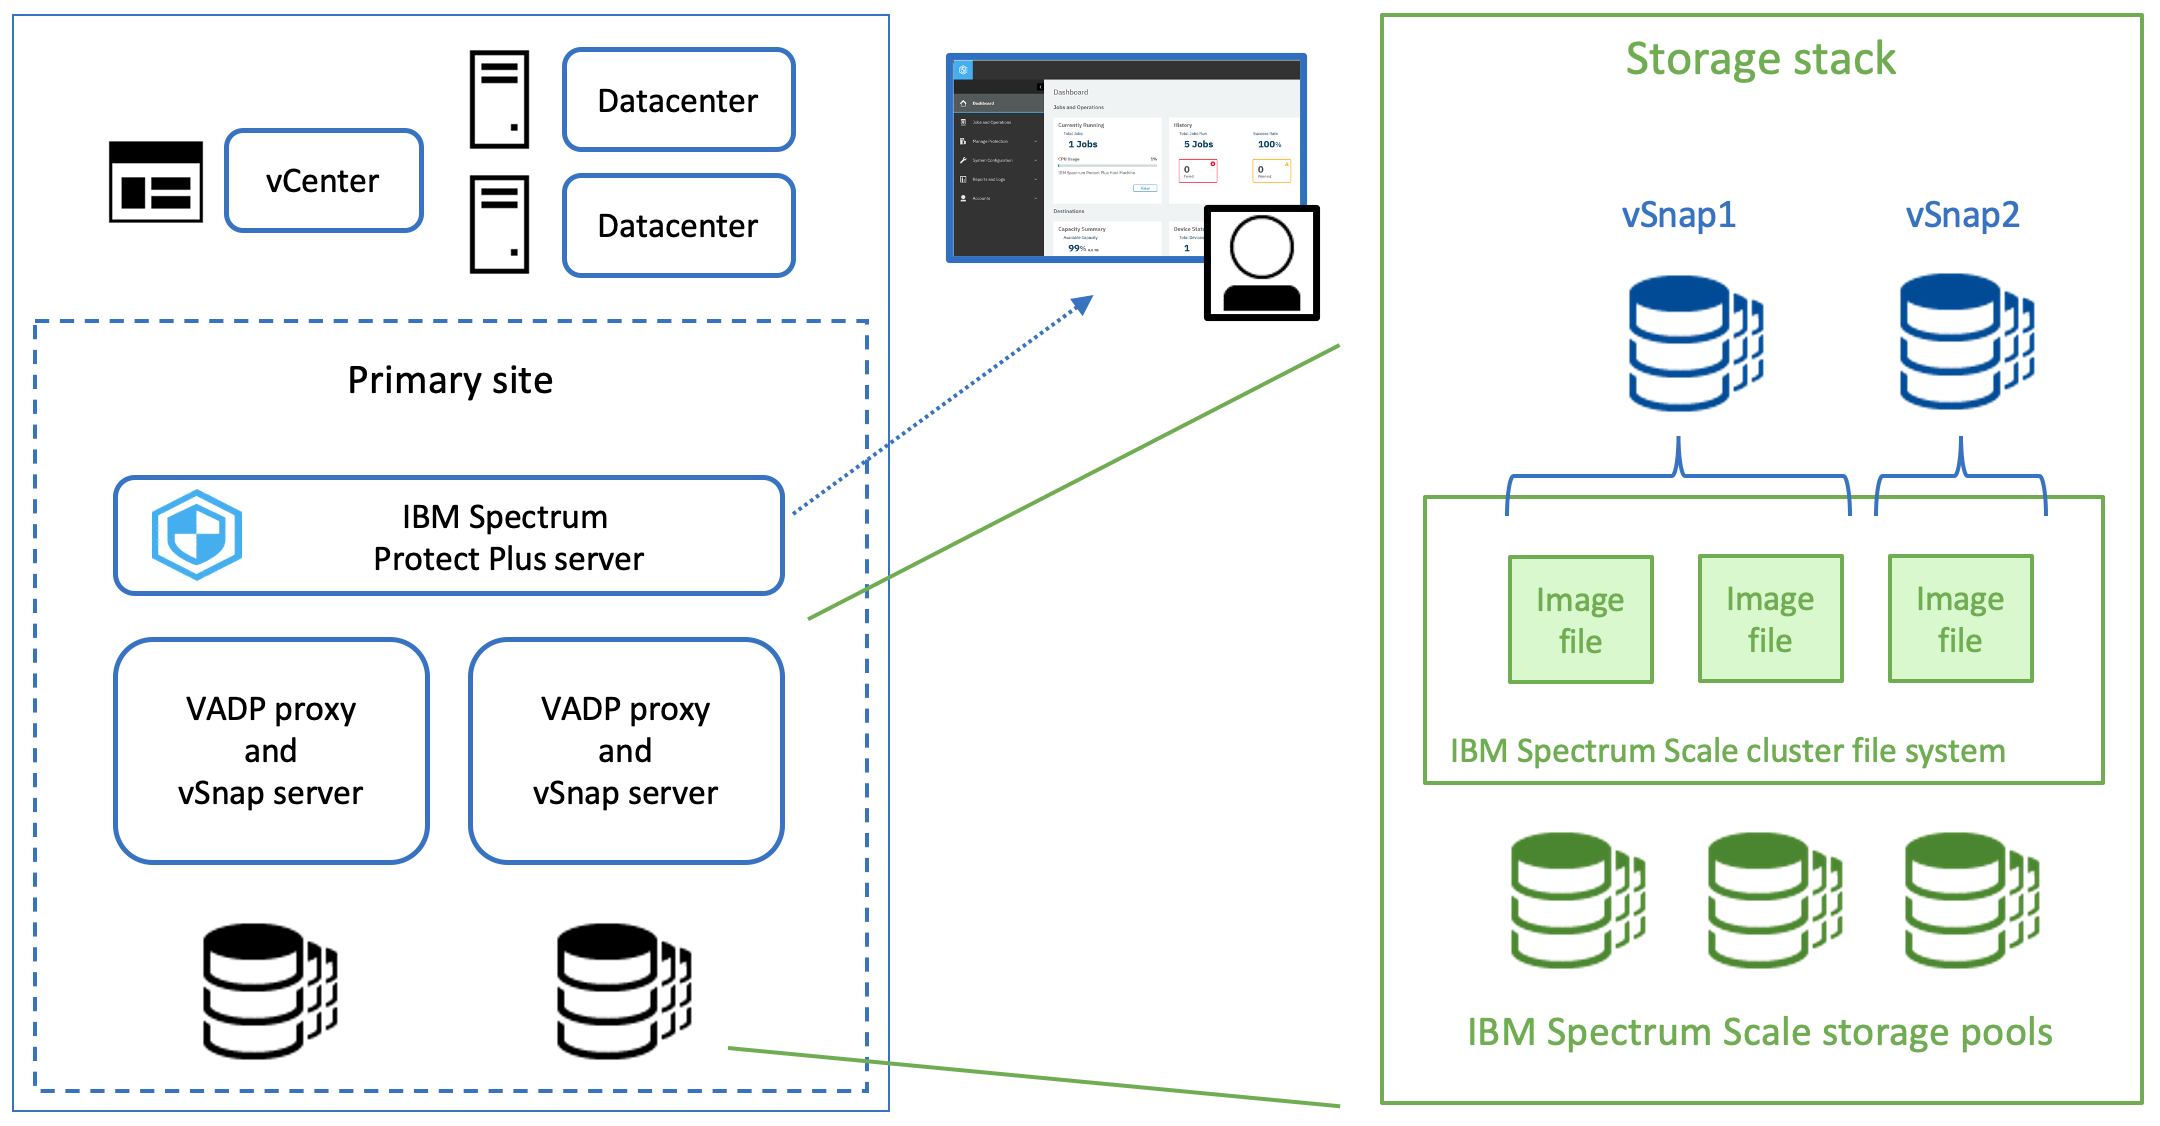
If you plan to use the vSnap server in combination with IBM Spectrum Scale, manual deployment on a preconfigured system is required. The system must be preconfigured with a Red Hat Linux operating system, must be part of an IBM Spectrum Scale cluster, and must have access to an IBM Spectrum Scale file system.
The file system can be an IBM Spectrum Scale Network Shared Disk (NSD) server or client. The same IBM Spectrum Scale file system can be used to provide storage capacity for multiple independent vSnap server instances. The IBM Spectrum Scale file system provides images that are used as storage devices for the vSnap server. Each vSnap server can use multiple storage images to distribute the file input/output (I/O) workload. However, an individual storage image can be assigned to only one vSnap server instance. The following figure is a conceptual overview that depicts the integration of IBM Spectrum Protect Plus with IBM Spectrum Scale:
Environment
The preferred method is to follow the IBM Spectrum Protect Plus Blueprints to meet the system requirements in terms of CPU, memory, and network connections for the planned vSnap server capacity. Complete the following steps:
- Determine the required vSnap server capacity. The capacity is calculated based on your organization's business requirements by using the IBM Spectrum Protect Plus vSnap sizer tool, which is part of the Blueprints package.
- Determine the base CPU and memory requirements to support this capacity, based on the Blueprints.
- Add an extra 8 GB for the IBM Spectrum Scale page pool memory. For more information about page pool memory, see Pinned memory.
- Ensure that the following extra system requirements are met:
| IBM Spectrum Protect Plus | Red Hat Enterprise Linux (RHEL) | IBM Spectrum Scale |
|---|---|---|
| Version 10.1.7 or later | 7.7 or later PTF | V5.0.5.1 or later |
| Version 10.1.8 or later | 8.3 or later PTF | V5.1.1.0 or later |
| Version 10.1.11 or later | 8.6 or later PTF | V5.1.4.0 or later |
| Version 10.1.14 or later | 8.7 or later PTF |
V5.1.6.1 or later
V5.2.0 or later
|
Steps
Procedures
OVA-based installation and configuration (vSnap 10.1.11 and newer)
Beginning with vSnap 10.1.11 the OVA package of the vSnap includes a fully configured RHEL 8 operating system image. To install and configure the IBM Spectrum Protect Plus vSnap server in combination with IBM Spectrum Scale, complete the following steps:
- Install the kernel headers and kernel tools that are included in the vSnap server package, as described in Installing kernel headers and tools.
- Install and configure IBM Spectrum Scale and create a file system, as described in Installing and configuring IBM Spectrum Scale.
- Configure the vSnap server, as described in Configuring the IBM Spectrum Protect Plus vSnap server.
- If you plan to copy data for long-term storage to a Cloud Object Storage provider or IBM Spectrum Protect, create a cache area that can be used to copy data from the vSnap server to Amazon Simple Storage Service (S3) or to an IBM Spectrum Protect repository server. Follow the instructions in Optional: Creating a cache area for data copies on Amazon S3 or a repository server.
- Finish the installation and configuration by initializing the system. Follow the instructions in Finishing the configuration of the environment.
OVA-based upgrade installation
To upgrade an existing vSnap that is configured with IBM Spectrum Scale to a new vSnap version complete the following steps:
- Back up the vSnap configuration, as described in Backup vSnap configuration.
- Install a new vSnap virtual machine by using the vSnap 10.1.11 OVA package.
Tip: Before you shut down the existing IBM Spectrum Scale based vSnap, remove the vSnap node from the IBM Spectrum Scale cluster to ensure the cluster does not lose quorum and shuts down unexpected. - Install the kernel headers and kernel tools that are included in the vSnap server package, as described in Installing kernel headers and tools.
- Install and configure IBM Spectrum Scale and create a file system, as described in Installing and configuring IBM Spectrum Scale.
- Restore the vSnap configuration, as described in Restore vSnap configuration.
Note: The RHEL 8 operating system image that comes with the vSnap OVA does not permit root user login. Since IBM Spectrum Scale requires root user login, this login must be configured after the installation of the vSnap. Furthermore, the firewall is configured for vSnap ports only. IBM Spectrum Scale might require other ports to be opened. Follow the IBM Spectrum Scale user guide and open the required ports in the firewall configuration.
Not OVA-based installation and configuration (vSnap pre-10.1.11 or physical machine installation)
To install and configure the IBM Spectrum Protect Plus vSnap server in combination with IBM Spectrum Scale, complete the following steps:
- Review the most current version of the IBM Spectrum Protect Plus Blueprints to understand the best practices for setup and configuration of IBM Spectrum Protect Plus.
- Install and configure the RHEL operating system, as described in Installing and configuring RHEL.
- Install the vSnap server with the included Linux kernel Version, as described in Installing the IBM Spectrum Protect Plus vSnap server.
- Install the kernel headers and kernel tools that are included in the vSnap server package, as described in Installing kernel headers and tools.
- Install and configure IBM Spectrum Scale and create a file system, as described in Installing and configuring IBM Spectrum Scale.
- Configure the vSnap server, as described in Configuring the IBM Spectrum Protect Plus vSnap server.
- If you plan to copy data for long-term storage to a Cloud Object Storage provider or IBM Spectrum Protect, create a cache area that can be used to copy data from the vSnap server to Amazon Simple Storage Service (S3) or to an IBM Spectrum Protect repository server. Follow the instructions in Optional: Creating a cache area for data copies on Amazon S3 or a repository server.
- Finish the installation and configuration by initializing the system. Follow the instructions in Finishing the configuration of the environment.
Tip: All commands described in the following sections are based on the assumption that the administrator has sudo root rights or root rights on the system.
Detailed Steps
Installing and configuring RHEL
Complete the following steps:
- Configure a local or global yum repository for the installation packages.
- Download the following packages. By installing these packages, you can help to prevent dependency conflicts when you install the vSnap server packages later:
> yum install ksh > yum install samba > yum install samba-client > yum install samba-winbind > yum install samba-winbind-clients > yum install samba-winbind-modules - Disable Security-Enhanced Linux (SELinux) on the system by issuing the following commands:
> vi /etc/selinux/config → set SELinux=disabled -
Install and configure the operating system by following the instructions in the Red Hat Enterprise Linux documentation.
-
Restart the system.
Installing the IBM Spectrum Protect Plus vSnap server
The IBM Spectrum Protect Plus vSnap server installation package includes two Linux kernel packages. The Linux kernel packages included depend on the run file type you use.
| Run file type | Default Linux kernel | Alternative Linux kernel |
|---|---|---|
| vsnap-dist-el7-10.1.8-xxx.run | 4.19 | 3.10 |
| vsnap-dist-el8-10.1.8-xxx.run | 4.18 | n/a |
| vsnap-dist-el8-10.1.11-xxx.run | 4.18 | n/a |
Before you begin
Note: This step is not required for vSnap 10.1.11 and newer
To use the alternative kernel package, complete the following configuration. Type the commands:
RHEL 7 > mkdir /etc/vsnap
RHEL 7 > touch /etc/vsnap/skip_kernel_upgrade
Procedure
- Install the IBM Spectrum Protect Plus vSnap server package. Type the command:
Follow the prompts to complete the installation.RHEL 7 > ./vsnap-dist-el7-10.1.8-xxx.run RHEL 8 > ./vsnap-dist-el7-10.1.8-xxx.run RHEL 8.6 and newer > ./vsnap-dist-el8-10.1.11-xxx.run - Restart the system.
Installing the Red Hat kernel headers and tools
To ensure compatibility between IBM Spectrum Protect Plus and IBM Spectrum Scale, more kernel headers and kernel tools must be installed before you configure the IBM Spectrum Scale cluster and file system. The kernel headers and kernel tools are included in the vSnap server installation package and are copied to the system as part of the vSnap server installation process.
- Go to the directory that contains the required packages by issuing the following command:
> cd /opt/vsnap/config/pkgs/kernel/ - Install or upgrade the packages by taking the appropriate action:
- If no kernel development packages are installed on your system, install all included packages by issuing the following command:
Tip: If you install vSnap 10.1.11, the kernel modules for the 4.18 kernel are included onlyRHEL 7 > rpm -i kernel*3.10* RHEL 8 > rpm -i kernel*4.18* - If development tools were installed on the system as part of a Red Hat installation, the kernel development headers and tools were installed then. In this case, use the upgrade option by issuing the following command:
Tip: If you install vSnap 10.1.11, the kernel modules for the 4.18 kernel are included onlyRHEL 7 > rpm -U kernel*3.10* RHEL 8 > rpm -U kernel*4.18*
- If no kernel development packages are installed on your system, install all included packages by issuing the following command:
Installing and configuring IBM Spectrum Scale
Complete the following steps:
- Install and configure IBM Spectrum Scale and create a cluster or use an existing cluster. Create a file system to use for vSnap server images. Tips:
- For general instructions about installing and configuring IBM Spectrum Scale, go to the IBM Spectrum Scale documentation collection in IBM Documentation. Search for “Installation and protocols deployment on Linux nodes”.
- For detailed IBM Spectrum Scale configuration instructions based on best practices for IBM Spectrum Protect, see the procedure that is used for IBM Spectrum Protect server setup in combination with IBM Spectrum Scale in the IBM Spectrum Protect Blueprints. In the Blueprint document for Linux x86, see “IBM Elastic Storage Server systems: Configuring the system”.
- Configure automated cluster startup and file system mount to ensure that the images for the vSnap server are accessible immediately after a system restart. Type the following commands:
> mmchconfig autoload=yes > mmchfs device -A yes - Start the IBM Spectrum Scale cluster and mount the file system by issuing the following commands:
> mmstartup
> mmmount device
Tip: When you configure the IBM Spectrum Scale cluster and file system, the preferred method is to specify certain values that differ from the default. The following IBM Spectrum Scale parameter values were set during testing. The options under tapsrv14 were set only for the NSD client:
Configuration data for cluster tapsrv09.storage.tucson.ibm.com:
---------------------------------------------------------------
clusterName tapsrv09.storage.tucson.ibm.com
clusterId 12429875367521229043
dmapiFileHandleSize 32
minReleaseLevel 5.1.1.0
ccrEnabled yes
cesSharedRoot /vmware
cnfsSharedRoot /cnfs
autoload yes
maxblocksize 8192K
cipherList AUTHONLY
pagepool 8G
[tapsrv14]
ignorePrefetchLUNCount yes
maxMBpS 2048
maxFcntlRangesPerFile 20000
numaMemoryInterleave yes
[common]
workerThreads 512
adminMode central
> mmchconfig pagepool=8G
The following IBM Spectrum Scale file system parameters were used during testing:
flag                value                    description
------------------- ------------------------ -----------------------------------
 -f                 16384                    Minimum fragment (subblock) size in bytes
 -i                 4096                     Inode size in bytes
 -I                 32768                    Indirect block size in bytes
 -m                 1                        Default number of metadata replicas
 -M                 2                        Maximum number of metadata replicas
 -r                 1                        Default number of data replicas
 -R                 2                        Maximum number of data replicas
 -j                 cluster                  Block allocation type
 -D                 nfs4                     File locking semantics in effect
 -k                 nfs4                     ACL semantics in effect
 -n                 32                       Estimated number of nodes that will mount file system
 -B                 8388608                  Block size
 -Q                 none                     Quotas accounting enabled
                    none                     Quotas enforced
                    none                     Default quotas enabled
 --perfileset-quota No                       Per-fileset quota enforcement
 --filesetdf        No                       Fileset df enabled?
 -V                 19.01 (5.0.1.0)          File system version
 --create-time      Wed Jan  9 07:54:53 2019 File system creation time
 -z                 No                       Is DMAPI enabled?
 -L                 134217728                Logfile size
 -E                 Yes                      Exact mtime mount option
 -S                 relatime                 Suppress atime mount option
 -K                 whenpossible             Strict replica allocation option
 --fastea           Yes                      Fast external attributes enabled?
 --encryption       No                       Encryption enabled?
 --inode-limit      44447744                 Maximum number of inodes in all inode spaces
 --log-replicas     0                        Number of log replicas
 --is4KAligned      Yes                      is4KAligned?
 --rapid-repair     Yes                      rapidRepair enabled?
 --write-cache-threshold 0                   HAWC Threshold (max 65536)
 --subblocks-per-full-block 512              Number of subblocks per full block
 -P                 system                   Disk storage pools in file system
 --file-audit-log   No                       File Audit Logging enabled?
 --maintenance-mode No                       Maintenance Mode enabled?
Configuring the IBM Spectrum Protect Plus vSnap server
In this configuration, the vSnap server backup storage pools use images that are provided by IBM Spectrum Scale. To configure the backup storage pools, you must create images in IBM Spectrum Scale. To distribute data and metadata workload generated from the vSnap server to the IBM Spectrum Scale file system, the preferred method is to use one IBM Spectrum Scale independent file set per vSnap server instance.
Because IBM Spectrum Scale commands often require a device name and a mount name, the first step in the procedure identifies those values.
- To identify the device name and the mount that belongs to it, type the mount command and grep for GPFS, as shown in the following example:
> mount | grep gpfs
   scale_device_01 on /scale_01 type gpfs (rw,relatime)
   scale_device_02 on /scale_02 type gpfs (rw,relatime)
In this example, scale_device_01 and scale_device_02 are device names, and /scale_01 and /scale_02 are mounts.
Tip: GPFS refers to the General Parallel File System, which is file system software that was later renamed to IBM Spectrum Scale. - To create a file set, type the following commands:
> mmcrfileset device vsnap01 --inode-space new > mmlinkfileset device vsnap01 -J /mount/vsnap01 - In the IBM Spectrum Scale file set, create images to use as storage devices. The preferred method is to use files no larger than 10 TiB. Multiple images can be used to increase the capacity of a single vSnap server instance. To create image files, type the following commands:
> fallocate -l 10TiB /mount/vsnap01/vdev01.img - Based on the images created in the file set, create a storage pool for the vSnap server by issuing the following commands:
> vsnap system init --skip_pool
> vsnap pool create --name primary --disk_list /mount/vsnap01/vdev01.img,…,/mount/vsnap01/vdevN.img --encryption no --enc_type disk --deduplication yes --compression yes --force
Restriction: At the time of publication, the encryption feature was not supported for the vSnap server. You can use IBM Spectrum Scale file system encryption instead. For more information about IBM Spectrum Scale file system encryption, see IBM Documentation. The system that was used to test the described procedure was not enabled for file system encryption.
Tip: To expand the GPFS-based pool by adding more file devices, use the following command:
> vsnap pool expand --id <pool id> --disk_list /mount/vsnap01/vdevN+1.img --force - Disable the AUTOTRIM feature of the vSnap server storage pool:
> vspool list
NAME     SIZE  ALLOC   FREE  CKPOINT  EXPANDSZ   FRAG    CAP  DEDUP    HEALTH  ALTROOT
vpool8   198G  19.4G   179G        -         -     0%     9%  1.00x    ONLINE  /vsnap
> vspool list -o autotrim
AUTOTRIM
      on
> vspool set autotrim=off vpool8
> vspool list -o autotrim
AUTOTRIM
     off
Optional: Creating a cache area for data copies on Amazon S3 or a repository server
Because of file system functions that are used in the cloud cache area, the implementation requires an XFS file system. In this configuration, vSnap server backup storage pools use images that are provided by IBM Spectrum Scale. To configure the IBM Spectrum Scale-based cloud cache area, create images in IBM Spectrum Scale. The images are used to nest the required XFS file system that must be mounted to the directory /mount/vsnap_cloud_cache. This process includes creating another independent file set in the IBM Spectrum Scale file system, creating an image file that is used as a device for the XFS file system, creating the XFS file system, and mounting the XFS file system.
- To create the file set, type the following commands:
> mmcrfileset device vsnap_cloud_cache --inode-space new > mmlinkfileset device vsnap_cloud_cache -J /mount/vsnap_cloud_cache > cd /mount/vsnap_cloud_cache - Review the configuration guidance for the cloud cache area capacity, as documented in the IBM Spectrum Protect Plus Blueprints.
- Create the image file by issuing the following command:
> fallocate -l 128GiB cache.img - Create the file system and a mount point to the cloud cache directory by issuing the following commands:
> mkfs.xfs /mount/vsnap_cloud_cache/cache.img
> mkdir /opt/vsnap-data
> mount /mount/vsnap_cloud_cache/cache.img /opt/vsnap-data
The mount options for the cloud cache area cannot be added to the /etc/fstab file because GPFS must be mounted before the cloud cache area can be mounted. To prevent issues at the time of the system startup, create an extra fstab file for the cloud cache area. Type the following command:
> echo "/mount/vsnap_cloud_cache/cache.img /opt/vsnap-data xfs defaults 0 0" > /etc/vsnap/fstab_gpfs
Restriction: The mount point name (/opt/vsnap-data) and the name of the additional fstab (/etc/vsnap/fstab_gpfs) must match the names that are listed in this technote.
Finishing the configuration of the environment
The scripts in this section are part of the IBM Spectrum Protect Plus V10.1.7 distribution.
After successful setup and configuration, the vSnap system must be initialized to use GPFS-based storage.
- To initialize the vSnap system, run the following script:
> /opt/vsnap/bin/vsnap_gpfs_initThis script extracts the disk information from the existing vSnap pool and writes the information to the
/etc/vsnap/gpfsdevicesfile. The existence of this file and its content indicate that the vSnap server was set up for IBM Spectrum Scale.The next time the vSnap server is started. The initialization process ensures that the following actions occur:
- The script
/opt/vsnap/bin/vsnap_gpfsis started in /opt/vsnap/bin/startup_pre before other operations. - The vSnap pool devices database zdb is backed up before the vSnap service is started
(/opt/vsnap/bin/vsnap_gpfs runs /opt/vsnap/bin/vsnap_gpfs_zdb_backup). - The IBM Spectrum Scale cluster is active and the GPFS file system is mounted before the vSnap service is started
Tip: This script verifies that the GPFS file system is mounted local. Beginning with IBM Spectrum Protect Plus 10.1.8 patch1 the script was updated to allow remote mounted GPFS file systems.
(/opt/vsnap/bin/vsnap_gpfsruns /opt/vsnap/bin/vsnap_gpfs_verify). - The (optional) cloud cache is mounted before the vSnap service is started
(/opt/vsnap/bin/vsnap_gpfsruns /opt/vsnap/bin/vsnap_gpfs_mount_cloud_cache).
All vSnap startup operations that are specific to IBM Spectrum Scale are written to a specific log file.
- The script
- Optional: To access the log information, run the following command:
> cat /opt/vsnap/log/gpfspool.logThe output is similar to the following example:
Tue Sep 29 10:24:17 CEST 2020 : ./vsnap_gpfs_init : Identified zdb name is 8
Tue Sep 29 10:24:17 CEST 2020 : ./vsnap_gpfs_init : list of devices in pool: /gpfs_vsnap/vdev01.img /gpfs_vsnap/vdev02.img /gpfs_vsnap/vdev03.img /gpfs_vsnap/vdev04.img
Tue Sep 29 10:24:17 CEST 2020 : ./vsnap_gpfs_init : remove old device file
Tue Sep 29 10:24:17 CEST 2020 : ./vsnap_gpfs_init : vdev list written to file: /etc/vsnap/gpfsdevices
Tue Sep 29 11:14:24 CEST 2020 : /opt/vsnap/bin/vsnap_gpfs : Verify if vSnap is enabled for GPFS ...
Tue Sep 29 11:14:24 CEST 2020 : /opt/vsnap/bin/vsnap_gpfs : vSnap enabled for GPFS
Tue Sep 29 11:14:24 CEST 2020 : /opt/vsnap/bin/vsnap_gpfs : Create a backup of the zdb ...
Tue Sep 29 11:14:24 CEST 2020 : /opt/vsnap/bin/vsnap_gpfs_zdb_backup : Identified zdb name is 8
Tue Sep 29 11:14:24 CEST 2020 : /opt/vsnap/bin/vsnap_gpfs_zdb_backup : Directory for zdb backup exists
Tue Sep 29 11:14:24 CEST 2020 : /opt/vsnap/bin/vsnap_gpfs_zdb_backup : Created copy of zdb in /etc/vsnap/zpool.cache.backup/8
Tue Sep 29 11:14:24 CEST 2020 : /opt/vsnap/bin/vsnap_gpfs : Verify if GPFS is up and running ...
Tue Sep 29 11:14:25 CEST 2020 : /opt/vsnap/bin/vsnap_gpfs_verify : GPFS cluster node is active
Tue Sep 29 11:14:25 CEST 2020 : /opt/vsnap/bin/vsnap_gpfs_verify : Found GPFS (5.0.5.1 ) installation on this system
Tue Sep 29 11:14:27 CEST 2020 : /opt/vsnap/bin/vsnap_gpfs_verify : GPFS file systems are mounted:
Tue Sep 29 11:14:28 CEST 2020 : /opt/vsnap/bin/vsnap_gpfs_verify : GPFS device: gpfs_vsnap, mounted on: /gpfs_vsnap
Tue Sep 29 11:14:28 CEST 2020 : /opt/vsnap/bin/vsnap_gpfs_verify : Found GPFS based vsnap device file /gpfs_vsnap/vdev01.img with size 53687091200 (Bytes)
Tue Sep 29 11:14:28 CEST 2020 : /opt/vsnap/bin/vsnap_gpfs_verify : Found GPFS based vsnap device file /gpfs_vsnap/vdev02.img with size 53687091200 (Bytes)
Tue Sep 29 11:14:28 CEST 2020 : /opt/vsnap/bin/vsnap_gpfs_verify : Found GPFS based vsnap device file /gpfs_vsnap/vdev03.img with size 53687091200 (Bytes)
Tue Sep 29 11:14:28 CEST 2020 : /opt/vsnap/bin/vsnap_gpfs_verify : Found GPFS based vsnap device file /gpfs_vsnap/vdev04.img with size 53687091200 (Bytes)
Tue Sep 29 11:14:28 CEST 2020 : /opt/vsnap/bin/vsnap_gpfs : Verify if the cloud cache is available and mounted ...
Tue Sep 29 11:14:28 CEST 2020 : /opt/vsnap/bin/vsnap_gpfs_mount_cloud_cache : Mounted cloud cache to directory /opt/vsnap-data
Tue Sep 29 11:14:28 CEST 2020 : /opt/vsnap/bin/vsnap_gpfs_mount_cloud_cache : Cloud cache mounted to /opt/vsnap-data with capacity of 1014M
Tue Sep 29 11:14:29 CEST 2020 : /opt/vsnap/bin/vsnap_gpfs : Return to caller ...
Specific failure scenarios and recovery procedure
The IBM Spectrum Scale cluster must be running and the GPFS file system must be mounted to ensure that the vSnap server functions as expected.
If you must unmount the file system or stop the cluster, stop the vSnap service before you unmount the file system to ensure a clean shutdown and startup of the system without causing failures.
In rare cases, you might see failures such as a connection loss to the vSnap server repository or an internal connection loss between the vSnap server and the IBM Spectrum Scale storage system. Review the following failure scenarios:
- The IBM Spectrum Scale service on the cluster node that hosts the vSnap server has a software error and stops without warning. This software error causes a vSnap server internal connection loss to the storage system and switches the storage pool to the suspended state.
- The IBM Spectrum Scale cluster loses the quorum in the cluster and shuts down the IBM Spectrum Scale service and unmounts the file system. This situation causes the vSnap server to lose its connection to the storage system and switches the storage pool to the suspended state.
- The cluster node that hosts the vSnap server has a network failure and is no longer accessible. This network failure causes a connection loss between the IBM Spectrum Protect Plus server and the vSnap server. The vSnap server is marked as unavailable in the IBM Spectrum Protect Plus user interface.
- The IBM Spectrum Scale cluster node that hosts the vSnap server has a hardware error or a significant software error that causes the system to stop. Without warning, access to the vSnap server and the IBM Spectrum Scale file system becomes unavailable. This condition causes a connection loss between the IBM Spectrum Protect Plus server and the vSnap server. The vSnap server is marked as unavailable in the IBM Spectrum Protect Plus user interface.
All of the listed failure scenarios can be resolved by completing the following steps:
- Ensure that the system that hosts the vSnap server is running.
- Ensure that the network interface is available and has an assigned network address, and the system is accessible by using a Secure Shell (SSH) remote shell.
- Ensure that the IBM Spectrum Scale cluster node is in active state. To verify the state, type the following command:
> mmgetstate -a - Ensure that the IBM Spectrum Scale file system is mounted and that the file sets that are used to store the vSnap server images are linked. To verify the linkage, type the following command:
> mmlsfileset device - Restart the vSnap server service by issuing the following command:
> systemctl restart vsnap.service - Remount the IBM Spectrum Scale file system by issuing the following commands:
> mmumount device > mmmount device - Verify whether the vSnap server storage pool is online by issuing the following command:
> vspool status - If the pool is in suspended state and reports errors, type the following cleanup command:
> vspool clear poolname
After this procedure, the IBM Spectrum Protect Plus vSnap server storage pool is online. You can type the following command to verify the vSnap server pool state:
> vsnap pool show
In addition to the local verification of the storage pool, you can initiate an update of the pool state by using the update function in the IBM Spectrum Protect Plus user interface.
Backup vSnap configuration
Complete the following steps to back up the vSnap configuration.
Tip: Use the existing and mounted IBM Spectrum Scale file system as a target for the vSnap configuration backup.
> cd /opt/vsnap/bin
> ./vsnap_config_backup.sh -f /scale/vSnapConfigBackup001.tar.gz
Restore vSnap configuration
Complete the following steps to restore the vSnap configuration.
> cd /opt/vsnap/bin
> vsnap system init --skip_pool
> ./vsnap_config_restore.sh -f /scale/vSnapConfigBackup001.tar.gz
Additional Information
Guidelines for performance testing
Members of the IBM Spectrum Protect Plus development team tested the configuration. This section describes the storage environment and the test results, and provides guidelines for your own testing.
Environment configuration
Hardware:
- File system
scale01: 14 x 20 TB NSDs from Storwize v5020 with NL-SAS from DRAID across 92 drives. The metadata and data were all from the system pool. - File system
scaleflash: 5 x 1 TB NSDs from IBM FlashSystem 900. The metadata and data were in separate pools. - Lenovo SR650 servers with dual socket, 128 GB RAM (as described in the IBM Spectrum Protect Plus Blueprints).
- 10 GigE network connection (shared network for backup data and control data).
Software:
- IBM Spectrum Scale 5.0.5.1
- IBM Spectrum Protect Plus 10.1.7
- RHEL 7.7
Setup 1 (NL-SAS):
- Data flow: NSD client with vSnap -> NSD servers ->
scale01file system - Test 1a: vsnapperf.plwith the parameter settings random=high, dedup=on, compression=on
- Result: 317.16 MiB per second
- Test 1b: vsnapperf.plwith the parameter settings random=high, dedup=off, compression=on
- Result: 636.13 MiB per second
Setup 2 (all flash):
- Tests indicate that the same results can be achieved in this environment. It is expected that the network bandwidth is the limiting factor and not the I/O bandwidth.
Note: The performance test described in the section "Instructions for using the performance tool" was performed by using the combination of hardware and software described in this section. The performance test was not repeated by using new versions of IBM Spectrum Protect Plus.
Instructions for using the performance tool
You can use the vsnapperf.pl tool to run performance tests. The preferred method is to run the tests before you register the vSnap server with IBM Spectrum Protect Plus. In this way, you can ensure that the results of the performance tests are not skewed by the potential production workload (real backup workload) that is targeted to the new vSnap repository.
About this task
Each time you run the performance tool, a vsnapperf_summary.txt output log is generated. An output file is generated for each iteration within the vsnapperfx.txt file. The vsnapperf_summary.txt file need to be retained for each run and shared with IBM.
To run performance tests, complete the following steps:
- Run the
vsnapperftool command from the root of the vpool file set that was created when you configured the vSnap server. Use the flags as shown for sequential write, file size, number of volumes, iterations, and data randomization:> perl /home/vsnapperf/vsnapperf.pl seqwrite -filesize 5g -numVol 5 -iterations 25 -random high - After the tool is run and the
vsnapperf_summary.txtfile is copied to another location, you can clean up the data generated by thevsnapperftool with the following command:> perl /home/vsnapperf/vsnapperf.pl cleanup -numVol 5 - After the cleanup, run the tests again with a different data deduplication setting. For example, if you ran the first set of tests with data deduplication, you can update the vSnap pool to disable deduplication:
> vsnap pool update --id 5 --deduplication no - Repeat Step 1 to rerun the tests with the new data deduplication setting.
- Copy the
vsnapperf_summary.txtgenerated by the second test and send both of the summary files to IBM. - Clean up the data generated by the
vsnapperftool by repeating Step 2.
Sample output from the vsnapperf tool
> perl /home/vsnapperf/vsnapperf.pl seqwrite -filesize 5g -numVol 5 -iterations 25 -random high
===================================================================
: IBM® Spectrum Protect Plus vSnap storage performance test  (Program version 1.3)
:
: Running with action seqwrite
:
: Number of iterations: 25
: Skipping iterations:  0
: Number of volumes:    5
:
: Block size:   256k
: File size:    5g
: Syncwrite:    disabled
: Snapshots:    yes
: Cleanup:      no
: Random:       /dev/randhigh
: Volumes:      /vsnap/vpool1/SPPvSnapPerf1 /vsnap/vpool1/SPPvSnapPerf2 /vsnap/vpool1/SPPvSnapPerf3 /vsnap/vpool1/SPPvSnapPerf4 /vsnap/vpool1/SPPvSnapPerf5
:
===================================================================
: Beginning I/O test.
: Run 1. Output: vsnapperf1.txt Status: COMPLETE   Seconds: 37.46  Total GiB: 25.0  MiB/sec: 683.49  IOPS: 2733.94
: Run 2. Output: vsnapperf2.txt Status: COMPLETE   Seconds: 39.37  Total GiB: 25.0  MiB/sec: 650.22  IOPS: 2600.88
: Run 3. Output: vsnapperf3.txt Status: COMPLETE   Seconds: 41.18  Total GiB: 25.0  MiB/sec: 621.59  IOPS: 2486.38
: Run 4. Output: vsnapperf4.txt Status: COMPLETE   Seconds: 38.90  Total GiB: 25.0  MiB/sec: 658.10  IOPS: 2632.41
: Run 5. Output: vsnapperf5.txt Status: COMPLETE   Seconds: 41.63  Total GiB: 25.0  MiB/sec: 614.88  IOPS: 2459.50
: Run 6. Output: vsnapperf6.txt Status: COMPLETE   Seconds: 39.29  Total GiB: 25.0  MiB/sec: 651.50  IOPS: 2605.98
: Run 7. Output: vsnapperf7.txt Status: COMPLETE   Seconds: 42.92  Total GiB: 25.0  MiB/sec: 596.48  IOPS: 2385.92
: Run 8. Output: vsnapperf8.txt Status: COMPLETE   Seconds: 40.76  Total GiB: 25.0  MiB/sec: 628.06  IOPS: 2512.24
: Run 9. Output: vsnapperf9.txt Status: COMPLETE   Seconds: 38.85  Total GiB: 25.0  MiB/sec: 658.89  IOPS: 2635.56
: Run 10. Output: vsnapperf10.txt Status: COMPLETE   Seconds: 40.18  Total GiB: 25.0  MiB/sec: 637.18  IOPS: 2548.73
: Run 11. Output: vsnapperf11.txt Status: COMPLETE   Seconds: 39.51  Total GiB: 25.0  MiB/sec: 647.92  IOPS: 2591.69
: Run 12. Output: vsnapperf12.txt Status: COMPLETE   Seconds: 39.39  Total GiB: 25.0  MiB/sec: 649.93  IOPS: 2599.71
: Run 13. Output: vsnapperf13.txt Status: COMPLETE   Seconds: 38.52  Total GiB: 25.0  MiB/sec: 664.67  IOPS: 2658.69
: Run 14. Output: vsnapperf14.txt Status: COMPLETE   Seconds: 39.32  Total GiB: 25.0  MiB/sec: 651.06  IOPS: 2604.26
: Run 15. Output: vsnapperf15.txt Status: COMPLETE   Seconds: 39.21  Total GiB: 25.0  MiB/sec: 652.88  IOPS: 2611.50
: Run 16. Output: vsnapperf16.txt Status: COMPLETE   Seconds: 39.54  Total GiB: 25.0  MiB/sec: 647.53  IOPS: 2590.10
: Run 17. Output: vsnapperf17.txt Status: COMPLETE   Seconds: 41.14  Total GiB: 25.0  MiB/sec: 622.33  IOPS: 2489.31
: Run 18. Output: vsnapperf18.txt Status: COMPLETE   Seconds: 40.13  Total GiB: 25.0  MiB/sec: 637.87  IOPS: 2551.48
: Run 19. Output: vsnapperf19.txt Status: COMPLETE   Seconds: 41.85  Total GiB: 25.0  MiB/sec: 611.72  IOPS: 2446.88
: Run 20. Output: vsnapperf20.txt Status: COMPLETE   Seconds: 40.87  Total GiB: 25.0  MiB/sec: 626.43  IOPS: 2505.72
: Run 21. Output: vsnapperf21.txt Status: COMPLETE   Seconds: 40.57  Total GiB: 25.0  MiB/sec: 630.97  IOPS: 2523.88
: Run 22. Output: vsnapperf22.txt Status: COMPLETE   Seconds: 42.16  Total GiB: 25.0  MiB/sec: 607.25  IOPS: 2428.98
: Run 23. Output: vsnapperf23.txt Status: COMPLETE   Seconds: 40.56  Total GiB: 25.0  MiB/sec: 631.13  IOPS: 2524.53
: Run 24. Output: vsnapperf24.txt Status: COMPLETE   Seconds: 41.86  Total GiB: 25.0  MiB/sec: 611.57  IOPS: 2446.29
: Run 25. Output: vsnapperf25.txt Status: COMPLETE   Seconds: 42.00  Total GiB: 25.0  MiB/sec: 609.54  IOPS: 2438.18
: All iterations complete!
:
: Total processed    (GiB):     625.0
: Minimum throughput (MiB/sec): 596.48
: Maximum throughput (MiB/sec): 683.49
: Average throughput (MiB/sec): 636.13
===================================================================
Related Information
Document Location
Worldwide
Historical Number
1.0
Product Synonym
IBM Spectrum Protect Plus;Spectrum Protect Plus;Plus;
IBM Spectrum Scale;Spectrum Scale;Scale;GPFS;gpfs;
Was this topic helpful?
Document Information
Modified date:
04 April 2023
UID
ibm16338585