Question & Answer
Question
Cause
Answer
The instructions provide information about applying updates in two environments: one in which the end-user machines have internet access and the other in which no internet access is available.
Notes:
- Each fix pack download page explains whether a new version of Installation Manager is required. For example, versions 7.1.2 requires IBM Installation Manager version 1.5.2 and 7.0.4 requires IBM Installation Manager, version 1.4.1.
- Starting in versions 7.1.1.1 and 7.0.3.1, processes and services for the Rational® Team product(s) are stopped automatically if they are running at the time of installation. The manual stoppage of these services is required for previous versions. For further details about stopping processes and services for Rational products before updating, see technote 388117. Regardless of the version, stopping Rational services and processes prior to updating can help prevent unforeseen problems.
- The instructions in this technote apply to the IBM® Rational Software Development Platform Team product versions listed in the Cross-reference information table at the end of this document.
- If you are upgrading an installation that includes IBM® Rational TestManager, see the important information in technotes 397999 and 621091.
- When you upgrade, you always need a connection to the "base" media where "base" is either 7.0.2, 7.0.3, 7.0.4, 7.1, 7.1.1, or 7.1.2. This can depend upon the update that you apply.
INTERNET ACCESS INSTRUCTIONS
End-user clients who have Internet access using the GUI
End-user clients who have Internet access and want to upgrade silently
NON- INTERNET ACCESS INSTRUCTIONS
End-user clients who do not have Internet access and want to use the GUI
End-user clients who do not have Internet access and want to upgrade silently
INTERNET ACCESS INSTRUCTIONS
- Under the Preferences Updates property, select the Search for Installation Manager updates checkbox.
For Installation Manager 1.3.0 and higher, you must have the Search for Updates property set in order for Installation Manager to automatically look for updates to itself. The details on how to set this property for silent installation is described in the next section.

- Select the Search service repositories during installation and updates checkbox.
You must set Installation Manager to search the service repositories such that it looks on IBM.com for the latest version of the product.

- Ensure that you still have repository connections to the 7.0.2, 7.0.3, 7.0.4, 7.1, 7.1.1, 7.1.2 or 8.0 media for the products that you have installed. Click Update from the first screen of Installation Manager. Installation Manager automatically searches to see if a new version of Installation Manager is available. If there is, it updates Installation Manager first. Once Installation Manager has been upgraded, click Update again. Installation Manager then searches for product updates and installs them.
Note: When you upgrade to a 7.1.2 or 7.0.4 fix pack or iFix from a previous release, you must first install the new release from a locally accessible repository. Installation Manager will not update to a new release over the Internet, as it is a full product installation.
End-user clients who have Internet access and want to upgrade silently
- Obtain the latest response files you used to install your products, or use the appropriate version from one of these technotes:
ClearQuest response files
ClearCase response files
(If you have both products installed, you can merge the files and remove any duplicate keys that are shared between the products; for example, CM server keys or license server values.)
- Modify the above response files to match the feature set you have installed. Also take a note of the comments in the response file as to whether you need the version number within the install command. If you want to upgrade to the latest version available, make sure the version tag is not within the install command. Make sure the following preference is set to true:
<preference value='true' name='offering.service.repositories.areUsed' />
If the fix pack requires Installation Manager to be upgraded, make sure you also have this set to true:
<preference name='com.ibm.cic.common.core.preferences.searchForUpdates' value='true'/>
- Save the response file.
To invoke a silent install, do the following:
- Navigate to the eclipse folder where Installation Manager is installed (the default locations are shown here):
Windows: C:\Program Files\IBM\Installation Manager\eclipse
Unix: /opt/IBM/InstallationManager/eclipse
- Invoke one of the following commands:
Windows: IBMIMc.exe --launcher.ini silent-install.ini -input <path to response file>
Unix: ./IBMIM --launcher.ini silent-install.ini -input <path to response file>
Note: The double hyphens (--) in the above syntax are required.
Note: When you upgrade to a 7.1.2 or 7.0.4 fix pack or iFix from a previous release, you must first install the new release from a locally accessible repository. Installation Manager will not update to a new release over the Internet, as it is a full product installation.
NON-INTERNET ACCESS INSTRUCTIONS
End-user clients who do not have Internet access and want to use the GUI
You must have at least one machine that can access the Internet to download the latest Installation Manager version and product fix packs that you want to install. Refer to Note 1 above to download the appropriate version of IBM® Installation Manager that your clients can update to. Make sure to follow the instructions in this document as it explicitly explains that you need to use the com.ibm.cic.agent.offering.zip file in order to upgrade existing Installation Manager installs.- Make sure Search for Installation Manager updates is selected under the Preferences Updates property.

- Add the new repository to Installation Manager for both the new version of Installation Manager as well as the fix packs for "ALL" products you have installed. You also need repository connections to 7.1.0, 7.1.1, 7.1.2 or 8.0 for all installed products.
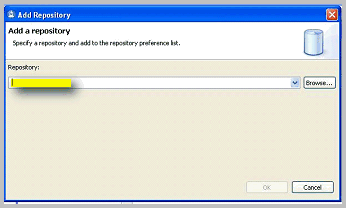
- Navigate to File > Preferences.

- In the Repositories tab, click Add Repository.

- Add the repository location and click OK.
Note: You must repeat steps b and c until all 7.1 and fix pack repositories are added
- Click OK and return to the Installation Manager main menu.

- Navigate to File > Preferences.
- Click Update to start the update for all products installed using the Installation Manager. If Installation Manager requires an update, it updates itself first.

- Click Next to scan all products for updates.


- Select the products you want to apply updates to and click Next.

- Rectify any install problems that might be referenced and click Next.

- Click Next to agree to the licensing terms.

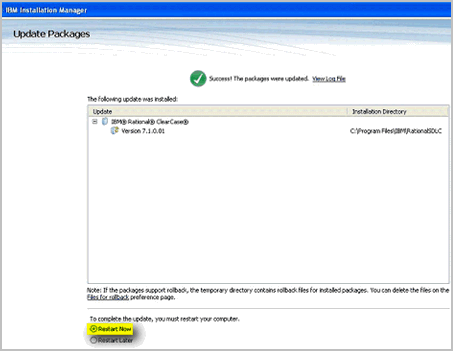
- Click Update to begin the update process.


- Restart the machine (if necessary).
End-user clients who do not have Internet access and want to upgrade silently
- Obtain the latest response files you used to install your products, or use the appropriate version from one of these resources:
ClearQuest response files
ClearCase response files
(If you have both products installed, you can merge the files and remove any duplicate keys that are shared between the products (for example, license server values.)
- Modify the above response files to match the feature set you have installed. Also take note of the comments in the response file as to whether you need the version number within the install command. Make sure the following preference is set to false because you do not want it to try to connect to the Internet.
<preference value='false' name='offering.service.repositories.areUsed' />
If the fix pack requires that Installation Manager be upgraded, make sure you also have this set to true:
<preference name='com.ibm.cic.common.core.preferences.searchForUpdates' value='true'/>
- Make sure you have repository connections in the response file to the base level of the product (either 7.1 or 7.1.1) and a repository connection to the fix pack you want to upgrade to. If you want to also upgrade Installation Manager, you must also download uncompress the Installation Manager fix pack that has a name similar to: com.ibm.cic.agent.offering_1.4.1000.20100810_1125.zip (for example, do not download the .zip files that contain a platform in their name). Add that location as a repository in your response file.
- Save the response file.
To invoke a silent installation, do the following:
Note: Before proceeding with the upgrade you must first stop all processes and services associated with any IBM Rational product or the silent installation will fail.
- Navigate to the eclipse folder where Installation Manager is installed (the default locations are shown below):
Windows: C:\Program Files\IBM\Installation Manager\eclipse
Unix: /opt/IBM/InstallationManager/eclipse
- Start one of the following commands:
Windows: IBMIMc.exe --launcher.ini silent-install.ini -input <path to response file>
Unix: ./IBMIM --launcher.ini silent-install.ini -input <path to response file>
Related Information
Was this topic helpful?
Document Information
Modified date:
12 January 2023
UID
swg21380386