White Papers
Abstract
This paper describes an example of an electronic vaulting solution in which deduplicated data that is stored in IBM Tivoli Storage Manager storage pools is replicated to a remote site. The server database is replicated to a remote standby server by using the IBM Db2 high availability disaster recovery (HADR) function. No specific hardware is required for this solution.
Tips:
- This paper was written about Tivoli Storage Manager, and the original product names are retained in this paper. The product was later rebranded to IBM Spectrum Protect.
- The instructions were written for Tivoli Storage Manager and have not been tested in IBM Spectrum Protect with the use of container storage pools.
- The server names and database instance names, such as tsminst1, are example values. You might have to change these values based on your configuration.
Content
Solution benefits
Many Tivoli Storage Manager customers use tape copy storage pools and send the copy storage pool tapes to a remote site for disaster recovery. To get the same disaster recovery protection but avoid the logistics and security exposure of physically moving tapes, customers are interested in an electronic vaulting solution. With electronic vaulting, data is stored in Tivoli Storage Manager storage pools and replicated to a remote site for disaster recovery and failover. Remote electronic vaulting can also potentially reduce recovery time objectives (RTO) and recovery point objectives (RPO) compared to the traditional tape-transport approach. Bandwidth consumption and storage requirements can be reduced by transferring data with deduplication, whereby data chunks are not sent if the chunks are already available at the remote location.
From a Tivoli Storage Manager perspective, this solution is not a high availability clustering solution where a failover occurs almost imperceptibly to Tivoli Storage Manager users and administrators. The solution is intended as a site disaster recovery solution that promises less downtime than the pickup truck access method (PTAM).
Solution overview
This solution provides deduplicated replication of Tivoli Storage Manager data with no dependency on specific hardware. The solution includes the following key elements:
- Use client-side deduplication to store data to the Tivoli Storage Manager server. This method ensures that data is deduplicated at the time it is stored in a sequential-access primary storage pool, conserving network bandwidth for storage pool backup to the copy pool volumes. Using client-side deduplication also minimizes later data transfer for reclamation between the primary and secondary sites.
- Back up the storage pool data to a deduplicated copy storage pool at a secondary site by using synchronous writes to network-attached disk. Synchronous write ensures that data was written to the copy storage pool volumes before the server database is updated to show that the data was copied. Synchronous write prevents synchronization problems between the data itself and the metadata in the server database.
- Use Db2 HADR to replicate the Tivoli Storage Manager database, giving improved RPO and RTO as compared to using database backup. Db2 HADR is a log shipping facility, so replication means that log changes on the primary Db2 database are continuously applied to a standby, "warm" Db2 database at the secondary site.
If a failure occurs at the primary site, recovery requires the following steps:
- Start the Tivoli Storage Manager server at the secondary site by using the replicated Db2 database. Thus, the secondary server is a warm, not hot, standby.
- Switch the clients to the Tivoli Storage Manager server at the secondary site either by Domain Name System (DNS) redirection or by updates to client option files. Requests from clients to access existing objects are handled by accessing the objects from the copy storage pool at the secondary site. The clients can also store new objects by using the secondary server.
- To resume operations at the primary location after an extended outage, try priming the replacement primary database by using the steps that were originally used to establish the secondary site. After HADR synchronization of the Tivoli Storage Manager database, it should be possible to fail back to the primary site server and restore primary storage pool content from the copy storage pools.
This solution uses a copy storage pool on shared network disk instead of using the replication functions of a storage system to replicate primary storage pools. The use of a copy storage pool on network-attached storage (NAS) disk has the following advantages:
- The BACKUP STGPOOL operation is asynchronous with client backup operations to a primary storage pool. Therefore, client operations are not as heavily affected by network performance between the primary and secondary systems.
- The BACKUP STGPOOL operation validates primary storage pool object states. For example, primary disk errors are not automatically replicated to the secondary site.
Tip: Tivoli Storage Manager provides both client-side and server-side data deduplication. HADR can be successfully used with deduplication configurations other than the one proposed in this paper. For an introduction to data deduplication, see Data deduplication options. For more information about selecting the best data deduplication option for your system environment, see Data deduplication FAQ.
Configuration and operations overview
Configure a pair of servers, one at the primary site and one at the secondary site. In this example configuration, host TSMAWP05 is at the primary site and host TSMAWP06 is at the secondary or standby site.
|
Item |
Primary site |
Secondary (standby) site |
|---|---|---|
|
Server name |
TSMAWP05 |
TSMAWP06 |
|
Database instance name |
tsminst1 |
tsminst1 |
|
Database (TSMDB1) |
HADR primary node |
HADR standby node |
|
Server status |
Running |
Not running |
|
Primary storage pools |
Active |
Not active |
|
Copy storage pools |
Network-attached file system |
Network-attached file system |
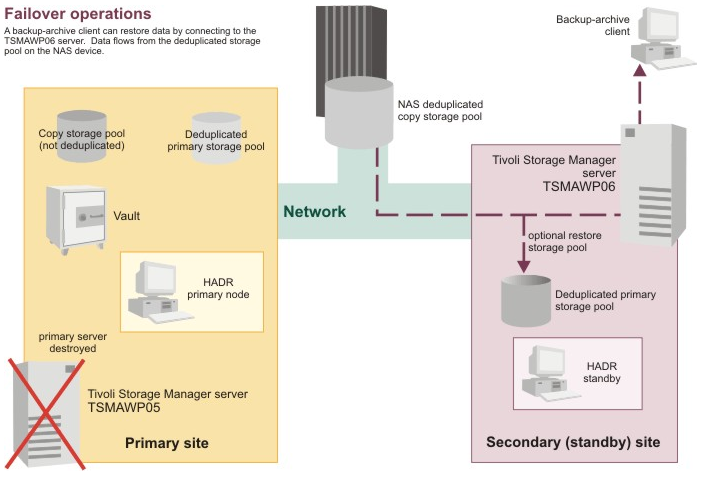
During normal operations, the Tivoli Storage Manager server runs on host TSMAWP05. Changes made to the server database, TSMDB1, during normal server operation are replicated to a standby copy of the TSMDB1 database on host TSMAWP06 by using the Db2 HADR feature. The deduplicated primary storage pool of the TSMAWP05 server is backed up both to a local, normal copy storage pool, and to a deduplicated copy storage pool on a NAS device.
Ensure that you have adequate bandwidth between the primary and secondary sites for both the copy storage pool data and the HADR database traffic. Using HADR can degrade performance of the database on your primary system. The degradation is highly dependent on the latency between the two sites. Therefore, long distances between primary and secondary sites might not be practical.

If a failure occurs at the primary site, operations can fail over to the secondary site. The standby status of the TSMAWP06 server's TSMDB1 database is changed, and the server is started. Backup-archive clients can restore and back up data by connecting to the TSMAWP06 server at the secondary site. The server gets the client data from the deduplicated copy storage pool on the NAS device. Optionally, the primary storage pool can be restored to a disk on the secondary server.
Additional licensing requirements to use HADR
Licensing terms for the Tivoli Storage Manager server include the use of the Bundled Db2 Edition software.
- To use HADR to replicate data from one Tivoli Storage Manager server (with Bundled Db2) to another Tivoli Storage Manager server (with Bundled Db2), no additional Db2 licensing is required.
- To use HADR to replicate data from a Tivoli Storage Manager server (with Bundled Db2) to a non-bundled Db2 instance, the licensee must purchase 100 processor value units (PVUs) to obtain a license for Db2 Enterprise Edition (bundled).
Guidelines for the shared copy storage pool destination
You need a disk-based NAS file system that can be shared between the two nodes.
The main purpose of this shared file system is to write output volumes from the backup storage pool operation. The file system must be reliable from both nodes, or restore operations will fail from the secondary site. Consider the following items when you select a Network File System solution:
- Reliability and data integrity
See the guidelines for disk subsystems in the Tivoli Storage Manager documentation. The Tivoli Storage Manager server uses the O_SYNC flag on write operations to request that the file system actually writes to disk before reporting the success of the operation. Do not use file system options that defeat the O_SYNC flag by using caching. For example, an NFS client must be configured with hard option, and an NFS server must be configured with the sync export option. These options will result in slower performance, but consider the slower performance in light of the fact that less data is written over time because the storage pool is deduplicated.
- Write speed
Typically, there will be more writes to this file system than reads because disaster recovery situations should be rare, but backup storage pool operations should occur frequently. You also must consider that you want the writes to have been completed before HADR has applied the corresponding database log entries on the secondary system. The motivation is that, in case of a system crash, you are better off with missing database entries than missing copy storage pool data.
- Cost
When you consider cost, also consider the value of the data. Use high-quality NAS appliances that guarantee proper O_SYNC operation.
Configuring the systems
Configure the systems by completing the following steps:
1.Install the Tivoli Storage Manager servers.
2. Synchronize the time on the servers.
3. Prime the HADR database.
4. Configure HADR.
5. Start HADR.
6. Configure storage pools and policy.
7. Configure backup-archive clients.
Installing the Tivoli Storage Manager servers
- Install the Tivoli Storage Manager server on tsmawp05 (primary site).
Follow the procedures for installing the Tivoli Storage Manager server by using the installation wizard. Then, follow the instructions for taking the first steps after you install the server. See Installing and upgrading the server.
Note: For additional resiliency, you can place the archive log directory on network attached disk that is accessible by both the primary and secondary site. These archive logs would then be available for possible use in a rollforward recovery if after a HADR failover there was a subsequent hardware failure at the secondary site requiring a database restore.
2. Install the Tivoli Storage Manager server on tsmawp06 (secondary site).
Follow the procedures for installing the Tivoli Storage Manager server by using the installation wizard. Then, follow the instructions for taking the first steps after you install the server. See Installing and upgrading the server.
Important:
- Create the instance user ID and all the directories (database, active log, and archive log) the same as you did on the primary server.
- Do not start the Tivoli Storage Manager server.
Synchronizing time on the servers
The clocks for the primary and secondary systems must be synchronized by using facilities such as Network Time Protocol (NTP).
Tivoli Storage Manager server operations can be affected by time changes. You must have the time zone for the secondary system set to the same as the primary system before you start the Tivoli Storage Manager server on the secondary system during a failover operation.
The distance between the nodes will affect selection of HADR modes SYNC, NEARSYNC, and ASYNC and related recovery point objectives.
Priming the HADR database
You must initialize or prime the TSMDB1 database on the standby system so that subsequent log updates that occur on the primary TSMDB1 database can be applied to the standby TSMDB1 database. You do the priming using the Db2 backup db utility.
1. Back up the database on tsmawp05
tsm:server1> halt
su - tsminst1
db2 backup db tsmdb1 to /space/mx/hadrtest
Do not start the server (do not issue the dsmserv command).
2. Restore the tsmawp05 database to the server on tsmawp06
Stop the Tivoli Storage Manager server if it is running.
su - tsminst1
db2 drop db tsmdb1
db2 restore db tsmdb1 from /space/mx/hadrtest
Do not start the server (do not issue the dsmserv command).
Configuring HADR
You must set the following Db2 database configuration parameters on each HADR node.
|
Parameter |
Description |
|---|---|
| hadr_local_host | Local host name |
| hadr_local_svc | Local TCP/IP port to be assigned to HADR process |
| hadr_remote_host | Remote host name that the peer HADR resides on |
| hadr_remote_inst | Remote database instance that the peer TSMDB1 database resides in |
| hadr_remote_svc | Remote port of the peer HADR process |
| hadr_syncmode | How primary log writes are synchronized with standby |
| hadr_timeout | Time HADR process waits before communication attempt with peer is considered as failed |
For more information about these database configuration parameters, see the IBM DB2 product documentation.
Determining the available TCP port to be assigned for use by HADR on tsmawp05
Find an available port to be assigned to the HADR process. Use the available port as the value of hadr_local_svc and for the peer, hadr_remote_svc. Issue the command:
cat /etc/services
Observe ports currently being used by tsminst1 Db2 instance:
Db2_tsminst1 60000/tcp
Db2_tsminst1_1 60001/tcp
Db2_tsminst1_2 60002/tcp
Db2_tsminst1_END 60003/tcp
For this scenario, 60010 was chosen because it was not in use in /etc/services and was an easy number to remember.
Tip: Other applications on the system might not put entries in /etc/services, yet are configured to use the port that you select. For example, other instances of HADR might exist on the same system. The "netstat -an" command can show you which ports are currently in use. Some trials might be necessary to find a port number that is not in use on the system.
Determining the available TCP port to be assigned for use by HADR on tsmawp06
Find an available port to be assigned to the HADR process. This will be the value of hadr_local_svc and, for the peer, hadr_remote_svc. Issue the command:
cat /etc/services
Observe ports currently being used by tsminst1 Db2 instance:
Db2_tsminst1 60000/tcp
Db2_tsminst1_1 60001/tcp
Db2_tsminst1_2 60002/tcp
Db2_tsminst1_END 60003/tcp
For this scenario, 60010 was chosen because it was not in use in /etc/services, was an easy number to remember, and was consistent with the port selected for the primary server.
Tip: Other applications on the system might not put entries in /etc/services, yet are configured to use the port that you select. For example, other instances of HADR might exist on the same system. The "netstat -an" command can show you which ports are currently in use. Some trials might be necessary to find a port number that is not in use on the system.
Configuring HADR on the primary node, tsmawp05
Issue the following sequence of commands to configure HADR on the primary node. Ensure that you are running under the Db2 instance that TSMDB1 is contained in.
su - tsminst1
db2 update db cfg for tsmdb1 using hadr_local_host tsmwawp05.storage.tucson.ibm.com
db2 update db cfg for tsmdb1 using hadr_local_svc 60010
db2 update db cfg for tsmdb1 using hadr_remote_host tsmawp06.storage.tucson.ibm.com
db2 update db cfg for tsmdb1 using hadr_remote_inst tsminst1
db2 update db cfg for tsmdb1 using hadr_remote_svc 60010
db2 update db cfg for tsmdb1 using hadr_syncmode SYNC
db2 update db cfg for tsmdb1 using hadr_timeout 120
Configuring HADR on the standby node, tsmawp06
Issue the following sequence of commands to configure HADR on the standby node. Ensure that you are running under the Db2 instance that TSMDB1 is contained in.
su - tsminst1
db2 update db cfg for tsmdb1 using hadr_local_host tsmawp06.storage.tucson.ibm.com
db2 update db cfg for tsmdb1 using hadr_local_svc 60010
db2 update db cfg for tsmdb1 using hadr_remote_host tsmawp05.storage.tucson.ibm.com
db2 update db cfg for tsmdb1 using hadr_remote_inst tsminst1
db2 update db cfg for tsmdb1 using hadr_remote_svc 60010
db2 update db cfg for tsmdb1 using hadr_syncmode SYNC
db2 update db cfg for tsmdb1 using hadr_timeout 120
Starting HADR
1. Start HADR on tsmawp06, the secondary server. Issue the following commands:
db2 start hadr on db tsmdb1 as standby
db2pd -hadr -db tsmdb1, observe Role Standby, State Disconnected
2. Start HADR on tsmawp05, the primary server. Issue the following commands:
db2 start hadr on db tsmdb1 as primary
cd /home/tsminst1
/opt/tivoli/tsm/server/bin/dsmserv -q &
db2pd -hadr -db tsmdb1, observe Role Primary, State Peer, LogGapRunAvg not 0
If you receive message SQL1766W when starting HADR: The message SQL1766W might be issued when you run the start HADR commands because by default the Tivoli Storage Manager database is configured with the Db2 database parameter LOGINDEXBUILD set to OFF. This setting reduces log space required by the Tivoli Storage Manager server. However, it will likely cause a longer restart process (possibly hours) during failover to the standby system. For more information about the effects of setting LOGINDEXBUILD to ON, see technote 89129.
Configuring storage pools and policy
Configure the tsmawp05 storage pools and policy.
To support deduplication the copy storage pools must use a device class with device type FILE. The copy storage pool is on network-attached file (NAS) disk shared between the primary and secondary systems.
The Tivoli Storage Manager administrative commands that are issued to set up the device class, storage pools, and policy in this scenario are:
define devclass filesloc devtype=file format=drive maxcap=2g mountl=2 directory=/lspace/devclassfiles/tsminst1 shared=no
define devclass filesnet devtype=file format=drive maxcap=2g mountl=2
directory=/space/mx/hadrtest/tsmawp05_tsmawp06/tsminst1/files_net shared=no
define stgpool dedup filesloc pooltype=primary maxscratch=999 dedup=yes
define stgpool dedupcopy filesnet pooltype=copy maxscratch=999 dedup=yes
update copygroup standard standard standard type=backup destination=dedup
activate policyset standard standard
Backing up the deduplicated storage pool
Back up the primary storage pool to the copy storage pool:
backup stgpool dedup dedupcopy wait=yes
Ensure that this operation occurs regularly by scheduling it. For example, use the DEFINE SCHEDULE command, or add it to a maintenance script that is created by using the Tivoli Storage Manager Administration Center.
Configuring backup-archive clients
1. Register nodes on the Tivoli Storage Manager server with the DEDUPLICATION parameter set to allow the client-side data deduplication, for example:
register node somenode somepass deduplication=clientorserver
2. Set required options in the backup-archive client dsm.opt file
TCPSERVERADDRESS tsmawp05.storage.tucson.ibm.com
TCPPORT 1500
DEDUPL YES
NODENAME somenode
3. Run a typical backup operation on the backup-archive client to verify the setup.
C:\Program Files\Tivoli\TSM\baclient>dsmc inc c:\tsmdrivers\v620d062\drm*
-tcpserv=tsmawp05.storage.tucson.ibm.com -node=somenode -pass=somepass -dedupl=yes
Backup-archive client reroute (virtual IP) definition
The Tivoli Storage Manager backup-archive client has no native mechanism to reroute to a different Tivoli Storage Manager server IP address. So the solution requires TSA or some other cluster mechanism that supports VIP. For now, for disaster recovery the client dsm.opt file must be manually updated to change the tcpserveraddress, or the -tcpserveraddr option must be specified.
Commands to use to fail over to the secondary site
1. Shut down the Tivoli Storage Manager server on tsmawp05:
tsm:server1> halt
db2start
db2 start hadr on db tsmdb1 as standby
db2pd -hadr -db tsmdb1, observe Role Standby, State Catchup
2. Take over TSMDB1 on tsmawp06:
db2 takeover hadr on db tsmdb1 by force
cd /home/tsminst1
/opt/tivoli/tsm/server/bin/dsmserv -q &
db2pd -hadr -db tsmdb1, observe Role Primary, State Peer
Configuration reports
You can get information from Db2 about the HADR configuration and status.
HADR configuration information
On the primary system, tsmawp05, issue the command:
db2 get db cfg for tsmdb1 | grep HADR
Typical results:
$ db2 get db cfg for tsmdb1 | grep HADR
HADR database role = PRIMARY
HADR local host name (HADR_LOCAL_HOST) = tsmawp05.storage.tucson.ibm.com
HADR local service name (HADR_LOCAL_SVC) = 60010
HADR remote host name (HADR_REMOTE_HOST) = tsmawp06.storage.tucson.ibm.com
HADR remote service name (HADR_REMOTE_SVC) = 60010
HADR instance name of remote server (HADR_REMOTE_INST) = tsminst1
HADR timeout value (HADR_TIMEOUT) = 120
HADR log write synchronization mode (HADR_SYNCMODE) = SYNC
HADR peer window duration (seconds) (HADR_PEER_WINDOW) = 0
$
On the secondary system, tsmawp06, issue the command:
db2 get db cfg for tsmdb1 | grep HADR
Typical results:
$ db2 get db cfg for tsmdb1 | grep HADR
HADR database role = STANDBY
HADR local host name (HADR_LOCAL_HOST) = tsmawp06.storage.tucson.ibm.com
HADR local service name (HADR_LOCAL_SVC) = 60010
HADR remote host name (HADR_REMOTE_HOST) = tsmawp05.storage.tucson.ibm.com
HADR remote service name (HADR_REMOTE_SVC) = 60010
HADR instance name of remote server (HADR_REMOTE_INST) = tsminst1
HADR timeout value (HADR_TIMEOUT) = 120
HADR log write synchronization mode (HADR_SYNCMODE) = SYNC
HADR peer window duration (seconds) (HADR_PEER_WINDOW) = 0
$
HADR status information
On the primary system, tsmawp05, issue the command:
db2pd -hadr -db tsmdb1
Typical results:
$ db2pd -hadr -db tsmdb1
Database Partition 0 -- Database TSMDB1 -- Active -- Up 11 days 00:06:06
HADR Information:
Role State SyncMode HeartBeatsMissed LogGapRunAvg (bytes)
Primary Peer Sync 0 1147
ConnectStatus ConnectTime Timeout
Connected Thu Mar 25 17:08:58 2010 (1269551338) 120
LocalHost LocalService
tsmawp05.storage.tucson.ibm.com 60010
RemoteHost RemoteService RemoteInstance
tsmawp06.storage.tucson.ibm.com 60010 tsminst1
PrimaryFile PrimaryPg PrimaryLSN
S0000119.LOG 2311 0x0000000252E533C0
StandByFile StandByPg StandByLSN
S0000119.LOG 2311 0x0000000252E533C0
$
On the secondary system, tsmawp06, issue the command:
db2pd -hadr -db tsmdb1
Typical results:
$ db2pd -hadr -db tsmdb1
Database Partition 0 -- Database TSMDB1 -- Standby -- Up 11 days 00:02:58
HADR Information:
Role State SyncMode HeartBeatsMissed LogGapRunAvg (bytes)
Standby Peer Sync 0 36
ConnectStatus ConnectTime Timeout
Connected Thu Mar 25 14:08:58 2010 (1269551338) 120
LocalHost LocalService
tsmawp06.storage.tucson.ibm.com 60010
RemoteHost RemoteService RemoteInstance
tsmawp05.storage.tucson.ibm.com 60010 tsminst1
PrimaryFile PrimaryPg PrimaryLSN
S0000119.LOG 2311 0x0000000252E533C0
StandByFile StandByPg StandByLSN StandByRcvBufUsed
S0000119.LOG 2311 0x0000000252E533C0 0%
$
Instance directory listings
The following examples show that the database and log directories are contained within the instance directory for Tivoli Storage Manager. The examples are for illustrative purposes only and are not meant to imply that locating database and logs in the instance directory is a best practice. For best performance and reliability for a real server, allocate each database and log directory to its own disk or file system.
For the primary system, tsmawp05:
# pwd
/home/tsminst1
# ls -l
total 384
-rwxr----- 1 tsminst1 tsmsrvrs 423 Mar 10 12:11 .profile
-rw------- 1 tsminst1 tsmsrvrs 848 Mar 15 14:13 .sh_history
-rw------- 1 root system 151 Mar 10 17:20 TSM.PWD
drwxr-xr-x 3 tsminst1 tsmsrvrs 256 Mar 10 15:03 activelog
drwxr-xr-x 4 tsminst1 tsmsrvrs 256 Mar 10 15:03 archfaillog
drwxr-xr-x 3 tsminst1 tsmsrvrs 256 Mar 10 15:03 archlog
drwxr-xr-x 3 tsminst1 tsmsrvrs 256 Mar 10 15:02 dbpaths
-rw-r-r- 1 tsminst1 tsmsrvrs 184 Mar 10 16:50 devconfig.txt
-rw-r-r- 1 tsminst1 tsmsrvrs 27 Mar 10 15:02 dsmserv.dbid
-rw-r-r- 1 tsminst1 tsmsrvrs 302 Mar 25 14:03 dsmserv.opt
-rw-r-r- 1 tsminst1 tsmsrvrs 60 Mar 25 14:05 dsmserv.v6lock
-rw-r-r- 1 tsminst1 tsmsrvrs 189 Mar 25 14:05 logattr.chk
-rw-r-r- 1 tsminst1 tsmsrvrs 122 Mar 10 15:51 nodelock
-rw-r-r- 1 tsminst1 tsmsrvrs 4660 Mar 15 13:55 smit.log
drwxrwsr-t 21 tsminst1 tsmsrvrs 4096 Mar 11 15:36 sqllib
-rw-r-r- 1 tsminst1 tsmsrvrs 1470 Mar 23 17:18 tsmdbmgr.log
-rw-r-r- 1 tsminst1 tsmsrvrs 29 Mar 10 17:09 tsmdbmgr.opt
drwxrwxr-x 3 tsminst1 tsmsrvrs 256 Mar 10 15:01 tsminst1
-rw-r-r- 1 tsminst1 tsmsrvrs 138757 Apr 01 17:41 volhist.txt
#
For the secondary system, tsmawp06:
# pwd
/home/tsminst1
# ls -l
total 344
-rwxr----- 1 tsminst1 tsmsrvrs 423 Mar 23 14:08 .profile
-rw-r-r- 1 root system 151 Mar 23 15:08 TSM.PWD
drwxr-xr-x 2 tsminst1 tsmsrvrs 256 Mar 23 14:00 activelog
drwxr-xr-x 2 tsminst1 tsmsrvrs 256 Mar 23 14:01 archfaillog
drwxr-xr-x 2 tsminst1 tsmsrvrs 256 Mar 23 14:01 archlog
drwxr-xr-x 3 tsminst1 tsmsrvrs 256 Mar 23 17:25 dbpaths
-rw-r-r- 1 tsminst1 tsmsrvrs 27 Mar 25 11:19 dsmserv.dbid
-rw-rw-rw- 1 tsminst1 tsmsrvrs 303 Mar 25 14:07 dsmserv.opt
-rw-r-r- 1 tsminst1 tsmsrvrs 189 Mar 25 11:19 logattr.chk
-rw-r-r- 1 tsminst1 tsmsrvrs 369 Mar 25 11:31 nodelock
drwxrwsr-t 20 tsminst1 tsmsrvrs 4096 Mar 23 17:24 sqllib
-rw-r-r- 1 tsminst1 tsmsrvrs 315 Mar 23 15:04 tsmdbmgr.log
-rw-rw-rw- 1 tsminst1 tsmsrvrs 29 Mar 23 14:28 tsmdbmgr.opt
drwxrwxr-x 3 tsminst1 tsmsrvrs 256 Mar 23 17:24 tsminst1
-rw-r-r- 1 tsminst1 tsmsrvrs 135961 Mar 25 11:37 volhist.txt
#
The cat /etc/services file for tsmawp05 and tsmawp06
$cat /etc/services
.
.
Db2_tsminst1 60000/tcp
Db2_tsminst1_1 60001/tcp
Db2_tsminst1_2 60002/tcp
Db2_tsminst1_END 60003/tcp
Scenario for takeover on the secondary system
In this scenario, the primary system is halted, and the secondary system takes over. Later, the system that had the role of primary server is restored and resumes its role.
Commands on the primary system
(tsmawp05) TSM:SERVER1>halt
(tsmawp05) db2start
(tsmawp05) db2 start hadr on db tsmdb1 as standby
Commands on the secondary system
db2 takeover hadr on db tsmdb1 by force
cd /home/tsminst1
/opt/tivoli/tsm/server/bin/dsmserv -q &
Now try to restore a user's file.
C:\Program Files\Tivoli\TSM\baclient>dsmc res c:\tsmdrivers\v620d062\drm* c:\dump\xxx\
-tcpserv=tsmawp06.storage.tucson.ibm.com -node=somenode -pass=somepass -sub=yes
The restore operation failed because the primary volume, which was only on the failed primary system, could not be mounted. Issue the following UPDATE VOLUME command so that the server obtains the data from the deduplicated copy storage pool that has been shared.
Update vol /lspace/devclassfiles/tsminst1/00000195.BFS access=unavail
C:\Program Files\Tivoli\TSM\baclient>dsmc res c:\tsmdrivers\v620d062\drm* c:\dump\xxx\
-tcpserv=tsmawp06.storage.tucson.ibm.com -node=somenode -pass=somepass -sub=yes
Restore succeeded.
C:\Program Files\Tivoli\TSM\baclient>dsmc inc c:\tsmdrivers\v620d042\drm*
-tcpserv=tsmawp06.storage.tucson.ibm.com -node=somenode -pass=somepass -dedupl=yes
Backup succeeded.
C:\Program Files\Tivoli\TSM\baclient>dsmc res c:\tsmdrivers\v620d042\drm* c:\dump\xxx\
-tcpserv=tsmawp06.storage.tucson.ibm.com -node=somenode -pass=somepass -sub=yes
restore stgpool dedup
anr1238i files restored: 334 bytes restore: 10334633 ...
anr1341i scratch volume .. 195.BFS has been deleted from storage pool BACKUPPOOL
C:\Program Files\Tivoli\TSM\baclient>dsmc res c:\tsmdrivers\v620d042\drm\* c:\dump\xxx\
-tcpserv=tsmawp06.storage.tucson.ibm.com -node=somenode -pass=somepass -sub=yes
Restore succeeded.
Resuming normal operations at the primary site
At some point, maybe a couple of weeks after the disaster, the plan might be to resume operations at the primary site. The steps include the following.
- After reinstalling Tivoli Storage Manager on the replacement machine, repeat the HADR initialization at the primary site including restoration of an offline backup from the secondary site that is currently acting as HADR primary.
- Use HADR commands to flip roles.
Alternatives for restoring the primary system's primary storage pools when returning to primary site are:
- Copy secondary system's primary storage pool volumes over to primary system by using FTP or other methods. To do this, you must have the same primary storage pool file paths.
- Restore primary system storage pool from the copy storage pool.
Other considerations
Setting DEDUPREQUIRESBACKUP NO
The Tivoli Storage Manager product documentation notes the advantages of using the default value, YES, for the DEDUPREQUIRESBACKUP option. In addition to the deduplicated copy storage pool, use a second, non-deduplicated copy storage pool that is local. Take the volumes for the local copy storage pool offsite to a vault, following traditional DRM type procedures. In this way, you can provide multiple tiers of protection. If the HADR-based solution fails for whatever reason there is this next level backing it up.
Is Tivoli Storage Manager BACKUP DB still necessary?
Yes. The Tivoli Storage Manager BACKUP DB command is still required. Also still required is saving backup copies of the volume history and device configuration files. The server database cannot be restored without a volume history file and a device configuration file.
- For day-to-day operations, the Tivoli Storage Manager BACKUP DB TYPE=FULL provides relief for the Tivoli Storage Manager server's recovery log space.
- HADR replicates whatever the primary server does. You need the ability to recover from an accidental DELETE FILESPACE * command, for example.
- HADR itself might fail. It might be possible to get both the primary and secondary databases into states where neither of them can be started as the primary HADR node. Recovery from this situation requires restoring the primary database from the Tivoli Storage Manager database backup, by issuing offline commands db2 backup db and db2 restore db to prime the secondary, and then issuing the HADR commands to restart HADR.
Troubleshooting HADR Operations
If you are having problems getting HADR to start on the primary or standby system, the first place to look for detailed related error messages is in the db2diag.log file for the primary or standby server's Db2 instance.
Applying Tivoli Storage Manager Server maintenance
- On the primary server:
- Shut down the Tivoli Storage Manager server. This action deactivates the database and stops Db2.
- Upgrade Tivoli Storage Manager to the new fix pack level by using the COI installation.
- Start the Tivoli Storage Manager server.
- Issue the following command to verify that HADR has resumed:
db2 -hadr -db tsmdb1
- On the standby server:
- Keep HADR enabled and running until the primary server is upgraded to the new level.
- Because the standby server does not have the Tivoli Storage Manager server running, you must deactivate and stop Db2 manually using Db2 commands:
db2 deactivate db tsmdb1
db2stop
db2start
db2 activate db tsmdb1
db2 -hadr -db tsmdb1
The last command verifies that HADR operation has resumed.
Allocating additional disk to the database in a Db2 HADR environment
The new directory for the database must have the same name and same size on both servers.
- On the primary server (tsmawp05)
- Shut down the Tivoli Storage Manager server. This action deactivates the database and stops Db2.
- Reboot the system to pick up the new disk LUN.
- Configure the new file system on the newly added disk.
- Start the Tivoli Storage Manager server.
- Issue the following command to verify that HADR has resumed:
db2pd -hadr -db tsmdb1
- On the standby server (tsmawp06)
- Keep HADR enabled and running until the primary server restarts again.
- Because the standby server does not have the Tivoli Storage Manager server running, you must deactivate and stop Db2 manually using Db2 commands. Issue the commands:
db2 deactivate db tsmdb1
db2stop
- Reboot the system to pick up the new disk LUN.
- Configure the new file system on the newly added disk.
- Issue the commands:
db2start
db2 activate db tsmdb1
db2pd -hadr -db tsmdb1
The last command verifies that HADR operation has resumed.
- On the primary server (tsmawp05)
Extend the database space to the newly defined file system by using the Tivoli Storage Manager server administrative command EXTEND DBSPACE.
Message ANR0227S occurs at failover to secondary node
Message ANR0227S states, "Incorrect database opened. Server cannot start." This error occurs because the database ID file is not in sync with the database. There are two ways to correct the error. Complete one of the following tasks:
- Copy the dsmserv.dbid file from the Tivoli Storage Manager instance directory for the primary HADR node, to the instance directory for the secondary HADR node.
- Delete or rename the dsmserv.dbid file that is located in the Tivoli Storage Manager instance directory for the secondary HADR node. Then, start the server in the foreground with the -S option:
dsmserv -S
After the server is started successfully, it can be halted and started normally.
Reference materials
IBM Redbooks: High Availability and Disaster Recovery Options for Db2 on Linux®, UNIX®, and Windows
Performing a HADR failover operation
Related materials
IBM Data Deduplication Strategy and Operations white paper:
Contributors to this paper
Don Moxley, Development - Author
Randy Larson, Advanced Technical Support - Author
Diem Nguyen - CET Test
Clare Byrne, Holly King - Information Development
Robert Elder - Performance
Was this topic helpful?
Document Information
Modified date:
18 June 2021
UID
ibm16212198