Troubleshooting
Problem
Resolving The Problem
Component: Runtime: Overview
This topic contains error messages and common issues that require a SAML web SSO trace to determine the root cause of the problem. The instructions to obtain a SAML web SSO trace are in the 'Collecting data manually' section of the Collect data tab. If a trace string required for a specific problem is different than what is shown on the Collect data tab, the trace string is noted in the steps to diagnose the problem. In the rest of this document, 'SAML web SSO trace' is referred to as 'SAML trace'.
![]() On earlier fix packs of WebSphere traditional, problem determination of configuration errors was exceedingly difficult. Because of this problem, serviceability updates were put into 7.0.0.45, 8.0.0.14, 8.5.5.13 and 9.0.0.5. If you have a SAML web SSO issue and the SAML feature was never operational on that system before, be sure to try one of those fix packs (or later). Doing so can greatly reduce your time to resolution.
On earlier fix packs of WebSphere traditional, problem determination of configuration errors was exceedingly difficult. Because of this problem, serviceability updates were put into 7.0.0.45, 8.0.0.14, 8.5.5.13 and 9.0.0.5. If you have a SAML web SSO issue and the SAML feature was never operational on that system before, be sure to try one of those fix packs (or later). Doing so can greatly reduce your time to resolution.
- Find the right trace specification:
- Navigate to MustGather: Web Single Sign-on problems with WebSphere Application Server
- Click SSO Trace specifications > WebSphere traditional
- Copy the string that is shown under SAML Web Single Sign On
- Enable SAML SSO trace:
- In the administrative console, click Troubleshooting > Logs and trace
- Click the server that you want to trace.
- Click Diagnostic trace > Change log detail levels
- In the box, enter the trace specification that you want to use
- Click OK
- Restart the server.
The custom properties for SAML web SSO can be found in the IBM Documentation. See:
SAML web single sign-on (SSO) trust association interceptor (TAI) custom properties for v8.5.5If you want to see the custom properties for a version other than 8.5.5, use the Version drop-down at the top of the IBM Documentation page.
Where can I find the WebSphere SAML TAI messages?
You can find the messages that the WebSphere SAML TAI emits into the ffdc, trace.log, SystemOut.log, and SystemErr.log files in the IBM Documentation. The IBM Documentation has the explanation and action for each message. The messages are located by prefix:
How can I tell if my trace is from server startup?IBM support requires that traces be gathered from server startup. If you want to make sure that your traces are gathered from server startup, check for the following string in your trace:
|
Search string
|
Full message
|
| e-business | WSVR0001I: Server {0} open for e-business |
Can the SAML TAI do SP-Initiated SSO with an AuthnRequest?
If you read the IBM Documentation article SAML single sign-on scenarios, features, and limitations, you find a description of a "bookmark style" login flow at the end of the document. The bookmark style login flow emulates, but does not fully implement, a more traditional SP-initiated flow. This is the only SP-initiated login flow that the SAML TAI supports out-of-box.
In WebSphere 7.0.0.39, 8.0.0.11, 8.5.5.7, 9.0.0.0 and later, you can achieve a traditional SP-Initiated login flow with custom code by implementing the com.ibm.wsspi.security.web.saml.AuthnRequestProvider interface. The custom code that you provide builds the AuthnRequest to send to the IdP. Information on how to implement an AuthnRequestProvider for use by the SAML TAI can be found in the Enabling SAML SP-Initiated web single sign-on (SSO) IBM Docs article.
Is HTTP-Redirect binding supported?
The SAML SSO feature in WebSphere traditional does not support HTTP-Redirect binding; it only supports HTTP-POST binding.
The following is a common error that is received from Azure when it is configured for HTTP-Redirect binding. If you get this error, your Azure IdP needs to be reconfigured to allow for HTTP-POST binding in order to interoperate with WebSphere.
| AADSTS750054: SAMLRequest or SAMLResponse must be present as query string parameters in HTTP request for SAML Redirect binding. |
In order for SAML web SSO to work, trust association must be enabled. If trust association is not enabled, the SAML TAI does not load and process requests.
If trust association is enabled, you see this entry in the trace:| [6/04/16 15:30:29:681 CEST] 00000000 TrustAssociat 3 Trust Association enabled: Trying to load the interceptors |
If trust association is not enabled, you see this entry in the trace:
| [6/04/16 15:30:29:681 CEST] 00000000 TrustAssociat 3 Trust Association not enabled |
For step to enable trust association, see the second bullet of step number 2 in the document Enabling your system to use the SAML web single sign-on (SSO) feature
How can I tell if the SAML TAI is configured?
If trust association is enabled and the SAML TAI is configured, you see the following entry in the trace:
| [6/04/16 15:30:29:681 CEST] 00000000 TrustAssociat > loadInterceptor Entry com.ibm.ws.security.web.saml.ACSTrustAssociationInterceptor |
If you don't see this entry in the trace, first see the previous section to ensure trust association is enabled. If trust association is enabled, see the second bullet of step number 2 in Enabling your system to use the SAML web single sign-on (SSO) feature to use the administrative console to check your TAI configuration.
- In the administrative console of the target application server, add the following trace string to the current trace specification:
SamlCommandProviderImpl=all - Restart the application server.
- From a wsadmin prompt or script, run your SAML admin task, such as exportSAMLSpMetadata.
- The trace output is in trace.log on the target application server.
How do I find my SAML TAI custom properties in a trace?
You can find your SAML TAI custom properties in a trace by searching for the string sso_1.sp.acsUrl. Your first hit should look something like this (all on one line):
| {sso_1.sp.filter=request-url%=yourportal, sso_1.sp.acsUrl=https://yourcomp.com/samlsps/yourportal?user_type=EXTERNAL, sso_1.sp.retryOnceAfterTrustFailure=true, sso_1.sp.targetUrl=https://yourcomp.com/yourportal, sso_1.sp.EntityID=https://yourcomp.com, sso_1.sp.trustStore=IdPTrustStore, sso_1.sp.wantAssertionsSigned=true, sso_1.idp_1.SingleSignOnUrl=https://yourcomp.com/authenticate/ssaas/loginRequestListener, sso_1.sp.trustedAlias=ssaas-int, alternate.db.url=jdbc:db2://1.2.3.4:50000/HANDIC3, alternate.db.j2c.alias=YourCellManager/DB2ADMIN, sso_1.sp.acsErrorPage=https://yourcomp.com/SAMLProcessingError.html, alternate.db.driver=com.ibm.db2.jcc.DB2Driver, sso_1.sp.principalName=urn:yourcomp:person:ssin, sso_1.sp.uniqueId=urn:yourcomp:person:ssin, sso_1.sp.idMap=idAssertion, sso_1.sp.userMapImpl=yourcomp.ws.security.web.saml.myUserMappingImpl, sso_1.sp.login.error.page=yourcomp.ws.security.web.saml.mySAMLAuthnRequest} |
After that, you see the properties parsed by the ACSTrustAssociationInterceptor:
| ACSTrustAssoc > initialize Entry ACSTrustAssoc 3 sso_1.sp.filter=request-url%=yourportal ACSTrustAssoc 3 sso_1.sp.acsUrl=https://yourcomp.com/samlsps/yourportal?user_type=EXTERNAL ACSTrustAssoc 3 sso_1.sp.retryOnceAfterTrustFailure=true ACSTrustAssoc 3 sso_1.sp.targetUrl=https://yourcomp.com/yourportal ACSTrustAssoc 3 sso_1.sp.EntityID=https://yourcomp.com ACSTrustAssoc 3 sso_1.sp.trustStore=IdPTrustStore ACSTrustAssoc 3 sso_1.sp.wantAssertionsSigned=true ACSTrustAssoc 3 sso_1.idp_1.SingleSignOnUrl=https://yourcomp.com/authenticate/ssaas/loginRequestListener ACSTrustAssoc 3 sso_1.sp.trustedAlias=ssaas-int ACSTrustAssoc 3 alternate.db.url=jdbc:db2://1.2.3.4:50000/HANDIC3 ACSTrustAssoc 3 alternate.db.j2c.alias=YourCellManager/DB2ADMIN ACSTrustAssoc 3 sso_1.sp.acsErrorPage=https://yourcomp.com/SAMLProcessingError.html ACSTrustAssoc 3 alternate.db.driver=com.ibm.db2.jcc.DB2Driver ACSTrustAssoc 3 sso_1.sp.principalName=urn:yourcomp:person:ssin ACSTrustAssoc 3 sso_1.sp.uniqueId=urn:yourcomp:person:ssin ACSTrustAssoc 3 sso_1.sp.idMap=idAssertion ACSTrustAssoc 3 sso_1.sp.userMapImpl=yourcomp.ws.security.web.saml.myUserMappingImpl ACSTrustAssoc 3 sso_1.sp.login.error.page=yourcomp.ws.security.web.saml.mySAMLAuthnRequest |
You can use the SAML TAI to protect the WebSphere administrative console. See Configuring WebSphere admin console to login with SAML.
CWWSS7074E: The key is not retrieved. The exception is:: com.ibm.wsspi.wssecurity.core.SoapSecurityException: CWSML7004E: The [KeyInfo] element in the Assertion element is missing or empty.- Make sure that the SAML Assertion contains a KeyInfo element.
- Add the sso_<id>.trustedAlias SAML TAI custom property that is the alias of the certificate in the sso_<id>.trustStore to use to validate the signature.
- Set sso_<id>.wantAssertionsSigned to false.
SAMLResponse could not be verified.com.ibm.wsspi.wssecurity.core.SoapSecurityException: Fail to decrypt EncryptedKey -or- CWWSS7074E: The key is not retrieved. The exception is: Fail to decrypt EncryptedKey
- Check the trace for this entry:
EncryptedData 3 Fail to decrypt EncryptedKey:null - If you find this entry, it means that the following property is not specified for the decrypting key:
sso_<id>.sp.keyName - Resolution: Set the sso_<id>.sp.keyName SAML TAI custom property to the value of the alias of your decrypting key in your keystore.
- If you find this entry, it means that the following property is not specified for the decrypting key:
- If you do not find EncryptedKey:null, check the trace for an entry similar to this one:
KeyInfoUtil 3 KeyInfo does not match Key defined in Bindings for
CN=hostname,O=domain,ST=state,C=com- If you find this, the most likely cause is that the partner is Microsoft Windows with ADFS:
- The Java implementation used by WebSphere Application Server differs from Microsoft Windows in the representation of the "StateOrProvinceName" field of a certificate distinguished name.
- The WebSphere WS-Security run time is unable to process a certificate sent by ADFS 2.0. If the issuer's distinguished name contains any "StateOrProvinceName" value and the KeyInfo type for the certificate is X509Data/X509IssuerSerial.
- The StateOrProvinceName field shows up as S=state from ADFS, whereas the Java implementation used by WebSphere requires it as ST=state, which does not explicitly match, thus causing the failure.
- Resolution: To work around this interoperability issue, one of the following approaches can be used:
- Do not include "StateOrProvinceName" in certificate DN's.
- Do not enable/require the encryption on the operation.
- Configure the ADFS to identify certificates via X509SubjectKeyIdentifier (KeyId), or Thumbprint. If SAML tokens are affected, X509Data with X509Certificate or X509SKI can also be used. Contact Microsoft ADFS support for information on how to make this change.
- If you find this, the most likely cause is that the partner is Microsoft Windows with ADFS:
- If you get a "com.ibm.wsspi.wssecurity.core.SoapSecurityException: Fail to decrypt EncryptedKey" error associated with a web service, also check the trace for "EncryptedKey:null". If you find this, then the key name in the callback handler of the token consumer associated with decryption (your inbound encryption part) does not have a value.
- In the other case, the issue is resolved the same as for SAML WSSO.
CWWSS8010E: The SAML response Destination https://mycompany1.com/samlsps/wps/ is not for the service provider https://mycompany2.com/samlsps/wps/
This error generally occurs when there is a conflict between the values two or more acsUrl custom properties. The value for each service provider's acsUrl must be unique. Here is a description of the requirements for the acsUrl custom property:
| The value for each sso_<id>.sp.acsUrl property must have a unique URL path. A URL path does not include the protocol and <hostname>:<port> parts of a URL string. For instance, https://here.com/samlsps/app/go and https://elsewhere.com/samlsps/app/go have the same URL path (/samlsps/app/go) so only one of them can be configured as an acsUrl entry. |
In the CWWSS8010E message in the problem statement, both of the acsUrl entries shown in the message have the same URL path (samlsps/wps), so they do not meet the requirements.
If you get this message, check the acsUrl settings for each of your service providers to make sure each one of them has a unique URL path.
Error in mapping credential for Trust Association:user1@company.com
This error is emitted by core security's WebAuthenticator class. It is only emitted after a TAI has authenticated a user and exits without error. In the case of SAML, the SAMLResponse from the IdP was validated successfully and the SAML TAI exited without error. For example;
|
[2/2/22 14:13:43:674 CST] 000001cb TAIWrapper < negotiateAndValidateEstablishedTrust(): status code = 200 Exit
[2/2/22 14:13:43:674 CST] 000001cb WebAuthentica 3 TAI [com.ibm.ws.security.web.saml.ACSTrustAssociationInterceptor] has been validated successfully.
[2/2/22 14:13:43:674 CST] 000001cb WebAuthentica 3 Subject retrieved is [Subject:
Private Credential: {com.ibm.wsspi.security.cred.cacheKey=saml_acs_tai:sso_saml20_n1631011985n315412204, com.ibm.wsspi.security.cred.uniqueId=https://sts.windows.net/tenantid//user1@company.com, com.ibm.wsspi.security.cred.realm=https://sts.windows.net/tenantid/, Saml20TaiSsoPartners=saml_acs_tai:sso_saml20_, com.ibm.wsspi.security.cred.securityName=user1@company.com, com.ibm.wsspi.security.cred.groups=[]}
Private Credential: com.ibm.ws.wssecurity.platform.websphere.wssapi.token.impl.WasSAML20TokenImpl:(assertionID)
]
[2/2/22 14:13:43:674 CST] 000001cb WebAuthentica 3 Username retrieved from TAI is [user1@company.com]
[2/2/22 14:13:43:674 CST] 000001cb WebAuthentica 3 Map credentials for user1@company.com.
(snip ffdc)
[2/2/22 14:13:43:705 CST] 000001cb WebAuthentica 3 Error in mapping credential for Trust Association:user1@company.com
[2/2/22 14:13:43:705 CST] 000001cb WebAuthentica < Exiting with user_mapping_failed. Exit
[2/2/22 14:13:43:705 CST] 000001cb WebAuthentica 3 first user mapping failed, continue login set to false
|
When you get this error, it means that core security does not trust the realm associated with the user in the Subject. In the case of this example, https://sts.windows.net/tenantid/. If you get this error, do one of the following:
- Set the SAML TAI property sso_<id>.useRealm to the value of your WebSphere realm name.
- If you are running WebSphere 8.5.5.23 or 9.0.5.13 or later, you can set the property to WAS_DEFAULT.
- Otherwise, to find your local realm name, perform the following actions:
- In the administrative console, navigate to Security > Global security
- Your realm name is in the Realm name field under User account repository.
- Check whether your IdP's realm is configured correctly as a trusted realm on your WebSphere traditional server:
- Find the Error in mapping credential for Trust Association error in the trace.
- Search backwards a few lines beyond the ffdc entries, to find the Subject, for instance:
[2/2/22 14:13:43:674 CST] 000001cb WebAuthentica 3 Subject retrieved is [Subject:Private Credential: {com.ibm.wsspi.security.cred.cacheKey=saml_acs_tai:sso_saml20_n1631011985n315412204,com.ibm.wsspi.security.cred.uniqueId=https://sts.windows.net/tenantid//user1@company.com,com.ibm.wsspi.security.cred.realm=https://sts.windows.net/tenantid/,Saml20TaiSsoPartners=saml_acs_tai:sso_saml20_,com.ibm.wsspi.security.cred.securityName=user1@company.com,com.ibm.wsspi.security.cred.groups=[]}
- Get the realm name from the com.ibm.wsspi.security.cred.realm entry in the Subject.
- Check the trusted realms configured on your application server:
- In the admin console, navigate to Security > Global Security
- Under user account repository, click Configure
- Under Related Items, click 'Trusted Authentication Realms - Inbound'
- Check whether the realm from your ID token is in the list. If not, add it:
- Click Add External Realm
- Enter the realm from your ID token.
- Click OK
- Click Save
- Restart the application server
- Retest
- Check whether your application is configured for 'All Authenticated in Trusted Realms':
- In the admin console, navigate to Applications > Application Types > WebSphere enterprise applications
- Click your application
- Under Detail Properties, click 'Security role to user/group mapping'
- If you do not have your preferred JEE security role mapped to the Special subjects='All Authenticated in Trusted Realms', perform the following steps:
- Check the JEE security role to which you'd like to map your WebSphere user/groups for this test.
- If you are using the WebSphere DefaultApplication for this test, check 'All Role' in this step.
- Click 'Map Special Subjects', then select 'All Authenticated in Trusted Realms'
- Click OK
- Click Save
- Restart the application server
- Retest
- Check the JEE security role to which you'd like to map your WebSphere user/groups for this test.
SECJ5008W: The realm specified in com.ibm.wsspi.security.cred.realm (someForeignRealm) does not match the current realm (theLocalRealm). This could cause problems when trying to make a downstream request.
When you see this warning in a trace it might be a sign of a problem, but it might not. You only need to worry about it if think that the mis-matched realm is causing is a problem. If you want to get rid of this warning for a realm that is from your SAML IdP, see the first remediation step at Error in mapping credential for Trust Association:user1@company.com to hardcode the SAML TAI to use the local realm.SESN0008E: A user authenticated as user:samlForeignRealm/samlUser has attempted to access a session owned by theLocalRealm/uid=localUser,o=theLocalRealm.
|
You can integrate HTTP sessions and security in WebSphere® Application Server. When security integration is enabled in the session management facility and a session is accessed in a protected resource, you can access that session only in protected resources from then on. Session security (security integration) is enabled by default.
You cannot mix secured and unsecured resources accessing sessions when security integration is turned on. Security integration in the session management facility is not supported in form-based login with SWAM.
|
This error only appears in a SAML TAI trace. When you experience this problem without trace enabled, you get at least one ffdc entry that contains the following string:
| com.ibm.websphere.security.WebTrustAssociationFailedException: com.ibm.wsspi.wssecurity.core.SoapSecurityException: unable to find valid certification path to requested target |
If you are getting SAML login failures due to trust validation errors, you see ffdc entries from the SAML TAI similar to the following:
| [3/13/19 19:19:19:513 IST] FFDC Exception:com.ibm.websphere.security.WebTrustAssociationFailedException SourceId:com.ibm.ws.security.web.saml.ACSTrustAssociationInterceptor.invokeTAIbeforeSSO ProbeId:552 com.ibm.websphere.security.WebTrustAssociationFailedException: com.ibm.wsspi.wssecurity.core.SoapSecurityException: unable to find valid certification path to requested target at com.ibm.ws.security.web.saml.ACSTrustAssociationInterceptor.processSAMLResponseContext(ACSTrustAssociationInterceptor.java:867) at com.ibm.ws.security.web.saml.ACSTrustAssociationInterceptor.invokeTAIbeforeSSO(ACSTrustAssociationInterceptor.java:536) ..... |
This error is logged at several code points, so the exact stack isn't as important as that it is from the SAML TAI and that the error is unable to find valid certification path to requested target.
What this error means is that you have a truststore configured for the SAML TAI and that the TAI is unable to establish trust for the certificate that signed the SAML Assertion. The SAML TAI uses Java security to establish trust, therefore the rules for the Java runtime that you have installed are enforced. When you get this error, you most likely have one of the following issues:
- The signing certificate is self-signed. The certificate is not in the truststore.
- The signing certificate is issued by a root CA, neither the certificate, nor the root CA certificate is in the truststore.
- The signing certificate is issued by an intermediate CA and the root certificate is in the truststore, neither the certificate, nor the intermediate CA certificate is in the truststore.
As you can see, just from the perspective of fixing a trust validation problem, there are various issues that can be causing the validation problem and each issue can have one or more solutions. However, your specific problem at hand is that the certificate that your SAML IdP used to sign a SAML Assertion is somehow not trusted; this isn't a "general client that uses general service" issue. The easiest way to solve this problem is to place the IdP's certificate into the truststore that the SAML TAI is using. To do this, you can do one of the following:
- Get a file that contains the IdP's signer certificate, then import it into the SAML TAI's truststore.
- Import the file that you receive from your IdP administrator into your SAML truststore. To do this with the admin console, see Adding a certificate to a keystore. Alternatively, you can use keytool:
keytool -import -keystore (trustStoreName) -storepass (trustStorePassword) -file idp.crt -storetype (trustStoreType) - Restart your application server
- Retest
- Import the file that you receive from your IdP administrator into your SAML truststore. To do this with the admin console, see Adding a certificate to a keystore. Alternatively, you can use keytool:
- Extract the IdP's signer certificate from a WebSphere trace, then import it into the SAML TAI's truststore.
 You can only use this method if the IdP's X509 Certificate is contained within the SAML Assertion. If you have the sso_<id>.sp.trustedAlias SAML TAI property configured, then you cannot use this method.
- Gather a SAML SSO trace to catch the error. See MustGather: Web Single Sign-on problems with WebSphere Application Server for the SAML SSO trace specification.
- Open the trace.log file in an editor.
- To find the SAMLResponse, search the trace for ':Response'. You see something like this:
[3/13/19 19:19:19:201 IST] 0000014d SAMLResponseC 3 > <samlp:Response xmlns:samlp="urn:oasis:names:tc:SAML:2.0:protocol" ID="_b3f2dd89-7fb3-4716-ab0b-87a88ebc8269" Version="2.0" IssueInstant="2019-03-13T13:50:54.545Z" Destination="https://knowledge.negd.co.in:443/samlsps/wps/" Consent="urn:oasis:names:tc:SAML:2.0:consent:unspecified"><Issuer xmlns="urn:oasis:names:tc:SAML:2.0:assertion">http://company.com/services/trust</Issuer><samlp:Status><samlp:StatusCode Value="urn:oasis:names:tc:SAML:2.0:status:Success"></samlp:StatusCode></samlp:Status><Assertion xmlns="urn:oasis:names:tc:SAML:2.0:assertion" ID="123456789-abcd-dcdc-bfbf-0987654321" IssueInstant="2019-04-09T12:59:54.545Z" Version="2.0"><Issuer>http://company.com/services/trust</Issuer> ... - Within the SAML Response, search for the string X509Certificate. You see something like this:
<ds:X509Certificate>MIIJBTCCB+2gAwIBAgIQApyyGiSmoUNKs0mEHfv...snip...D3sjPFH1kOXT</ds:X509Certificate> - With an editor, create a new file called idp.crt that contains the following two lines:
---- BEGIN CERTIFICATE----
----END CERTIFICATE---- - From the trace, paste the string between the <ds:X509Certificate> and </ds:X509Certificate> between the BEGIN and END lines in your idp.crt file. It looks something like this:
---- BEGIN CERTIFICATE----
MIIJBTCCB+2gAwIBAgIQApyyGiSmoUNKs0mEHfv...snip...D3sjPFH1kOXT
----END CERTIFICATE---- - Save the file
- Before you import the certificate into your truststore, make sure that you want to trust the certificate. Do one of the following:
- If you are running on a Windows system, view the certificate via File Explorer:
- Start File Explorer.
- Open the directory that contains idp.crt.
- Double-click idp.crt, then click Open.
- View the certificate information and verify that you want to trust it.
- Use an online certificate checker tool, such as Certificate Decoder from sslshopper.com, to view the certificate:
- Open your certificate decoder.
- From the trace, copy the string between the <ds:X509Certificate> and </ds:X509Certificate> tags.
- Paste the text into the decoder window.
- View the certification information and verify that you want to trust it.
- If you are running on a Windows system, view the certificate via File Explorer:
- Import the file into your SAML truststore. To do this with the admin console, see Adding a certificate to a keystore. Alternatively, you can use keytool:
keytool -import -keystore (trustStoreName) -storepass (trustStorePassword) -file idp.crt -storetype (trustStoreType) - Restart your application server
- Retest
My SAML logins are in a redirect loop
Consider the following scenario:
- You direct your browser to a protected resource on WebSphere
- WebSphere SAML SSO redirects the request to the IdP for authentication
- The IdP redirects back to WebSphere with a valid SAMLResponse
- WebSphere validates the SAMLResponse and redirects the request to a target on a server in a different cell
- The request is redirected back to the IdP for authentication
Two likely causes of this problem are:
- You have not exchanged LTPA keys between the two servers
- You do not have security attribute propagation turned on for both servers (it defaults on)
How can I retrieve attributes from the SAML token?
After a successful login, the SAML Assertion that was received from the IdP is marshaled into a SAMLToken object and placed onto the WebSphere runAs subject. You can obtain this SAMLToken object and use methods to obtain its attributes and other settings.
In v9.0, and starting in fix packs 7.0.0.43, 8.0.0.13 and 8.5.5.10, you can use WSSUtilFactory methods that were added with APAR PI62148 to obtain the SAMLToken object from the runAs subject.
Here is some sample code:
import javax.xml.namespace.QName;
import javax.security.auth.Subject;
import com.ibm.websphere.wssecurity.wssapi.WSSUtilFactory;
import com.ibm.websphere.wssecurity.wssapi.token.SAMLTokenFactory;
import com.ibm.websphere.wssecurity.wssapi.token.SAMLToken;
import com.ibm.wsspi.wssecurity.saml.data.SAMLAttribute;
import com.ibm.wsspi.wssecurity.saml.data.SAMLNameID;
import com.ibm.websphere.security.WSSecurityException;

public class SAMLTest1 {
  SAMLNameID sameNameID;
  String attrName;

  void retrieveSAMLTokens() throws WSSecurityException {
    WSSUtilFactory wssuf = WSSUtilFactory.getInstance()
    SAMLToken samlToken = wssuf.getSaml20Token();
    samlNameID = samlToken.getSAMLNameID();

    for (SAMLAttribute samlAttribute : samlToken.getSAMLAttributes()) {
      attrName = samlAttribute.getName();
    }
  }
If you are running on a fix pack that does not include the WSSUtilFactory.getSaml20Token method, you can use the following sample code:
import java.util.Set;
import javax.security.auth.Subject;

import com.ibm.websphere.security.WSSecurityException;
import com.ibm.websphere.wssecurity.wssapi.token.SAMLToken;
import com.ibm.wsspi.wssecurity.saml.data.SAMLAttribute;
import com.ibm.wsspi.wssecurity.saml.data.SAMLNameID;

public class SAMLTest2 {

  SAMLNameID sameNameID;
  String attrName;

  void retrieveSAMLTokens() throws WSSecurityException{

    Subject callerSubject = com.ibm.websphere.security.auth.WSSubject.getRunAsSubject();
    Set<SAMLToken> privateCredentials =  callerSubject.getPrivateCredentials(com.ibm.websphere.wssecurity.wssapi.token.SAMLToken.class);

    for (SAMLToken samlToken : privateCredentials) {
      samlNameID = samlToken.getSAMLNameID();
      for (SAMLAttribute samlAttribute : samlToken.getSAMLAttributes()) {
        attrName = samlAttribute.getName();
      }
    }
  }
}
com.ibm.websphere.wssecurity.wssapi.token.SAMLToken samlToken = yourMethodToGetTheSAMLToken();

Object obj = samlToken.getXML();
org.apache.axiom.om.OMElement samlElement = ((com.ibm.wsspi.wssecurity.wssapi.OMStructure)obj).getNode();
String samlXmlString = samlElement.getText();
| sso_ sso_ sso_ sso_ |
If you are not getting the encryption certificate emitted in the metadata, check the following:
- All the SAML TAI custom properties are specified, are spelled correctly, and have the correct case.
- The keystore exists:
- In the admin console, navigate to Security > SSL Certificate and Key Management > Keystores and Certificates
- Check that your specified keystore is in the list
- If you created the keystore, make sure that you restarted the server after creating it.
- The key alias in the keystore exists
- In the admin console, navigate to Security > SSL Certificate and Key Management > Keystores and Certificates
- Click your keystore
- Click Personal certificates
- Check the alias column for your configured keyAlias
- The key password is correct
You can check that the alias that you have configured is the correct using the keytool application. The keytool application is installed with the application server in the (wasHome)/bin directory.- In a command prompt, change directory to the location of your keystore
- Run the following command:
(wasHome)/bin/keytool -keypasswd -keystore (keystoreFileName) -storepass (keystorePassword) -storetype (keystoreType) -storepass (keystorePassword) -alias (keyAlias) -keypass (keyPassword) - If you get a prompt that says New key password for <(alias)>, then the password is correct.
- Press Ctrl-C to stop the password change.
- If you get a message that says Password change failed for alias <(alias)>, then the password is incorrect
- If you get a prompt that says New key password for <(alias)>, then the password is correct.
| urn:oasis:names:tc:SAML:2.0:status:Success |
- In a SAML trace, search for the CWWSS8003Eerror.
- Search backwards for the following string to get the StatusCode that is in the SAMLResponse:
Response has a failing status code
- urn:oasis:names:tc:SAML::2.0:status:Responder
- urn:oasis:names:tc:SAML::2.0:status:Resquester
- urn:oasis:names:tc:SAML::2.0:status:VersionMismatch
This version of the CWWSS8017E message can be confusing. It implies that there is a SAML SSO cookie missing, but the message is really talking about the LTPA cookie. The CWWSS8017E message, explanation, and action have been rewritten in a way that may assist you with problem determination:
User action: If the request is to the Assertion Consumer Service (ACS) URL, ensure that the identity provider (IdP) includes the SAMLResponse parameter on the HTTP request. If the request is to the business endpoint and the error is expected, but not wanted, perform one or more of the following actions: 1) If the enforceTaiCookie SAML Web SSO TAI property is set to true, set it to false. 2) If one or more of the sso_<id>.sp.enforceTaiCookie SAML Web SSO TAI properties are set to true, set them to false. 3) Increase the LTPA timeout.
You might see an error like the following for one or more of your SAML users:
|
[4/19/23 20:05:47:339 UTC] 00000138 WebCollaborat A SECJ0129E: Authorization failed for user samlUser1 while invoking GET on default_host:/endpoint1/, Authorization failed, Not granted any of the required roles: example_group1 example_group2
|
Remediation:
If you expect your SAML users to have permission to the protected endpoints, but they do not, perform at least one of the following actions:
 If the SAML users are in the WebSphere registry, set the following SAML TAI property and value:
sso_<id>.sp .idMap = localRealm - If at least one of the groups in the message is in a Attribute in the SAML Assertion, but the TAI is not picking it up, make sure that you set the following SAML TAI properties and values:
sso_<id>.sp .
groupName = (attributeName) sso_<id>.sp .groupMap = localRealm - If none of the above methods work, or are not appropriate, follow the steps in WebSphere application security role mapping to external groups.
- The absolute minimum configuration for the SAML TAI is at least one sso_<id>.sp.acsUrl property.
- This will accommodate IdP-Initiated SAML SSO only.
- If the SAMLResponse is not validated successfully, the user is redirected to form login.
- If you want the user redirected back to the IdP if the SAMLResponse is not validated successfully, you must add the sso_<id>.login.error.page property.
- If you want to also accommodate the SP-Initiated SSO scenario (where the request navigates to the WebSphere server first), the sso_<id>.login.error.page property must be added.
- If you want to accommodate the SP-Initiated SSO scenario with more than one service provider configuration (where you have sso_1, sso_2, and so on), the sso_<id>.sp.filter property must be added.
- The URI that we want to have redirected to the IdP for authentication is /myLogin.
- When the request is received by the application server, the request is being sent directly to /myLogin; an authentication request is not sent to the IdP.
Debug procedure:
- Make sure that application security is enabled.
- If you see an entry like this in your trace then application security is not enabled and requests are not sent to any TAI for processing:
[2/22/23 23:48:17:433 EST] 00000112 EJSWebCollabo 3 preInvoke
Skip authorization for non-system apps when app security is disabled. - Take action:
Action: Enable application security- In the administrative console, navigate to Security > Global Security
- Under Application security, check Enable application security
- Click OK
- Click Save
- Restart the server
- If you see an entry like this in your trace then application security is not enabled and requests are not sent to any TAI for processing:
- Make sure that trust association is enabled:
[1/10/20 13:25:05:163 EST] 00000001 TrustAssociat 3 isTrustAssociationEnabled returns [true] - Take action:
Action: Enable trust association- In the administrative console, navigate to Security > Global Security > Web and SIP security > Trust association
- If Enable trust association is not selected, select it, then click Apply
- Click Save
- Restart the server
- Take action:
- Make sure the ACSTrustAssociationInterceptor class is a configured TAI:
[1/10/20 13:24:54:345 EDT] 00000001 TrustAssociat 3 getInterceptors returns [not null]
[1/10/20 13:24:54:345 EDT] 00000001 TrustAssociat 3 TAI class name[0]: com.ibm.ws.security.web.TAMTrustAssociationInterceptorPlus
[1/10/20 13:24:54:345 EDT] 00000001 TrustAssociat 3 TAI class name[1]: com.ibm.ws.security.spnego.TrustAssociationInterceptorImpl
[1/10/20 13:24:54:345 EDT] 00000001 TrustAssociat 3 TAI class name[2]: com.ibm.ws.security.web.saml.ACSTrustAssociationInterceptor- Take action:
Action: Verify the configured interceptors- In the administrative console, navigate to Security > Global Security > Web and SIP security > Trust association > Interceptors
- Verify that com.ibm.ws.security.web.saml.ACSTrustAssociationInterceptor is in the list and that it is spelled correctly.
- If com.ibm.ws.security.web.saml.ACSTrustAssociationInterceptor is not in the list, follow the instructions on Enabling your system to use the SAML web single sign-on (SSO) feature to set up the SAML TAI.
- Take action:
- Make sure the ACSTrustAssociationInterceptor class and configuration were loaded successfully:
...[1/10/20 13:24:54:345 EDT] 00000001 TrustAssociat A SECJ0121I: Trust Association Init class com.ibm.ws.security.web.saml.ACSTrustAssociationInterceptor loaded successfully [1/10/20 13:24:54:345 EDT] 00000001 ACSTrustAssoc < initialize Exit
[1/10/20 13:24:54:345 EDT] 00000001 TrustAssociat A SECJ0122I: Trust Association Init Interceptor signature:
[1/10/20 13:24:54:345 EDT] 00000001 TrustAssociat < loadInterceptor (success) Exit- Take action:
Action: Fix the configuration error.
- Search the trace for the entries like this:
[1/10/20 13:24:54:345 EDT] 00000001 TrustAssociat < loadInterceptor (exception) Exit - Page back in the trace to find the configuration error.
- Search the trace for the entries like this:
- Take action:
- Check to see if ACSTrustAssociationInterceptor.isTargetInterceptor is being invoked for the URI
 The following procedures use trace implementation that was added to the SAML TAI in fix packs 8.5.5.21 and 9.0.5.10. Evaluating isTargetInterceptor issues before those fixpacks is much more difficult than after.
- Search the trace for isTargetInterceptor.
- Check the next line to find the URI being evaluated, for example:
[1/11/23 10:40:01:119 CST] 00000238 ACSTrustAssoc > SAML SSO: isTargetInterceptor(/myLogin)  If you do not find an isTargetInterceptor entry for your URI, check a startup trace to see if your URI is protected. If the URI has no web constraints, the request will not go through any TAI:
[1/10/20 11:29:18:001 EST] 0000009a WebConstraint > getConstraints: Entry
/myLogin
GET
[1/10/20 11:29:18:001 EST] 0000009a WebConstraint 3 webConstraintsTable.length = 0
[1/10/20 11:29:18:001 EST] 0000009a WebResourceCo > isStandardHTTPMethod Entry
GET
[1/10/20 11:29:18:001 EST] 0000009a WebResourceCo < isStandardHTTPMethod Exit
true
[1/10/20 11:29:18:001 EST] 0000009a WebConstraint < getConstraints Exit
[1/10/20 11:29:18:001 EST] 0000009a WebCollaborat 3 No WebConstraints for URI = /myLogin, method = GET
Action: If your URI is not protected, protect it. See the security-constraints element in Configuring Security Using Deployment Descriptors in the Oracle Java documentation.- If you find web constraints for your URI, make sure that it has role requirements. If the URI has no role requirements, the request does not go through any TAI:
[1/19/24 10:30:05:470 GMT] 00000152 WebResourceCo 3 Checking URL: /app1/*
[1/19/24 10:30:05:470 GMT] 00000152 WebResourceCo < no match Exit
[1/19/24 10:30:05:470 GMT] 00000152 WebConstraint < getConstraints Exit
[1/19/24 10:30:05:470 GMT] 00000152 WebCollaborat 3 securityConstraints=null
[1/19/24 10:30:05:470 GMT] 00000152 WebCollaborat > invokeTAI Entry
[1/19/24 10:30:05:470 GMT] 00000152 WebCollaborat 3 everyoneAllowed: false reqRole: No required role(s) persistCred: true performTAIForUnprotectedURI: false isFileTransferApp: false rsaToken in the request header: null
[1/19/24 10:30:05:470 GMT] 00000152 WebCollaborat < invokeTAIReturning doTAI:false Exit
Action: If your URI does not have at least one role requirement, add one. See the security-role element in Configuring Security Using Deployment Descriptors in the Oracle Java documentation. - If you find an entry for your URI, check a little farther down in the trace to see if the TAI is intercepting the request:
Action: Assuming that isTargetInterceptor returns false, adjust your SAML TAI filter settings to make sure that your URI is intercepted.[1/11/23 10:40:01:135 CST] 00000238 ACSTrustAssoc < SAML SSO: isTargetInterceptor returns [false] Exit - If your URL is going through the TAI, but you are being sent to your endpoint and not the IdP, then isTargetInterceptor must be returning false.
- If isTargetInterceptor returns true, and you are not redirected to the IdP, then some error occurred in the TAI, and you would be getting a 403.
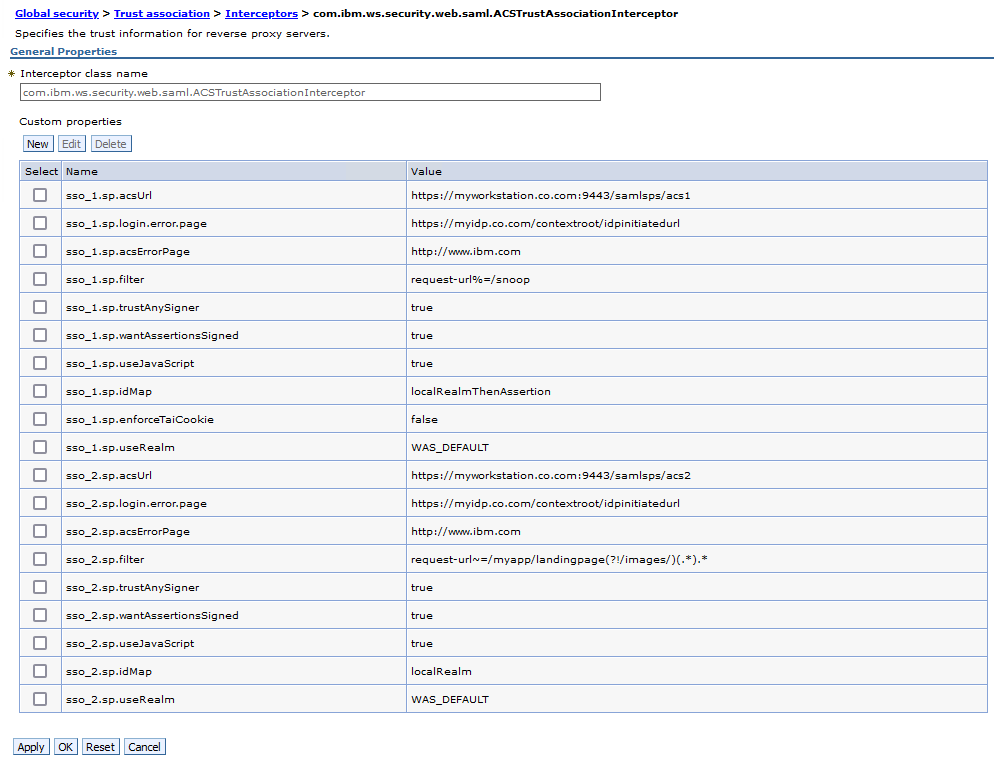
| AdminTask.configureInterceptor('-interceptor com.ibm.ws.security.web.saml.ACSTrustAssociationInterceptor -customProperties ["sso_1.sp.acsUrl=https://myworkstation.co.com:9443/samlsps/acs1","sso_1.sp.login.error.page=https://myidp.co.com/contextroot/idpinitiatedurl","sso_1.sp.acsErrorPage=http://www.ibm.com","sso_1.sp.filter=request-url%=/snoop","sso_1.sp.trustAnySigner=true","sso_1.sp.wantAssertionsSigned=true","sso_1.sp.useJavaScript=true","sso_1.sp.idMap=localRealmThenAssertion","sso_1.sp.enforceTaiCookie=false","sso_1.sp.useRealm=WAS_DEFAULT"] ') |
- Configures the SAML SSO TAI with the properties required for two provider configurations.
- The configureInterceptor task is run two times, but in the end, all the properties are combined together under a single Trust Association entry for the com.ibm.ws.security.web.saml.ACSTrustAssociationInterceptor class.
- Turns on Trust Association.
- Adds https://issuer.com and BasicRealm as trust realms.
- Sets the com.ibm.websphere.security.InvokeTAIbeforeSSO and com.ibm.websphere.security.DeferTAItoSSO core Security custom properties to com.ibm.ws.security.web.saml.ACSTrustAssociationInterceptor.
configBegin="-interceptor com.ibm.ws.security.web.saml.ACSTrustAssociationInterceptor -customProperties '"
configEnd="'"

config = configBegin
id="sso_1.sp"
config += "\"" + id + ".acsUrl=https://myworkstation.co.com:9443/samlsps/acs1\","
config += "\"" + id + ".login.error.page=https://myidp.co.com/contextroot/idpinitiatedurl\","
config += "\"" + id + ".acsErrorPage=http://www.ibm.com\","
config += "\"" + id + ".filter=request-url%=/snoop\","
config += "\"" + id + ".trustAnySigner=true\","
config += "\"" + id + ".wantAssertionsSigned=true\","
config += "\"" + id + ".useJavaScript=true\","
config += "\"" + id + ".idMap=localRealmThenAssertion\","
config += "\"" + id + ".enforceTaiCookie=false\","
config += "\"" + id + ".useRealm=WAS_DEFAULT\""
config += configEnd
print "\n configuring " + config
AdminTask.configureInterceptor(config)

config = configBegin
id="sso_2.sp"
config += "\"" + id + ".acsUrl=https://myworkstation.co.com:9443/samlsps/acs2\","
config += "\"" + id + ".login.error.page=https://myidp.co.com/contextroot/idpinitiatedurl\","
config += "\"" + id + ".acsErrorPage=http://www.ibm.com\","
config += "\"" + id + ".filter=request-url~=/myapp/landingpage(?!/images/)(.*).*\","
config += "\"" + id + ".trustAnySigner=true\","
config += "\"" + id + ".wantAssertionsSigned=true\","
config += "\"" + id + ".useJavaScript=true\","
config += "\"" + id + ".idMap=localRealm\","
config += "\"" + id + ".useRealm=WAS_DEFAULT\""
config += configEnd
print "\n configuring " + config
AdminTask.configureInterceptor(config)

AdminTask.addTrustedRealms('[-communicationType inbound -realmList http://issuer.com|BasicRealm]')
AdminTask.configureTrustAssociation("-enable true")

AdminTask.setAdminActiveSecuritySettings(' -customProperties \'"com.ibm.websphere.security.InvokeTAIbeforeSSO=com.ibm.ws.security.web.saml.ACSTrustAssociationInterceptor"\'')
AdminTask.setAdminActiveSecuritySettings(' -customProperties \'"com.ibm.websphere.security.DeferTAItoSSO=com.ibm.ws.security.web.saml.ACSTrustAssociationInterceptor"\'')

AdminConfig.save()
|
WASX7209I: Connected to process "server1" on node wsx61Node using SOAP connector; The type of process is: UnManagedProcess
configuring -interceptor com.ibm.ws.security.web.saml.ACSTrustAssociationInterceptor -customProperties '"sso_1.sp.acsUrl=https://myworkstation.co.com:9443/samlsps/acs1","sso_1.sp.login.error.page=https://myidp.co.com/contextroot/idpinitiatedurl","sso_1.sp.acsErrorPage=http://www.ibm.com","sso_1.sp.filter=request-url%=/snoop","sso_1.sp.trustAnySigner=true","sso_1.sp.wantAssertionsSigned=true","sso_1.sp.useJavaScript=true","sso_1.sp.idMap=localRealmThenAssertion","sso_1.sp.enforceTaiCookie=false","sso_1.sp.useRealm=WAS_DEFAULT"' configuring -interceptor com.ibm.ws.security.web.saml.ACSTrustAssociationInterceptor -customProperties '"sso_2.sp.acsUrl=https://myworkstation.co.com:9443/samlsps/acs2","sso_2.sp.login.error.page=https://myidp.co.com/contextroot/idpinitiatedurl","sso_2.sp.acsErrorPage=http://www.ibm.com","sso_2.sp.filter=request-url~=/myapp/landingpage(?!/images/)(.*).*","sso_2.sp.trustAnySigner=true","sso_2.sp.wantAssertionsSigned=true","sso_2.sp.useJavaScript=true","sso_2.sp.idMap=localRealm","sso_2.sp.useRealm=WAS_DEFAULT"' |
|
By default, the SAML TAI requires that an LTPA cookie created for an SSO partner only is used for requests associated with that specific SSO partner. What this means is that if, for example, an LTPA cookie was created for a request that satisfied sso_1.sp.filter, then a subsequent request is received that satisfies sso_2.sp.filter, the user is redirected to the IdP to log in again.
The behavior described above is controlled by the sso.<id> If you have a SAML TAI configuration with more than one SSO partner and have requests that are intercepted by the SAML TAI that are successful, then a subsequent request is redirected to the IdP unexpectedly, try setting the enforceTaiCookie to property to false to see whether it fixes the problem. If it does, then consider if the enforceTaiCookie property can be set to false for your use case:
|
|
If an LTPA validation fails for any reason, the user is going to be redirected to the IdP to get a new SAML Assertion. The reasons that an LTPA validation might fail include, but are not limited to:
If the SAML expiration is taken into account during Subject validation, the user is redirected to the IdP at the lesser of the LTPA and SAML timeout values. Either the LTPA validation fails first causing a redirect, or the SAML fails after successful LTPA validation, causing a redirect. |
|
An unexpired Subject must be re-created due to an AuthCache miss. Consider the following:
You can set the sso_<id>.sp.includeCacheKey property to false to resolve this specific issue. However, when the sso_<id>.sp.includeCacheKey property is set to false, if the Subject is reconstructed from the registry, the SAMLToken is no longer on the Subject. Do not set the includeCacheKey property to false in at least the following conditions:
|
|
Some cookies are misusing the recommended “SameSite“ attribute:
- Cookie “WasSamlSpReqURL” does not have a proper “SameSite” attribute value. Soon, cookies without the “SameSite” attribute or with an invalid value will be treated as “Lax”. This means that the cookie will no longer be sent in third-party contexts. If your application depends on this cookie being available in such contexts, please add the “SameSite=None“ attribute to it. To know more about the “SameSite“ attribute, read https://developer.mozilla.org/docs/Web/HTTP/Headers/Set-Cookie/SameSite for navigator request
|
- To prevent this warning, set the com.ibm.websphere.security.addSameSiteAttributeToCookie global security custom property to Lax.
- You can use the ProviderConfig object to customize attributes for the SAMLToken that are specific to the issuer. For example, the issuer URL or signing keys.
- You can use the RequesterConfig object to customize the information from the Subject that is added to the token. For example, the groups or the realm name.
- You can use the SAMLToken object to emit the XML for the SAML Assertion.
- This example creates a SAML Assertion based on the runAs Subject.
- Settings in the SAMLIssuerConfig.properties file are used for signing and time to live.
- The following attributes are included from the Subject:
- Groups
- Realm name
package saml.test;

import org.apache.axiom.om.OMElement;

import com.ibm.websphere.security.auth.WSSubject;
import com.ibm.websphere.wssecurity.wssapi.token.SAMLToken;
import com.ibm.websphere.wssecurity.wssapi.token.SAMLTokenFactory;
import com.ibm.wsspi.wssecurity.saml.config.ProviderConfig;
import com.ibm.wsspi.wssecurity.saml.config.RequesterConfig;

public class samlEmitter {

  public static String createSamlAssertion() {
    final String MY_ISSUER = "https://myco.com";

    String origSigValue = null;
    String origIssuerValue = null;
    String samlXml = null;

    try {
      SAMLTokenFactory samlFactory = SAMLTokenFactory.getInstance(SAMLTokenFactory.WssSamlV20Token11);
      RequesterConfig requesterCfg = samlFactory.newBearerTokenGenerateConfig();
      ProviderConfig issuerCfg = samlFactory.newDefaultProviderConfig(MY_ISSUER);

      setupProviderConfig(issuerCfg);
      setupRequesterConfig(requesterCfg);

      SAMLToken samlToken = samlFactory.newSAMLToken(WSSubject.getCallerSubject(), requesterCfg, issuerCfg);

      OMElement samlOm = ((com.ibm.wsspi.wssecurity.wssapi.OMStructure)samlToken.getXML()).getNode();

      samlXml = samlOm.toString();

    } catch ( Exception e ) {
      e.printStackTrace();
    }
    return samlXml;
  }

  //Customize the data in the RequesterConfig object
  private static void setupRequesterConfig(RequesterConfig requesterCfg) throws Exception {
    requesterCfg.setNotOnOrAfter(30);
    requesterCfg.setIncludeRealmName(true);
    requesterCfg.setIncludeGroupIds(true);
  }

  //Customize the data in the ProviderConfig object
  public static void setupProviderConfig(ProviderConfig issuerConfig) throws Exception {
    //The provider config object is initialized from the file
    //(PROFILE_ROOT)/config/cells/(CELL_NAME)/sts/SAMLIssuerConfig.properties
    //
    //This allows an administrator to configure keystores, keys, passwords and other
    //information for creating SAML Assertions.
    //
    //Once the ProviderConfig object is created, you can modify data within the object.
    //For example, if you want to change the keystore and key:
    //SAMLTokenFactory samlFactory = SAMLTokenFactory.getInstance(SAMLTokenFactory.WssSamlV20Token11);
    //KeyStoreConfig ksc = samlFactory.newKeyStoreConfig( "jks", "keystores/saml/myx509.ks", "storepass");
    //issuerConfig.setKeyStoreConfig(ksc);
    //KeyInformationConfig kic = samlFactory.newKeyInformationConfig(""mysignalias", "keypass", "mysign");
    //issuerConfig.setKeyInformationConfig(kic);
  }

}
<saml2:Assertion xmlns:saml2="urn:oasis:names:tc:SAML:2.0:assertion" Version="2.0" ID="_4F78F6DE4D1B1789721695519615335" IssueInstant="2023-09-24T01:40:15.334Z">
    <saml2:Issuer>https://myco.com</saml2:Issuer>
    <ds:Signature xmlns:ds="http://www.w3.org/2000/09/xmldsig#">
        <ds:SignedInfo>
            <ds:CanonicalizationMethod Algorithm="http://www.w3.org/2001/10/xml-exc-c14n#"></ds:CanonicalizationMethod>
            <ds:SignatureMethod Algorithm="http://www.w3.org/2000/09/xmldsig#rsa-sha1"></ds:SignatureMethod>
            <ds:Reference URI="#_4F78F6DE4D1B1789721695519615335">
                <ds:Transforms>
                    <ds:Transform Algorithm="http://www.w3.org/2000/09/xmldsig#enveloped-signature"></ds:Transform>
                    <ds:Transform Algorithm="http://www.w3.org/2001/10/xml-exc-c14n#"></ds:Transform>
                </ds:Transforms>
                <ds:DigestMethod Algorithm="http://www.w3.org/2000/09/xmldsig#sha1"></ds:DigestMethod>
                <ds:DigestValue>7YSgCtqae1VRoaoMZ7iKmAfwfgg=</ds:DigestValue>
            </ds:Reference>
        </ds:SignedInfo>
        <ds:SignatureValue>(BINARY)</ds:SignatureValue>
        <ds:KeyInfo>
            <ds:X509Data>
                <ds:X509Certificate>(BINARY)</ds:X509Certificate>
            </ds:X509Data>
        </ds:KeyInfo>
    </ds:Signature>
    <saml2:Subject>
        <saml2:NameID NameQualifier="realm.myco.com:389">testuser</saml2:NameID>
        <saml2:SubjectConfirmation Method="urn:oasis:names:tc:SAML:2.0:cm:bearer">
            <saml2:SubjectConfirmationData NotOnOrAfter="2023-09-24T01:40:15.384Z"></saml2:SubjectConfirmationData>
        </saml2:SubjectConfirmation>
    </saml2:Subject>
    <saml2:Conditions NotBefore="2023-09-24T01:40:15.342Z" NotOnOrAfter="2023-09-24T02:40:15.342Z"></saml2:Conditions>
    <saml2:AttributeStatement>
        <saml2:Attribute Name="RealmName" NameFormat="com.ibm.websphere.security.cred.WSCredential">
            <saml2:AttributeValue>realm.myco.com:389</saml2:AttributeValue>
        </saml2:Attribute>
        <saml2:Attribute Name="GroupIds" NameFormat="com.ibm.websphere.security.cred.WSCredential">
            <saml2:AttributeValue>group2</saml2:AttributeValue>
            <saml2:AttributeValue>group1</saml2:AttributeValue>
        </saml2:Attribute>
    </saml2:AttributeStatement>
</saml2:Assertion>
Common Issues
Issue 1When WebSphere redirects the request to the Identity Provider (IdP), the browser associates the WasSamlSpReqUrl cookie that WebSphere creates with the host name associated with the request URL. The IdP must redirect the request back to the ACS URL. If the request URL host name is not the same as the ACS URL host name, the browser does not send the cookie with the redirected request. If the cookie is not present on the redirected request, the request cannot be redirected to the original URL after authentication.
Things to think about:
|
When performing anything but true IdP-initiated SSO, the WebSphere SAML SSO TAI might require browser cookies for proper operation. For instance, as noted above, there is the WasSamlSpReqUrl that contains the original request URL. There is also the WASPostParam cookie that contains additional request information and the WasSamlAcsID cookie that contains the information required for the proper operation of custom SP-Initiated SSO.
When performing bookmark-style SSO, it is possible to operate without cookies if the target is hardcoded or set by the relayState in the SAMLResponse. However, the WasSamlAcsID must be present for the custom SP-Initiated SSO scenario to operate properly. If that cookie is missing, you see the following error:
| CWWSS8006E: InResponseTo must not be present for IdP-Initiated unsolicited responses. |
If you get this error when performing custom SP-Initiated SSO, steps must be taken to ensure that the WasSamlAcsID cookie is not lost.
 Note:
Note:
Related Information
Was this topic helpful?
Document Information
Modified date:
25 June 2024
UID
swg21982431