Technical Blog Post
Abstract
What's new in September 2017
Body
Dual y-axis support added to Tealeaf on Cloud standard report
The ability to include a dual y-axis on standard reports enables users to show the relationship between 2 variables with varying magnitudes and scales of measurement.
If your report contains multiple metrics, you can use the Dual Y-axis feature to plot data on a left and right Y-axis. The Dual Y-axis is a feature of the combo report type.
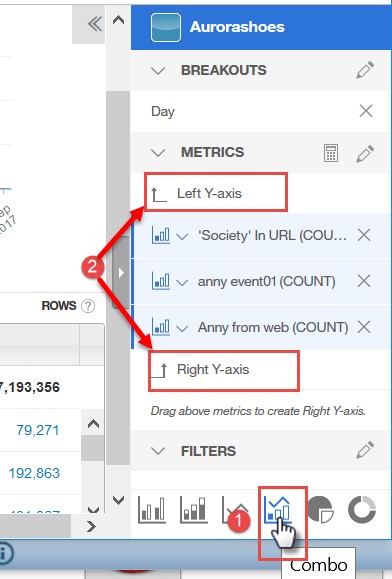
To enable the Dual Y-axis feature for a standard report, select Combo from the list of chart types at the bottom of the Report builder UI:
 |
Because of selecting the Combo chart type, options for a Left Y-axis and Right Y-axis are added to METRICS list:
|
|
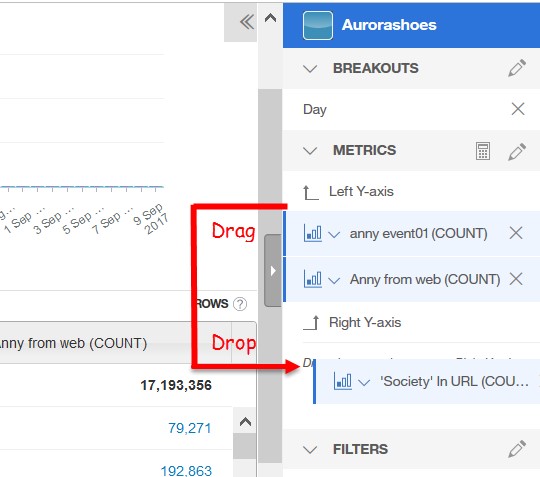
To get the chart to display a metric on the right Y-axis, drag and drop the metric from Left Y-axis to Right Y-axis:
|
|
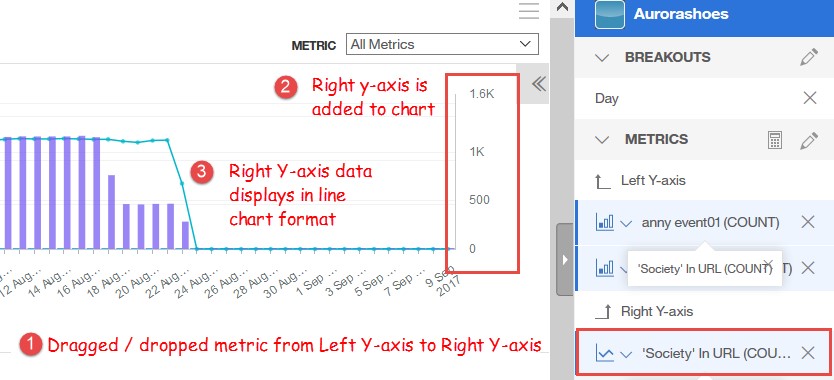
As a result of dragging and dropping the metric ‘Society’ in URL from the Left Y-axis to the Right Y-axis, a right axis is added to the chart and data for the ‘Society’ in URL is plotted in line chart format, differentiating it from the Left Y-axis data, which is plotted in bar chart format:
 |
Enhancements to the Struggle Analytics UI
The Struggle Analytics UI includes additional data for a deeper analysis of step count and page load struggle.
The page detail view includes new charts for the following struggle factors:
- Median page load
- Median step count
- Struggle values for step count
- Struggle values for the load time
New to TeaLeaf and want to get started?
Tealeaf on Cloud provides a starter workspace, preconfigured with standard ready-to-use reports.
The starter workspace is a great place to get started and to familiarize yourself with basic Tealeaf reporting capabilities. For new users, the default home / landing page provides access to the starter workspace.
 |
Open to my favorite workspace
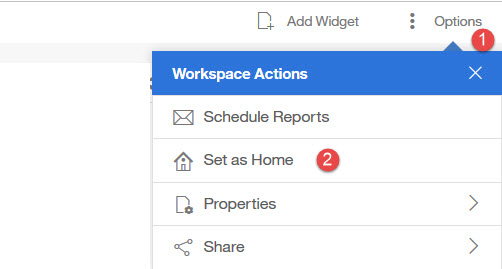
You probably have a workspace, that you’ve created, and that is where you spend most of your time. You keep thinking, I would really like this to be my “Home” workspace. Now you can!
Open the workspace, then select Options and select Set as Home.
 |
Sharing workspaces just got easier
Sometimes you need to share your workspace with more than one colleague. In the past, this meant performing the “Share workspace” operation for each colleague with whom you wanted to share the workspace.
Now, the Share Workspace option includes a multi-select capability that allows share your workspace with multiple users at one time!
From the workspace, click Options, then Share. Select the users with whom you want to share the workspace and click Save.
|
|

Quick search on a Session ID
Recently we added Session Search to your landing page. Well, now not only can you search for a single word or text string, but you can search on a Session ID.
 |
If you don’t like having the Session Search on your landing page. With a simple click you can collapse the field.
 |
To expand and redisplay the Session Search , click on the search (magnifying glass) icon:
 |
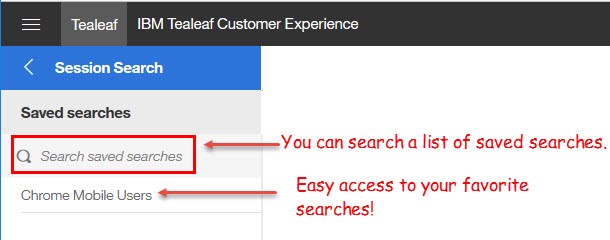
Save my session search
Ever find yourself building and running the same Session Search over and over again? I know I do. Do you ever wish there was a way to save that near perfect search as a template? Well, your wish has been granted!
A Save option has been added to the Search Results page. Click Save and name it.
|
|

Enter a name for the search and click Save.
|
|

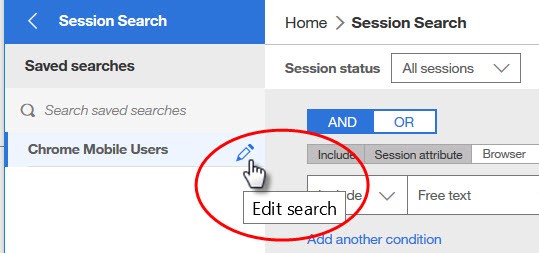
The search is added to the list of Saved Searches in the main navigation panel.
 |
If you need to edit the conditions of your saved search, simply click edit and make your changes.
 |
UID
ibm11122441