How To
Summary
This guide walks you through the steps of Configuring WebSphere with LDAP Security. These examples are shown on WebSphere 8.0 and 8.5 but the configuration is similar in WebSphere 7. A prerequisite to configuring WebSphere for LDAP security is an LDAP Server configured with the appropriate users and groups.
Steps
Adding the wasadmin user to Tivoli Directory Server
When you enable LDAP security in WebSphere, you must also enable Administrative Security. This means that your WebSphere deployment manager console now requires a username and password to log in (if it did not already). The default admin user for WebSphere is wasadmin and by default this user exists in a file-based repository on the WebSphere server. It is common practice to remove this file-based realm and add wasadmin to your LDAP directory. This section outlines how to add wasadmin to Tivoli Directory Server.
command-line method:
- Create an LDIF file similar to this one attached (or you can use this one). This LDIF contains the information to add wasadmin to the same directory structure that was created in Installing and configuring IBM Tivoli Directory Server for Maximo Security. If your structure differs, you need to edit this file to accommodate.
- In a command prompt, navigate to the Tivoli Directory Server bin directory (example: C\IBM\LDAP\V6.3\bin)
- Run the following command (substitute appropriate values): idsldapadd -h <hostname> -D cn=root -w <AdminDNpassword> -v -f <pathtoLDIFfile>
- If there were no errors, you have the Directory configured with the wasadmin user
Web Administration Tool Method:
- Log in to the Web Admin tool by navigating to http://localhost:12100/IDSWebApp/ in a browser. Log in to your local instance with cn=root user/pass.
- Select Directory Management > Manage Entries
- Navigate to the directory you created to store Maximo users
- Click Add

- On the Select object class panel, choose inetOrgPerson, click Next
- On the Select Auxilliary object classes panel, leave the defaults and click Next
- For Relative DN, enter: uid=wasadmin. For cn and sn enter wasadmin. Click Next

- On the optional attributes panel, enter uid: wasadmin and give it a userPassword. Click Finish.

- Wasadmin now exists in the Tivoli Directory Server directory
Adding the wasadmin user to Microsoft Active Directory
When you enable LDAP security in WebSphere, you must also enable Administrative Security. Meaning that your WebSphere deployment manager console now requires a username and password to log in (if it did not already). The default admin user for WebSphere is wasadmin and by default this user exists in a file-based repository on the WebSphere server. It is common practice to remove this file-based realm and add wasadmin to your LDAP directory. This section outlines how to add wasadmin to Microsoft Active Directory (2012 in this example).
- Log on to the Microsoft Active Directory server as an Administrative user
- Launch the Control Panel > Administrative Tools > Active Directory Users and Computers application
- In the navigation pane, right-click the container you store your Maximo users in and select New > User

- Enter wasadmin for the First name and User Logon name. Click Next

- Give wasadmin a password, this password has to conform to the server password policy. Deselect "User must change password at next logon" and select "Password never expires". Click Next then Finish
- Wasadmin now exists in the Active Directory
Configuring WebSphere with Tivoli Directory Server
Now that we have all the users in the Tivoli Directory Server directory (including wasadmin) we can configure WebSphere to use this directory for security. This example uses WebSphere 8.0 but the procedure is similar on WebSphere 8.5 and 7.0.
- Navigate to your WebSphere administrative console in a browser (usually http://servername:9060/ibm/console) and log in.
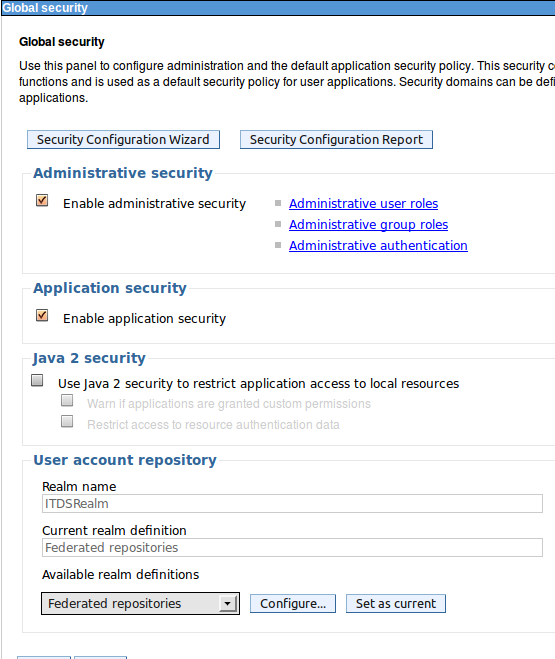
- Go to Security > Global Security
- On the Available Realm Definitions page, select Federated Repositories from the drop down and click Configure

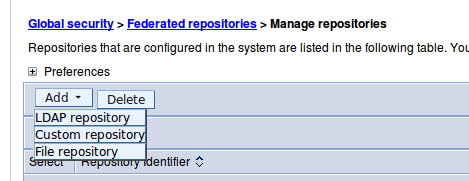
- In the Related Items section, select Manage repositories
- Click Add > LDAP Repository

- Give it a Repository identifier (any name is fine)
- In the Directory type, select IBM Tivoli Directory Server
- Complete the hostname and port of the Tivoli Directory Server server
- For Bind Distinguished name, use cn=root and enter the password for this AdminDN user

- Click OK and Save
- Your Tivoli Directory Server Repository now shows up in the list of Repositories

- Go back to the Federated Repositories screen
- On the Repositories in the Realm section, click Add Base entry to Realm

- Select Tivoli Directory Server repository and complete your top-level OU where Maximo users and groups are stored in the Distinguished Name fields. Click OK and Save

- Back on the Federated repositories screen, you can change the Realm name to Tivoli Directory Server and complete wasadmin for the primary administrative user name. In the repositories in the realm section, check off the o=defaulfWIMFileBasedRealm and click Remove.

- Click OK and save
- Back on the Global Security page, select Enable administrative security, Enable application security and make sure Java 2 security is not enabled. From the Available realm definitions, select Federated repositories and click Set as current

- Click Apply, then save. WebSphere now needs to be restarted for the changes to take effect
- When WebSphere restarts, navigate back to the Admin Console log in page. It now requires a username and password. Log in as wasadmin with the wasadmin password you specified in Tivoli Directory Server
- Click Users and Groups > Manage users
- Your Tivoli Directory Server users should show up in the Users list

- Click Users and Groups > Manage Groups
- The group maximousers shows up. If you click on it and click the Members tab, all your maximousers show up as a member

- WebSphere is now configured for LDAP security with Tivoli Directory Server
Configuring WebSphere with Microsoft Active Directory
Now that we have all the users in the Microsoft Active directory (including wasadmin) we can configure WebSphere to use this directory for security. This example uses WebSphere 8.5 but the procedure is similar on WebSphere 8.0 and 7.0.
- Navigate to your WebSphere administrative console in a browser (usually http://servername:9060/ibm/console) and log in.
- Go to Security > Global Security
- On the Available Realm Definitions page, select Federated Repositories from the drop down and click Configure

- In the Related Items section, select Manage repositories
- Click Add > LDAP Repository

- Give it a Repository identifier (any name is fine)
- In the Directory type, select Microsoft Active Directory
- Complete the hostname and port of the MSAD server
- For Bind Distinguished name, use a user that exists in LDAP (that is able to bind) and enter the password for this user. My example uses wasadmin and this user is fine. Change the Federated repository properties for log in to cn

- Click OK and Save
- Your Tivoli Directory Server Repository should now show up in the list of Repositories
- Go back to the Federated repositories screen
- In the Repositories in the realm section, click Add Repositories

- Select MSAD from the drop down list and enter the full Base Distinguished Name of the parent OU where Maximo users and groups are stored. For example, my users/groups are stored in an OU called SWG on qalab07ldap.swg.usma.ibm.com so my Base DN would look like OU=SWG,DC=qalab07ldap,DC=swg,DC=usmaDC=ibm,DC=com. Click OK and Save

- Back on the Federated repositories screen, you can change the Realm name to MSAD and complete wasadmin for the primary administrative user name. In the repositories in the realm section, check off the o=defaulfWIMFileBasedRealm and click Remove. Click on Apply and Save

- On the federated repositories screen, under the additional properties section, select supported entity types
- Select each item and Change the Base Entry for Default parent to the same Base DN you used on the previous screen. For PersonAccount changed the Relative Distinguished Name Properties to cn. Click Save.

- Back on the Federated Repositories screen, click OK and Save
- Back on the Global Security page, select Enable administrative security, Enable application security and make sure Java 2 security is not enabled. From the Available realm definitions, select Federated repositories and click Set as current

- Click Apply, then save. WebSphere now needs to be restarted for the changes to take effect
- When WebSphere restarts, navigate back to the Admin Console log in page. It now requires a username and password. Log in as wasadmin with the wasadmin password you specified in MSAD
- Click on Users and Groups > Manage users. Your Maximo users from MSAD show in the list
- The group maximousers should show up. If you click on it and click the Members tab, all your maximo users show up as a member
- WebSphere is now configured to use MSAD LDAP for Security
Document Location
Worldwide
Was this topic helpful?
Document Information
Modified date:
01 July 2021
UID
ibm15694069