Troubleshooting
Problem
This document describes a problem where local print screens from a PC5250 display session are not ejecting the page.
Resolving The Problem
Some users are seeing a problem where their printer is not ejecting a page after doing a local print screen from a PC5250 display session that is configured to use a Printer Definition Table (PDT) File.
The PDT files were set up to match the Windows® printer drivers. In some cases, they were set up to issue a form feed at the end of each print job (or spooled file) because the printer driver was not taking care of it. In other cases, they were not set up to issue a form feed at the end of each print job because the printer driver was issuing a form feed. Problems have occurred where a different version of the Windows printer driver does not issue a form feed, yet PC5250 expects it to, thus causing the printer to wait until someone manually ejects the form.
Because some Windows printer drivers issue their own form feed at the end of each spooled file and some do not, you will find that some Printer Definition Table (PDT) files have a form feed control in the PC5250 end of job control string and some do not.
Note: If host print screens are not ejecting when printing through a PC5250 printer session that is configured to use the Windows printer driver (without a PDT file), get the latest Client Access for Windows 95/NT Service Pack or PC5250 Print PTF.
This document was last updated on 12 October 2011.
Creating a Modified PDT File to Issue a Form Feed at the End of the Print Job
To make copy of the PDT source and add the form feed control to the PC5250 end of job control string, do the following:
| 1. | Bring up the PC5250 display session profile. |
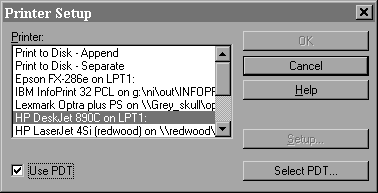
| 2. | Click on File/Printer Setup on the menu bar to bring up the Printer Setup dialog box. |
| 3. | Click on the Select PDT button to bring up the Select PDT file dialog box. |
 | |
| 4. | Look in the File Name field to see which PDT file is currently being used (for example, HPDSKJT.PDT). |
 | |
| 5. | Leave the PC5250 display session profile on the Select PDT file dialog box and bring up File Manager (for Windows 3.1) or the Windows Explorer (for Windows 95). |
| 6. | Go to the C:\PCOMWIN\PDFPDT directory (for Windows 3.1) or the C:\Program Files\IBM\Client Access\Emulator\pdfpdt folder (for Windows 95). |
 | |
| 7. | Double-click on the corresponding PDF source file (for example, HPDSKJT.PDF) to open it using Notepad. Note: If you are using Windows 3.1 and get the error "No application is associated with this file", click on the OK button on the error message, click on File/Associate on the menu bar, click on Text File (notepad.exe), click on the OK button, and double-click on the corresponding PDF file. |
| 8. | Click on File/Save As on the menu bar to save the file using a new name; for example, EJECTPG.PDF for Windows 3.1 or Eject Page.pdf for Windows 95, so that you do not modify the original PDF and PDT files (and do not have to worry about these changes being overwritten by PTFs or a Service Pack). |
 | |
| 9. | Search for the END_JOB control code and add the FFF control as shown below: Original PDF source: END_JOB = CUL CBP CS1 Modified PDF source: END_JOB = CUL CBP CS1 FFF |
| 10. | Click on File/Save on the menu bar to save the file. |
| 11. | Return to the PC5250 display session profile, and return to the Select PDT file dialog box by clicking on File/Printer Setup on the menu bar. Then, click on the Select PDT button. |
 | |
| 12. | Click on the Convert PDF button. |
| 13. | Find your modified PDF file (that is, EJECTPG.PDF or Eject Page.pdf) in the list. Click on the file to select it, and click on the Convert button. |
 | |
| 14. | Verify that the table compilation was successful, and click on the Close button on the PDF File Converter dialog box. |
 | |
| 15. | Click on the Close button on the Convert PDF to PDT dialog box. |
| 16. | Verify that the new PDT file (that is, EJECTPG.PDT or Eject Page.pdt) is selected on the Select PDT file dialog box, and click on OK. |
 | |
| 17. | Click OK on the Printer Setup dialog box. |
| 18. | Click on File/Save on the menu bar to save the PC5250 display session profile. |
| 19. | Print a few local print screens from the PC5250 display session to verify that PC5250 ejects each page automatically. |
Historical Number
10062740
Was this topic helpful?
Document Information
Modified date:
18 December 2019
UID
nas8N1018494