How To
Summary
Instructions for setting up a new installation of Information Server 11.7.1.3.
Information Server 11.7.1.3 can be installed on any of the supported platforms.
Starting with Information Server 11.7.1.0, in addition to Information Server Enterprise Search (ISES), the master node (ISES) host contains other microservices and is called the Microservices tier.
You should install the Microservices tier if you plan to use any of the following features:
1. Information Server Enterprise Search
2. the new Information Governance Catalog and Information Analyzer console
These instructions can be used to install Information Server 11.7.1.3 with or without a Microservices tier.
Objective
Set up a new installation of Information Server 11.7.1.3 with or without a Microservices tier.
Environment
Information Server 11.7.1.3 can be installed on all supported platforms.
For the Information Server host system and the Microservices tier, ensure that your system meets the requirements listed in Information Server 11.7.1 System requirements.
Refer to the pre-installation checklist while checking your system.
Using Db2 as the repository database
You can use the Information Server 11.7.1.3 installation program to install Db2 11.5, or preinstall Db2 11.5. Db2 11.1 is not supported.
Using WebSphere Application Server Network Deployment
Microservices tier system requirements and configuration
Requirements related to single and multiple nodes
You can set up the Microservices tier as a single node or as multiple nodes with a master node and two worker nodes.
The Microservices tier needs to meet the following requirements:
- Red Hat 7.3 or later
-
Single node: minimum 8 vcpu and 32 GB memory
-
Multiple nodes: minimum 8 vcpu and 32 GB memory on each node
Network protocol
However, communication between the services tier and the repository tier will not be TLS 1.2 by default; it can be changed post-install.
Steps
Table of Contents
1) General installation information
1.1) Using a password or passwordless SSH for installing the Microservices tier
1.3) GIDs and UIDs created during Microservices tier installation
3.1) Instructions for is-suite installation
3.1.1) Installation in GUI mode
3.1.2) Installation in Console (silent) mode
4) Post-install actions
4.1) Remove Governance Monitor icon from launchpad
4.2) (Optional) Change communication between the services tier and the repository tier to TLS 1.2
4.3) Disable the Kafka log cleaner
4.4) Information Server Microservices tier needs an additional key
However, there are additional installation modes that do not need passwordless SSH to be set up.
a. Specify that the root user must be used on the master node, and provide the password and sftp port.
In this case, you do not have to set up passwordless SSH from the Information Server host to the master node.
However, for a multiple nodes environment, you must set up passwordless SSH for the root user from the master node to the worker nodes.
The specified non-root user must have sudo privilege with NOPASSWD enabled.
In this case, you do not have to set up passwordless SSH from the user running the install on the Information Server host to the master node.
For a multiple nodes environment:
ii. you must set up passwordless SSH for the specified non-root user from the master node to the worker nodes
You must set up passwordless SSH from the user running the install on the Information Server host to the master node.
For a multiple nodes environment, passwordless SSH must also be set up for the root user from the master node to the worker nodes.
The specified non-root user must have sudo privilege with NOPASSWD enabled.
You must set up passwordless SSH from the user running the install on the Information Server host to the master node.
For a multiple nodes environment
i. the specified non-root user must be set up in the same manner on all nodes
ii. passwordless SSH must also be set up for the specified non-root user from the master node to the worker nodes
Note:
1. In all four installation modes, use visudo to update the /etc/sudoers file and add an entry for root:
2. To enable NOPASSWD for the non-root user, use visudo to append " ALL=NOPASSWD: ALL" to the user's entry in the /etc/sudoers file, or add a new entry.
3. In the /etc/sudoers file, there is a "requiretty" setting that can cause the following messages to appear in the Kubernetes deployment log:
a. A "sudo: sorry, you must have a tty to run sudo" message when sudo is invoked.
b. While "yum install zip" is running, you may get a message
"ERROR: With yum install of zip. You can try to install requirement manually"
This error can appear even if zip is installed as needed.
You will have to disable "requiretty" globally or at a user/group/command level:
Replace "Defaults requiretty" with "Defaults !requiretty" in your /etc/sudoers. This will impact your global sudo configuration.
Defaults:myuser !requiretty
4. sudo privilege is only needed for the duration of the install.
5. Sample setup of passwordless SSH connection for a root user to the Microservices Tier node.
a. If the file /root/.ssh/id_rsa.pub does not exist, create the SSH Keys with the following command:
> ssh-keygen -f /root/.ssh/id_rsa -q -N ""
b. Copy the SSH public key to the Microservices Tier node with the following command:
> ssh-copy-id -i /root/.ssh/id_rsa.pub root@<enterprise search="" node="">
c. Validate the root passwordless SSH connection to the Microservices Tier node with the following command:
> ssh root@<enterprise search="" node=""> hostname
A non-root user with sudo privileges can be set up for passwordless SSH in the same manner.
The following ports are used during Microservices tier installation. Please ensure that they are not in use.
HTTP 80
TCP 443 - ingress-nginx-controller
TCP 5000 -- docker
TCP 6443* Kubernetes API Server
TCP 2379-2380 etcd server client API
TCP 10250 Kubelet API
TCP 10251 kube-scheduler
TCP 10248 kubelet
TCP 10249 kube-proxy
TCP 10252 kube-controller-manager
TCP 10255 Read-Only Kubelet API
TCP 30000-32767 NodePort Services
TCP 6783/6784 Weave Services
TCP 9092 Kafka
TCP 2181 zookeeper
1.3) GIDs and UIDs created during Microservices tier installation
The following GIDs and UIDs are created during the Microservices tier installation.
Please make sure that they are available for use. These IDs are created as local OS groups and users.
WKC group - gid=3000
kafka_user_uid: 9092
redis_user_uid: 6379
solr_user_uid: 8983
zookeeper_user_uid: 2181
elasticsearch_user_uid: 9200
kibana_user_uid: 5601
grafana_user_uid: 9091
prometheus_user_uid: 9090
cassandra_user_uid: 9042
zookeeper_user_uid: 2181
elasticsearch_user_uid: 9200
You can change the UID and GID only while adding a Microservices tier to an existing Information Server installation. See technote for details.
2) Downloads and preinstall actions
2.1) On the Information Server host, download the Information Server is-suite image from Passport Advantage.
For example, IS_V11713_Linux_x86_multi.tar.gz
AIX
Linux
Windows
2.2) Extract the image
Ensure that your umask is set to 022.
For example, tar -xvf IS_V11713_Linux_x86_multi.tar.gz
2.3) On the client tier, download the Information Server client image from Passport Advantage.
For example, IS_V11.7.1.3_WINDOWS_CLIENT.zip
For example, is-enterprise-search-11.7.1.3.tar.gz
Do not extract the file.
Starting in Information Server version 11.7.1.2, Ansible is no longer shipped with the product. This utility is still required for installation of version 11.7.1.2 and future maintenance actions. You can install Ansible version 2.9 in a number of different ways, which are described in the official documentation: https://docs.ansible.com/ansible/2.9/installation_guide/intro_installation.html.
For example, you may need the following libraries and any dependencies:
You can use yum to list available packages, and install as needed. For example,
yum list libXp
yum install libXp .x86_64
2.6) Windows installations must enable TLS 1.2 support in Internet Explorer
IMPORTANT - This step must be followed even if your using an alternative web browser to Internet Explorer.
- Open Internet Explorer.
- From the menu bar, click Tools > Internet Options > Advanced tab.
- Scroll down to the security section at the bottom of the Settings.
- Enable "Use TLS 1.2".
- Save the changes.
OpenSSL must be upgraded to version 1.0.2.2102 or later. For example, see AIX Web Download Pack Programs.
3.1) Instructions for is-suite installation
If not already done, before installing Information Server 11.7.1.3, see "Preparing the Information Server 11.7.1 microservices tier node" for details of the steps needed to set up the Microservices tier. You can use this pre-installation checklist while setting up the Microservices tier.
You should address "Known issues while installing or upgrading Information Server to version 11.7.1.0" before starting the 11.7.1.3 install.
3.1.1) Installation in GUI mode
3.1.1.1) Login to the Information Sever host as the root user (or a user that has all sudo access) and change directory to the folder where is-suite is extracted.
To start the install, run the following command
<is-suite downloaded path>/.setup
Provide information as required in each panel as shown below.
3.1.1.2) Click Login.
3.1.1.3) Getting started – Click Next.

3.1.1.4) Click Next.

3.1.1.5) Early system requirement – Click Next if all requirements are passed.
3.1.1.6) Select the Installation directory (the installer will automatically display the default install directory). Click Next.
3.1.1.7) Select New Installation and click Next.
3.1.1.8) Select the Tiers you want to install and click Next.
3.1.1.9) Select the products you want to install and click Next.
3.1.1.10) Accept the license and click Next.
3.1.1.11) Click Next, unless you are installing a High Availability installation.
3.1.1.12) Db2 11.5 is bundled in the Information Server install image. You can choose to preinstall Db2 or the Information Server installation program can install Db2 for you.
If you want the Installer to install DB2 that is bundled with Information Server, click the first radio button. Click Next and go to step 3.1.1.13.
If you have preinstalled Db2 11.5, click the second radio button to use your existing Db2 instance. Click Next and go to step 3.1.1.12.1.
3.1.1.12.1) Provide the information for your Db2 11.5 instance. Click Next and move to step 3.1.1.16.
Note: Even though Db2 11.1 is listed, it is not supported. You must point to a Db2 11.5 instance.
If you provide a Db2 11.1 instance, an error message will be reported:
3.1.1.13) Provide the DB2 installation directory and click Next.
3.1.1.14) Provide the DB2 Instance user name and click Next.
3.1.1.15) Provide the DB2 Fence user name and click Next.
3.1.1.16) Provide the XMETA user name and password. Click Next.
3.1.1.17) Provide the XMETASR user name and password and click Next.
3.1.1.18) Select the WebSphere Application Server Installation type. For WebSphere Network Deployment, you may choose to have it installed, or use an existing installation. Click Next.
3.1.1.19) Provide the WebSphere Application Server Network Deployment installation directory and click Next.
3.1.1.20) Examine the ports that will be used by WebSphere and customize as needed. Click Next.
3.1.1.21) Provide the WebSphere Application Server user name and password. Click Next.
3.1.1.22) Provide the Information Server user name and password. Click Next.
3.1.1.23) Select Next to use the default ports for Connector Access Services.
If any of the specified ports are in use, you may accept the currently specified range or modify the specified range. Click Next.
3.1.1.24) Specify the Agent port and click Next.
3.1.1.25) Provide the DataStage Administrator user name and password. Click Next.
3.1.1.26) Select the TCP/IP ports. Click Next.
3.1.1.27) Select the ITAG for Engine tier instance and click Next.
3.1.1.28) Select Install globalization support and click Next.
3.1.1.29) Click Next.
3.1.1.30) Click Next.
3.1.1.31) Select the default dstage1 project and click Next.
3.1.1.32) Provide the IAUSER user name and password. Click Next.
3.1.1.33) If you do not intend to use Information Server Enterprise Search or the new Information Governance Catalog and Information Analyzer console you can skip installation of the Microservices tier:
Select the checkbox "Skip installation of Information Server microservices tier".
Click Next and skip forward to step 3.1.1.35.
3.1.1.34) Installation of the Microservices tier
3.1.1.34.1) Provide the information needed to install the Microservices tier:


a. See the "Microservices tier system requirements and configuration" section of this document for details.
b. For details on the "Authenticate with a password" box shown below, see section 1.1.
c. For the Persistent Storage location, specify a directory on a local file system that has at least 300 GB of free disk space; do not specify a device location.
Click Next.

3.1.1.34.2) If you specified more than one node, you can specify the hosts for the worker nodes. Click Next.

3.1.1.35) Provide credentials to be used for Kafka and Solr (for example, solruser, solrpwd etc).
The Suite Installer will create the specified users in Kafka and Solr; they do not have to be an operating system user, Information Server user or LDAP user.
Later, you can use the specified values for maintenance actions such as accessing the Solr Web UI.
Click Next.
3.1.1.36) Provide Operation Database Configuration user name and password, or skip the step and you can configure them subsequently. Click Next.
3.1.1.37) Select the DataStage Edition options as appropriate and click Next.
3.1.1.38) Ensure that all system requirements are passed and click Next.
3.1.1.39) Examine the results from system requirement checks of the Microservices tier. If all is good, click Next.
3.1.1.40) You can choose to generate a response file or proceed with the install. Click Next.
3.1.1.41) Check the Preinstallation Summary and click Install to start the install.
3.1.1.42) Click Finish to complete the install.
3.1.1.43) Click “Advanced” and "Proceed to <machine name>".
3.1.1.44) Click the link "Proceed to <machine name>".
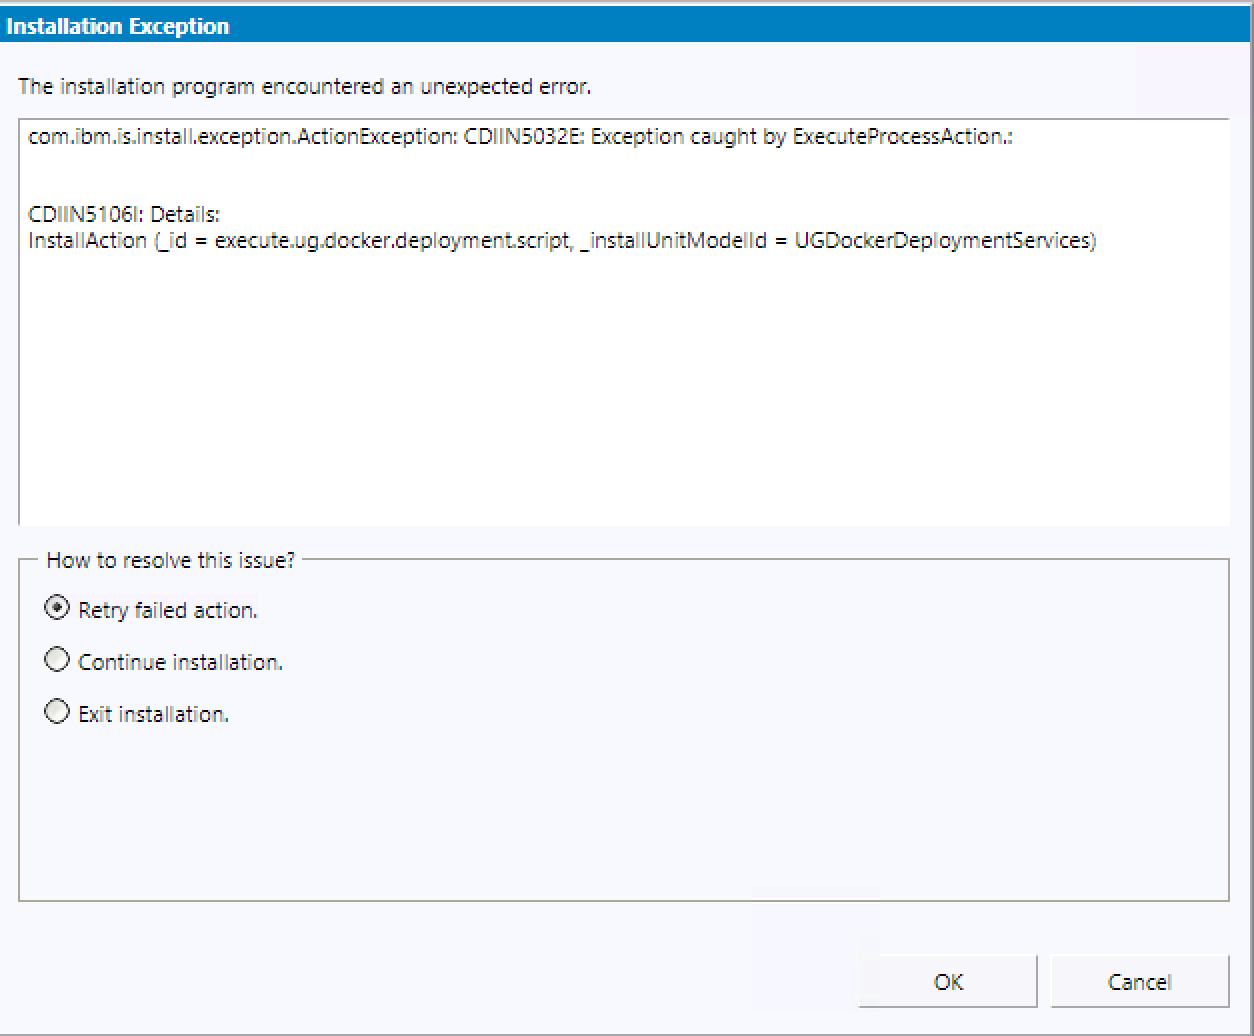
3.1.1.45) If any failure occurs during installation of the Microservices tier, an Installer exception is displayed with three options to select from
- Retry
- Continue
- Exit
If the error reported is the same as in the following screen capture, choose the Continue option to complete the installation.
3.1.1.46) The Launchpad is displayed.
3.1.1.46.1) If Information Server was installed without the Microservices Tier, the Information Sever Launchpad is displayed.
Subsequently, you can open the Information Server Launchpad by using url <Information Server hostname>:port/ibm/iis/launchpad
3.1.1.46.2) If you installed a Microservices tier, the Information Server (Microservices) Launchpad is displayed.
3.1.2) Installation in Console (silent) mode
3.1.2.1) Login to the Information Server host. Change directory to <is-suite downloaded build path>/is-suite
For example, cd /opt/Builds/is-suite
3.1.2.2) Prepare the response file.
It is a best practice to first generate a response file, and then use it while installing.
The response file can be generated by running the Suite installer in GUI mode, and clicking the "Cancel" button in the "Preinstallation Summary" screen.
Edit the response file, providing password values and changing any values that are specific for the computer that you are installing the software on:
- You can edit the following sample response file to install Information Server without a Microservices tier
Sample response file without a Microservices tier
- You can edit either of the following sample response files to install Information Server with a single node or multiple nodes Microservices tier
Sample response file for single node
Sample response file for multiple nodes
3.1.2.3) Run the Installer.
./setup -rsp /opt/Builds/response.txt -verbose
4.1) Remove Governance Monitor icon from launchpad
If the Governance Monitor icon is displayed in the Microservices tier launchpad, remove it by doing the following steps.
4.1.1) Unset corresponding iisAdmin keys:
a) /opt/IBM/InformationServer/ASBServer/bin/iisAdmin.sh -unset -key com.ibm.iis.launchpad.application.govmon.name
b) /opt/IBM/InformationServer/ASBServer/bin/iisAdmin.sh -unset -key com.ibm.iis.launchpad.application.govmon.url
c) /opt/IBM/InformationServer/ASBServer/bin/iisAdmin.sh -unset -key com.ibm.iis.launchpad.application.govmon.icon
4.2) (Optional) Change communication between the services tier and the repository tier to TLS 1.2
You can use the following technotes depending on your repository type:
4.3) Disable the Kafka log cleaner
If a Microservices tier is not installed, the Kafka log cleaner must be disabled as follows:
a) edit kafka/conf/server1.properties
b) search the log cleaner property and set it to false: log.cleaner.enable=false
c) restart the services
The logs are deleted because the cleanup.policy is set to delete. Also, after 7 days, the logs are auto deleted because log.retention.hours is set to 168 hours.
If you installed a Microservices tier, run the following commands on your services tier
$ cd <IIS_INSTALL_LOCATION>/ASBServer/bin
$ ./iisAdmin.sh -set -key com.ibm.iis.ug.installed.version -value 11713
History
29 October 2021: Initial publish
10 November 2021: fixed AIX link for Passport Advantage
07 January 2022: Information Server Microservices tier needs an additional key
12 April 2022: 11.7.1.3 suite installation supports only Db2 11.5
10 October 2022: Only Db2 11.5 is supported even though Db2 11.1 is listed in drop down choices for preinstalled repository
Was this topic helpful?
Document Information
Modified date:
03 November 2022
UID
ibm16489295