Product Documentation
Abstract
Instructions for installing memory options in the IBM eServer xSeries 200
Content
| Installing memory modules |
|---|
Adding memory to the server is an easy way to make programs run faster. You can increase the amount of memory in the server by installing options called memory modules. Each module contains one industry-standard, dual in-line memory module (DIMM). The server uses a noninterleaved memory configuration.
Memory considerations
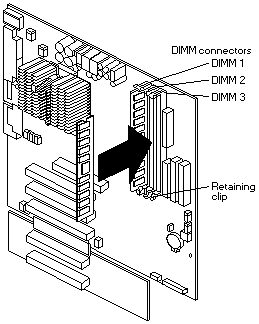
- The server comes with a DIMM installed on the system board in DIMM connector 1.
- When installing additional memory modules, install the second memory module in DIMM connector 2, and the third in DIMM connector 3.
- The xSeries 200 server supports 64 MB, 128 MB, 256 MB, and 512 MB DIMMs. The server supports a minimum of 64 MB and a maximum of 1.5 GB of system memory.
Click here for more information on supported memory modules. - Installing or removing DIMMs changes the configuration information in the server. Therefore, after installing or removing a DIMM, you must change and save the new configuration information by using the Configuration/Setup Utility program. When you restart the server, the system displays a message indicating that the memory configuration has changed. Start the Configuration/Setup Utility program and select Save Settings.
Note: The illustrations in this document might differ slightly from the hardware.
To install a DIMM, complete the following steps:
WARNING: When you handle ESD-sensitive devices, take precautions to avoid damage from static electricity.
- Review the safety precautions in 'Safety information'.
- Turn off the server and peripheral devices, and disconnect all external cables and power cords; then, remove the cover.
- Remove the support bracket assembly and disconnect the fan cable from the connector (SYSFA3) on the system board.
- Touch the static-protective package containing the DIMM to any unpainted metal surface on the server.
- Then, remove the DIMM from the package.
- Install the DIMM
- If you are installing a DIMM in connector 1, remove the AGP adapter.Remove the AGP adapter only if you are replacing the DIMM in connector 1.
- Open the retaining clip on each end of the DIMM slot.Turn the DIMM so that the pins align correctly with the connector.
WARNING: To avoid breaking the retaining clips or damaging the DIMM connectors, open and close the clips gently.
- Insert the DIMM into the connector by aligning the DIMM edges with the slots at each end of the DIMM connector. Firmly press the DIMM straight down into the connector by applying pressure on both ends of the DIMM simultaneously. Be sure that the retaining clips snap into the locked position when the DIMM is firmly seated in the connector.
- If a gap exists between the DIMM and the retaining clips, the DIMM has not been properly installed. In this case, open the retaining clips and remove the DIMM; then, reinsert the DIMM.
- If you removed the AGP adapter, reinstall it now.
- If you have other options to install or remove, do so now.
- Replace the support bracket assembly and reconnect the fan cable to the connector (SYSFA3) on the system board.
- Reconnect the external cables and power cords, and turn on the peripheral devices and the server.
Document Location
Worldwide
[{"Type":"HW","Business Unit":{"code":"BU016","label":"Multiple Vendor Support"},"Product":{"code":"HW18G","label":"Older System x->xSeries 200"},"Platform":[{"code":"PF025","label":"Platform Independent"}],"Line of Business":{"code":"","label":""}}]
Was this topic helpful?
Document Information
Modified date:
24 January 2019
UID
ibm1MIGR-45040