Product Documentation
Abstract
Follow these instructions to install the clamp-on ferrite core onto the power cables for your non-hot-swap hard disk drives
Content
You will need the following equipment:
- Small flat-blade screwdriver
- Cutters to cut the cable ties
Follow these instructions to install the clamp-on ferrite core onto the power cables for your non-hot-swap hard disk drives:
- Review the "Safety Information" and "Installing Options" sections of your IBM eServer xSeries 200 or xSeries 220 User's Reference.
- Turn off the server and peripherals, and disconnect all external cables.
- Remove the cover from your server.
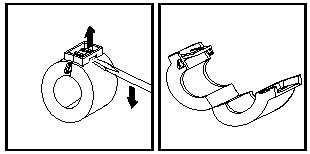
- Use the screwdriver to open the clamp-on ferrite core.

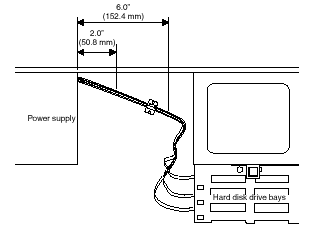
- Clamp the core around the power cables for the hard disk drives, about 2 inches (50.8 mm) to 6 inches (152.4 mm) from the power supply.

Note: Do not clamp the core around the power cables for the CD-ROM drive, the diskette drive, or the system board.
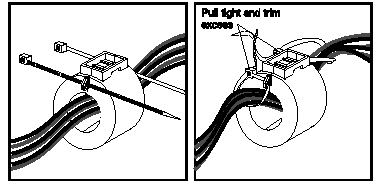
- Secure the core with cable ties.
- Place the cable ties into the slots on the side of the core, as shown (the ridged side of the cable tie faces away from the core).

- Loop the cable ties around the cables and pull the ties snug.
- Trim off and discard the excess length from the cable ties.
- Place the cable ties into the slots on the side of the core, as shown (the ridged side of the cable tie faces away from the core).
- Replace the cover.
- Reconnect the cables you disconnected in step 2, and turn the peripherals and server on.
Document Location
Worldwide
[{"Type":"HW","Business Unit":{"code":"BU016","label":"Multiple Vendor Support"},"Product":{"code":"HW18G","label":"Older System x->xSeries 200"},"Platform":[{"code":"PF025","label":"Platform Independent"}],"Line of Business":{"code":"","label":""}},{"Type":"HW","Business Unit":{"code":"BU016","label":"Multiple Vendor Support"},"Product":{"code":"HW18H","label":"xSeries 220"},"Platform":[{"code":"PF025","label":"Platform Independent"}],"Line of Business":{"code":"","label":""}}]
Was this topic helpful?
Document Information
Modified date:
23 January 2019
UID
ibm1MIGR-4Y9M3F