General Page
Enable JazzSM/DASH High Availability (HA) on NETCOOL/OMNIbus ObjectServer v8.1 and greater
1. Steps run on ObjectServer
- Create non-root user in ObjectServer:
- Create WebHA group, which has two roles “CatalogUser” and “DatabaseAdmin”
- The admin have to create a new non-rootuser in the ObjectServer and assign the WebHA group to it
- Use this non-root user in the WebSphereApplication J2CAuthentication
2. Create a database in ObjectServer by naming “dashdb”: Open ObjectServer GUI ->Right click database section ->Create Database
- Configure HA on WebSphere Application Server:
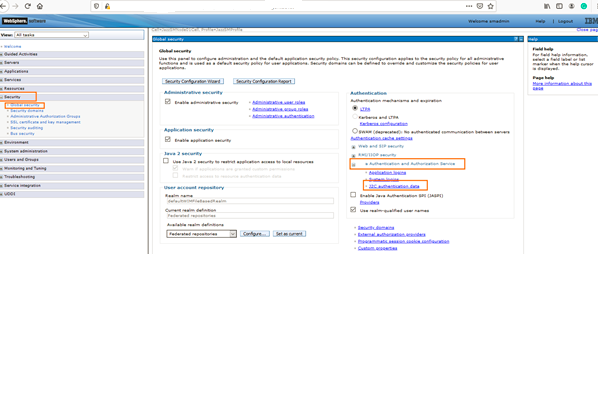
- Log in to WebSphere Application admin console
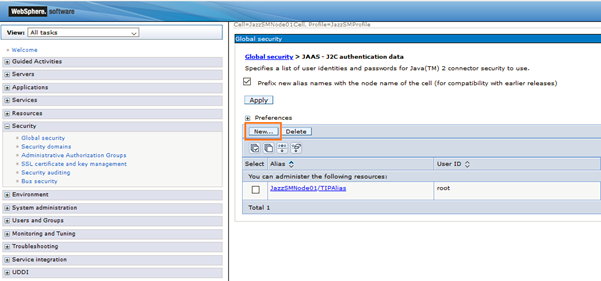
- From left Navigation: click Security ->Global Security ->Expand ‘Java Authentication and Authorization Service ->click J2C authentication data
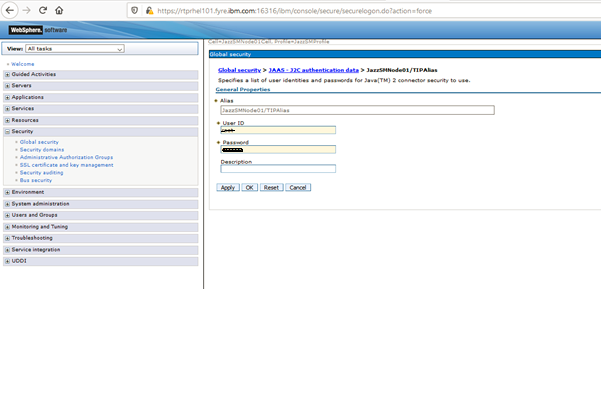
- click New, give the alias name, provide ObjectServer credentials ->click apply
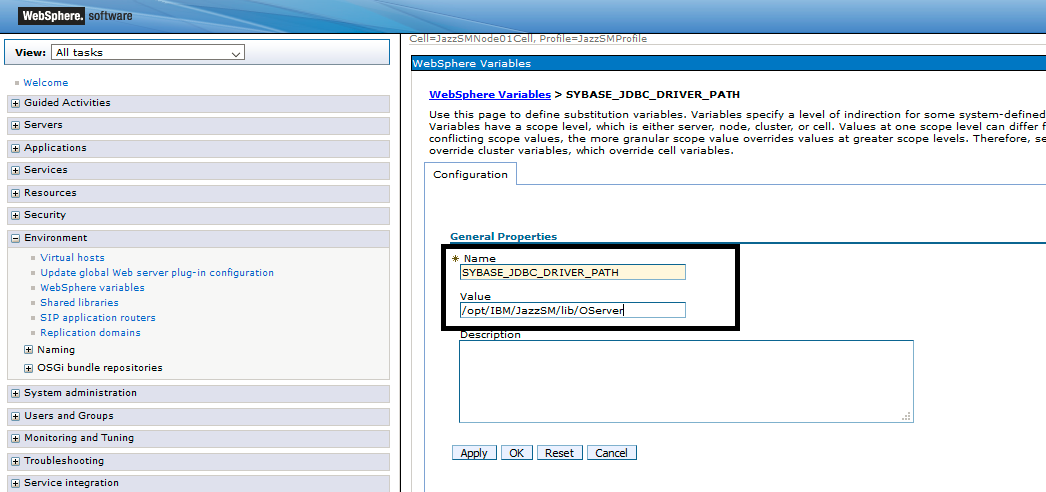
- Create WebSphere variable for Sybase driver path: Environment ->WebSphere variables->New
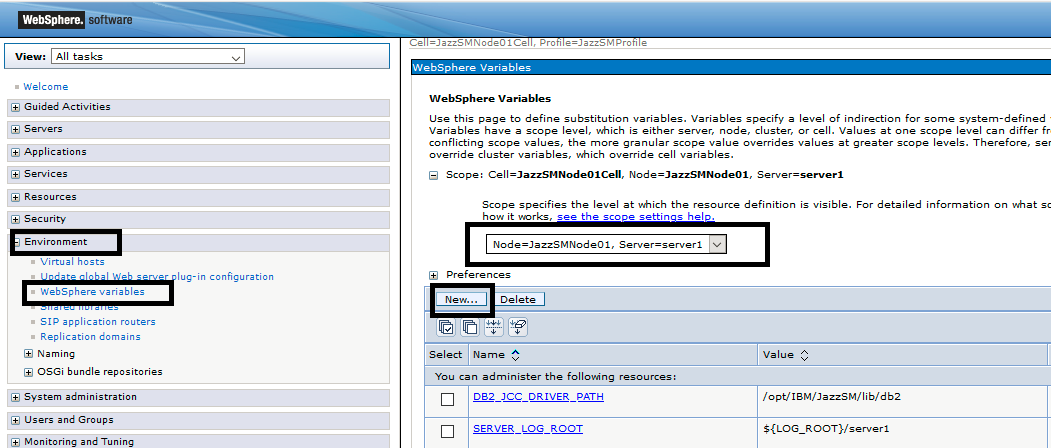
- Example screen: click Apply and Save
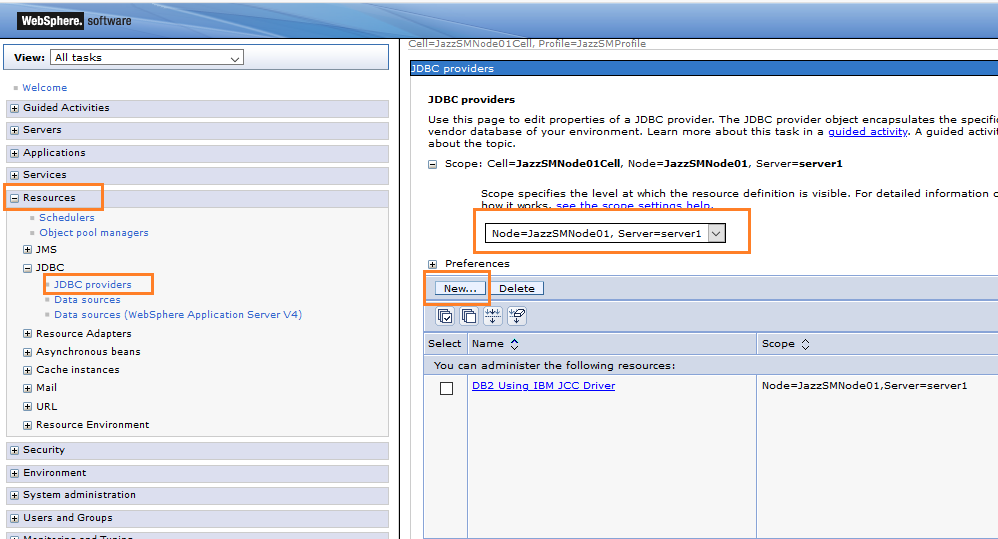
- Configure JDBC providers: click Resources ->JDBC->JDBC Provider ->Select Scope: Node=JazzSMNode01, Server= server1-> click New
-
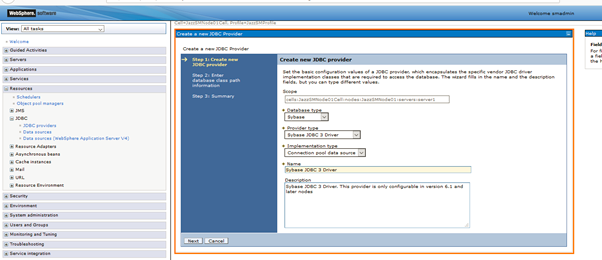
- Follow the screens to complete the JDBC provider configuration
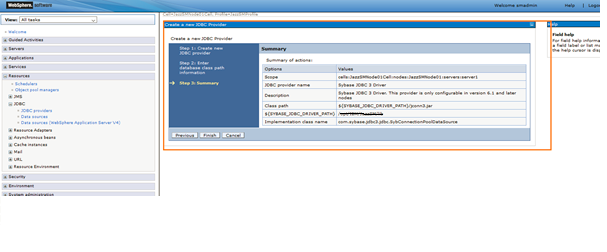
- click Finish
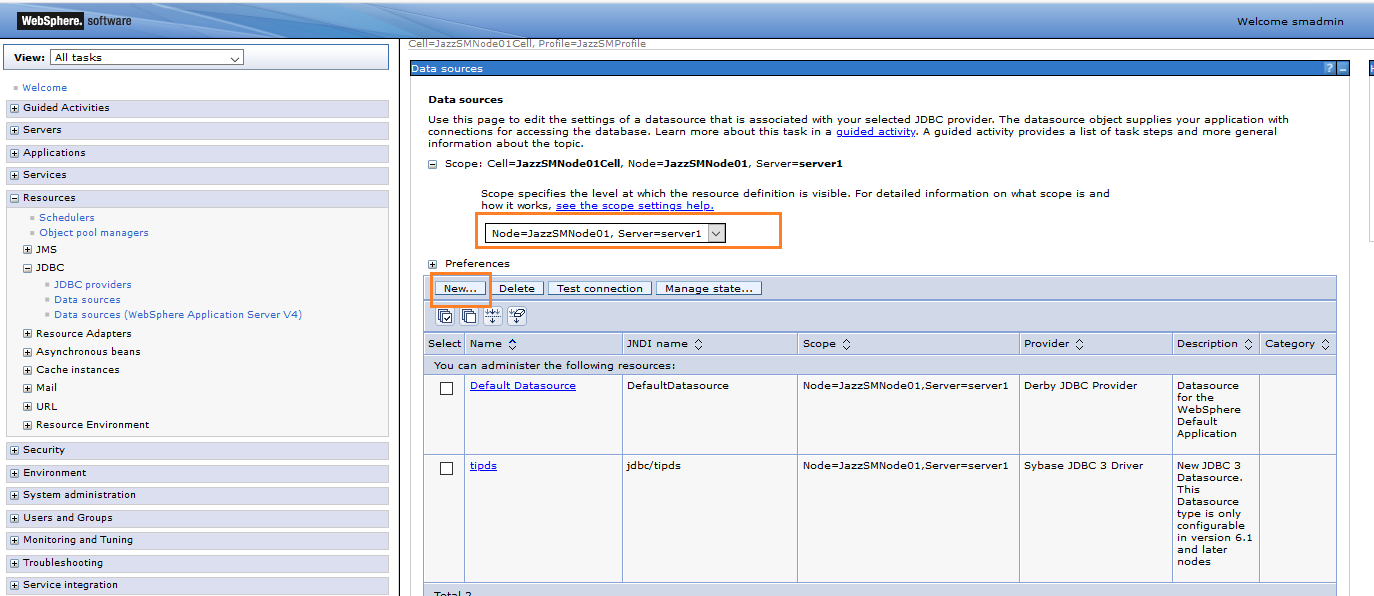
- Configure the data source: click data sources ->Select Scope: Node=JazzSMNode01, Server= server1->click New
-
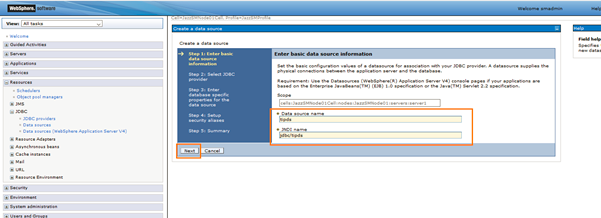
- Provide the data source Name as ‘tipds’ and JNDI name as jdbc/tipds and click Next button
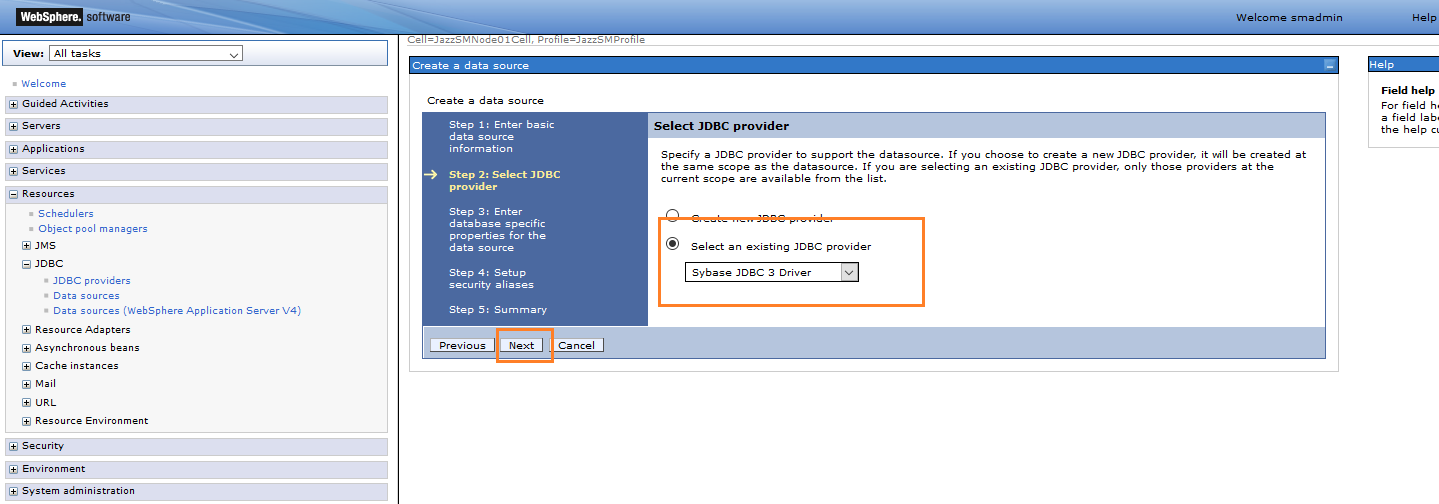
- Select an existing JDBC Provider ‘Sybase JDBC 3 Driver’ from drop and click Next
-
-
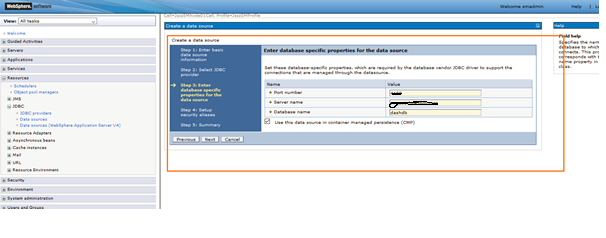
Provide Port Number, Server Name of the ObjectServer. User "dashdb" for Database Name and click Next
-
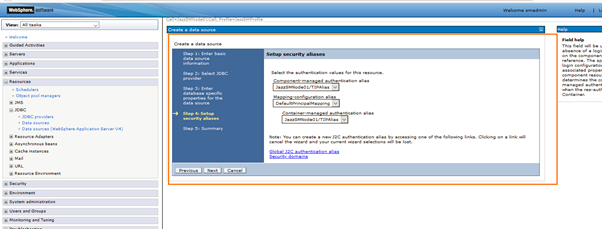
- Setup security aliases ->click Next
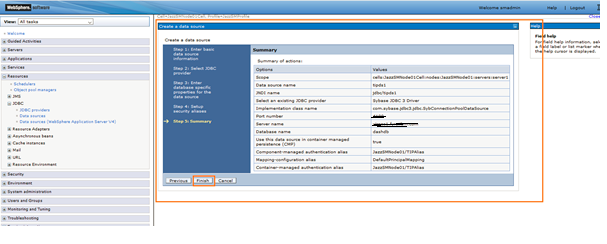
- Check the summary and click Finish
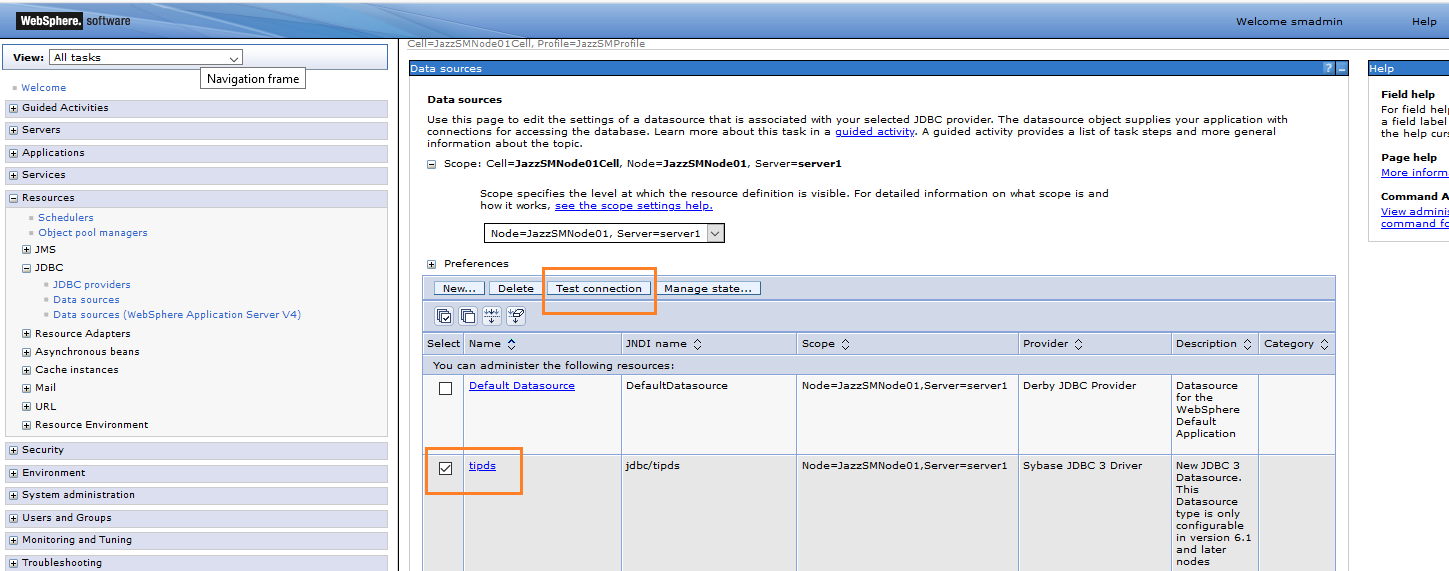
- Test Connection ->Select the data source ->click Test connection
-
-
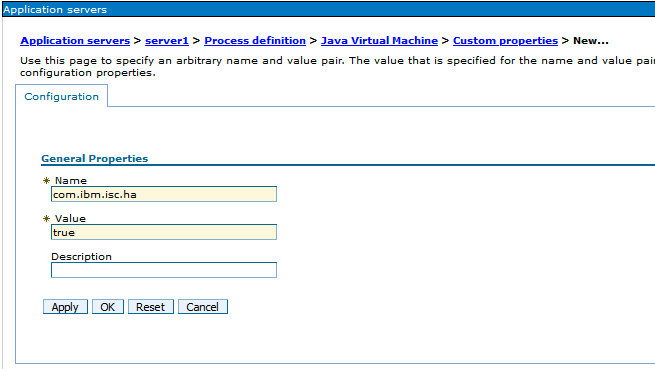
Optional Java System property "com.ibm.isc.ha" can be set to "false" in the WebSphere Application Server Admin Console temporarily not to consider the server to be in High Availability. To set this property, go to Servers ->WebSphere Application Servers ->server1->Process definition ->Java virtual machine ->Custom properties >New
-
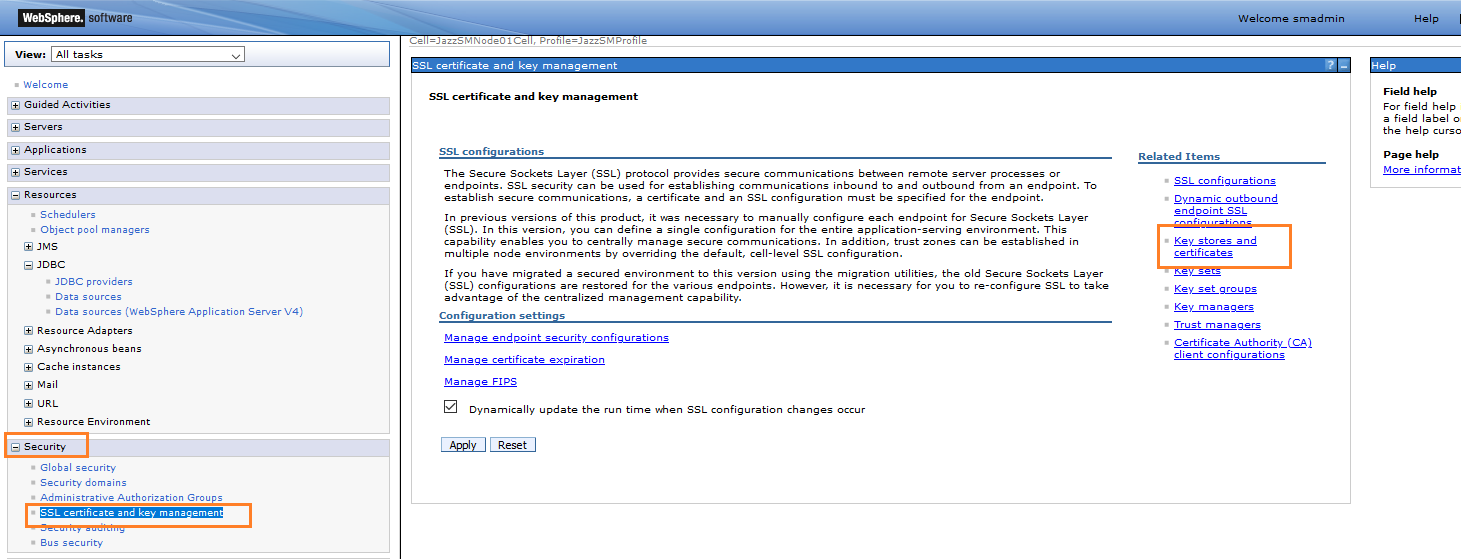
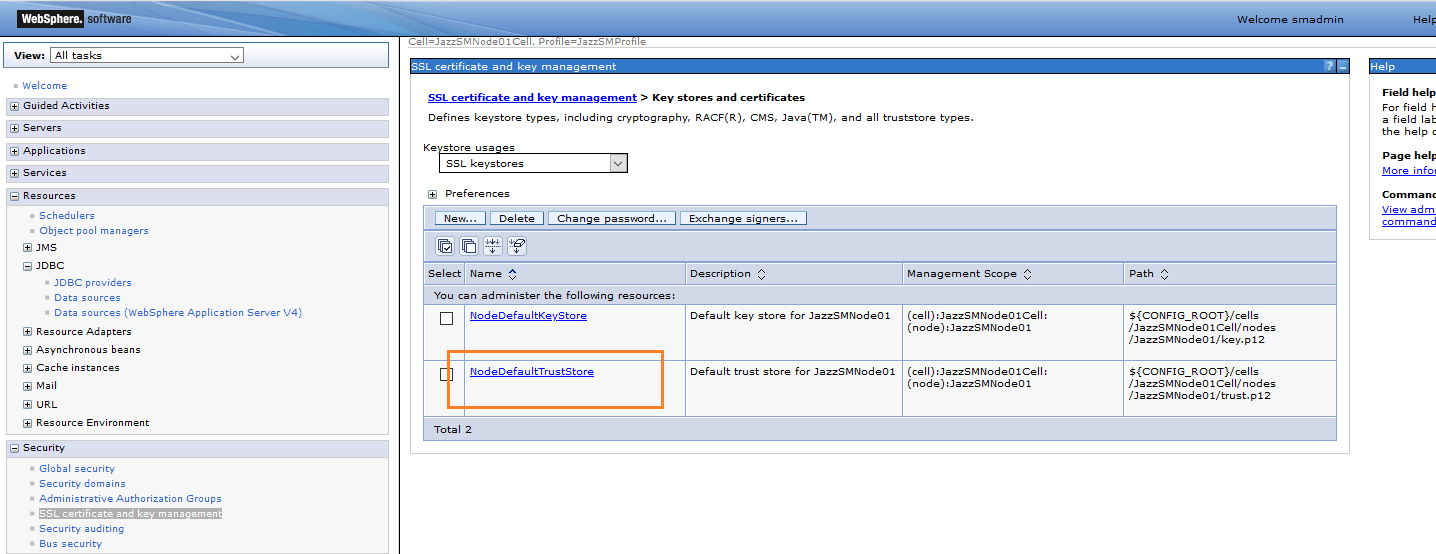
- Enable the trust between the nodes (In Node 1 provide Node 2 and vice versa in Node 2 ) click Security ->SSL certificate and key management ->keystores and certificates
-
- click NodeDefaultTrustStore
-
- click Signer certificates
-

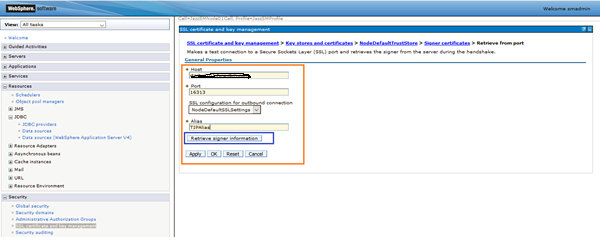
- click Retrieve from port
-
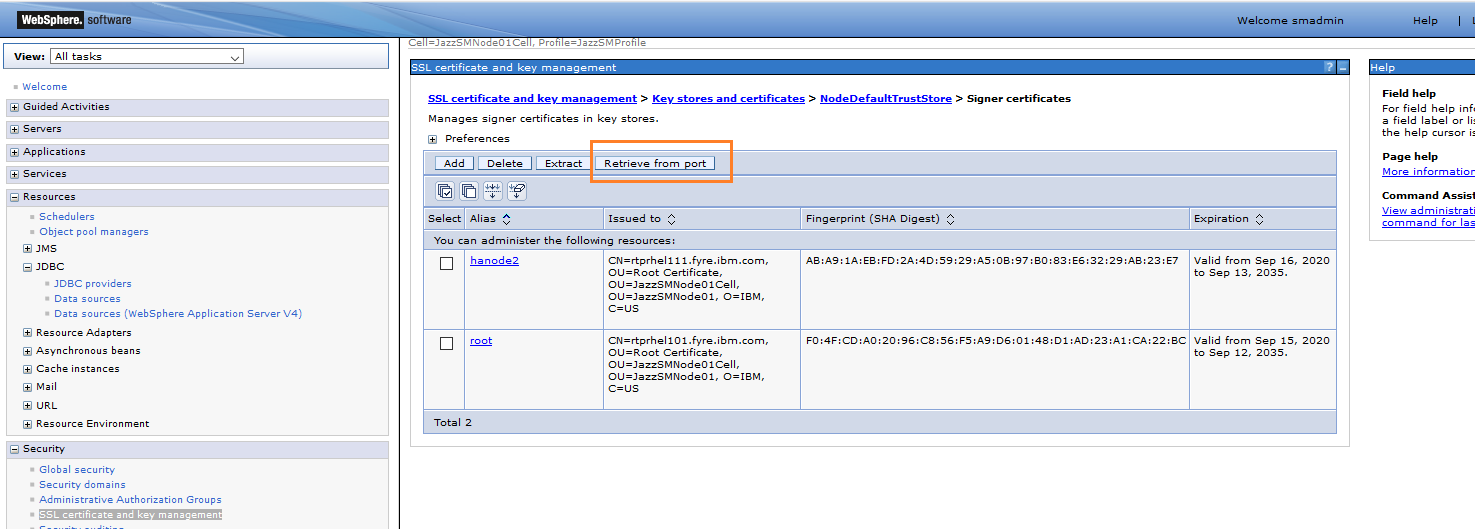
- Retrieve Signer information and apply
- Do the same on required Nodes and restart DASH profile server on all DASH nodes one after other
3. From JazzSM 1.1.3.11 and WebGUI FP23 onwards, failover is supported(on ObjectServer) and to enable fail over follow the configurations:
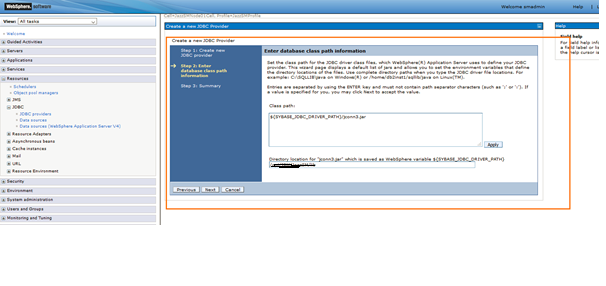
- Copy jconn3.jar from <JazzSM_HOME>/lib/OServer to WebSphere Application Server/lib/ext (ensure to take backup of existing jconn3.jar)
- Note: Copying the file will break a hybrid integration with the following error.
Where, cnea-id is the hdm-client-id used when deploying or setting up the hybrid HADR cluster. For a hybrid HADR deployment, do not copy the jconn3.jar file. Keep the original jconn3.jar files in DASH and WebSphere.CWOAU0023E: The client could not be found cnea-id
- Note: Copying the file will break a hybrid integration with the following error.
- Install two ObjectServers AGG_P(Primary) and AGG_B(Backup): Installing the primary aggregation ObjectServer - IBM Documentation
- Set up a gateway by adding the entries from
- Content of attached file AGG_GATE.tblrep.def.txt to NCHOME/omnibus/etc/AGG_GATE.tblrep.def
- Content of attached file AGG_GATE.map.txt to NCHOME/omnibus/etc/AGG_GATE.map
- Check AGG_GATE_props. If you are using default AGG_P and AGG_B values, changes in NCHOME/omibus/etc/AGG_GATE.props are usually not necessary and it should look like in attached file AGG_GATE_props.txt. In case using different ObjectServer instance names, modify in NCHOME/omibus/etc/AGG_GATE.props file accordingly
- Run this script against AGG_P and AGG_B to initialize and create the necessary DASH and WebGUI tables in the dashdb database for the primary and backup servers. Move attached file "webha.sql" to $NCHOME/omnibus/bin/ and run script as shows below
- Example:
- Unix - $NCHOME/omnibus/bin/nco_sql -server ObjectServer_name -username <username> -password <password> < webha.sql
- Windows - %NCHOME%\omnibus\bin\isql -S ObjectServer_name -U <username> -P <password> -i webha.sql
- Example:
- Start AGG_P and AGG_B
- $NCHOME/omnibus/bin/nco_objserv -name AGG_P
- $NCHOME/omnibus/bin/nco_objserv -name AGG_B
- Start the gateway with following steps:
- NCHOME/omnibs/bin/nco_g_objserver_bi -propsfile NCHOME/omnibus/etc/AGG_GATE.props (or)
- nco_g_objserv_bi -name AGG_GATE -objectserveraserver NCOMS_AGG_P -objectserverbserver NCOMS_AGG_B
- Setup HA nodes and the WebSphere Application Server data source as usual and point to AGG_P.
- Add failover details for AGG_B to all HA Nodes by going to:
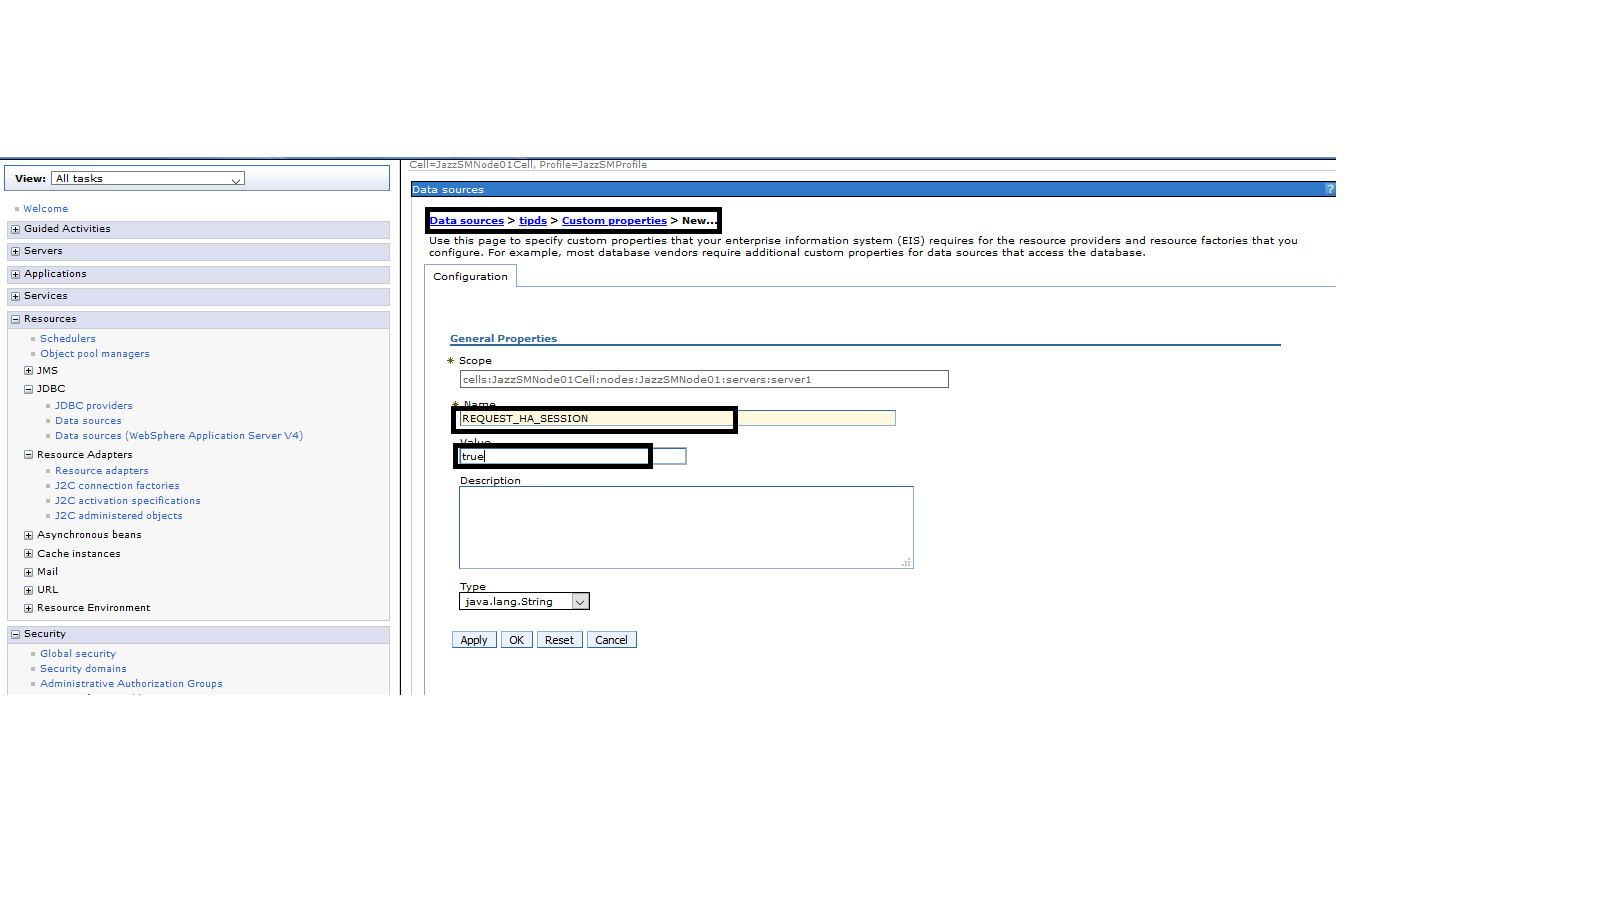
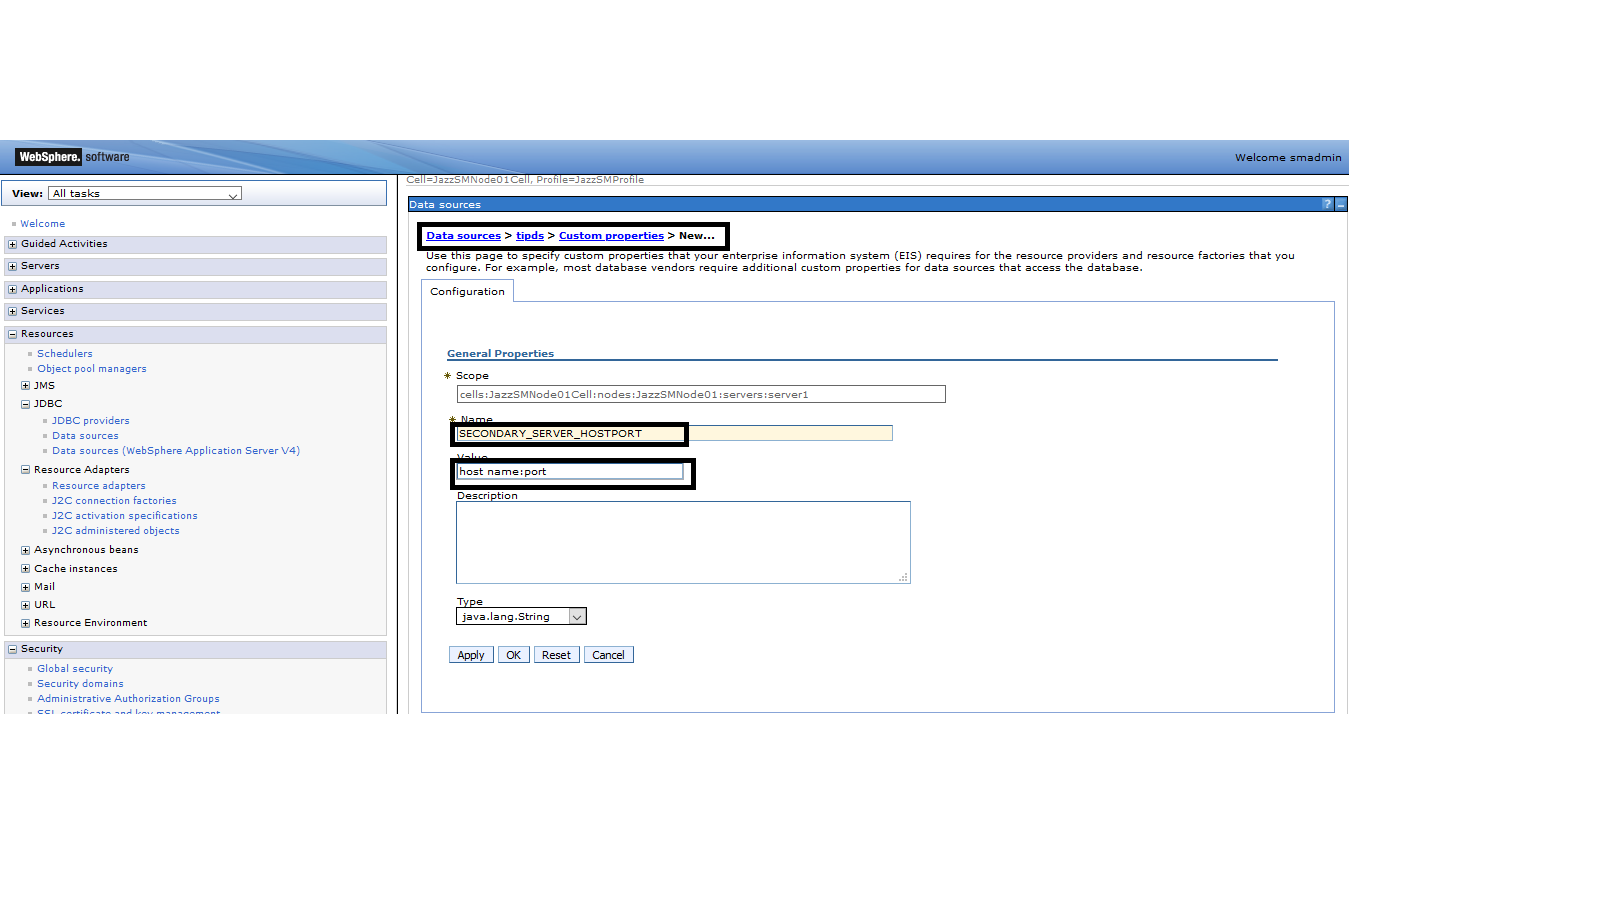
- WebSphere Application Server Admin Console > data sources > tipds > Custom properties
- And add the three properties
- SECONDARY_SERVER_HOSTPORT=[AGG_B_HOSTNAME:PORT]
- REQUEST_HA_SESSION=true
- APPLICATIONNAME=WebHA
- Log in to WebSphere Application Server admin console
- click Resources ->data sources ->tipds ->Custom Properties ->New ->Name:REQUEST_HA_SESSION, Value: true
- click Resources ->data sources ->tipds ->Custom Properties ->New -> Name:SECONDARY_SERVER_HOSTPORT, value:[AGG_B_HOSTNAME:PORT]
- click Resources ->data sources ->tipds ->Custom Properties ->New ->Name: APPLICATIONNAME Value: WebHA

- click Apply and Save for all three properties
3. The failover Object Server should be created with same name 'dashdb'
4. Ensure to restart WebSphere Application Server profile servers on all nodes
[{"Line of Business":{"code":"LOB45","label":"Automation"},"Business Unit":{"code":"BU059","label":"IBM Software w\/o TPS"},"Product":{"code":"SSEKCU","label":"Jazz for Service Management"},"ARM Category":[{"code":"a8m500000008bsvAAA","label":"DASH"}],"ARM Case Number":"","Platform":[{"code":"PF002","label":"AIX"},{"code":"PF016","label":"Linux"},{"code":"PF033","label":"Windows"}],"Version":"3.1.3"}]
Was this topic helpful?
Document Information
Modified date:
25 March 2024
UID
ibm16373940