Question & Answer
Question
How to configure BigInsights on Information Analyzer?
Answer
1. Install IBM Information Server 9.1.2 rollup 2 for Information Analyzer on Linux 64/Windows
2. Install the following connectivity patch, that will be provided by IBM InfoSphere Information Server technical support team: patch_JR50351_ccodbc_linux64_9100-9120.tar
3. Install the following Data Direct Drivers, Available at Fix Central
– IBM (Data Direct) Apache Hive Version 07.14: is_ddodbc_7.1.4_server_linux64
4. Gather with your Hive/BI administrator the connectivity information for the BigInsights Hive data source.
5. Create a DSN pointing to the Hive data source in the above step.
A sample DSN Definition for Linux 64 is as below :
(DSN to the defined in .odbc.ini file in [IS Install Location]/InformationServer/Server/DSEngine)
DSN Definition :
[HIVE_BI212]
Driver=/opt/IBM/InformationServer/Server/branded_odbc/lib/VMhive00.so
Description=DataDirect Apache Hive Wire Protocol
Hostname=HostServerName
Database=default
DataSourceName=HIVE_BI212
PortNumber=10000
EnableDescribeParam=1
MaxVarcharSize=8196
TransactionMode=1
LogonID=biadmin
Password=biadmin
WireProtocolVersion=2
RemoveColumnQualifiers=0
StringDescribeType=12
UseCurrentSchema=0
EnablePacketLogging=1
QEWSD=2456808
6. Login to Information Analyzer.

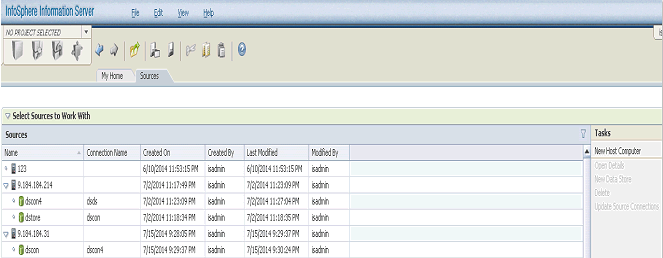
7. Click on Home Pillar → Configuration → Sources

8. The following screen appears :

9. Click on New Host Computer. The below screen appears. On this screen enter a host name and click on “Add” datastore :

10 . After clicking on Add, the below screen appears. Enter a Data Store Name, Data Connection Name, Select ODBC Connector from the dropdown, and select the connection string you created in step 5 and specify user name and password.

11. Now click on “Connect”. You should get a message that “Test Connection Succeeded”

12. Click on OK in the above screen and click on “Save and Close”.
13. Now click on Home Pillar → Metadata Management → Import Metadata

14. The below screen appears. In this screen, select the host you created in step 9 to 11 and click on “Identify All Levels”

15. After clicking on Identify All Levels, you should see the below.

16. Click on OK in the above dialog. Select the tables identified in the above step and click on “Import”. You will see the below dialog :

Once Import is done , click on OK. You can add these imported data sources to your project in IA and run your Analysis.
* In case you still face connection issues, set: WireProtocolVersion=1
Check at your Hive if a connection request is received and/or rejected.
If the issue persists, please contact IBM InfoSphere Information Server Technical Support team.
Was this topic helpful?
Document Information
Modified date:
16 June 2018
UID
swg21684951