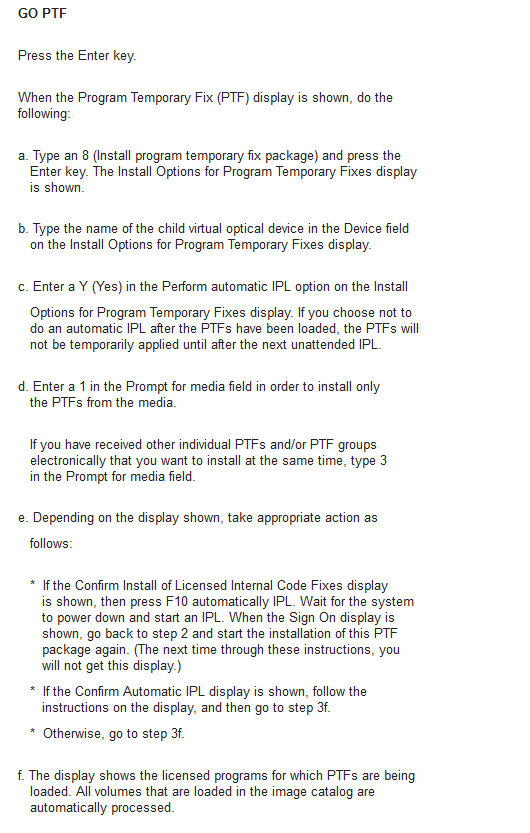
News
Abstract
This document contains detailed information about the optical device support for IBM i. IBM i supports DVD drives, RDX drives, and USB flash drives.
Content
- RDX Drives on IBM i
- USB flash drives
- Optical Virtualization
- Optical Containers
- D-Mode IPL from Removable Mass Storage (RMS) media
- D-Mode IPL from USB flash drives
RDX drives and cartridges are being positioned for the lower end of the performance requirements (Faster than DAT tape). RDX cartridges are very reliable. They are ruggedized to withstand a drop from up to 0.9 meters (36 in.) without damage, and they never need cleaning. A cartridge can be placed in either a USB or SATA dock to access the data.
Performance is better than typical for low-cost tape drives (DAT), and the SATA device can achieve rates over 180GB/Hr.
The optical container support added with IBM i 7.2 TR5 and 7.3 TR1 allows optical image catalogs to be stored on RDX media. For more information about optical containers, see Optical containers.
Cartridge Capacity
Capacity is 160 GB to 2 TB per removable cartridge. The RDX cartridge part numbers currently available to order are 46C5379 / 46C5368 (500GB), 46C2335 (1TB), and 46C2975 / 00KC506 (2TB)
IMPORTANT NOTICE: When connecting RDX devices to IBM POWER8, POWER9, or POWER10 Systems by using the backplane USB ports, it is a requirement that the RDX devices use an AC Power cable. Not using the AC Power cable might result in failures.
| Hardware resource type and model | Device type |
|---|---|
| 63B8-004 | RDX SATA |
| 63B8-005 | RDX USB |
| 63B8-0D2 | RDX (virtual client partition) |
| 63B8-0E2 | RDX (VIOS hosted) |
Table 1. Supported hardware for removable mass storage
Support
- RDX support is available for native-attached in IBM i 7.1 TR5 (Technology Refresh 5), either USB or SATA. The RDX dock is available in either 5.25" internal (SATA or USB) or external USB.
- IBM i 6.1.1 support reports the dock as a 632A (generic DVD) when directly attached, and as a 632C (virtualized DVD) when a client.
- IBM i 7.1 Technology Refresh 5 and later releases report the device as a 63B8 regardless of native attached or virtualized client. This release can host the device, but only to another i partition.
- The external USB devices allow the cable to be unplugged without a configuration change (removing the IOA from the partition, or powering off), but the device should be varied off (VRYCFG) before the device is unplugged.
- Except for POWER9 and POWER10 Systems, performing a D-Mode Initial Program Load (IPL) from an RDX drive requires an HMC-managed system. For POWER9 and POWER10 Systems, the USB CEC ports are in the default search sequence for a D-mode IPL, so an HMC is not required for boot from a USB RDX drive.
- The following Program Temporary Fixes (PTFs) or their superseding PTFs are required for IBM i releases before IBM i 7.2:
- 7.1
- TR5
- SI47039 (5770BR1)
- V6R1M1
- SI47038 (5761BR1)
- SI47648
- MF54369
- 7.1
- IBM Docs
Using the RDX drives on IBM i
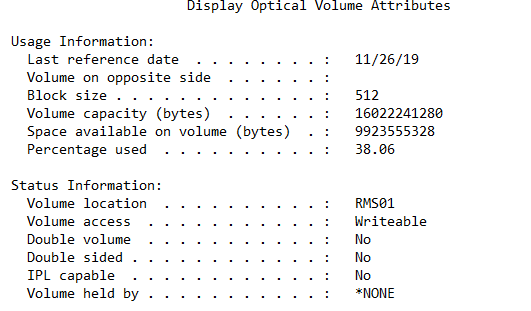
Save/restore operations are done as with a DVD, for example, SAVLIB DEV(RMS01). Because it is an optical class device, you can also use IFS to manage data, for example, WRKLNK OBJ(‘/QOPT/RDXVOL’). Commands are the normal optical storage commands (WRKOPTVOL, INZOPT, etc.). Rather than create all new commands, we recognize that the media is random access and spins, with fixed size physical blocks that is similar to optical devices, so Removable Mass Storage (RMS) devices are “optical class” devices to IBM i. RDX Docks are available as CEC installed SATA devices on 6.1.1, or as SATA or USB devices on 7.1 with Technology Refresh 5. Cartridges can be from 160GB to 2 TB.
Optical devices use a random storage mode to save information. Optical devices use a hierarchical file structure when the system accesses files on the media. If you want to save the same libraries to an optical device, the OPTFILE parameter needs to used.
Example
SAVLIB LIB(MYLIB) DEV(OPT01) OPTFILE('MYDIR/*')
In this example, the system creates the following optical file: MYDIR/MYLIB.
When users look at the files on the optical device by using WRKOPTVOL option 11 or WRKLNK OBJ('/QOPT'), they see the directory specified in the OPTFILE parameter.
BRMS support for Optical:
- 32-byte volume IDs
- Volume selection done up-front
- DUPMEDBRM (DUPOPT) etc.
- Using only optical media with BRMS does not require a license for Media Storage Extensions (57xxSS1 Option 18)
Restrictions/Requirements
- The media policy option to 'Mark history for duplication' is restricted to *NO. BRMS does not allow duplication of optical history items.
- BRMS does not provide tracking of opposite side volume identifiers or double-sided volumes. Each piece of media is viewed as a single volume.
- No optical support for the following BRMS functions: Dump BRMS (DMPBRM), Add Media Information to BRMS (ADDMEDIBRM), Extract Media Information (EXTMEDIBRM), Print Media Exceptions for BRMS (PRTMEDBRM), and no reclaim support.
- Only one device (DEV) parameter can be specified. Optical does not support cascading or parallel processing.
- Optical media libraries cannot be shared between systems in a BRMS network.
- Duplicate media by using BRM (DUPMEDBRM) can only duplicate the entire volume, and the output volume must have the same physical characteristics as the volume specified on the FROMVOL parameter.
- Optical does not support remote duplicate. Duplicate media by using BRM (DUPMEDBRM). Values for the 'From system' (FROMSYS) parameter support only *LCL.
- Optical devices do not support software data encryption.
- BRMS has the same restrictions as the native save/restore commands.
- It is not possible to duplicate RDX media to tape or virtual tape media, or vice versa.
- Except for POWER9 and POWER10 Systems, performing a D-Mode IPL from an RDX drive requires an HMC-managed system. For POWER9 and POWER10 Systems, the USB CEC ports are in the default search sequence for a D-mode IPL, so an HMC is not required for boot from a USB RDX drive.
USB flash drives
IBM i 7.1 with Technology Refresh 6 (TR6) on POWER7, POWER7+, and POWER8 Systems support the use of USB attached flash drives for both direct attach and iVirtualization configurations, where IBM i is serving I/O to a virtual client IBM i partition, or where IBM i is a virtual client of an IBM i partition.
IBM i 7.2 with Technology Refresh 8 (TR8) on POWER9 Systems support the use of USB attached flash drives for both direct attach and iVirtualization configurations (where IBM i is serving I/O to a virtual client IBM i partition, or where IBM i is a virtual client of an IBM i partition).
Note: VIOS does not support virtualizing USB flash drives to IBM i client partitions.
Flash drives, also referred to as memory keys or thumb drives, are small pluggable devices that do not have removable media. A single flash drive can hold a large amount of data that would otherwise need multiple DVDs, and can typically access the data much faster. On IBM i, they are "optical class" devices whose main purpose is data movement such as IFS copy, Save/Restore operations directly to or from the device, or D-mode IPLs. Due to lack of reliability of flash drives in general, they are not recommended as backup devices; however, they are useful for these types of operations:
- Copying a file (in other words, PTF fix, database file, spooled file) from one IBM i partition to another.
- Copying a file from an IBM i partition to another type of system, for example, a Windows 7 or Apple PC.
- Copying a main store dump and other debug information from an IBM i partition and taking it to another partition, or even a PC, to send it in to IBM service.
- Installing PTFs, or an XPF application.
- ISV software distribution.
- Performing a D-Mode IPL.
- To use the USB drive as an Alternate IPL device (D-Mode), the USB adapter is tagged as the alternate restart device adapter. This is similar to tagging the SAS/SATA IOA for IPL from DVD). For example, a USB adapter would show up as:
- "U78AB.001.WIH000M-P1-T5 Universal Serial Bus UHC Spec"
- To use the USB drive as an Alternate IPL device (D-Mode), the USB adapter is tagged as the alternate restart device adapter. This is similar to tagging the SAS/SATA IOA for IPL from DVD). For example, a USB adapter would show up as:
Note: for POWER7, POWER7+, and POWER8 Systems the system must be HMC-managed in order to tag the USB adapter as the alternate restart device adapter. For POWER9 and POWER10 Systems, the USB system unit ports are in the default search sequence for a D-mode IPL, so an HMC is not required for boot from a USB drive.
- Use as an alternative to sending files over a network, if your network is constrained.
These drives are not intended to protect or prevent loss of the System or User data. Regular tape drives, VTLs, or optical drives should be used to store important or long-term data
The USB ports on POWER7, POWER7+, POWER8, POWER9, and POWER10 system units and the USB ports on the USB 3.0 adapter (#EC45 / #EC46) can be used for flash drives.
There are no IBM Power Systems features available for USB flash drives. IBM does not qualify and does not recommend any particular device. The intent is to provide generic support for devices, so the USB flash vendor of choice can be used. The following types of flash drive configurations are allowed:
- A USB 2.0 device (up to 32 GB in capacity) attached to a USB 2.0 system unit port.
- A USB 3.0 device attached to a USB 3.0 port (adapter or system unit). - 32GB max capacity restriction removed with 7.2 PTF MF63610 (or superseding PTFs), 7.3 PTF MF63611 (or superseding PTFs), IBM i 7.4, and IBM i 7.5. The largest size flash drives that verified to work with IBM i are 256GB.
IBM i uses the industry standard UDF protocol, so data interchange can be done with other operating systems that use UDF format. Performance varies from device to device. If a particular vendor's flash drive does not work, it might not comply with the USB interface specifications, and a different vendor's drive should be tried.
Hardware Prerequisite: POWER7, POWER7+, POWER8, POWER9, and POWER10 Systems, which should be running the latest System firmware.
Software Prerequisite: IBM i V7R1 with Technology Refresh 6 or higher installed (PTF Group SF99707 Level 6 or higher) or IBM i 7.2 with Technology Refresh 8 (TR8) on POWER9)
Setting up the device description for the USB flash drive
- Enable the automatic configuration:
- CHGSYSVAL SYSVAL(QAUTOCFG) VALUE('1')
- Plug the USB flash drive into any of the supported USB ports of your POWER7 or POWER7+ Server.
- After you plug in the USB flash drive, you will see these messages being logged in the *SYSOPR message queue:
- CPC2630 - Automatic configuration created device description RMSxx.
- CPC2605 - Vary on completed for device RMSxx.
- OPT1410 - Volume 130326175747 added to optical device.
Removing a USB flash drive
- Use one or more of these commands to ensure all data is correctly committed to media
- VRYCFG STATUS(*OFF), or use
- RMVOPTCTG or
- Option 4 on WRKOPTVOL to eject the media
- If not already done, vary off the RMSxx device description associated with the USB flash drive. Verify that the RMSxx device description is varied off
- Unplug the USB flash drive
There is no requirement to clean up resources as they are reused when a USB drive is plugged in again to the same USB port.
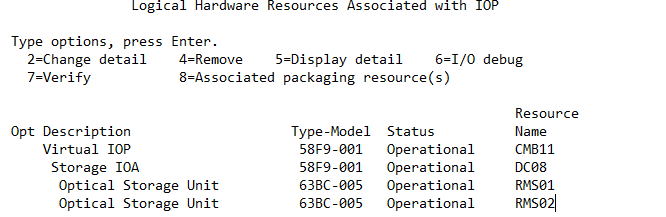
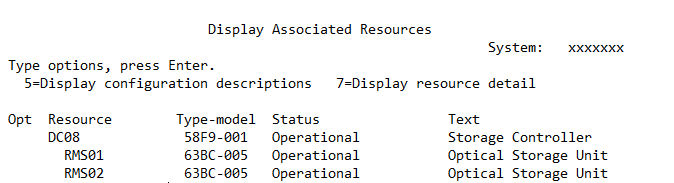
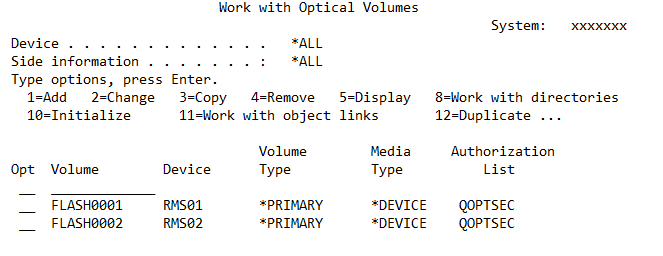
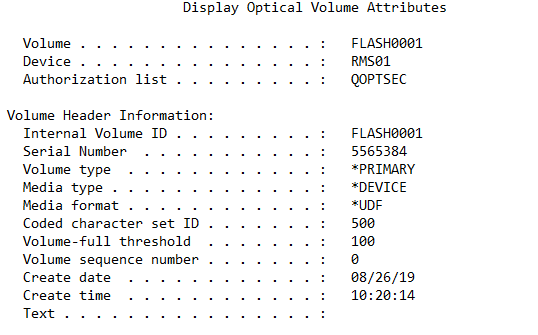
How the USB hardware resources, device descriptions, and optical volumes look as seen from the Hardware Service Manager and commands.
Hardware Service Manager (strsst, 1, 7,2,1, navigate to the USB IOP and use option 9)
DSPHDWRSC TYPE(*STG), navigate to the USB IOA and use option 9

WRKOPTVOL
DSPOPT VOL(*MOUNTED) DEV(RMS01)
Here are some examples of operations that can be performed that use a USB flash drive as the destination:
- Initialize the USB flash drive:
- INZOPT NEWVOL('USB_P1-T3-L1') DEV(RMS01) CHECK(*NO) MEDFMT(*UDF)
- Save a library:
- SAVLIB LIB(MATIAS) DEV(RMS01) USEOPTBLK(*NO) DTACPR(*HIGH)
- Save a copy of the security data:
- SAVSECDTA DEV(RMS01) USEOPTBLK(*NO) DTACPR(*HIGH)
- Save a folder:
- SAVDLO DLO(*ALL) FLR(MATIAS) DEV(RMS01) USEOPTBLK(*NO) DTACPR(*HIGH)
- Save an IFS object:
- SAV DEV('/qsys.lib/rms01.devd') OBJ(('/home/MATIAS/MH01355.iso')) USEOPTBLK(*NO) DTACPR(*HIGH)
- Create a directory:
- MKDIR DIR('/QOPT/USB_P1-T3-L1/tmp')
- Copy some objects from the Root file system into the USB flash drive:
- CPY OBJ('/tmp/01A*') TODIR('/QOPT/USB_P1-T3-L1/tmp')
- Copy some objects from the QDLS file system into the USB flash drive:
- CPY OBJ('/QDLS/MATIAS/*.txt') TODIR('/QOPT/USB_P1-T3-L1/tmp')
- Move objects from the Root file system into the USB flash drive:
- MOV OBJ('/tmp/mi400c_v2r1m0_v6r1.iso') TODIR('/QOPT/USB_P1-T3-L1/tmp')
- MOV OBJ('/tmp/*.savf') TODIR('/QOPT/USB_P1-T3-L1/tmp')
- Copy some PTF save files from QGPL into the USB flash drive:
- MKDIR DIR('/QOPT/USB_P1-T3-L1/SERVICE')
- CPY OBJ('/qsys.lib/qgpl.lib/qmf*.file') TODIR('/QOPT/USB_P1-T3-L1/SERVICE')
- Move some objects from a Library into the USB flash drive:
- MOV OBJ('/qsys.lib/qgpl.lib/qsi*.file') TODIR('/QOPT/USB_P1-T3-L1/SERVICE')
- Print the contents of the USB flash drive in tree format:
- QSH CMD('ls -FRaq /QOPT/USB_P1-T3-L1/* | Rfile -KQw -c "OVRPRTF FILE(QPRINT) OUTQ(QGPL/QDKT) HOLD(*YES) USRDTA(USB) SPLFNAME(USB)" qprint')
- WRKSPLF SELECT(*CURRENT *ALL *ALL *ALL *ALL USB)
- Display the contents of the USB flash drive in tree format:
- QSH CMD('ls -FRaq /QOPT/USB_P1-T3-L1/*')
- Restore an object from a library that was save into the USB flash drive:
- RSTOBJ OBJ(IPLSSSINST) SAVLIB(MATIAS) DEV(RMS01) OBJTYPE(*PGM) RSTLIB(QTEMP)
- Save a copy of the Licensed Internal Code and QSYS library (SAVSYS):
- INZOPT NEWVOL('USB_P1-T3-L1') DEV(RMS01) CHECK(*NO) MEDFMT(*UDF)
- SAVSYS DEV(RMS01) USEOPTBLK(*NO) DTACPR(*HIGH)
- DSPF STMF('/QOPT/USB_P1-T3-L1/*')
- DSPOPT VOL(*MOUNTED) DEV(RMS01)
Optical virtualization
Any optical drive supported in the host IBM i LPAR can be virtualized to an IBM i client LPAR. An existing VSCSI connection can be used, or a new connection can be created explicitly for optical I/O traffic.
- RDX drives appear as Type-model 63B8-0D2 on the client partitions
- USB flash drives appear as Type-model 63BC-0D2 on the client partitions
- All other physical optical device types, and IFS/NFS file backed virtual devices (632B-001 and 632B-003) appear as Type-model 632C-002 on the client partitions.
By default, if a VSCSI connection exists between host and client, all physical and virtual OPTxx optical drives in the host are available to the client, where they are recognized as OPTxx devices. The NWSD parameter Restricted device resources or Allowed device resources parameter can be used to control which host optical devices the client partition can access.
A virtualized optical drive in the host partition can be used for a D-mode Initial Program Load (IPL) and installation of the client partition, as well as for installing Program Temporary Fixes (PTFs) or data. If the optical drive is writeable, the client partition is able to write to the physical media in the drive.
If you are virtualizing an RDX or USB flash drive that contains optical container media, and there is a volume list file on the media that makes the child virtual volumes writeable, then only one partition at a time can access the child virtual volumes. For all other partitions, the child virtual device description must be varied off.
Optical Sharing Rules
With IBM i 7.2 and PTF MF69031, IBM i 7.3 and PTF MF69032, or IBM i 7.4 and PTF MF69033, when an optical device is shared between IBM i partitions using client virtual device support, attempting to use the volume while another partition has the volume in use will result in MSGOPT1790 "Operation not allowed or conflicts with another request" with reason code 9. Five seconds after a partition has finished modifying/using the optical volume all of the using partitions will be automatically notified that the volume contents have been modified and the volume will be freed for use, so it will no longer be necessary to vary off/on the optical device description from the partition that modified the optical volume before the other partitions can use the volume. If needed, varying off/on the optical device description on the partition that modified the optical volume will allow it to be used before the five second wait time.
If any attempt is made to use the modified volume before the automatic notification that the volume contents were modified has completed the operation may fail with MSGOPT1605 "Media or device error occurred" with an extended status beginning with 01A10A00. Retrying the operation will recover from that error.
Optical Containers
With IBM i 7.2 TR5 and 7.3 TR1, support is added for optical container media - storing an optical Image Catalog (IMGCLG) on flash or RDX media.
PTFs required for 7.2 TR5: MF62456, SI61113, SI61117, SI63024
PTFs required for 7.3 TR1: MF62457, SI61114, SI61118, SI63043
PTFs required for 7.4 or 7.5: None
With IBM i 7.2 TR7, 7.3 TR3, and later, support is added for installing Power Systems with POWER8, POWER9, and POWER10 technology by using USB 3.0 flash drives and IBM i images downloaded from the Entitled Systems Support (ESS) website. For more information, see Install using IBM i images downloaded from the Entitled Systems Support website
The primary uses for optical containers are:
- Download ISO files for PTFs to store on a flash drive that can be later used to install IBM i PTFs
- Storing an entire optical image catalog on flash or RDX media.
- Partitioning RDX media to allow multiple incremental saves to the same media. This enables cleanup of old files to avoid file fragmentation performance issues without needing to reinitialize the entire media.
- Installing IBM i from images downloaded from the ESS website
In addition to adding support for container media with 7.2 TR5 and 7.3 TR1, it is now possible to add RDX and flash drive compatible virtual volumes to an image catalog that uses storage on the system disk units. The new media type has a block size of 512 bytes so it can be used for duplication to or from RDX or flash media.
Preparing to use optical containers
The device used for optical containers must be a flash drive or an RDX drive. The flash or RDX media must have a media capacity of at least 5GB.
To prepare a flash drive or RDX drive media be used as container volume the volume needs to be initialized (INZOPT) with a type of *CONTAINER.
Example – Creating an optical container:
- Initialize the optical volume as type *CONTAINER
- INZOPT VOL(*MOUNTED) NEWVOL(RDX1) DEV(RMS01) CHECK(*NO) TYPE(*CONTAINER)
- Vary optical device RMS01 off and on to cause a child virtual device to be created and associated with the physical optical device.
- VRYCFG CFGOBJ(RMS01) CFGTYPE(*DEV) STATUS(*OFF)
- VRYCFG CFGOBJ(RMS01) CFGTYPE(*DEV) STATUS(*ON)
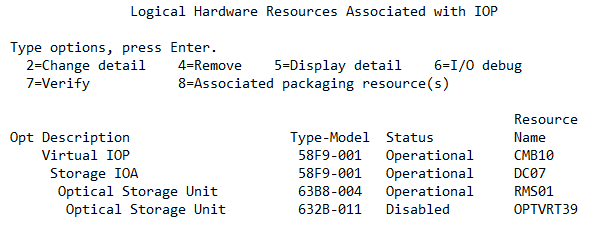
- Use DSPHDWRSC to find the resource name of the child virtual device.
- DSPHDWRSC *STG
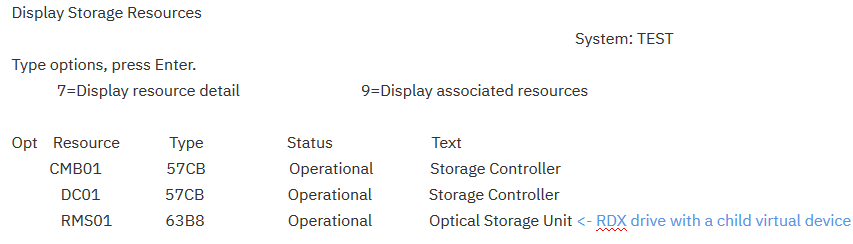
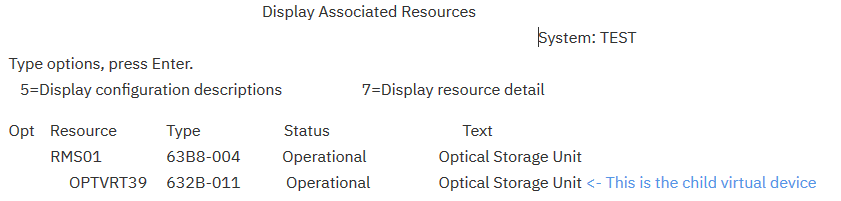
Flash or RDX devices that have a child virtual device, appear on the main Display Storage Resources panel. Use option 9=Display associated resources to view the child virtual device
Example – creating or modifying child virtual device descriptions to identify the associated physical device:
Creating a device description:
CRTDEVOPT DEVD(RMS01VRT) RSRCNAME(OPTVRT39)
Changing the name of an existing device description:
RNMOBJ OBJ(OPTVRT39) OBJTYPE(*DEVD) NEWOBJ(RMS01VRT)
Notes:
- You might also want to change the resource name of the child virtual device by using the System Service Tools to match it with the physical device resource name.
- Once RDX or flash media is initialized as container media, a child virtual device is automatically created the first time a device with that media is detected by an IBM i partition.
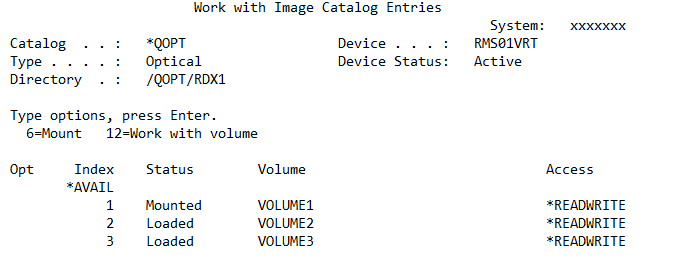
Adding virtual volumes (image catalog entries) to Optical containers
Adding virtual volumes to optical containers for applying PTFs
1. Download the PTF files to your PC from fix central
2. Plug a flash drive that was previously initialized to be container media on an IBM i partition into a USB port on your PC
3. Drag the PTF ISO images (the xxxxx.bin) files to the container media flash drive.
4. When you plug that flash drive into the USB port on the IBM i partition the optical image catalog containing the PTF images is automatically loaded in the child virtual device. You can install the PTFs from the virtual child device by using the standard PTF commands.
Example – WRKIMGCLGE view of flash drive with PTF ISO image copied from a PC. The access is *READONLY because there is no VOLUME_LIST file on the physical media.
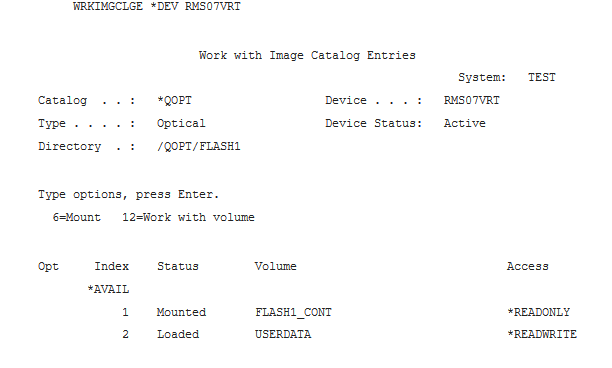
WRKIMGCLGE *DEV RMS07VRT
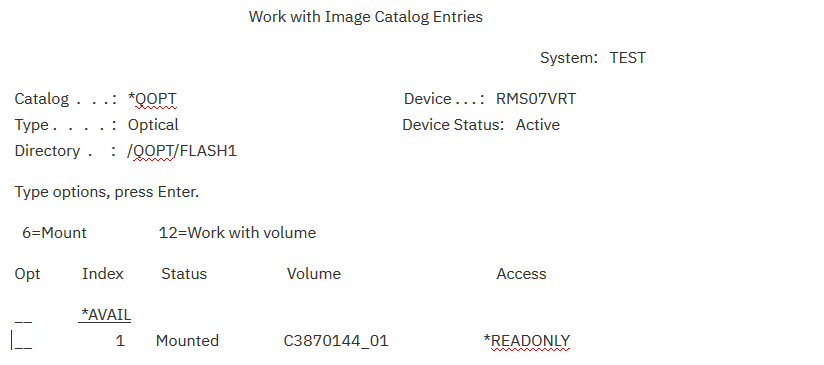
The Directory field shows the path name of the physical volume for the container.
Example – Directions for installing PTFs from a child virtual device.
5. Type the following command:
Adding an existing image catalog to an optical container
Example – copying an existing image catalog to an optical container
1. Load the image catalog that you want to copy to the optical container on a virtual optical device
LODIMGCLG IMGCLG(CATALOG1) DEV(OPTVRT01)
2. Use the Verify Image Catalog (VFYIMGCLG) command to create a volume list file for the image catalog. If the volume list file is not created the volumes will all be in read only state after they are copied to the container.
VFYIMGCLG IMGCLG(CATALOG1) TYPE(*OTHER) NFSSHR(*YES)
3. Copy the files from the image catalog into the optical container.
CPY OBJ('/directory1/catalog1/*') TODIR('/qopt/rdx1')
4. Vary the child virtual device off and on to pick up the changes.
VRYCFG CFGOBJ(RMS01VRT) CFGTYPE(*DEV) STATUS(*OFF)
VRYCFG CFGOBJ(RMS01VRT) CFGTYPE(*DEV) STATUS(*ON)
5. The Work Image Catalog Entry command can be used to view and work with the volumes in the optical container.
Example – using WRKIMGCLE to work with container volumes.
WRKIMGCLGE *DEV RMS01VRT
The virtual volumes in the optical container can now be moved to different partitions and systems by moving the flash drive or RDX media.
If you use flash or RDX media for multiple incremental saves, and repeatedly delete and resave files, fragmentation occurs and the performance is degraded. Optical containers can be used to avoid this problem by partitioning the flash or RDX media into multiple virtual volumes that can be individually initialized to delete old files without causing fragmentation.
Example – creating multiple volumes on optical container media to use for incremental saves.
1. Use the Create Container Volumes (QMOCRTCV) API to create the number of virtual volumes that you need.
CALL QMOCRTCV (RMS01 *DFT ‘7’ ‘10000’)
Note: This example API call creates seven 10000MB virtual volumes in device RMS01. See the QMOCRTCV API documentation in IBM Docs for more examples and instructions for how to use this API. The API call will automatically create the volume list file so the volumes are read/write capable.
2. Vary the child virtual device off and on to pick up the changes.
VRYCFG CFGOBJ(RMS01VRT) CFGTYPE(*DEV) STATUS(*OFF)
VRYCFG CFGOBJ(RMS01VRT) CFGTYPE(*DEV) STATUS(*ON)
3. The Work Image Catalog Entry command can be used to view and work with the volumes in the optical container.
WRKIMGCLGE *DEV RMS01VRT

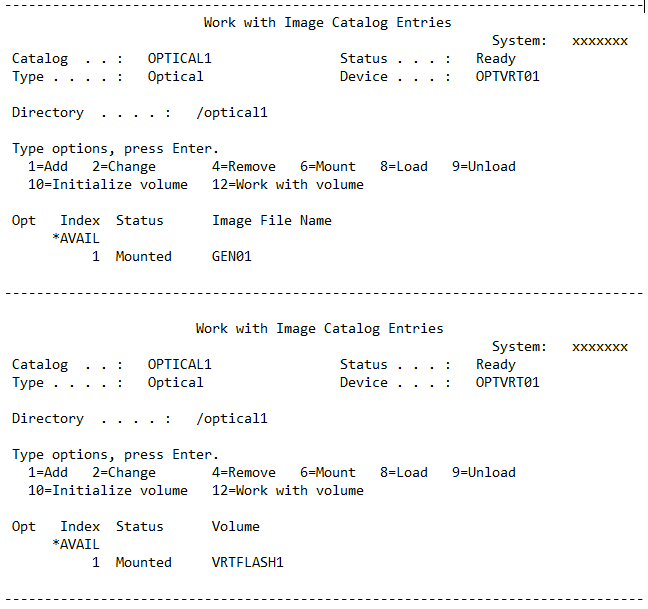
4. The created virtual volumes are uninitialized and are assigned the default date/time stamp volume name so you need to initialize them individually before they can be used. From the WRKIMGCLGE screen, you would use Option 12=Work with volume for each entry and then option 10=Initialize to initialize the volume. Note: The volumes are automatically mounted when you select the option to work with the volume.
5. After all of the volumes are initialized, you can use them to do your incremental saves
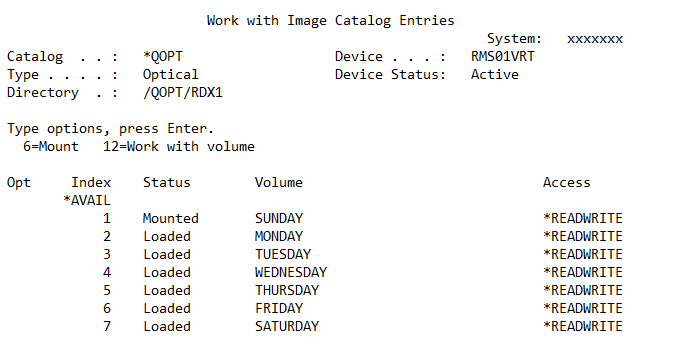
Instead of deleting the old files before the save, you would instead use the INZOPT command to clear the old files before the save.
Example – Initializing a container volume to clear the old files.
INZOPT VOL(MONDAY) CHECK(*NO)
1. Plug a USB 3.0 flash drive into a USB port on a PC that is running Windows 7, Windows 10, or Mac OS 10.11 or newer, and has Java version 8 or greater installed.
2. Download the bootable image of the Licensed Machine Code for IBM i (USB I_BASE_01_Licensed_Machine_Code*.img) from the ESS website to the PC.
Note: The bootable image is stored in ESS as one of the downloads available for IBM i product number 5770-SS1.
For IBM i 7.2, it is part of 5770-SS1 feature 5972: USB Lic Mac Cde Flash Image v07.02.00
USB I_BASE_01_Licensed_Machine_Code_RS_720-*
For IBM i 7.3, it is part of 5770-SS1 feature 5973: USB Lic Mach Cde Flash Image v07.03.00
USB I_BASE_01_Licensed_Machine_Code_RS_730-*
For IBM i 7.4, it is part of 5770-SS1 feature 5974: 7.4 USB Lic Mach Cd Flsh Img v07.04.00
USB I_BASE_01_Licensed_Machine_Code_RS_740-*
For IBM i 7.5, it is part of 5770-SS1 feature 5795: 7.5 USB Lic Mach Cd Flsh Img v07.05.00
USB_I_BASE_01_Licensed_Machine_Code_RS_750-*
3. Download the Utility for bootable Licensed Machine Code USB .zip file from the ESS website to the PC.
Note: The Utility for bootable Licensed Machine Code USB is stored in ESS as one of the downloads available for IBM i product number 5770-SS1.
For IBM i 7.2, it is part of 5770-SS1 feature 5972: USB Lic Mac Cde Flash Image v07.02.00
Utility for bootable Licensed Machine Code USB
For IBM i 7.3, it is part of 5770-SS1 feature 5973: USB Lic Mach Cde Flash Image v07.03.00
Utility for bootable Licensed Machine Code USB
For IBM i 7.4, it is part of 5770-SS1 feature 5974: 7.4 USB Lic Mach Cd Flsh Img v07.04.00
Utility for bootable Licensed Machine Code USB
For IBM i 7.5, it is part of 5770-SS1 feature 5975: 7.5 USB Lic Mach Cd Flsh Img v07.05.00
Utility for bootable Licensed Machine Code USB
4. Extract the Java-based utility USBUtility-1.3.0.0.jar (or a newer version) from the Bootable LIC USB Utility for IBM i .zip file.
5. Use the Java-based utility to copy the Licensed Machine Code for IBM i to the USB 3.0 flash drive:
Using the Java-based utility - Instructions for Windows Users
Using the Java-based utility - Instructions for Mac OS users
6. If wanted you can also download the Operating System and LPP ISO images from the ESS website, and PTF files from Fix Central and drag the files to the same USB 3.0 flash drive.
Note: The files you download from ESS and Fix Central can be .zip files, you need to extract them before copying them to the flash drive.
Note: Since the installation image is counted as one of the virtual volumes in the container, and a container is limited to a maximum of 256 virtual volumes, you can add only 255 more virtual volume files to the container.
Example 1 - Installation media after running the Java USB utility and adding more files from ESS and Fix Central by using a Windows PC
View of the flash drive from Windows Explorer
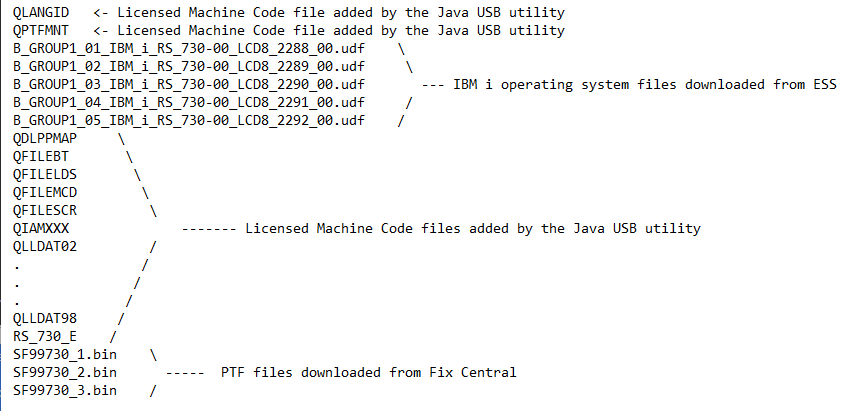
IBM i view of the same flash drive using the WRKIMGCLGE command for the child virtual device.
If you do not have a VOLUME_LIST file on your container media, you can use the Work with Object Links (WRKLNK) command to remove individual virtual volumes from the container media.
If you have a VOLUME_LIST file on your container media, do not remove individual virtual volumes by using the Work with Object Links (WRKLNK) command since that will require the VOLUME_LIST file to be manually edited to match the changes. When there is a VOLUME_LIST file on the container media, remove all of the virtual volumes at the same time using the Initialize Optical (INZOPT) command.
Example – Using the INZOPT command to remove all of the virtual volumes.
1. Vary off the child virtual device
VRYCFG CFGOBJ(RMS09VRT) CFGTYPE(*DEV) STATUS(*OFF)
2. Use the Initialize Optical (INZOPT) command to reinitialize the container volume.
INZOPT VOL(*MOUNTED) NEWVOL(RDX1) DEV(RMS01 CHECK(*NO) TYPE(*CONTAINER)
Note: If you reinitialize the RDX or flash media as *PRIMARY media, the child virtual optical device goes into Disabled state after the media type change is detected. The media type change is detected when the RDX or flash drive is varied off and then back on.
Using the Java-based utility - Instructions for Windows Users
Instructions for Windows Users - Command prompt Interface
=====================================================================
1. Open a Command Prompt as an Administrator. Find "Command Prompt" in your Start Menu > All Programs > Accessories. Right-click on the Command Prompt icon and choose "Run as administrator". You are prompted to "allow the following program to make changes to this computer" and possibly be asked to provide your password. Do so and select "Yes".
2. Change your directory (use the cd command) to where you extracted the USB Utility (JAR file). To run the utility, issue this command in this format:
java -jar USBUtility-1.3.0.0.jar DRIVE_LETTER IMAGE_FILE
Where:
DRIVE_LETTER is the drive letter of your USB media, for example, E:
Alternatively, you might specify a disk or drive
number, for example, \\.\PhysicalDrive1
IMAGE_FILE is a path to where your bootable image is.
For example, path\to\I_BASE_01.IMG
3. The utility displays a warning that all data on the USB device will be lost. Verify that the information displayed is for the correct USB device before you continue.
The utility provides some progress information and displays the message "Copy complete" when done.
Note: You must eject the media with Explorer, or use the "Safely Remove Hardware and Eject Media" icon in the System Tray to avoid leaving the file system in an Open Integrity state.
Instructions for Windows Users - graphical user interface
=====================================================================
1. (Method 1)
Locate and double-click on USBUtility-1.3.0.0.jar in Explorer. If prompted to "allow the following program to make changes to this computer", respond by entering your password (if it is asked for) and select "Yes".
(Method 2)
Open a Command Prompt as an Administrator. Find "Command Prompt" in your Start Menu > All Programs > Accessories. Right-click on the Command Prompt icon and choose "Run as administrator". You might be prompted to "allow the following program to make changes to this computer" and possibly be asked to provide your password. Do so and select "Yes".
Change your directory (use the cd command) to where you extracted the USBUtility-1.3.0.0.jar file. To run the utility, issue this command:
java -jar USBUtility-1.3.0.0.jar
2. The utility opens with a small window with input fields to provide a path to the source bootable USB image and to select which USB device to burn the image to. You can use the Browse button to help locate the image file. If you add or remove USB devices after opening the utility, use the Refresh button to update the list of devices displayed or input the drive letter or physical drive path.
3. Select your source bootable USB image and USB device. When you are ready to copy the image, click "Create media". You are prompted to confirm the destination disk information. If it is correct, click "Yes" to begin copying.
4. The utility provides some progress information and displays the message "Copy complete" when done. You are now ready to copy any more IBM i and LPP images to your USB device.
Note: You must safely eject the disk with Explorer, or use the Safely Remove Hardware and Eject Media icon in the System Tray, to avoid leaving the file system in an Open Integrity state.
Instructions for Mac OS Users - Command Line Interface
=====================================================================
1. Open a Terminal window and change your directory (use the cd command) to where you extracted the USBUtility-1.3.0.0.jar file. To run the utility, issue this command:
sudo java -jar USBUtility-1.3.0.0.jar DEV_DISK IMAGE_FILE
Where:
DEV_DISK is the device associated with your USB media disk.
Example: /dev/disk1
IMAGE_FILE is a path to where your bootable image is.
For example, path/to/I_BASE_01.IMG
2. The utility displays a warning that all data on the USB device will be lost. Verify that the information displayed is for the correct USB device before you continue.
3. The utility provides some progress information and displays the message "Copy complete" when done.
4. You are asked if you want to remount the disk. If you intend to copy any more IBM i and LPP images to your USB device, click "Yes".
Note: If you've remounted the disk, you must safely eject the disk with Finder, or drag it to the trash, to avoid leaving the file system in an Open Integrity state.
Instructions for Mac OS Users - graphical user interface
=====================================================================
1. (Method 1)
Locate and double-click the USBUtility-1.3.0.0.jar file in Finder. If prompted that "osascript wants to make changes.", choose to allow it.
(Method 2)
Open a Terminal window and change your directory (use the cd command) to where you extracted the USBUtility-1.3.0.0.jar file. To run the utility, issue this command:
sudo java -jar USBUtility-1.3.0.0.jar
2. The utility opens with a small window with input fields to provide a path to the source bootable USB image and to select which USB device to burn the image to. You can use the Browse button to help locate the image file. If you add or remove USB devices after opening the utility, use the Refresh button to update the list of devices displayed or input the disk device path.
3. Select your source bootable USB image and USB device. When you are ready to copy the image, click "Create media". You are prompted to confirm the destination disk information. If it is correct, click "Yes" to begin copying.
4. The utility provides some progress information and displays the message "Copy complete" when done.
5. You are asked if you want to remount the disk. If you intend to copy any more IBM i and LPP images to your USB device, click "Yes".
Note: If you've remounted the disk, you must safely eject the disk with Finder, or drag it to the trash, to avoid leaving the file system in an Open Integrity state.
Restrictions
Image catalogs and containers cannot be nested so you cannot initialize the virtual volumes within an optical volume to be container media. However, it is possible to store container media within container volumes or image catalog volumes, but they do not function as container volumes that allow access to the optical image catalog entries stored in that volume. The system supports storing container media images in these locations to enable later duplication to a physical RMS device where the contained optical image catalog entries will again be accessible. For example, you can use the DUPOPT command to copy media with a volume type of *CONTAINER to a virtual optical volume, and the *CONTAINER volume type is preserved, but it does not function as a container volume until it is later duplicated to a physical RMS device.
If you change any of the files on IPL capable container media by commands that use the physical device or the path to the physical optical volume (edit using WRKLNK), the virtual volumes become unusable until both the child virtual device and the physical device are varied off and back on.
BRMS does not support optical containers. The virtual volumes from *IMGCLGs in QOPT can be enrolled in BRMS as physical optical media. However, BRMS does not have any knowledge of the container volume or the fact that it contains virtual media. Users have to manage the container volume, and know to load the container when the system prompts for a virtual volume in the container. Users will also have to make sure that there are sufficient virtual volumes allocated before a save operation.
Displaying volumes
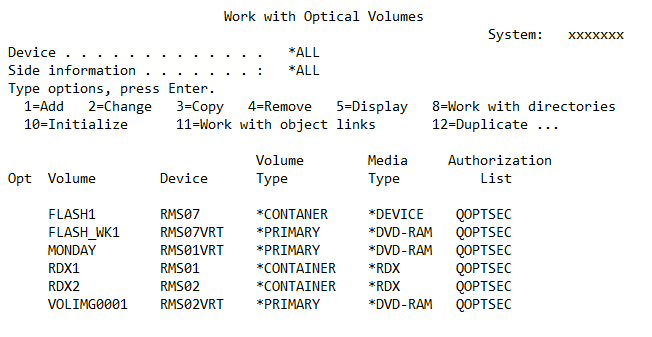
The WRKOPTVOL command can be used to display and work with both the physical volume and the virtual volumes in container media.
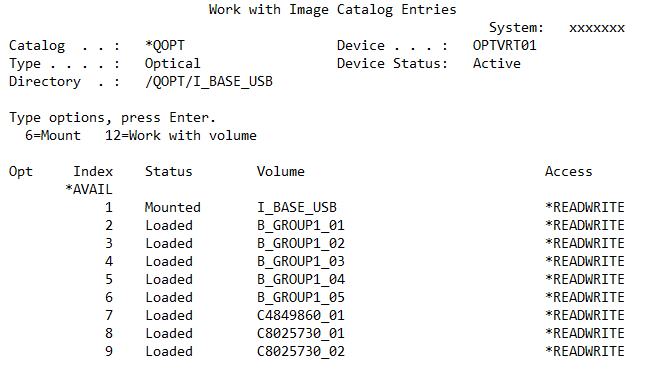
Example – WRKOPTVOL on partition with 3 optical containers.
Use Option 5=Display to display details about the volume
Switching volumes
The WRKIMGCLGE command can be used to manually switch to a different virtual optical volume. The system will automatically switch volumes if a volume list is provided for a save command.
Duplicating container volumes
The Duplicate Optical (DUPOPT) command is used to duplicate the contents of container volumes. You can duplicate the individual virtual volumes, or duplicate the entire container volume with all of its virtual volumes.
Note: If you want to duplicate the entire container volume, you need to vary off the child virtual device and specify the RDX or flash device or the physical volume as the FROMDEV / FROMVOL.
Note: The type (*PRIMARY or *CONTAINER) of the destination volume is changed during the duplicate process to match the type of the source volume.
Volume list file
The volume list file is created automatically by the VFYIMGCLG command or the QMOCRTCV API. It is possible to manually create and edit a VOLUME_LIST file on the physical optical device. The VOLUME_LIST file for optical containers uses the same format as the VOLUME_LIST file that is used for image catalogs stored in the Network File System (NFS).
See the IBM Docs topic "Storage Solutions > Virtual storage > IBM I virtual optical storage > Virtual optical storage using the Network File System > Requirements for virtual optical storage within a Network Files System network" for details on the format of the VOLUME_LIST file.
If there is a VOLUME_LIST file on the media, only the volumes in that file appear as optical container volumes, except for an installation image, which is automatically added as an optical container volume. Volumes on the container media that are not in the volume list file are marked as Read Only. Recovering from errors while using optical containers
OPT1791(Operation not allowed or conflicts with another request) with reason code 03 - This indicates that a file on an IPL capable container media was altered after the volume was mounted. The recovery is to vary off the child virtual device, vary off and on the physical device, vary on the child virtual device.
OPT1120 (File already exists) – This error message is sent if an attempt is made to use the QMOCRTCV API to create container volumes and there are already container volumes and a VOLUME_LIST file on the media. The recovery is to either reinitialize the container media to remove the existing files or to use different media that does not already have container volumes.
OPT1345 (No free space available on media) – This error message is sent if an attempt is made to use the QMOCRTCV API and there is not enough space on the media to create the number of volumes requested at the specified size. The recovery is to change the number/size of the volumes so that they can all fit on the container media.
Adding virtual RMS media to an image catalog.
In addition to adding support for container media with 7.2 TR5 and 7.3 TR1, it is now possible to add RDX and flash drive compatible virtual volumes to an image catalog that uses storage on the system disk units. The new media type has a block size of 512 bytes, so it can be used for duplication to or from RDX or flash media.
Example – Adding an RDX and flash drive compatible virtual volume to an Optical image catalog
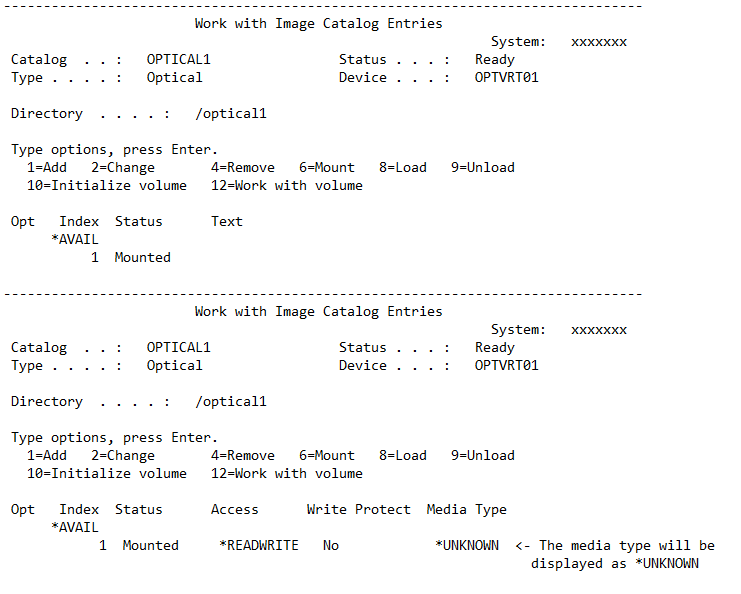
ADDIMGCLGE IMGCLG(OPTICAL1) FROMFILE(*NEW) MEDTYPE(*RMS) IMGSIZ(8000)
Example – Using the WRKIMGCLGE command to working with RDX and flash drive compatible virtual media. F11 is used to switch between the views.
Installing from optical container media
It is possible to use optical container media to install either from a SAVSYS image, or (with 7.2 TR7, 7.2 TR3, 7.4, and 7.5) a bootable USB image downloaded from the ESS website and copied to a USB 3.0 flash drive by using a Java utility that is also available on ESS.
See Adding virtual volumes to optical containers for install for the procedure to use to prepare the installation media.
1. Plug the USB 3.0 flash drive with the installation image into the USB port on the system
2. For POWER7, POWER7+, and POWER8 Systems tag the USB adapter as the alternate restart adapter by using an HMC. For POWER9 and POWER10 Systems managed by an HMC, tag the USB adapter as the alternate restart adapter. For POWER9 and POWER10 Systems not managed by an HMC, the USB system ports are in the default search sequence for a D-mode IPL, so it is not necessary to tag the USB adapter.
Note: For POWER7, POWER7+, and POWER8 Systems you will not be able to install from a USB flash drive on a system that is not managed by HMC
3. Start the D-IPL
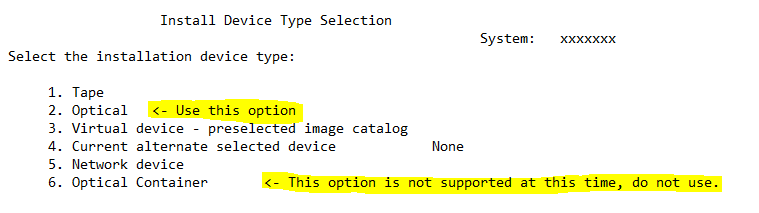
When you install the operating system from container media, you must still select an installation device type of 2. Optical instead of 6. Optical Container
5. Once the Licensed Internal Code and Operating System installation is complete you can use the other virtual volumes on the container media to install PTFs, user data, etc.
Installing from a SAVSYS image
It is not possible to install (D-IPL) directly from a virtual optical volume in a child virtual device, but it is possible to store an installation image (SAVSYS) on a physical optical volume that is also used as container media. The system recognizes that the container media contains an installation image and adds it as one of the virtual volumes in the container. The installation image is mounted in both the physical device and the virtual child device at the same time. To avoid duplicate volume names the suffix “_CONT” is appended to the volume name that is mounted in the virtual child device.
Note: If there is not enough room for the full suffix to be appended to the volume name, then the suffix will overwrite the trailing characters of the physical volume name. If this results in a duplicate volume name, then you will not be able to mount the volume.
Note: After a SAVSYS to container media, you need to vary off and on the physical device to make the installation (SAVSYS) image visible as virtual volume in the container.
Note: For IPL capable container media the physical optical device must always be varied on before the child virtual device is varied on.
Note: A SAVSYS will clear all pre-existing files on the container media, so the container volumes need to be added to the media after the SAVSYS completes.
Note: Since the installation image is counted as one of the virtual volumes in the container, and a container is limited to a maximum of 256 virtual volumes, you can add only 255 more virtual volumes to the container.
Note: If you add more files or volumes to the physical optical device, or edit any of the files on the physical optical device after the child virtual device is varied on, then you need to vary off the child virtual device, vary off and on the physical optical device, and vary on the child virtual device before you can use the child virtual device volumes.
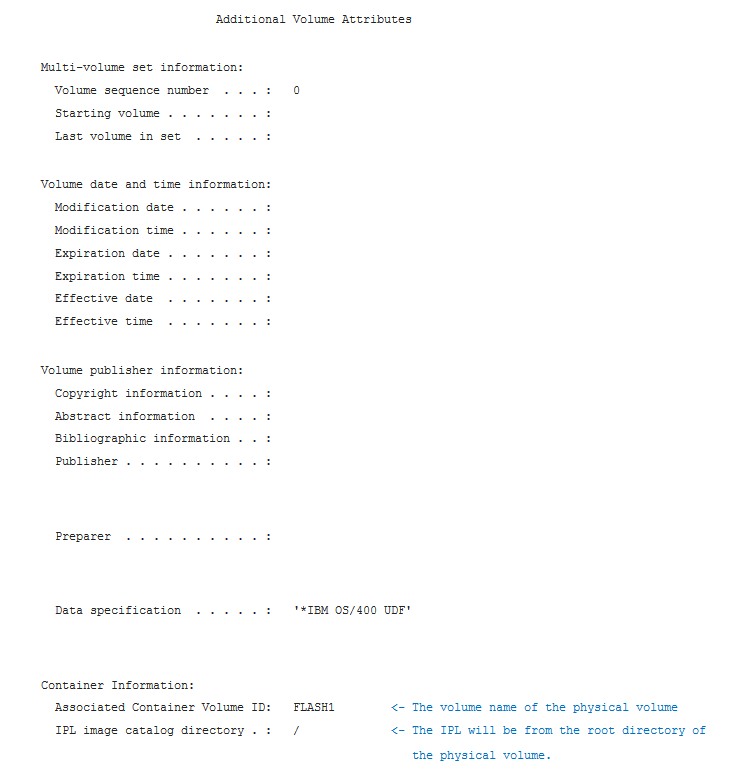
Example – WRKIMGCLGE for an IPL capable container media.
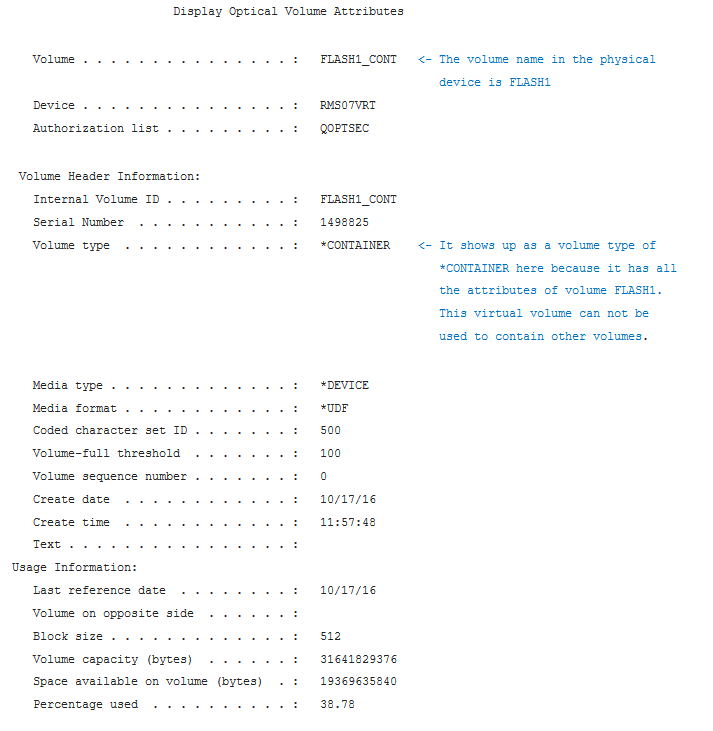
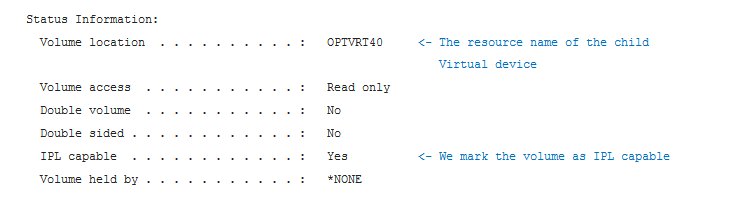
Use F14=Additional volume attributes
If you start a D-IPL from container media the initial part of the installation uses the physical media as the load source, then the system switches to using the virtual volume in the 632B-011 child virtual device for the remainder of the Licensed Internal Code installation.
When you install the operating system from container media, you must still select an installation device type of 2. Optical instead of 6. Optical Container

Using Container media as an alternate installation device.
If you start the D-mode IPL from a DVD or tape device, and you want to use container media as an alternate installation device, you need to select the child virtual device resource (632B-011) from the "Select Alternate Installation Device" screen instead of the RMS physical device resource.
Starting at IBM i 7.1 Removable Mass Storage (RMS) can be used for D-Mode IPLs. When using RMS media, the HMC does not care which port the device is on. The adapter is tagged and the firmware checks all ports of the adapter for IPLable media, and boots from the first one it finds.
To boot from RMS media on a POWER7 system, the minimum firmware is
| System Server Model | Firmware Level |
| 8233-E8B, 8236-E8C, 9117-MMB, 8246-L2B, 9119-FHB | 730.70 |
|
8246-L2C, 8246-L2S/L1C/L1S, 8231-E1C/E2C 8282-E4C,
8205-E6C,9117-MMC
|
740.50 |
|
8246-L1D/L1T/L2D/L2T, 8231-E1D/E2D, 8202-E4D/E6D,
9117-MMD
|
760 |
If the wrong firmware level is on the system, a circumvention is to boot from DVD, and select the RMS media as the alternate installation device at DST.
Also, note that some devices can force many retries for the boot code, and if the machine does not boot, disconnect all the USB devices except the load source.
Finally, regardless of the device, expect about 30 mins to get to the DST screen on POWER7 Systems, because the firmware on POWER7 Systems runs all devices in USB1 mode, which is slow. Once the system is running the device, it switches to USB2 or USB3 mode.
Note: for POWER7, POWER7+, and POWER8 Systems the system must be HMC-managed in order to tag the USB adapter as the alternate restart device adapter. For POWER9 and POWER10 Systems, the USB system unit ports are in the default search sequence for a D-mode IPL, so an HMC is not required for boot from a USB drive.
IBM i 7.1 with Technology Refresh 6 (TR6) on POWER7, POWER7+, and POWER8 Systems support the use of USB attached flash drives for both direct attach and iVirtualization configurations (where IBM i is serving I/O to a virtual client IBM i partition, or where IBM i is a virtual client of an IBM i partition).
IBM i 7.2 with Technology Refresh 8 (TR8) on POWER9 Systems support the use of USB attached flash drives for both direct attach and iVirtualization configurations (where IBM i is serving I/O to a virtual client IBM i partition, or where IBM i is a virtual client of an IBM i partition).
- Performing a D-Mode IPL.
- To use the USB drive as an Alternate IPL device (D-Mode), the USB adapter is tagged as the alternate restart device adapter. This is similar to tagging the SAS/SATA IOA for IPL from DVD). For example, a USB adapter would show up as:
- "U78AB.001.WIH000M-P1-T5 Universal Serial Bus UHC Spec"
- To use the USB drive as an Alternate IPL device (D-Mode), the USB adapter is tagged as the alternate restart device adapter. This is similar to tagging the SAS/SATA IOA for IPL from DVD). For example, a USB adapter would show up as:
Note: for POWER7, POWER7+, and POWER8 Systems the system must be HMC-managed in order to tag the USB adapter as the alternate restart device adapter. For POWER9 and POWER10 Systems, the USB CEC ports are in the default search sequence for a D-mode IPL, so an HMC is not required for boot from a USB drive.
Trademarks
Microsoft and Windows are trademarks of Microsoft Corporation in the United States, other countries, or both.
Java and all Java-based trademarks and logos are trademarks or registered trademarks of Oracle and/or its affiliates.
Was this topic helpful?
Document Information
Modified date:
24 August 2022
UID
ibm11111239