How To
Summary
Enabling single sign-on for the Windows desktop. Where the user authenticates to a desktop PC by using AD domain log in and then can securely access the web application without prompting you to log in. Specifically, you configure the Simple and Protected GSS-API Negotiation Mechanism (SPNEGO) feature on the Liberty server that hosted a web application.
Microsoft extended Kerberos with a protocol known as Simple and Protected GSS-API Negotiation Mechanism (SPNEGO) for sharing Windows credentials with Liberty Server. This protocol permits a window client machine and the Liberty server to negotiate where the Client machine sends a SPNEGO token wrapped within a Kerberos Token. On the Liberty server, SPNEGO is initialized and understands the SPNEGO token, then this token is used to implement secure SSO.
Objective
Steps
How Does SPNEGO Work in Liberty Server?
This section highlights the essential parts of the SPNEGO authentication process flow. It explains how Microsoft and IBM components are involved in the SPNEGO SSO flow.
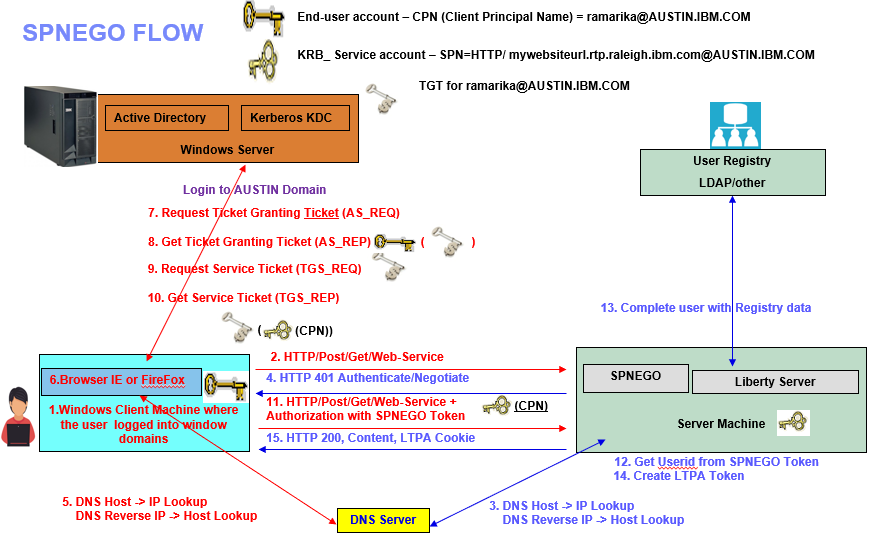
6. Using the SPN that is passed in, LSASS requests a Kerberos ticket to a domain controller (KDC) Which means client (PC that logged in to domain) contacts the KDC on the domain controller and requests a ticket for the SPN based on what the browser client sent as the hostname (FQDN or alias) and that is determined by network (DNS, DHCP) settings. This tells the web browser that it needs to check with the local OS (Client Window 10 or 8) regarding what options it has available from the Negotiate Security Support Provider (SSP) to authenticate the user and Client begins a Kerberos authentication sequence.
14b. If not, an "HTTP 403 Not Authorized" response is sent to the client
High-Level Steps
1. Set up Active Directory users and Map the service principal name (SPN).
2. Set up Kerberos configuration file in Liberty.
3. Deploy the sample application libertyDefaultApplication in Liberty.
4. Configure LDAP user registry and SPNEGO authentication in Liberty.
5. Enable SPNEGO authentication in Liberty.
6. Configure IE and Firefox browser.
7. Test the snoop application to validate the spnego.
8. How to debug the Spnego problem by using traces.
1. Set up Active Directory users and Map the service principal name (SPN).
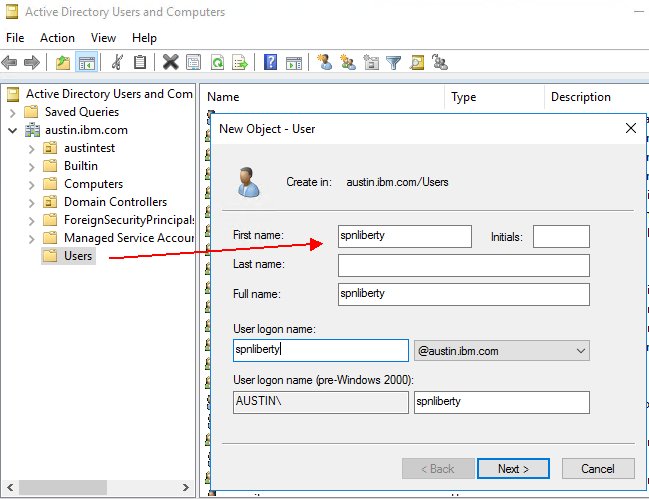

Check the option “This account support AES 256 encryptions” in user properties if you want to use higher encryption keys.

Create a service principal name (SPN) and Map the service principal name to the account that you created on the AD server. So In this example, the Active Directory user is spnliberty, and it is associated with service name HTTP/ by running the ktpass command on the domain controller.
Always use the latest version of the ktpass command for the right Windows version.
The realm name is all uppercases of the MS Active Directory domain name.
SPN is the Kerberos service principal name. The hostname specified in the SPN should match with the hostname of the URL that you are trying to do SSO, which means it could be your Webserver or VIP or Liberty Server depends on your scenario.
Generate the keytab file using Microsoft tool ktpass command on Active Directory Domain Controller Server (KDC server)
ktpass -princ hostname_of_web_site@ACTIVE_DIRECTORY_DOMAIN_NAME -ptype KRB5_NT_PRINCIPAL -mapuser SPNuser -mapOp set -pass your_spnuserpassword -out full_path_to_keytab_file -crypto cipher
Example command:
hostname_of_web_site = mywebsitehost.rtp.raleigh.ibm.com
ACTIVE_DIRECTORY_DOMAIN_NAME = AUSTIN.IBM.COM
your_spnuserpassword = Existing password that used by this account spnliberty
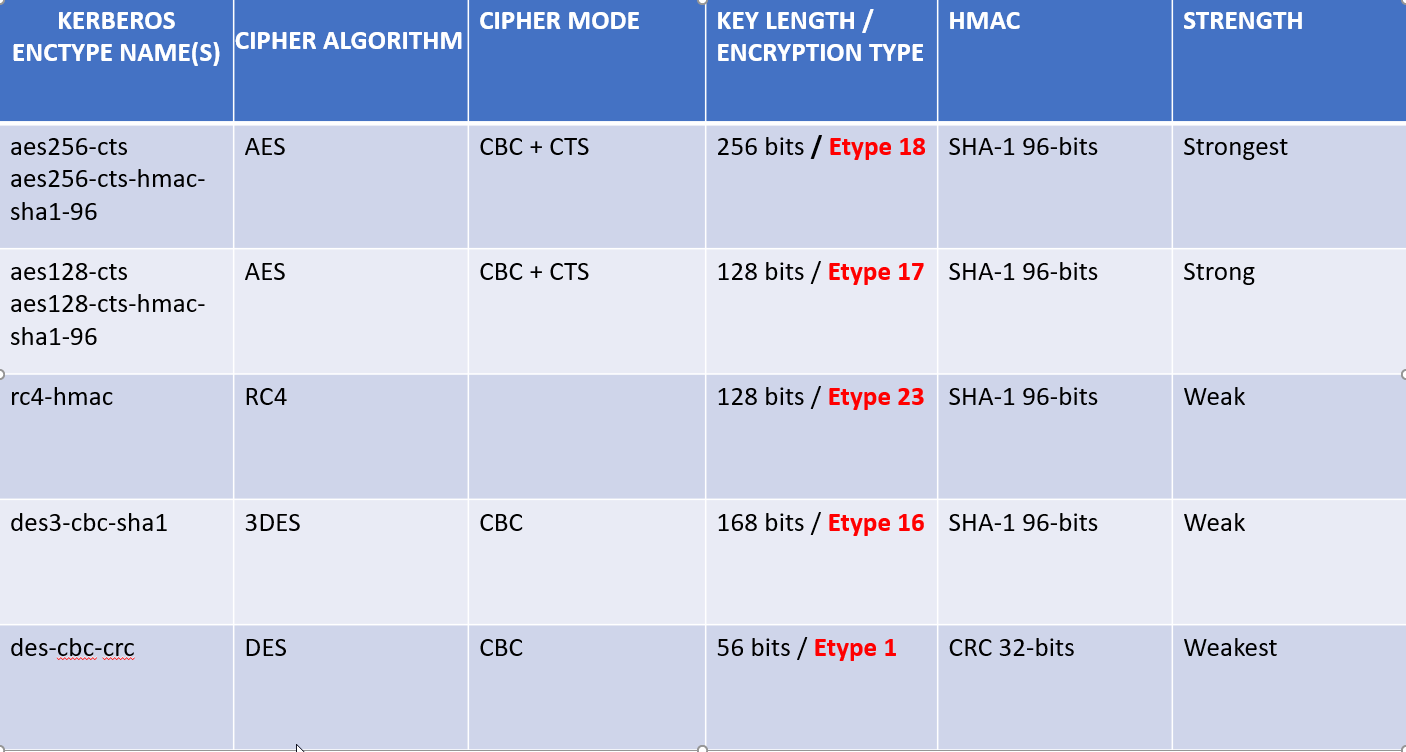
cipher = encryption type AES256-SHA1 that is used by the Kerberos client
ktpass -princ HTTP/mywebsitehost.rtp.raleigh.ibm.com@AUSTIN.IBM.COM -ptype KRB5_NT_PRINCIPAL -mapUser spnliberty -mapOp set -pass password -out krb5.keytab -crypto AES256-SHA1

In the above command -mapOp set Flush other Service Principal Names that are associated with the user and set the one provided by -princ

More details, see the following Microsoft link.
https://docs.microsoft.com/en-us/windows-server/administration/windows-commands/ktpass
Kerberos Encryption Type Details
If your Microsoft setspn command version supports the -X option to search for a duplicated SPN, then use setspn -X will check entire Domain.

2. Set up Kerberos configuration file.
Kerberos configuration file contains client configuration information.
default_realm: Identifies the Kerberos realm for the client
default_keytab_name: Provides the file system location of the Kerberos keytab file
default_tgs_enctypes: Identifies the supported list of session key encryption types that the client should request when making a TGS-REQ
default_tkt_enctypes: Identifies the supported list of session key encryption types that the client should request when making an AS-REQ
kdc : Specifies a list of the hostname of the Kerberos Key Distribution Center (KDC) for this realm and port number
domain_realm: This section provides a translation from a domain name or hostname to a Kerberos realm name.
The following example file is set up for using domain and realm settings. For windows default file name is krb5.ini and on Unix platforms file name is krb5.conf.

3. Deploy the sample application libertyDefaultApplication in Liberty.
I am providing a sample application called libertyDefaultApplication.ear.
Click here to download the SAMPLE application ==> libertyDefaultApplication.ear
Deploying libertyDefaultApplication in Liberty Server
Place this libertyDefaultApplication.ear under the dropins folder, ${server.config.dir}/dropins (that is, wlp/usr/servers/server_name/dropins). By default, the dropins directory is automatically monitored. If you drop an application into this directory, the application is automatically deployed on the server.

Add the following line to the server.xml file
<feature>appSecurity-2.0</feature>
<!-- Automatically expand WAR files and EAR files -->
<applicationManager autoExpand="true"/>
When you add the appSecurity-2.0 feature to your server, you need to configure a user registry (LDAP or Federated Repository) This feature support for securing the server runtime environment and applications. This feature enables servlet-3.0 and web application security, support for LDAP and basic user registries, and SSL.
4. Configure LDAP user registry and SPNEGO authentication in Liberty.
Add the ldapRegistry-3.0 Liberty feature to the server.xml file. This will enable the LDAP User Registry feature.
<feature>ldapRegistry-3.0</feature>
To configure an LDAP in Liberty, you need the following information.
1. Host name of the AD server
2. LDAP port of AD server (typically 389)
3. Bind DN with which WebSphere will connect to query entries.
4. Bind password corresponding to DN.
5. The search base under which all users exist.
6. Configuring the LDAP filter.
<!-- LDAP Configuration -->
<ldapRegistry id="ldap" realm="myldap.austin.ibm.com:389"
host="myldap.austin.ibm.com" port="389" ignoreCase="true"
baseDN="DC=AUSTIN,DC=IBM,DC=COM"
bindDN="CN=wasadmin,CN=IBMSecurity,Ou=Techspport,DC=AUSTIN,DC=IBM,DC=COM"
bindPassword="password"
ldapType="Microsoft Active Directory">
<activedFilters
userFilter="(&(|(sAMAccountName=%v)(displayName=%v))(objectclass=user))"
groupFilter="(&(cn=%v)(objectcategory=group))"
userIdMap="user:sAMAccountName"
groupIdMap="*:cn"
groupMemberIdMap="memberOf:member" >
</activedFilters>
</ldapRegistry>
5. Enable SPNEGO authentication in Liberty.
Add the spnego-1.0 Liberty feature to the server.xml file.
<feature>spnego-1.0</feature>
Here is a sample configuration in server.xml that changes the default <spnego> settings
<spnego id="mySpnego"
includeClientGSSCredentialInSubject="false"
krb5Config="${server.config.dir}/resources/security/krb5.conf"
krb5Keytab="${server.config.dir}/resources/security/krb5.keytab"
servicePrincipalNames="HTTP/mywebsiteurlhost.rtp.raleigh.ibm.com" />
Example for the LDAP registry and SPNEGO authentication from the Liberty server.xml file.

6. Configure IE and Firefox browser.
Microsoft Internet Explorer:
a. At the desktop, log in to the Windows Active Directory domain.
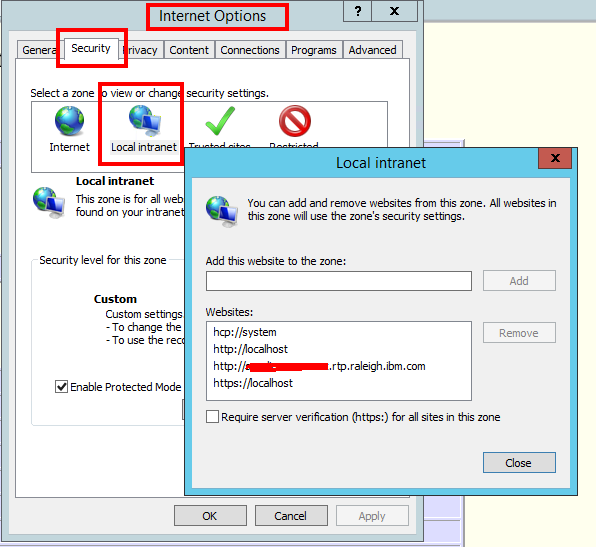
b. In the Internet Explorer window, click Tools > Internet Options. In the window that is displayed, click the Security tab.
c. Select the Local intranet icon and click Sites.
If you are using Internet Explorer version 9 or older, go to the next step. If you are using Internet Explorer 10 or later, click Advanced in the Local intranet window.
d. In the Local intranet window, complete the Add this website to the zone field with the web address of the hostname so that single sign-on (SSO) can be enabled for the list of websites that are shown in the websites field.
e. On the Internet Options window, click the Advanced tab and scroll to Security settings. Ensure that the Enable Integrated Windows® Authentication box is selected.
f. Click OK. Restart your Microsoft Internet Explorer to activate this configuration.
Mozilla Firefox:
a. At the desktop, log in to the Windows Active Directory domain.
b. In the address field in Firefox, type about:config.
c. In the Filter/Search box, type network.n.
e. Double-click network.negotiate-auth.trusted-uris. This preference lists the sites that are permitted to engage in SPNEGO Authentication with the browser. Enter a comma-delimited list of trusted domains or URLs.
Note
You must set the value for network.negotiate-auth.trusted-uris.
f. If the deployed SPNEGO solution is using the advanced Kerberos feature of Credential Delegation, double-click network.negotiate-auth.delegation-uris. This preference lists the sites for which the browser can delegate user authorization to the server. Enter a comma-delimited list of trusted domains or URLs
.

g. Click OK. The configuration reflects the updates.
h. Restart your Firefox browser to activate this configuration.
7. Test the snoop application to validate the spnego.
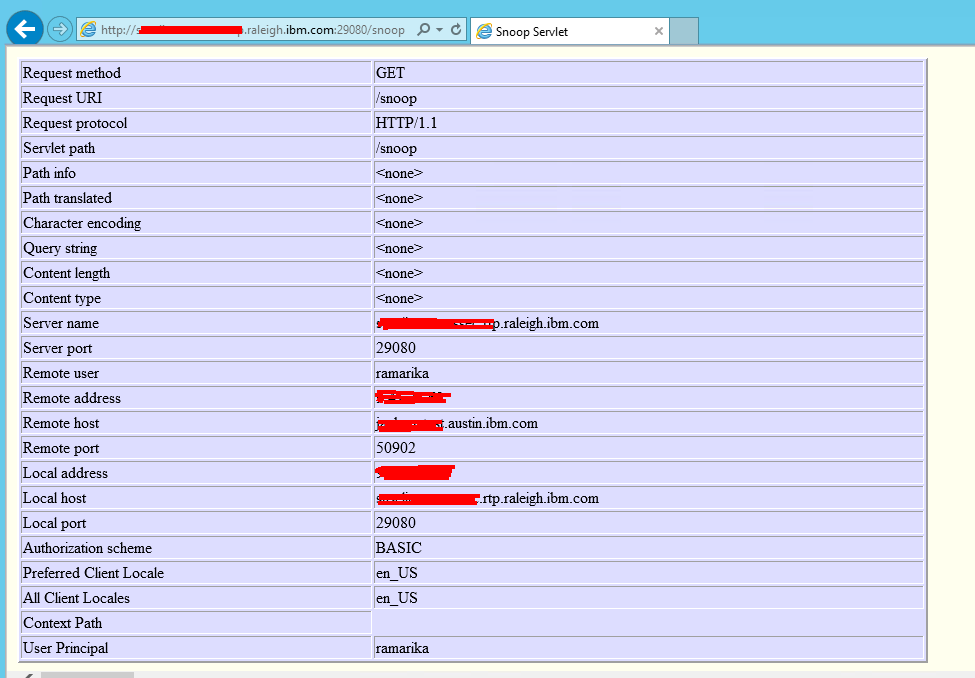
To confirm whether SPNEGO is working correctly at the Liberty server by accessing the snoop servlet using the Web browser on client desktop that logged in to the Windows Active Directory domain. The snoop servlet that deployed on Liberty server’s application will retrieve information about a servlet request. If Liberty Security is enabled, then the users must authenticate with the server to initiate the servlet. If SPNEGO is configured and working correctly in liberty server, then the user is automatically logged in by using a SPNEGO token without prompting for credentials. If SPNEGO is working, you should see the following information.

8. How to debug the Spnego problem by using traces.
Add the following string to the <logging> element in the server.xml file:
com.ibm.ws.security.*=all:com.ibm.ws.webcontainer.security.*=all:com.ibm.websphere.wim.*=all:com.ibm.wsspi.wim.*=all:com.ibm.ws.wim.*=all

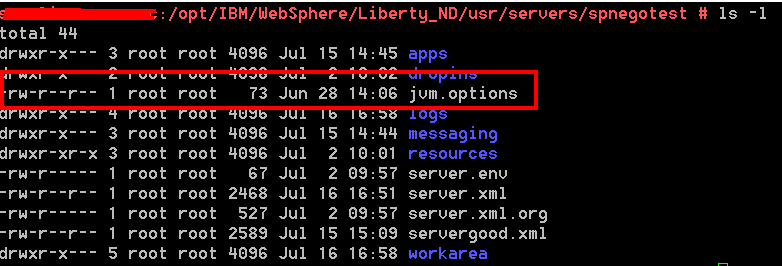
Insert the following generic JVM arguments in the jvm.options file:
-Dcom.ibm.security.jgss.debug=all
-Dcom.ibm.security.krb5.Krb5Debug=all

How can I find in the traces has spnego debug property is enabled?
In the traces file search for JGSS_ you will see the following message

Document Location
Worldwide
Was this topic helpful?
Document Information
Modified date:
30 August 2022
UID
ibm11072604