Troubleshooting
Problem
Websphere iFixes:
8.5.5.0-WS-WAS-IFPH57998 8.5.5.0 through 8.5.5.24 (Applicable)
9.0.5.0-WS-WAS-IFPH57998 9.0.5.0 through 9.0.5.18 (Applicable)
IBM J9 Java:
https://www.ibm.com/support/pages/apar/IJ45598
https://www.ibm.com/support/pages/node/1117839
https://www.ibm.com/docs/en/sdk-java-technology/8?topic=introduction-java-virtual-machine
https://www.ibm.com/docs/en/sdk-java-technology/8?topic=introduction-java-virtual-machine
After the JDK 8.0 J9 FP5 update, you receive in Websphere Application Server instance HTTP500 error and gsk 406 error in the plugin.log file.
IHS plugin log location:
IHS plugin log location:
${CONFIG_ROOT}/logs/<lpar_IHSinstance>/plugin.log
ERROR: lib_security: logSSLError: str_security (gsk error 406):  Error occurred in TLS processing, check the errno value.
ERROR: lib_security: initializeSecurity: Failed to initialize GSK environment. Secure transports are not possible.
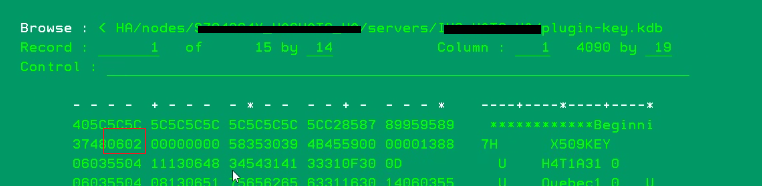
To validate CMS version the plugin-key.kdb, we want to view the object in hex (F10). Review the 3rd byte value on the second line. This value identifies what CMS version that the key database file version has. If you see 06, in return means CMSV6 or 03 would mean CMSV3 and so on.
WRKLNK '${CONFIG_ROOT}/cells/<lpar_APPServer>/nodes/<lpar_APPServer/servers/<IHS_Instance>/plugin-key.kdb'
NOTE: The IBM i System TLS APIs (that initialize the gskit secure environment) supports CMS keystore version 4 and is backwards compatible.
https://www.ibm.com/docs/en/i/7.5?topic=concepts-secure-sockets
https://www.ibm.com/docs/en/was/8.5.5?topic=scus-keystore-configurations-ssl-1
Environment
Note: IBM recommends backup your Websphere environment prior and after any major updates/changes.
Instructions:
Backing Up Websphere Environment (IM & ProfileData):
https://www.ibm.com/support/pages/node/645161
Resolving The Problem
Websphere iFixes:
First, you will need to install the WebSphere Application Server Interim Fix (iFix). Then, review the Preface section and follow the instructions in the Solution section to ensure the web server key store has been recreated and copied to the web server config directory.
How to install interim fixes:
Commandline method:
https://www.ibm.com/docs/en/was/9.0.5?topic=product-installing-uninstalling-interim-fixes
GUI method:
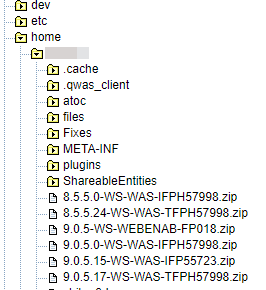
a) Download iFix PH57998 and ensure it is placed in the IFS. You can use ACS and the Integrated File System option for uploading your files.
Websphere iFixes:
b) End the QWASxx subsystem.
ENDSBS QWAS85 or QWAS9
c) Login to your HTTPAdmin console:
http://ip:2001/HTTPAdmin or https://ip:2010/HTTPAdmin
For troubleshooting admin job issues refer:
https://www.ibm.com/docs/en/i/7.5?topic=troubleshooting-web-administration-i
d) Locate your Websphere Installation and select and click "Update" at the bottom of the screen.

WebSphere Application Server v9.0
WEBENAB - IBM Web Enablement for IBM i (com.ibm.websphere.WEBENAB.v90)
BASE - Base (com.ibm.websphere.BASE.v90)
WebSphere Application Server v8.5
WEBENAB - IBM Web Enablement for IBM i (com.ibm.websphere.WEBENAB.v85)
EXPRESS - Express (com.ibm.websphere.EXPRESS.v85)
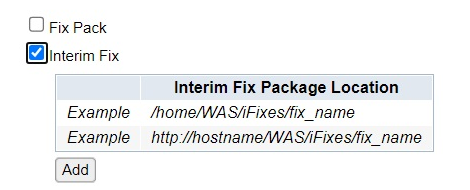
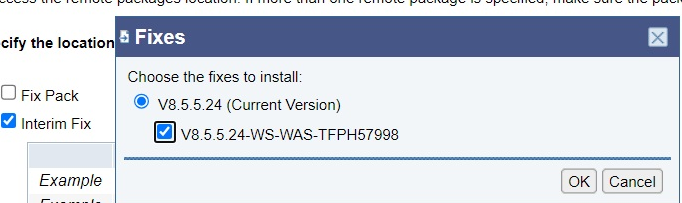
f) Next click on the "Browse" button. Locate the directory placement of iFix PH57998 that was done in step c. Select the zip file and click "OK".
g) Ensure that the zip location is selected, then click "Next" at the bottom.
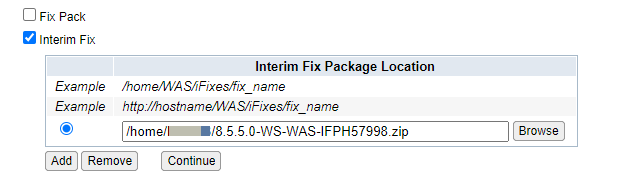
the ifix for WAS8.5 is 8.5.5.0-WS-WAS-IFPH57998.zip
the ifix for WAS9.0 is 9.0.5.0-WS-WAS-IFP57998.zip
h) A pop-up that confirms the iFix to update. Click "OK" again.
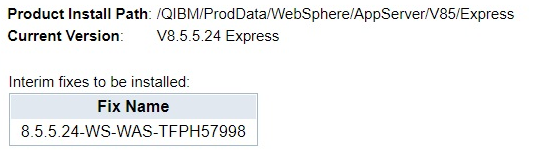
i) It takes a few minutes for the next screen to show up. However, we again need to confirm and click "Finish".
or
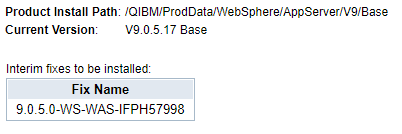
for WAS 9.0
j) As the iFix updates it takes a while for it to complete.

Note: You can monitor the status in 5250 by doing a WRKACTJOB SBS(QHTTPSVR).

k) Once the iFix update finishes, you see the status of your Websphere Installations.
Congratulations, you installed iFix PH57998 successfully.
After installing the WebSphere Application Server iFix, review the Preface section and follow the instructions under the Solution section to refresh your plugin-key.kdb web server key store to resolve the issue.
Preface:
This problem has been reported to only occur with new WebSphere Application Server CMS key stores that are being created after IBM i J9 Java is updated to FP5, but before IFPH57998 is installed. The IBM i System TLS APIs (that initialize the gskit secure environment) supports CMS keystore is CMS version 4 and is backwards compatible.
NOTE: PH57998 creates new CMS keystores at CMSv3, which is compatible with CMSv4.
To view the current CMS version of the plugin-key.kdb store, locate the 3rd byte value on the second line.
WRKLNK '/QIBM/UserData/Websphere/AppServer/V85/Express/profiles/<Instance>/config/cells/<lpar_Instance>/nodes/<lpar_Instance>/servers/<IHS_Instance>/plugin-key.kdb'

If the CMS key store version is 4 or lower, no additional actions are required since the client was able to immediately apply the iFix without an CMS changes.
However, if the 3rd byte value on the second line shows higher than 04, you must follow the instructions in the Solution part in this document.
Solution:
Client has an existing Traditional Websphere Application Server that recently applied the latest IBM i J9 Java update and Websphere Application Server Fix Pack. But iFix PH57998 is not applied. They maybe then created a new IHS instance associated to a Traditional Websphere instance or recently associated an IHS instance to a Traditional Websphere instance. The newly created CMS plugin-key.kdb key store may not be a compatible version on the IBM i.
You want to view the current CMS version of the plugin-key.kdb store. Locate the 3rd byte value on the second line. Any value 06 or higher, you need to follow the instructions to resolve the gsk406 error.
WRKLNK '/QIBM/UserData/Websphere/AppServer/V85/Express/profiles/<Instance>/config/cells/<lpar_Instance>/nodes/<lpar_Instance>/servers/<IHS_Instance>/plugin-key.kdb'
1) Follow the instructions in section: How to install interim fixes to apply the iFix PH57998.
Websphere iFixes:
https://www.ibm.com/support/pages/node/611243
https://www.ibm.com/support/pages/node/715559
2) Goto the HTTPAdmin GUI and view your associated HTTP instance.
Login to your HTTPAdmin console:
http://ip:2001/HTTPAdmin or https://ip:2010/HTTPAdmin
For troubleshooting admin job issues refer:
https://www.ibm.com/docs/en/i/7.5?topic=troubleshooting-web-administration-i
Note: For issues regarding not seeing your Websphere Instances in the HTTPAdmin GUI, view the conclusion of this technote to resolve the issue.
3) Ensure that your HTTP and Webpshere instances are ended. On the command line type:
STRQSH
cd /QIBM/UserData/Websphere/Appserver/<Version>/<Type>/profiles/<Instance>/bin
stopServer
where Version = V85,V9, and so on
where Type = Express, Base, and so on.
You might also want to access HTTPAdmin to administrate your Websphere Servers.
Further information about starting your Websphere Application Server can be located in our Knowledge Center.
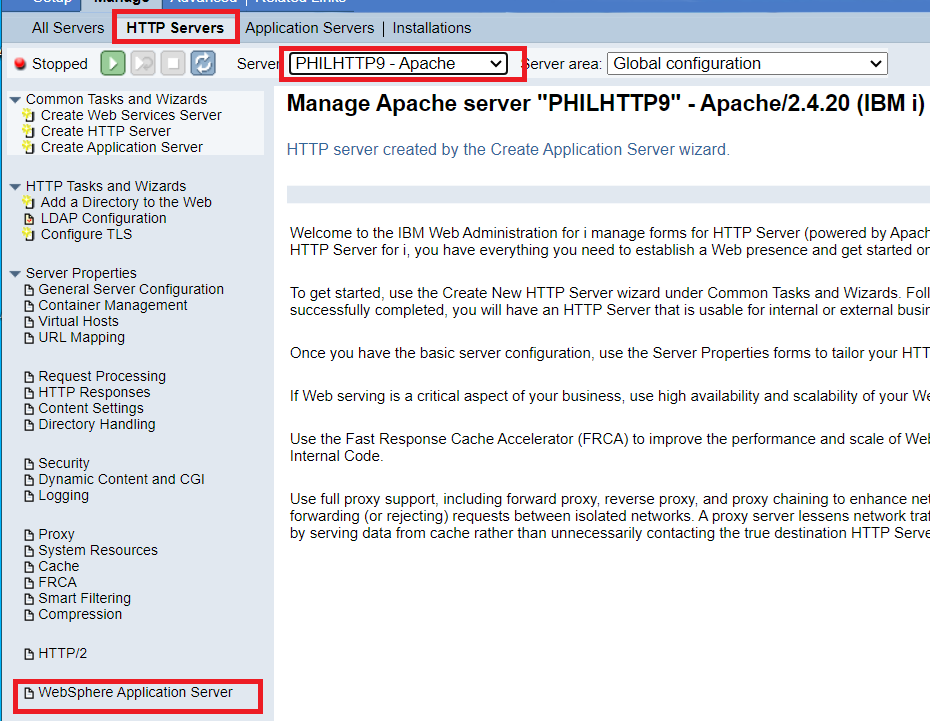
4) Locate your HTTP instance in the HTTPAdmin GUI. Goto tab "HTTP Servers", select the dropdown box for the associated IHS instance, then click on "Websphere Application Server". (It may take a few minutes for the web page to resolve).
Note: If you have never had an associated HTTP instance to the Websphere Application Server instance, you can use this document to setup an IHS instance associated to Websphere: https://www.ibm.com/support/pages/node/667039
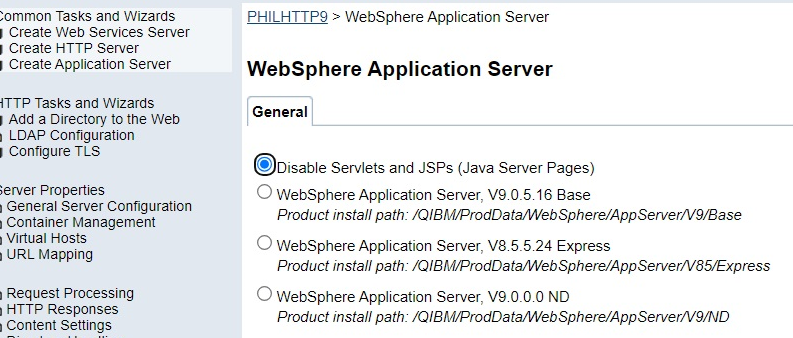
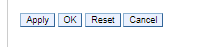
5) Disable the current JSP servlets to the IHS and Websphere Application Server instance.
Select "Disable Servlets and JSPs (Java Server Pages)". Then click "Apply". Then click "OK".
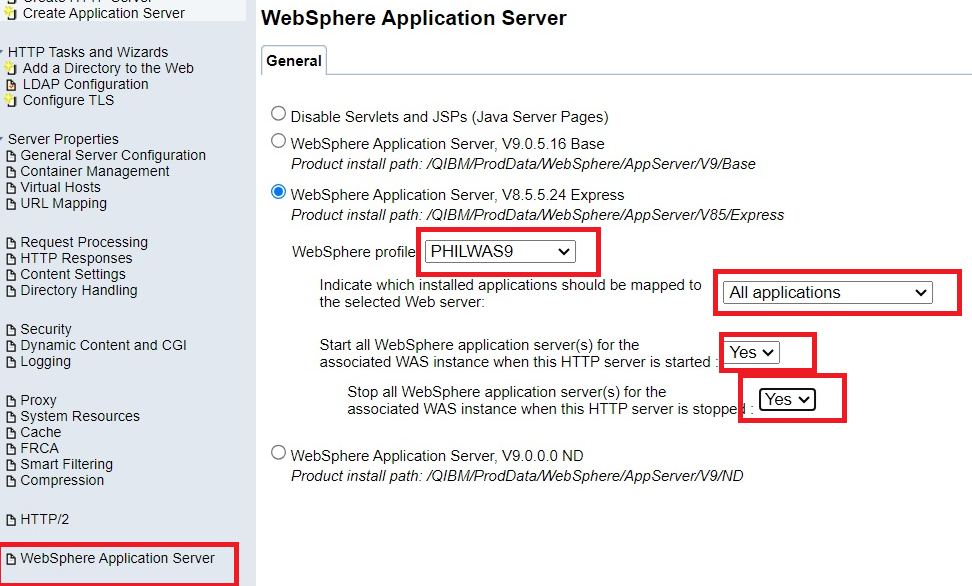
6) Next go back to your profile and click on the "Websphere Application Server" just like before. This time make sure that you select "Websphere Application Server V8.5.5.xx Express" is selected in the General section. Then a dropdown box will show up. Select the respective Websphere instance that we want to reassociate. You can select the options as shown below. You will want to ensure "All Applications" are mapped to the Web Server. To restart your instances select "YES" as shown below. Click "Apply" and then click "OK".
7) Verify that your application instance is running. (If your instance has not restarted, click on Application Servers, then click on Start button).
8) To verify the CMS version of the plugin-key.kdb we can review the hex code (F10) for the file.

WRKLNK '${CONFIG_ROOT}/cells/<lpar_APPServer>/nodes/<lpar_APPServer/servers/<IHS_Instance>/plugin-key.kdb'
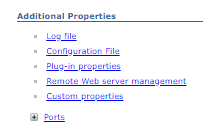
9) Then, go into your WebSphere Application Server Integrated Solutions Console. Select Servers -> Server Types -> Web servers -> Click on your web server name -> click Plug-in Properties -> click the Copy to Web Server Key Store Directory button. This will copy the plugin-key.kdb file to the correct profile_root/config/webserverName/ directory. Finally, restart the web server to pick up the new CMS key store.
10) Congratulations, you have completed the steps necessary to ensure the CMS key store is valid and functional on the IBM i. You may want to re-enable global security. Please review Additional Resources for details.
NOTE: This will only copy the default server certificate and default root CA from the "NodeDefaultKeystore" to the new CMSKeystore (plugin-key.kdb file). If you have additional certificates that need to be moved to the CMS key store please follow step 7) g. in section "What if I cannot see my Websphere instances in the HTTPAdmin GUI?"
What if I cannot see my Websphere instances in the HTTPAdmin GUI?
If you are not able to view your Websphere instances in the HTTPAdmin GUI after applying the latest fixpack, you have two options to resolve this issue.
Option 1:
You must apply the iFix outlined in techdoc: https://www.ibm.com/support/pages/node/7033015. Then complete the instructions as outlined in the Solution section of this document.
Option 2:
You can manually recreate your plugin-key.kdb file for the IHS instance. This solution does not require HTTPAdmin GUI, but rather you will be using the WASADM console.
1) Ensure that the Websphere Application instance is running. On the command line type:
STRQSH
cd /QIBM/UserData/Websphere/Appserver/<Version>/<Type>/profiles/<Instance>/bin
startServer
where Version = V85,V9, and so on
where Type = Express, Base, and so on.
You might also want to access HTTPAdmin to administrate your Websphere Servers.
Further information about starting your Websphere Application Server can be located in our Knowledge Center.
2) We need to rename or delete the plugin-key.kdb file for the IHS instance.
WRKLNK '${CONFIG_ROOT}/cells/<lpar_APPServer>/nodes/<lpar_APPServer/servers/<IHS_Instance>/plugin-key.kdb'
Take an option 7 to rename this file. You can change it to plugin-key.bak.

3) You need to obtain the WASADM console port to access the Websphere Console.
Method A: Joblog
WRKJOB <Instance>
Option 1
Option 10
F10 & PageUp
Locate: Websphere application server xxxx ready.
Place your cursor on this message and press F1.

Method B: serverindex.xml file
WRKLNK '/QIBM/UserData/Websphere/Appserver/<Version>/<Type>/profiles/<Instance>/config/cells/<lpar>_<Instance>/nodes/<lpar>_<Instance>/serverindex.xml'
Locate WC_adminhost for nonSSL WASADM port or WC_adminhost_secure when global security is enabled for the Websphere Application Server. You also have the option of disabling global security.
Note: This screen is just an example of a the port numbers and location. Yours might be different.
4) Access the WASADM console by using the port number obtained from previous step.
Open your browser and connect to your WASADM console:
http://ip:<port>/ibm/console
https://ip:<port>/ibm/console
If you have problems to access the console, you might need to verify that your Websphere Instance is indeed active. Further information about starting your Websphere Application Server can be located in our Knowledge Center.
5) We need to locate your old CMS Keystore and record the attributes.
a) Follow to WASADM > Security > SSL certificate and key management > Keystores and certificates
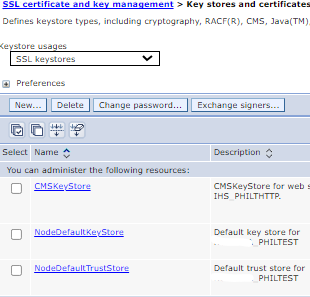
b) Click on CMSKeystore and view the current attributes.
Note: Your keystore might be labeled differently. You can look at the key URL location to ensure you have the correct path:
${CONFIG_ROOT}/cells/<lpar>_<instance>/nodes/<lpar>_<instance>/servers/IHS_<instance>/plugin-key.kdb
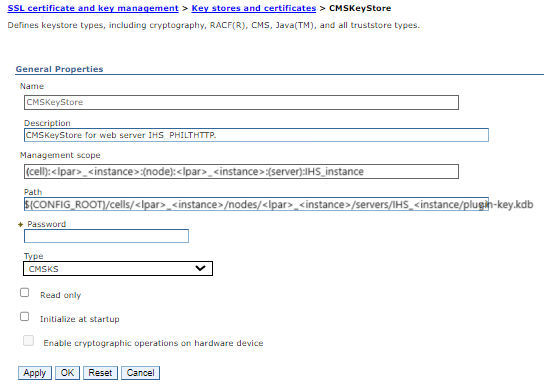
Ensure that you copy and record the Management scope and Path. You need to use these settings for the new CMS keystore attributes.
c) Click "Cancel" to get out of the CMSKeystore.
6) We need to create a new CMSKeystore2 by using your attributes from the old CMSKeystore.
a) Click "New" at the top of the page to create a new key store.
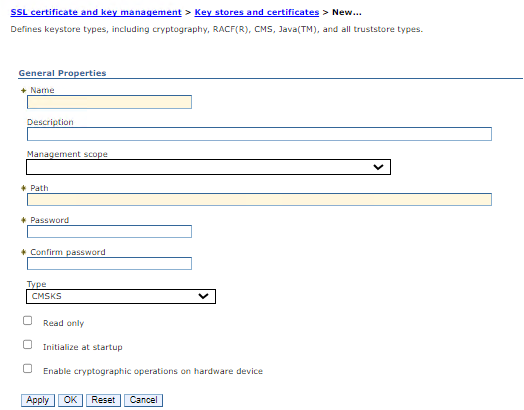
b) We need to fill this page to add the attributes from our old CMSKeystore.
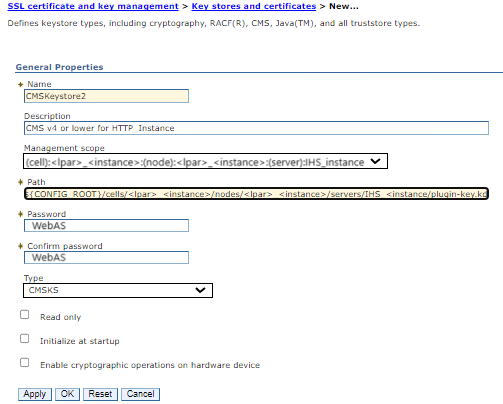
Name: CMSKeystore2
Description: CMS v4 or lower for HTTP_Instance
Management scope: (cell):<lpar>_<instance>:(node):<lpar>_<instance>:(server):IHS_instance
Path: "${CONFIG_ROOT}/cells/<lpar>_<instance>/nodes/<lpar>_<instance>/servers/IHS_<instance/plugin-key.kdb"
Password: WebAS
Type: CMSKS
Ensure that you are provide the exact Management scope and Path as recorded from the old CMSKeystore attributes taken from step 6.
Additional information about CMS Keystore attributes and values can be found in our Knowledge Center.
c) Once all the attributes are filled, click "OK".
d) You need to confirm update to the master configuration by clicking "Save".
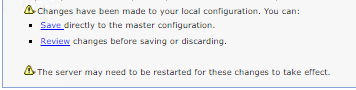
Note: If you are seeing errors and red instructions above this box, click on "Review" and then "Discard". After discarding, the WASADM console will take you back to the WASADM home. You need to review step 6. again and the menu location WASADM > Security > SSL certificate and key management > Keystores and certificates. Review the old CMSKeystore again and ensure that there were no syntax errors. If you already attempted this multiple times, contact IBM Technical Support for more assistance or questions.
e) After successfully saving your master configuration it takes you back to your keystore list.
7) We now need to copy all the certificates and signers to the new CMSKeystore2.
a) Click on the NodeDefaultKeystore. If you do not have this keystore, it maybe labeled different.
Note: Review the Path location of the keystores that you do currently have. The name of the file might help you give a clue on the correct keystore. Key.p12 is typically a keystore while Trust.p12 would be a truststore.
ex: ${CONFIG_ROOT}/cells/<lpar>_<instance>/nodes/<lpar>_<instance>/key.p12
ex: ${CONFIG_ROOT}/cells/<lpar>_<instance>/nodes/<lpar>_<instance>/trust.p12
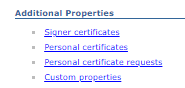
b) On the next page we want to click on "Personal Certificates" under the Additional Properties section.
c) Next select (checkbox) the certificates that you would like to export to the new CMSKeystore2. Depending on your environment you can have multiple certificates to export.
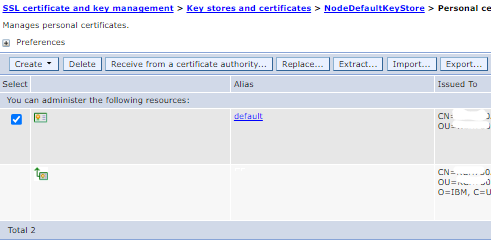
d) Click on the "Export" button. We need to fill in the attributes for CMSKeystore2.
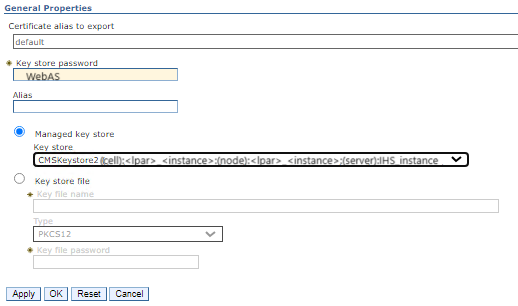
Key store password: WebAS
Managed key store: CMSKeystore2 (cell):<lpar>_<instance>:(node):<lpar>_<instance>:(server):IHS_instance
Ensure that we have provided the correct details as shown above. Ensure that we have selected Managed key store option and selected the correct dropdown box for CMSKeystore2.
e) Click "OK" to save details.
f) You need to confirm update to the master configuration by clicking "Save".

Note: If you are seeing errors and red instructions above this box, click on "Review" and then "Discard". After discarding, the WASADM console will take you back to the WASADM home. You need to goto menu location WASADM > Security > SSL certificate and key management > Keystores and certificates. Please verify one or more certificates that you have selected to export. Most likely a certificate(s) is expired or invalid to export. If you have attempted this multiple time, please contact IBM Technical Support to assist or answer questions you might have.
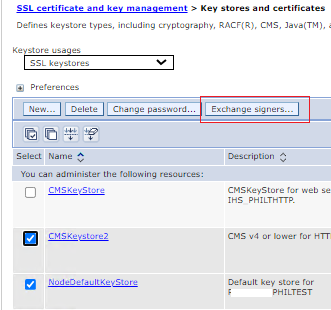
g) After successfully updating the master configuration file, we need to Exchange Signers between the NodeDefaultKeystore and the CMSKeystore2. Click on "Keystores and certificates" at the top of the page.
Select/checkbox for both NodeDefaultKeystore and CMSKeystore2. Click "Exchange signers" at the top of the page.
Note: Again if you have a different labeled NodeDefaultKeystore, review step 8) a.
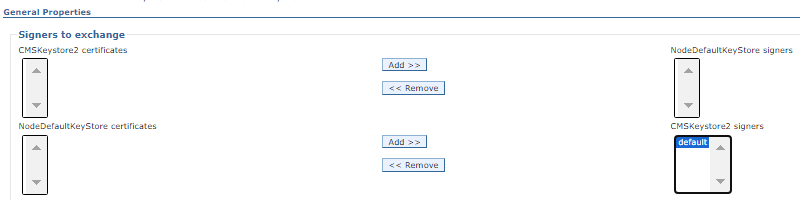
h) On the next page we see signer certificates listed for NodeDefaultKeystore.
If we see no signers listed for CMSKeystore2, we must click "Add" from the NodeDefaultKeyStore certificates. If we do see signers listed in the CMSKeystore2, we must verify if it contains the correct signers (same as NodeDefaultKeystore).
Click "OK" at the bottom to update.
Note: If there is no signers needed exchanged, then we can click "Cancel" and continue to the next step 9.
i) You need to confirm update to the master configuration by clicking "Save".

Note: If you are seeing errors and red instructions above this box, click on "Review" and then "Discard". After discarding, the WASADM console will take you back to the WASADM home. You need to goto menu location WASADM > Security > SSL certificate and key management > Keystores and certificates. Please verify the keystores that you have selected/checkbox are indeed the correct keystores. Most likely you are attempting to exchange signers certificates between incorrect keystores. If you have already attempted this multiple times, contact IBM Technical Support for more assistance or questions.
8) You need to copy the web server key database file, generate and propagate the plugin.
Forward to Servers > Server Types > Web servers > Click your <IHS Instance>
a) Click on "Plug-in Properties" under Additional Properties.
b) Click on "Copy to Web server key store directory".
c) Click "Apply" at the bottom of the page.
d) You need to confirm update to the master configuration by clicking "Save".
Note: If you are seeing errors and red instructions above this box, click on "Review" and then "Discard". After discarding, the WASADM console will take you back to the WASADM home. You need to goto menu location WASADM > Servers > Server Types > Web servers > Click <IHS Instance>. Try and attempt step 9 again. If you have already attempted this multiple times, contact IBM Technical Support for more assistance or questions.
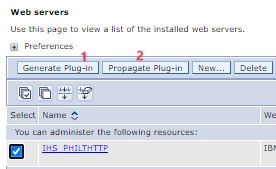
e) We want to generate and propagate the plugin. Select/checkbox the IHS instance. Then, click "Generate Plug-in". Select the IHS instance again, then, click "Propagate Plug-in".
f) Restart your Websphere Application Server.
STRQSH
cd /QIBM/UserData/Websphere/Appserver/<Version>/<Type>/profiles/<Instance>/bin
stopServer
startServer
where Version = V85,V9 etc
where Type = Express, Base, etc.
You may also want to access HTTPAdmin to administrate your Websphere Servers.
Further information about starting your Websphere Application Server can be located in our Knowledge Center.
g) To verify the CMS version of the plugin-key.kdb we can review the hex code (F10) for the file.
WRKLNK '${CONFIG_ROOT}/cells/<lpar_APPServer>/nodes/<lpar_APPServer/servers/<IHS_Instance>/plugin-key.kdb'
Congratulations, you have completed the steps necessary to ensure the CMS key store is valid and functional on the IBM i. You may want to re-enable global security. Please review Additional Resources for details.
Additional Resources:
HowTo install WAS v8.0 & v8.5.5 fixpacks:
https://www.ibm.com/support/pages/node/645197
iFixes:
https://www.ibm.com/support/pages/node/611243
HowTo install WAS v9.0.5 fixpacks:
https://www.ibm.com/support/pages/node/667053
iFixes:
https://www.ibm.com/support/pages/node/715559
Setting the Websphere plug-in UseInsecure=True workaround:
https://www.ibm.com/support/pages/node/645163
To re-enable global security you may review this documentation:
https://www.ibm.com/docs/en/was/9.0.5?topic=security-enabling
Related Information
Document Location
Worldwide
[{"Type":"MASTER","Line of Business":{"code":"LOB57","label":"Power"},"Business Unit":{"code":"BU058","label":"IBM Infrastructure w\/TPS"},"Product":{"code":"SWG60","label":"IBM i"},"ARM Category":[{"code":"a8m0z0000000CHUAA2","label":"WebSphere Application Server"}],"ARM Case Number":"","Platform":[{"code":"PF025","label":"Platform Independent"}],"Version":"All Versions"}]
Was this topic helpful?
Document Information
Modified date:
25 January 2024
UID
ibm17096469