Troubleshooting
Problem
Environment
Resolving The Problem
o If an Apache HTTP Server needs to be created, follow the "Create a New HTTP Server" wizard under Setup in the IBM Web Administration Console under http://<serverName>:2001 URL.
o If the IBM Web Administration Console is unavailable, refer to IBM Technical document, How to Manually Create a HTTP Server, for information on how to manually create an IBM i HTTP Server instance.
Assumption: An IBM WebSphere Application Server Profile V6.1 or later exists and is functional.
o If an IBM WebSphere Application Server V6.1 or later profile needs to be created, follow the "Create a New Application Server" wizard under Setup in the IBM Web Administration Console under http://<serverName>:2001 URL.
o If the IBM Web Administration Console is unavailable, refer to IBM Knowledge Center article on the manageprofiles command for information on how to manually create an IBM WebSphere Application Server Profile V6.1 and later. i.e. manageprofiles -create -profileName <name> -startingPort <port>
Step 1: Create a new Web Server Definition
NOTE: If you would like to customize the node name the web server is created under, IBM recommends you use the configureOS400WebServerDefinition script in Option B.
Option A: Create a new Web Server Definition through the Integrated Solutions Console
| 1. | Open a web browser and navigate to the Integrate Solutions Console (in other words, WebSphere Administration Console). You can also find a link to the console in the IBM Web Administration Console (http://<serverName>:2001/HTTPAdmin) by clicking on Manage -> Application Servers -> select your application server from the drop down menu -> Select "Launch Administrative Console" under the Tools section in the left-hand vertical menu. |
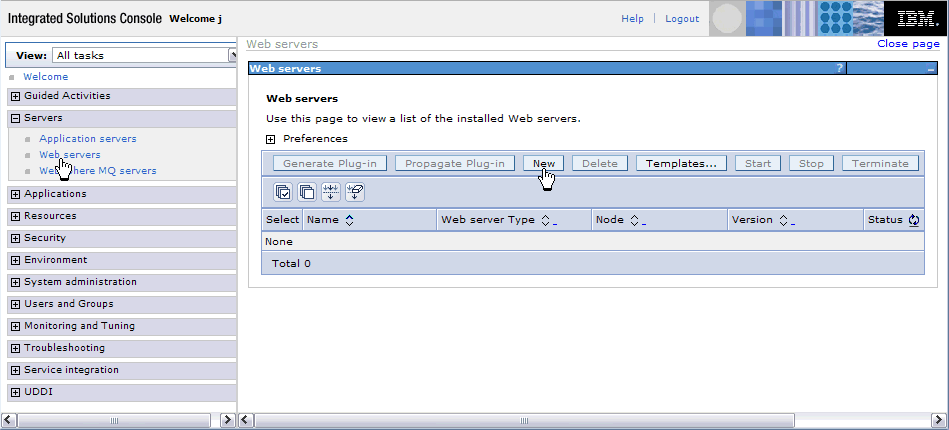
| 2. | Once you are in the Integrated Solutions Console, select Servers -> Web servers (v7.0 and later: Servers -> Server Types -> Web servers) from the left-hand vertical menu as shown in the screen shot. |
| 3. | Click on the "New" button to create a new web server definition through the wizard. |
| 4. | Step 1 requests the web server name, type, host name, and platform be specified. Server name: The name of the Apache HTTP Server you wish to associate with the WebSphere Application Server Profile. Type: IBM HTTP Server Host name: The server host name specified in CFGTCP (Configure TCP) Option 12 (Usually the system name) Platform: OS/400 After the required parameters are entered, press Next to continue to Step 2. |

| 5. | Step 2 requires you to specify a web server template. By default, only one template is displayed and selected; IHS. If it is not selected, select it. Then, press Next to continue to Step 3. |

| 6. | Step 3 requires you to enter the properties for the new web server. Port: The port number the Apache HTTP Server is specified to listen on. This can be found in the /www/<serverName>/conf/httpd.conf file next to the "Listen" configuration directive. For this example, I used the default HTTP port, 80. Web server installation location: The location where the Apache HTTP Server was installed. Usually, the default value is valid since /www/<serverName> is the default installation location. In most cases, no changes need to be made. Web server Instance Name: The name of the Apache HTTP Server. This value should be automatically carried over from the Server name parameter value you specified in Step 1. Plug-in installation location: The location where the web server plug-in will be created. The default value specified is valid. No changes need to be made. Application mapping to the Web server: The application web modules that will be mapped to the web server. The default and recommended value is "All". No changes need to be made. Under the "Enter the IBM Administration Server properties." Port: The port number the ADMIN HTTP Server is specified to listen on. The default value is 2001. No changes need to be made. Username: A valid IBM i user profile name. Password/Confirm password: The password assigned to the username specified. After the required parameters are entered, press Next to continue to Step 4. |

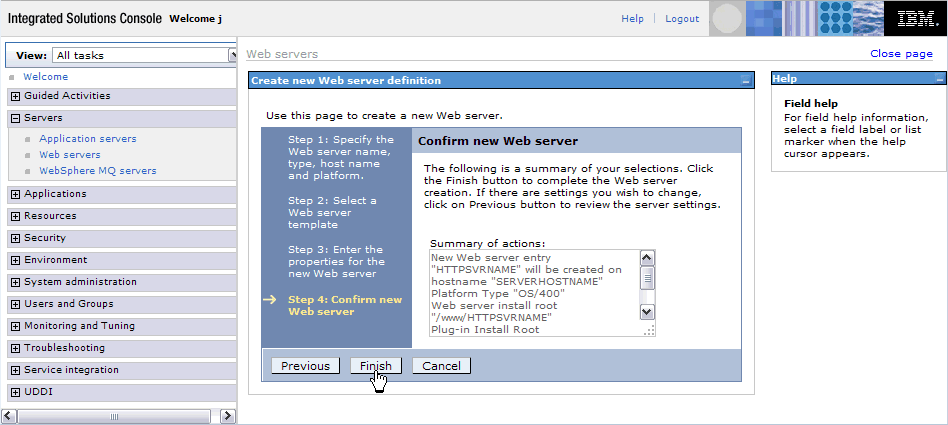
| 7. | Step 4 provides you with a summary of the configuration actions for the creation of a new web server definition. Please review these items. If a change needs to be made to one or more items, press the Previous button. Once you have confirmed the configuration, press the Finish button to create the new web server definition. |
| 8. | After the new web server is created, you will be prompted to save your changes directly to the master configuration. Click on the Save link as shown below to save your changes. You will also notice your new web server is now listed in the table as shown below. |

Option B: Execute the configureOS400WebServerDefinition Command
The configureOs400WebServerDefinition command creates a web server definition in a WebSphere Application Server or deployment manager profile.
The configureOs400WebServerDefinition command can be used to associate a local as well as a remote HTTP server. This document will only reference how to associate an IBM i Apache HTTP Server running on the same partition as the WebSphere Application Server Profile.
To run this command, your user profile must have *ALLOBJ authority.
| 1. | Type QSH on the CL command line to enter the Qshell Interpreter. |
| 2. | Change directory to the <product_root>/bin directory. WebSphere Application Server V6.1, V7.0, V8.0, V8.5, V9.0: cd /QIBM/ProdData/WebSphere/AppServer/<version>/<edition>/bin where <version> = V61, V7, V8, V85, V9 and <edition> = Express, Base, ND |
| 3. | Execute the configureOs400WebServerDefinition command. Refer to the example and URL below for more information. After the execution of this command, you should see an IHS Web Server definition in the Integrated Solutions Console under Servers -> Web Servers for the Apache HTTP Server. The name of the web server should be something like IHS_ApacheHTTPServer. NOTE: You can determine the node name of your application server using the "dspwasinst -profileName profile" WAS administrative command or by displaying the application server information in the WebSphere Application Server Integrated Solutions Console under Servers -> Server Types -> WebSphere Application Servers. Example: configureOs400WebServerDefinition -webserver.name <ApacheHTTPServer> -profileName <WASprofileName> -webserver.port <ApacheHTTPport> -webserver.node=<NodeName> -webserver.name This parameter is optional when -webserver.instance.name is specified. The value of webserverName specifies the name of the web server definition. The default value is webserverType_webserverInstanceName. -profileName This is an optional parameter. The value profile1 specifies the profile where the web server definition will be configured. The default value is default. -webserver.port This is an optional parameter. The value specifies the listening port of the web server. The default is 80. -webserver.node This is an optional parameter. The webserverNode value specifies the node name of the web server definition. The default value is hostName-node. This parameter cannot be used with the -webserver.host parameter. Please specify one or the other. For detailed information on the command, refer to the following URL: http://www-01.ibm.com/support/knowledgecenter/SSAW57_8.5.5/com.ibm.websphere.nd.iseries.doc/ae/rxml_configos400.html?lang=en |
Step 2: Generate the Web Server Plug-in File and Copy the Plug-in Keystore File
| 1. | Open a web browser and navigate to the Integrate Solutions Console (in other words, the WebSphere Administration Console). You can also find a link to the console in the IBM Web Administration Console (http://<serverName>:2001/HTTPAdmin) by clicking on Manage -> Application Servers -> select your application server from the drop down menu -> Select "Launch Administrative Console" under the Tools section in the left-hand vertical menu. |
| 2. | Once you are in the Integrated Solutions Console, select Servers -> Web servers from the left-hand vertical menu as shown below. |
| 3. | To generate the plug-in, select the web server by clicking on the empty check box under the Select column. Then, click on the Generate Plug-in button as shown below. See image 2a. |
| 4. | After the plug-in has been generated, write down the full path to the plug-in configuration file as shown in the PLGC0005I message. An example of what to write down follows: /QIBM/UserData/WebSphere/AppServer/V9/Base/profiles/jared9/config/cells/AS400_jared9/nodes/AS400-node /servers/IHS_AS400/plugin-cfg.xml The path to the plugin-cfg.xml file that will be needed later on is included in Step 3: Modify the Apache HTTP Server Configuration File. |
| 5. | Click on the web server name under Servers -> Server Types -> Web Server. |
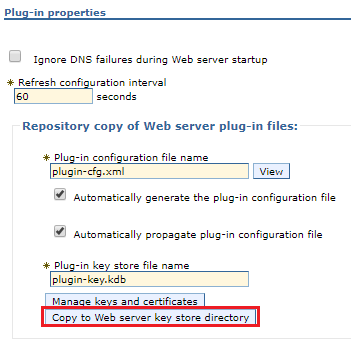
| 6. | Click on Plug-in properties under Additional Properties. |
| 7. | Click on the Copy to Web server key store directory button under Repository copy of Web server plug-in files. See Image 2b. |
Image 2a.

Image 2b.
Step 3: Modify the Apache HTTP Server Configuration File
Locate your Apache HTTP Server's configuration file and then add the following lines to the beginning of the file. The Apache HTTP Server's configuration file is usually located in /www/<apacheServerName>/conf/httpd.conf.
| 1. | Identify your WAS installation library. STRQSH cd /QIBM/ProdData/WebSphere/AppServer/<version>/<edition>/bin ./queryWASinstalls where <version> = V61, V7, V8, V85, V9 and <edition> = Express, Base, ND The output of the command should look something like this: ---------------------------------------------------------------------------- Websphere Edition: EXPRESS Version: 8.5.5.2 Installation Location: /QIBM/ProdData/WebSphere/AppServer/V85/Express Installation Library: QWAS85F Default Profile Location: /QIBM/UserData/WebSphere/AppServer/V85/Express ---------------------------------------------------------------------------- In the example above, the installation library is defined as "QWAS85F". This would be the library you would use in place of the <INSTALL_LIBRARY> variable. <INSTALL_LIBRARY> = Installation Library |
| 2. | From a CL command line, enter the following. WRKLNK OBJ('/www/<apacheServerName>/conf/httpd.conf') |
| 3. | Enter 2 in the Opt column to edit the file. |
| 4. | Add the following configuration directives based on your version and release of the operating system and WebSphere Application Server: IBM i 7.3, 7.4, & 7.5 WebSphere Application Server V8.5 & 9.0: WebSpherePluginConfig /QIBM/UserData/WebSphere/AppServer/<version>/<edition>/profiles/<profileName>/config/cells/<cellName>/nodes/<nodeName>/servers/<IHSserverName>/plugin-cfg.xml LoadModule was_ap20_module /QSYS.LIB/<INSTALL_LIBRARY>.LIB/QSVTAP24.SRVPGM where <version> = V85, V9; <edition> = Express, Base, ND IBM i 7.2 WebSphere Application Server V8.0, 8.5, & 9.0: WebSpherePluginConfig /QIBM/UserData/WebSphere/AppServer/<version?/<edition>/profiles/<profileName>/config/cells/<cellName>/nodes/<nodeName>/servers/<IHSserverName>/plugin-cfg.xml LoadModule was_ap20_module /QSYS.LIB/<INSTALL_LIBRARY>.LIB/QSVTAP24.SRVPGM where <version> = V8, V85, V9; <edition> = Express, Base, ND IBM i 7.1 WebSphere Application Server V6.1, V7.0, V8.0, V8.5, V9.0: WebSpherePluginConfig /QIBM/UserData/WebSphere/AppServer/<version>/<edition>/profiles/<profileName>/config/cells/<cellName>/nodes/<nodeName>/servers/<IHSserverName>/plugin-cfg.xml LoadModule was_ap20_module /QSYS.LIB/<INSTALL_LIBRARY>.LIB/QSVTAP22LF.SRVPGM where <version> = V61, V7, V8, V85, V9; <edition> = Express, Base, ND IBM i 6.1 WebSphere Application Server V8.5 WebSpherePluginConfig /QIBM/UserData/WebSphere/AppServer/V85/<edition>/profiles/<profileName>/config/cells/<cellName>/nodes/<nodeName>/servers/<IHSserverName>/plugin-cfg.xml LoadModule was_ap20_module /QSYS.LIB/<INSTALL_LIBRARY>.LIB/QSVTAP22.SRVPGM WebSphere Application Server V8.0: WebSpherePluginConfig /QIBM/UserData/WebSphere/AppServer/V8/<edition>/profiles/<profileName>/config/cells/<cellName>/nodes/<nodeName>/servers/<IHSserverName>/plugin-cfg.xml LoadModule was_ap20_module /QSYS.LIB/<INSTALL_LIBRARY>.LIB/QSVTAP22.SRVPGM WebSphere Application Server V7.0: WebSpherePluginConfig /QIBM/UserData/WebSphere/AppServer/V7/<edition>/profiles/<profileName>/config/cells/<cellName>/nodes/<nodeName>/servers/<IHSserverName>/plugin-cfg.xml LoadModule was_ap20_module /QSYS.LIB/QHTTPSVR.LIB/QSVT2270.SRVPGM WebSphere Application Server V6.1: WebSpherePluginConfig /QIBM/UserData/WebSphere/AppServer/V61/<edition>/profiles/<profileName>/config/cells/<cellName>/nodes/<nodeName>/servers/<IHSserverName>/plugin-cfg.xml LoadModule was_ap20_module /QSYS.LIB/QHTTPSVR.LIB/QSVTAP22.SRVPGM WebSphere Application Server V6.0: WebSpherePluginConfig /QIBM/UserData/WebSphere/AppServer/V6/<edition>/profiles/<profileName>/config/cells/<cellName>/nodes/<IHSnodeName>/servers/<IHSserverName>/plugin-cfg.xml LoadModule was_ap20_module /QSYS.LIB/QWAS6.LIB/QSVTAPGT.SRVPGM IBM i 5.4 WebSphere Application Server V7.0: WebSpherePluginConfig /QIBM/UserData/WebSphere/AppServer/V7/<edition>/profiles/<profileName>/config/cells/<cellName>/nodes/<nodeName>/servers/<IHSserverName>/plugin-cfg.xml LoadModule was_ap20_module /QSYS.LIB/<<INSTALL_LIBRARY>.LIB>/QSVTAP20.SRVPGM WebSphere Application Server V6.1: WebSpherePluginConfig /QIBM/UserData/WebSphere/AppServer/V61/<edition>/profiles/<profileName>/config/cells/<cellName>/nodes/<IHSnodeName>/servers/<IHSserverName>/plugin-cfg.xml LoadModule was_ap20_module /QSYS.LIB/<<INSTALL_LIBRARY>.LIB>/QSVTAP20.SRVPGM WebSphere Application Server V6.0: WebSpherePluginConfig /QIBM/UserData/WebSphere/AppServer/V6/<edition>/profiles/<profileName>/config/cells/<cellName>/nodes/<IHSnodeName>/servers/<IHSserverName>/plugin-cfg.xml LoadModule was_ap20_module /QSYS.LIB/QWAS6.LIB/QSVTAP20.SRVPGM |
| 5. | Press F3 two times to Save/Exit, once you have added the necessary configuration lines. |
Step 4: Modify the Virtual Host
| 1. | Open a web browser and navigate to the Integrate Solutions Console (in other words, the WebSphere Administration Console). You can also find a link to the console in the IBM Web Administration Console (http://<serverName>:2001/HTTPAdmin) by clicking on Manage -> Application Servers -> select your application server from the drop down menu -> Select "Launch Administrative Console" under the Tools section in the left-hand vertical menu. |
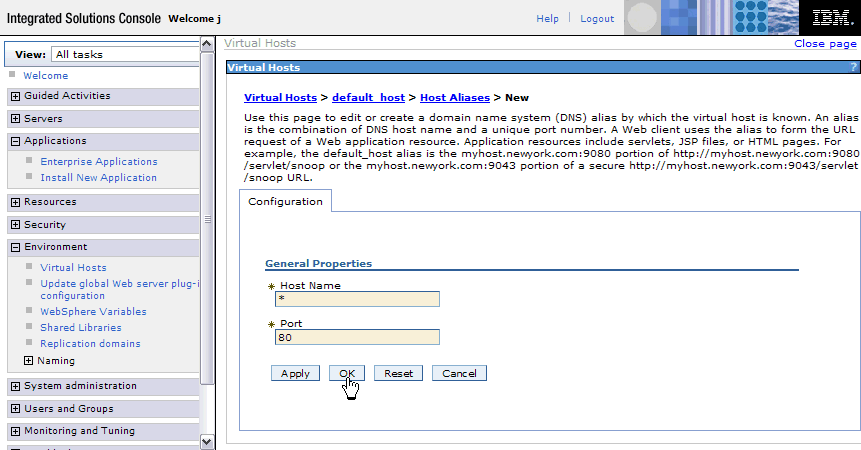
| 2. | Once you are in the Integrated Solutions Console, select Environment -> Virtual Hosts from the left-hand vertical menu as shown below. |
| 3. | Select default_host or whichever virtual host you have assigned to your WebSphere Application Server. |

| 4. | Select Host Aliases to display the host alias list. |

| 5. | Verify the Apache HTTP Server port is not in the list. If the Apache HTTP Server port is in the list, go to Step 5: Manage Enterprise Application Modules. |
| 6. | If the Apache HTTP Server port is not in the Host Alias list, click on the "New" button to add a new host alias. |

| 7. | Enter the Host Name and the Port Number the Apache HTTP Server is listening on. If you do not know this, you may find this information on the "Listen" directive in the /www/<apacheServerName>/conf/httpd.conf file. Click OK to add the new host alias. |
| 8. | Save your changes to the master configuration. You should now see the new host alias in the list of Host Aliases under the Virtual Host (in other words, default_host). |
Step 5: Manage Enterprise Application Modules
| 1. | Open a web browser and navigate to the Integrate Solutions Console (in other words, the WebSphere Administration Console). You can also find a link to the console in the IBM Web Administration Console (http://<serverName>:2001/HTTPAdmin) by clicking on Manage -> Application Servers -> select your application server from the drop down menu -> Select "Launch Administrative Console" under the Tools section in the left-hand vertical menu. |
| 2. | Once you are in the Integrated Solutions Console, select Applications -> Enterprise Applications (v7.0 and later: Applications -> Application Types -> WebSphere enterprise applications) from the left-hand vertical menu as shown below. |
| 3. | Click on your enterprise application name you wish to access externally through the Apache HTTP Server (in other words, DefaultApplication.ear) |

| 4. | Refer to your version of WebSphere Application Server. WebSphere Application Server V7.0 and later: a) Select "Manage Modules" under Modules on the Configuration tab. |

| WebSphere Application Server V6.0: b) Select Map modules to servers under Additional Properties on the Configuration tab. |

| 5. | Highlight all items in the Clusters and Servers box. |
| 6. | Click on the check box next to the Enterprise Application Module under the Select column. |
| 7. | Select Apply next to the Clusters and Servers box. |
| 8. | Click OK. |

| 9. | Finally, restart the Apache HTTP Server and the WebSphere Application Server Profile to complete the association. |
| 10. | Congratulations! You have successfully manually associated an Apache HTTP Server with a WebSphere Application Server Profile. You can now access your Enterprise Application through the Apache HTTP Server port (in other words, http://<serverName>:80/myapplication) |
Historical Number
498047715
Was this topic helpful?
Document Information
Modified date:
11 July 2023
UID
nas8N1018700