Question & Answer
Question
How do you install or upgrade WebSphere Application Server V8.5.x to support IBM® Rational ClearCase CCRC WAN server and IBM® Rational ClearQuest Web server V8.0.1?
Cause
When you upgrade Rational® web components to V8.0.1, you have the option to deploy the components on WebSphere Application Server V8.5.x.
Before you can deploy the upgraded Rational® web components, either upgrade the existing WebSphere Application Server to the new version or a separate V8.5.x instance.
Answer
ClearCase® and ClearQuest® V8.0.1 web components support deployment in WebSphere Application Server version 8.0.0.x and 8.5.x.
Depending on the Rational® product version installed and the WebSphere Application Server version used for deployment, upgrading to ClearCase® CCRC WAN server or ClearQuest® Web server V8.0.1 might require installing a new instance of the WebSphere Application Server and IBM HTTP Server or upgrading the existing version.
Install a new instance of WebSphere Application Server 8.5.x in any of the following cases:
- When you upgrade from ClearCase® or ClearQuest® V7.1.1.x, V7.1.2.x to V8.0.1
- When you upgrade from a ClearCase® or ClearQuest® V8.0 or V8.0.0.1 installation deployed to WebSphere Application Server V7.0.x
If you are upgrading to ClearCase® or ClearQuest® V8.0.1 from a V8.0.0.x installation deployed to WebSphere Application Server V8.0.0.x, you have the option to upgrade the existing WebSphere Application Server to version 8.5.x or to continue using WebSphere Application Server V8.0.0.x.
This technote provides instructions for installing a new instance of WebSphere Applications Server V8.5.x.x that can be used to deploy ClearCase® CCRC WAN server or ClearQuest® Web server V8.0.1 or later.
See the IBM Support article: Upgrading ClearCase, ClearQuest or RequisitePro web components to use WebSphere Application Server and IBM HTTP Server V8.x for more detailed information about the following installation and upgrade tasks:
- Matrix of supported installation, upgrade, and roll back scenarios
- Information about upgrading an existing installation of WebSphere Application Server and IBM HTTP Server components.
- Instructions for upgrading ClearCase® and ClearQuest® web components and deploying or redeploying them to the WebSphere Application Server
Instructions for installing a new instance of IBM® Rational WebSphere Application Server V8.5.x
Contents
- You can obtain IBM® WebSphere Application Server and IBM HTTP Server V8.5.x from IBM® Passport Advantage at www.ibm.com/software/passportadvantage. Fixpacks are available from IBM® Support Fix Central at http://www.ibm.com/support/fixcentral/.
- Note: WebSphere Application Server and IBM HTTP Server V8.5.x are not supported by IBM® Rational ClearCase and IBM® ClearQuest V8.0.0.x and earlier.
- Complete this task if you are upgrading ClearCase® and ClearQuest® web components to V8.0.1 and want to deploy the product components to WebSphere Application Server and IBM HTTP Server V8.5.x.
Note: WebSphere Application Server and IBM® HTTP Server V8.5.x are not supported by IBM® Rational ClearCase and IBM® ClearQuest V8.0.0.x and earlier.
Use IBM Installation Manager
Beginning with V8.0, WebSphere Application Server and IBM® HTTP Server V8.0 and later are installed using IBM® Installation Manager (IM). This allows you to install multiple components at the same time. At this time, you cannot install Rational® web components at the same time that you install WebSphere Application Server and IBM® HTTP Server. You must install WebSphere and HTTP Server first, and then install Rational® web components.
Overview
You can obtain IBM® WebSphere Application Server and IBM® HTTP Server V8 from IBM® Passport Advantage at www.ibm.com/software/passportadvantage. Fixpacks are available from IBM® Support Fix Central at http://www.ibm.com/support/fixcentral/.
- Using Installation Manager, install IBM® WebSphere Application Server, IBM® HTTP Server for WebSphere Application Server, Web Server Plug-ins for IBM® WebSphere Application Server, and the WebSphere Customization Toolbox.
- Optional. Configure the web server for secure communication with the application server by using the Web Server Plug-ins Configuration Tool included in the WebSphere Customization Toolbox.
Note: Complete this step if you want to secure the communication between the WebSphere Application server and the Rational web components with SSL.
- Install or upgrade your Rational product, including web server components.
Restrictions
Before you begin an installation of WebSphere Application Server V8, be aware of the following restrictions:
- Make sure you prepare your operating system for WebSphere and IBM® HTTP Server.
- Refer to technote 1573966 (Known issues and limitations found while installing or configuring WebSphere Application Server and IBM HTTP Server v8.0 to work with IBM Rational ClearCase 8.0.0.x, IBM Rational ClearQuest 8.0.0.x or IBM Rational RequisitePro 7.1.3.1) for known issues installing and configuring WAS/IHS V8 for CC/CQ/ReqPro.
- Do not use symbolic links as the destination directory. Symbolic links are not supported.
- Do not use a semicolon in the directory name. WebSphere Application Server cannot install properly if the target directory includes a semicolon. A semicolon is the character used to construct the class path on Windows systems.
- The maximum path length for the installation location on the Windows Server 2008, Windows Vista, and Windows 7 operating systems is 60 characters.
- Deleting the default target location and leaving an installation directory field empty prevents you from continuing.
- If you support any of the following web features, you must install WebSphere Application Server 32-bit edition: ReqPro: ReqWeb and Reporting Server; ClearQuest®: Full Text Search, Report Launcher (data pull reports). These features are not supported on the 64-bit edition.
- Start Installation Manager.
- Add the installation repository for WebSphere Application Server:
- Click File > Preferences.
- Add the installation repository for WebSphere Application Server in the Repositories section on the Preferences panel.
Installation Manager Tip:
Select the Search service repositories during installation and updates on the Installation Manager Repository preference page (File->Preferences). Then, if you are connected to the Internet while you install, you can click Check for Other Versions and Extensions to search for updates in the default update repositories for the selected packages. In this case, you do not need to add the specific service-repository URL to the Installation Manager Repository preference page.
- Click Install at the main Installation Manager screen.
- At the Install Packages panel, select the following packages for installation:
- IBM® WebSphere Application Server
- IBM® HTTP Server for WebSphere Application Server
- Web Server Plug-ins for IBM® WebSphere Application Server
- WebSphere Customization Toolbox
If you have another version of WebSphere Application Server and IBM® HTTP Server installed on the system, click Yes when you are prompted to install the WebSphere Application Server in a new package group. - Optional. If you enabled the Search service repositories during installation and updates option, check for package version updates, fixes, and extensions.
- Select the Show all versions option. Then, click Check for Other Versions and Extensions to find and load available updates for the selected packages..
If you have not authenticated to the IBM® server, you are prompted to enter an IBM® user name and password authorized to access the service repositories. - When the search completes, review the Summary information for the package updates that were found. Then, click OK.
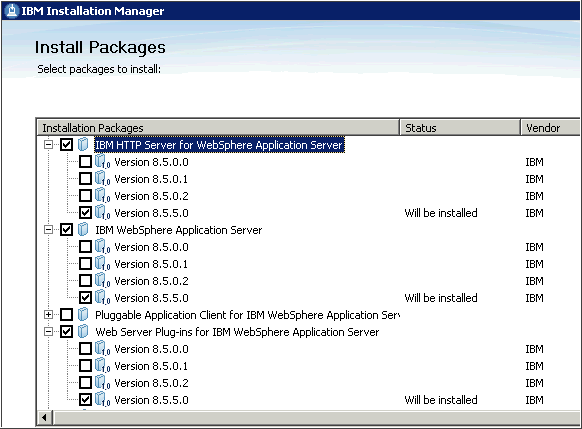
Figure 1 shows the updated package list which includes the available updates with the recommended package version selected by default.
Figure 1: Select WebSphere Application Server packages to install
- Click Next to view the available fixes for the selected packages.
- To install the selected package versions and fixes, click Next.
- Select the Show all versions option. Then, click Check for Other Versions and Extensions to find and load available updates for the selected packages..
- Accept the license agreement, and then click Next.
- On the Shared Resources Directory panel, review any installation warnings and instructions.
- Set the directory path for IBM® Installation Manger shared resources. Then, click Next.
- Optional. To modify the package group installation directory for a component, click the component name in the Package Group Name listing. Then, update the Installation Directory path as required.
Note: If you change the installation directory of either the Web Server Plugins or the Customization Toolbox, you might need to make the same change for the IBM® HTTP Server and the WebSphere Application Server. Do not specify a location that is already in use by another WebSphere Application Server and IBM® HTTP server instance on the same system. - Select your translation choices. Click Next.
- Verify that the following components are included in the Features listing.
- IBM® WebSphere Application Server
- IBM® HTTP Server for WebSphere Application Server
- Web Server Plug-ins for IBM® WebSphere Application Server
- WebSphere Customization Toolbox - Accept the default selections. Then, click Next.
- Specify the port number for the IBM® HTTP Server configuration.
To avoid port conflicts, accept the default value, port 80. - Windows only. Choose whether to run the IBM® HTTP Server as a Windows service.
- You can configure the service to run as a local system account or a user ID that you specify. The user ID requires the following advanced user rights:
- Act as part of the operating system.
- Log in as a service.
- Accept the default startup type, Automatic.
Important: If you do not select Run IBM HTTP Server as a Windows Service, this instance of IBM® HTTP Server cannot be stopped or started by the WebSphere Application Server administrative console. At any time after installation, you can create a service by running the following command: ihs_root/bin/httpd.exe -n new_service_name -k install. After you create the service, update the web server definition in the administrative console to specify the new service name.
- You can configure the service to run as a local system account or a user ID that you specify. The user ID requires the following advanced user rights:
- Click Next.
- Review the summary information, and then click Install.
- If the installation is not successful or if error messages are displayed in the summary panel, review the installation log file. For troubleshooting information, see IBM® Support article #1573966.
- If the installation completes successfully, review the summary information.
- Optional. You can start installed components from the Start program list in the Installation Manager, or start them from the program shortcuts created during the WebSphere Application Server installation process.
- Click Finish to complete the WebSphere Application Server installation.
If you selected an application to start, the application starts after the Installation Manager exits. For further configuration instructions, see Post-installation steps.
Post-installation steps
Optional. Configure a Web plugin
- If you have not already run the Web Server Plug-ins Configuration Tool to configure the web server to communicate with the application server, see Configuring a web plug-in for IBM HTTP Server version 8 in the product information center.
On Windows, this tool requires user credentials for a built-in Administrator or a local user in the Administrator group. For details, see APAR PM46369.
Optional. Create a WebSphere Application Server application profile
- When you install IBM® Rational ClearCase and IBM® Rational ClearQuest web components to a WebSphere Application Server application profile, you can choose the Profile Deployment Type: new profile or existing profile. To determine which type of profile to use, see Using WebSphere Application Server profiles for web feature deployment.
If you plan to deploy the product web components to an existing WAS profile, make sure this profile has already been created. Run the WebSphere Application Server Profile Management Tool or use themanageprofilesscript to create a WAS profile. For instructions, see Managing profiles on non-z/OS operating systems in the WebSphere Application Server Information Center.
Upgrade Rational ClearCase CCRC WAN server and ClearQuest Web Server to V8.0.1
For additional information
Detailed information about installing and using WebSphere Application Server V8.5.x can be found in the WebSphere Application Server Information Center V8.5.
Additional information is available from the WebSphere Application Server at http://www.ibm.com/support/knowledgecenter/SSEQTP/mapfiles/product_welcome_was.html.
Was this topic helpful?
Document Information
Modified date:
23 November 2020
UID
swg21634430