Question & Answer
Question
How do you use FSCK (File System Consistency check)?
Answer
Answer
Sometimes you experience unexpected server outages or crashes. Also, there is a chance that the filesystem will get corrupted or damaged. When these issues occur, you can use the “fsck” command to check and repair the filesystem. FSCK stands for “File System Consistency check." Also, data loss is a possibility when you use this command so you should ensure that you have backup of your data before you proceed with the filesystem check.
If you have a file system that is in read-only state or has developed some sort of corruption, it needs to be repaired before it can be used again. In order to do so, it must go through a procedure called “file system check” or FSCK for short.
These errors can appear for many reasons: if you have a virtual instance, the disks are mounted from a network attached storage (NAS) and a problem in networking between the host server where your VSI is running and the storage can lead to data loss which manifests as bad data on your virtual disk.
If you have a real server with physical disks, they can develop bad blocks (areas that cannot be read/written anymore), they can have connectivity problems (bad cabling) or something else.
For any type of disk, data loss can also occur if the file systems are not unmounted (deactivated and detached) properly so a part of the data is not written correctly – file write transaction is then incomplete and OS might not know that some of the data is lost – like in a case when a server is forcefully restarted or powered down and not properly shut down.
Also, data loss can occur if the server has a load so big that it cannot sustain the required number of input/output operations and the disks simply do not have time to write everything down.
Whatever the reason, when data is not properly written on the disk, a number of errors might appear:
- Data is partially written and so is incomplete
- Data is not written correctly (is garbled)
- Data is written but the file system information about it is not updated
- Metadata is not written/changed correctly or is damaged
- Journal is damaged/inconsistent
- Data is deleted/destroyed
Some of these cases can be repaired easily and today’s file system repair tools can cope with most of the errors that are not repeated in large number, but sometimes it’s up to user to decide whether he wants fsck tools to try and fix data on their own or he wants to decide for each problem, or maybe first create a backup and then proceed with data repair.
It is important here to say that any file system check that does data repair can lead to DATA LOSS and so it is very important to have backups – created before the file system was corrupted or before the repair is started.
To have a specific file system repaired properly, it must not be in use – which means, it must not be “attached” or mounted to your operating system in read-write mode (changeable). It can be mounted in read-only mode but the safest solution is to have it un-mounted completely so that no processes (programs) are accessing it.
The safest way to have a file system un-mounted and thus properly fsck-ed is to not boot your usual operating system, but another one that can access your real or virtual hard drives and all partitions on them, thus having full access to all file systems as well.
In our environment, such special operating system is called “rescue layer” and you, as a user, can have all your servers boot into it in order to perform diagnostic and repair actions on your hard drives.
Rescue layer is created specifically for every user, since it has user’s administrative rights and credentials and specific network configuration, and is also OS dependent – one version exists for Linux servers and another one for Windows servers.
- Booting into rescue layer
In order to use rescue layer, you need to force your problematic server to reboot into it. That can be done through your user control portal (CP) if you have the appropriate privileges.
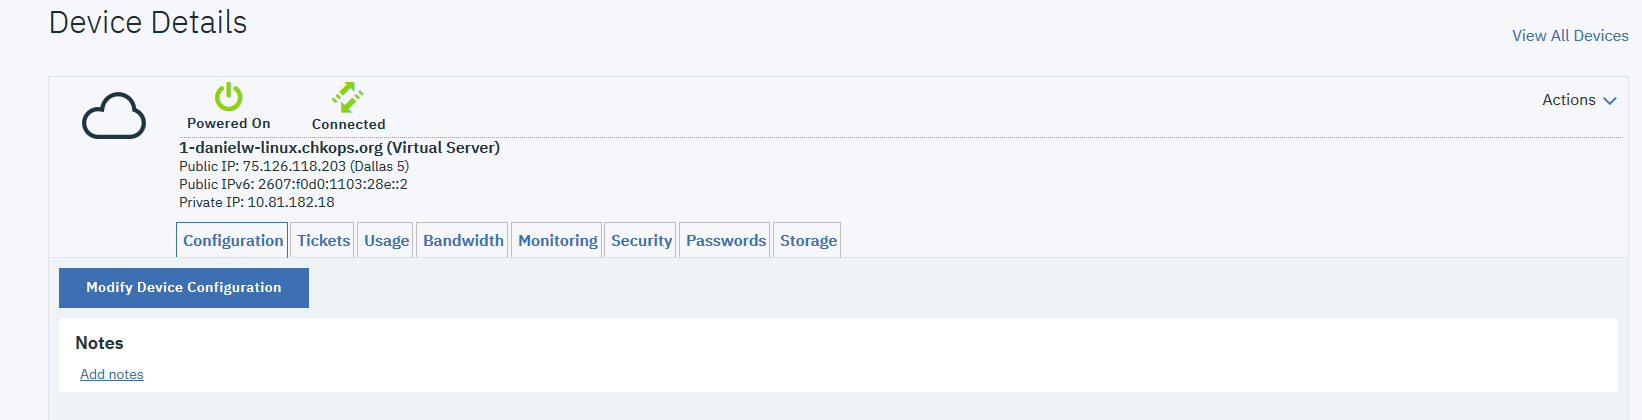
If you do, then you can start by locating your server in the device list from the Devices/Device List menu on the first page.
You will get a list of all your virtual and bare metal servers, something like this:

You need to click on the underlined name of your server from this list – not just a “>” sign, and that will open a page with device details:
As this was a quite lengthy explanation, here is the shorter version on this
The best way to check and repair the filesystem is to change the server to rescue mode. Complete the following steps:
- Click Devices > Device List in the control panel.
- Select the server that requires a filesystem check.
- Click Rescue from the Action drop-down menu. See the following screen shot:
The server is now in rescue mode.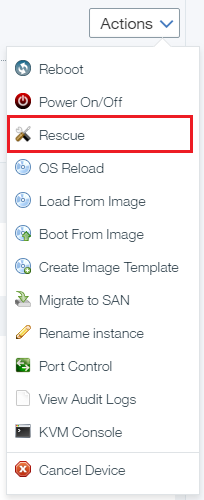
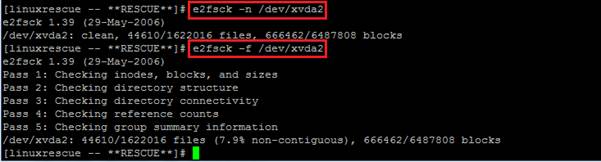
- ssh into the server and run “fsck” to filesystems that requires filesystem check and repair.
- Run fdisk -l list all disks. In the following screen shot, “Id” field has device type, “Id” 83 is Linux filesystem, and “Id” 82 is swap device.

EXT filesystem – ext2, ext3, ext4
All those filesystems use e2fsck (or just fsck) to check and repair the filesystem.

This previous screenshot shows that /dev/xvda1 is /boot filesystem and /dev/xvda2 is / filesystem. If there are any errors, fsck will prompt(y/n) you for an answer before making changes and then type “y” to fix the issues. When there are many errors, you can use the -y option, which automatically answers with “yes”. i.e. “e2fsck -y /dev/xvda1”.
Here are some useful options that you can also use:
-n : No modify mode, check only
-f : Force full check even if there is no recorded errors
-b superblock : Specify the block number of an alternative superblock if primary superblock is damaged.
-C : Display completion/progress bars
-y : Fix any detected filesystem corruption automatically
XFS Filesystem
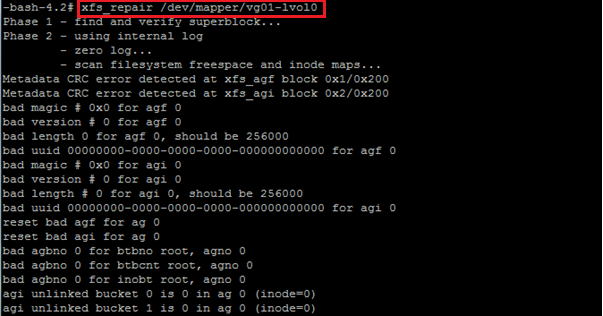
There is a different command for XFS filesystem which is “xfs_repair” with a few options.
-n : No modify mode, check only
Skip
LVM Filesystem
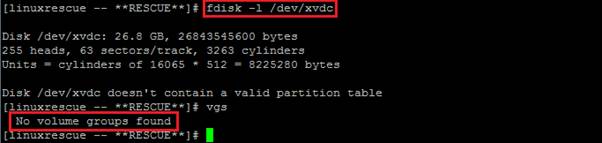
The VSI rescue mode does not activate LVM, by default. You need to manually activate the volume group if you have an LVM filesystem and would like to run a filesystem check. The following screen shot shows a scenario that has volume group on disk /dev/xvdc.

The following screen shot shows what happens when you change the server to rescue mode and you find that there is no activated volume group.
The following screen shows an activated volume group, ensures that the volume group is activated, and it contains the correct disk.
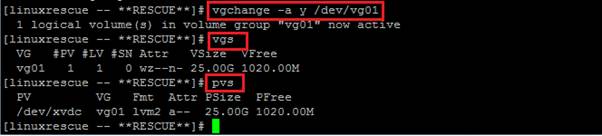
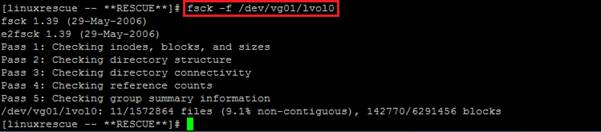
You can then run the filesystem to check the logical volume.
There is another scenario in which you have a LVM filesystem and you are unable to run the fsck command because your cannot activate LVM volume group in rescue mode i.e. Block Storage - iSCSI. In these cases, complete the following steps. The command “fsck” only run to unmounted filesystem. C
- Check whether filesystem is used by any application. See the following screen shot.
In this case, one or more processes is running on this filesystem and you cannot umount it.
- Comment out /data filesystem from /etc/fstab and reboot the server. Alternatively, stop or kill the process and umount the filesystem.
When the server is up and running after rebooting without mounting /data file system, you can run the filesystem check to /data filesystem. Do not forget to update the /etc/fstab file.
- Some errors that are possible
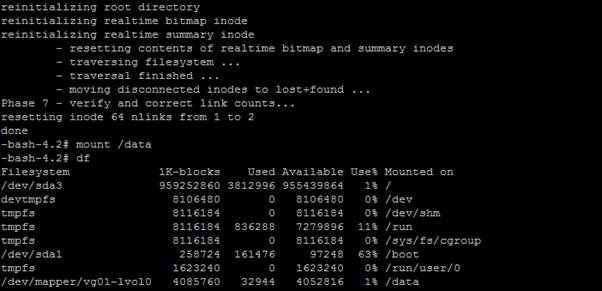
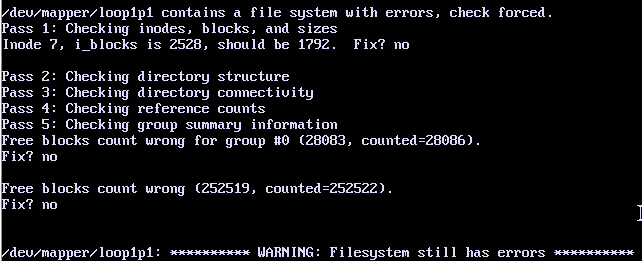
If fsck does detect errors in non-destructive check, it will write about them on the output and a summary at the end:
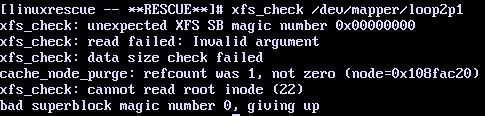
Or, for XFS, it might look like this:
Some of the errors are simple to fix, like missing ‘lost+found’ folder on ext file system or ‘.’ and ‘..’ links and errors about the number of free blocks.
If the files are cross-linked, that means that a piece of one file points to the same place that belongs to another file, but it is impossible to know which file is the original “owner” of that piece – so, one file is damaged and in that case it is impossible to tell which one unless you look into their content.
Sometimes deleted files are not marked as such or their size is wrong. Or, a file can be deleted, but the operation failed and it is marked as deleted but is actually “lost” – in that case, all unknown files are moved to ‘lost+found’ folder on that partition where they can be further manually examined.
The only problem is that fsck does not know what they are or how they were called, so it’s simply giving them a name that is actually their inode number.
In most of these cases, repairing the error is not a problem, but data loss can occur if there are many of them of specific type, like cross-linked or lost files. Then some of them are still there but are unusable or hard to identify and become practically lost unless you want to investigate them manually, one by one.
Fixing errors
If the number of errors is not big and they do not seem to be serious, you can try to run file system repair:

You can do it using ‘fsck.ext3 –v –C 0 /dev/xvda1’ for ext3, for example, or ‘xfs_repair /dev/xvda1’ for XFS.
Similar for ext2 and ext4 file systems.
It is important to check on the type and number of errors you get when fsck is actually trying to repair errors – if there are a lot of them or they look serious, do not proceed before making a backup.
If, on the other hand, you have a lot of errors that do not look serious or you just don’t care, you can run the fsck with the ‘–y’ switch: it tells fsck to answer ‘yes’ on all questions about repairing errors.
Although, even then some of the errors are too serious and can not be repaired: in that case, fsck will stop and report that. If you get such error, you need to see if it appeared due to hardware error (usually bad blocks) or the file system is so badly damaged that it is useless trying to repair it.
If hardware errors are present, you might get an error right on your console, and they will be logged to the system logs – usually ‘dmesg’ command will show kernel log and this kind of errors.
If file system errors are there not because of hardware problem but because the file system structure is too damaged, then you can only reformat the partition and return backup.
For example, if you see an error mentioning “superblock”, that means the error is low-level and repair can sometimes be done automatically if the backup of the superblock can be found – otherwise, it can maybe be done manually in a way that is not a part of this document.
Or, if you get an error about journal when repairing ext3, ext4 or XFS file systems, that means that the file transaction log is damaged and usually has to be deleted and recreated.
Sometimes it has to be done manually, it can lead to data loss especially on XFS and fixing it is also not a part of this document.
Finally, if you want to re-check the file system that is already fixed or is not seen as problematic (it is marked CLEAN), you can force the check using ‘-f’ switch to fsck.extN command.
Each filesystem has different options and commands, refer to the filesystem manual for more details, as we can not explain every flag and option. The information provided would be enough to handle most of the daily requirements
A couple of weblinks providing more information :
https://en.wikipedia.org/wiki/Fsck
Was this topic helpful?
Document Information
Modified date:
01 August 2019
UID
ibm1KB0010934